NISSAN PRIMERA 1999 Electronic Repair Manual
Manufacturer: NISSAN, Model Year: 1999, Model line: PRIMERA, Model: NISSAN PRIMERA 1999Pages: 2267, PDF Size: 35.74 MB
Page 2151 of 2267
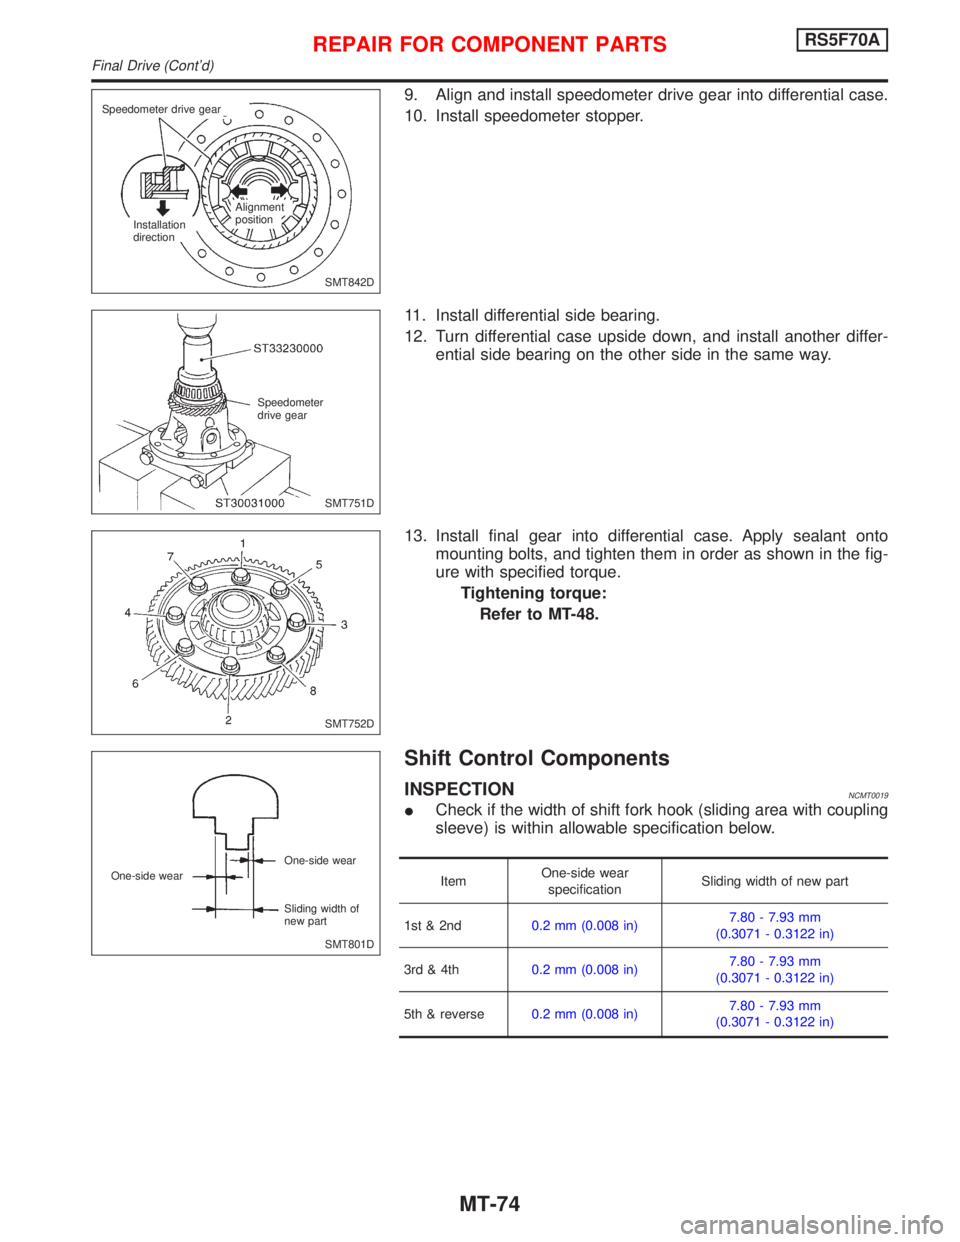
9. Align and install speedometer drive gear into differential case.
10. Install speedometer stopper.
11. Install differential side bearing.
12. Turn differential case upside down, and install another differ-
ential side bearing on the other side in the same way.
13. Install final gear into differential case. Apply sealant onto
mounting bolts, and tighten them in order as shown in the fig-
ure with specified torque.
Tightening torque:
Refer to MT-48.
Shift Control Components
INSPECTIONNCMT0019
ICheck if the width of shift fork hook (sliding area with coupling
sleeve) is within allowable specification below.
ItemOne-side wear
specificationSliding width of new part
1st & 2nd0.2 mm (0.008 in)7.80 - 7.93 mm
(0.3071 - 0.3122 in)
3rd & 4th0.2 mm (0.008 in)7.80 - 7.93 mm
(0.3071 - 0.3122 in)
5th & reverse0.2 mm (0.008 in)7.80 - 7.93 mm
(0.3071 - 0.3122 in)
SMT842D Speedometer drive gear
Installation
directionAlignment
position
SMT751D Speedometer
drive gear
SMT752D
SMT801D One-side wear
Sliding width of
new part One-side wear
REPAIR FOR COMPONENT PARTSRS5F70A
Final Drive (Cont'd)
MT-74
Page 2152 of 2267
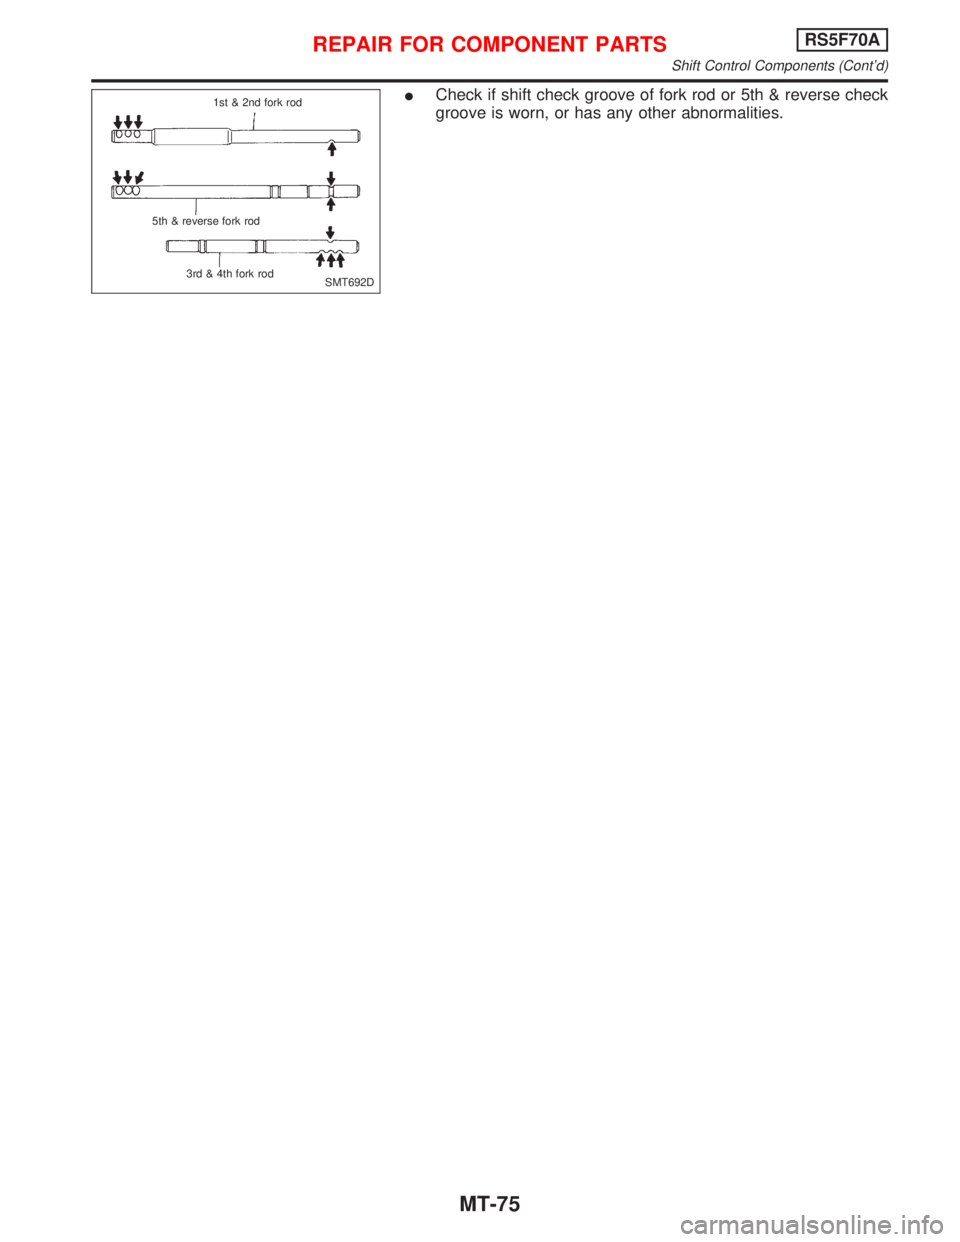
ICheck if shift check groove of fork rod or 5th & reverse check
groove is worn, or has any other abnormalities.
SMT692D 1st & 2nd fork rod
5th & reverse fork rod
3rd & 4th fork rod
REPAIR FOR COMPONENT PARTSRS5F70A
Shift Control Components (Cont'd)
MT-75
Page 2153 of 2267
NCMT0023
Clutch HousingNCMT0023S01
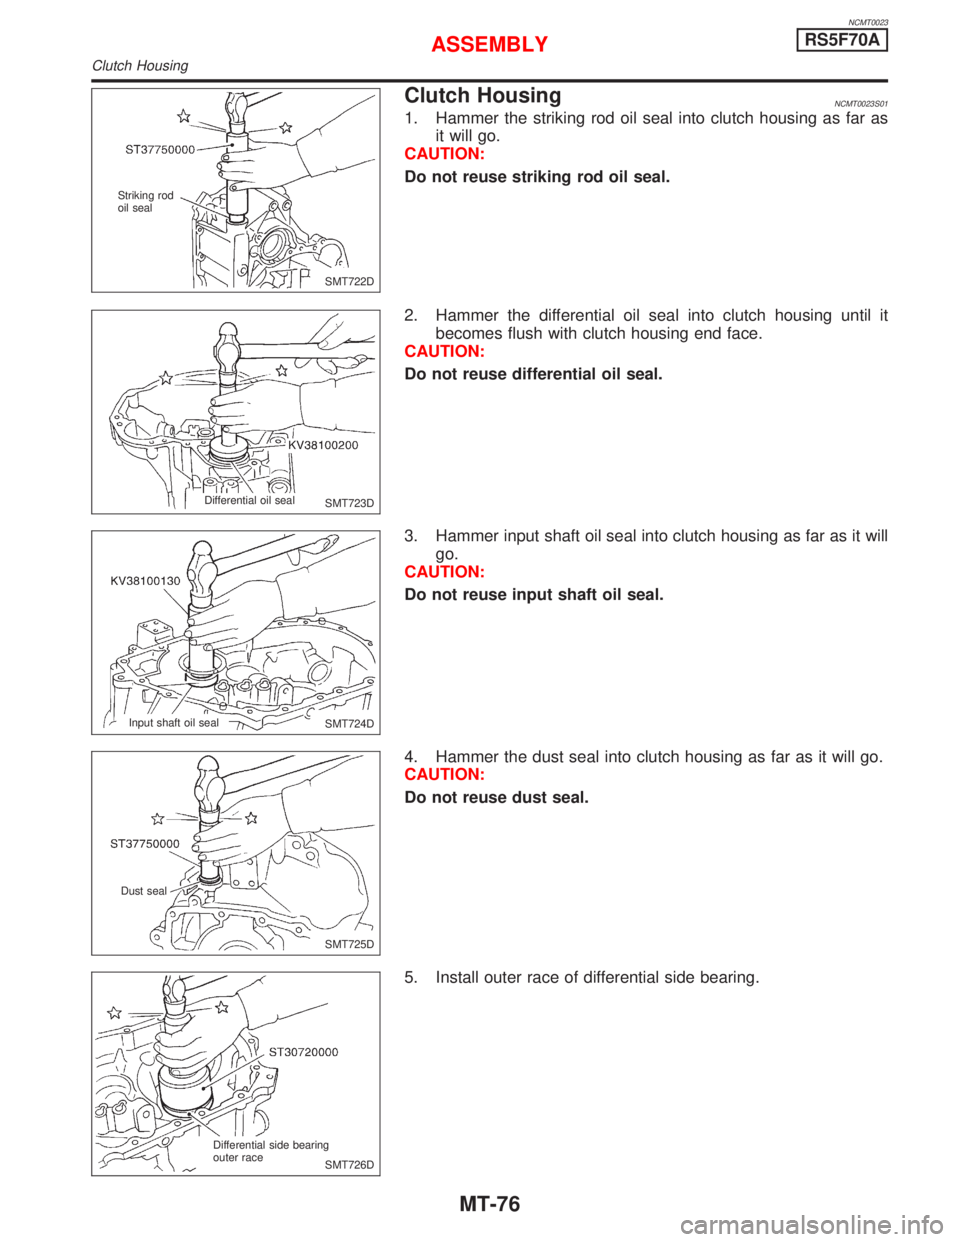
1. Hammer the striking rod oil seal into clutch housing as far as
it will go.
CAUTION:
Do not reuse striking rod oil seal.
2. Hammer the differential oil seal into clutch housing until it
becomes flush with clutch housing end face.
CAUTION:
Do not reuse differential oil seal.
3. Hammer input shaft oil seal into clutch housing as far as it will
go.
CAUTION:
Do not reuse input shaft oil seal.
4. Hammer the dust seal into clutch housing as far as it will go.
CAUTION:
Do not reuse dust seal.
5. Install outer race of differential side bearing.
SMT722D Striking rod
oil seal
SMT723D Differential oil seal
SMT724D Input shaft oil seal
SMT725D Dust seal
SMT726D Differential side bearing
outer race
ASSEMBLYRS5F70A
Clutch Housing
MT-76
Page 2154 of 2267
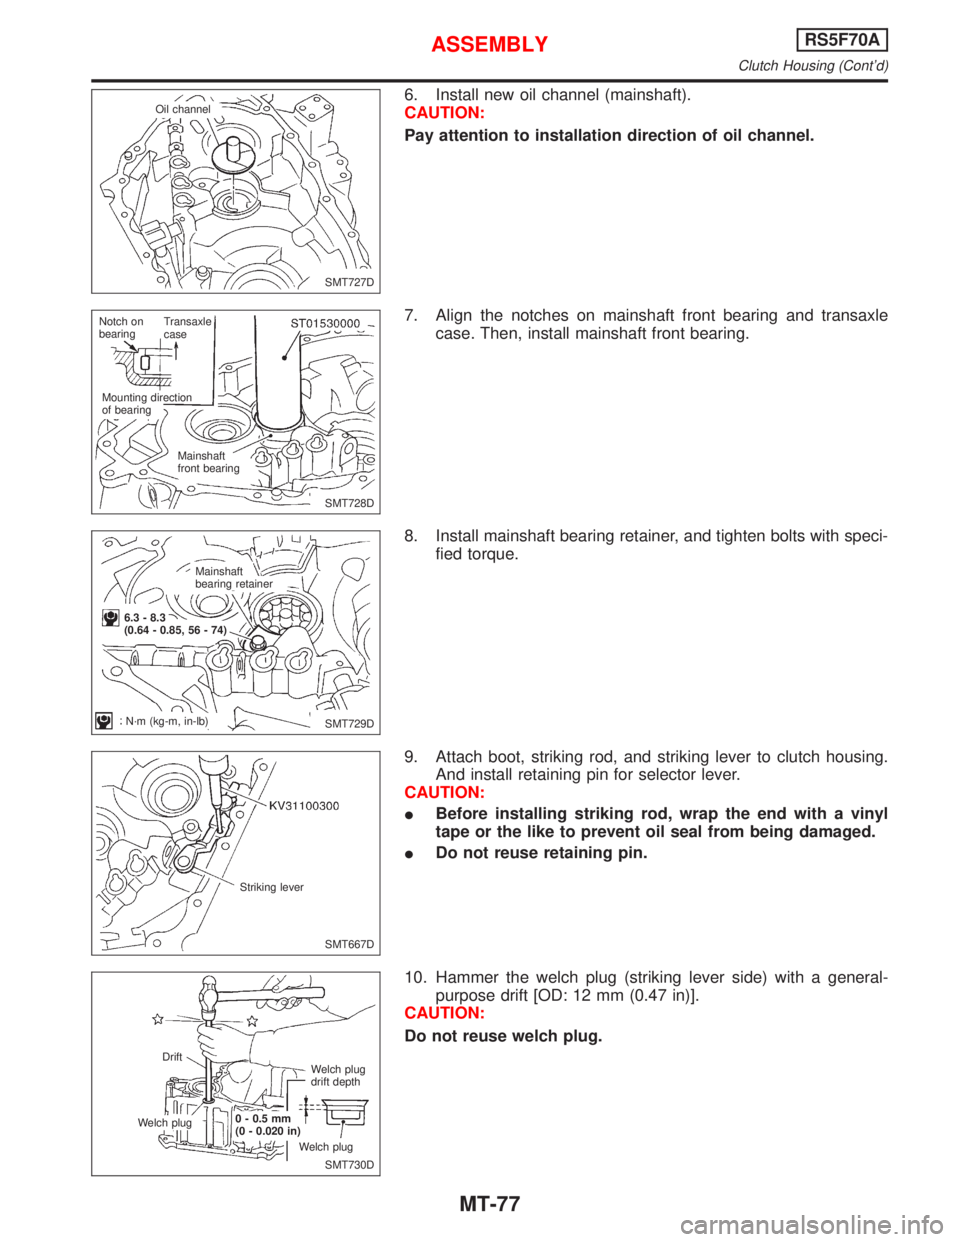
6. Install new oil channel (mainshaft).
CAUTION:
Pay attention to installation direction of oil channel.
7. Align the notches on mainshaft front bearing and transaxle
case. Then, install mainshaft front bearing.
8. Install mainshaft bearing retainer, and tighten bolts with speci-
fied torque.
9. Attach boot, striking rod, and striking lever to clutch housing.
And install retaining pin for selector lever.
CAUTION:
IBefore installing striking rod, wrap the end with a vinyl
tape or the like to prevent oil seal from being damaged.
IDo not reuse retaining pin.
10. Hammer the welch plug (striking lever side) with a general-
purpose drift [OD: 12 mm (0.47 in)].
CAUTION:
Do not reuse welch plug.
SMT727D Oil channel
SMT728D Notch on
bearingTransaxle
case
Mounting direction
of bearing
Mainshaft
front bearing
SMT729D Mainshaft
bearing retainer
6.3 - 8.3
(0.64 - 0.85, 56 - 74)
N´m (kg-m, in-lb)
SMT667D Striking lever
SMT730D Drift
Welch plug0 - 0.5 mm
(0 - 0.020 in)
Welch plugWelch plug
drift depth
ASSEMBLYRS5F70A
Clutch Housing (Cont'd)
MT-77
Page 2155 of 2267
![NISSAN PRIMERA 1999 Electronic Repair Manual 11. Install selector, selector shaft, and selector shaft pin into clutch
housing.
12. Hammer the welch plug (selector shaft side) with a general-
purpose drift [OD: 12 mm (0.47 in)].
CAUTION:
Do not r NISSAN PRIMERA 1999 Electronic Repair Manual 11. Install selector, selector shaft, and selector shaft pin into clutch
housing.
12. Hammer the welch plug (selector shaft side) with a general-
purpose drift [OD: 12 mm (0.47 in)].
CAUTION:
Do not r](/img/5/57377/w960_57377-2154.png)
11. Install selector, selector shaft, and selector shaft pin into clutch
housing.
12. Hammer the welch plug (selector shaft side) with a general-
purpose drift [OD: 12 mm (0.47 in)].
CAUTION:
Do not reuse welch plug.
13. Install selector leaf spring, return spring, steel ball, reverse
gate, selector arm, bushing, and return bearing. Then, tighten
two reamer bolts with specified torque.
CAUTION:
Use correct reamer bolts for each installation point, because
each bolt has a different length.
14. Install oil pocket.
SMT731D Selector shaft pin
Selector
Welch plug
Selector shaft
SMT732D Drift
Welch plug
0 - 0.5 mm
(0 - 0.020 in)Welch plug
drift depth
Welch plug
SMT733D Reamer bolt
(short)
Selector
leaf spring
Return
spring
Reverse
gate
Steel ballReamer bolt
(long)
Bushing
Return bearing
Selector
arm
SMT734D N´m
(kg-m, ft-lb)
16-21
(1.6 - 2.1, 12 - 15)
SMT735D Oil pocket
ASSEMBLYRS5F70A
Clutch Housing (Cont'd)
MT-78
Page 2156 of 2267
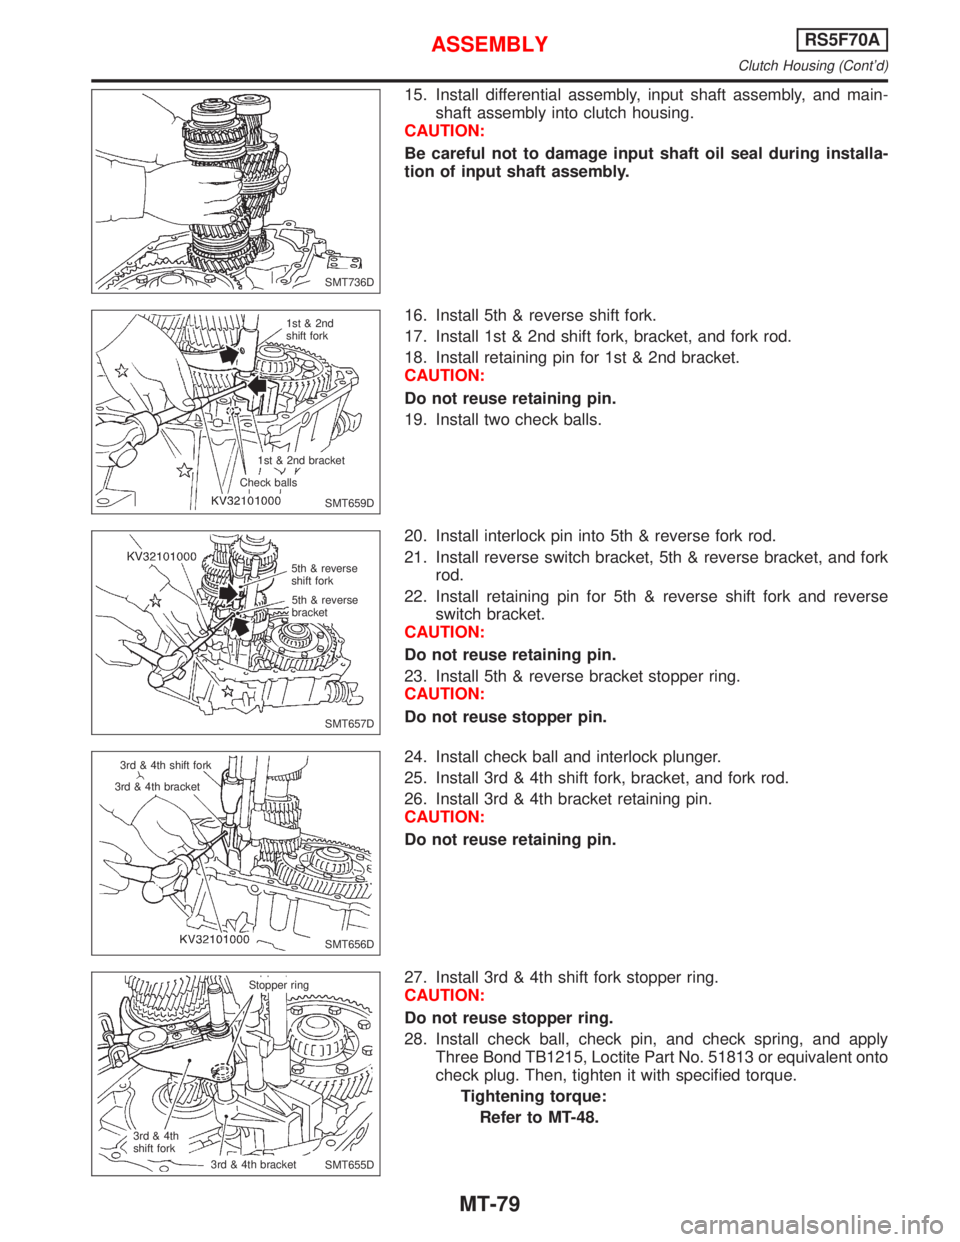
15. Install differential assembly, input shaft assembly, and main-
shaft assembly into clutch housing.
CAUTION:
Be careful not to damage input shaft oil seal during installa-
tion of input shaft assembly.
16. Install 5th & reverse shift fork.
17. Install 1st & 2nd shift fork, bracket, and fork rod.
18. Install retaining pin for 1st & 2nd bracket.
CAUTION:
Do not reuse retaining pin.
19. Install two check balls.
20. Install interlock pin into 5th & reverse fork rod.
21. Install reverse switch bracket, 5th & reverse bracket, and fork
rod.
22. Install retaining pin for 5th & reverse shift fork and reverse
switch bracket.
CAUTION:
Do not reuse retaining pin.
23. Install 5th & reverse bracket stopper ring.
CAUTION:
Do not reuse stopper pin.
24. Install check ball and interlock plunger.
25. Install 3rd & 4th shift fork, bracket, and fork rod.
26. Install 3rd & 4th bracket retaining pin.
CAUTION:
Do not reuse retaining pin.
27. Install 3rd & 4th shift fork stopper ring.
CAUTION:
Do not reuse stopper ring.
28. Install check ball, check pin, and check spring, and apply
Three Bond TB1215, Loctite Part No. 51813 or equivalent onto
check plug. Then, tighten it with specified torque.
Tightening torque:
Refer to MT-48.
SMT736D
SMT659D 1st & 2nd
shift fork
1st & 2nd bracket
Check balls
SMT657D 5th & reverse
shift fork
5th & reverse
bracket
SMT656D 3rd & 4th shift fork
3rd & 4th bracket
SMT655D Stopper ring
3rd & 4th
shift fork.3rd & 4th bracket
ASSEMBLYRS5F70A
Clutch Housing (Cont'd)
MT-79
Page 2157 of 2267
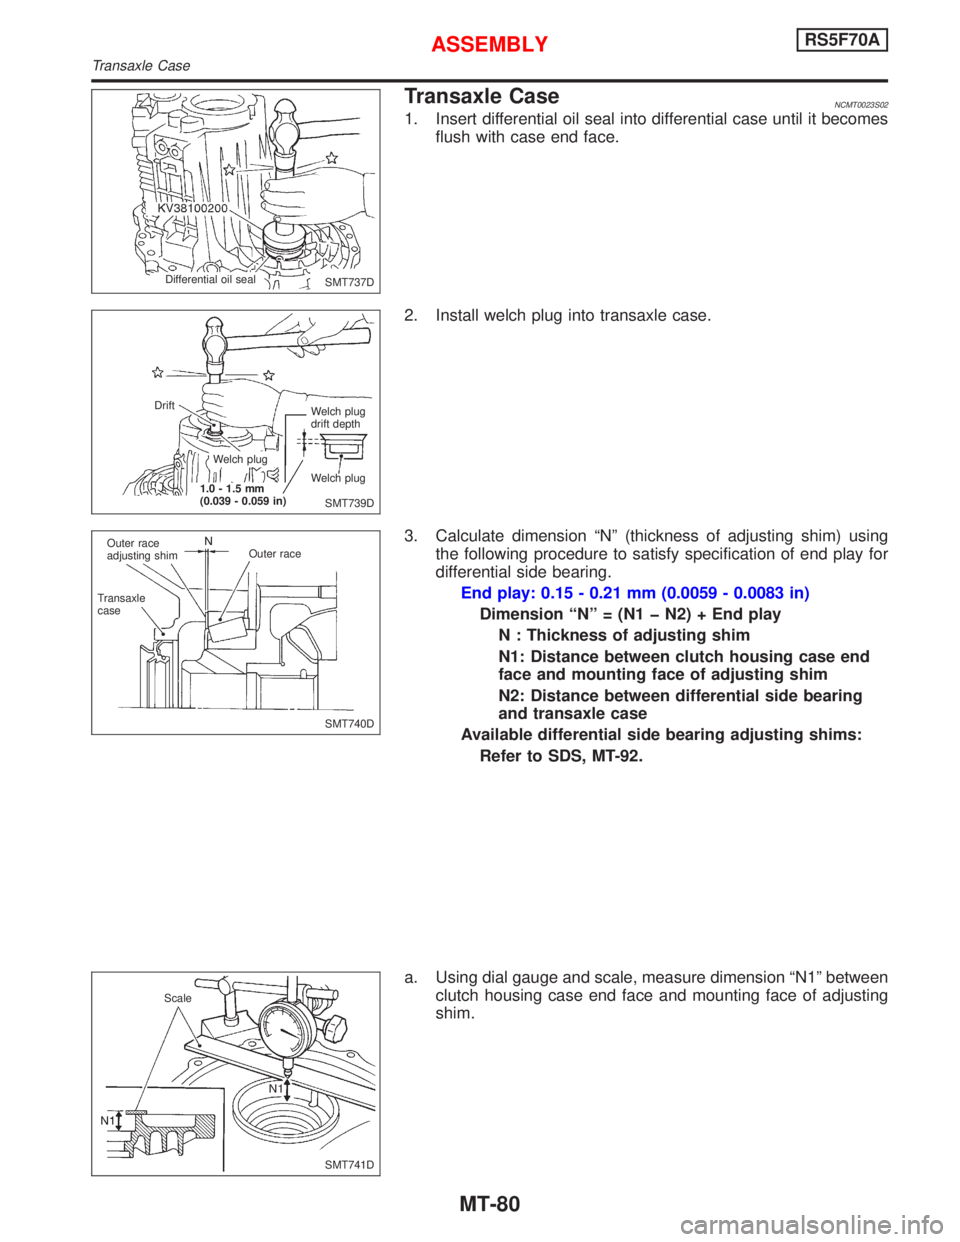
Transaxle CaseNCMT0023S02
1. Insert differential oil seal into differential case until it becomes
flush with case end face.
2. Install welch plug into transaxle case.
3. Calculate dimension ªNº (thickness of adjusting shim) using
the following procedure to satisfy specification of end play for
differential side bearing.
End play: 0.15 - 0.21 mm (0.0059 - 0.0083 in)
Dimension ªNº = (N1 þ N2) + End play
N : Thickness of adjusting shim
N1: Distance between clutch housing case end
face and mounting face of adjusting shim
N2: Distance between differential side bearing
and transaxle case
Available differential side bearing adjusting shims:
Refer to SDS, MT-92.
a. Using dial gauge and scale, measure dimension ªN1º between
clutch housing case end face and mounting face of adjusting
shim.
SMT737D Differential oil seal
SMT739D Welch plug
drift depth
Welch plug Welch plug
1.0 - 1.5 mm
(0.039 - 0.059 in) Drift
SMT740D Outer race
adjusting shim
Transaxle
caseOuter race
SMT741D Scale
ASSEMBLYRS5F70A
Transaxle Case
MT-80
Page 2158 of 2267
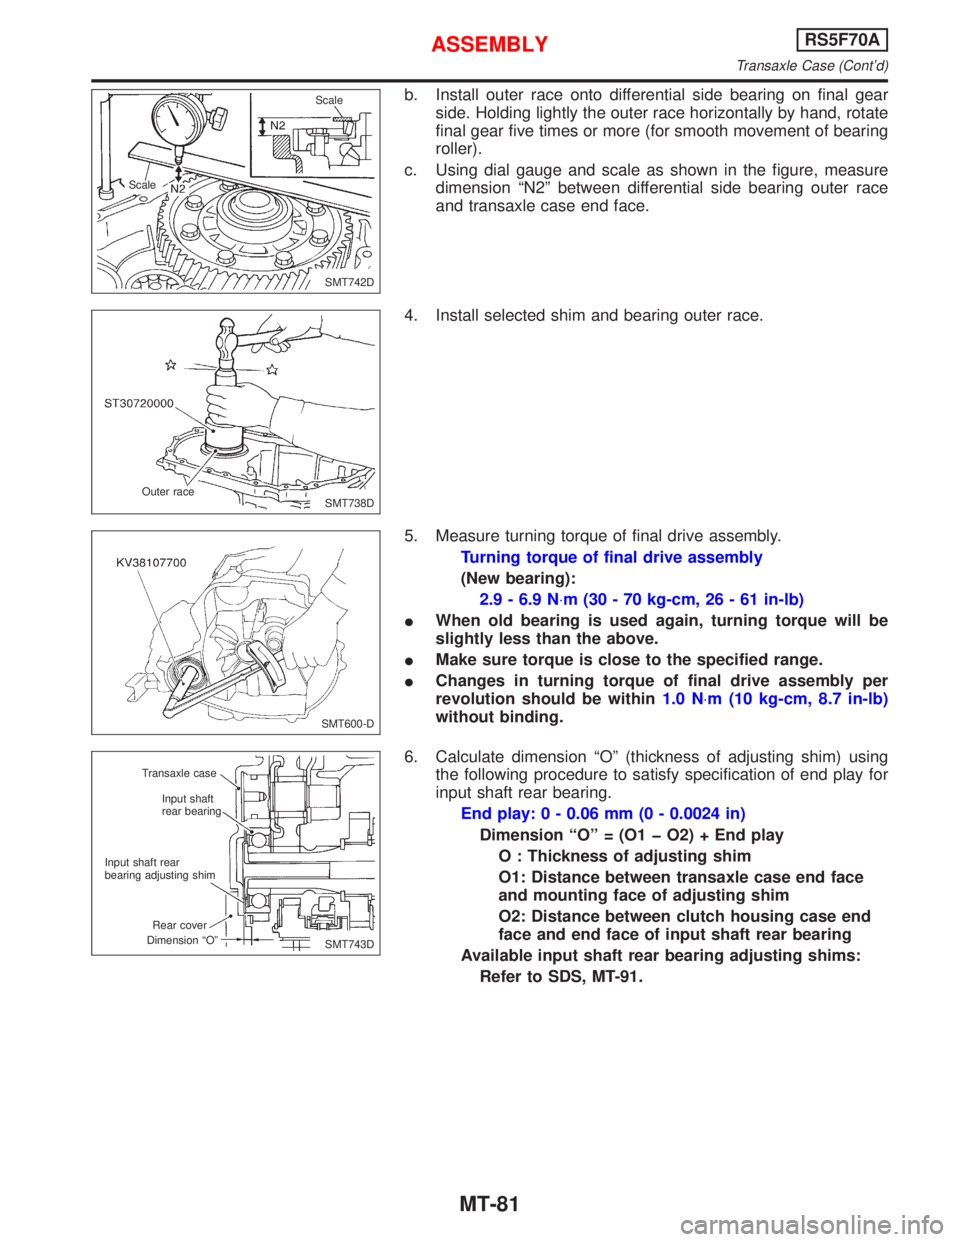
b. Install outer race onto differential side bearing on final gear
side. Holding lightly the outer race horizontally by hand, rotate
final gear five times or more (for smooth movement of bearing
roller).
c. Using dial gauge and scale as shown in the figure, measure
dimension ªN2º between differential side bearing outer race
and transaxle case end face.
4. Install selected shim and bearing outer race.
5. Measure turning torque of final drive assembly.
Turning torque of final drive assembly
(New bearing):
2.9 - 6.9 N×m (30 - 70 kg-cm, 26 - 61 in-lb)
IWhen old bearing is used again, turning torque will be
slightly less than the above.
IMake sure torque is close to the specified range.
IChanges in turning torque of final drive assembly per
revolution should be within1.0 N×m (10 kg-cm, 8.7 in-lb)
without binding.
6. Calculate dimension ªOº (thickness of adjusting shim) using
the following procedure to satisfy specification of end play for
input shaft rear bearing.
End play: 0 - 0.06 mm (0 - 0.0024 in)
Dimension ªOº = (O1 þ O2) + End play
O : Thickness of adjusting shim
O1: Distance between transaxle case end face
and mounting face of adjusting shim
O2: Distance between clutch housing case end
face and end face of input shaft rear bearing
Available input shaft rear bearing adjusting shims:
Refer to SDS, MT-91.
SMT742D ScaleScale
SMT738D Outer race
SMT600-D
SMT743D Transaxle case
Input shaft
rear bearing
Input shaft rear
bearing adjusting shim
Rear cover
Dimension ªOº
ASSEMBLYRS5F70A
Transaxle Case (Cont'd)
MT-81
Page 2159 of 2267
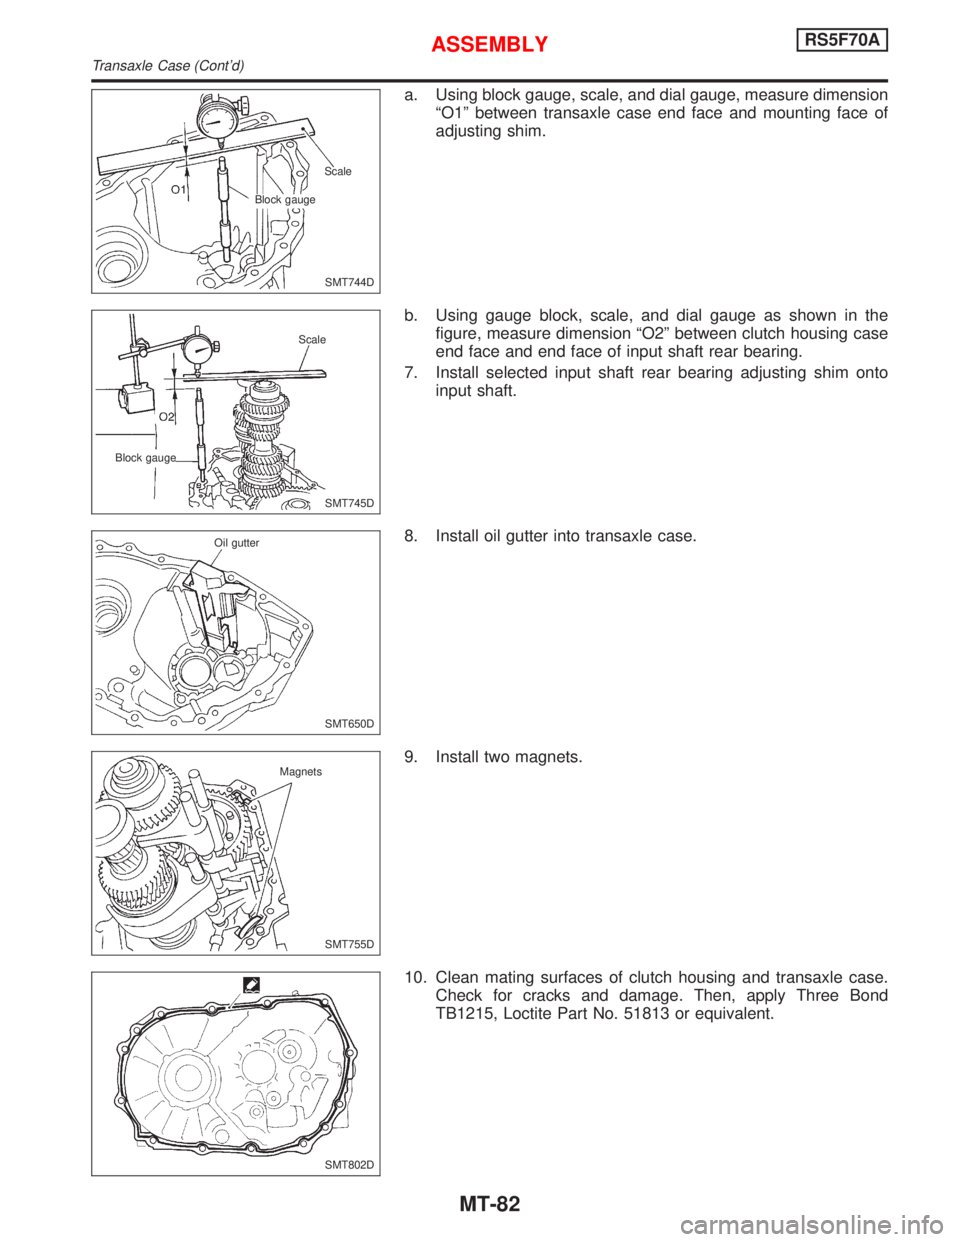
a. Using block gauge, scale, and dial gauge, measure dimension
ªO1º between transaxle case end face and mounting face of
adjusting shim.
b. Using gauge block, scale, and dial gauge as shown in the
figure, measure dimension ªO2º between clutch housing case
end face and end face of input shaft rear bearing.
7. Install selected input shaft rear bearing adjusting shim onto
input shaft.
8. Install oil gutter into transaxle case.
9. Install two magnets.
10. Clean mating surfaces of clutch housing and transaxle case.
Check for cracks and damage. Then, apply Three Bond
TB1215, Loctite Part No. 51813 or equivalent.
SMT744D Scale
Block gauge
SMT745D Scale
Block gauge
SMT650D Oil gutter
SMT755D Magnets
SMT802D
ASSEMBLYRS5F70A
Transaxle Case (Cont'd)
MT-82
Page 2160 of 2267
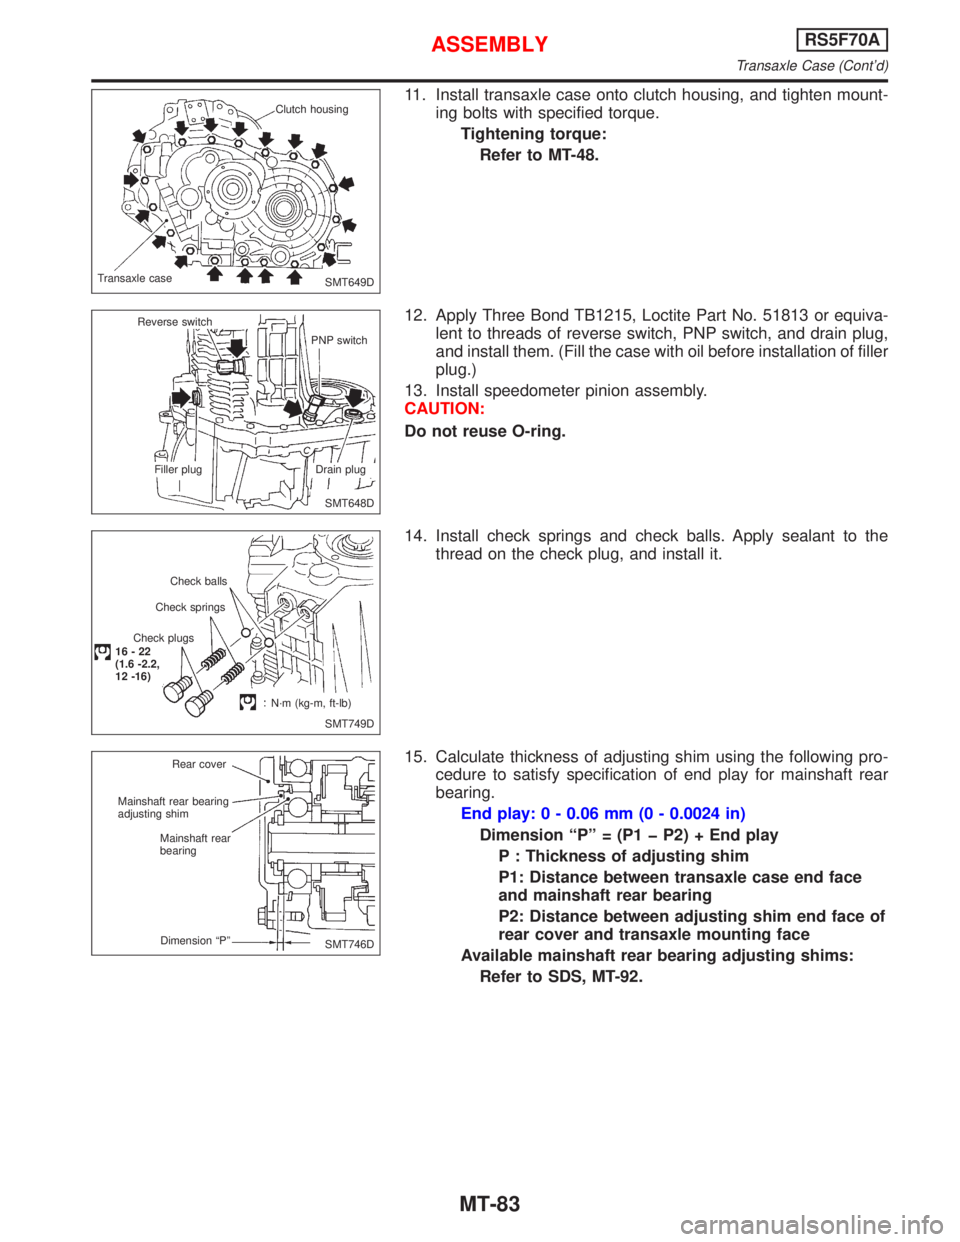
11. Install transaxle case onto clutch housing, and tighten mount-
ing bolts with specified torque.
Tightening torque:
Refer to MT-48.
12. Apply Three Bond TB1215, Loctite Part No. 51813 or equiva-
lent to threads of reverse switch, PNP switch, and drain plug,
and install them. (Fill the case with oil before installation of filler
plug.)
13. Install speedometer pinion assembly.
CAUTION:
Do not reuse O-ring.
14. Install check springs and check balls. Apply sealant to the
thread on the check plug, and install it.
15. Calculate thickness of adjusting shim using the following pro-
cedure to satisfy specification of end play for mainshaft rear
bearing.
End play: 0 - 0.06 mm (0 - 0.0024 in)
Dimension ªPº = (P1 þ P2) + End play
P : Thickness of adjusting shim
P1: Distance between transaxle case end face
and mainshaft rear bearing
P2: Distance between adjusting shim end face of
rear cover and transaxle mounting face
Available mainshaft rear bearing adjusting shims:
Refer to SDS, MT-92.
SMT649D Clutch housing
Transaxle case
SMT648D Reverse switch
PNP switch
Filler plug Drain plug
SMT749D Check balls
Check springs
Check plugs
16-22
(1.6 -2.2,
12 -16)
N´m (kg-m, ft-lb)
SMT746D Rear cover
Mainshaft rear bearing
adjusting shim
Mainshaft rear
bearing
Dimension ªPº
ASSEMBLYRS5F70A
Transaxle Case (Cont'd)
MT-83