NISSAN PRIMERA 1999 Electronic Repair Manual
Manufacturer: NISSAN, Model Year: 1999, Model line: PRIMERA, Model: NISSAN PRIMERA 1999Pages: 2267, PDF Size: 35.74 MB
Page 261 of 2267
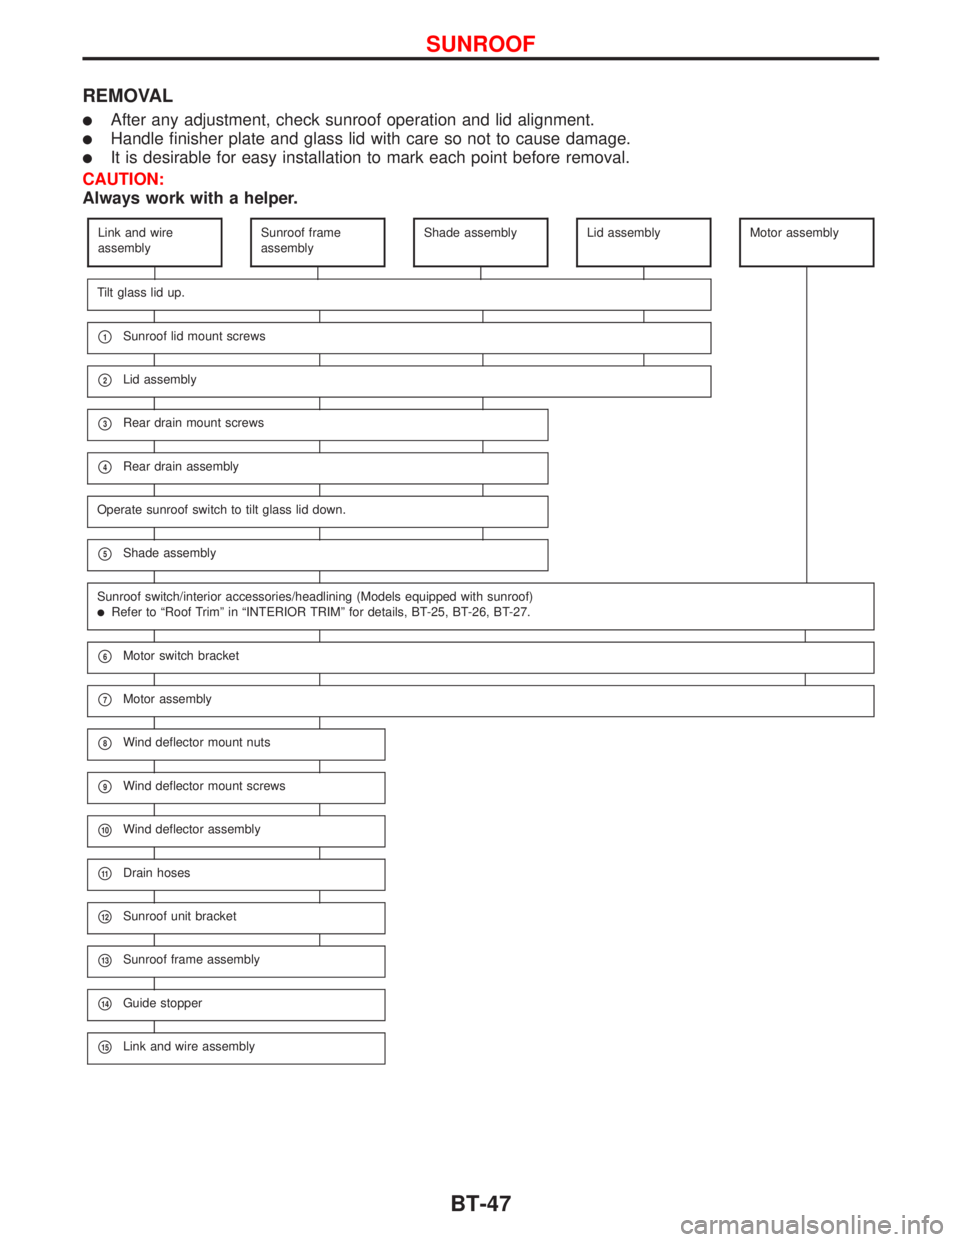
REMOVAL
lAfter any adjustment, check sunroof operation and lid alignment.
lHandle finisher plate and glass lid with care so not to cause damage.
lIt is desirable for easy installation to mark each point before removal.
CAUTION:
Always work with a helper.
Link and wire
assemblySunroof frame
assemblyShade assemblyLid assemblyMotor assembly
Tilt glass lid up.
p1Sunroof lid mount screws
p2Lid assembly
p3Rear drain mount screws
p4Rear drain assembly
Operate sunroof switch to tilt glass lid down.
p5Shade assembly
Sunroof switch/interior accessories/headlining (Models equipped with sunroof)lRefer to ªRoof Trimº in ªINTERIOR TRIMº for details, BT-25, BT-26, BT-27.
p6Motor switch bracket
p7Motor assembly
p8Wind deflector mount nuts
p9Wind deflector mount screws
p10Wind deflector assembly
p11Drain hoses
p12Sunroof unit bracket
p13Sunroof frame assembly
p14Guide stopper
p15Link and wire assembly
SUNROOF
BT-47
Page 262 of 2267
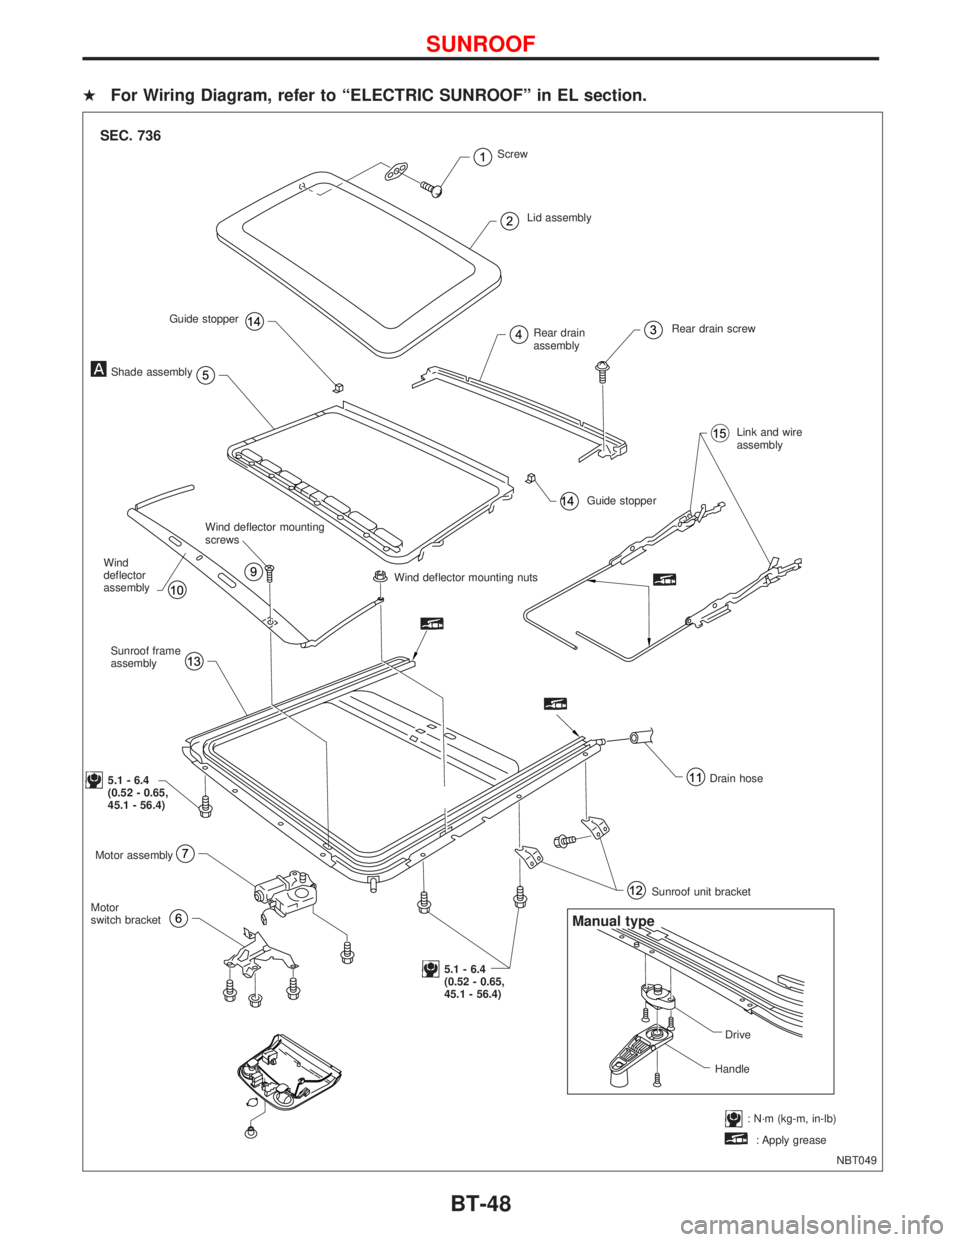
HFor Wiring Diagram, refer to ªELECTRIC SUNROOFº in EL section.
NBT049
SEC. 736
Rear drain
assemblyRear drain screw
Link and wire
assembly
Guide stopper
Wind deflector mounting nuts
Drain hose
Sunroof unit bracket
5.1 - 6.4
(0.52 - 0.65,
45.1 - 56.4) Motor
switch bracketMotor assembly
5.1 - 6.4
(0.52 - 0.65,
45.1 - 56.4)Sunroof frame
assembly Wind
deflector
assemblyWind deflector mounting
screws
Shade assemblyGuide stopperScrew
: N´m (kg-m, in-lb) Lid assembly
Manual type
Drive
Handle
: Apply grease
SUNROOF
BT-48
Page 263 of 2267
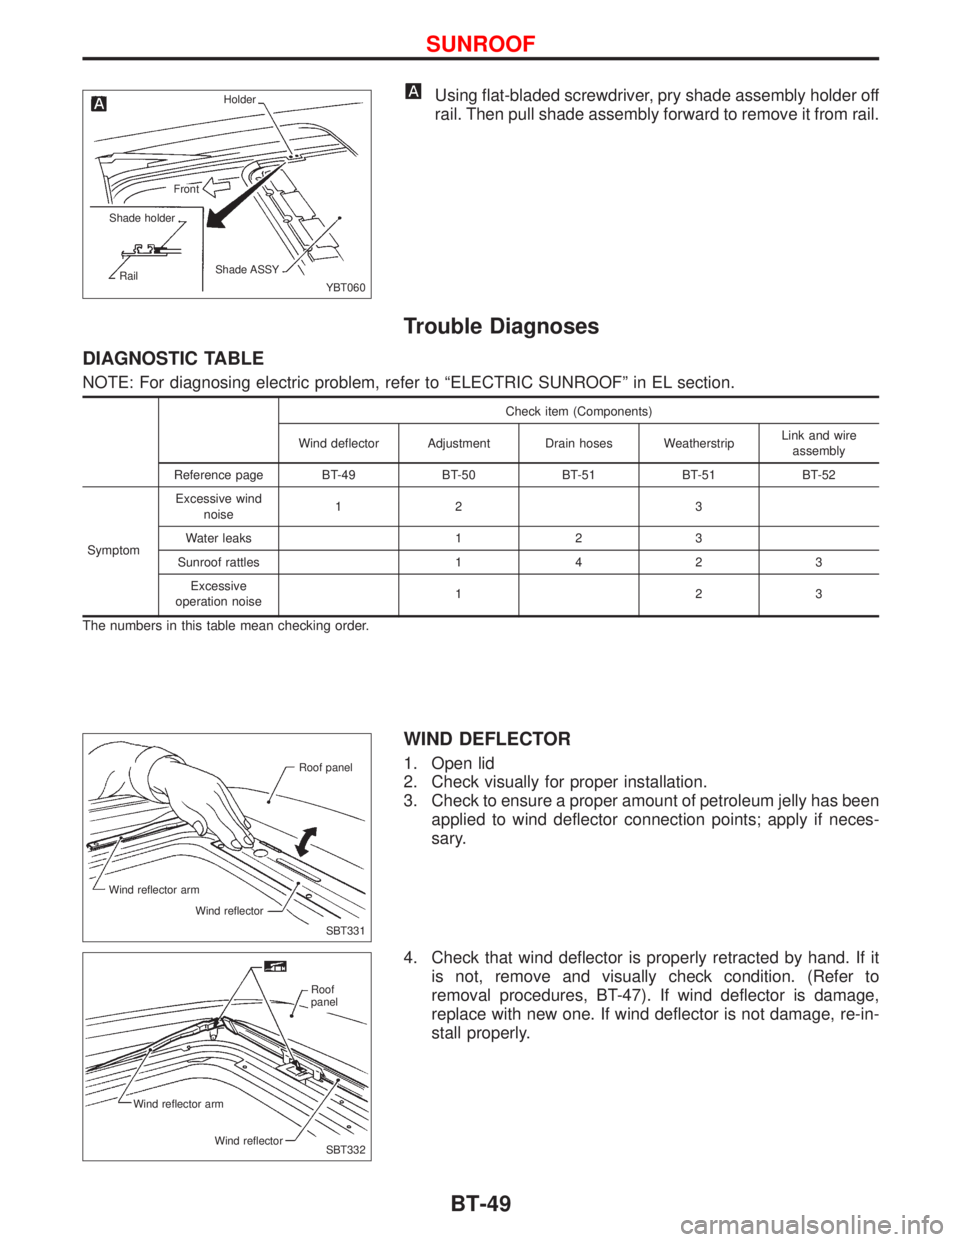
Using flat-bladed screwdriver, pry shade assembly holder off
rail. Then pull shade assembly forward to remove it from rail.
Trouble Diagnoses
DIAGNOSTIC TABLE
NOTE: For diagnosing electric problem, refer to ªELECTRIC SUNROOFº in EL section.
Check item (Components)
Wind deflector Adjustment Drain hoses WeatherstripLink and wire
assembly
Reference page BT-49 BT-50 BT-51 BT-51 BT-52
SymptomExcessive wind
noise12 3
Water leaks 1 2 3
Sunroof rattles1423
Excessive
operation noise123
The numbers in this table mean checking order.
WIND DEFLECTOR
1. Open lid
2. Check visually for proper installation.
3. Check to ensure a proper amount of petroleum jelly has been
applied to wind deflector connection points; apply if neces-
sary.
4. Check that wind deflector is properly retracted by hand. If it
is not, remove and visually check condition. (Refer to
removal procedures, BT-47). If wind deflector is damage,
replace with new one. If wind deflector is not damage, re-in-
stall properly.
YBT060 Shade holder
RailFront
Shade ASSYHolder
SBT331 Roof panel
Wind reflector arm
Wind reflector
SBT332 Roof
panel
Wind reflector arm
Wind reflector
SUNROOF
BT-49
Page 264 of 2267
ADJUSTMENT
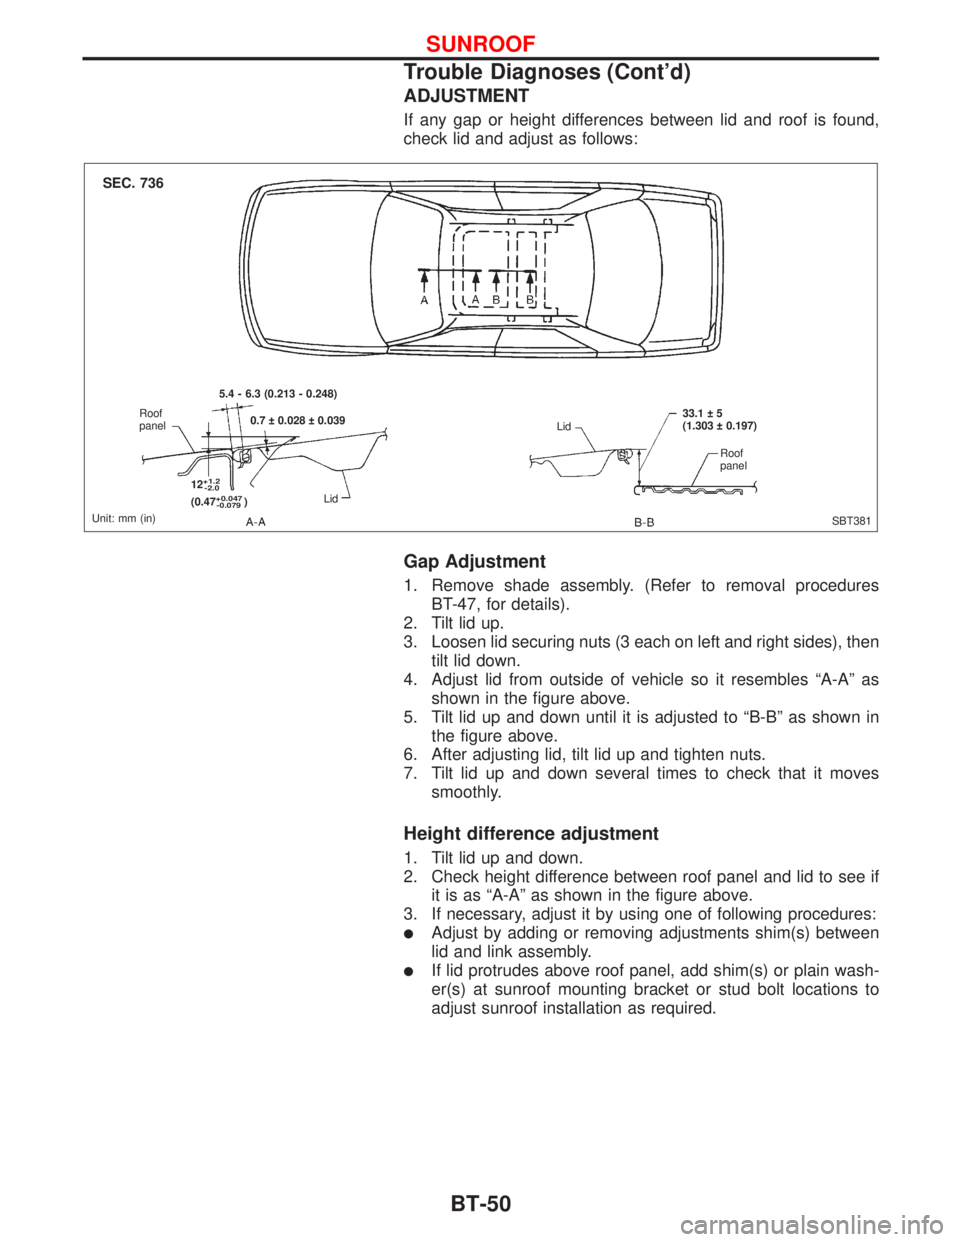
If any gap or height differences between lid and roof is found,
check lid and adjust as follows:
Gap Adjustment
1. Remove shade assembly. (Refer to removal procedures
BT-47, for details).
2. Tilt lid up.
3. Loosen lid securing nuts (3 each on left and right sides), then
tilt lid down.
4. Adjust lid from outside of vehicle so it resembles ªA-Aº as
shown in the figure above.
5. Tilt lid up and down until it is adjusted to ªB-Bº as shown in
the figure above.
6. After adjusting lid, tilt lid up and tighten nuts.
7. Tilt lid up and down several times to check that it moves
smoothly.
Height difference adjustment
1. Tilt lid up and down.
2. Check height difference between roof panel and lid to see if
it is as ªA-Aº as shown in the figure above.
3. If necessary, adjust it by using one of following procedures:
lAdjust by adding or removing adjustments shim(s) between
lid and link assembly.
lIf lid protrudes above roof panel, add shim(s) or plain wash-
er(s) at sunroof mounting bracket or stud bolt locations to
adjust sunroof installation as required.
SBT381 Unit: mm (in)Roof
panel5.4 - 6.3 (0.213 - 0.248)
0.7 0.028 0.039
12
+1.2
-2.0
(0.47+0.047
-0.079)LidLid33.1 5
(1.303 0.197)
Roof
panel
SEC. 736
SUNROOF
Trouble Diagnoses (Cont'd)
BT-50
Page 265 of 2267
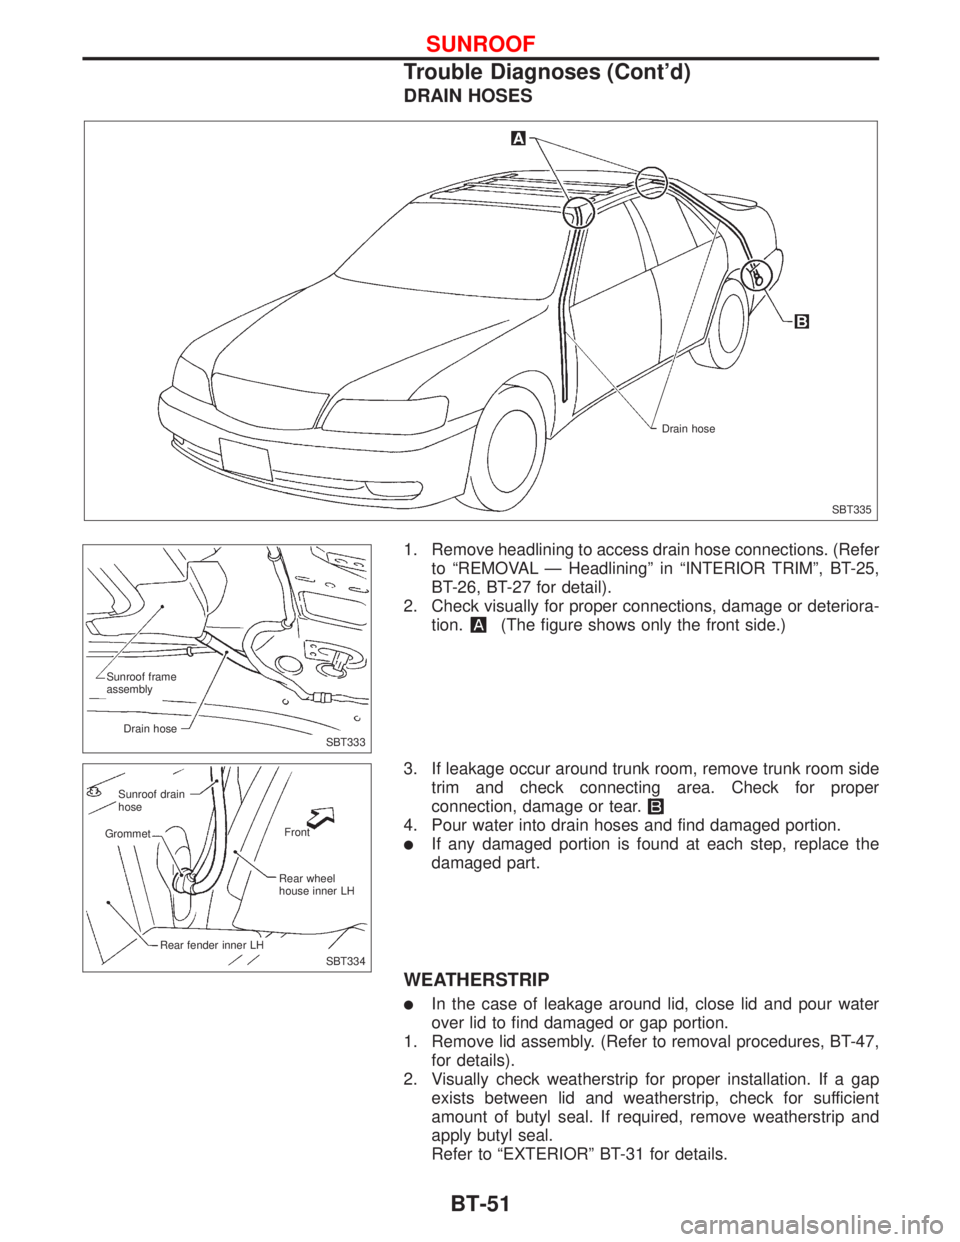
DRAIN HOSES
1. Remove headlining to access drain hose connections. (Refer
to ªREMOVAL Ð Headliningº in ªINTERIOR TRIMº, BT-25,
BT-26, BT-27 for detail).
2. Check visually for proper connections, damage or deteriora-
tion.
(The figure shows only the front side.)
3. If leakage occur around trunk room, remove trunk room side
trim and check connecting area. Check for proper
connection, damage or tear.
4. Pour water into drain hoses and find damaged portion.
lIf any damaged portion is found at each step, replace the
damaged part.
WEATHERSTRIP
lIn the case of leakage around lid, close lid and pour water
over lid to find damaged or gap portion.
1. Remove lid assembly. (Refer to removal procedures, BT-47,
for details).
2. Visually check weatherstrip for proper installation. If a gap
exists between lid and weatherstrip, check for sufficient
amount of butyl seal. If required, remove weatherstrip and
apply butyl seal.
Refer to ªEXTERIORº BT-31 for details.
SBT335 Drain hose
SBT333 Sunroof frame
assembly
Drain hose
SBT334
.Sunroof drain
hose
Front
Grommet
Rear wheel
house inner LH
Rear fender inner LH
SUNROOF
Trouble Diagnoses (Cont'd)
BT-51
Page 266 of 2267
3. Check weatherstrip visually for damage, deterioration, or flat-
tening.
lIf any damage is found, replace weatherstrip.
CAUTION:
Do not remove weatherstrip except when replacing, or fill-
ing up butyl seal.
LINK AND WIRE ASSEMBLY
Before replacing a suspect part, carefully ensure it is the
source of noise being experienced.
1. Check link to determine if coating film has been peeled of to
such an extent that substrate is visible. Check also to deter-
mine if link is the source of noise. If it is, replace it.
2. Visually check to determine if a sufficient amount of petro-
leum jelly has been applied to wire or rail groove. If not, add
petroleum jelly as required.
3. Check wire for any damage or deterioration. If any damage
is found, remove rear guide (refer to removal procedures,
BT-47 for details), then replace wire.
SUNROOF
Trouble Diagnoses (Cont'd)
BT-52
Page 267 of 2267
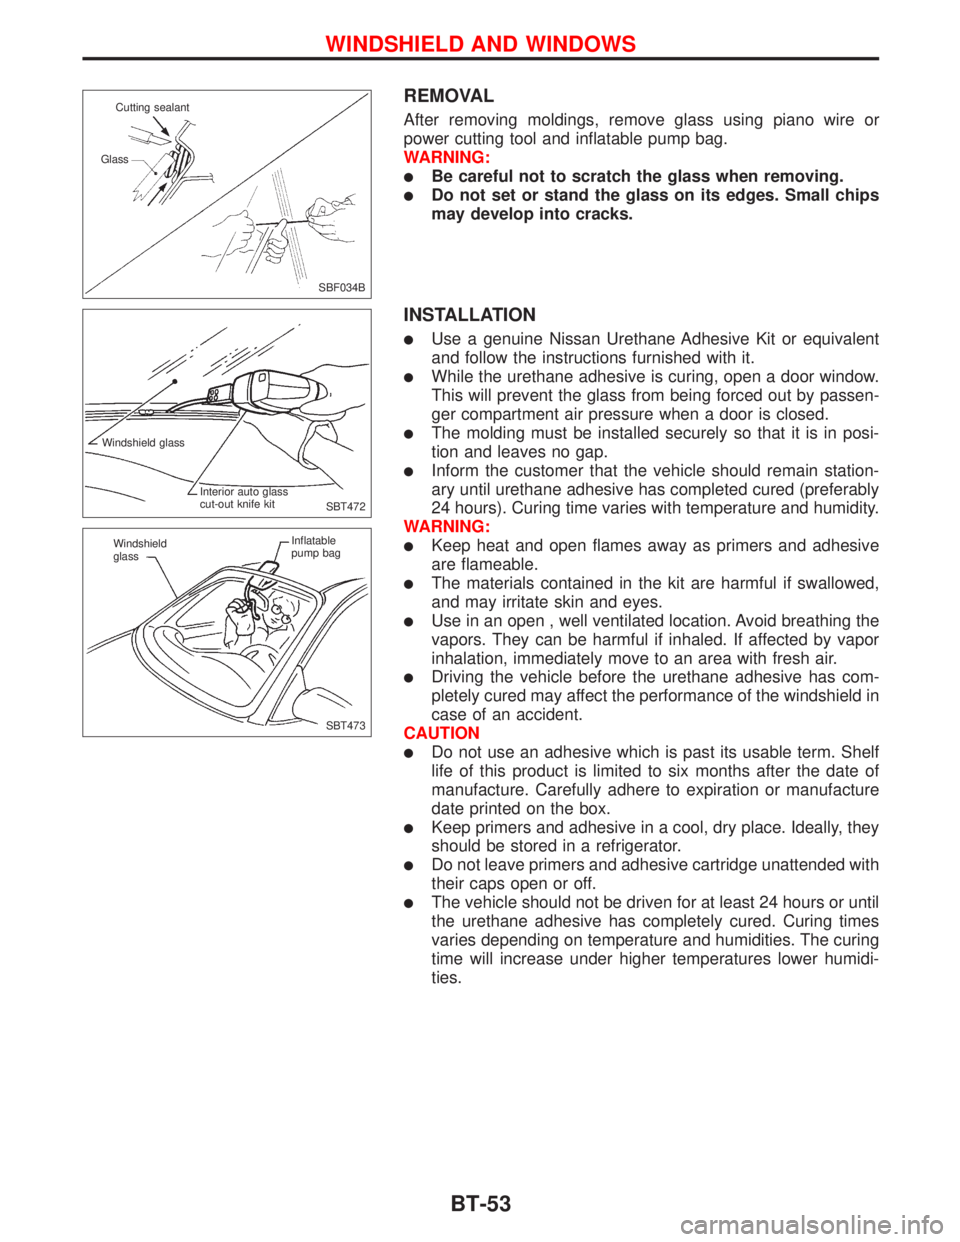
REMOVAL
After removing moldings, remove glass using piano wire or
power cutting tool and inflatable pump bag.
WARNING:
lBe careful not to scratch the glass when removing.
lDo not set or stand the glass on its edges. Small chips
may develop into cracks.
INSTALLATION
lUse a genuine Nissan Urethane Adhesive Kit or equivalent
and follow the instructions furnished with it.
lWhile the urethane adhesive is curing, open a door window.
This will prevent the glass from being forced out by passen-
ger compartment air pressure when a door is closed.
lThe molding must be installed securely so that it is in posi-
tion and leaves no gap.
lInform the customer that the vehicle should remain station-
ary until urethane adhesive has completed cured (preferably
24 hours). Curing time varies with temperature and humidity.
WARNING:
lKeep heat and open flames away as primers and adhesive
are flameable.
lThe materials contained in the kit are harmful if swallowed,
and may irritate skin and eyes.
lUse in an open , well ventilated location. Avoid breathing the
vapors. They can be harmful if inhaled. If affected by vapor
inhalation, immediately move to an area with fresh air.
lDriving the vehicle before the urethane adhesive has com-
pletely cured may affect the performance of the windshield in
case of an accident.
CAUTION
lDo not use an adhesive which is past its usable term. Shelf
life of this product is limited to six months after the date of
manufacture. Carefully adhere to expiration or manufacture
date printed on the box.
lKeep primers and adhesive in a cool, dry place. Ideally, they
should be stored in a refrigerator.
lDo not leave primers and adhesive cartridge unattended with
their caps open or off.
lThe vehicle should not be driven for at least 24 hours or until
the urethane adhesive has completely cured. Curing times
varies depending on temperature and humidities. The curing
time will increase under higher temperatures lower humidi-
ties.
SBF034B Cutting sealant
Glass
SBT472 Windshield glass
Interior auto glass
cut-out knife kit
SBT473 Windshield
glassInflatable
pump bag
WINDSHIELD AND WINDOWS
BT-53
Page 268 of 2267
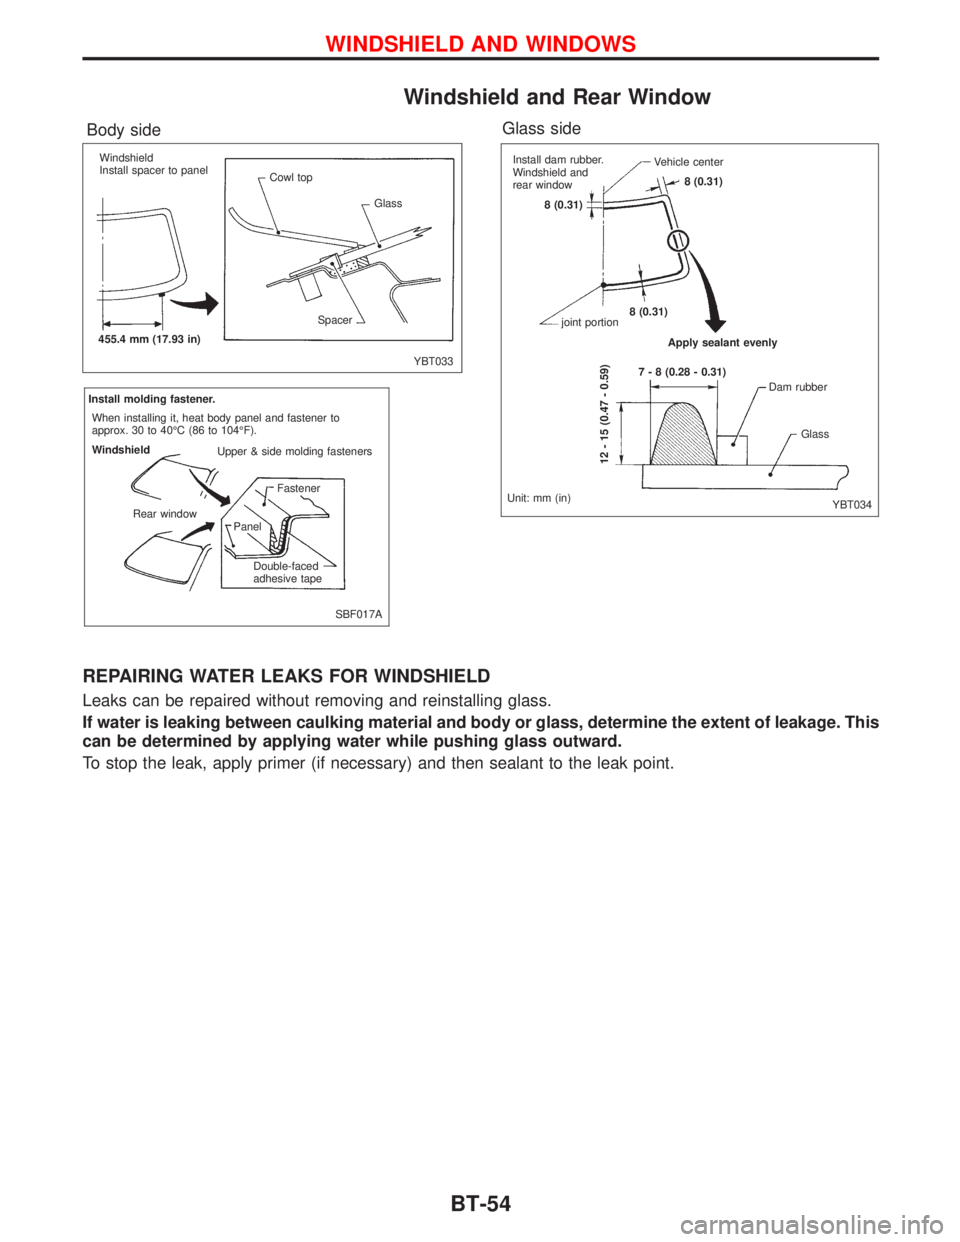
Windshield and Rear Window
REPAIRING WATER LEAKS FOR WINDSHIELD
Leaks can be repaired without removing and reinstalling glass.
If water is leaking between caulking material and body or glass, determine the extent of leakage. This
can be determined by applying water while pushing glass outward.
To stop the leak, apply primer (if necessary) and then sealant to the leak point.
YBT033
Body side
SBF017A
Glass side
YBT034
Windshield
Install spacer to panel
Cowl top
Glass
Spacer
455.4 mm (17.93 in)Install dam rubber.
Windshield and
rear window
8 (0.31)Vehicle center
joint portion
Apply sealant evenly
12 - 15 (0.47 - 0.59)
Dam rubber
Glass
Unit: mm (in)7 - 8 (0.28 - 0.31) 8 (0.31)8 (0.31)Install molding fastener.
When installing it, heat body panel and fastener to
approx. 30 to 40ÉC (86 to 104ÉF).
Windshield
Upper & side molding fasteners
Fastener
Panel
Double-faced
adhesive tape Rear window
WINDSHIELD AND WINDOWS
BT-54
Page 269 of 2267
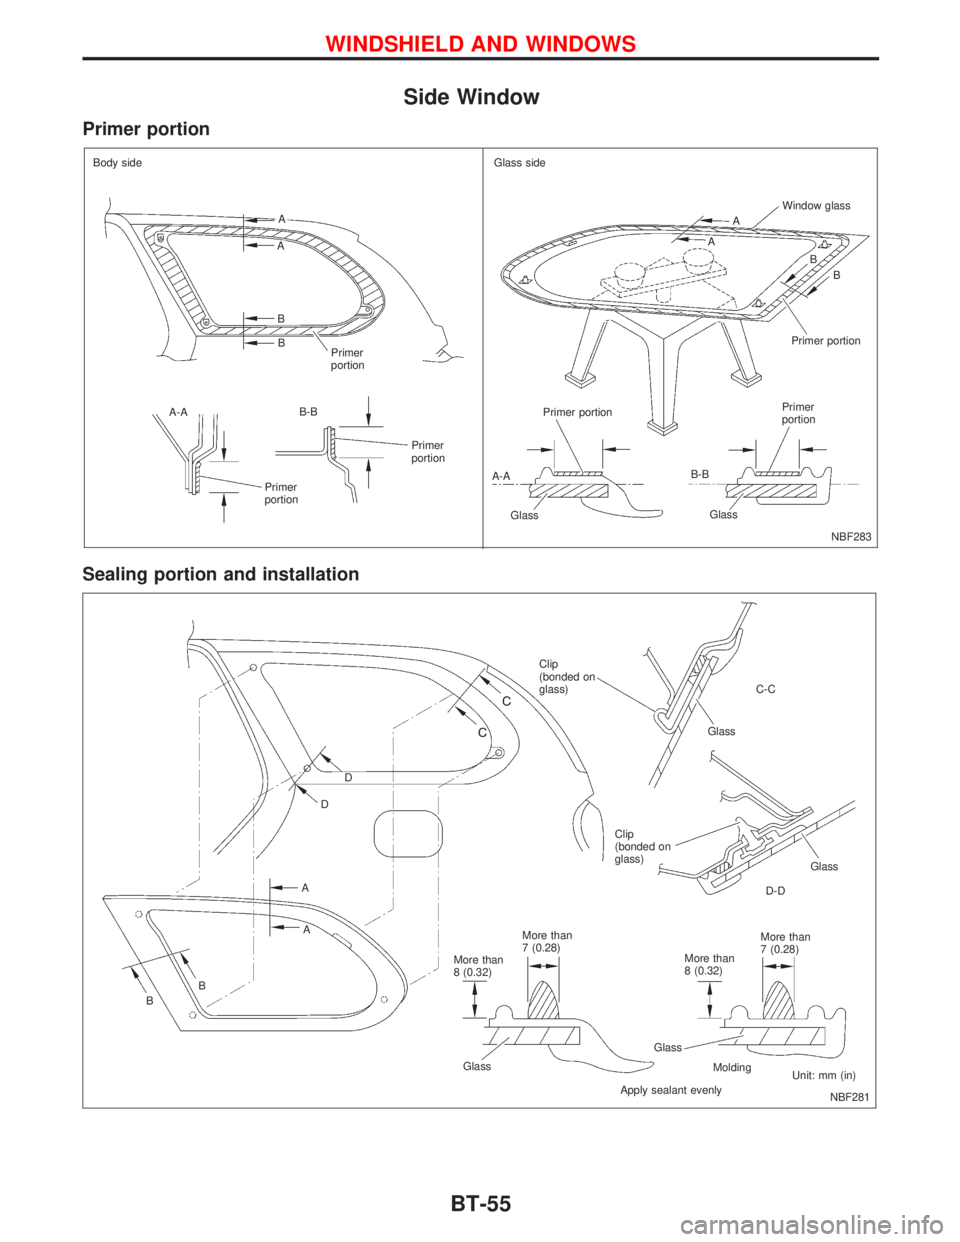
Side Window
Primer portion
Sealing portion and installation
NBF283 Body side
.A
A
B
B
Primer
portion
A-AB-B
Primer
portion
Primer
portionGlass side
A
AWindow glass
B
Primer portion
Primer portion
A-A
GlassB-B
GlassPrimer
portionB
D
D
A
A
B
BClip
(bonded on
glass)C-C
Glass
Clip
(bonded on
glass)
Glass
D-D
More than
7 (0.28)
More than
8 (0.32)
Glass
Molding
Apply sealant evenlyUnit: mm (in) More than
7 (0.28)
More than
8 (0.32)
Glass
NBF281
WINDSHIELD AND WINDOWS
BT-55
Page 270 of 2267
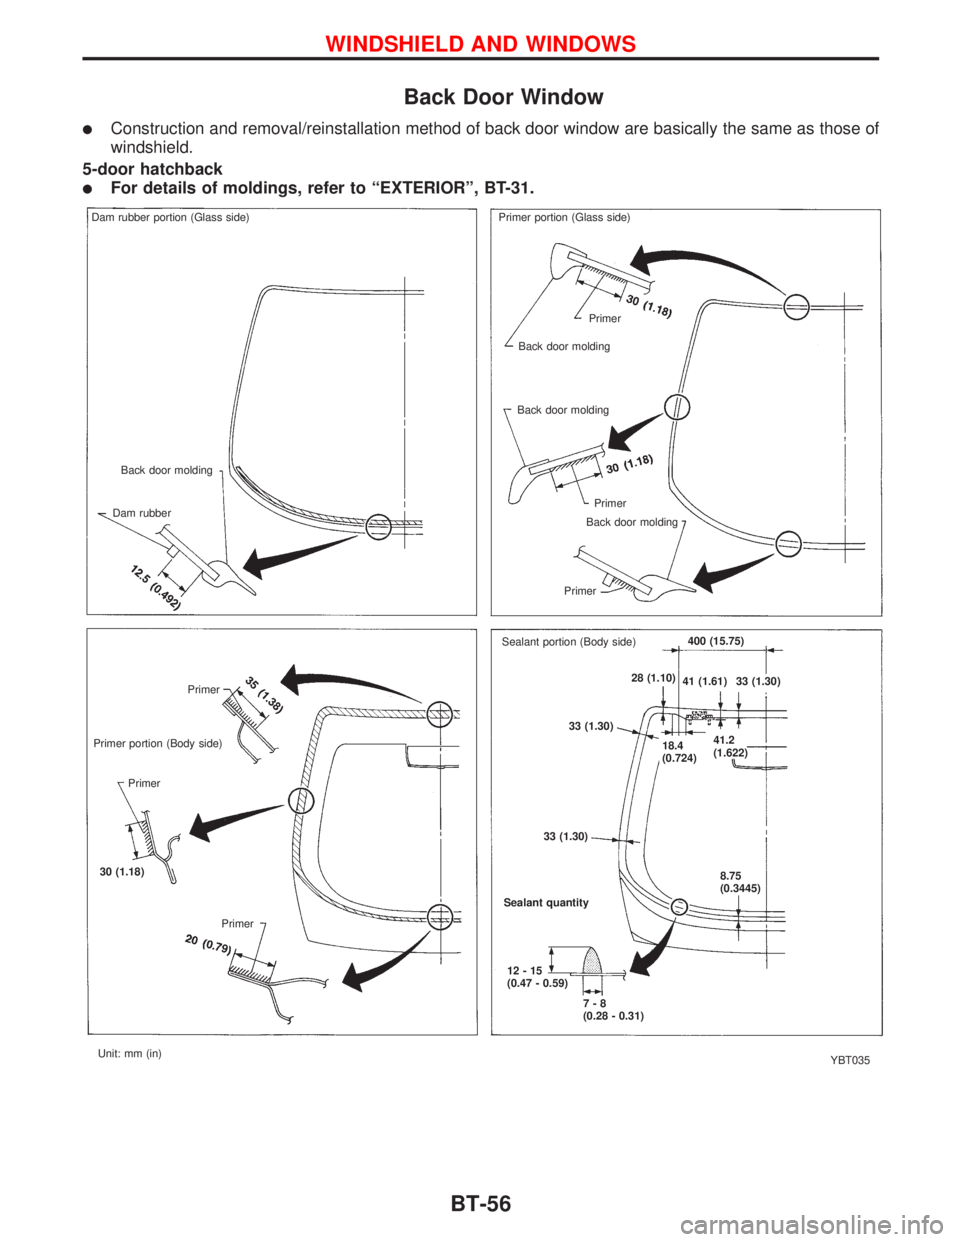
Back Door Window
lConstruction and removal/reinstallation method of back door window are basically the same as those of
windshield.
5-door hatchback
lFor details of moldings, refer to ªEXTERIORº, BT-31.
YBT035 Primer portion (Body side)Primer
Primer
30 (1.18)
PrimerSealant quantity
12-15
(0.47 - 0.59)
7-8
(0.28 - 0.31) 33 (1.30)33 (1.30)
8.75
(0.3445) 18.4
(0.724)41.2
(1.622) 28 (1.10)
41 (1.61) 33 (1.30)400 (15.75)
Sealant portion (Body side) Primer portion (Glass side) Dam rubber portion (Glass side)
Back door molding
Dam rubberPrimer
Back door molding
Back door molding
Primer
Back door molding
Primer
Unit: mm (in)
WINDSHIELD AND WINDOWS
BT-56