light NISSAN PULSAR 1987 Service Manual
[x] Cancel search | Manufacturer: NISSAN, Model Year: 1987, Model line: PULSAR, Model: NISSAN PULSAR 1987Pages: 238, PDF Size: 28.91 MB
Page 118 of 238

118 Emission Control
Installed view of the charcoal canister.
When the engine is at rest, fuel vapor through
evaporation gradually fills the air space in the fuel
tank. The sealed filler cap pr events the escape of this
vapor and pressure builds up within the system,
forcing the vapor to flow into the charcoal canister
which is located in the engine compartment beneath
the windscreen wiper motor.
The fuel check valve prevents liquid fuel entering
the charcoal canister when the fuel tank is full or the
vehicle is parked on a steep incline. When the engine
is running, the vapor is drawn via a hose from the
charcoal canister to the throttle body and burnt in the
combustion chambers.
TO RENEW CHARCOAL CANISTER
(1) Suitably mark and disconnect the hoses from
the canister. (2) Release the retaining spring and remove the
canister from the engine compartment. Installation is a reversal of the removal procedure.
TO RENEW FUEL CHECK VALVE
(1) Disconnect the negative battery terminal.
(2) Raise the rear of the vehicle and support it
on chassis stands. Remove the left hand rear wheel. (3) Drain the fuel from the fuel tank using a
hand pump or a suitable siphon. Do not siphon fuel
using the mouth.
(4) Remove the hoses from the check valve.
(5) Squeeze the retaining clip and remove the
check valve from the mounting bracket. Installation is a reversal of the removal procedure.
TO SERVICE THE SYSTEM
(1) Inspect the vacuum lines and connectors for
signs of leakage, cracks and deterioration and renew
as necessary. (2) Remove the fuel tank cap and check that a
slight resistance is felt, when vacuum is applied to the
one-way relief valve in the centre of the cap. Renew the fuel tank cap if no resistance is felt or
if the valve is blocked.
(3) Inspect the fuel tank cap seal for deteriora-
tion. Renew as necessary.
Installed view of the fuel check valve as seen with the
left hand rear wheel removed.
Check the fuel filler cap seal for damage.
23Q/LDZ GAUGE
Line drawing showing a hand vacuum pump.
Page 122 of 238
122 Clutch
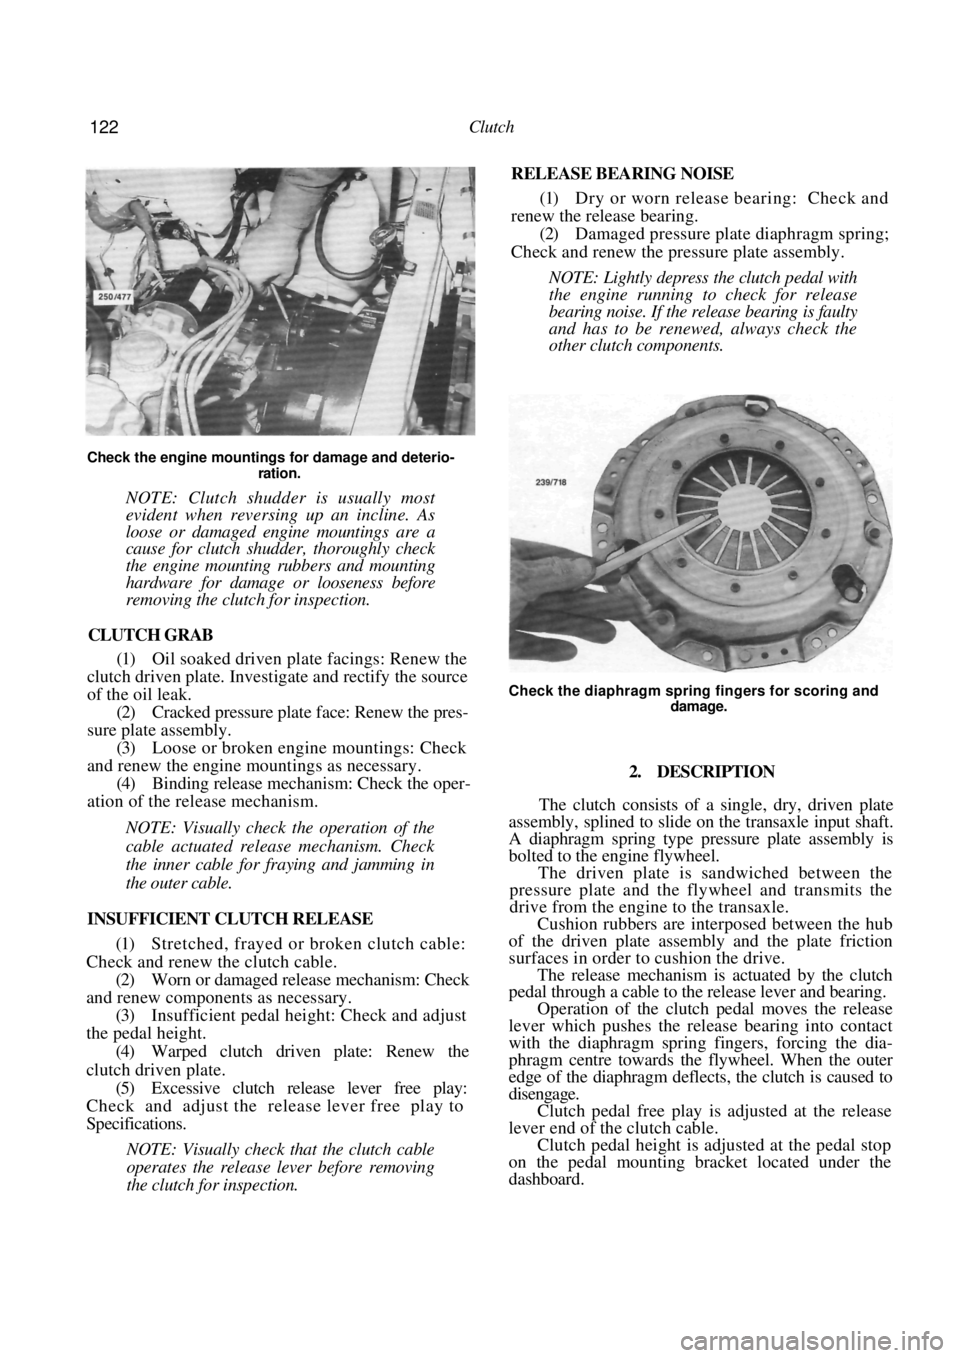
Check the engine mountings for damage and deterio- ration.
NOTE: Clutch shudder is usually most
evident when reversing up an incline. As
loose or damaged engine mountings are a
cause for clutch shudder, thoroughly check
the engine mounting rubbers and mounting
hardware for damage or looseness before
removing the clutch for inspection.
CLUTCH GRAB
(1) Oil soaked driven plate facings: Renew the
clutch driven plate. Invest igate and rectify the source
of the oil leak.
(2) Cracked pressure plate face: Renew the pres-
sure plate assembly. (3) Loose or broken engine mountings: Check
and renew the engine mountings as necessary.
(4) Binding release mechanism: Check the oper-
ation of the release mechanism.
NOTE: Visually check the operation of the
cable actuated release mechanism. Check
the inner cable for fraying and jamming in
the outer cable.
INSUFFICIENT CLUTCH RELEASE
(1) Stretched, frayed or broken clutch cable:
Check and renew the clutch cable. (2) Worn or damaged release mechanism: Check
and renew components as necessary. (3) Insufficient pedal height: Check and adjust
the pedal height.
(4) Warped clutch driven plate: Renew the
clutch driven plate. (5) Excessive clutch release lever free play:
Check and adjust the release lever free play to
Specifications.
NOTE: Visually check that the clutch cable
operates the release lever before removing
the clutch for inspection.
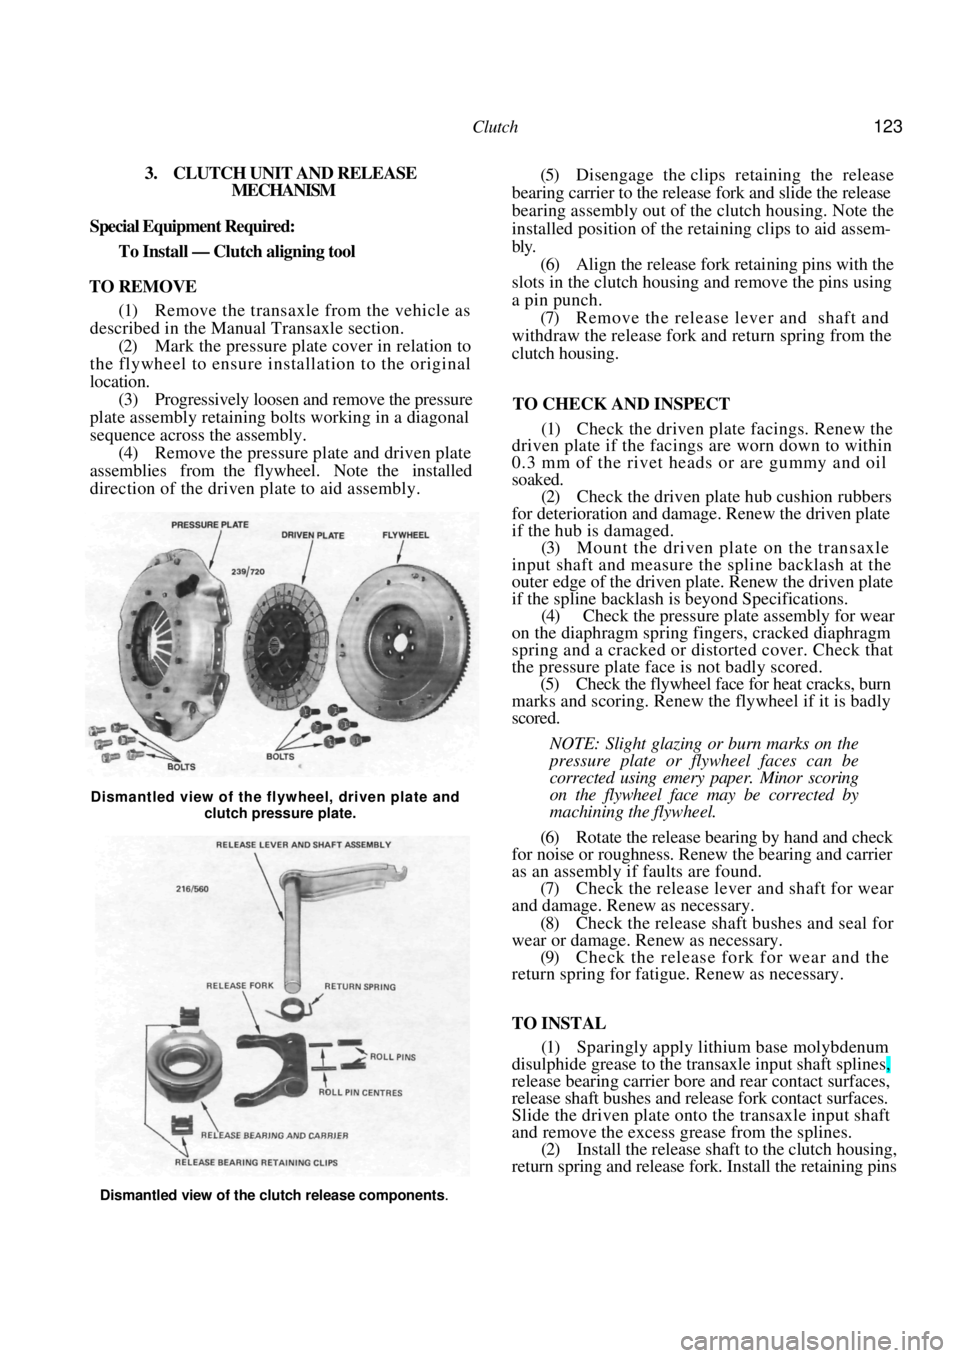
RELEASE BEARING NOISE
(1) Dry or worn release bearing: Check and
renew the release bearing.
(2) Damaged pressure plate diaphragm spring;
Check and renew the pressure plate assembly.
NOTE: Lightly depress the clutch pedal with
the engine running to check for release
bearing noise. If the release bearing is faulty
and has to be renewed, always check the
other clutch components.
Check the diaphragm spring fingers for scoring and damage.
2. DESCRIPTION
The clutch consists of a single, dry, driven plate
assembly, splined to slide on the transaxle input shaft.
A diaphragm spring type pr essure plate assembly is
bolted to the engine flywheel.
The driven plate is sandwiched between the
pressure plate and the flywheel and transmits the
drive from the engine to the transaxle.
Cushion rubbers are interposed between the hub
of the driven plate assembly and the plate friction
surfaces in order to cushion the drive.
The release mechanism is actuated by the clutch
pedal through a cable to the release lever and bearing.
Operation of the clutch pedal moves the release
lever which pushes the release bearing into contact
with the diaphragm spring fingers, forcing the dia-
phragm centre towards the flywheel. When the outer
edge of the diaphragm deflects, the clutch is caused to
disengage.
Clutch pedal free play is adjusted at the release
lever end of the clutch cable.
Clutch pedal height is adjusted at the pedal stop
on the pedal mounting bracket located under the
dashboard.
Page 123 of 238
Clutch 123
3. CLUTCH UNIT AND RELEASE MECHANISM
Special Equipment Required:
To Install — Clutch aligning tool
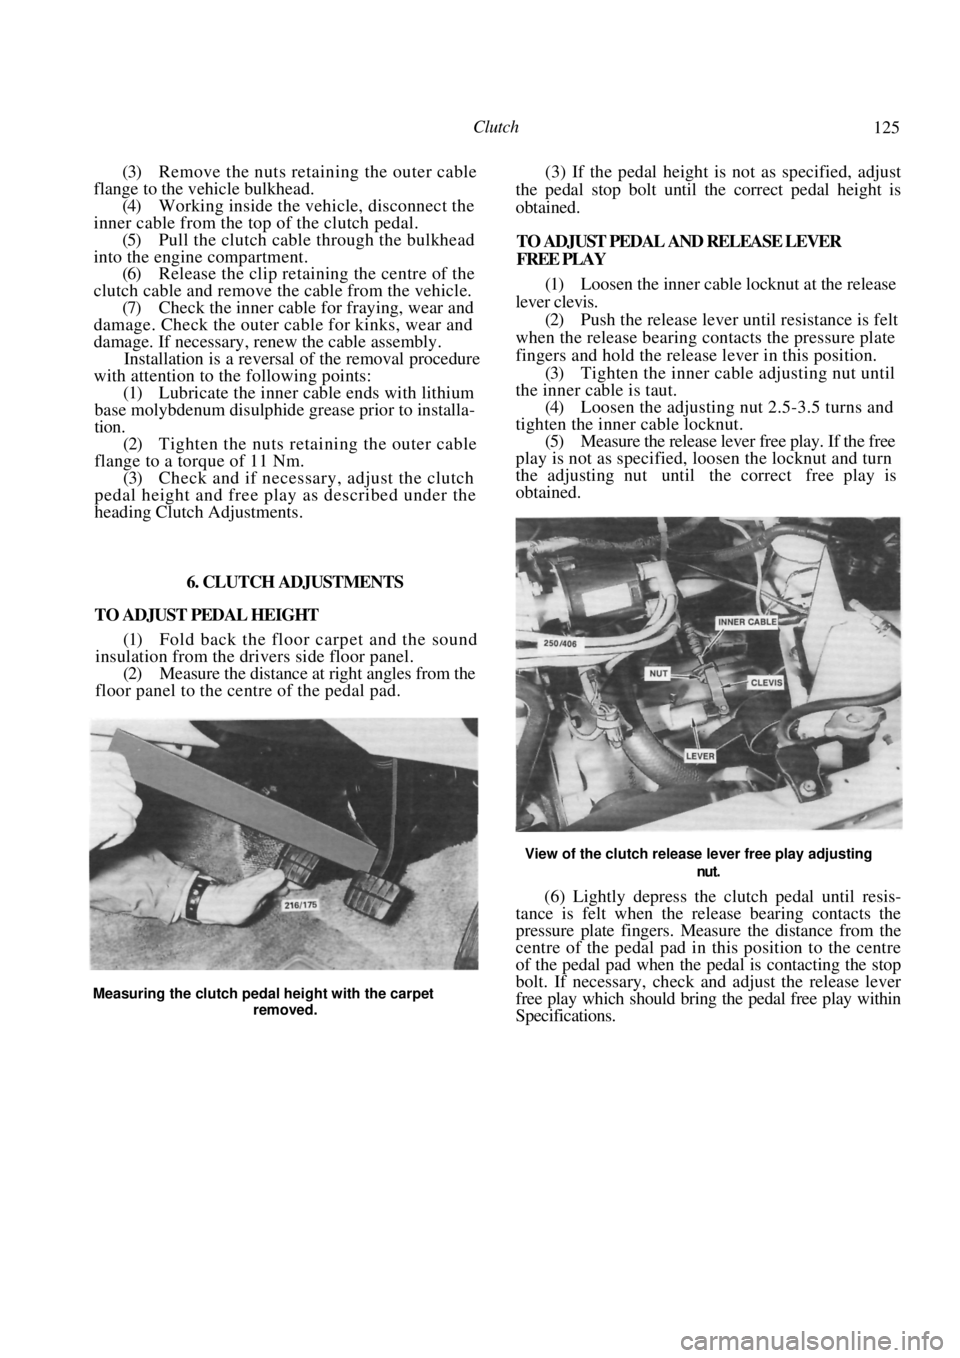
TO REMOVE
(1) Remove the transaxle from the vehicle as
described in the Manual Transaxle section. (2) Mark the pressure plate cover in relation to
the flywheel to ensure installation to the original
location. (3) Progressively loosen and remove the pressure
plate assembly retaining bolts working in a diagonal
sequence across the assembly. (4) Remove the pressure plate and driven plate
assemblies from the flywheel. Note the installed
direction of the driven plate to aid assembly.
(5) Disengage the clips retaining the release
bearing carrier to the release fork and slide the release
bearing assembly out of the clutch housing. Note the
installed position of the re taining clips to aid assem-
bly. (6) Align the release fork retaining pins with the
slots in the clutch housing and remove the pins using
a pin punch.
(7) Remove the release lever and shaft and
withdraw the release fork and return spring from the
clutch housing.
TO CHECK AND INSPECT
(1) Check the driven plate facings. Renew the
driven plate if the facings are worn down to within
0.3 mm of the rivet heads or are gummy and oil
soaked.
(2) Check the driven plate hub cushion rubbers
for deterioration and damage. Renew the driven plate
if the hub is damaged. (3) Mount the driven plate on the transaxle
input shaft and measure the spline backlash at the
outer edge of the driven plate. Renew the driven plate
if the spline backlash is beyond Specifications. (4) Check the pressure pl ate assembly for wear
on the diaphragm spring fingers, cracked diaphragm
spring and a cracked or distorted cover. Check that
the pressure plate face is not badly scored.
(5) Check the flywheel face for heat cracks, burn
marks and scoring. Renew the flywheel if it is badly
scored.
NOTE: Slight glazing or burn marks on the
pressure plate or flywheel faces can be
corrected using emery paper. Minor scoring
on the flywheel face may be corrected by
machining the flywheel.
(6) Rotate the release bearing by hand and check
for noise or roughness. Renew the bearing and carrier
as an assembly if fa ults are found.
(7) Check the release lever and shaft for wear
and damage. Renew as necessary.
(8) Check the release shaft bushes and seal for
wear or damage. Renew as necessary.
(9) Check the release fork for wear and the
return spring for fatigue. Renew as necessary.
TO INSTAL
(1) Sparingly apply lithium base molybdenum
disulphide grease to the tr ansaxle input shaft splines,
release bearing carrier bore and rear contact surfaces,
release shaft bushes and release fork contact surfaces.
Slide the driven plate onto the transaxle input shaft
and remove the excess grease from the splines. (2) Install the release shaft to the clutch housing,
return spring and release fork. Install the retaining pins
Dismantled view of the flywheel, driven plate and
clutch pressure plate.
Dismantled view of the clutch release components.
Page 125 of 238
Clutch 125
(3) Remove the nuts retaining the outer cable
flange to the vehicle bulkhead.
(4) Working inside the ve hicle, disconnect the
inner cable from the top of the clutch pedal. (5) Pull the clutch cable through the bulkhead
into the engine compartment. (6) Release the clip retaining the centre of the
clutch cable and remove the cable from the vehicle. (7) Check the inner cable for fraying, wear and
damage. Check the outer cable for kinks, wear and
damage. If necessary, renew the cable assembly. Installation is a reversal of the removal procedure
with attention to the following points:
(1) Lubricate the inner cable ends with lithium
base molybdenum disulphide grease prior to installa-
tion. (2) Tighten the nuts retaining the outer cable
flange to a torque of 11 Nm. (3) Check and if necessary , adjust the clutch
pedal height and free play as described under the
heading Clutch Adjustments.
6. CLUTCH ADJUSTMENTS
TO ADJUST PEDAL HEIGHT (1) Fold back the floor carpet and the sound
insulation from the drivers side floor panel.
(2) Measure the distance at right angles from the
floor panel to the centre of the pedal pad. (3) If the pedal height is not as specified, adjust
the pedal stop bolt until the correct pedal height is
obtained.
TO ADJUST PEDAL AND RELEASE LEVER
FREE PLAY
(1) Loosen the inner cable locknut at the release
lever clevis. (2) Push the release lever until resistance is felt
when the release bearing contacts the pressure plate
fingers and hold the release lever in this position.
(3) Tighten the inner cable adjusting nut until
the inner cable is taut.
(4) Loosen the adjusting nut 2.5-3.5 turns and
tighten the inner cable locknut. (5) Measure the release lever free play. If the free
play is not as specified, loosen the locknut and turn
the adjusting nut until the correct free play is
obtained.
View of the clutch release lever free play adjusting
nut.
(6) Lightly depress the clutch pedal until resis-
tance is felt when the release bearing contacts the
pressure plate fingers. Measure the distance from the
centre of the pedal pad in this position to the centre
of the pedal pad when the pedal is contacting the stop
bolt. If necessary, check and adjust the release lever
free play which should bring the pedal free play within
Specifications.
Measuring the clutch pedal height with the carpet
removed.
Page 133 of 238
Manual Transaxle and Drive Shafts 133
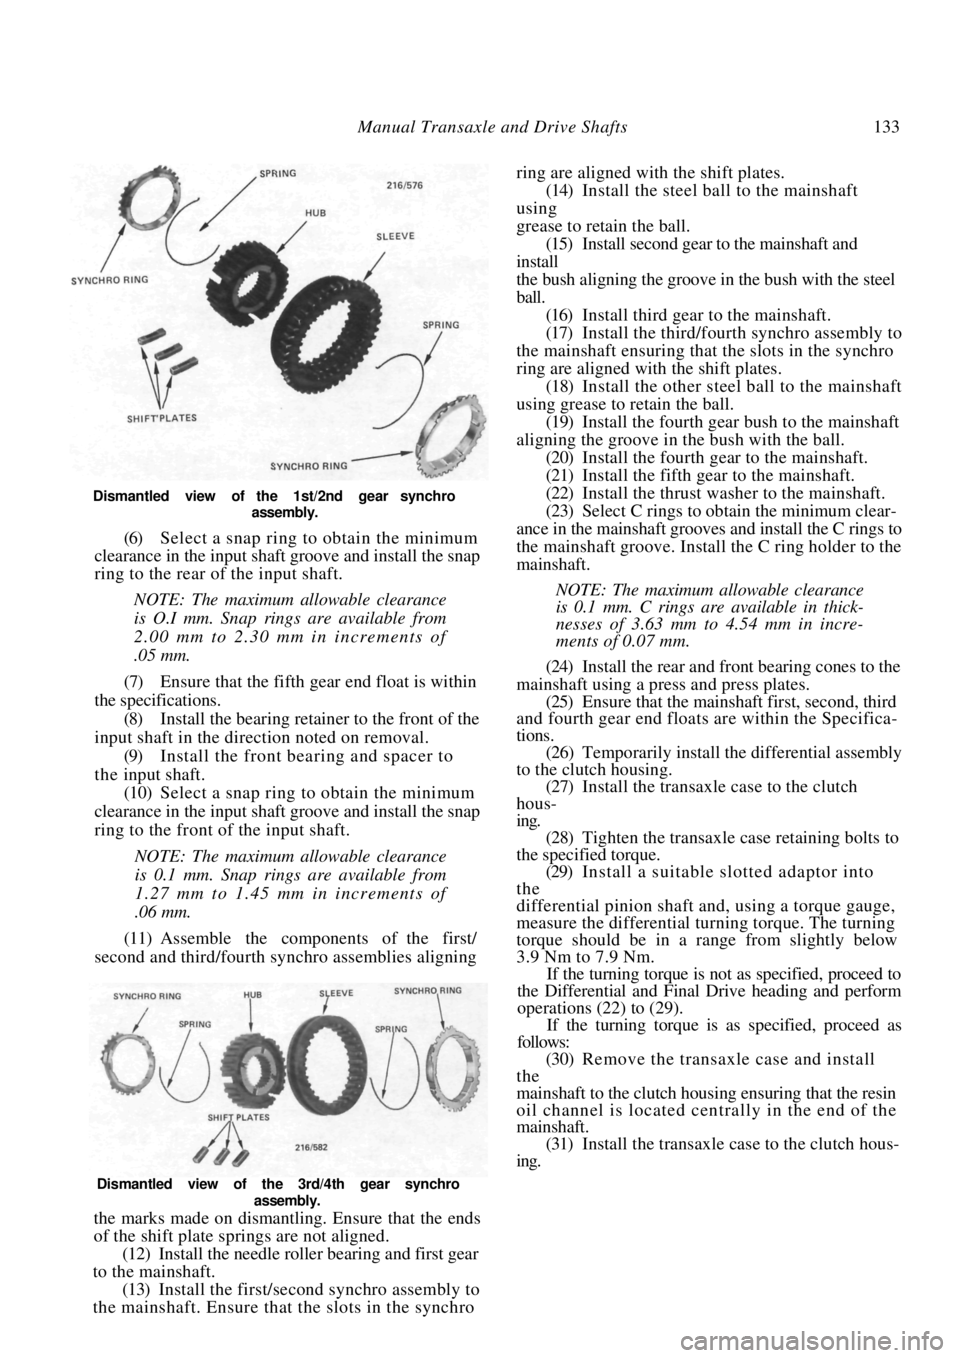
Dismantled view of the 1st/2nd gear synchro assembly.
(6) Select a snap ring to obtain the minimum
clearance in the input shaft groove and install the snap
ring to the rear of the input shaft.
NOTE: The maximum allowable clearance
is O.I mm. Snap rings are available from
2.00 mm to 2.30 mm in increments of
.05 mm.
(7) Ensure that the fifth gear end float is within
the specifications. (8) Install the bearing retain er to the front of the
input shaft in the direction noted on removal.
(9) Install the front bearing and spacer to
the input shaft. (10) Select a snap ring to obtain the minimum
clearance in the input shaft groove and install the snap
ring to the front of the input shaft.
NOTE: The maximum allowable clearance
is 0.1 mm. Snap rings are available from
1.27 mm to 1.45 mm in increments of
.06 mm.
(11) Assemble the components of the first/
second and third/fourth sy nchro assemblies aligning
the marks made on dismantling. Ensure that the ends
of the shift plate springs are not aligned.
(12) Install the needle roller bearing and first gear
to the mainshaft.
(13) Install the firs t/second synchro assembly to
the mainshaft. Ensure that the slots in the synchro ring are aligned with the shift plates.
(14) Install the steel ball to the mainshaft
using
grease to retain the ball. (15) Install second gear to the mainshaft and
install
the bush aligning the groove in the bush with the steel
ball. (16) Install third gear to the mainshaft.
(17) Install the third/fourth synchro assembly to
the mainshaft ensuring that the slots in the synchro
ring are aligned with the shift plates.
(18) Install the other steel ball to the mainshaft
using grease to retain the ball. (19) Install the fourth gear bush to the mainshaft
aligning the groove in the bush with the ball. (20) Install the fourth gear to the mainshaft.
(21) Install the fifth gear to the mainshaft.
(22) Install the thrust washer to the mainshaft.
(23) Select C rings to obtain the minimum clear-
ance in the mainshaft grooves and install the C rings to
the mainshaft groove. Install the C ring holder to the
mainshaft.
NOTE: The maximum allowable clearance
is 0.1 mm. C rings are available in thick-
nesses of 3.63 mm to 4.54 mm in incre-
ments of 0.07 mm.
(24) Install the rear and front bearing cones to the
mainshaft using a press and press plates. (25) Ensure that the mainshaft first, second, third
and fourth gear end floats are within the Specifica-
tions.
(26) Temporarily install the differential assembly
to the clutch housing. (27) Install the transaxle case to the clutch
hous-
ing. (28) Tighten the transaxle case retaining bolts to
the specified torque. (29) Install a suitable slotted adaptor into
the
differential pinion shaft a nd, using a torque gauge,
measure the differential tu rning torque. The turning
torque should be in a range from slightly below
3.9 Nm to 7.9 Nm. If the turning torque is not as specified, proceed to
the Differential and Final Drive heading and perform
operations (22) to (29).
If the turning torque is as specified, proceed as
follows:
(30) Remove the transaxle case and install
the
mainshaft to the clutch housing ensuring that the resin
oil channel is located centrally in the end of the
mainshaft. (31) Install the transaxle case to the clutch hous-
ing.
Dismantled view of the 3rd/4th gear synchro
assembly.
Page 134 of 238

134 Manual Transaxle and Drive Shafts
(32) Install and tighten the retaining bolts to
the specified torque.
(33) Repeat operation (29). The total turning
torque should be 5.9-13.7 Nm if new bearings have
been installed or slightly l ess if the original bearings
have been installed. If the turning torque is no t as specified, adjust the
mainshaft turning torque as follows:
(a) Remove the transaxle case rear cover, O ring,
spacer and adjusting shim from the transaxle case.
(b) Ensure that the mainsh aft rear bearing outer
race is fully seated on the bearing cone. (c) Using micrometer depth gauge, measure the
distance from the transaxle case to the bearing outer
race and note the reading. (d) Referring to the following table, select the
appropriate shim, according to the reading noted in
operation (c), required to correct the mainshaft turn-
ing torque.
READING SHIM
2.35-2.40 mm............................................... 0.10 mm
2.40-2.45 mm............................................... 0.15 mm
2.45-2.50 mm...............................................0.20 mm
2.50-2.55 mm...............................................0.25 mm
2.55-2.60 mm...............................................0.30 mm
2.60-2.65 mm............................................... 0.35 mm
2.65-2.70 mm............................................... 0.40 mm
2.70-2.75 mm............................................... 0.45 mm
2.75-2.80 mm............................................... 0.50 mm
2.80-2.85 mm............................................... 0.55 mm
2.85-2.90 mm............................................... 0.60 mm
2.90-2.95 mm............................................... 0.65 mm
2.95-3.00 mm............................................... 0.70 mm
3.00-3.05 mm............................................... 0.75 mm
3.05-3.10 mm............................................... 0.80 mm
3.10-3.15 mm............................................... 0.85 mm
3.15-3.20 mm............................................... 0.90 mm
3.20-3.25 mm............................................... 0.95 mm
3.25-3.30 mm...............................................1.00 mm.
(e) Install the spacer, shim, O ring and rear
cover to the transaxle case. Tighten the retaining
bolts securely.
(34) Measure the total turning torque as previ-
ously described. (35) Install the striking interlock and striking lever
to the clutch housing. (36) Install the striking ro d to the clutch housing
sliding the rod through the lever and interlock. Take
care that the end of the rod does not damage the seal. (37) Install a new retaining pin to the striking rod
using a pin punch. (38) Install the reverse and fifth gear check
assembly to the clutch housing. Tighten the retaining
screws securely. (39) Install the balls, spring and reverse check
plug to the clutch housing ensuring that the smaller
diameter ball enters the hole in the body of the
reverse and fifth gear check assembly body. Apply locking com-
pound and tighten the reverse check plug securely.
(40) Using a bar clamped to the end of the
striking rod, check that a force of 4.9-7.4 Nm is
required to overcome the spring loading of the reverse
and fifth gear check assembly. If necessary, renew the
springs to achieve this correct spring loading.
NOTE: Ensure that the reverse check plug is
coated with locking compound when finally
installed.
(41) Install the shift check ball, spring and plug to
the clutch housing. Ensure that the ball is centrally
located in the plug.
(42) If removed, install the oil reservoir to the
clutch housing.
(43) Install the input shaft assembly and the
reverse idler gear to the clutch housing taking care not
to damage the seal.
(44) Apply locking compound to the bearing
retainer bolts and tighten the bolts to the specified
torque.
(45) Install the spacer to the reverse idler shaft.
(46) Install the differential assembly to the clutch
housing.
(47) Install the mainshaft to the clutch housing
ensuring that the resin oil ch annel is located centrally
in the end of the mainshaft. (48) Install the shift cap to the slot in the first/
second shift fork and install the shift fork and control
bracket to the clutch housing. Use grease to hold the
shift cap in the shift fork slot. Ensure that the reverse
idler shift fork is correctly located over the gear.
(49) Apply locking compound to the threads of
the control bracket retaining bolts and tighten the
bolts to the specified torque. (50) Install the shift cap in the slot in the third/
fourth shift fork and install the fork to the transaxle
assembly. Use grease to hold the shift cap in the shift
fork slot. (51) Install the fifth gear shift fork to the transaxle
ensuring that the shift fork slot engages the control
finger.
(52) Install the fork shaft an d spring to the clutch
housing sliding the shaft through the shift forks. Use
grease to hold the spring in the end of the shaft. (53) Apply a continuous bead of sealant to the
mating face of the clutch housing so that the bead is
located inside the row of bolt holes.
NOTE: Sealant is available from Nissan
spare parts using the part number KP
610-00250.
(54) Install the transaxle case to the clutch hous-
ing. Install and tighten the retaining bolts to the
specified torque. (55) Select each gear in turn and check that the
transaxle turns freely in each gear. Ensure that it is not
Page 136 of 238

136 Manual Transaxle and Drive Shafts
right hand side gear and the adjacent spacer in an area
where there is no oil groove in the differential case.
(d) Insert another 0.03 mm feeler gauge diago-
nally opposite the first feeler gauge to avoid tilting the
side gear.
(e) Insert a splined adaptor into the right hand
side gear and attempt to rotate the gear by hand.
(f) If the gear cannot be rotated, change the
thickness of the left hand side gear spacer, repeating
the test until the gear can be rotated.
NOTE: Spacers are available in thicknesses
from 0.8 mm to 1.5 mm in increments of
0.1 mm.
(g) Remove the 0.03 mm feel er gauges and insert
0.09 mm feeler gauges to the same position. The gear
should lock.
(h) The spacer selection is correct when the right
hand side gear can be rotated with 0.03 mm feeler
gauges inserted but locks when 0.09 mm feeler gauges
are inserted.
(18) Install the ring gear to the differential case
with the chamfered edge of the ring gear inwards. (19) Install and tighten the retaining bolts in
a
diagonal sequence to the specified torque.
(20) Install a new speedometer drive gear to
the
differential case. Install the stopper adjacent to the
drive gear.
(21) Install the differentia] carrier bearing
cones
and roller assemblies to the differential case.
(22) Remove the adjusting shim from behind the
carrier bearing outer race in the transaxle case and
replace the outer race in the transaxle case.
(23) Install the differential assembly to the clutch
housing. (24) Install the transaxle case to the clutch housing
and tighten the retaining bolts to the specified torque.
(25) Mount a dial gauge to the clutch housing so
that the contact point is resting on the differential
case. (26) Insert a bar through the opposite side gear
and, contacting the pinion shaft, raise and lower the
differential case and measure the end float in the
carrier bearings. (27) Using the following table, select a shim to
correspond to the relevant end float.
END FLOAT SHIM THICKNESS
0.30-0.34 mm....................................................0.64 mm
0.34-0.38 mm................................................... 0.68 mm
0.38-0.42 mm................................................... 0.72 mm
0.42-0.46 mm................................................... 0.76 mm
0.46-0.50 mm................................................... 0.80 mm
0.50-0.54 mm................................................... 0.84 mm
0.54-0.58 mm................................................... 0.88 mm
0.58-0.62 mm................................................... 0.92 mm
0.62-0.66 mm................................................... 0.96 mm
0.66-0.70 mm................................................... 1.00 mm
0.70-0.74 mm................................................... 1.04 mm
0.74-0.78 mm ................................................... 1.08 mm
0.78-0.82 mm ................................................... 1.12 mm
0.82-0.86 mm ................................................... 1.16 mm
0.86-0.90 mm ................................................... 1.20 mm
0.90-0.94 mm ................................................... 1.24 mm
0.94-0.98 mm ................................................... 1.28 mm
0.98-1.02 mm ................................................... 1.32 mm
1.02-1.06 mm ................................................... 1.36 mm
1.06-1.10 mm ................................................... 1.40 mm
1.10-1.14 mm ................................................... 1.44 mm
1.14-1.18 mm ................................................... 1.48 mm
1.18-1.22 mm ................................................... 1.52 mm
1.22-1.26 mm ................................................... 1.56 mm
1.26-1.30 mm ................................................... 1.60 mm
1.30-1.34 mm ................................................... 1.64 mm
1.34-1.38 mm ................................................... 1.68 mm
1.38-1.42 mm ................................................... 1.72 mm
1.42-1.46 mm ................................................... 1.76 mm
The thickest shim available is 0.88 mm. Multiple
shims are required above this thickness.
(28) Install the shim behind the carrier
bearing
outer race in the transaxle case and assemble the unit
once more. (29) Using a suitable slotted adaptor engage the
pinion shaft and using a to rque gauge, measure the
differential turning torque. The turning torque when new carrier bearings
have been installed should be 3.9-7.8 Nm or slightly
lower if the original carrier bearings have been
replaced.
(30) Assemble the transaxle and measure the total
turning torque of the diff erential assembly and the
mainshaft. The total turning torque should be 5.9 to
13.7 Nm with new bearings or slightly lower if the
original bearings have been replaced.
5. GEAR LEVER ASSEMBLY
TO DISMANTLE AND ASSEMBLE
(1) Remove the gear lever knob and remove the
centre console as described in the Body section. If not
previously removed, remove the rubber boot sur-
rounding the gear lever. (2) Raise the front of the vehicle and support it
on chassis stands. Remove the catalytic converter and
heat shield as described in the Engine section.
(3) Remove the bolt and disconnect the control
rod from the bottom of the gear lever, noting the
position of the return spring and bracket.
(4) Remove the nuts retaining the gear lever
socket to the support rod. (5) Working inside the vehicle, lift the gear lever
out of the floor bracket. (6) Separate the lower rubber boot, socket,
spring seat, spring, upper ball seat and lower ball seat
from the gear lever, noting the location of each
component to aid assembly.
Page 144 of 238
144 Automatic Transaxle
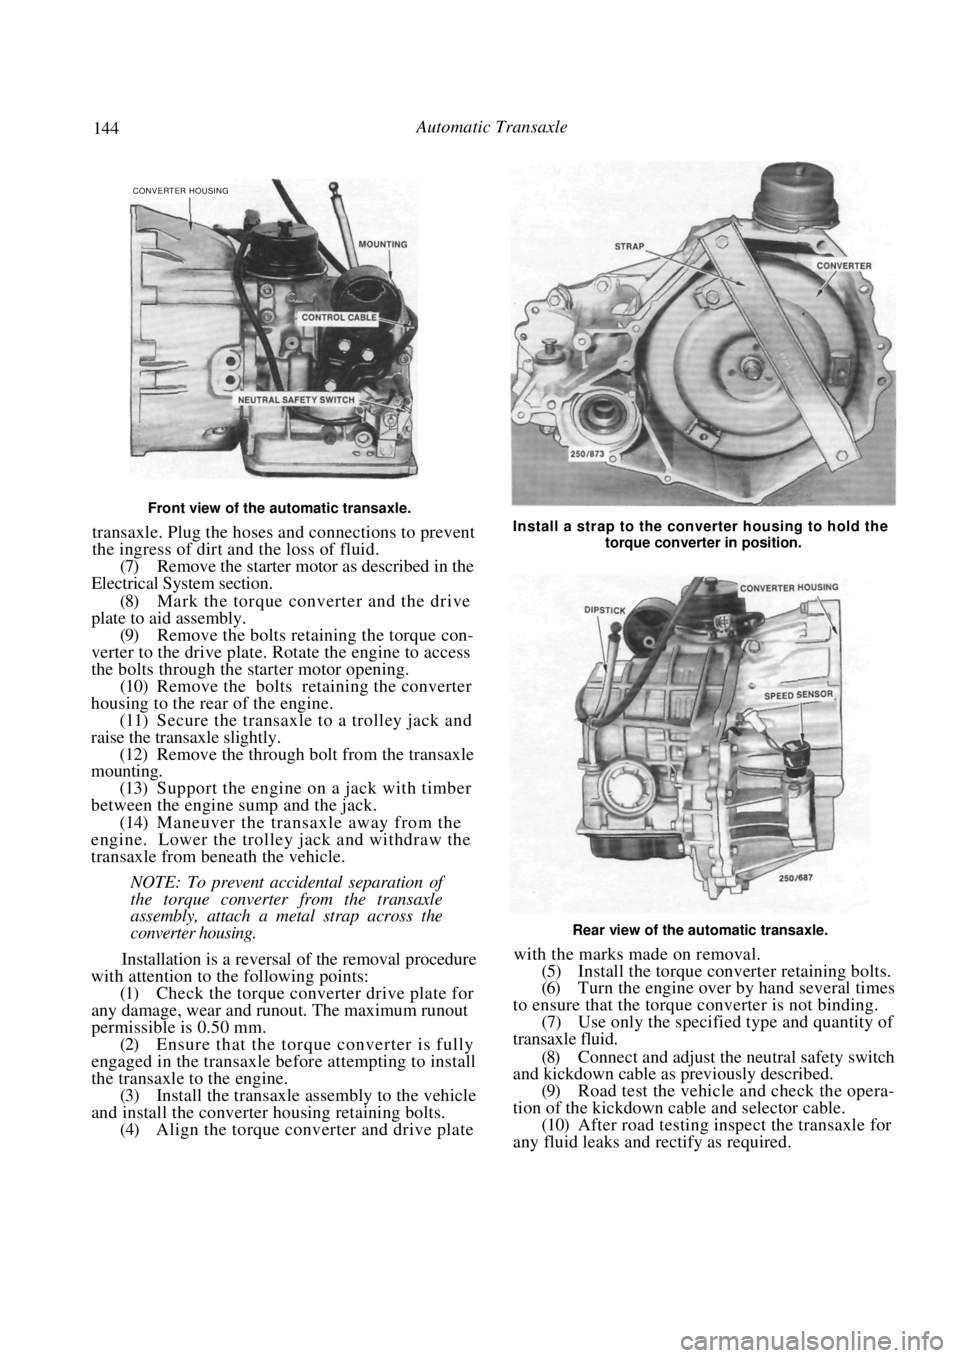
Front view of the automatic transaxle.
transaxle. Plug the hoses and connections to prevent
the ingress of dirt and the loss of fluid.
(7) Remove the starter motor as described in the
Electrical System section.
(8) Mark the torque converter and the drive
plate to aid assembly.
(9) Remove the bolts retaining the torque con-
verter to the drive plate. Rotate the engine to access
the bolts through the starter motor opening. (10) Remove the bolts retaining the converter
housing to the rear of the engine. (11) Secure the transaxle to a trolley jack and
raise the transaxle slightly. (12) Remove the through bolt from the transaxle
mounting.
(13) Support the engine on a jack with timber
between the engine sump and the jack. (14) Maneuver the transaxle away from the
engine. Lower the trolley jack and withdraw the
transaxle from beneath the vehicle.
NOTE: To prevent accidental separation of
the torque converter from the transaxle
assembly, attach a metal strap across the
converter housing.
Installation is a reversal of the removal procedure
with attention to the following points:
(1) Check the torque converter drive plate for
any damage, wear and runout. The maximum runout
permissible is 0.50 mm.
(2) Ensure that the torque converter is fully
engaged in the transaxle be fore attempting to install
the transaxle to the engine. (3) Install the transaxle assembly to the vehicle
and install the converter housing retaining bolts. (4) Align the torque converter and drive plate
Install a strap to the converter housing to hold the
torque converter in position.
Rear view of the automatic transaxle.
with the marks made on removal.
(5) Install the torque converter retaining bolts.
(6) Turn the engine over by hand several times
to ensure that the torque converter is not binding. (7) Use only the specified type and quantity of
transaxle fluid.
(8) Connect and adjust the neutral safety switch
and kickdown cable as previously described.
(9) Road test the vehicle and check the opera-
tion of the kickdown cable and selector cable. (10) After road testing inspect the transaxle for
any fluid leaks and rectify as required.
CONVERTER HOUSING
Page 147 of 238
147
PART 2. MANUAL STEERING
SPECIFICATIONS
Steering gear type ............................ Rack and pinion
Steering column type ...................... Energy absorbing
collapsible and tilt adjustable
Steering wheel free play
(maximum ) ...................................................... 35 mm
Linkage........................... Direct from rack ends to t i e
rods and steering knuckles
Turns lock to lock ................................................. 3.6
Steering column length .................. 534.7-537.3 mm
Steering gear lubricant.............. Castrol EPL 1 grease
TORQUE WRENCH SETTINGS
Steering wheel retaining nut ............................ 39 Nm
Steering gear to bulkhead
mounting bolts .............................................. 108 Nm
Tie rod to steering knuckle nut...................... 98 Nm
Tie rod to tie rod end locknut ....................... 98 Nm
Tie rod ball housing to rack............................ 88 Nm
Steering column to mounting
bracket bolt ...................................................... 14 Nm
Steering column universal
coupling joint pinch bolts ............................... 29 Nm
2. STEERING WHEEL
Special Equipment Required:
To Remove Steering Wheel - Steering wheel
puller
TO REMOVE AND INSTAL
(1) Disconnect the negative battery terminal.
(2) Using a small screwdriver, carefully prise the
centre ornament from the steering wheel.
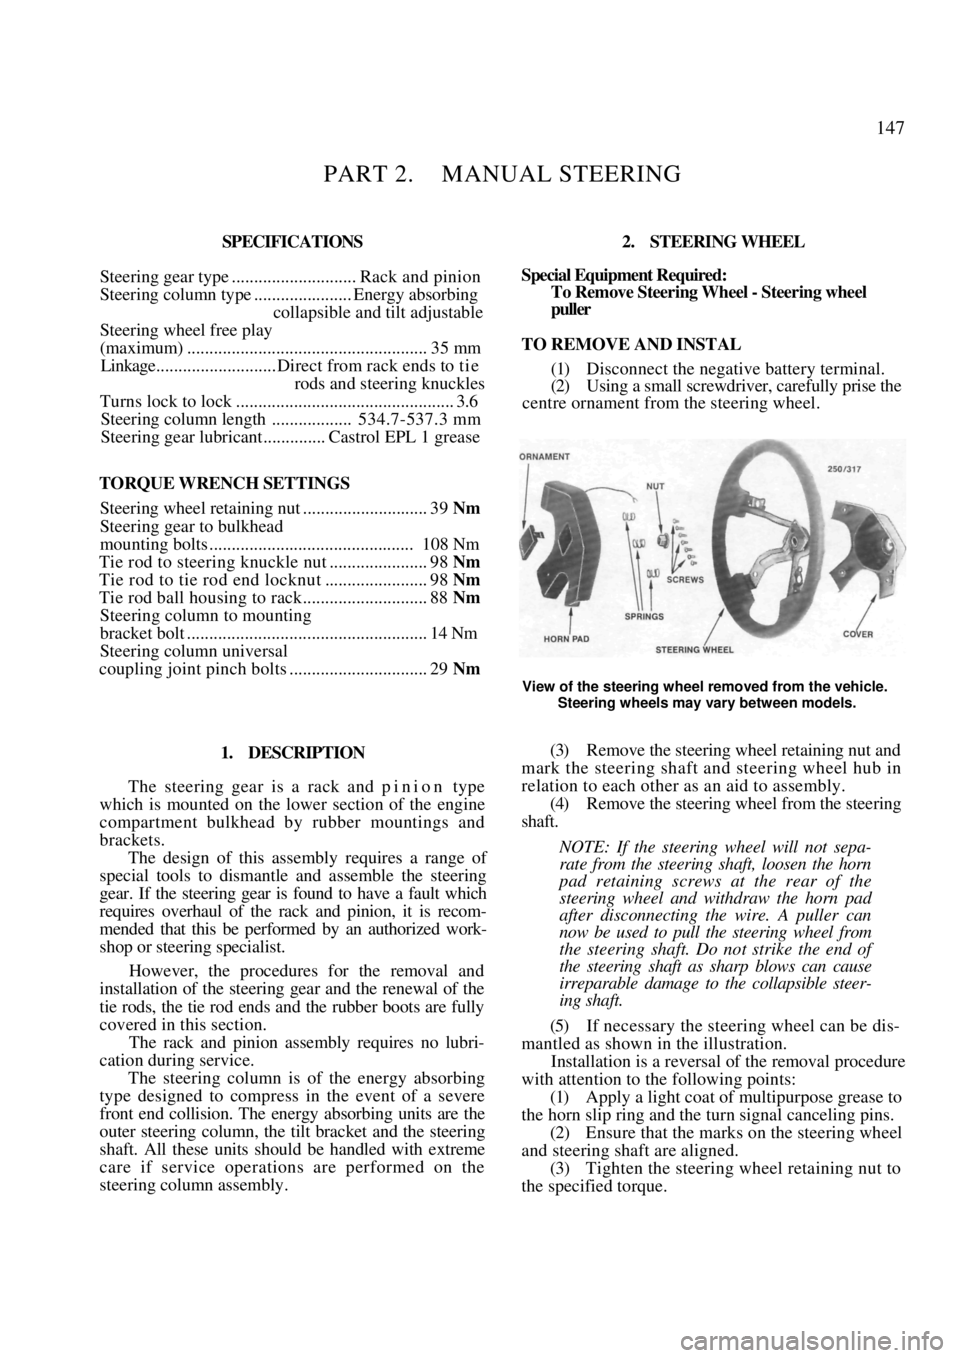
View of the steering wheel removed from the vehicle.
Steering wheels may vary between models.
1. DESCRIPTION
The steering gear is a rack and p i n i o n type
which is mounted on the lower section of the engine
compartment bulkhead by rubber mountings and
brackets.
The design of this assembly requires a range of
special tools to dismantle and assemble the steering
gear. If the steering gear is found to have a fault which
requires overhaul of the rack and pinion, it is recom-
mended that this be performed by an authorized work-
shop or steering specialist.
However, the procedures for the removal and
installation of the steering gear and the renewal of the
tie rods, the tie rod ends and the rubber boots are fully
covered in this section.
The rack and pinion assembly requires no lubri-
cation during service.
The steering column is of the energy absorbing
type designed to compress in the event of a severe
front end collision. The energy absorbing units are the
outer steering column, the tilt bracket and the steering
shaft. All these units shoul d be handled with extreme
care if service operations are performed on the
steering column assembly.
(3) Remove the steering wh eel retaining nut and
mark the steering shaft and steering wheel hub in
relation to each other as an aid to assembly.
(4) Remove the steering wheel from the steering
shaft.
NOTE: If the steering wheel will not sepa-
rate from the steering shaft, loosen the horn
pad retaining screws at the rear of the
steering wheel and withdraw the horn pad
after disconnecting the wire. A puller can
now be used to pull the steering wheel from
the steering shaft. Do not strike the end of
the steering shaft as sharp blows can cause
irreparable damage to the collapsible steer-
ing shaft.
(5) If necessary the steering wheel can be dis-
mantled as shown in the illustration.
Installation is a reversal of the removal procedure
with attention to the following points:
(1) Apply a light coat of multipurpose grease to
the horn slip ring and the turn signal canceling pins.
(2) Ensure that the marks on the steering wheel
and steering shaf t are aligned.
(3) Tighten the steering wheel retaining nut to
the specified torque.
Page 151 of 238

Steering — Part 2 151
(8) Slide the rack out of the housing slightly so
that an adjustable spanner can be used to hold the
rack. (9) Using a Stillsons wrench, unscrew the ball
housings in turn using care not to allow the rack to
rotate. Keep all the tie rod parts in order. (10) Inspect the rack boots for cracks and deteri-
oration and renew as necessary. (11) Inspect the tie rod ends for wear and damage
and renew as necessary.
Dismantled view of the tie rod ball housing and the tie
rod end assemblies removed from the steering gear.
Assembly is a reversal of the dismantling proce-
dure with attention to the following points:
(1) Using large Stillsons and a large adjustable
spanner, install the tie rod and ball housing
assemblies
to the rack. Tighten the ball housings to the specified
torque.
NOTE: To avoid damage to the rack or
pinion the adjustable spanner must be
firmly tightened over the rack teeth and the
rack must not be allowed to rotate when
installing the ball housings.
(2) Measure a point 9 mm in from the rear face
of the ball housing of the rack and at 90 deg to the
rack teeth. Centre punch this point.
(3) At this point drill a 4 mm hole, 10 mm deep
through the rack and into the ball housing thread.
(4) Place a locking pin above the hole and drive
it into position.
(5) Lubricate the rack, rack teeth and t i e rod
boot groove with suitable EPL 1 grease. (6) Install the rack boots and secure with the
clamps. Renew the clamps if necessary. (7) Install the tie rod end locknuts and then the
tie rod ends, ensuring that they are screwed on the
same number of turns as was necessary to remove
them.
(8) Tighten the locknuts to the specified torque.
(9) Install the mounting rubbers and brackets
to
the steering gear as noted on removal. (10) Install the steering gear assembly to
the
vehicle as previously described. (11) Check and if necessary adjust the front wheel toe in as described in the Front Suspension section
under the appropriate heading.
TO RENEW TIE ROD END
(1)
Raise the front of the vehicle and support it
on chassis stands. (2) Remove the relevant front wheel.
(3) Loosen the tie rod end locknut and remove
the tie rod end castellated nut. Disconnect the tie rod
from the steering arm by plac ing a suitable dolly or
hammer against one side of the steering arm eye and
striking the opposite side with a hammer. (4) Unscrew the tie rod end from the tie rod,
noting the number of turns necessary to remove it.
(5) Screw the new tie rod end onto the t i e rod
the same number of turn s noted during removal.
(6) Connect the t i e rod to the steering arm and
install the castellated nut. Tighten the nut to the
specified torque and secure it with a new split pin.
(7) Install the front wheel and lower the vehicle
to the ground. (8) Check and if necessary, adjust the front
wheel toe in as described in the Front Suspension
section. Ensure that the rubber boots are not distorted
or twisted on the tie rod when the adjustment is
completed.
TO RENEW RUBBER BOOT
(1) Raise the front of the vehicle and support it
on chassis stands. (2) Remove the relevant t i e rod end as previ-
ously described. (3) Release the clamps securi ng the boot to the
tie rod and steering gear housing. (4) Unscrew and remove the locknut from the
tie rod. (5) Remove the rubber boot together with the
outer retaining clamp from the t i e rod. (6) Sparingly lubricate th e tie rod boot groove
with EPL 1 grease, install the new boot to the t i e
rod
and push it onto the steering gear rack housing. Install
and secure the inner and outer retaining clamps.
(7) Install the tie rod end locknut and screw
the
tie rod end onto the tie ro d the same number of turns
noted during removal. (8) Connect the tie rod to the steering arm and
install the castellated nut. Tighten the nut to the
specified torque and secure it with a new split pin. (9) Install the wheel and lower the vehicle to the
ground. (10) Check and if necessary, adjust the front
wheel toe in as described in the Front Suspension
section. Ensure that the rubber boots are not distorted
or twisted when the adjustment is completed.