NISSAN TEANA 2014 Service Manual
Manufacturer: NISSAN, Model Year: 2014, Model line: TEANA, Model: NISSAN TEANA 2014Pages: 4801, PDF Size: 51.2 MB
Page 2431 of 4801
FRONT BUMPEREXT-17
< REMOVAL AND INSTALLATION >
C
D E
F
G H
I
J
L
M A
B
EXT
N
O P
Removal and InstallationINFOID:0000000009460995
REMOVAL
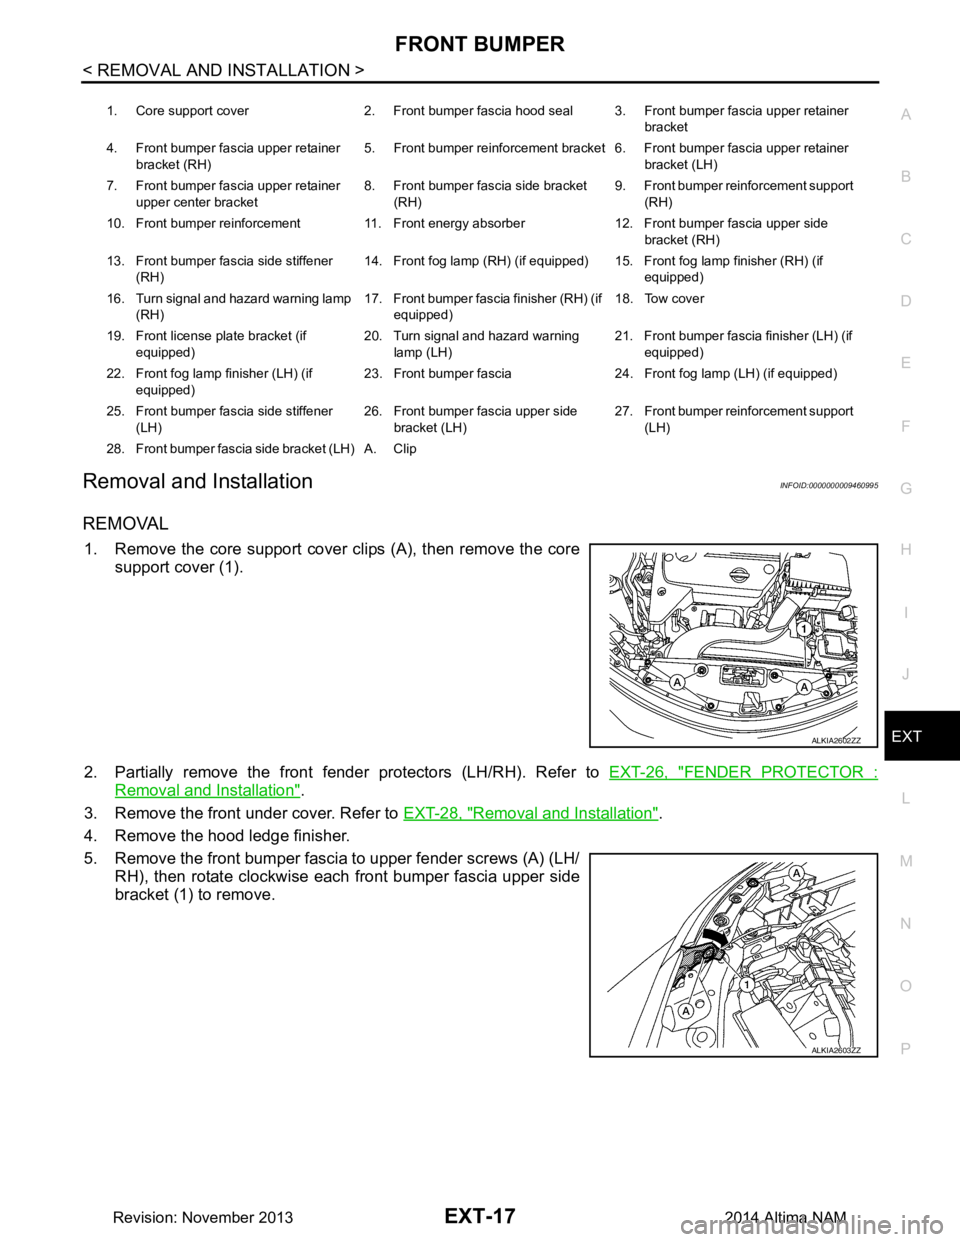
1. Remove the core support cover clips (A), then remove the core support cover (1).
2. Partially remove the front fender protectors (LH/RH). Refer to EXT-26, "FENDER PROTECTOR :
Removal and Installation".
3. Remove the front under cover. Refer to EXT-28, "Removal and Installation"
.
4. Remove the hood ledge finisher.
5. Remove the front bumper fascia to upper fender screws (A) (LH/ RH), then rotate clockwise each front bumper fascia upper side
bracket (1) to remove.
1. Core support cover 2. Front bumper fascia hood seal 3. Front bumper fascia upper retainer
bracket
4. Front bumper fascia upper retainer bracket (RH) 5. Front bumper reinforcement bracket 6. Front bumper fascia upper retainer
bracket (LH)
7. Front bumper fascia upper retainer upper center bracket 8. Front bumper fascia side bracket
(RH) 9. Front bumper reinforcement support
(RH)
10. Front bumper reinforcement 11. Front energy absorber 12. Front bumper fascia upper side bracket (RH)
13. Front bumper fascia side stiffener (RH) 14. Front fog lamp (RH) (if equipped) 15. Front fog lamp finisher (RH) (if
equipped)
16. Turn signal and hazard warning lamp (RH) 17. Front bumper fascia finisher (RH) (if
equipped) 18. Tow cover
19. Front license plate bracket (if equipped) 20. Turn signal and hazard warning
lamp (LH) 21. Front bumper fascia finisher (LH) (if
equipped)
22. Front fog lamp finisher (LH) (if equipped) 23. Front bumper fascia 24. Front fog lamp (LH) (if equipped)
25. Front bumper fascia side stiffener (LH) 26. Front bumper fascia upper side
bracket (LH) 27. Front bumper reinforcement support
(LH)
28. Front bumper fascia side bracket (LH) A. Clip
ALKIA2602ZZ
ALKIA2603ZZ
Revision: November 20132014 Altima NAM
Page 2432 of 4801
EXT-18
< REMOVAL AND INSTALLATION >
FRONT BUMPER
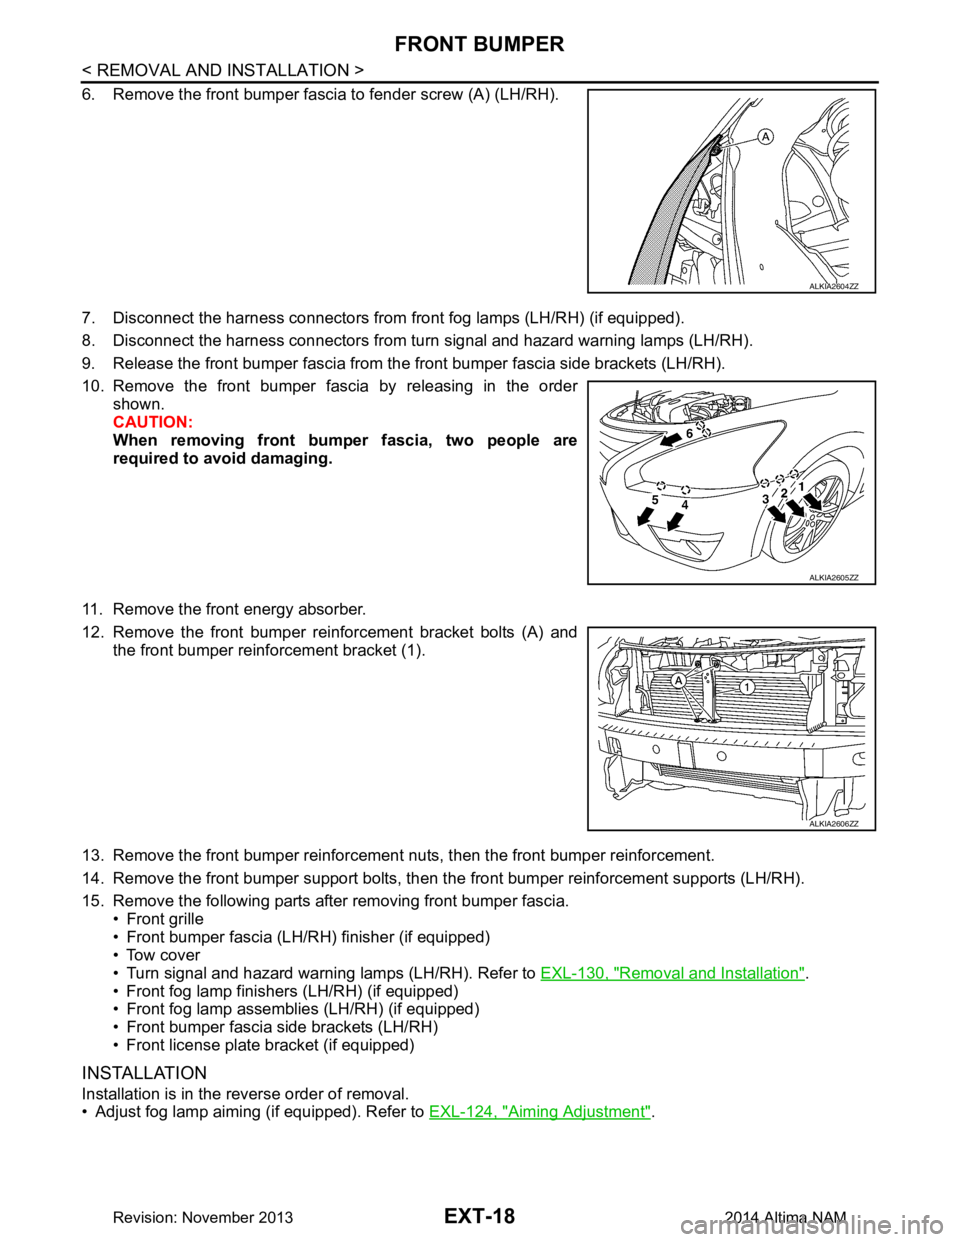
6. Remove the front bumper fascia to fender screw (A) (LH/RH).
7. Disconnect the harness connectors from front fog lamps (LH/RH) (if equipped).
8. Disconnect the harness connectors from turn signal and hazard warning lamps (LH/RH).
9. Release the front bumper fascia from the front bumper fascia side brackets (LH/RH).
10. Remove the front bumper fascia by releasing in the order shown.
CAUTION:
When removing front bumper fascia, two people are
required to avoid damaging.
11. Remove the front energy absorber.
12. Remove the front bumper reinforcement bracket bolts (A) and the front bumper reinforcement bracket (1).
13. Remove the front bumper reinforcement nuts, then the front bumper reinforcement.
14. Remove the front bumper support bolts, then t he front bumper reinforcement supports (LH/RH).
15. Remove the following parts after removing front bumper fascia. • Front grille
• Front bumper fascia (LH/RH) finisher (if equipped)
• Tow cover
• Turn signal and hazard warning lamps (LH/RH). Refer to EXL-130, "Removal and Installation"
.
• Front fog lamp finishers (LH/RH) (if equipped)
• Front fog lamp assemblies (LH/RH) (if equipped)
• Front bumper fascia side brackets (LH/RH)
• Front license plate bracket (if equipped)
INSTALLATION
Installation is in the reverse order of removal.
• Adjust fog lamp aiming (if equipped). Refer to EXL-124, "Aiming Adjustment"
.
ALKIA2604ZZ
ALKIA2605ZZ
ALKIA2606ZZ
Revision: November 20132014 Altima NAM
Page 2433 of 4801
FRONT BUMPEREXT-19
< REMOVAL AND INSTALLATION >
C
D E
F
G H
I
J
L
M A
B
EXT
N
O P
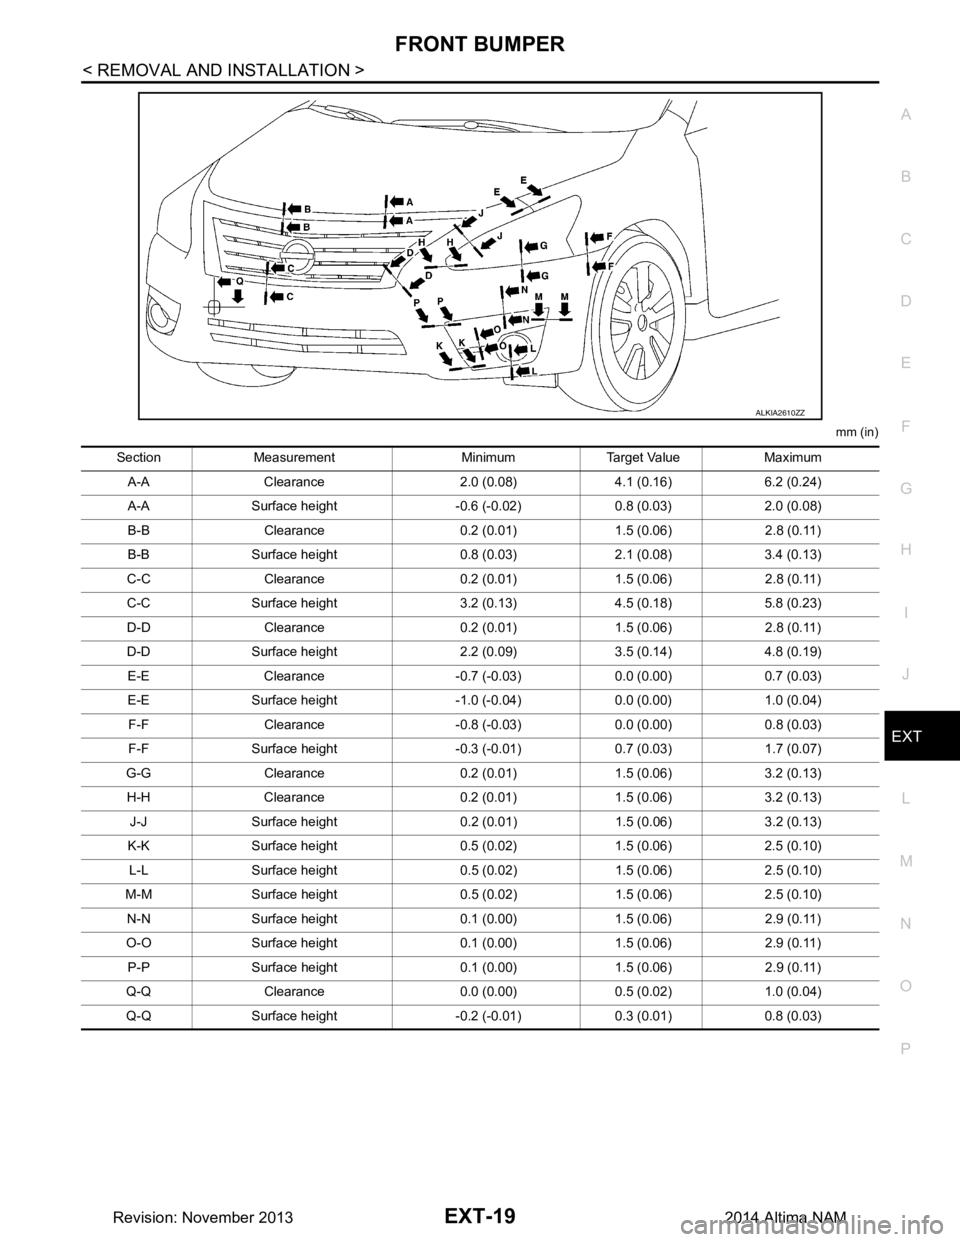
mm (in)
ALKIA2610ZZ
Section Measurement Minimum Target Value Maximum A-A Clearance 2.0 (0.08) 4.1 (0.16) 6.2 (0.24)
A-A Surface height -0.6 (-0.02) 0.8 (0.03) 2.0 (0.08)
B-B Clearance 0.2 (0.01) 1.5 (0.06) 2.8 (0.11)
B-B Surface height 0.8 (0.03) 2.1 (0.08) 3.4 (0.13)
C-C Clearance 0.2 (0.01) 1.5 (0.06) 2.8 (0.11)
C-C Surface height 3.2 (0.13) 4.5 (0.18) 5.8 (0.23)
D-D Clearance 0.2 (0.01) 1.5 (0.06) 2.8 (0.11)
D-D Surface height 2.2 (0.09) 3.5 (0.14) 4.8 (0.19) E-E Clearance -0.7 (-0.03) 0.0 (0.00) 0.7 (0.03)
E-E Surface height -1.0 (-0.04) 0.0 (0.00) 1.0 (0.04) F-F Clearance -0.8 (-0.03) 0.0 (0.00) 0.8 (0.03)
F-F Surface height -0.3 (-0.01) 0.7 (0.03) 1.7 (0.07)
G-G Clearance 0.2 (0.01) 1.5 (0.06) 3.2 (0.13)
H-H Clearance 0.2 (0.01) 1.5 (0.06) 3.2 (0.13) J-J Surface height 0.2 (0.01) 1.5 (0.06) 3.2 (0.13)
K-K Surface height 0.5 (0.02) 1.5 (0.06) 2.5 (0.10) L-L Surface height 0.5 (0.02) 1.5 (0.06) 2.5 (0.10)
M-M Surface height 0.5 (0.02) 1.5 (0.06) 2.5 (0.10) N-N Surface height 0.1 (0.00) 1.5 (0.06) 2.9 (0.11)
O-O Surface height 0.1 (0.00) 1.5 (0.06) 2.9 (0.11) P-P Surface height 0.1 (0.00) 1.5 (0.06) 2.9 (0.11)
Q-Q Clearance 0.0 (0.00) 0.5 (0.02) 1.0 (0.04)
Q-Q Surface height -0.2 (-0.01) 0.3 (0.01) 0.8 (0.03)
Revision: November 20132014 Altima NAM
Page 2434 of 4801
EXT-20
< REMOVAL AND INSTALLATION >
REAR BUMPER
REAR BUMPER
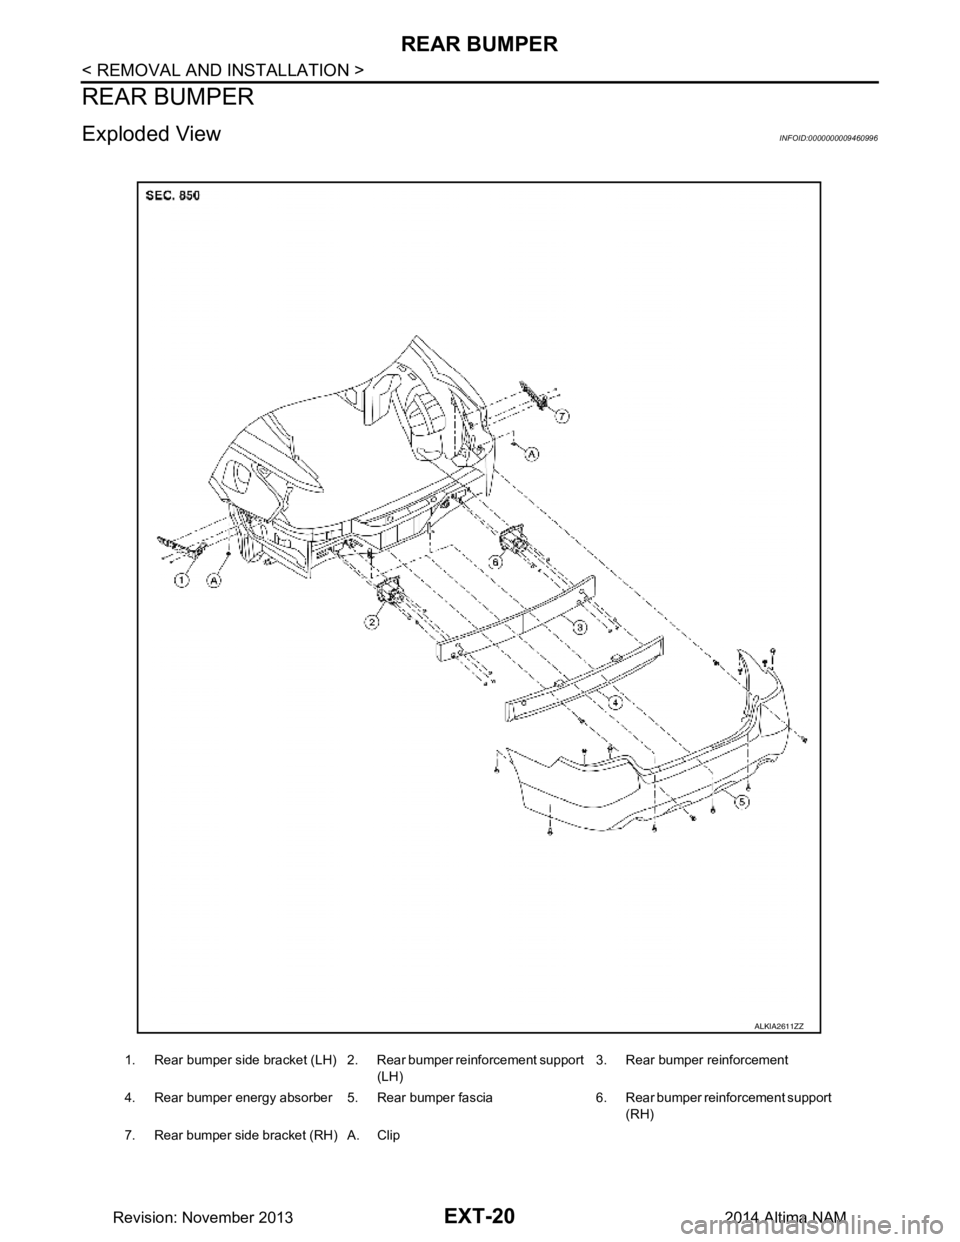
Exploded ViewINFOID:0000000009460996
1. Rear bumper side bracket (LH) 2. Rear bumper reinforcement support (LH)3. Rear bumper reinforcement
4. Rear bumper energy absorber 5. Rear bumper fascia 6. Rear bumper reinforcement support (RH)
7. Rear bumper side bracket (RH) A. Clip
ALKIA2611ZZ
Revision: November 20132014 Altima NAM
Page 2435 of 4801
REAR BUMPEREXT-21
< REMOVAL AND INSTALLATION >
C
D E
F
G H
I
J
L
M A
B
EXT
N
O P
Removal and InstallationINFOID:0000000009460997
REMOVAL
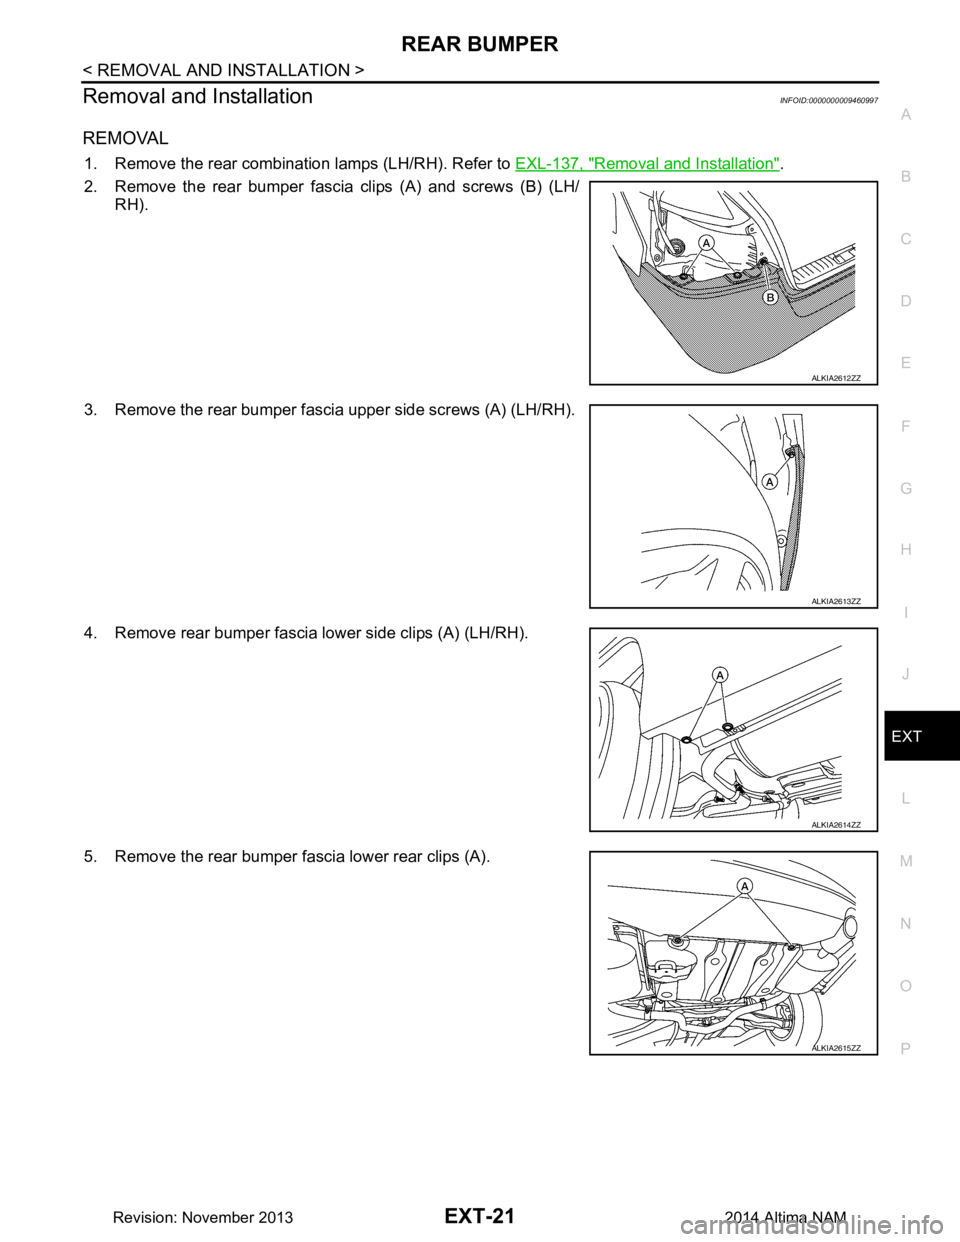
1. Remove the rear combination lamps (LH/RH). Refer to EXL-137, "Removal and Installation".
2. Remove the rear bumper fascia clips (A) and screws (B) (LH/ RH).
3. Remove the rear bumper fascia upper side screws (A) (LH/RH).
4. Remove rear bumper fascia lower side clips (A) (LH/RH).
5. Remove the rear bumper fascia lower rear clips (A).
ALKIA2612ZZ
ALKIA2613ZZ
ALKIA2614ZZ
ALKIA2615ZZ
Revision: November 20132014 Altima NAM
Page 2436 of 4801
EXT-22
< REMOVAL AND INSTALLATION >
REAR BUMPER
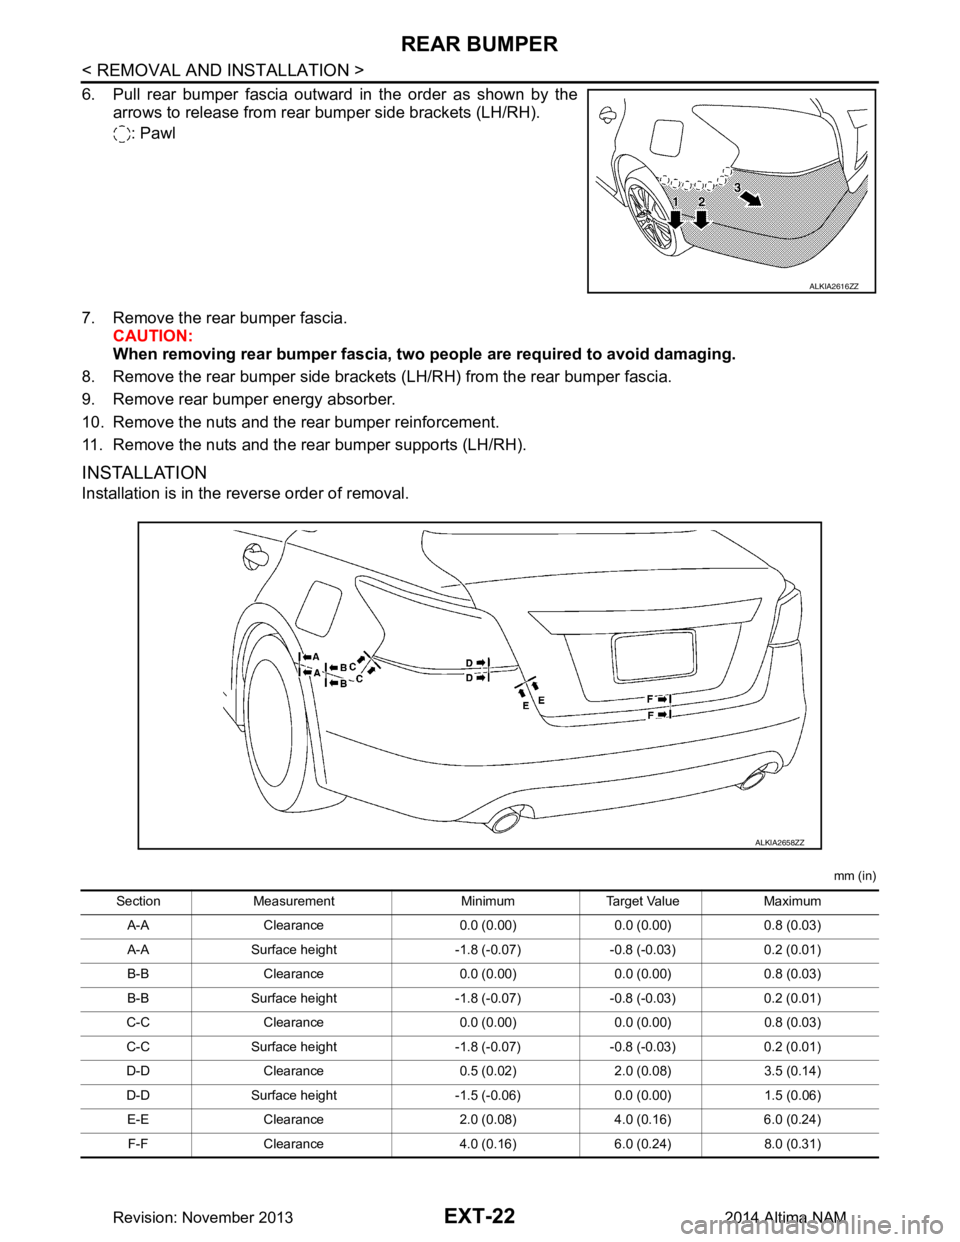
6. Pull rear bumper fascia outward in the order as shown by thearrows to release from rear bumper side brackets (LH/RH).
: Pawl
7. Remove the rear bumper fascia. CAUTION:
When removing rear bumper fascia, two people are required to avoid damaging.
8. Remove the rear bumper side brackets (LH/RH) from the rear bumper fascia.
9. Remove rear bumper energy absorber.
10. Remove the nuts and the rear bumper reinforcement.
11. Remove the nuts and the rear bumper supports (LH/RH).
INSTALLATION
Installation is in the reverse order of removal.
mm (in)
ALKIA2616ZZ
ALKIA2658ZZ
Section Measurement Minimum Target Value Maximum
A-A Clearance 0.0 (0.00) 0.0 (0.00) 0.8 (0.03)
A-A Surface height -1.8 (-0.07) -0.8 (-0.03) 0.2 (0.01)
B-B Clearance 0.0 (0.00) 0.0 (0.00) 0.8 (0.03)
B-B Surface height -1.8 (-0.07) -0.8 (-0.03) 0.2 (0.01)
C-C Clearance 0.0 (0.00) 0.0 (0.00) 0.8 (0.03)
C-C Surface height -1.8 (-0.07) -0.8 (-0.03) 0.2 (0.01)
D-D Clearance 0.5 (0.02) 2.0 (0.08) 3.5 (0.14)
D-D Surface height -1.5 (-0.06) 0.0 (0.00) 1.5 (0.06) E-E Clearance 2.0 (0.08) 4.0 (0.16) 6.0 (0.24)
F-F Clearance 4.0 (0.16) 6.0 (0.24) 8.0 (0.31)
Revision: November 20132014 Altima NAM
Page 2437 of 4801
FRONT GRILLEEXT-23
< REMOVAL AND INSTALLATION >
C
D E
F
G H
I
J
L
M A
B
EXT
N
O P
FRONT GRILLE
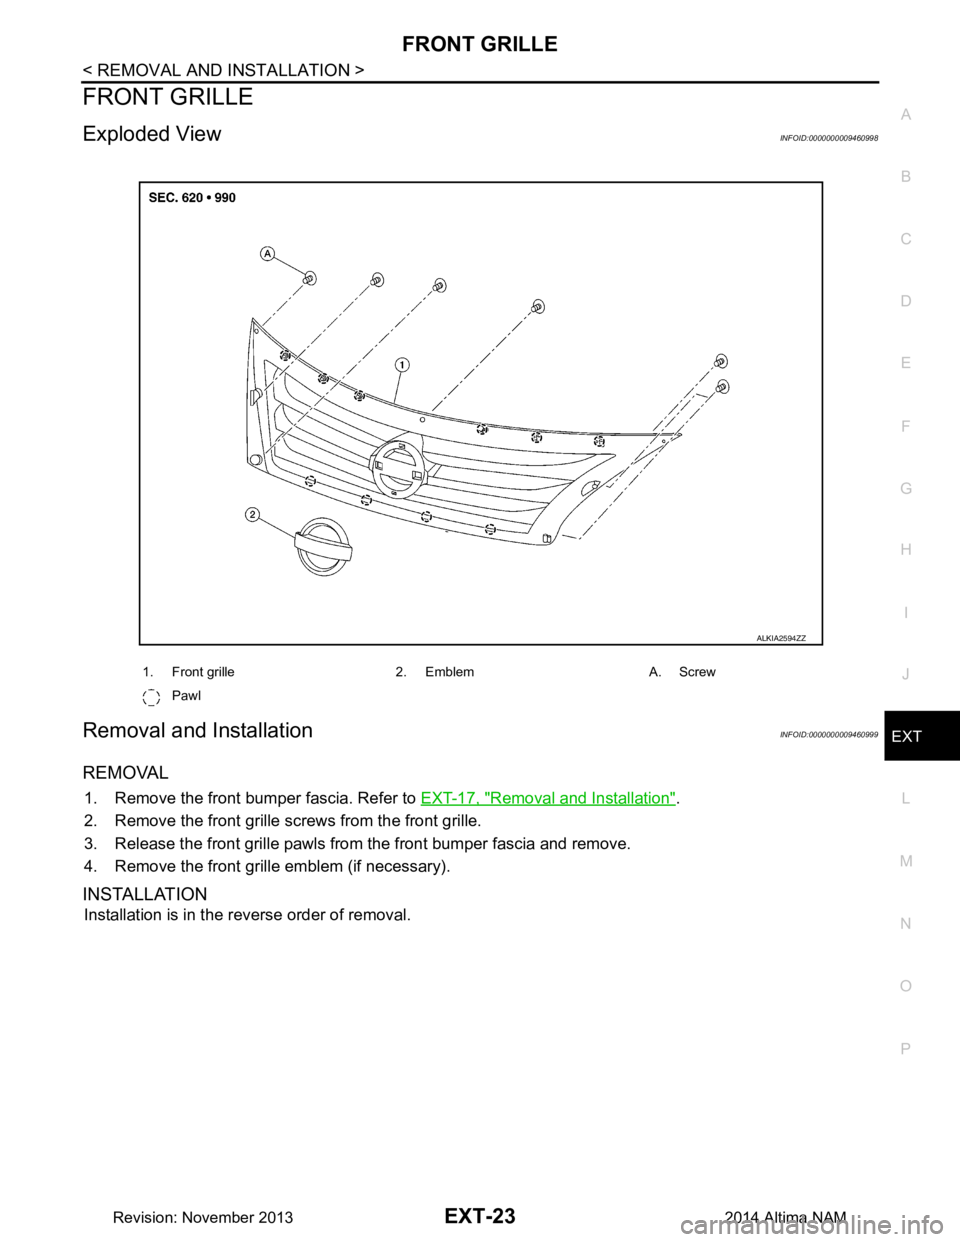
Exploded ViewINFOID:0000000009460998
Removal and InstallationINFOID:0000000009460999
REMOVAL
1. Remove the front bumper fascia. Refer to EXT-17, "Removal and Installation".
2. Remove the front grille screws from the front grille.
3. Release the front grille pawls from the front bumper fascia and remove.
4. Remove the front grille emblem (if necessary).
INSTALLATION
Installation is in the reverse order of removal.
1. Front grille 2. Emblem A. Screw
Pawl
ALKIA2594ZZ
Revision: November 20132014 Altima NAM
Page 2438 of 4801
EXT-24
< REMOVAL AND INSTALLATION >
COWL TOP
COWL TOP
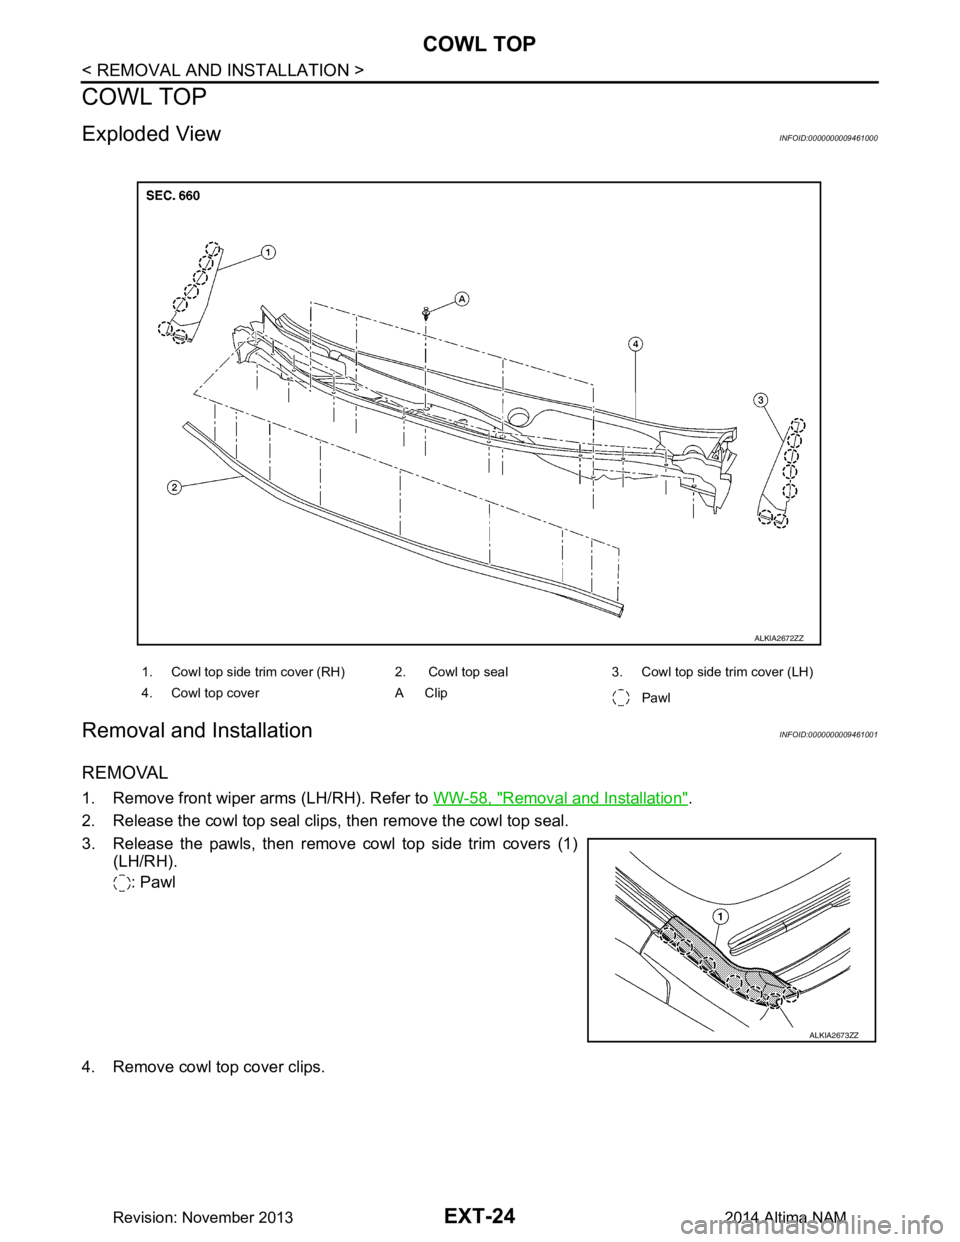
Exploded ViewINFOID:0000000009461000
Removal and InstallationINFOID:0000000009461001
REMOVAL
1. Remove front wiper arms (LH/RH). Refer to WW-58, "Removal and Installation".
2. Release the cowl top seal clips, then remove the cowl top seal.
3. Release the pawls, then remove cowl top side trim covers (1) (LH/RH).
: Pawl
4. Remove cowl top cover clips.
1. Cowl top side trim cover (RH) 2. Cowl top seal 3. Cowl top side trim cover (LH)
4. Cowl top cover A Clip Pawl
ALKIA2672ZZ
ALKIA2673ZZ
Revision: November 20132014 Altima NAM
Page 2439 of 4801
COWL TOPEXT-25
< REMOVAL AND INSTALLATION >
C
D E
F
G H
I
J
L
M A
B
EXT
N
O P
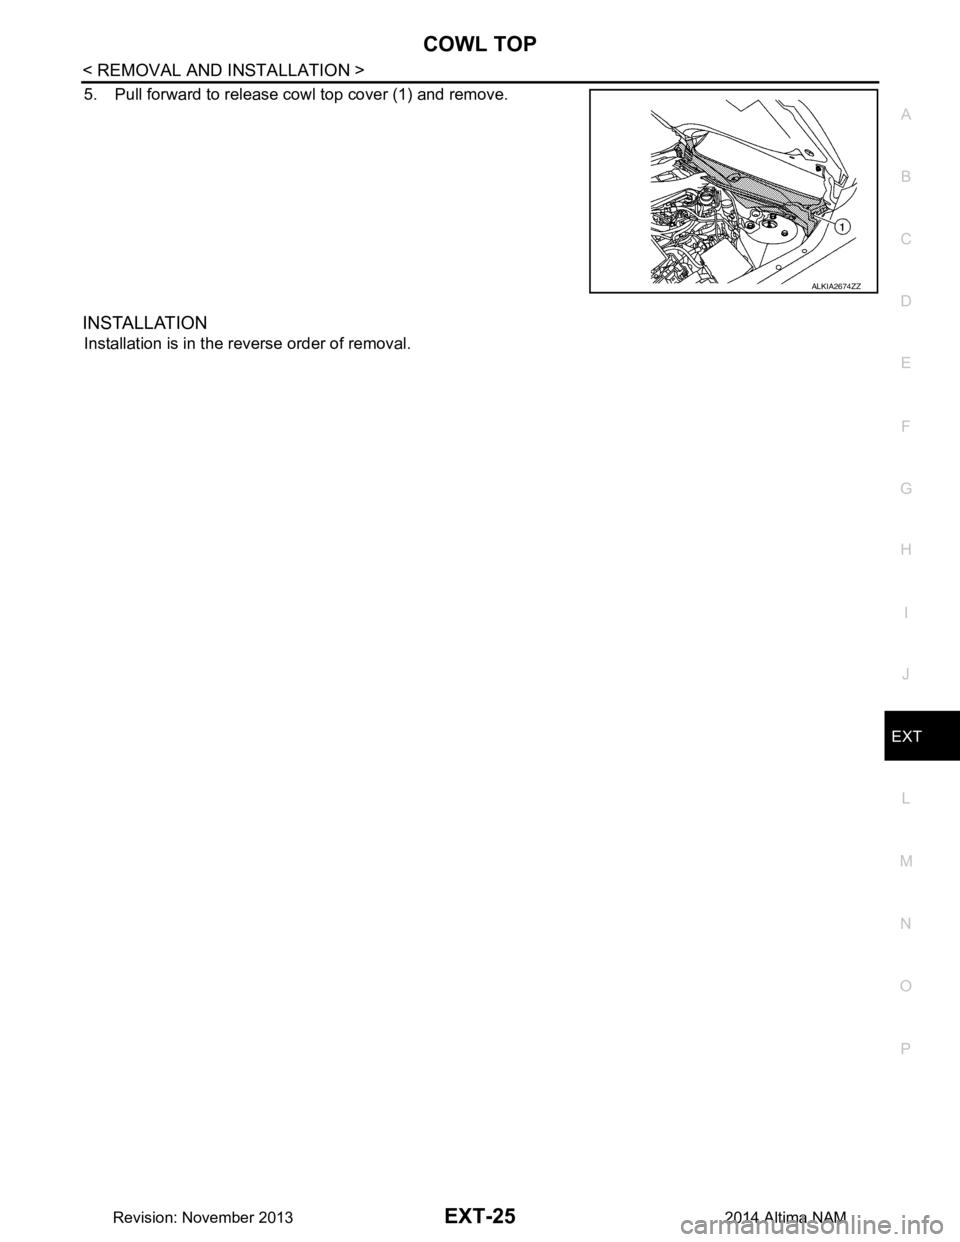
5. Pull forward to release cowl top cover (1) and remove.
INSTALLATION
Installation is in the reverse order of removal.
ALKIA2674ZZ
Revision: November 20132014 Altima NAM
Page 2440 of 4801
EXT-26
< REMOVAL AND INSTALLATION >
FENDER PROTECTOR
FENDER PROTECTOR
FENDER PROTECTOR
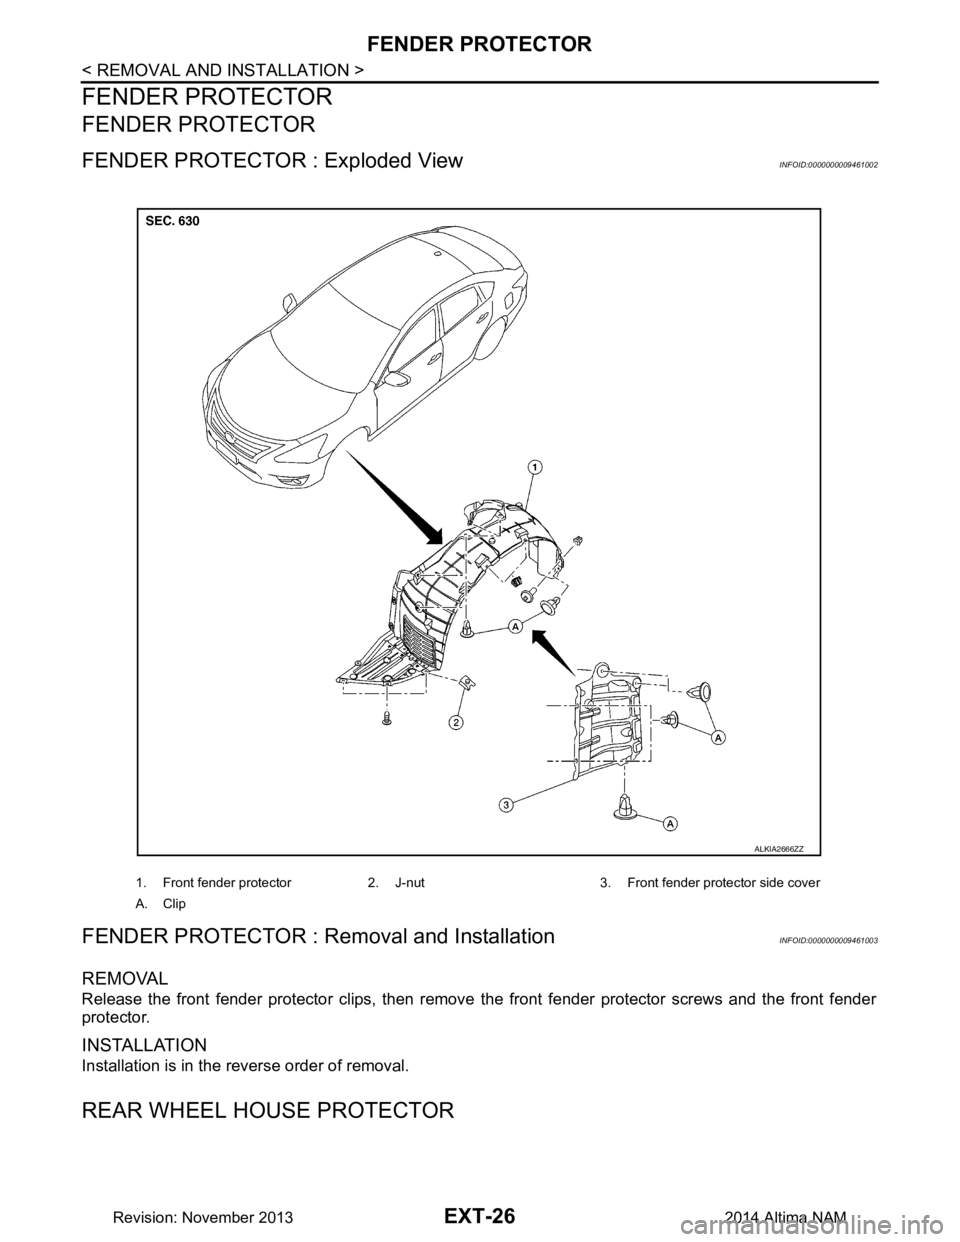
FENDER PROTECTOR : Exploded ViewINFOID:0000000009461002
FENDER PROTECTOR : Removal and InstallationINFOID:0000000009461003
REMOVAL
Release the front fender protector clips, then remove the front fender protector screws and the front fender
protector.
INSTALLATION
Installation is in the reverse order of removal.
REAR WHEEL HOUSE PROTECTOR
1. Front fender protector 2. J-nut 3. Front fender protector side cover
A. Clip
ALKIA2666ZZ
Revision: November 20132014 Altima NAM