NISSAN TERRANO 2002 Service Repair Manual
TERRANO 2002
NISSAN
NISSAN
https://www.carmanualsonline.info/img/5/57393/w960_57393-0.png
NISSAN TERRANO 2002 Service Repair Manual
Trending: hood release, recommended oil, height, compression ratio, sc-27, spare tire, ECO mode
Page 1691 of 1767
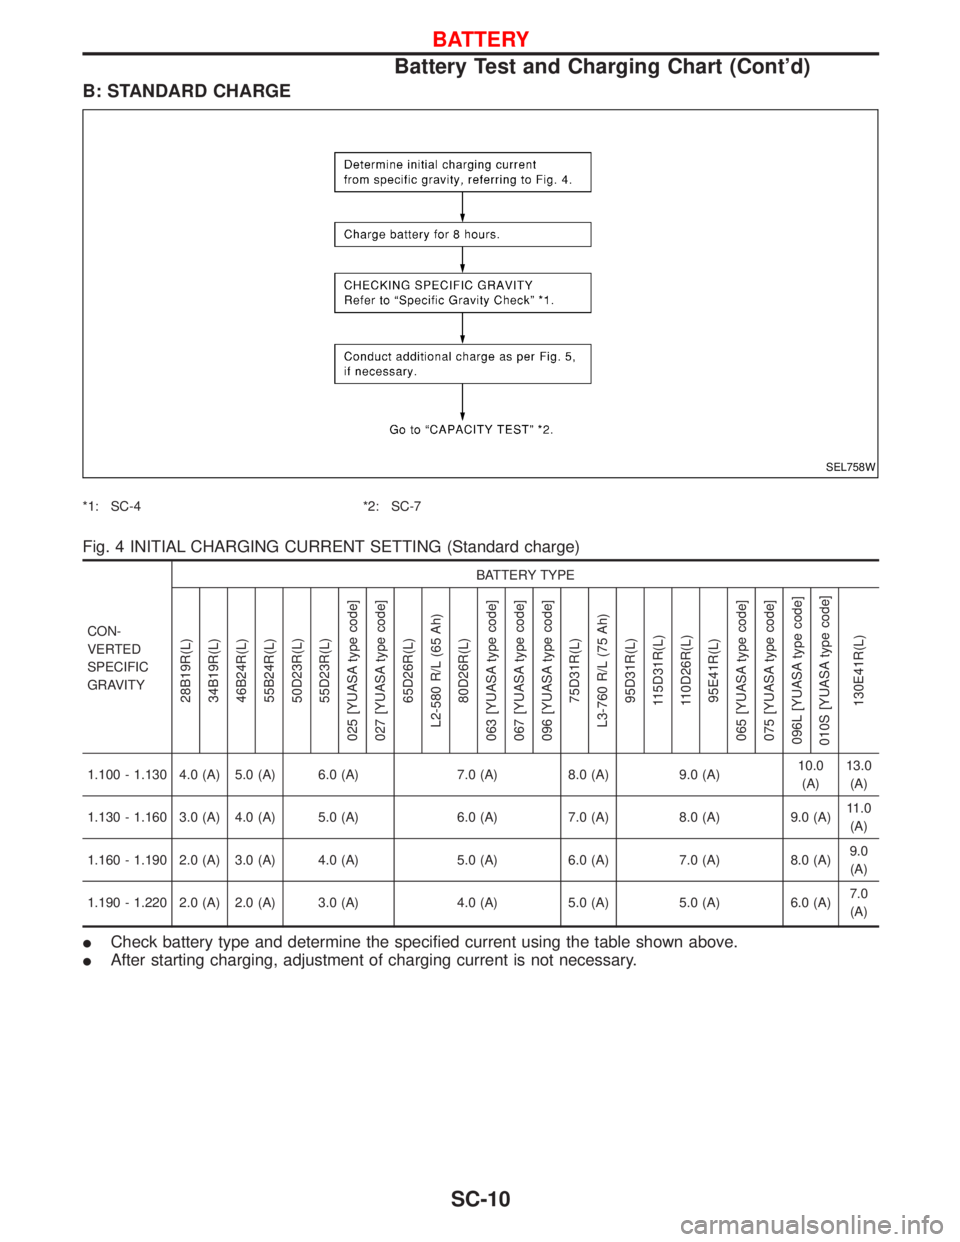
B: STANDARD CHARGE
*1: SC-4 *2: SC-7
Fig. 4 INITIAL CHARGING CURRENT SETTING (Standard charge)
CON-
VERTED
SPECIFIC
GRAVITYBATTERY TYPE
28B19R(L)
34B19R(L)
46B24R(L)
55B24R(L)
50D23R(L)
55D23R(L)
025 [YUASA type code]
027 [YUASA type code]
65D26R(L)
L2-580 R/L (65 Ah)
80D26R(L)
063 [YUASA type code]
067 [YUASA type code]
096 [YUASA type code]
75D31R(L)
L3-760 R/L (75 Ah)
95D31R(L)
115D31R(L)
110D26R(L)
95E41R(L)
065 [YUASA type code]
075 [YUASA type code]
096L [YUASA type code]
010S [YUASA type code]
130E41R(L)
1.100 - 1.130 4.0 (A) 5.0 (A) 6.0 (A) 7.0 (A) 8.0 (A) 9.0 (A)10.0
(A)13.0
(A)
1.130 - 1.160 3.0 (A) 4.0 (A) 5.0 (A) 6.0 (A) 7.0 (A) 8.0 (A) 9.0 (A)11.0
(A)
1.160 - 1.190 2.0 (A) 3.0 (A) 4.0 (A) 5.0 (A) 6.0 (A) 7.0 (A) 8.0 (A)9.0
(A)
1.190 - 1.220 2.0 (A) 2.0 (A) 3.0 (A) 4.0 (A) 5.0 (A) 5.0 (A) 6.0 (A)7.0
(A)
ICheck battery type and determine the specified current using the table shown above.
IAfter starting charging, adjustment of charging current is not necessary.
SEL758W
BATTERY
Battery Test and Charging Chart (Cont'd)
SC-10
Page 1692 of 1767
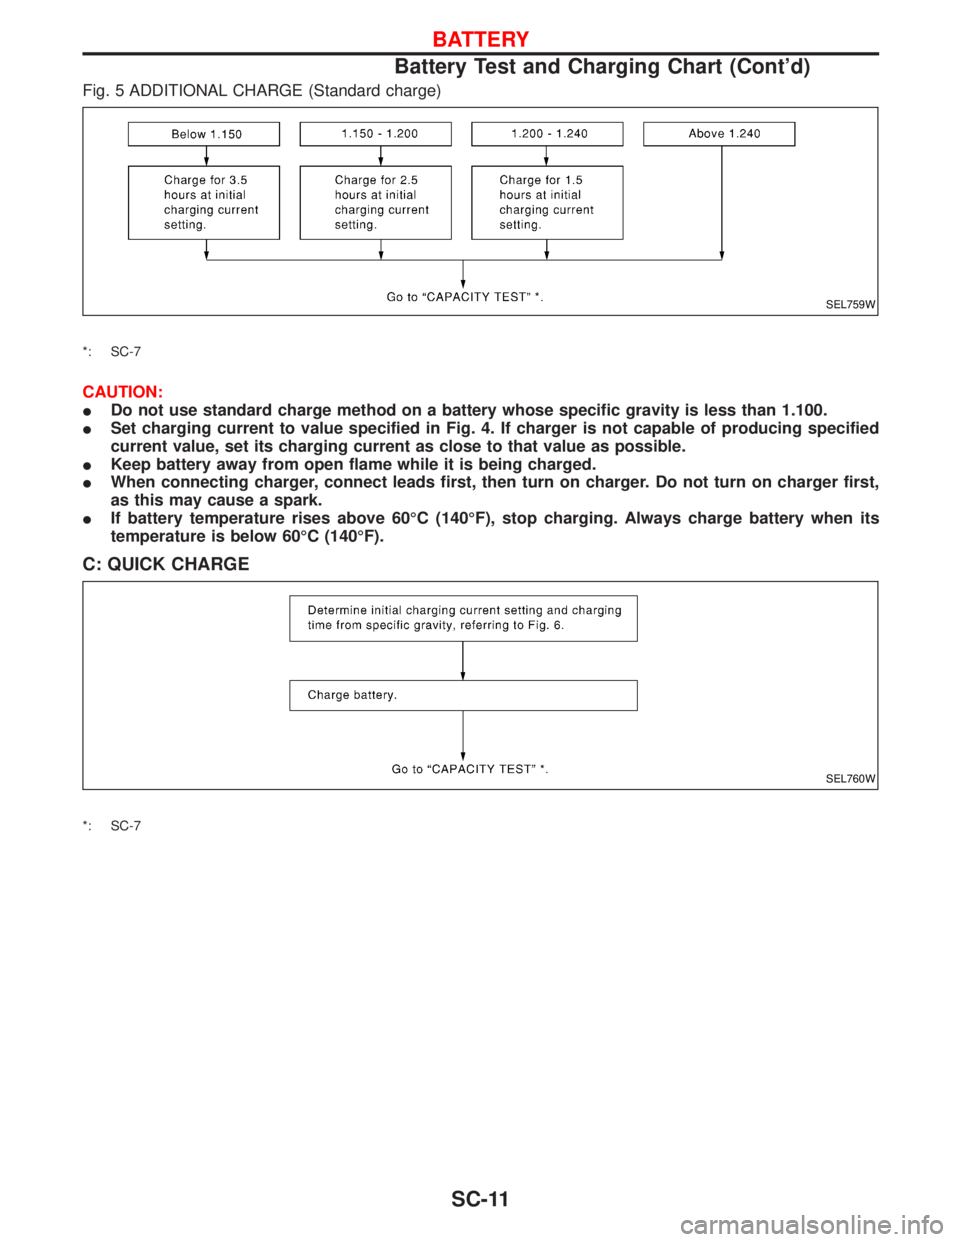
Fig. 5 ADDITIONAL CHARGE (Standard charge)
*: SC-7
CAUTION:
IDo not use standard charge method on a battery whose specific gravity is less than 1.100.
ISet charging current to value specified in Fig. 4. If charger is not capable of producing specified
current value, set its charging current as close to that value as possible.
IKeep battery away from open flame while it is being charged.
IWhen connecting charger, connect leads first, then turn on charger. Do not turn on charger first,
as this may cause a spark.
IIf battery temperature rises above 60ÉC (140ÉF), stop charging. Always charge battery when its
temperature is below 60ÉC (140ÉF).
C: QUICK CHARGE
*: SC-7
SEL759W
SEL760W
BATTERY
Battery Test and Charging Chart (Cont'd)
SC-11
Page 1693 of 1767
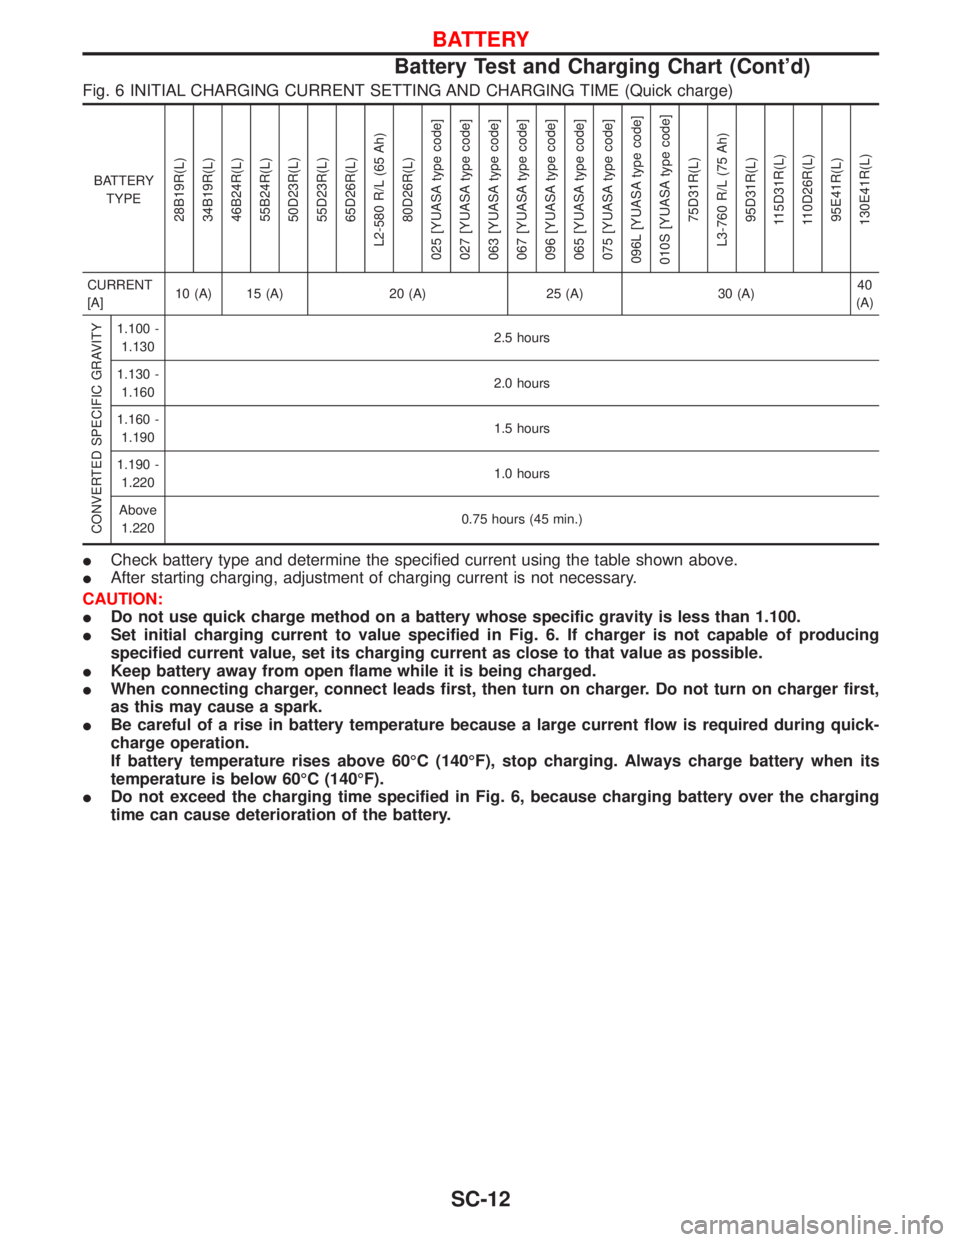
Fig. 6 INITIAL CHARGING CURRENT SETTING AND CHARGING TIME (Quick charge)
BATTERY
TYPE
28B19R(L)
34B19R(L)
46B24R(L)
55B24R(L)
50D23R(L)
55D23R(L)
65D26R(L)
L2-580 R/L (65 Ah)
80D26R(L)
025 [YUASA type code]
027 [YUASA type code]
063 [YUASA type code]
067 [YUASA type code]
096 [YUASA type code]
065 [YUASA type code]
075 [YUASA type code]
096L [YUASA type code]
010S [YUASA type code]
75D31R(L)
L3-760 R/L (75 Ah)
95D31R(L)
115D31R(L)
110D26R(L)
95E41R(L)
130E41R(L)
CURRENT
[A]10 (A) 15 (A) 20 (A) 25 (A) 30 (A)40
(A)
CONVERTED SPECIFIC GRAVITY
1.100 -
1.1302.5 hours
1.130 -
1.1602.0 hours
1.160 -
1.1901.5 hours
1.190 -
1.2201.0 hours
Above
1.2200.75 hours (45 min.)
ICheck battery type and determine the specified current using the table shown above.
IAfter starting charging, adjustment of charging current is not necessary.
CAUTION:
IDo not use quick charge method on a battery whose specific gravity is less than 1.100.
ISet initial charging current to value specified in Fig. 6. If charger is not capable of producing
specified current value, set its charging current as close to that value as possible.
IKeep battery away from open flame while it is being charged.
IWhen connecting charger, connect leads first, then turn on charger. Do not turn on charger first,
as this may cause a spark.
IBe careful of a rise in battery temperature because a large current flow is required during quick-
charge operation.
If battery temperature rises above 60ÉC (140ÉF), stop charging. Always charge battery when its
temperature is below 60ÉC (140ÉF).
IDo not exceed the charging time specified in Fig. 6, because charging battery over the charging
time can cause deterioration of the battery.
BATTERY
Battery Test and Charging Chart (Cont'd)
SC-12
Page 1694 of 1767
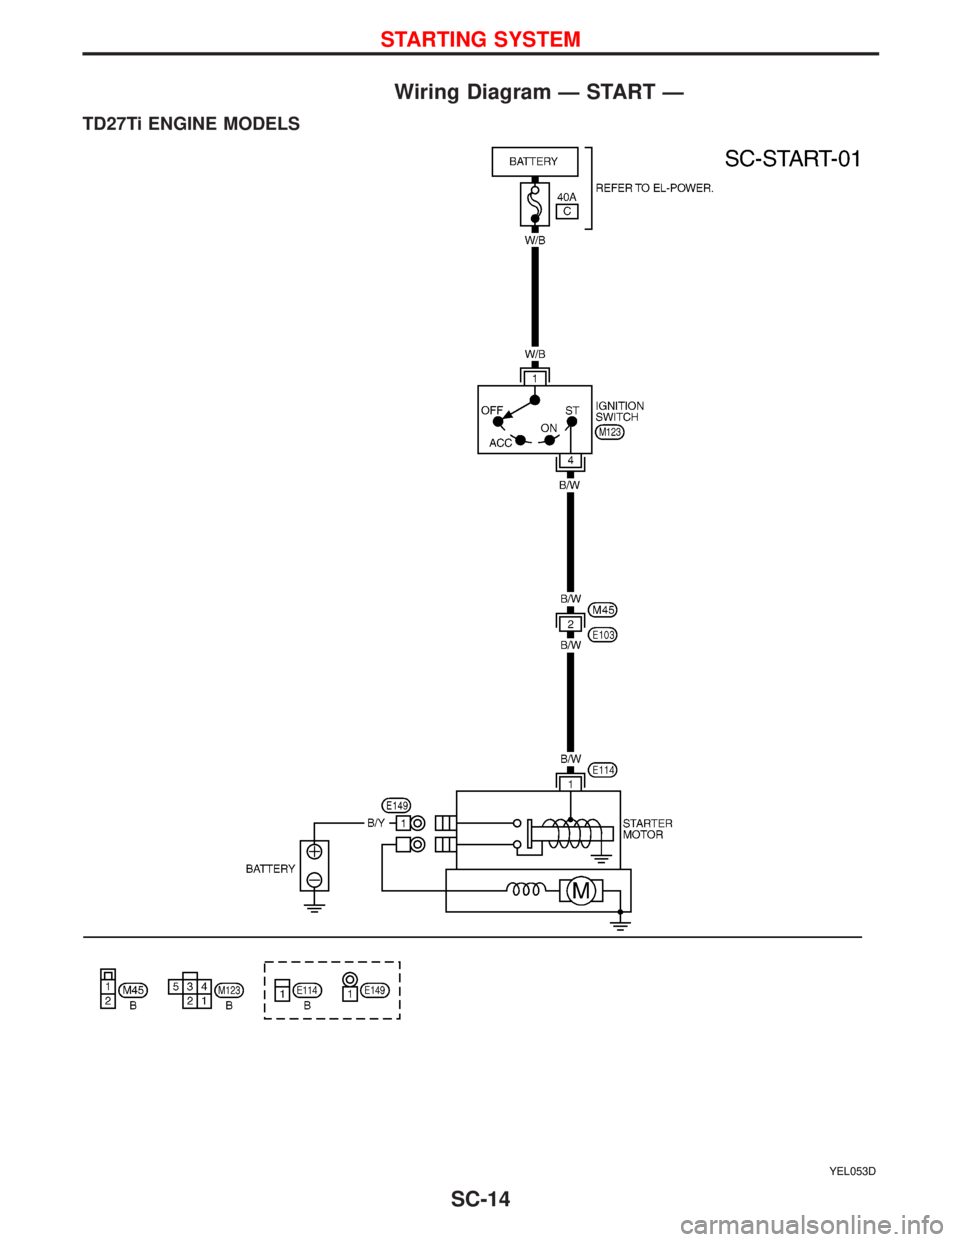
System Description
M/T MODELS
Power is supplied at all times
Ithrough 40A fusible link (letterC, located in the fuse and fusible link box)
Ito ignition switch terminal 1.
With the ignition switch in START position, power is supplied
Ifrom ignition switch terminal 1
Ito starter motor harness connector terminal 4.
The starter motor plunger closes and provides a closed circuit between the battery and starter motor. The
starter motor is grounded to the engine block. With power and ground supplied, cranking occurs and the engine
starts.
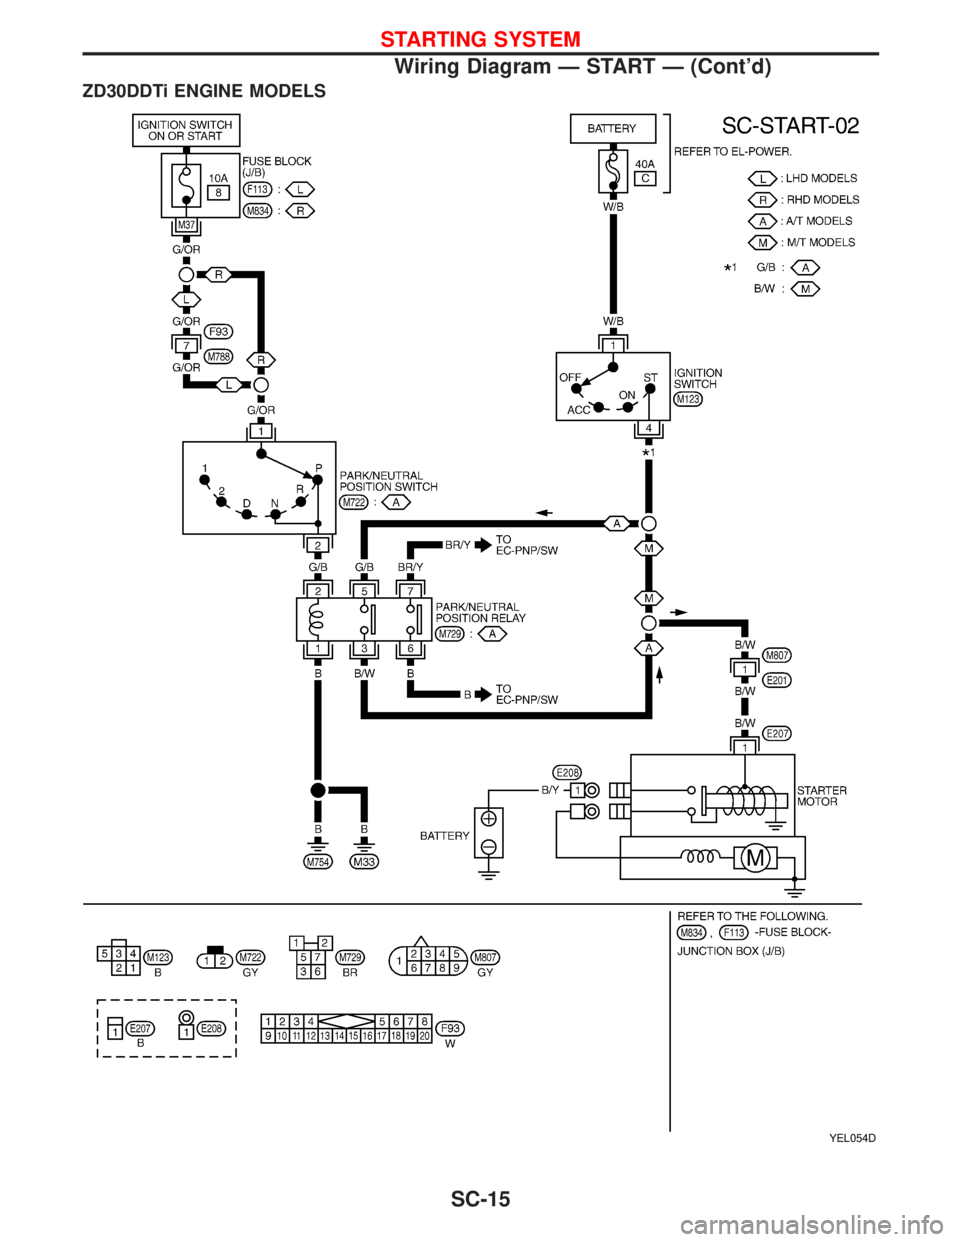
A/T MODELS
Power is supplied at all times
Ithrough 40A fusible link (letterC, located in the fuse and fusible link box)
Ito ignition switch terminal 1.
With the ignition switch in the START position, power is supplied
Ifrom ignition switch terminal 1
Ito park/neutral position relay terminal 4.
With the ignition switch ON or START position, power is supplied
Ithrough 10A fuse [No. 8, located in the fuse block (J/B)]
Ito park/neutral position (PNP) relay terminal 1.
With the selector lever in the P or N position, ground is supplied
Ito park/neutral position relay terminal 2 through the park/neutral position switch
Ifrom body grounds, M754 and M33.
Then park/neutral position relay is energized and power is supplied
Ifrom park/neutral position relay terminal 3
Ito starter motor harness connector terminal 1.
The starter motor plunger closes and provides a closed circuit between the battery and starter motor. The
starter motor is grounded to the engine block. With power and ground supplied, cranking occurs and the engine
starts.
STARTING SYSTEM
SC-13
Page 1695 of 1767
Wiring Diagram Ð START Ð
TD27Ti ENGINE MODELS
YEL053D
STARTING SYSTEM
SC-14
Page 1696 of 1767
ZD30DDTi ENGINE MODELS
YEL054D
STARTING SYSTEM
Wiring Diagram Ð START Ð (Cont'd)
SC-15
Page 1697 of 1767
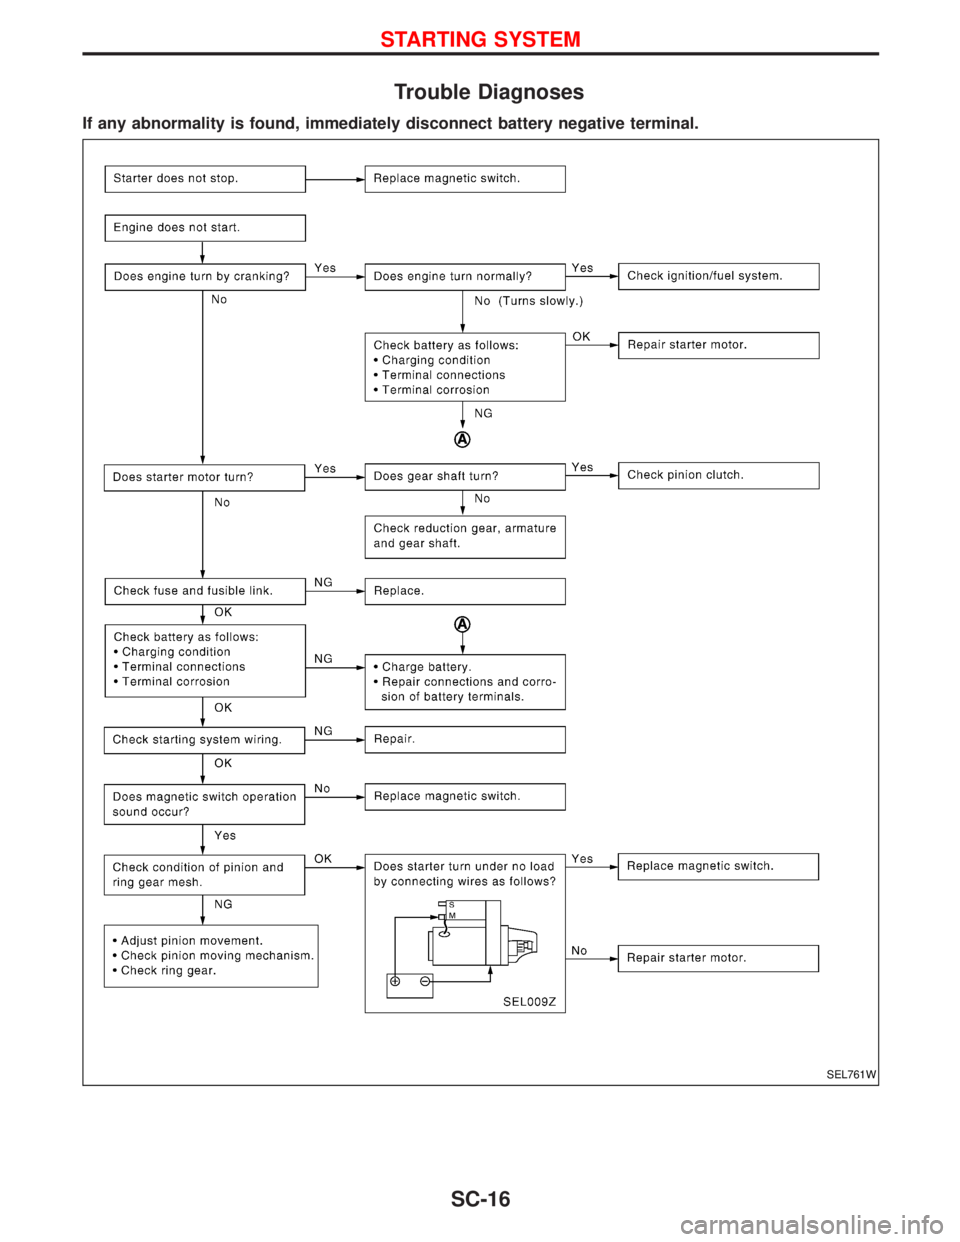
Trouble Diagnoses
If any abnormality is found, immediately disconnect battery negative terminal.
SEL761W
STARTING SYSTEM
SC-16
Page 1698 of 1767
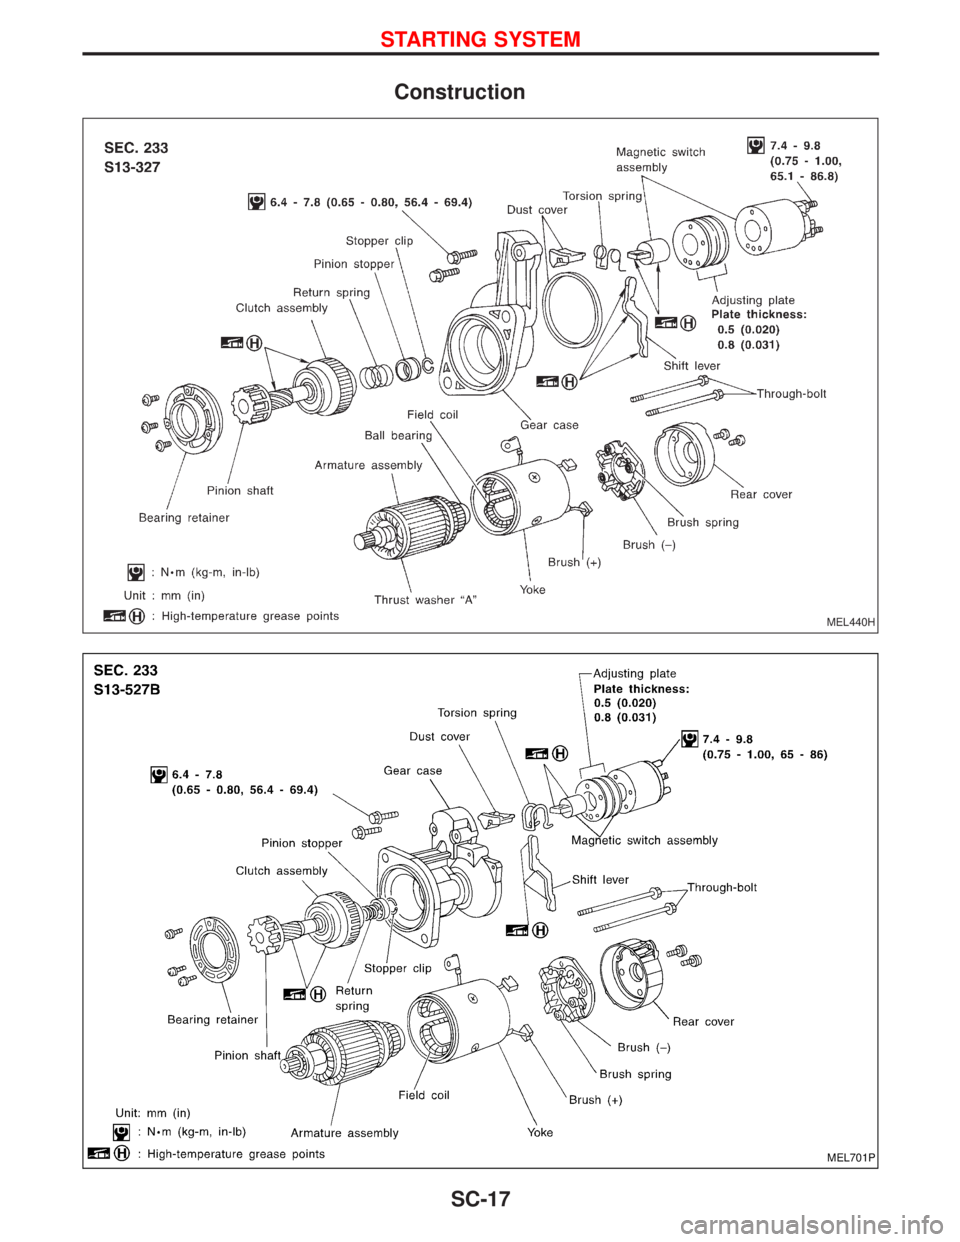
Construction
MEL440H
MEL701P
STARTING SYSTEM
SC-17
Page 1699 of 1767
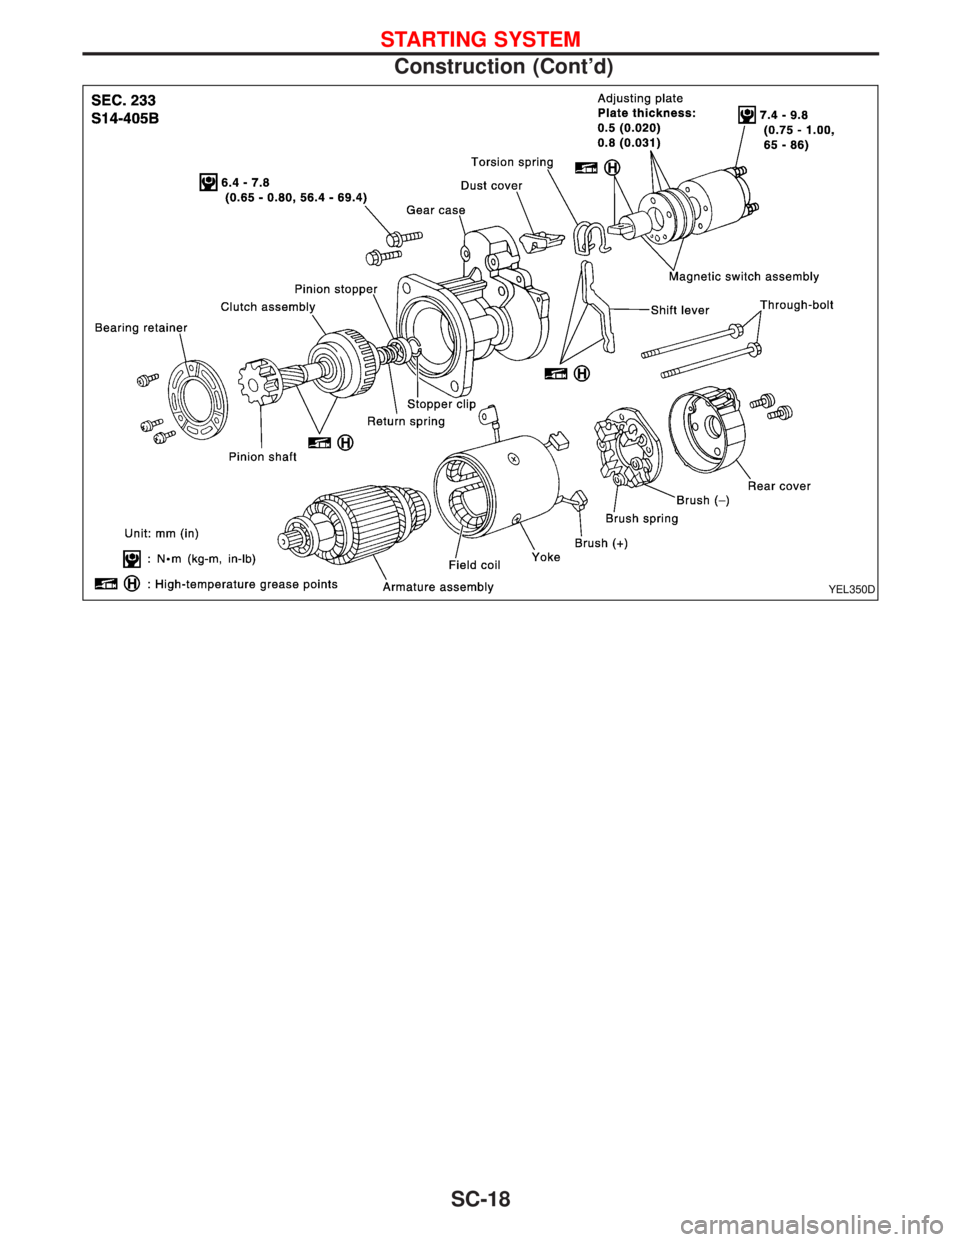
YEL350D
STARTING SYSTEM
Construction (Cont'd)
SC-18
Page 1700 of 1767
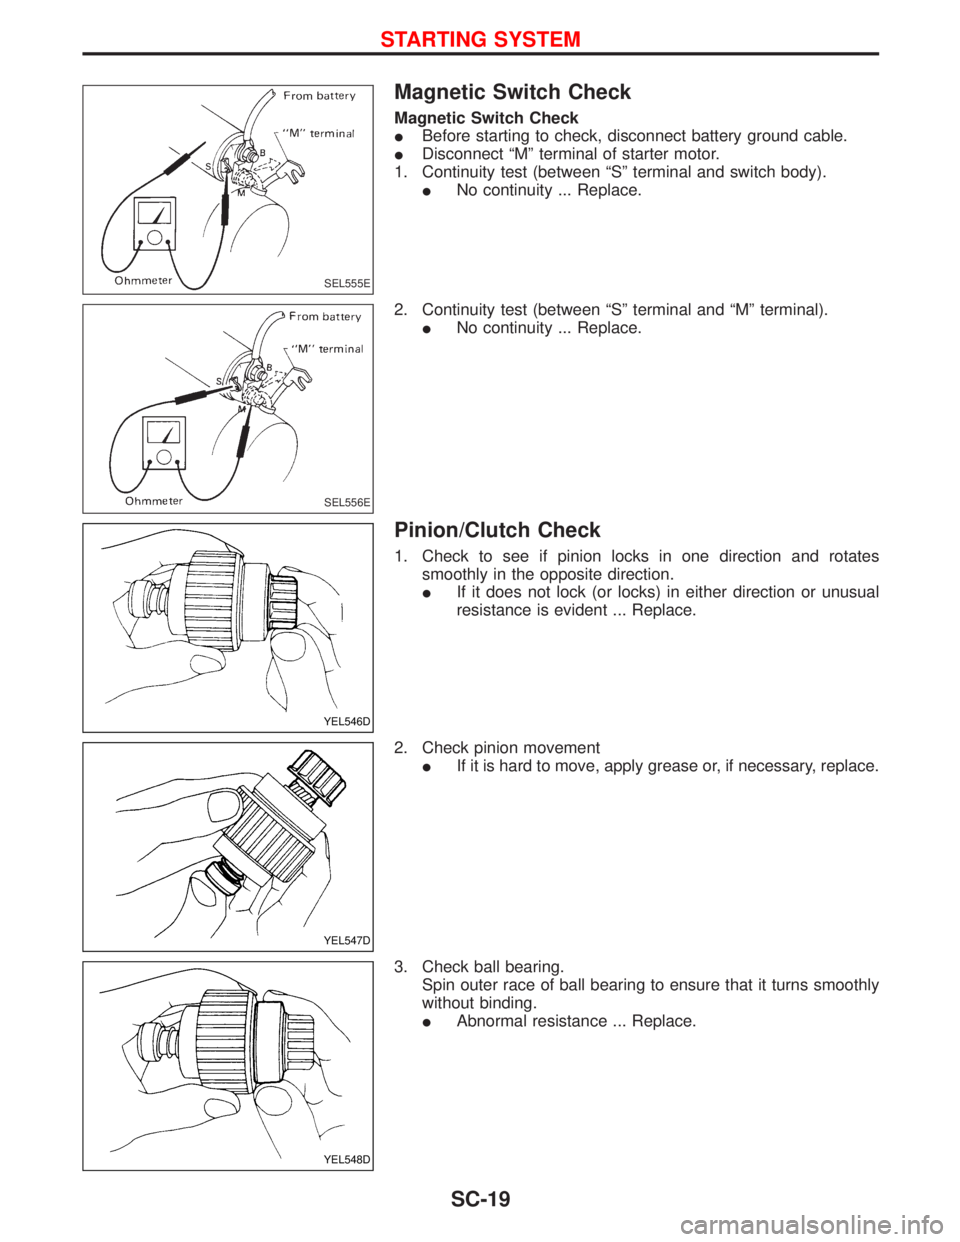
Magnetic Switch Check
Magnetic Switch Check
IBefore starting to check, disconnect battery ground cable.
IDisconnect ªMº terminal of starter motor.
1. Continuity test (between ªSº terminal and switch body).
INo continuity ... Replace.
2. Continuity test (between ªSº terminal and ªMº terminal).
INo continuity ... Replace.
Pinion/Clutch Check
1. Check to see if pinion locks in one direction and rotates
smoothly in the opposite direction.
IIf it does not lock (or locks) in either direction or unusual
resistance is evident ... Replace.
2. Check pinion movement
IIf it is hard to move, apply grease or, if necessary, replace.
3. Check ball bearing.
Spin outer race of ball bearing to ensure that it turns smoothly
without binding.
IAbnormal resistance ... Replace.
SEL555E
SEL556E
YEL546D
YEL547D
YEL548D
STARTING SYSTEM
SC-19
Trending: IDENTIFICATION INFORMATION, warning lights, wheel size, OBD port, sensor, auxiliary battery, service schedule

