NISSAN TERRANO 2002 Service Repair Manual
TERRANO 2002
NISSAN
NISSAN
https://www.carmanualsonline.info/img/5/57393/w960_57393-0.png
NISSAN TERRANO 2002 Service Repair Manual
Trending: sensor, air filter, run flat, service indicator, air bleeding, remote, parking brake
Page 1721 of 1767
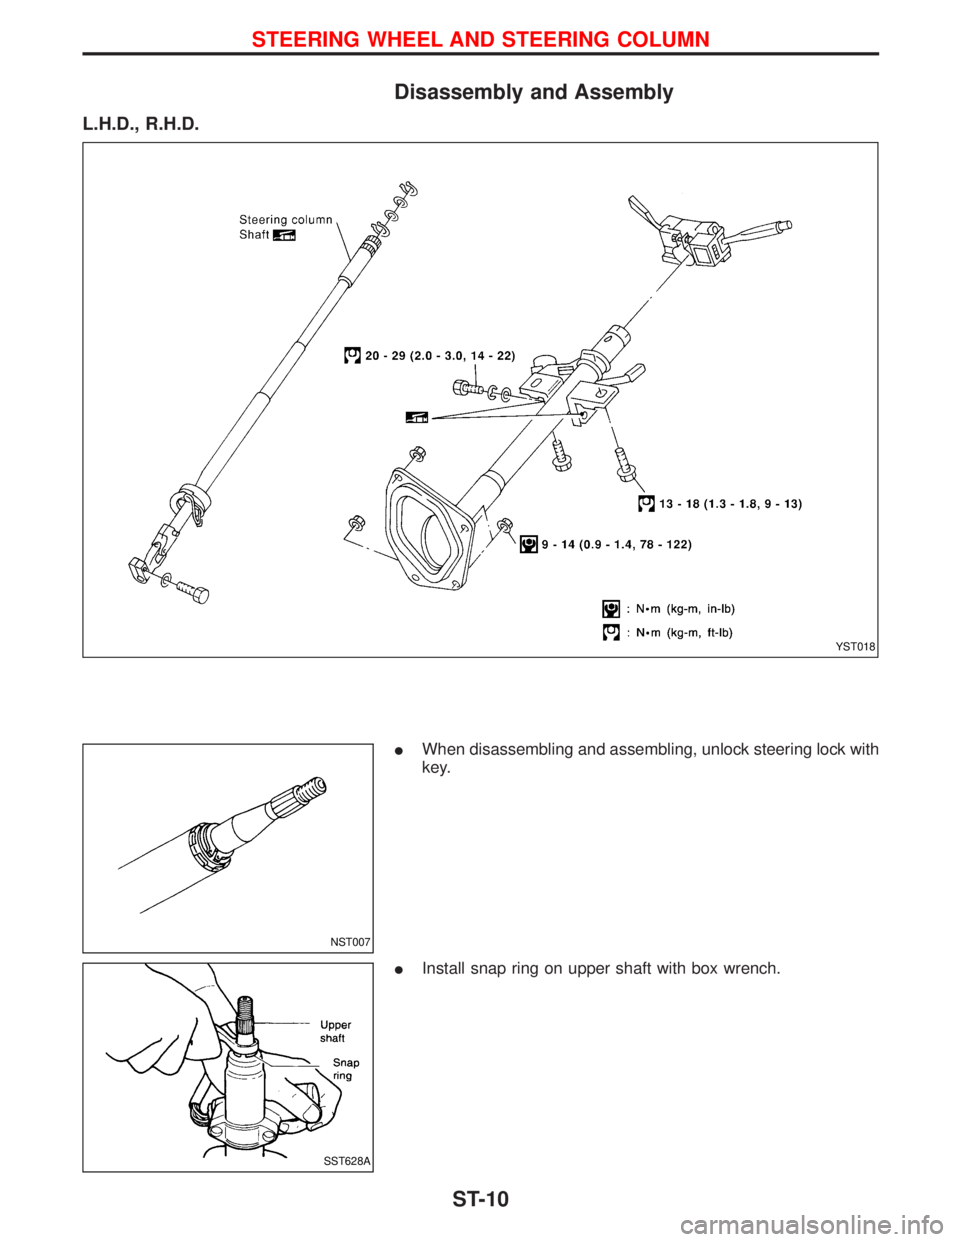
Disassembly and Assembly
L.H.D., R.H.D.
IWhen disassembling and assembling, unlock steering lock with
key.
IInstall snap ring on upper shaft with box wrench.
YST018
NST007
SST628A
STEERING WHEEL AND STEERING COLUMN
ST-10
Page 1722 of 1767
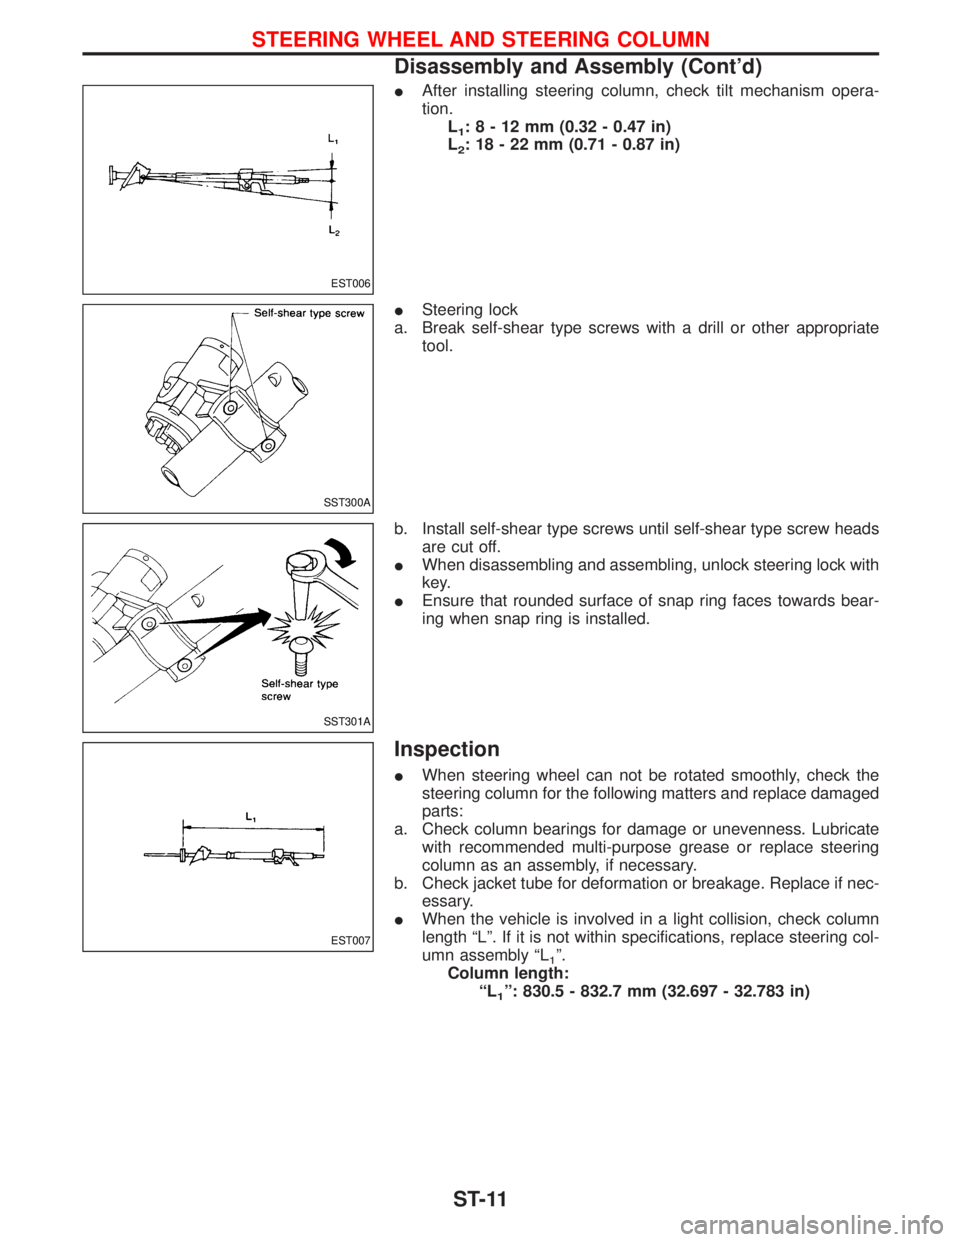
IAfter installing steering column, check tilt mechanism opera-
tion.
L
1:8-12mm(0.32 - 0.47 in)
L
2: 18 - 22 mm (0.71 - 0.87 in)
ISteering lock
a. Break self-shear type screws with a drill or other appropriate
tool.
b. Install self-shear type screws until self-shear type screw heads
are cut off.
IWhen disassembling and assembling, unlock steering lock with
key.
IEnsure that rounded surface of snap ring faces towards bear-
ing when snap ring is installed.
Inspection
IWhen steering wheel can not be rotated smoothly, check the
steering column for the following matters and replace damaged
parts:
a. Check column bearings for damage or unevenness. Lubricate
with recommended multi-purpose grease or replace steering
column as an assembly, if necessary.
b. Check jacket tube for deformation or breakage. Replace if nec-
essary.
IWhen the vehicle is involved in a light collision, check column
length ªLº. If it is not within specifications, replace steering col-
umn assembly ªL
1º.
Column length:
ªL
1º: 830.5 - 832.7 mm (32.697 - 32.783 in)
EST006
SST300A
SST301A
EST007
STEERING WHEEL AND STEERING COLUMN
Disassembly and Assembly (Cont'd)
ST-11
Page 1723 of 1767
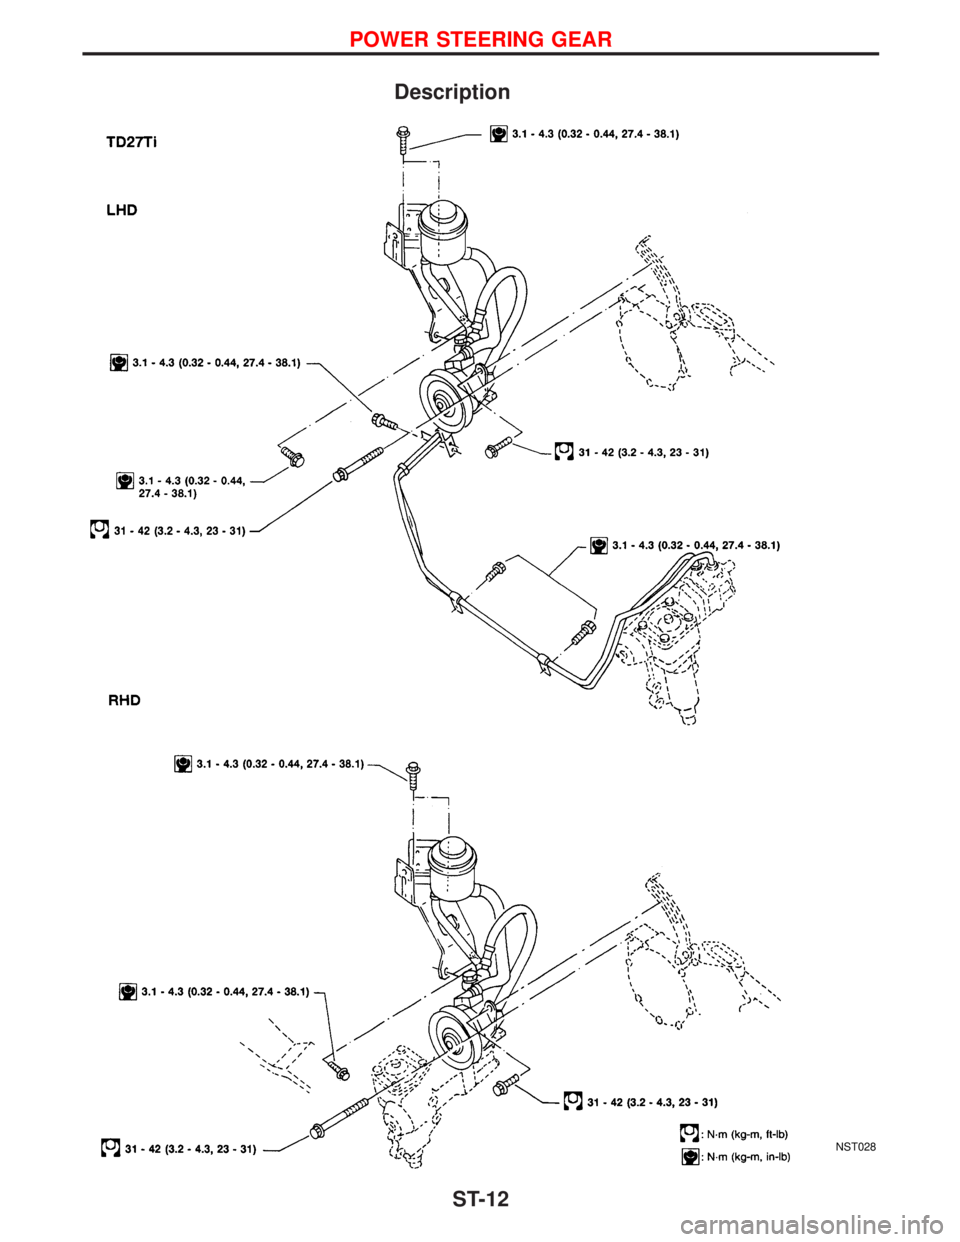
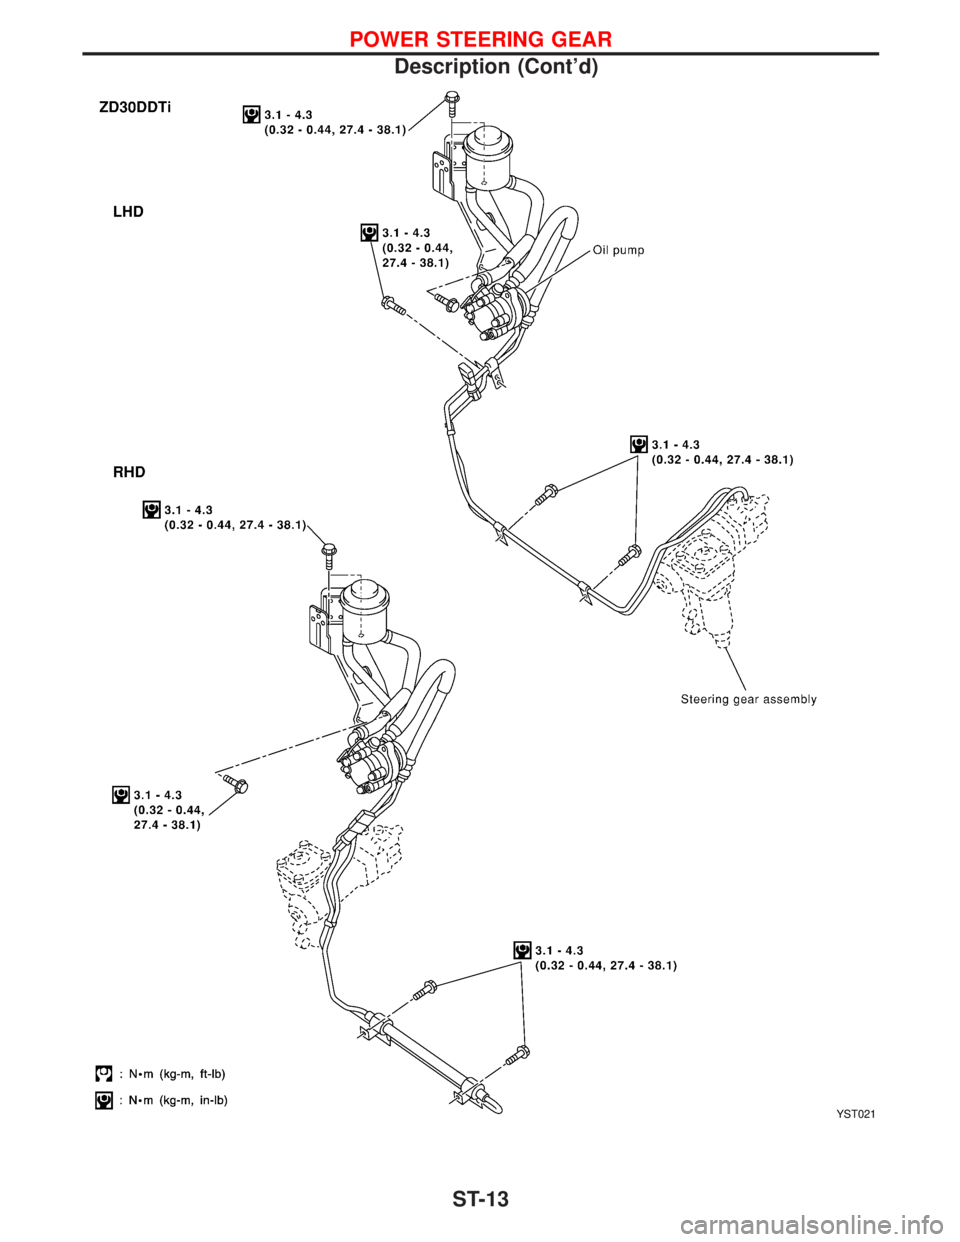
Description
NST028
POWER STEERING GEAR
ST-12
Page 1724 of 1767
YST021
POWER STEERING GEAR
Description (Cont'd)
ST-13
Page 1725 of 1767
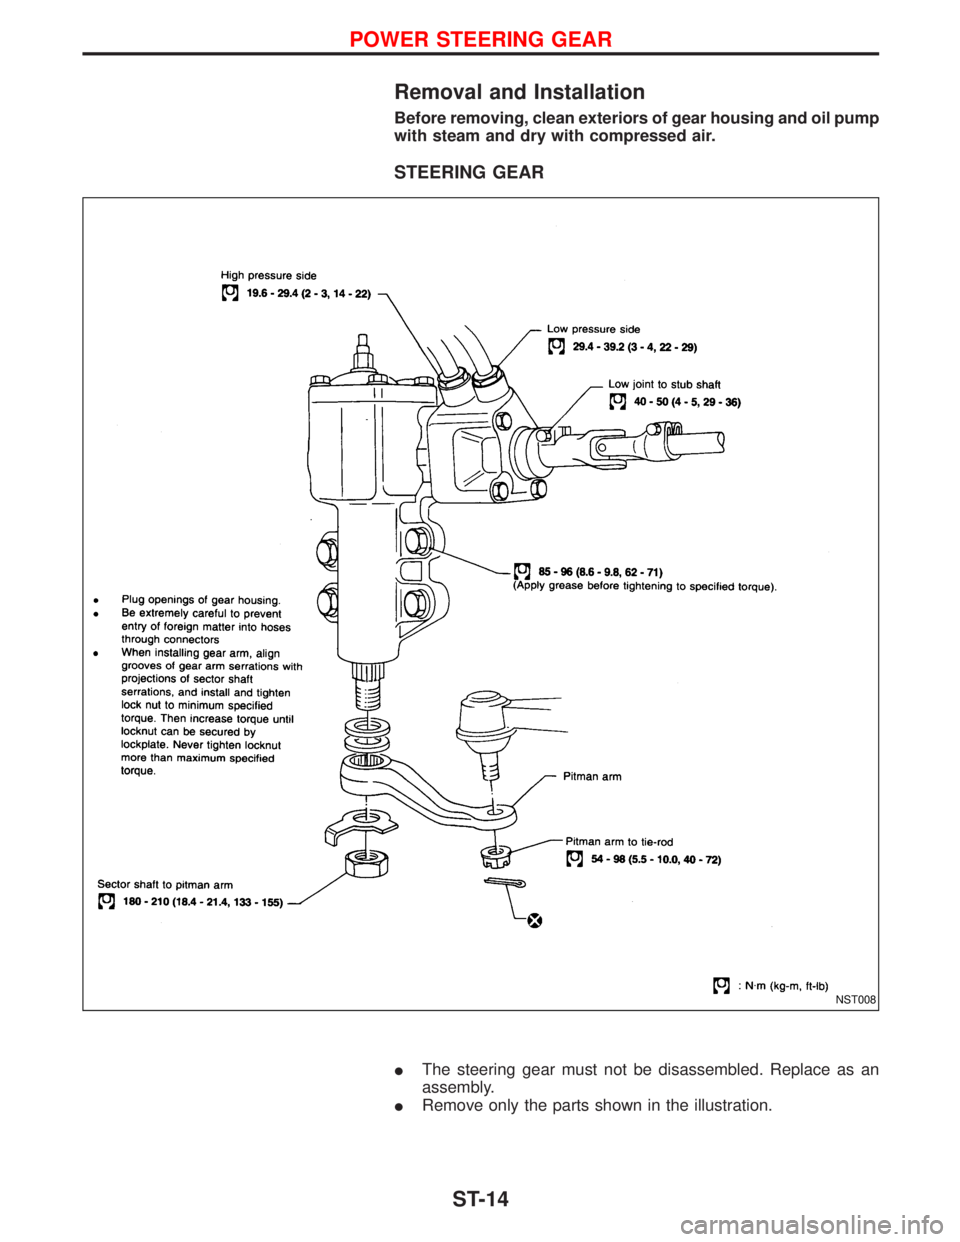
Removal and Installation
Before removing, clean exteriors of gear housing and oil pump
with steam and dry with compressed air.
STEERING GEAR
IThe steering gear must not be disassembled. Replace as an
assembly.
IRemove only the parts shown in the illustration.
NST008
POWER STEERING GEAR
ST-14
Page 1726 of 1767
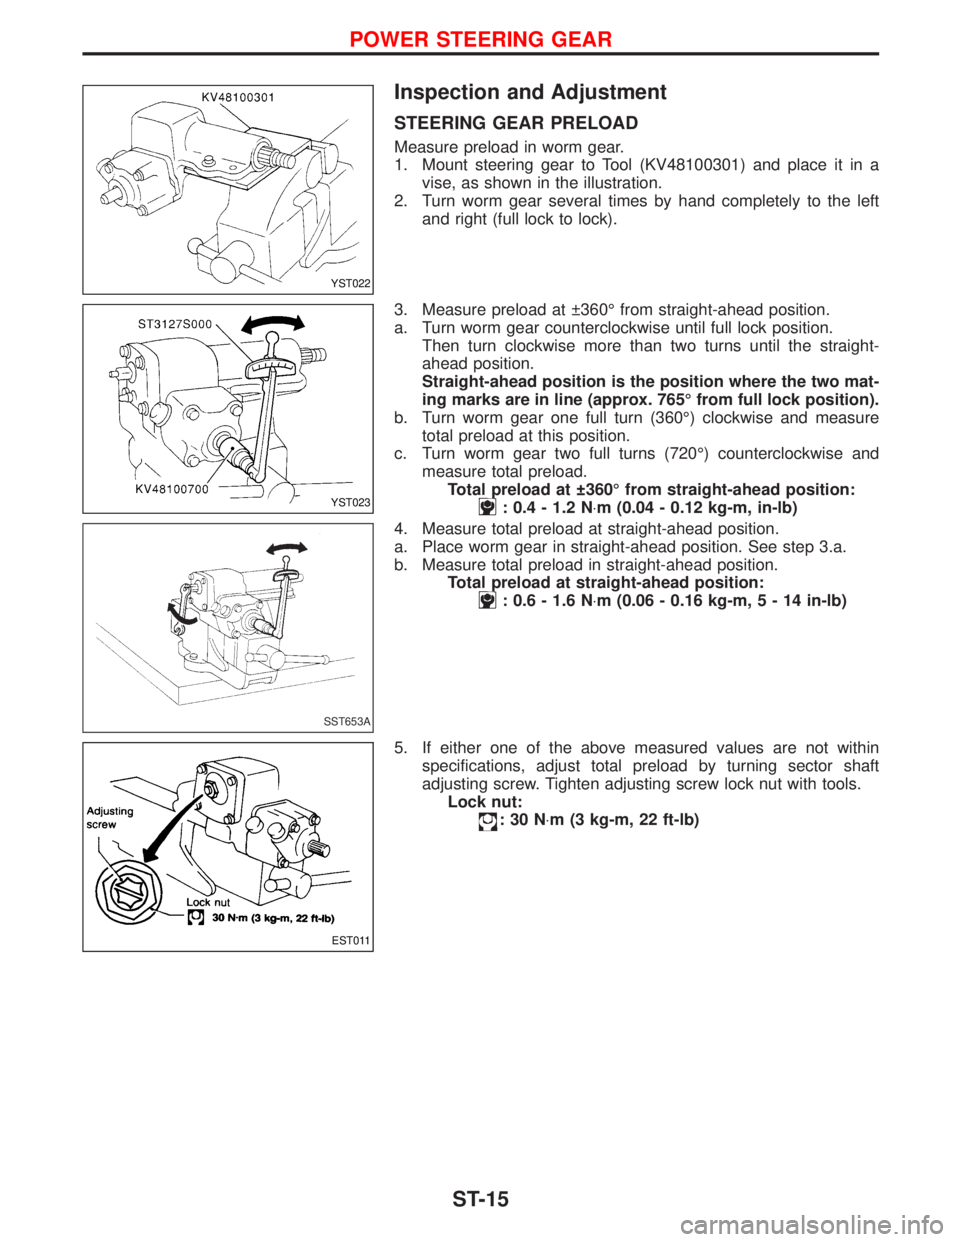
Inspection and Adjustment
STEERING GEAR PRELOAD
Measure preload in worm gear.
1. Mount steering gear to Tool (KV48100301) and place it in a
vise, as shown in the illustration.
2. Turn worm gear several times by hand completely to the left
and right (full lock to lock).
3. Measure preload at 360É from straight-ahead position.
a. Turn worm gear counterclockwise until full lock position.
Then turn clockwise more than two turns until the straight-
ahead position.
Straight-ahead position is the position where the two mat-
ing marks are in line (approx. 765É from full lock position).
b. Turn worm gear one full turn (360É) clockwise and measure
total preload at this position.
c. Turn worm gear two full turns (720É) counterclockwise and
measure total preload.
Total preload at 360É from straight-ahead position:
: 0.4 - 1.2 N×m (0.04 - 0.12 kg-m, in-lb)
4. Measure total preload at straight-ahead position.
a. Place worm gear in straight-ahead position. See step 3.a.
b. Measure total preload in straight-ahead position.
Total preload at straight-ahead position:
: 0.6 - 1.6 N×m (0.06 - 0.16 kg-m,5-14in-lb)
5. If either one of the above measured values are not within
specifications, adjust total preload by turning sector shaft
adjusting screw. Tighten adjusting screw lock nut with tools.
Lock nut:
:30N×m (3 kg-m, 22 ft-lb)
YST022
YST023
SST653A
EST011
POWER STEERING GEAR
ST-15
Page 1727 of 1767
Removal and Installation
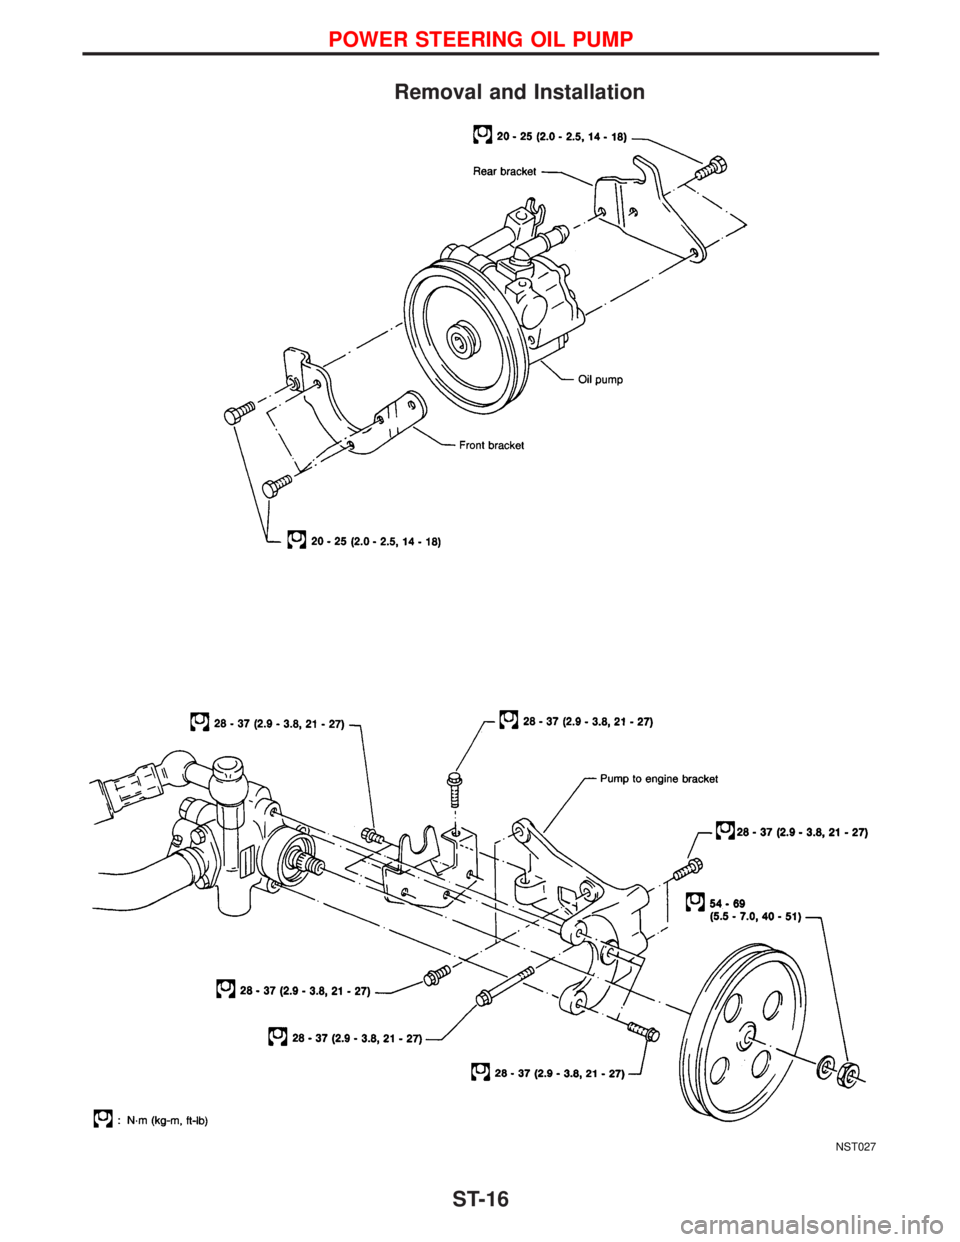
NST027
POWER STEERING OIL PUMP
ST-16
Page 1728 of 1767
Removal and Installation
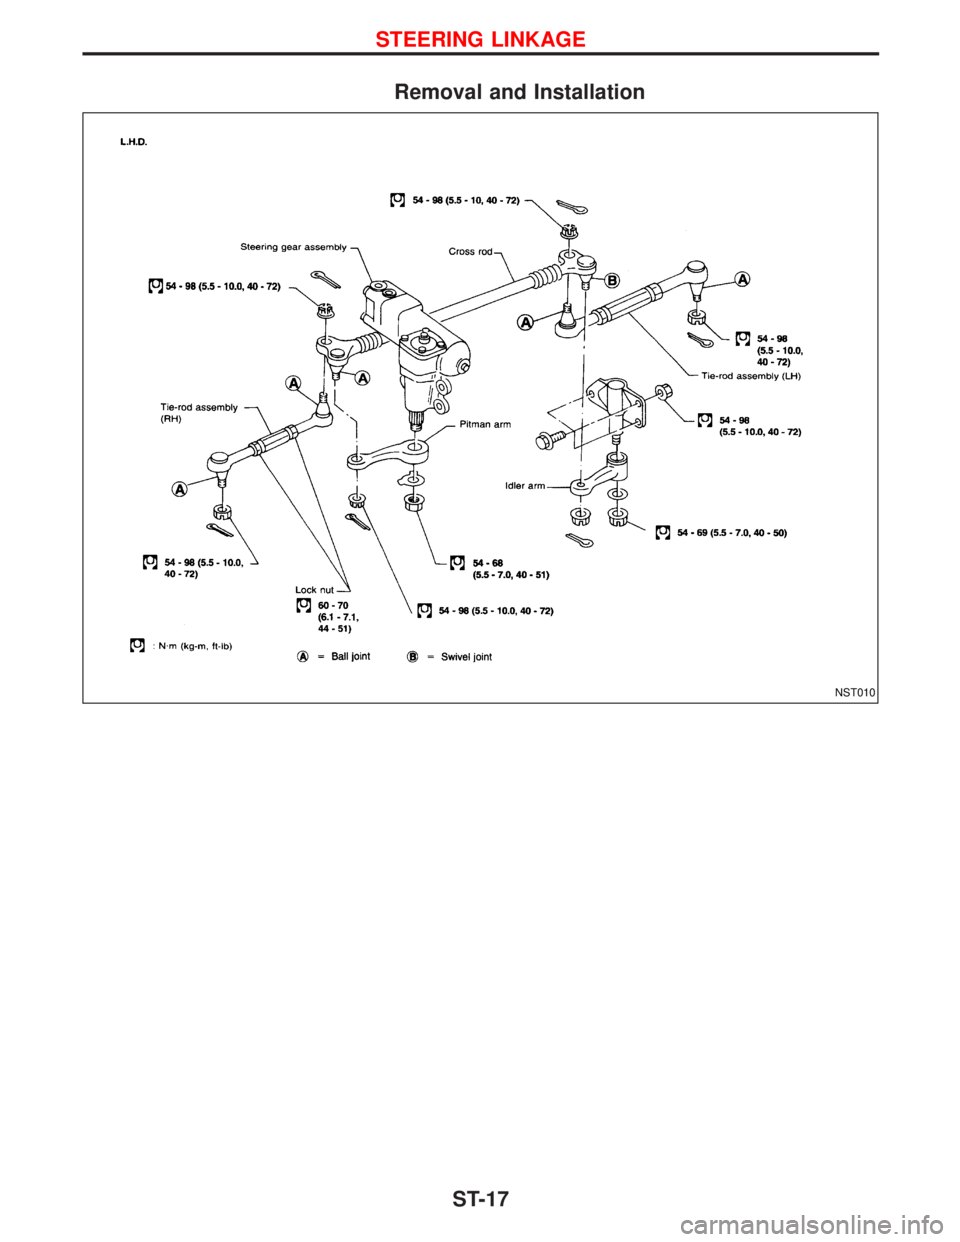
NST010
STEERING LINKAGE
ST-17
Page 1729 of 1767
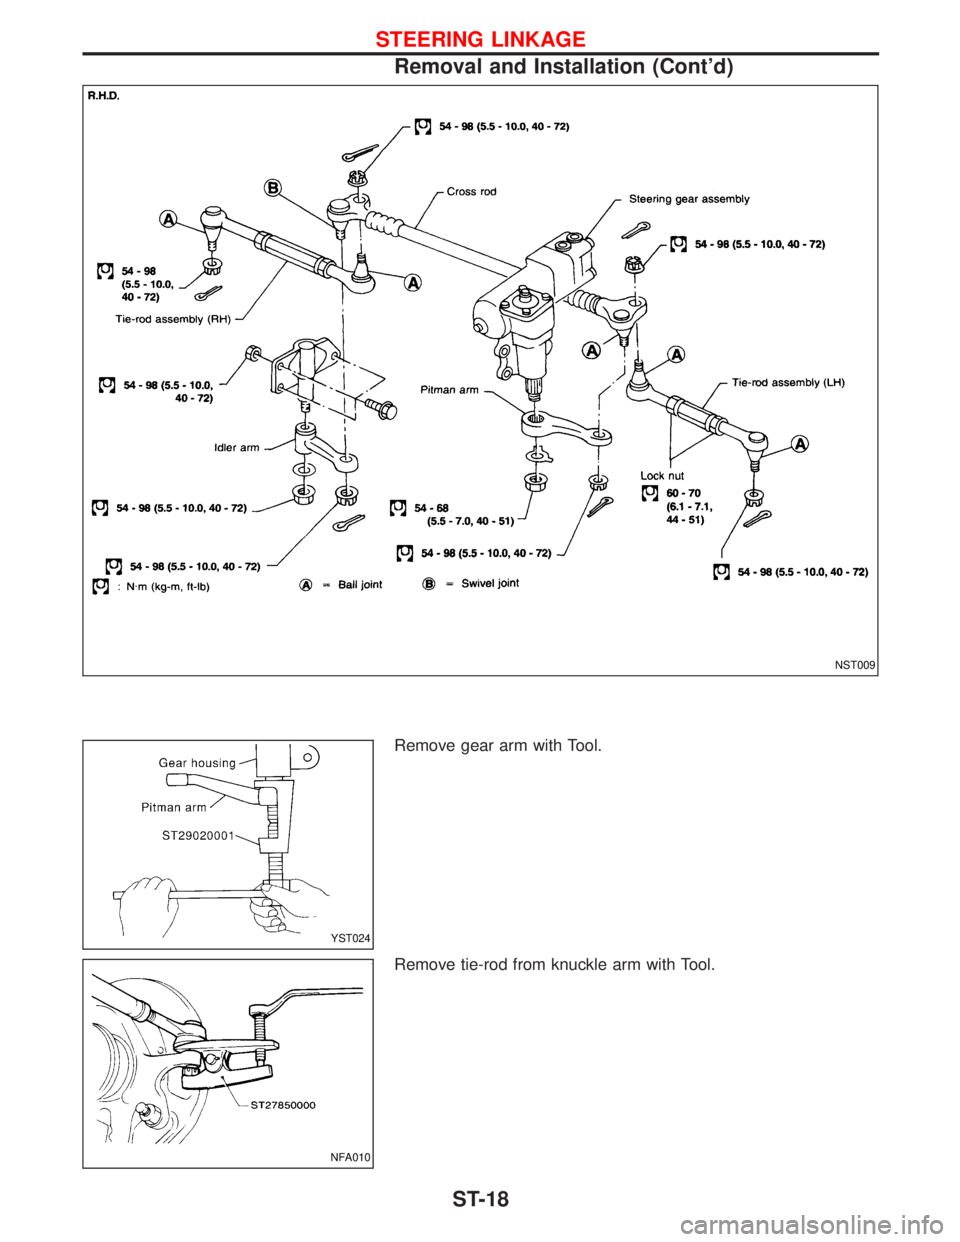
Remove gear arm with Tool.
Remove tie-rod from knuckle arm with Tool.
NST009
YST024
NFA010
STEERING LINKAGE
Removal and Installation (Cont'd)
ST-18
Page 1730 of 1767
Disassembly and Assembly
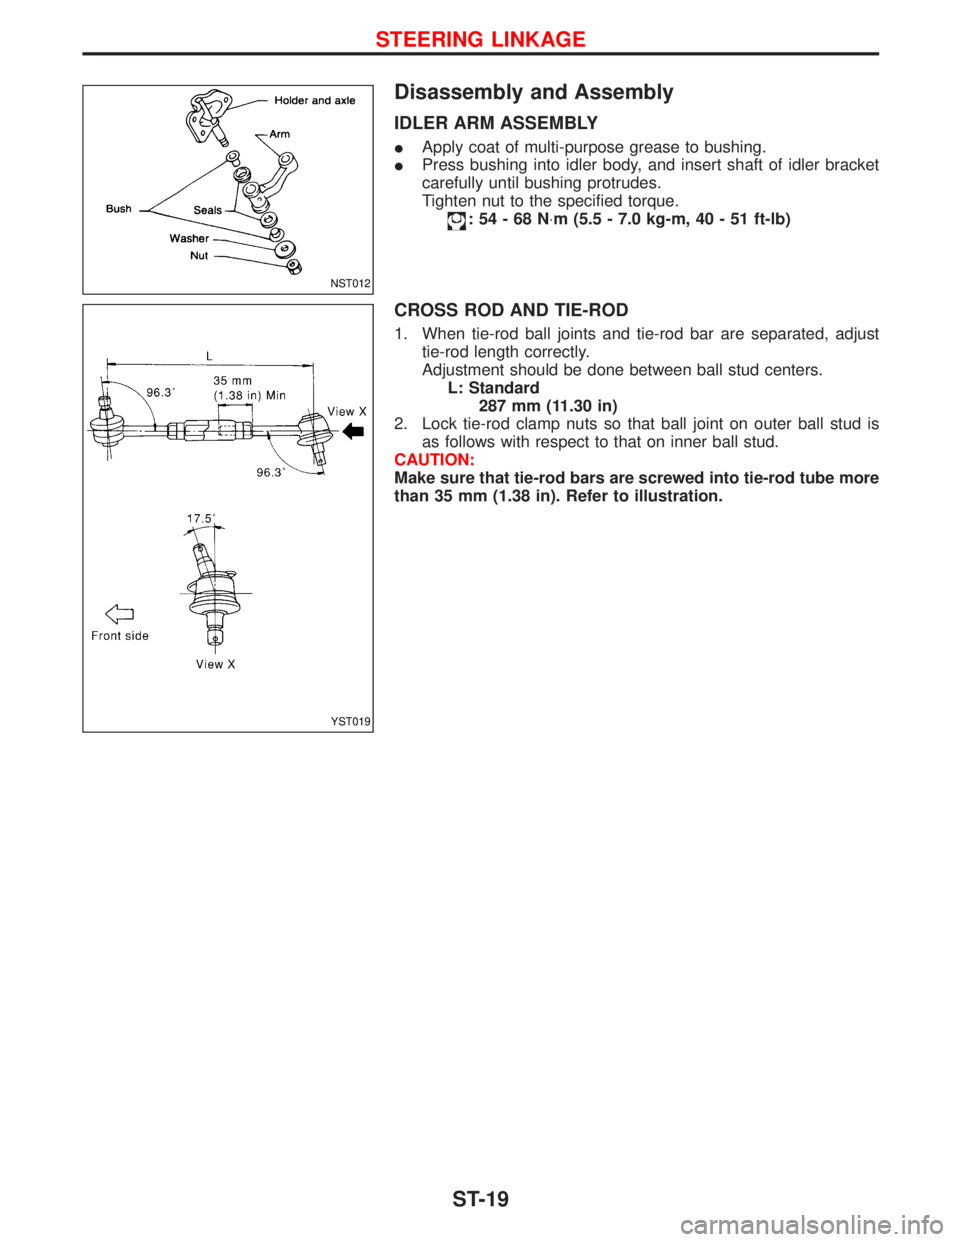
IDLER ARM ASSEMBLY
IApply coat of multi-purpose grease to bushing.
IPress bushing into idler body, and insert shaft of idler bracket
carefully until bushing protrudes.
Tighten nut to the specified torque.
:54-68N×m (5.5 - 7.0 kg-m, 40 - 51 ft-lb)
CROSS ROD AND TIE-ROD
1. When tie-rod ball joints and tie-rod bar are separated, adjust
tie-rod length correctly.
Adjustment should be done between ball stud centers.
L: Standard
287 mm (11.30 in)
2. Lock tie-rod clamp nuts so that ball joint on outer ball stud is
as follows with respect to that on inner ball stud.
CAUTION:
Make sure that tie-rod bars are screwed into tie-rod tube more
than 35 mm (1.38 in). Refer to illustration.
NST012
YST019
STEERING LINKAGE
ST-19
Trending: oil, fuse, key, dimensions, odometer, remote, CD player
