NISSAN TERRANO 2002 Service Repair Manual
TERRANO 2002
NISSAN
NISSAN
https://www.carmanualsonline.info/img/5/57393/w960_57393-0.png
NISSAN TERRANO 2002 Service Repair Manual
Trending: keyless, transmission fluid, fog light, hood open, lights, spare tire, check engine light
Page 1701 of 1767
4. Inspect pinion teeth.
IReplace pinion if teeth are worn or damaged. (Also check
condition of ring gear teeth.)
5. Inspect reduction gear teeth.
IReplace reduction gear if teeth are worn of damaged.
(Also check condition of armature shaft gear teeth.)
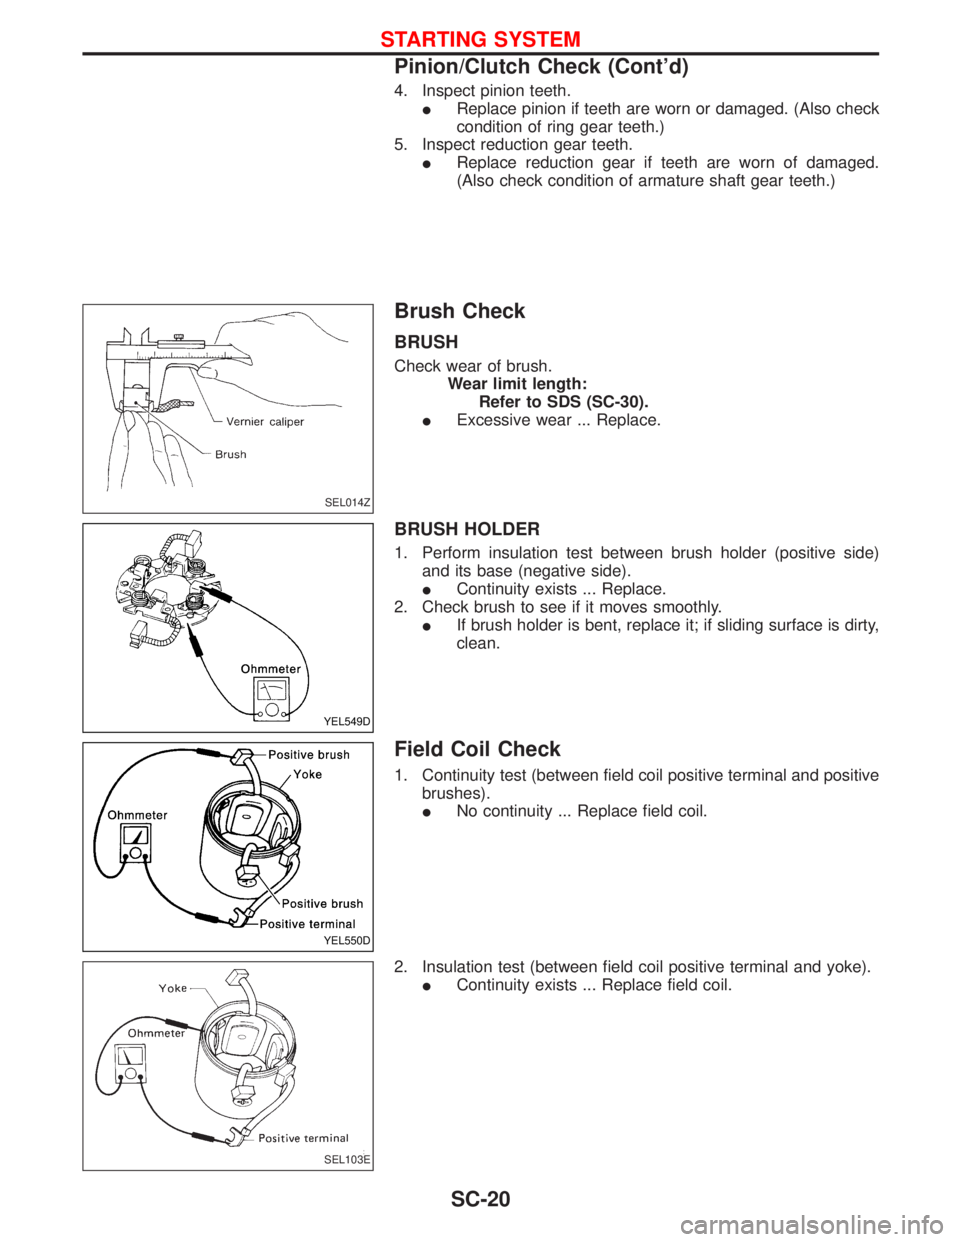
Brush Check
BRUSH
Check wear of brush.
Wear limit length:
Refer to SDS (SC-30).
IExcessive wear ... Replace.
BRUSH HOLDER
1. Perform insulation test between brush holder (positive side)
and its base (negative side).
IContinuity exists ... Replace.
2. Check brush to see if it moves smoothly.
IIf brush holder is bent, replace it; if sliding surface is dirty,
clean.
Field Coil Check
1. Continuity test (between field coil positive terminal and positive
brushes).
INo continuity ... Replace field coil.
2. Insulation test (between field coil positive terminal and yoke).
IContinuity exists ... Replace field coil.
SEL014Z
YEL549D
YEL550D
SEL103E
STARTING SYSTEM
Pinion/Clutch Check (Cont'd)
SC-20
Page 1702 of 1767
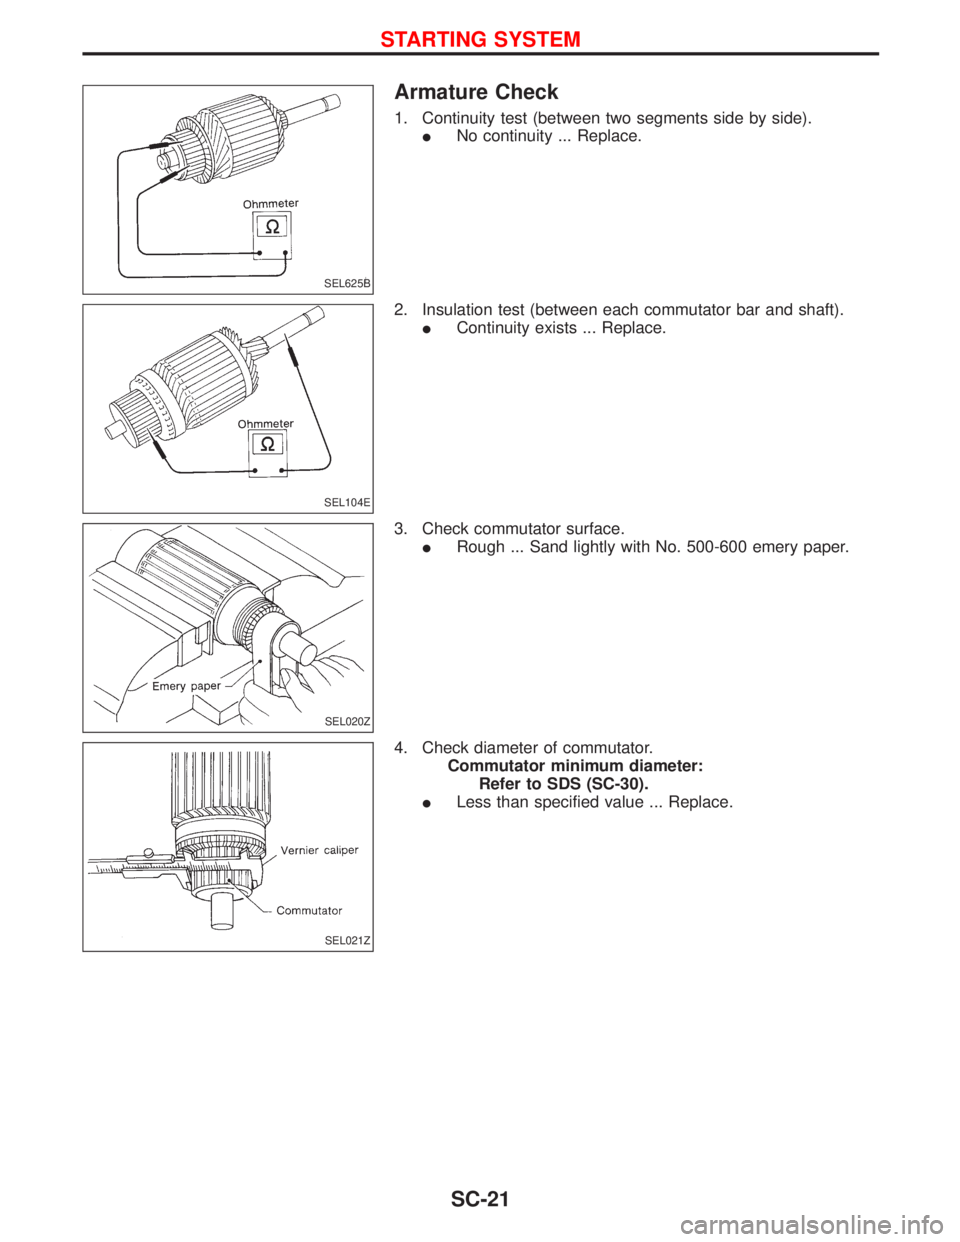
Armature Check
1. Continuity test (between two segments side by side).
INo continuity ... Replace.
2. Insulation test (between each commutator bar and shaft).
IContinuity exists ... Replace.
3. Check commutator surface.
IRough ... Sand lightly with No. 500-600 emery paper.
4. Check diameter of commutator.
Commutator minimum diameter:
Refer to SDS (SC-30).
ILess than specified value ... Replace.
SEL625B
SEL104E
SEL020Z
SEL021Z
STARTING SYSTEM
SC-21
Page 1703 of 1767
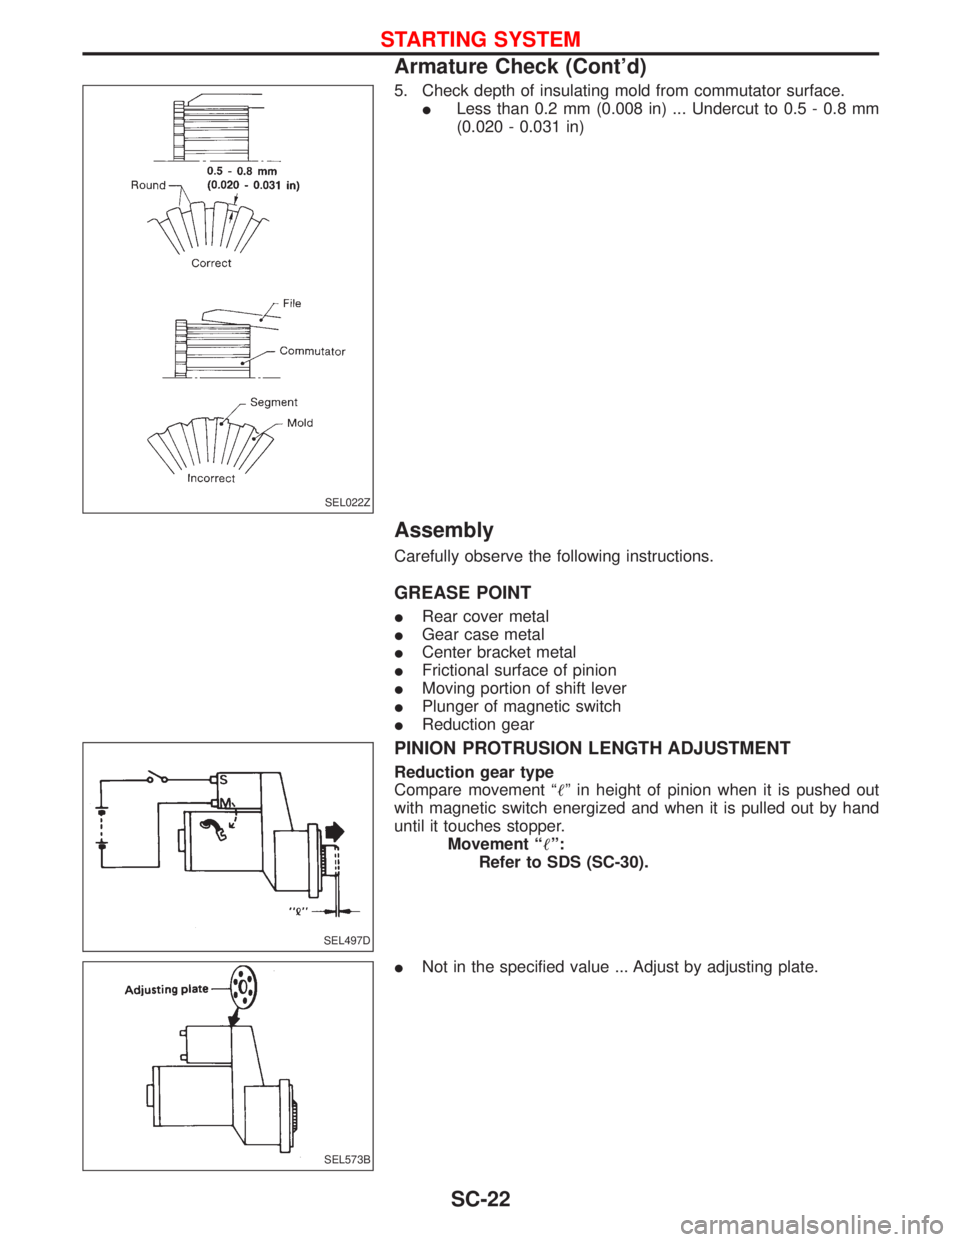
5. Check depth of insulating mold from commutator surface.
ILess than 0.2 mm (0.008 in) ... Undercut to 0.5 - 0.8 mm
(0.020 - 0.031 in)
Assembly
Carefully observe the following instructions.
GREASE POINT
IRear cover metal
IGear case metal
ICenter bracket metal
IFrictional surface of pinion
IMoving portion of shift lever
IPlunger of magnetic switch
IReduction gear
PINION PROTRUSION LENGTH ADJUSTMENT
Reduction gear type
Compare movement ªº in height of pinion when it is pushed out
with magnetic switch energized and when it is pulled out by hand
until it touches stopper.
Movement ªº:
Refer to SDS (SC-30).
INot in the specified value ... Adjust by adjusting plate.
SEL022Z
SEL497D
SEL573B
STARTING SYSTEM
Armature Check (Cont'd)
SC-22
Page 1704 of 1767
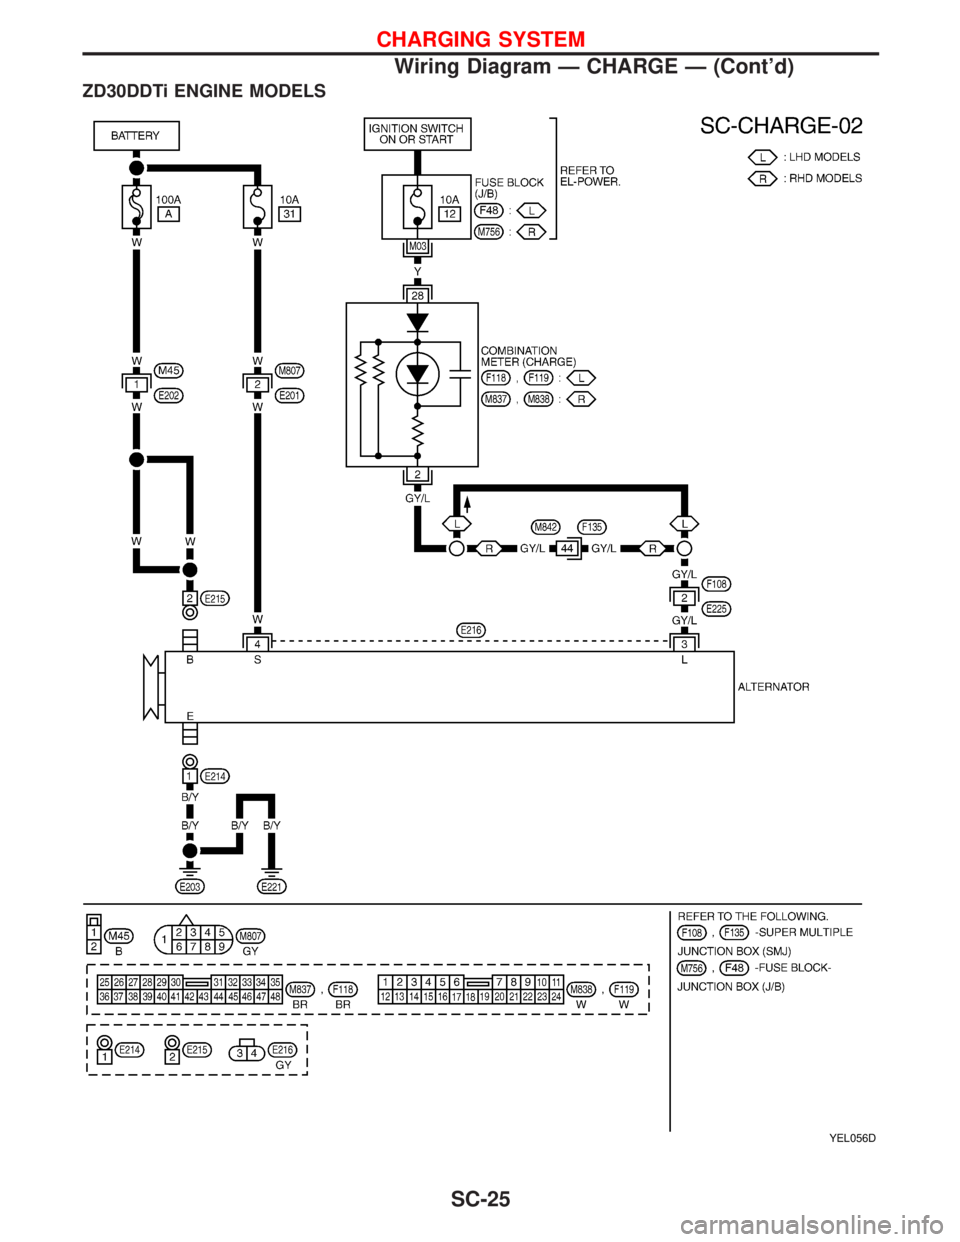
System Description
The alternator provides DC voltage to operate the vehicle's electrical system and to keep the battery charged.
The voltage output is controlled by the IC regulator.
Power is supplied at all times to alternator terminal 4 (S) through:
I10A fuse (No. 31, located in the fuse and fusible link box).
Terminal B supplies power to charge the battery and operate the vehicle's electrical system. Output voltage
is controlled by the IC regulator at terminal 4 (S) detecting the input voltage (ZD30DDTi engine models). The
charging circuit is protected by the 100A (A/T models) fusible link.
The alternator is grounded to the engine block.
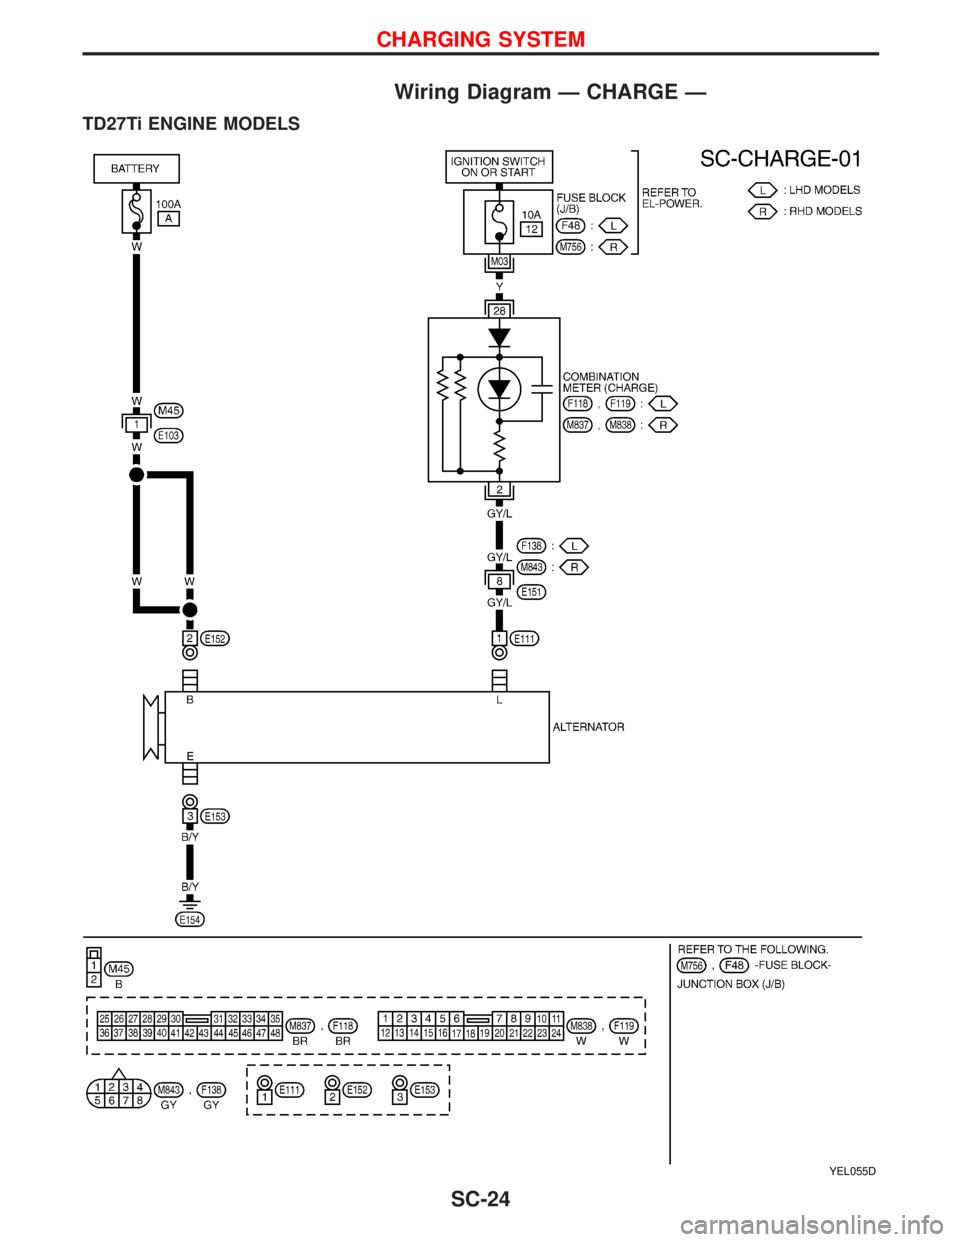
With the ignition switch in the ON or START position, power is supplied
Ithrough 10A fuse [No. 12, located in the fuse block (J/B)]
Ito combination meter terminal 28 for the charge warning lamp.
Ground is supplied to terminal 2 of the combination meter through terminal 1(L) (TD27Ti engine models) or
3(L) (ZD30DDTi engine model) of the alternator. With power and ground supplied, the charge warning lamp
will illuminate. When the alternator is providing sufficient voltage with the engine running, the ground is opened
and the charge warning lamp will go off.
If the charge warning lamp illuminates with the engine running, a malfunction is indicated.
CHARGING SYSTEM
SC-23
Page 1705 of 1767
Wiring Diagram Ð CHARGE Ð
TD27Ti ENGINE MODELS
YEL055D
CHARGING SYSTEM
SC-24
Page 1706 of 1767
ZD30DDTi ENGINE MODELS
YEL056D
CHARGING SYSTEM
Wiring Diagram Ð CHARGE Ð (Cont'd)
SC-25
Page 1707 of 1767
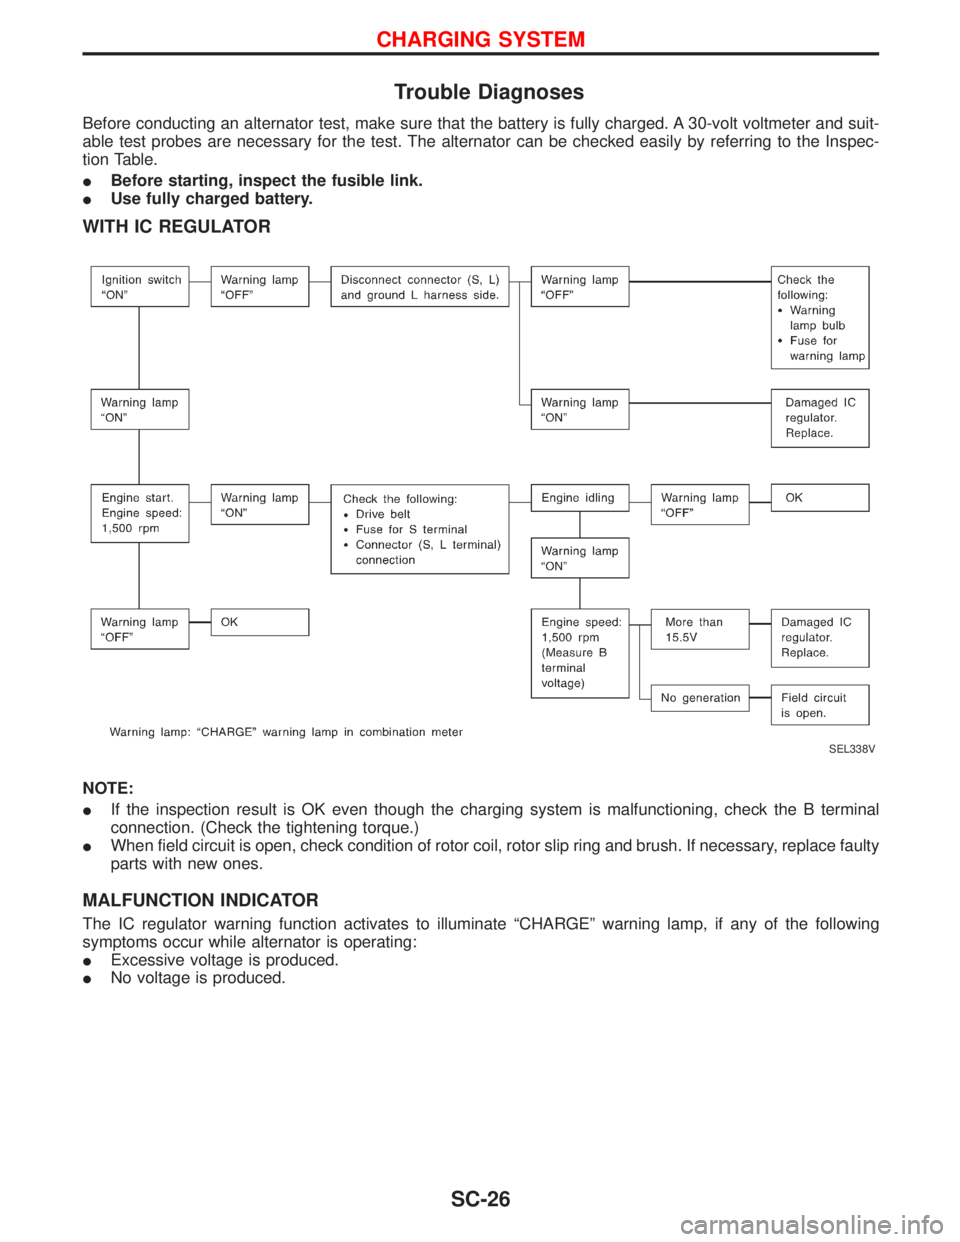
Trouble Diagnoses
Before conducting an alternator test, make sure that the battery is fully charged. A 30-volt voltmeter and suit-
able test probes are necessary for the test. The alternator can be checked easily by referring to the Inspec-
tion Table.
IBefore starting, inspect the fusible link.
IUse fully charged battery.
WITH IC REGULATOR
NOTE:
IIf the inspection result is OK even though the charging system is malfunctioning, check the B terminal
connection. (Check the tightening torque.)
IWhen field circuit is open, check condition of rotor coil, rotor slip ring and brush. If necessary, replace faulty
parts with new ones.
MALFUNCTION INDICATOR
The IC regulator warning function activates to illuminate ªCHARGEº warning lamp, if any of the following
symptoms occur while alternator is operating:
IExcessive voltage is produced.
INo voltage is produced.
SEL338V
CHARGING SYSTEM
SC-26
Page 1708 of 1767
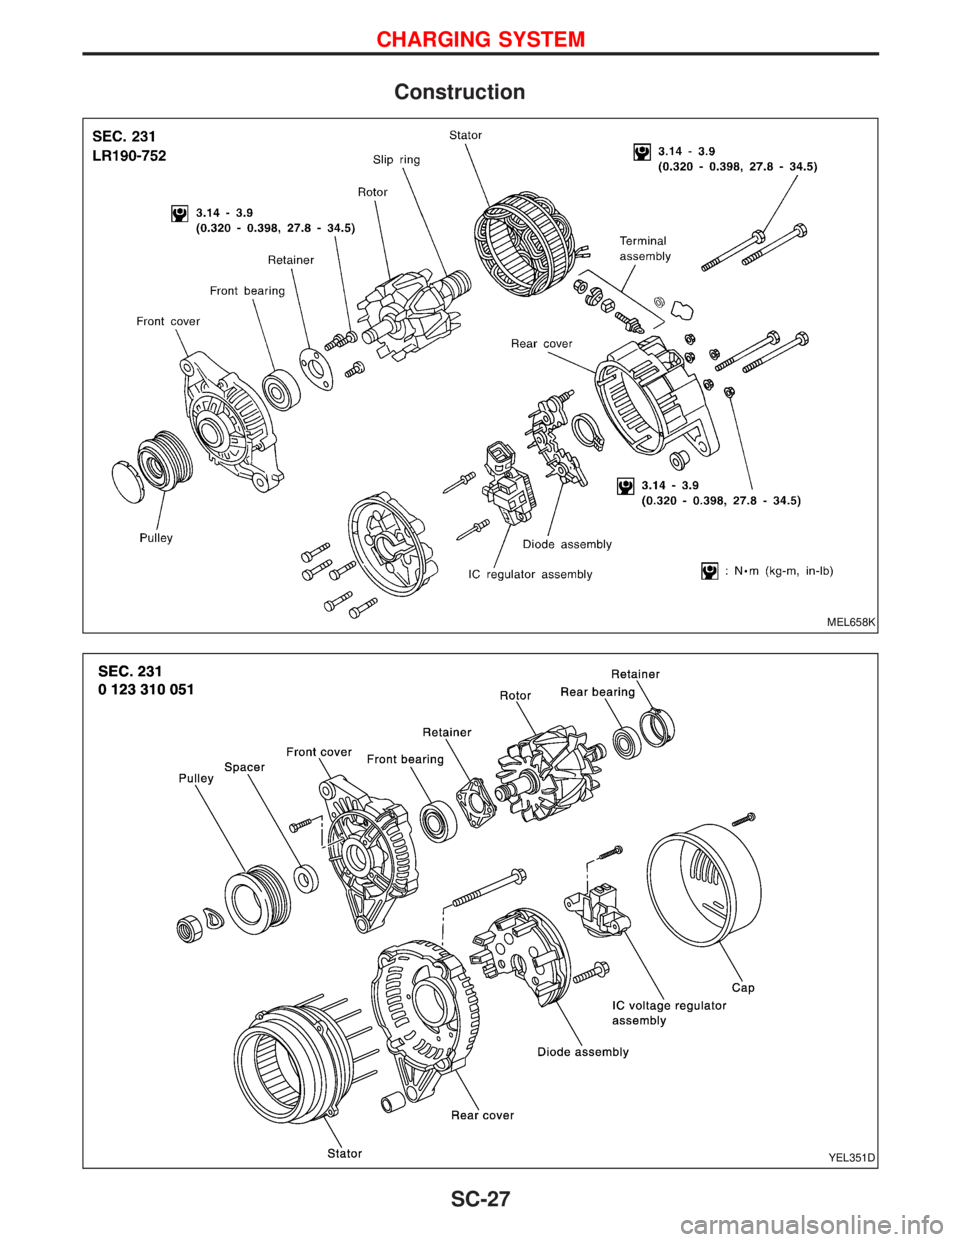
Construction
MEL658K
YEL351D
CHARGING SYSTEM
SC-27
Page 1709 of 1767
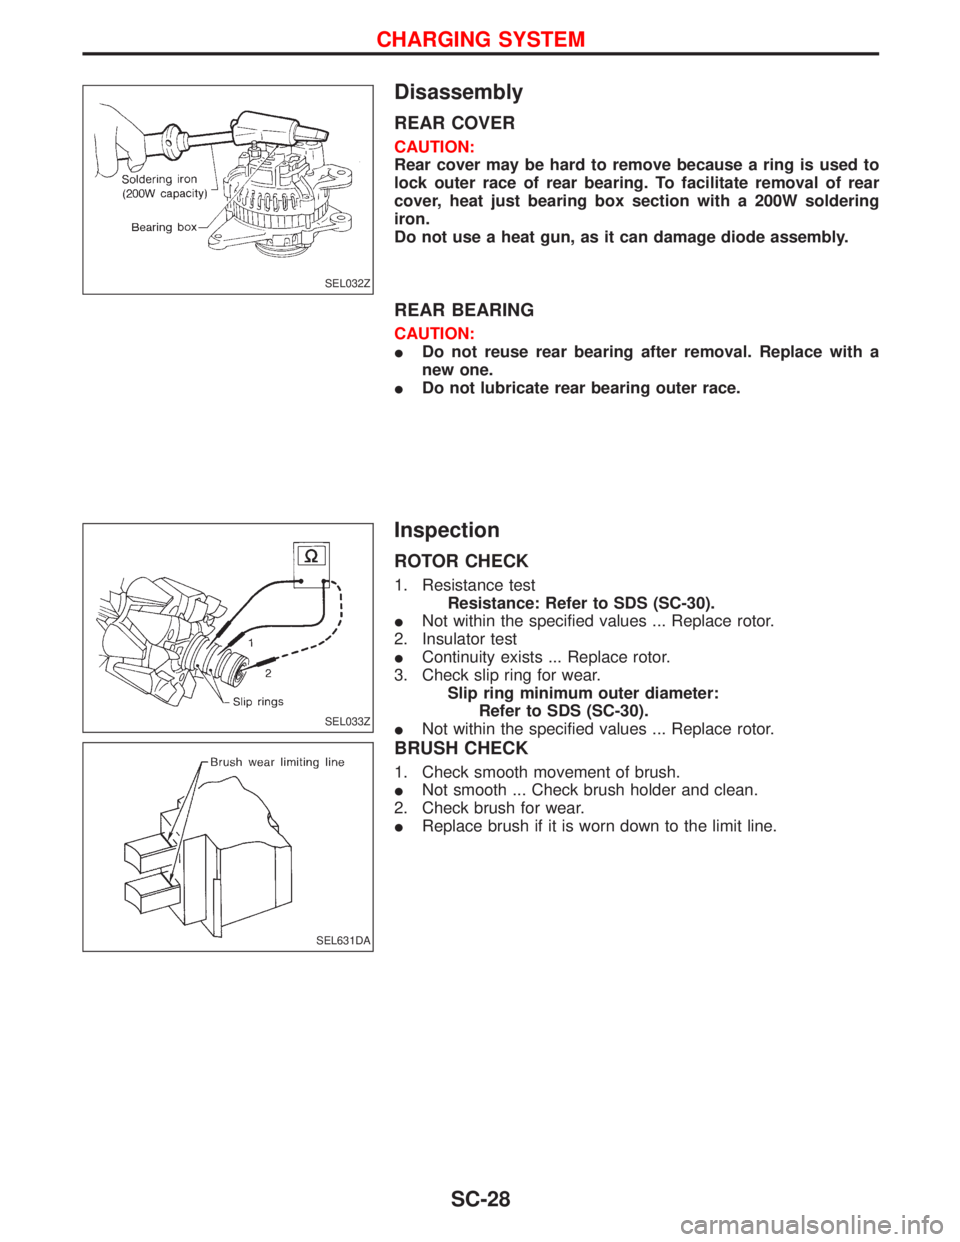
Disassembly
REAR COVER
CAUTION:
Rear cover may be hard to remove because a ring is used to
lock outer race of rear bearing. To facilitate removal of rear
cover, heat just bearing box section with a 200W soldering
iron.
Do not use a heat gun, as it can damage diode assembly.
REAR BEARING
CAUTION:
IDo not reuse rear bearing after removal. Replace with a
new one.
IDo not lubricate rear bearing outer race.
Inspection
ROTOR CHECK
1. Resistance test
Resistance: Refer to SDS (SC-30).
INot within the specified values ... Replace rotor.
2. Insulator test
IContinuity exists ... Replace rotor.
3. Check slip ring for wear.
Slip ring minimum outer diameter:
Refer to SDS (SC-30).
INot within the specified values ... Replace rotor.
BRUSH CHECK
1. Check smooth movement of brush.
INot smooth ... Check brush holder and clean.
2. Check brush for wear.
IReplace brush if it is worn down to the limit line.
SEL032Z
SEL033Z
SEL631DA
CHARGING SYSTEM
SC-28
Page 1710 of 1767
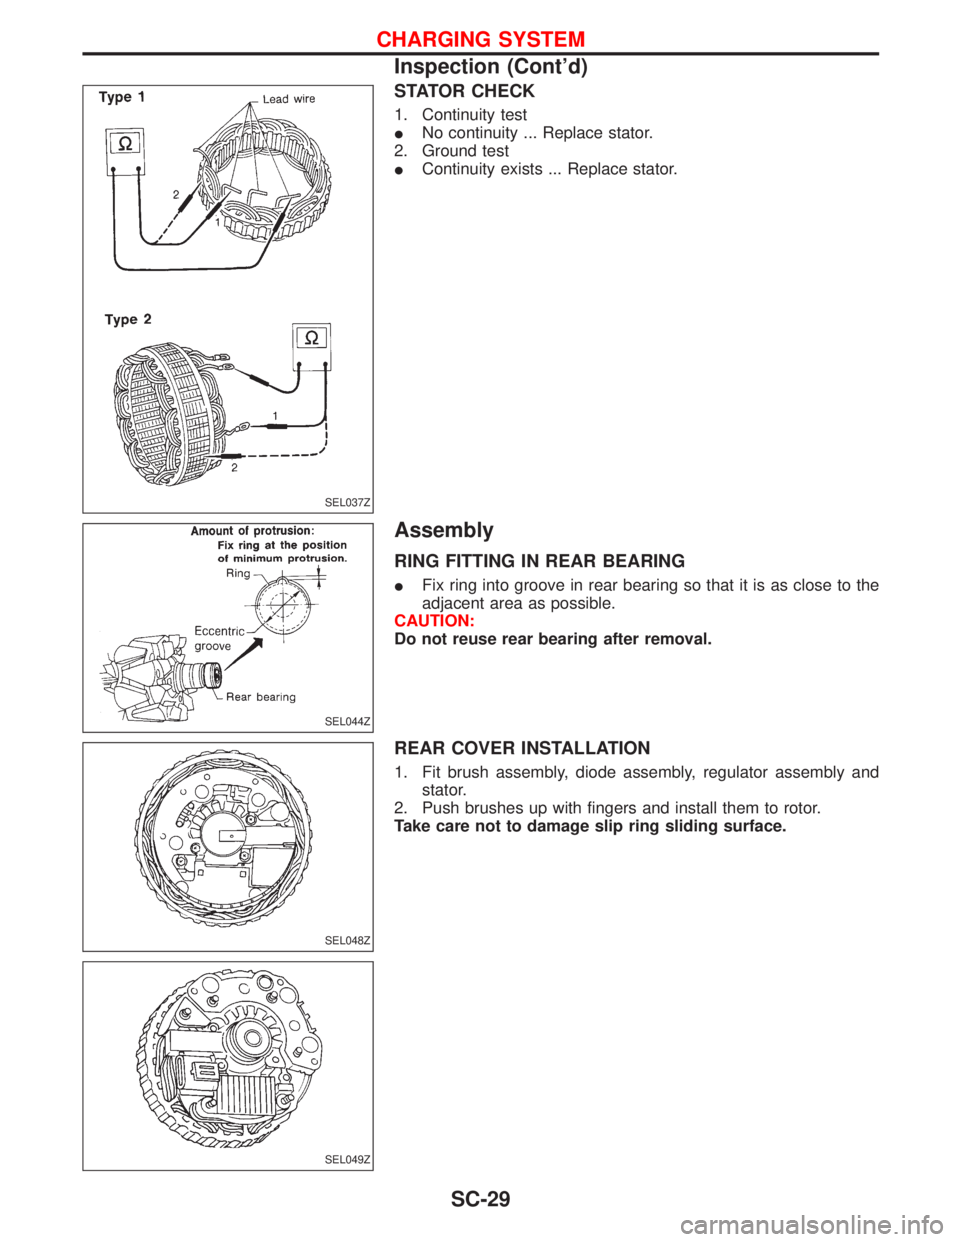
STATOR CHECK
1. Continuity test
INo continuity ... Replace stator.
2. Ground test
IContinuity exists ... Replace stator.
Assembly
RING FITTING IN REAR BEARING
IFix ring into groove in rear bearing so that it is as close to the
adjacent area as possible.
CAUTION:
Do not reuse rear bearing after removal.
REAR COVER INSTALLATION
1. Fit brush assembly, diode assembly, regulator assembly and
stator.
2. Push brushes up with fingers and install them to rotor.
Take care not to damage slip ring sliding surface.
SEL037Z
SEL044Z
SEL048Z
SEL049Z
CHARGING SYSTEM
Inspection (Cont'd)
SC-29
Trending: torque, wiper fluid, change wheel, maintenance schedule, CD player, language, glove box
