Peugeot 508 RXH 2014 Owners Manual
Manufacturer: PEUGEOT, Model Year: 2014, Model line: 508 RXH, Model: Peugeot 508 RXH 2014Pages: 338, PDF Size: 10.81 MB
Page 91 of 338
89
508RXH_en_Chap03_confort_ed01-2014
Head restraint height and angle
adjustment
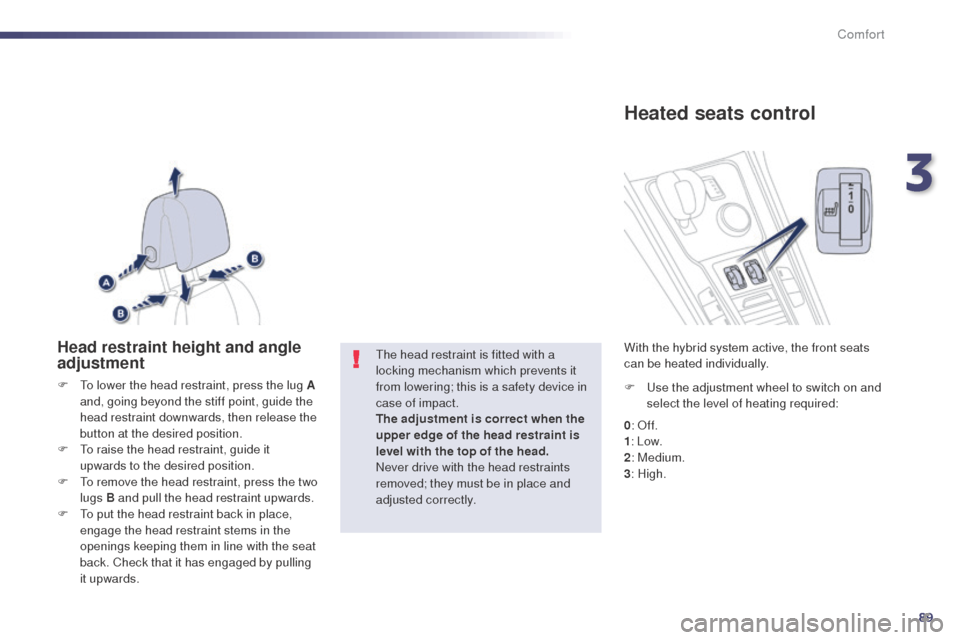
F to lower the head restraint, press the lug A and, going beyond the stiff point, guide the
head restraint downwards, then release the
button at the desired position.
F
t
o r
aise the head restraint, guide it
upwards to the desired position.
F
t
o r
emove the head restraint, press the two
lugs B and pull the head restraint upwards.
F
t
o p
ut the head restraint back in place,
engage the head restraint stems in the
openings keeping them in line with the seat
back. Check that it has engaged by pulling
it upwards.
th
e head restraint is fitted with a
locking mechanism which prevents it
from lowering; this is a safety device in
case of impact.
The adjustment is correct when the
upper edge of the head restraint is
level with the top of the head.
Never drive with the head restraints
removed; they must be in place and
adjusted correctly. F
us e the adjustment wheel to switch on and
select the level of heating required:
With the hybrid system active, the front seats
can be heated individually.
0
: Of f.
1 : Low.
2 : Medium.
3 : High.
Heated seats control
3
Comfort
Page 92 of 338
90
508RXH_en_Chap03_confort_ed01-2014
Massage function
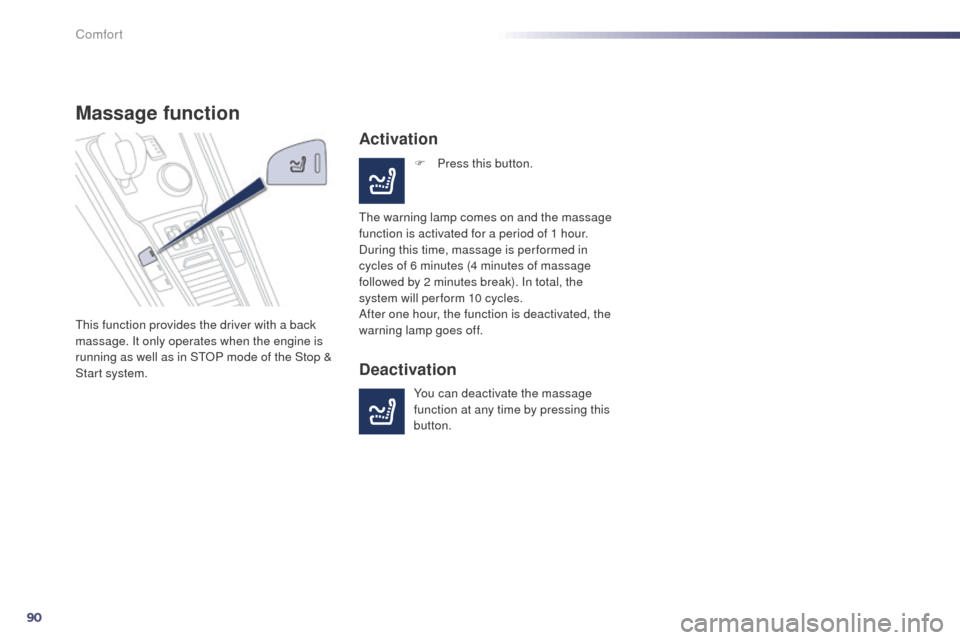
this function provides the driver with a back
massage. It only operates when the engine is
running as well as in S
tO
P mode of the Stop &
Start system.
Activation
F Press this button.
th
e warning lamp comes on and the massage
function is activated for a period of 1 hour.
During this time, massage is per formed in
cycles of 6 minutes (4 minutes of massage
followed by 2 minutes break). In total, the
system will per form 10 cycles.
After one hour, the function is deactivated, the
warning lamp goes off.
Deactivation
You can deactivate the massage
function at any time by pressing this
button.
Comfort
Page 93 of 338
91
508RXH_en_Chap03_confort_ed01-2014
Rear seatsBench seat the left-hand (1/3) or right-hand (2/3) section of which can be folded to adapt the boot load space.
Outer rear seat head restraints
these have a high position (comfort and
safety), a low position (rear visibility) and can
also be removed.
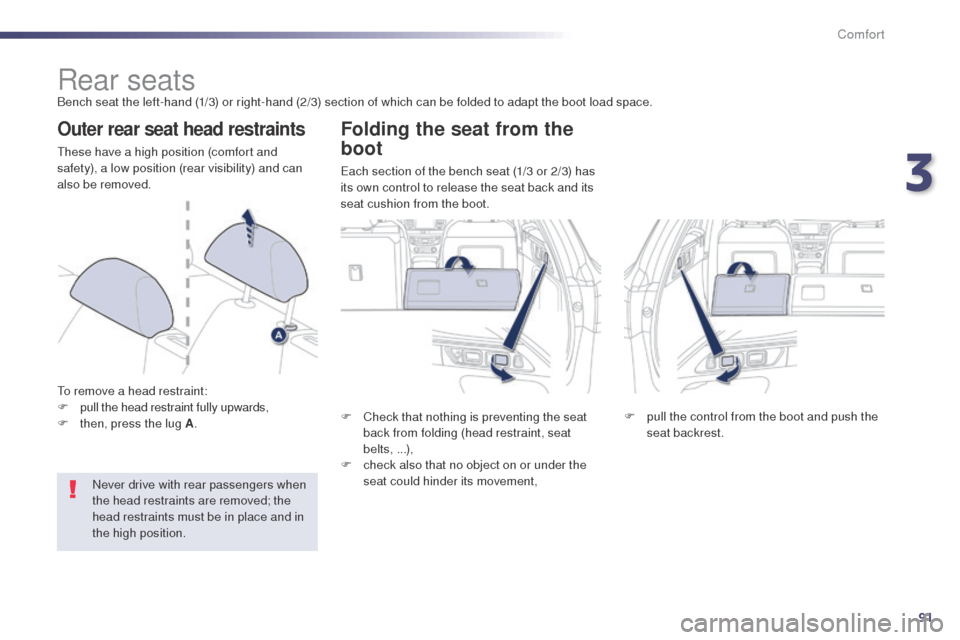
to r
emove a head restraint:
F
p
ull the head restraint fully upwards,
F
t
hen, press the lug A .
Never drive with rear passengers when
the head restraints are removed; the
head restraints must be in place and in
the high position.
Folding the seat from the
boot
each section of the bench seat (1/3 or 2/3) has
its own control to release the seat back and its
seat cushion from the boot.
F
C
heck that nothing is preventing the seat
back from folding (head restraint, seat
belts, ...),
F
c
heck also that no object on or under the
seat could hinder its movement, F
p
ull the control from the boot and push the
seat backrest.
3
Comfort
Page 94 of 338
92
508RXH_en_Chap03_confort_ed01-2014
Folding the seat from the
rear
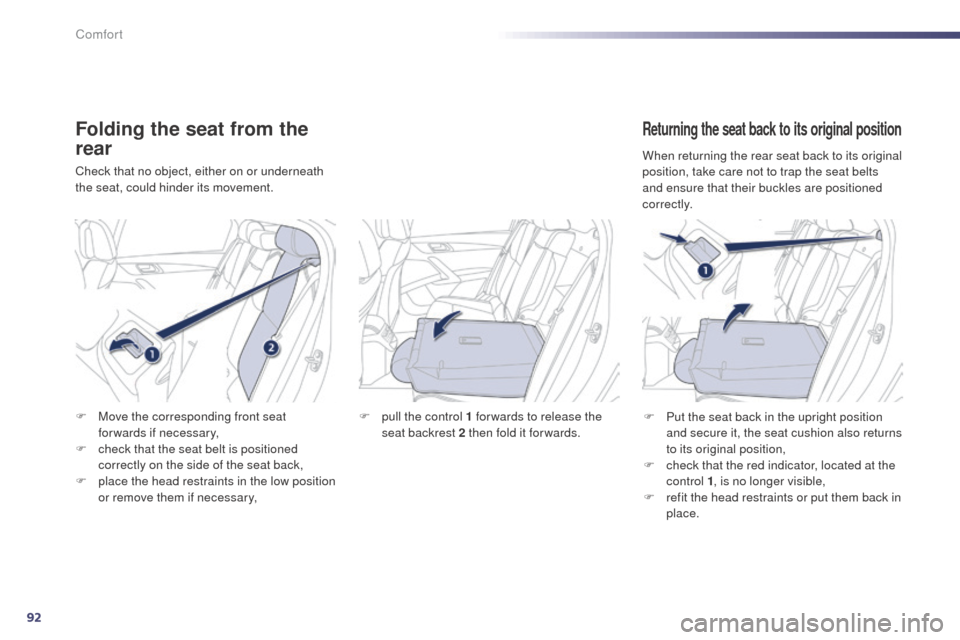
Check that no object, either on or underneath
the seat, could hinder its movement.
Returning the seat back to its original position
F Put the seat back in the upright position and secure it, the seat cushion also returns
to its original position,
F
c
heck that the red indicator, located at the
control 1 , is no longer visible,
F
r
efit the head restraints or put them back in
place.
F
M
ove the corresponding front seat
forwards if necessary,
F
c
heck that the seat belt is positioned
correctly on the side of the seat back,
F
p
lace the head restraints in the low position
or remove them if necessary, F
p
ull the control 1 for wards to release the
seat backrest 2 then fold it forwards. When returning the rear seat back to its original
position, take care not to trap the seat belts
and ensure that their buckles are positioned
c o r r e c t l y.
Comfort
Page 95 of 338
93
508RXH_en_Chap03_confort_ed01-2014
Mirrors
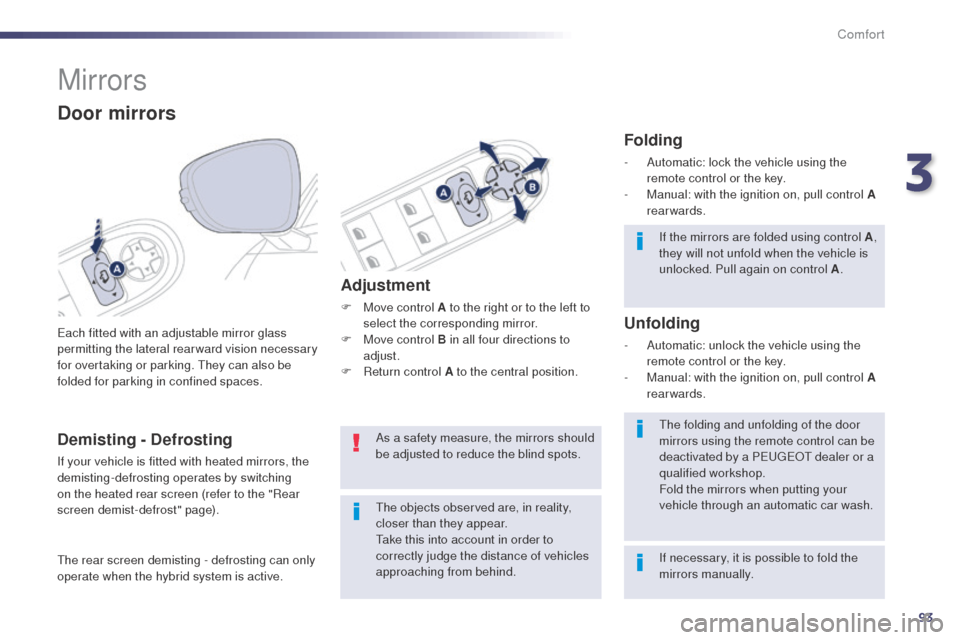
each fitted with an adjustable mirror glass
permitting the lateral rearward vision necessary
for overtaking or parking. t
h
ey can also be
folded for parking in confined spaces.
Door mirrors
If the mirrors are folded using control A ,
they will not unfold when the vehicle is
unlocked. Pull again on control A .
th
e folding and unfolding of the door
mirrors using the remote control can be
deactivated by a P
e
uge
Ot
dealer or a
qualified workshop.
Fold the mirrors when putting your
vehicle through an automatic car wash.
th
e objects observed are, in reality,
closer than they appear.
ta
ke this into account in order to
correctly judge the distance of vehicles
approaching from behind.
Demisting - Defrosting
If your vehicle is fitted with heated mirrors, the
demisting-defrosting operates by switching
on the heated rear screen (refer to the "Rear
screen demist-defrost" page).
Adjustment
F Move control A to the right or to the left to select the corresponding mirror.
F
M
ove control B in all four directions to
adjust.
F
R
eturn control A to the central position.
Folding
- Automatic: lock the vehicle using the remote control or the key.
-
M
anual: with the ignition on, pull control A
rearwards.
Unfolding
- Automatic: unlock the vehicle using the remote control or the key.
-
M
anual: with the ignition on, pull control A
rearwards.
th
e rear screen demisting - defrosting can only
operate when the hybrid system is active. As a safety measure, the mirrors should
be adjusted to reduce the blind spots.
If necessary, it is possible to fold the
mirrors manually.
3
Comfort
Page 96 of 338
94
508RXH_en_Chap03_confort_ed01-2014
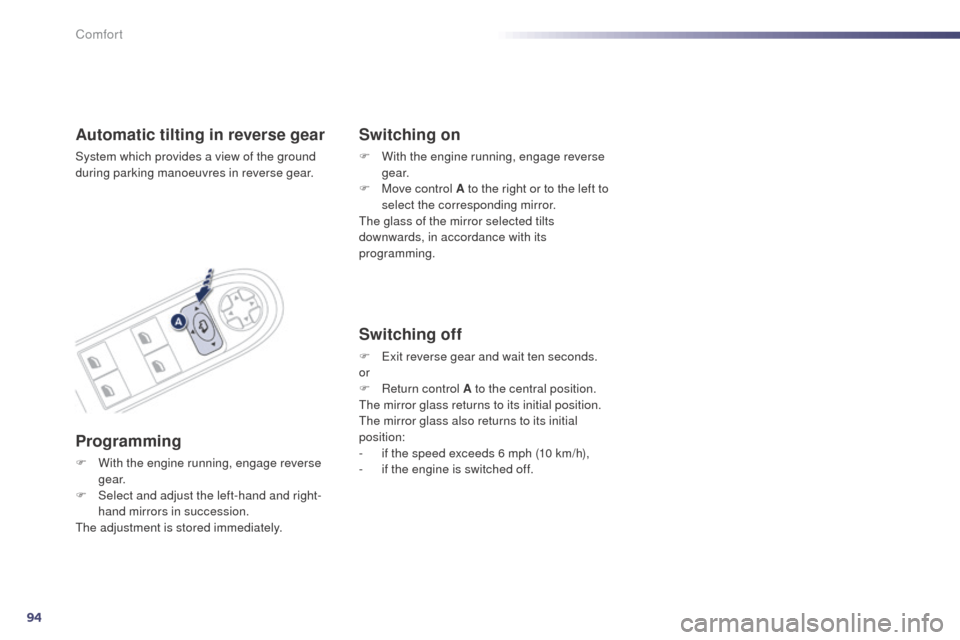
Automatic tilting in reverse gear
System which provides a view of the ground
during parking manoeuvres in reverse gear.
Programming
F With the engine running, engage reverse g e a r.
F
S
elect and adjust the left-hand and right-
hand mirrors in succession.
th
e adjustment is stored immediately.
Switching on
F With the engine running, engage reverse g e a r.
F
M
ove control A to the right or to the left to
select the corresponding mirror.
th
e glass of the mirror selected tilts
downwards, in accordance with its
programming.
Switching off
F exit reverse gear and wait ten seconds.
or
F
R
eturn control A to the central position.
th
e mirror glass returns to its initial position.
th
e mirror glass also returns to its initial
position:
-
i
f the speed exceeds 6 mph (10 km/h),
-
i
f the engine is switched off.
Comfort
Page 97 of 338
95
508RXH_en_Chap03_confort_ed01-2014
Automatic day/night model
By means of a sensor, which measures the
light from the rear of the vehicle, this system
automatically and progressively changes
between the day and night uses.
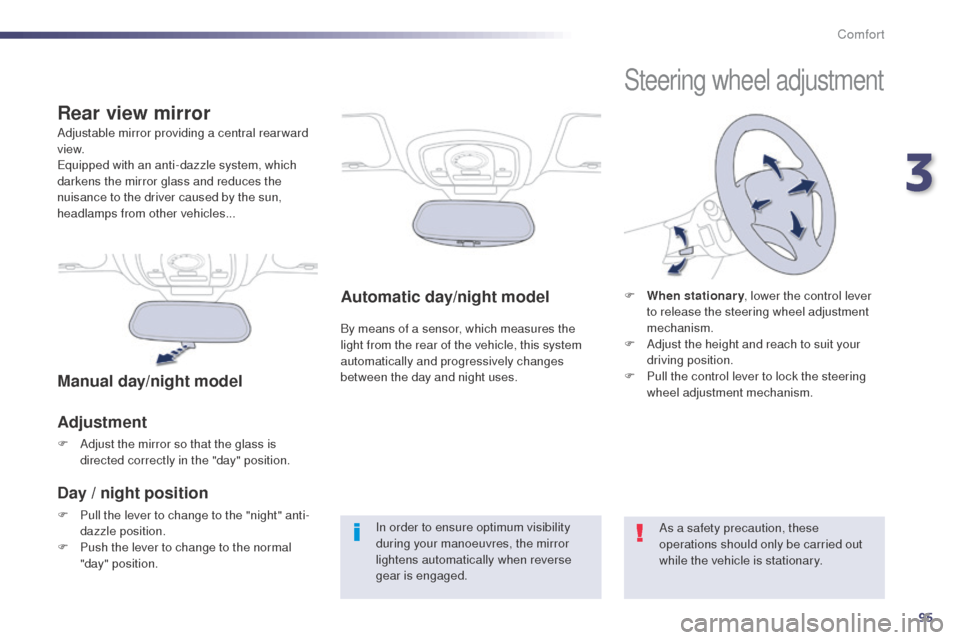
Adjustable mirror providing a central rearward
view.
eq
uipped with an anti-dazzle system, which
darkens the mirror glass and reduces the
nuisance to the driver caused by the sun,
headlamps from other vehicles...
Rear view mirror
Manual day/night model
Adjustment
F Adjust the mirror so that the glass is directed correctly in the "day" position.
Day / night position
F Pull the lever to change to the "night" anti-dazzle position.
F
P
ush the lever to change to the normal
"day" position. In order to ensure optimum visibility
during your manoeuvres, the mirror
lightens automatically when reverse
gear is engaged.
Steering wheel adjustment
F When stationary
, lower the control lever
to release the steering wheel adjustment
mechanism.
F
A
djust the height and reach to suit your
driving position.
F
P
ull the control lever to lock the steering
wheel adjustment mechanism.
As a safety precaution, these
operations should only be carried out
while the vehicle is stationary.
3
Comfort
Page 98 of 338
96
508RXH_en_Chap03_confort_ed01-2014
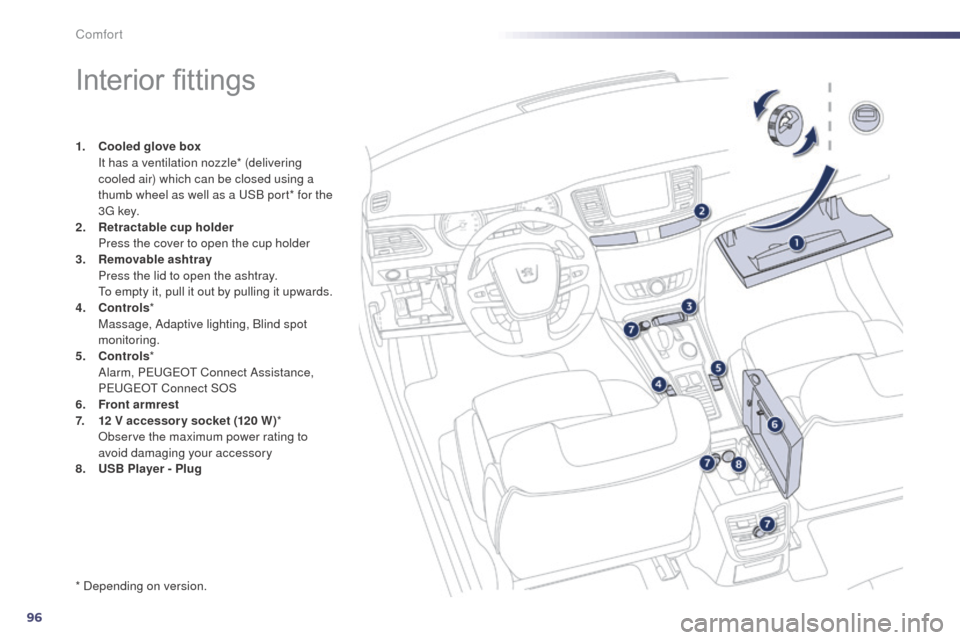
Interior fittings
1. Cooled glove box I
t has a ventilation nozzle* (delivering
cooled air) which can be closed using a
thumb wheel as well as a
u
S
B port* for the
3
g k
ey.
2.
R
etractable cup holder
P
ress the cover to open the cup holder
3.
Re
movable ashtray
P
ress the lid to open the ashtray.
t
o e
mpty it, pull it out by pulling it upwards.
4.
C
ontrols *
M
assage, Adaptive lighting, Blind spot
monitoring.
5.
C
ontrols *
Alarm, Peuge
O
t Connect Assistance,
Peuge
O
t Connect SOS
6.
F
ront armrest
7.
1
2 V accessor y socket (120 W) *
O
bserve the maximum power rating to
avoid damaging your accessory
8.
U
SB Player - Plug
* Depending on version.
Comfort
Page 99 of 338
97
508RXH_en_Chap03_confort_ed01-2014
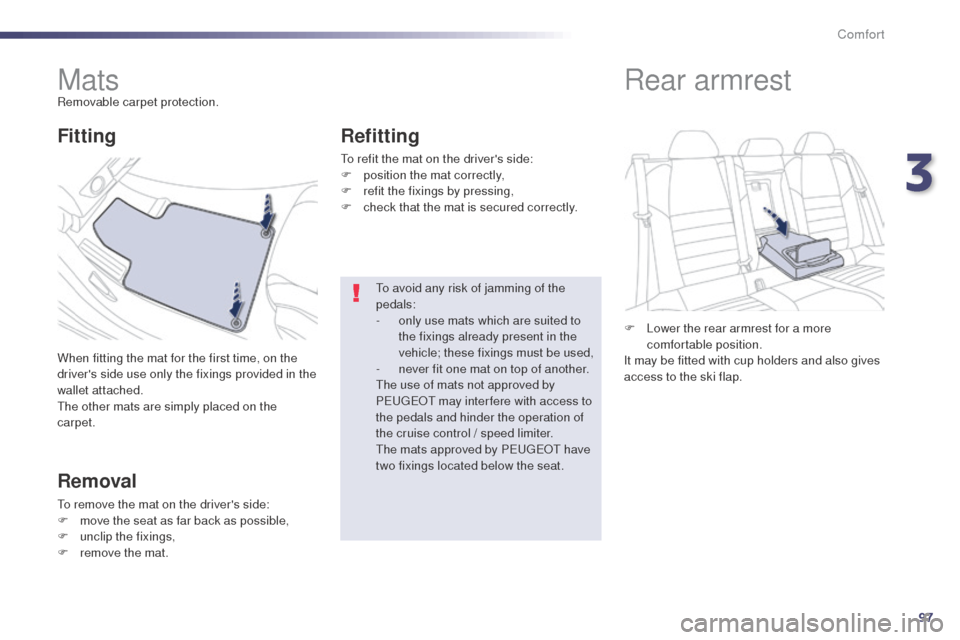
MatsRemovable carpet protection.
When fitting the mat for the first time, on the
driver's side use only the fixings provided in the
wallet attached.
th
e other mats are simply placed on the
carpet.
Fitting
Removal
to remove the mat on the driver's side:
F m ove the seat as far back as possible,
F
un
clip the fixings,
F
r
emove the mat.
Refitting
to refit the mat on the driver's side:
F p osition the mat correctly,
F
r
efit the fixings by pressing,
F
c
heck that the mat is secured correctly.
to a
void any risk of jamming of the
pedals:
-
o
nly use mats which are suited to
the fixings already present in the
vehicle; these fixings must be used,
-
n
ever fit one mat on top of another.
th
e use of mats not approved by
P
e
uge
Ot
may inter fere with access to
the pedals and hinder the operation of
the cruise control
/ speed limiter.
th
e mats approved by P
e
uge
Ot
have
two fixings located below the seat. F
L
ower the rear armrest for a more
comfortable position.
It may be fitted with cup holders and also gives
access to the ski flap.
Rear armrest
3
Comfort
Page 100 of 338
98
508RXH_en_Chap03_confort_ed01-2014
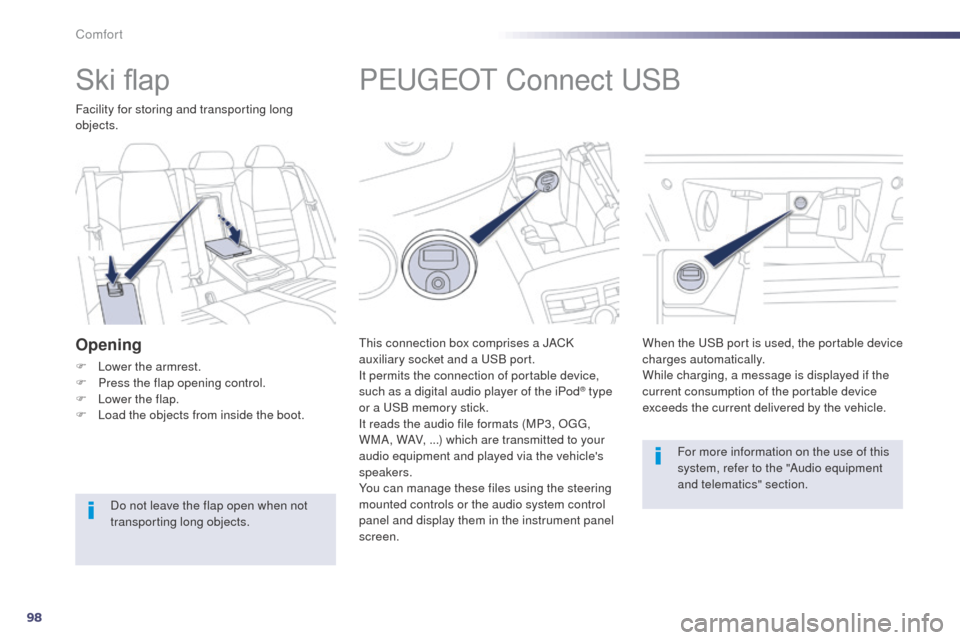
PeugeOt Connect uS B
this connection box comprises a JACK
auxiliary socket and a
uS B port.
It permits the connection of portable device,
such as a digital audio player of the iPod
® type
or a
uS
B memory stick.
It reads the audio file formats (MP3, O
g
g
,
W
MA, WAV, ...) which are transmitted to your
audio equipment and played via the vehicle's
speakers.
You can manage these files using the steering
mounted controls or the audio system control
panel and display them in the instrument panel
screen. When the
u
S
B port is used, the portable device
charges automatically.
While charging, a message is displayed if the
current consumption of the portable device
exceeds the current delivered by the vehicle.
For more information on the use of this
system, refer to the "Audio equipment
and telematics" section.
Ski flap
Facility for storing and transporting long
objects.
Opening
F Lower the armrest.
F P ress the flap opening control.
F
L
ower the flap.
F
L
oad the objects from inside the boot.
Do not leave the flap open when not
transporting long objects.
Comfort