Peugeot 508 RXH 2014 Owner's Manual
Manufacturer: PEUGEOT, Model Year: 2014, Model line: 508 RXH, Model: Peugeot 508 RXH 2014Pages: 338, PDF Size: 10.81 MB
Page 101 of 338
99
508RXH_en_Chap03_confort_ed01-2014
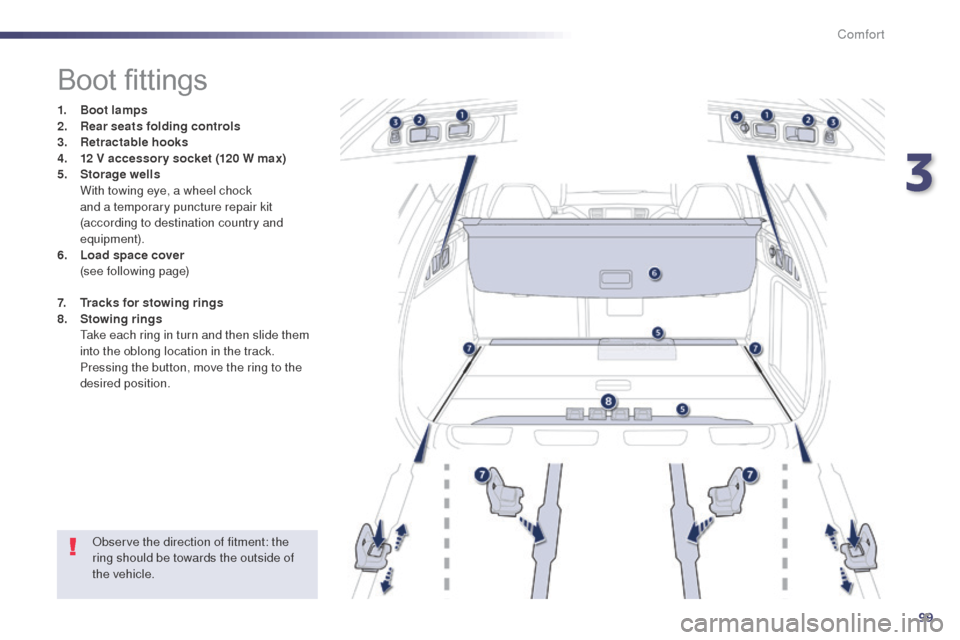
Boot fittings
1. Boot lamps
2. Rear seats folding controls
3.
R
etractable hooks
4.
1
2 V accessor y socket (120 W max)
5.
Sto
rage wells
W
ith towing eye, a wheel chock
and a temporary puncture repair kit
(according to destination country and
equipment).
6.
L
oad space cover
(
see following page)
7.
T
r a c k s for stowing rings
8.
S
towing rings
t
a
ke each ring in turn and then slide them
into the oblong location in the track.
P
ressing the button, move the ring to the
desired position.
Observe the direction of fitment: the
ring should be towards the outside of
the vehicle.
3
Comfort
Page 102 of 338
100
508RXH_en_Chap03_confort_ed01-2014
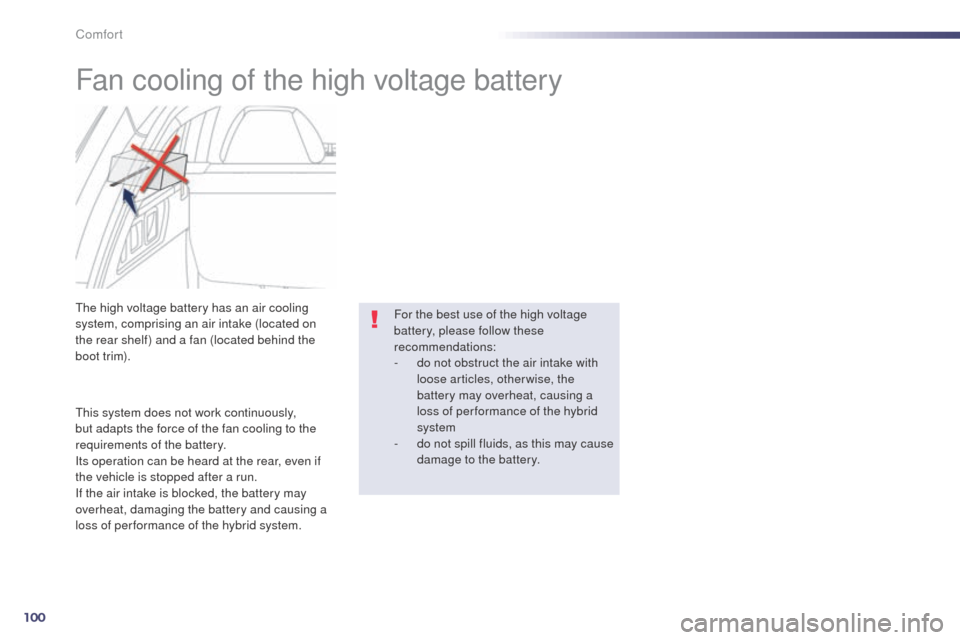
Fan cooling of the high voltage battery
this system does not work continuously,
but adapts the force of the fan cooling to the
requirements of the battery.
Its operation can be heard at the rear, even if
the vehicle is stopped after a run.
If the air intake is blocked, the battery may
overheat, damaging the battery and causing a
loss of per formance of the hybrid system.
th
e high voltage battery has an air cooling
system, comprising an air intake (located on
the rear shelf) and a fan (located behind the
b o ot t r im). For the best use of the high voltage
battery, please follow these
recommendations:
-
d
o not obstruct the air intake with
loose articles, otherwise, the
battery may overheat, causing a
loss of per formance of the hybrid
system
-
d
o not spill fluids, as this may cause
damage to the battery.
Comfort
Page 103 of 338
101
508RXH_en_Chap03_confort_ed01-2014
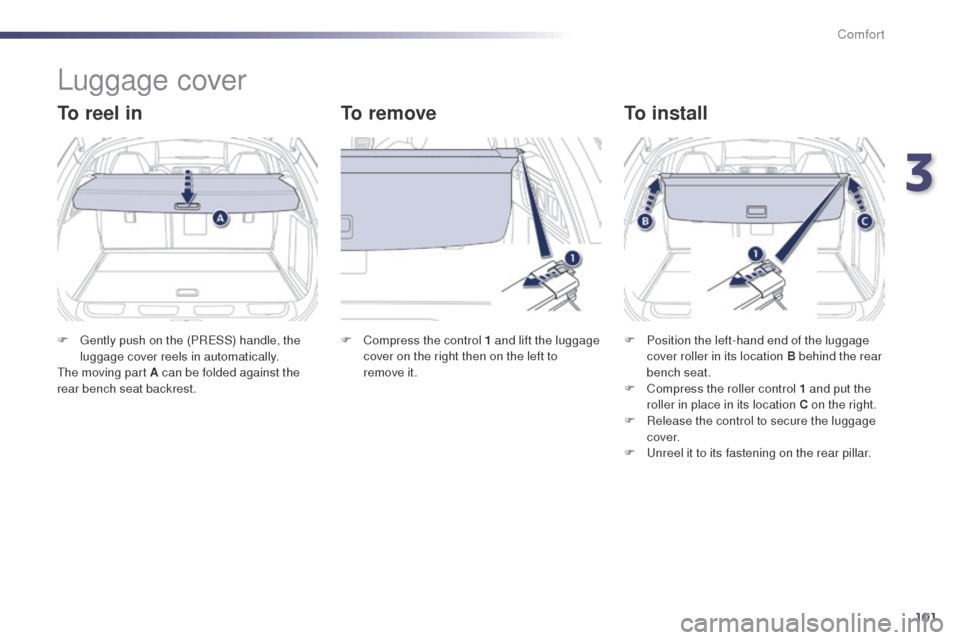
Luggage cover
To reel inTo removeTo install
F gently push on the (PReSS) handle, the
luggage cover reels in automatically.
th
e moving part A can be folded against the
rear bench seat backrest. F
C ompress the control 1 and lift the luggage
cover on the right then on the left to
remove
it.F
P osition the left-hand end of the luggage
cover roller in its location B behind the rear
bench seat.
F
C
ompress the roller control 1 and put the
roller in place in its location C on the right.
F
R
elease the control to secure the luggage
c ove r.
F
u
n
reel it to its fastening on the rear pillar.
3
Comfort
Page 104 of 338
102
508RXH_en_Chap03_confort_ed01-2014
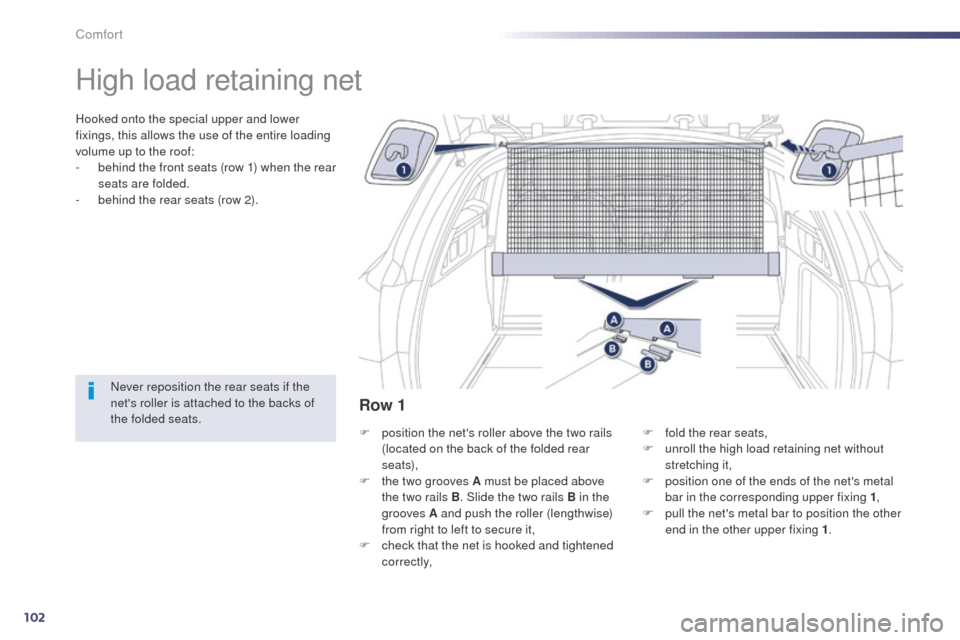
High load retaining net
Hooked onto the special upper and lower
fixings, this allows the use of the entire loading
volume up to the roof:
-
b
ehind the front seats (row 1) when the rear
seats are folded.
-
b
ehind the rear seats (row 2).
Never reposition the rear seats if the
net's roller is attached to the backs of
the folded seats. F
p
osition the net's roller above the two rails
(located on the back of the folded rear
seats),
F
t
he two grooves A must be placed above
the two rails B . Slide the two rails B in the
grooves A and push the roller (lengthwise)
from right to left to secure it,
F
c
heck that the net is hooked and tightened
c o r r e c t l y, F
f
old the rear seats,
F
u
nroll the high load retaining net without
stretching it,
F
p
osition one of the ends of the net's metal
bar in the corresponding upper fixing 1 ,
F
p
ull the net's metal bar to position the other
end in the other upper fixing 1 .
Row 1
Comfort
Page 105 of 338
103
508RXH_en_Chap03_confort_ed01-2014
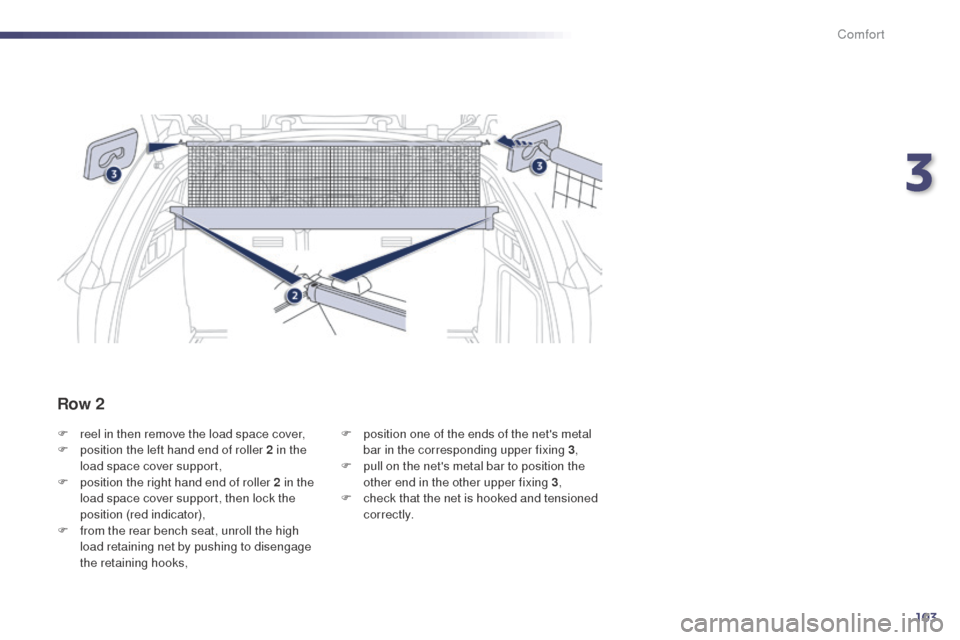
F reel in then remove the load space cover,
F p osition the left hand end of roller 2 in the
load space cover support,
F
p
osition the right hand end of roller 2 in the
load space cover support, then lock the
position (red indicator),
F
f
rom the rear bench seat, unroll the high
load retaining net by pushing to disengage
the retaining hooks, F
p osition one of the ends of the net's metal
bar in the corresponding upper fixing 3 ,
F
p
ull on the net's metal bar to position the
other end in the other upper fixing 3 ,
F
c
heck that the net is hooked and tensioned
c o r r e c t l y.
Row 2
3
Comfort
Page 106 of 338
104
508RXH_en_Chap03_confort_ed01-2014
Heating and Ventilation
Air intake
the air circulating in the passenger compartment
is filtered and originates either from the outside via
the grille located at the base of the windscreen or
from the inside in air recirculation mode.
Controls
the incoming air follows various routes
depending on the controls selected by
the driver, the front passenger and rear
passengers, according to the level of
equipment.
th
e temperature control enables you to obtain
the level of comfort required by mixing the air of
the various circuits.
th
e air distribution control enables you to
select the air vents used in the passenger
compartment by the combined use of the
associated buttons.
th
e air flow control enables you to increase or
reduce the speed of the ventilation fan.
th
ese controls are grouped together on control
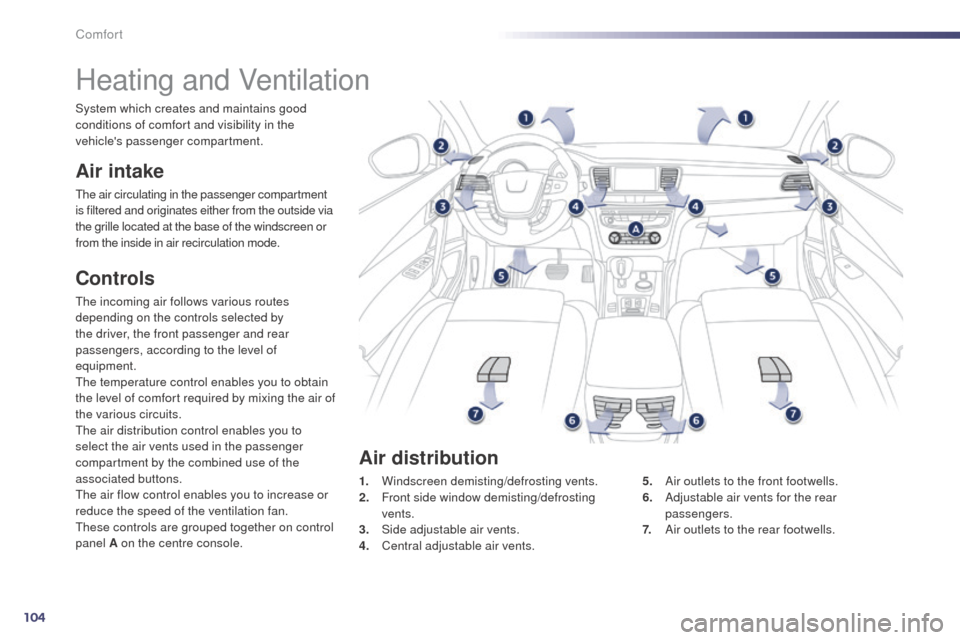
panel A on the centre console. 1.
W
indscreen demisting/defrosting vents.
2.
F
ront side window demisting/defrosting
vents.
3.
S
ide adjustable air vents.
4.
C
entral adjustable air vents.5.
A
ir outlets to the front footwells.
6.
A
djustable air vents for the rear
passengers.
7.
A
ir outlets to the rear footwells.
Air distribution
System which creates and maintains good
conditions of comfort and visibility in the
vehicle's passenger compartment.
Comfort
Page 107 of 338
105
508RXH_en_Chap03_confort_ed01-2014
In order for these systems to be fully effective, follow the operation and maintenance
guidelines below:
F
I
f the interior temperature remains very high after the vehicle has been parked in the sun
for a considerable time, first ventilate the passenger compartment for a few minutes.
P
lace the air flow control at a sufficient level to provide an adequate renewal of air in
the passenger compartment.
F
t
o o
btain an even air distribution, take care not to obstruct the exterior air intake grilles
located at the base of the windscreen, the nozzles, the vents and the air outlets, as well
as the air extractor located in the boot.
F
u
s
e in preference the intake of exterior air as prolonged use of the air recirculation may
cause misting of the windows and side windows.
F
D
o not cover the sunshine sensor, located on the dashboard; this is used for regulation
of the automatic air conditioning system.
F
O
perate the air conditioning system for 5 to 10 minutes, once or twice a month to keep it
in good working order.
F
e
n
sure that the passenger compartment filter is in good condition and have the filter
elements replaced regularly (refer to the "Checks" section).
W
e recommend the use of a combined passenger compartment filter. t
h
anks to its
second special active filter, it contributes to the purification of the air breathed by the
occupants and the cleanliness of the passenger compartment (reduction of allergic
symptoms, bad odours and greasy deposits).
F
t
h
e air conditioning uses power from the engine while operating. t
h
is results in an
increase in the vehicle's fuel consumption.
W
hen towing at or near maximum capacity or on steep slopes in high ambient
temperatures, switching off the air conditioning saves engine power and so improves
towing capacity.
C
ondensation created by the air conditioning results in a discharge of water under the
vehicle when stationary, which is per fectly normal.
F
t
o e
nsure correct operation of the air conditioning system, you are also advised to have
it checked regularly.
F
I
f the system does not produce cold air, do not use it and contact a P
e
uge
Ot
dealer or
a qualified workshop.
Recommendations for ventilation and air conditioning
the air conditioning system does not
contain chlorine and does not present
any danger to the ozone layer.
3
Comfort
Page 108 of 338
106
508RXH_en_Chap03_confort_ed01-2014
Dual-zone digital air conditioning
Automatic operation
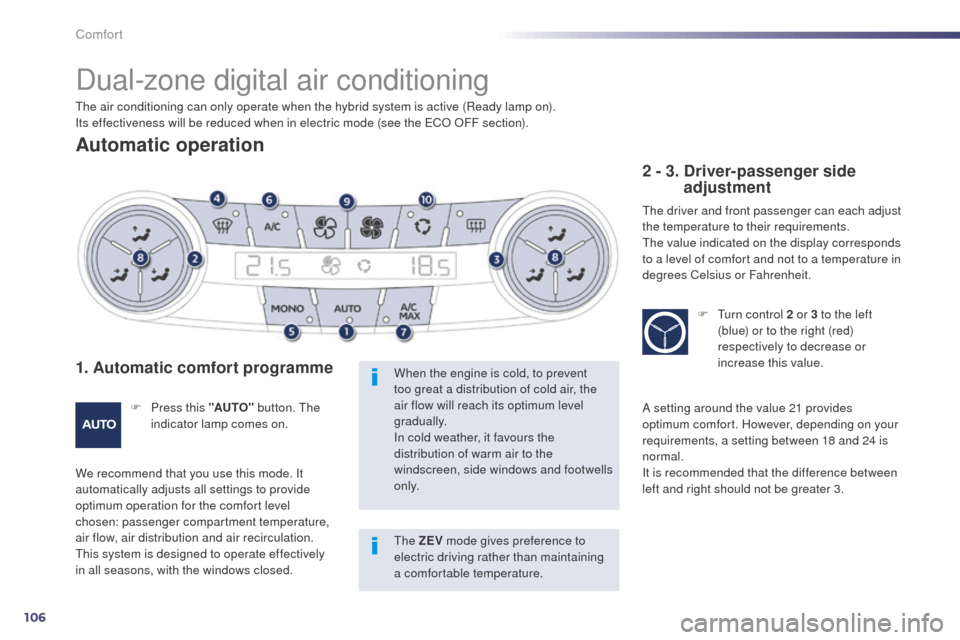
1. Automatic comfort programme
F Press this "AUTO" button. th e
indicator lamp comes on.
We recommend that you use this mode. It
automatically adjusts all settings to provide
optimum operation for the comfort level
chosen: passenger compartment temperature,
air flow, air distribution and air recirculation.
th
is system is designed to operate effectively
in all seasons, with the windows closed. When the engine is cold, to prevent
too great a distribution of cold air, the
air flow will reach its optimum level
gradually.
In cold weather, it favours the
distribution of warm air to the
windscreen, side windows and footwells
o n l y.
2 - 3. Driver-passenger side
adjustment
the driver and front passenger can each adjust
the temperature to their requirements.
th
e value indicated on the display corresponds
to a level of comfort and not to a temperature in
degrees Celsius or Fahrenheit.
F
t
u
rn control 2 or 3 to the left
(blue) or to the right (red)
respectively to decrease or
increase this value.
A setting around the value 21 provides
optimum comfort. However, depending on your
requirements, a setting between 18 and 24 is
normal.
It is recommended that the difference between
left and right should not be greater 3.
th
e air conditioning can only operate when the hybrid system is active (Ready lamp on).
Its effectiveness will be reduced when in electric mode (see the
e
C
O OFF section).
th
e ZEV mode gives preference to
electric driving rather than maintaining
a comfortable temperature.
Comfort
Page 109 of 338
107
508RXH_en_Chap03_confort_ed01-2014
On entering the vehicle, if the interior
temperature is much colder or warmer
than the comfort value, there is no
need to change the value displayed in
order to obtain the comfort required.
th
e system corrects the difference
in temperature automatically and as
quickly as possible.
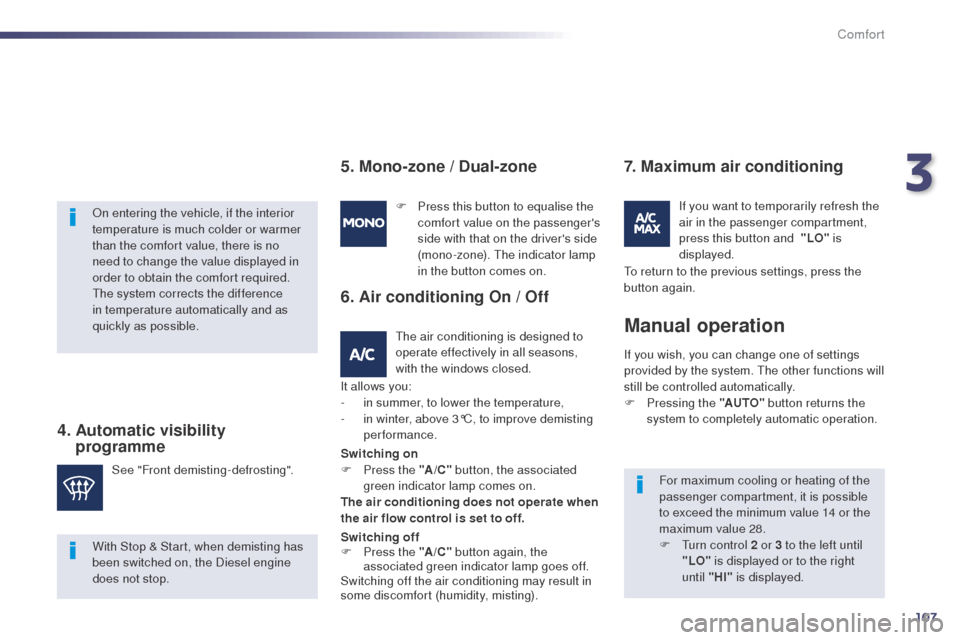
4. Automatic visibility programme
For maximum cooling or heating of the
passenger compartment, it is possible
to exceed the minimum value 14 or the
maximum value 28.
F
t
u
rn control 2 or 3 to the left until
"LO" is displayed or to the right
until "HI" is displayed.
See "Front demisting-defrosting". F
P
ress this button to equalise the
comfort value on the passenger's
side with that on the driver's side
(mono-zone).
t
h
e indicator lamp
in the button comes on.
If you wish, you can change one of settings
provided by the system. t
h
e other functions will
still be controlled automatically.
F
P
ressing the "AUTO"
button returns the
system to completely automatic operation.
Manual operation
5. Mono-zone / Dual-zone
the air conditioning is designed to
operate effectively in all seasons,
with the windows closed.
6. Air conditioning On / Off
It allows you:
-
i n summer, to lower the temperature,
-
i
n winter, above 3°C, to improve demisting
performance.
7. Maximum air conditioning
If you want to temporarily refresh the
air in the passenger compartment,
press this button and
"LO" is
displayed.
With Stop & Start, when demisting has
been switched on, the Diesel engine
does not stop. Switching on
F
P
ress the " A/C" button, the associated
green indicator lamp comes on.
The air conditioning does not operate when
the air flow control is set to off.
Switching off
F
P
ress the "A /C " button again, the
associated green indicator lamp goes off.
Switching off the air conditioning may result in
some discomfort (humidity, misting).
to r
eturn to the previous settings, press the
button again.
3
Comfort
Page 110 of 338
108
508RXH_en_Chap03_confort_ed01-2014
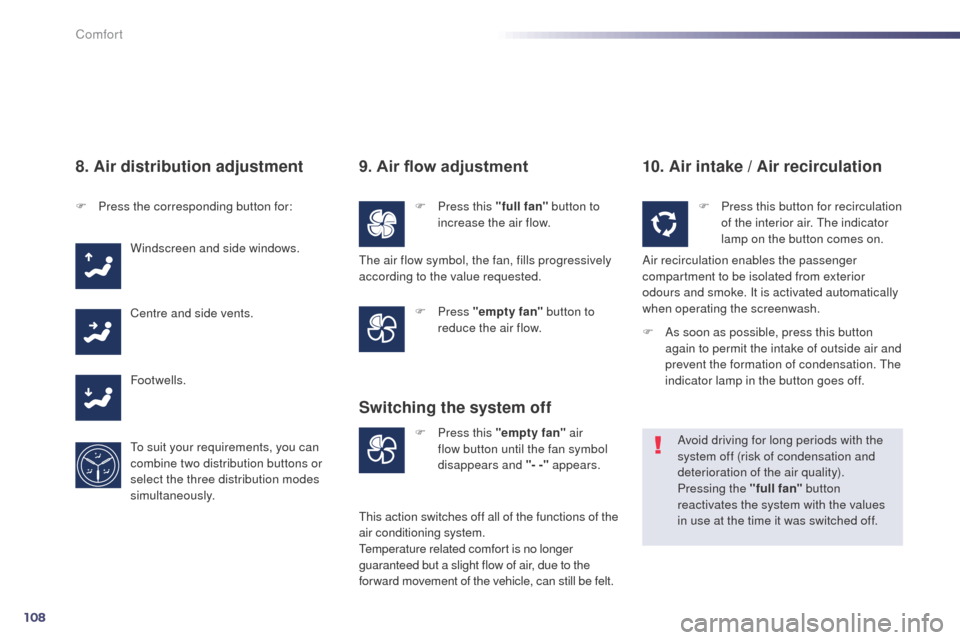
8. Air distribution adjustment
F Press the corresponding button for:Windscreen and side windows.
Centre and side vents.
Footwells.
to s
uit your requirements, you can
combine two distribution buttons or
select the three distribution modes
simultaneously.
9. Air flow adjustment
F Press this "full fan" button to
increase the air flow.
F
Press "empty fan" button to
reduce the air flow.
10. Air intake / Air recirculation
F Press this "empty fan" air
flow button until the fan symbol
disappears and "- -" appears.
Switching the system off
F Press this button for recirculation of the interior air. th e indicator
lamp on the button comes on.
Air recirculation enables the passenger
compartment to be isolated from exterior
odours and smoke. It is activated automatically
when operating the screenwash.
Avoid driving for long periods with the
system off (risk of condensation and
deterioration of the air quality).
Pressing the "full fan" button
reactivates the system with the values
in use at the time it was switched off.
th
e air flow symbol, the fan, fills progressively
according to the value requested.
th
is action switches off all of the functions of the
air conditioning system.
te
mperature related comfort is no longer
guaranteed but a slight flow of air, due to the
for ward movement of the vehicle, can still be felt. F
A
s soon as possible, press this button
again to permit the intake of outside air and
prevent the formation of condensation.
t
h
e
indicator lamp in the button goes off.
Comfort