PONTIAC FIERO 1988 Service Repair Manual
Manufacturer: PONTIAC, Model Year: 1988, Model line: FIERO, Model: PONTIAC FIERO 1988Pages: 1825, PDF Size: 99.44 MB
Page 211 of 1825
Page 212 of 1825
FRONT SUSPENSION 3C-1
SEC"T0RI 3C
FRONT SUSPENS
NOTICE: All front suspension fasteners are an important attaching part in that it could affect the
performance of vital parts and systems, and/or could result in major repair expense. They must be replaced with
one of the same part number or with an equivalent part if replacement becomes necessary. Do not use a
replacement part of lesser quality or substitute design. Torque values must be used as specified during reassembly
to assure proper retention of this part.
NOTICE: Never attempt to heat, quench or straighten any front suspension part. Replace it with a new part
or
damage to the part may result.
CONTENTS
General lnformation ....................................................................................................... 3C-I
On-Car Service ................................................................................................................... 3C- I
Specifications ..................................................................................................................... 3C- 10
GENERAL INFORMATION
The front suspension is designed to allow each
wheel to compensate for changes in the road surface ON-CAR SERVICE
level without appreciably affecting the opposite wheel. WHEEL BEARINGS
Each wheel is independently connected to the frame by
The proper functioning of the front suspension
a steering
kunckle, strut assembly, ball joint, and lower cannot be maintained unless the front wheel tapered arm. The steering in a roller bearings are correctly adjusted. The bearings
prescribed three dimensional arc. The front wheels are
must be a slip fit on the spindle and the inside diameter held in proper relationship to each other by two tie rods of the bearings should be lubricated to insure proper which are connected to steering arms on the knuckles ~h~ spindle nut must be a free-running fit and to the relay rod assembly.
on the threads.
Coil chassis springs are mounted between the
spring housings on the front crossmember and the
lower control arms. Ride control is provided by double,
direct acting strut assemblies. The upper portion of
each strut assembly extends through the fender well
and attaches to the upper mount assembly with a nut.
Side roll of the front suspension is controlled by
a spring steel stabilizer shaft. It is mounted in rubber
bushings which are held to the frame side rails by
brackets. The ends of the stabilizer are connected to the
lower control arms by link bolts and are isolated by
rubber grommets.
The inner ends of the lower control arms have
pressed in bushings. Bolts (passing through the
bushings) attach the arm to the suspension
crossmember. The lower ball joint assembly is a press
fit in the arm and attaches to the steering knuckle with
a torque prevailing nut.
Rubber grease seals are provided at ball socket
assemblies to keep dirt and moisture from entering the
joint and damaging bearing surfaces.
Adjustment
Figure 602
NOTICE: See NOTICE on Page 3C-1
of this
section.
1. Remove dust cap from hub.
2. Remove cotter pin from spindle and spindle nut.
3. Tighten the spindle nut to 16 Nsm (12 lb. ft.)
while turning the wheel assembly forward by
hand to fully seat the bearings. This will remove
any grease or burrs which could cause excessive
wheel bearing play later.
4. Back off the nut to the "just loose" position.
5. Hand tighten the spindle nut. Loosen spindle nut
until either hole in the spindle lines up with a slot
in the nut. Not
nlore than 1/2 flat.
6. Install
new cotter pin. Bend the ends of the cotter
pin against nut, cut off extra length to ensure ends
will not interfere with the dust cap.
7. Measure the looseness in the hub assembly. There
will be
from .03 to . l3mm (.001 to .005 inches)
end play when properly adjusted.
8. Install dust cap on hub.
FRONT SUSPENSION
Refer to Fig. 610 for illustration of attachment
provisions for the bolted-on front suspension
suspension
crossmember.
Page 213 of 1825
3C-2 FRONT SUSPENSION
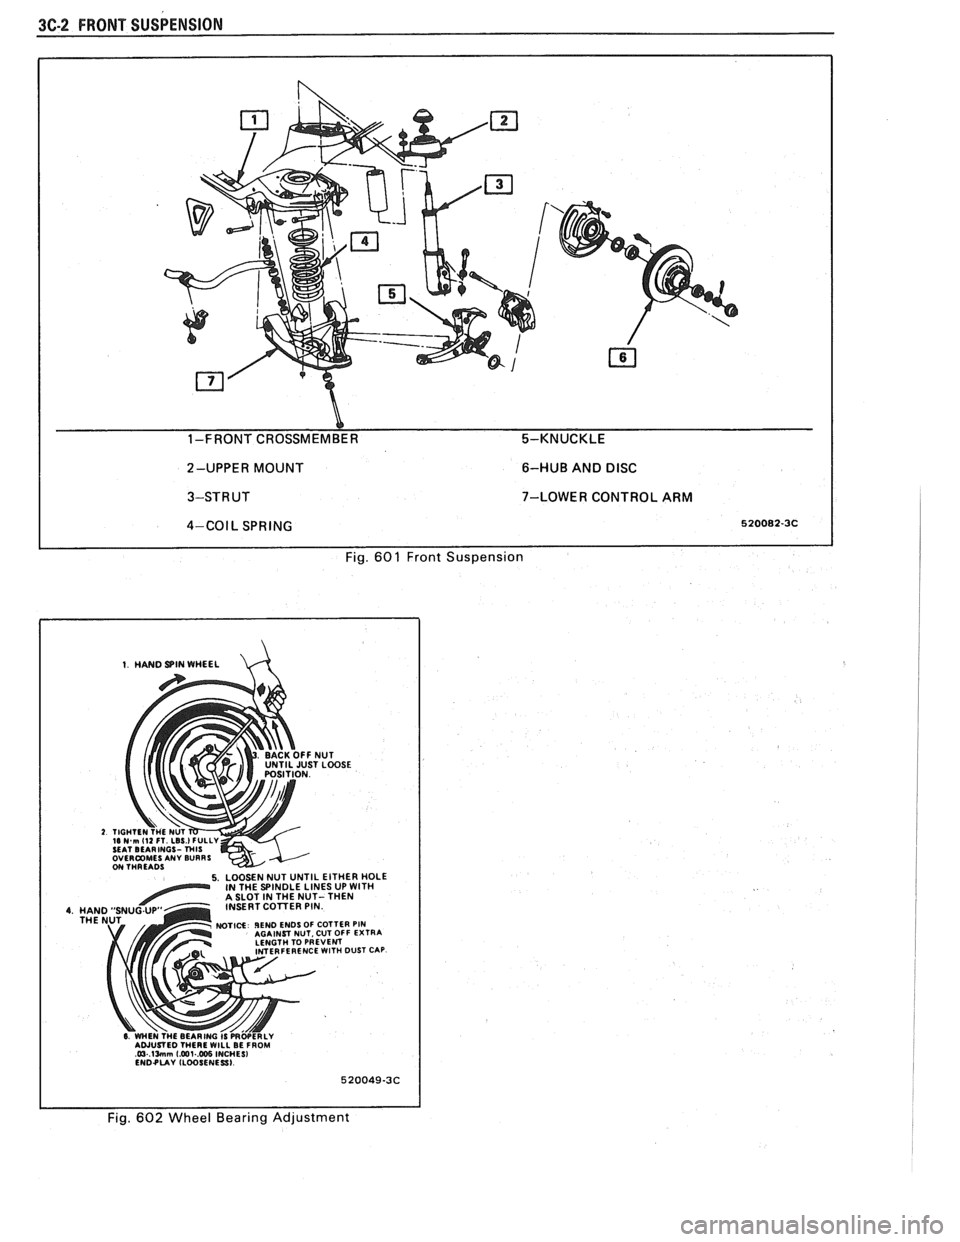
Y 1-FRONT CROSSMEMBER 5-KNUCKLE
2-UPPER MOUNT 6-HUB
AND
DISC
3-STRUT 7-LOWER CONTROL ARM I
4-COIL SPRING 520082-3C I I Fig. 601 Front Suspension
1. HAND SPIN WHEEL d
NUT iT LOOSE
5. LOOSEN NUT UNTIL EITHER HOLE IN THE SPINDLE LINES UP WlTH A SLOT IN THE NUT- THEN
INSERT COlTER PIN
NOTICE IEND ENDS OF COTTER PIN AGAINST NUT. CUT OFF EXTRA
LENGTH TO PREVENT
FERENCE
WlTH DUST CAP
6 WHEN THE BEARING IS PRWERLY AWUSTED THERE WILL BE FROM @.lMm [email protected] INCHES1 ENDPUY ILWSENESSI
1 I Fig. 602 Wheel Bearing Adjustment
Page 214 of 1825
FRONT SUSPENSION 3C3
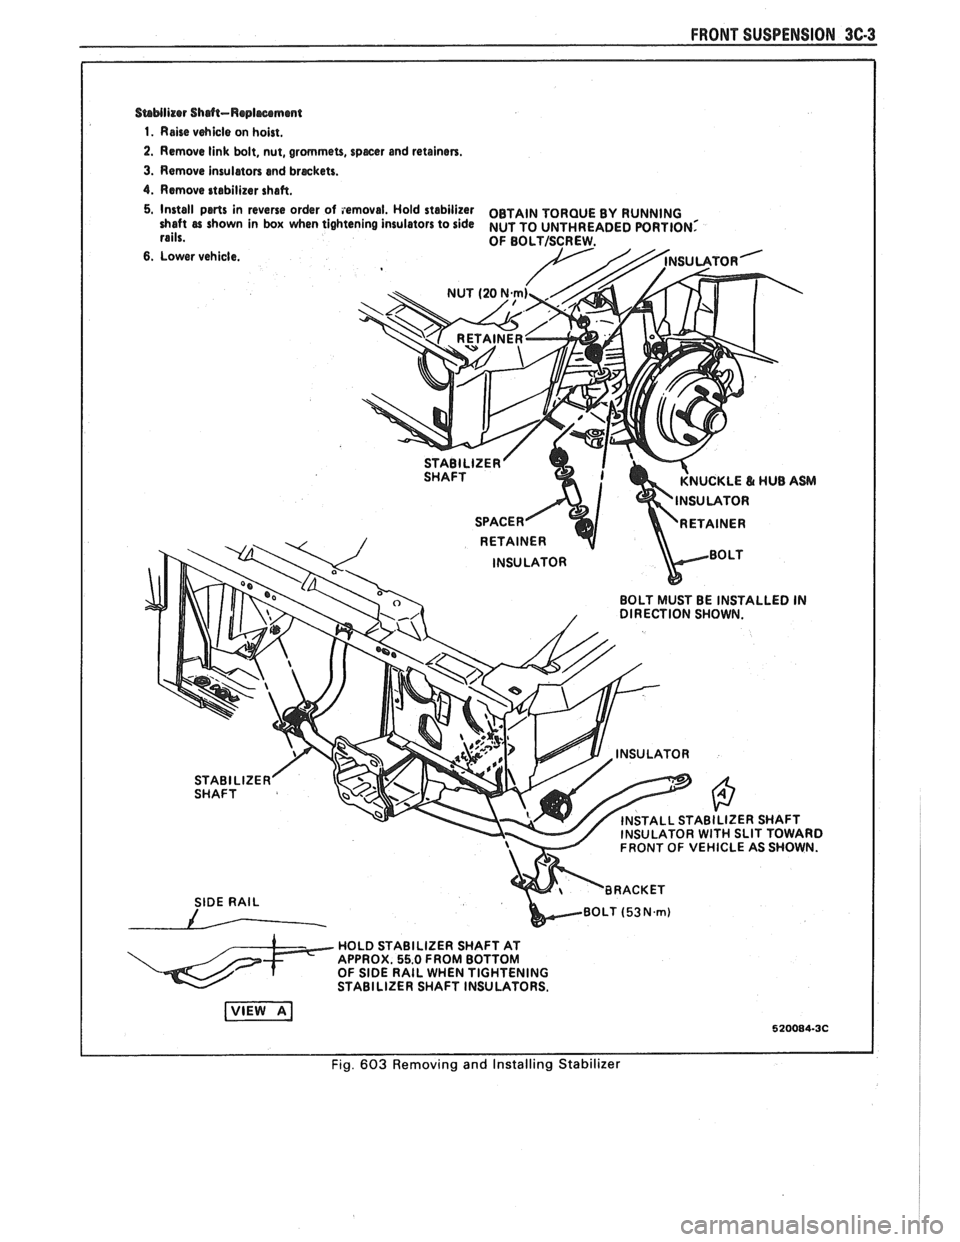
SaMlizer Sh&-Replrcrmmt
1. Rehe vehicle on hoist.
2. Remove link bolt, nut, grommets, specer and retainers.
3. Remove insulators end breckets.
4. Remove stabilizer shaft.
5.
Install ports in reverse order of iemova!. Hold stabilizer OBTAIN TORQUE BY RUNNING shaft as shown in box when tighten~ng ~nsulators to s~de NUT TO UNTHREADED PORTION: rails. OF BOLTISCREW.
6. Lower vehicle.
NUCKLE
6r HUB AW
SHAFT L STABILIZER SHAFT
TOR
WITH SLIT TOWARD
OF VEHICLE AS SHOWN.
SlDE RAIL
A
HOLD STABILIZER SHAFT AT
APPROX. 55.0 FROM BOTTOM
OF SlDE RAlL WHEN TIGHTENING
STABILIZER SHAFT INSULATORS.
I Fig. 603 Removing and Installing Stabilizer I
~
Page 215 of 1825
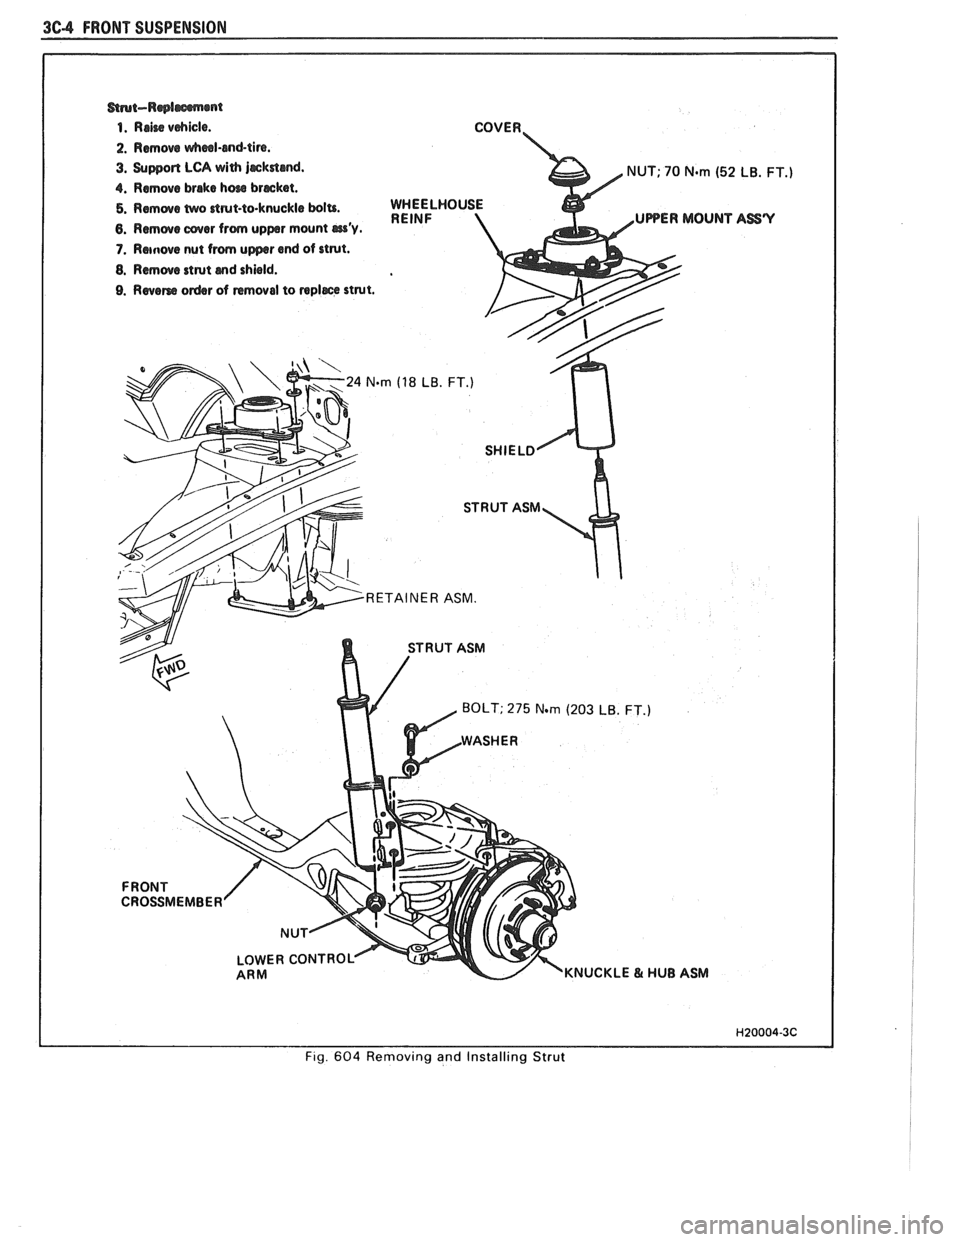
3C-4 FRONT SUSPENSION
3. Support LCA with j~kdmd. NUT; 70 Nern (52 LB. FT.)
4.
Remove brake hw brscket.
5. Remove tnro drut-to-knuckle bolts.
6. Remove cover from upper mount w'y. UPPER MOUNT ASS'V
7. Rmnove nut from upper end of strut.
8. Remove strut snd shield.
9. Revem order of removal to replece strut.
RETAINER ASM.
BOLT; 275 N.rn (203 LB. FT.)
CROSSMEMBER
LOWER CONTROL
KNUCKLE & HUB ASM
Fig. 604 Removing and Installing Strut I
Page 216 of 1825
FRONT SUSPENSION 3C-5
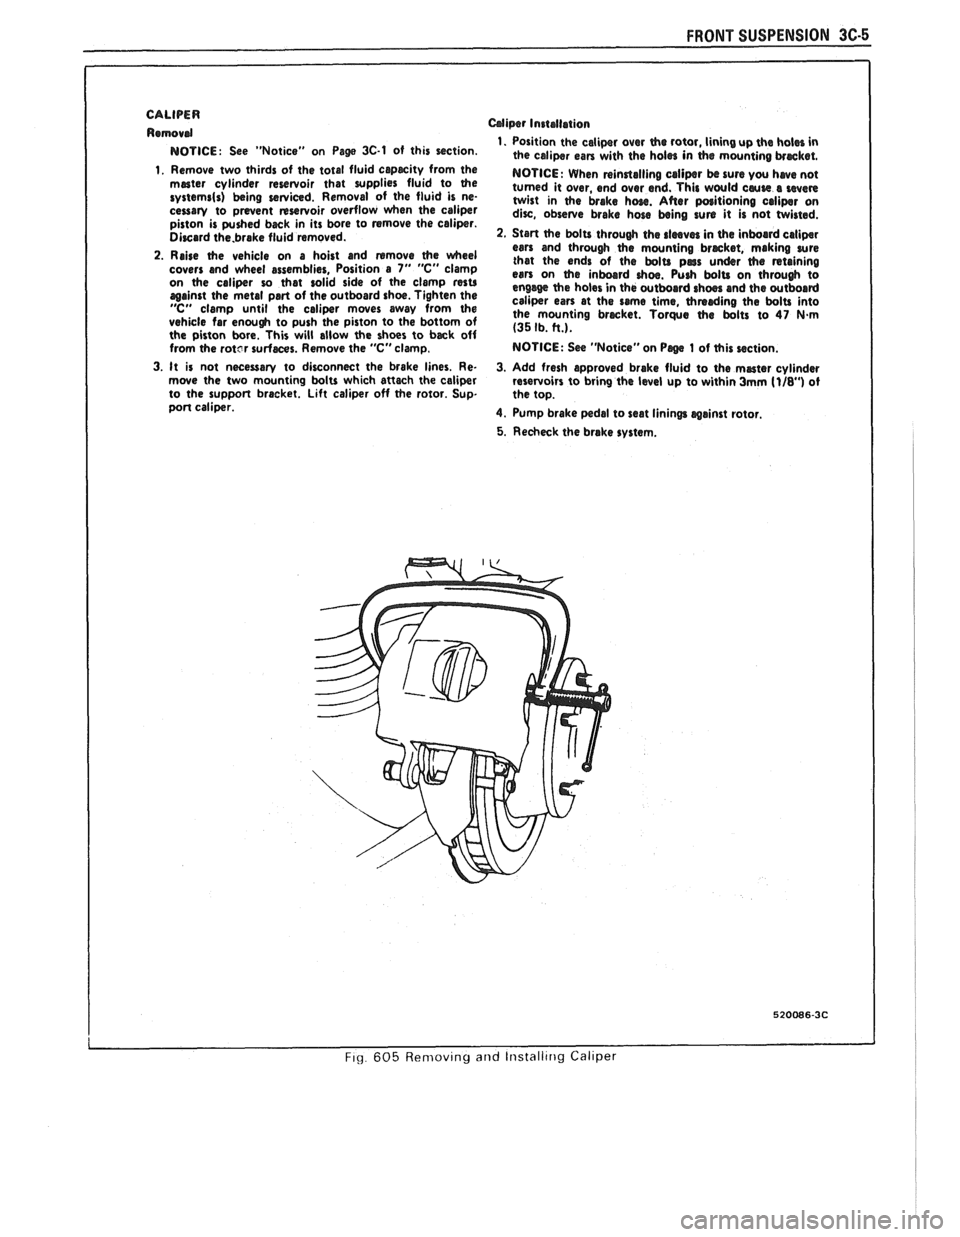
CALIPER
Remowd
NOTICE: See "Notice" on Page 3C-1 of this section.
1. Remove two thirds of the total fluid capecity from the meter cylinder reservoir that supplies fluid to the rystemrls) baing ~~iCed. Removal of the fluid is ne-
cessary to prevent nservoir overflow when the caliper
piston is pushed back in its bore to remove the caliper. Dircard the.brake fluid removed.
2. Raise the vehicle on a hoist and rumove (he wheel
covers and wheel assemblies, Position a 7" "C" clamp
on the caliper ro that solid side of the clamp resu against the metal part of the outboard shoe. Tighten the "C" clamp until the caliper mwes away from the vehicle far enough to push the piston to the bottom of
the piston bore. This will allow the shoes to back off
from the
rotcr surfaces. Remove the "C" clamp.
Mipr Installation
1. Position the caliper over the rotor, lining up the holes in
the caliper can with the holes in (he mounting brmket.
NOTICE: When rsinrtalling calipsr bc sure you hwe not
turned it over, end over end. This would cause s even twist in the brake hose. After poritioning caliper on dirc, observe brake hose being sun it is not twisted.
2. Start (he bolts through the rlmves in the inboard caliper ears and through the mounting brmket, making sure
that the ends of the bolts pars under (he rstaining esn on the inboard ohm. Push bolts on through to
engage the holes in the outboard rhm and the outboard
caliper ears at the same time, thmrding the bolts into
the mounting brwket. Torque the bolts to 47 N-m (35 Ib. tt.).
NOTICE: See "Notice" on Psge 1 of this section.
3. It
is not necessary to disconnect the brake lines. Re-
3. Add fresh approved brake fluid to the master cylinder
rnwe the two mounting bolts which attach the caliper
reservoirs to bring the level up to within 3mm [I/&') ot
to the support bracket. Lift caliper off the rotor. Sup.
the top.
port caliper.
4. Pump brake pedal to seat linings
wainst rotor.
5. Recheck the brake system.
I I
FI~ 605 Ren~ov~ng and Iristalltrig Callper
Page 217 of 1825
3C-6 FRONT SUSPENSION
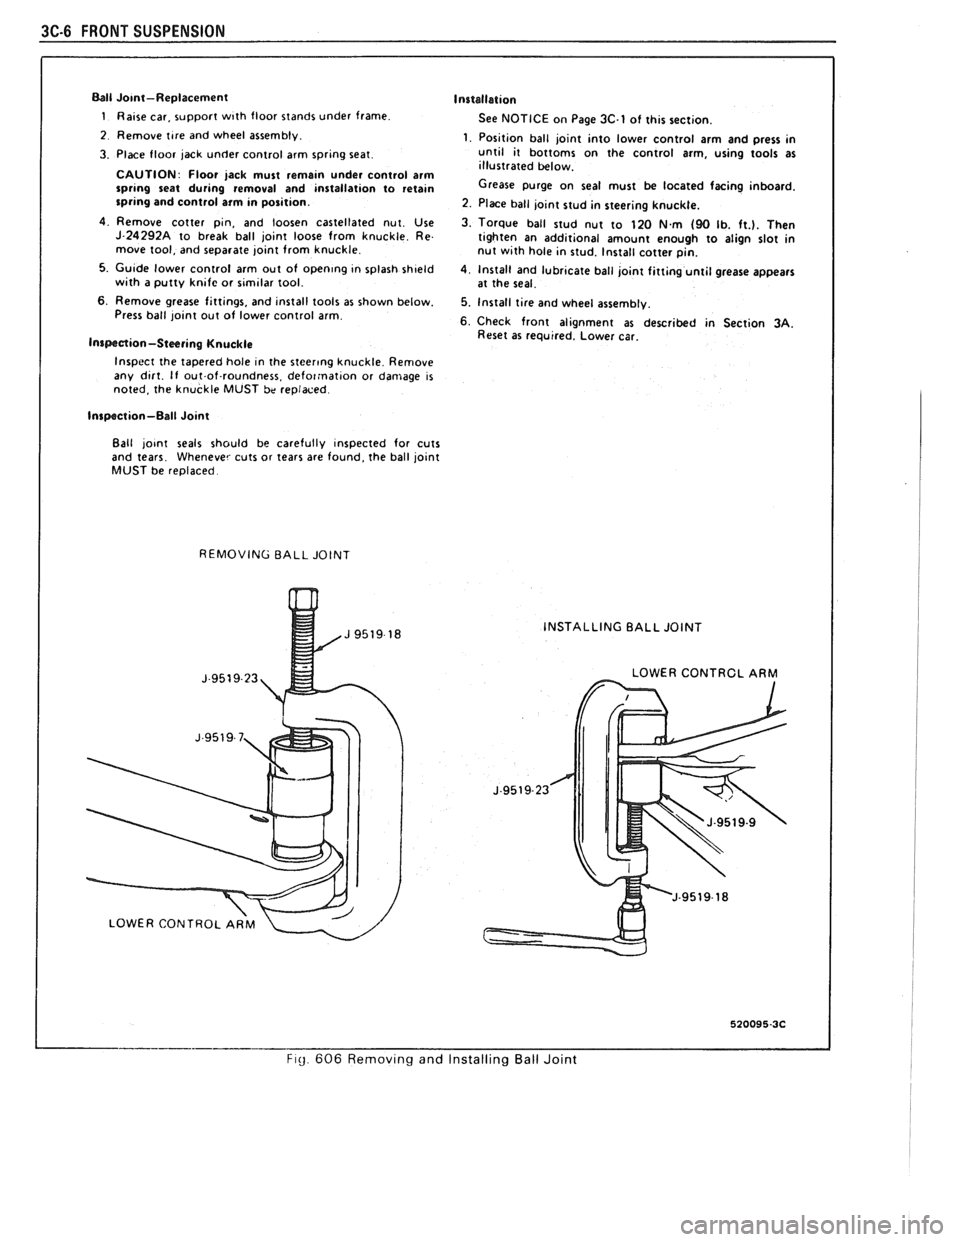
Ball Jo~nt-Replacement
1 Raise car, support w~th floor stands under frame
2 Remove tlre and wheel assembly.
3. Place floor jack under control arm sprtng seat
CAUTION Floor jack must
remaln under control arm sprbng seat dur~ng removal and tnstallat~on to retam sprlng and control arm In posttlon.
4 Remove cotter ptn, and loosen castellated nut Use J 24292A to break ball jolnt loose from knuckle Re
move tool, and separate jolnt from knuckle
5 Gu~de lower control arm out of openlng In splash sh~eld w~th a putty kntfc or stmtlar tool
6 Remove grease fttt~ngs, and ~nstall tools as shown below.
Press ball jolnt out of lower control arm
Inspection-Steering Knuckle
Installation
See NOTICE on Page 3C.1 of this section.
1. Position ball joint into lower control arm and press in
until it bottoms on the control arm, using tools as
illustrated below.
Grease purge on seal must be located facing inboard.
2. Place ball joint stud in steering knuckte.
3. Torque ball stud nut to 120
Nm (90 Ib. ft.). Then
tighten an additional amount enough to align slot in
nut with hole in stud. Install cotter pin.
4, Install and lubrtcate ball joint fitting until grease appears
at the seal.
5. Install tire and wheel assembly.
6. Check front alignment as described in Section 3A. Reset as requrred. Lower car.
Inspect the tapered hole
In the stcerlng knuckle Remove
any dtrt. If out.of-roundness, defor:nat~on or damage IS noted, the knuckle MUST be replaced
Inspection-Ball Joint
Ball
jo~nt seals should be carefully inspected for cuts
and tears. Whenever cuts or tears are found, the ball joint
MUST be replaced.
REMOVING BALL JOINT
INSTALLING BALL JOINT
LOWER CONTRCL ARM
FI~ 606 Remov~ng and Installing Ball Joint
Page 218 of 1825
FRONT SUSPENSION 3C-7
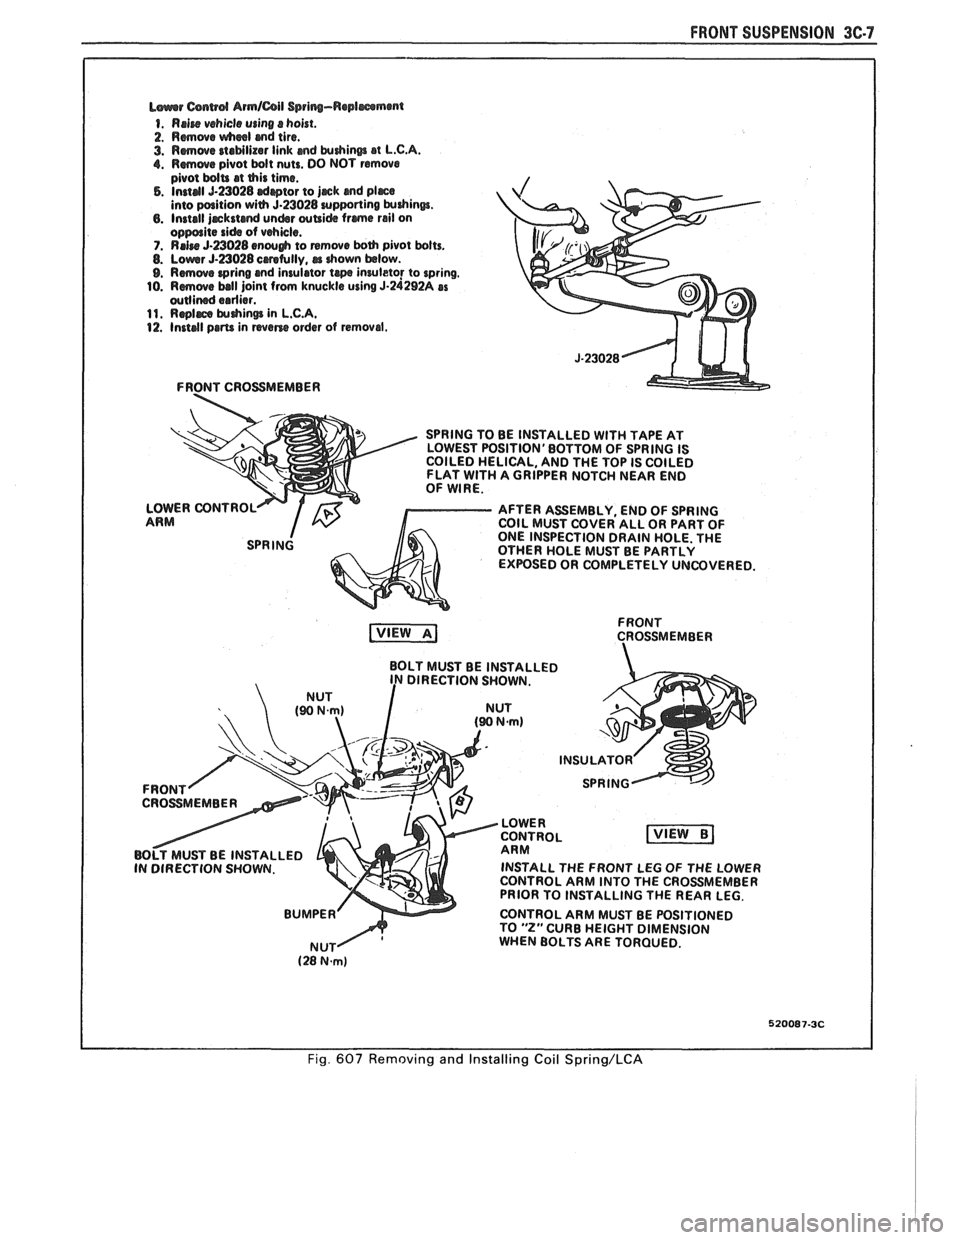
L~urrr Csnwd Armlail Spring-Replmmmt
1. Rrire vehicle using s hoist.
2. Rmwe wheel md tire.
3. Rmwe staMlizar link md krdrinm at L.C.A. 1. Rmwe pivot bdt nuts. DO NOT remove
pivot bdU at this time. 5. Instal 5-23028 drptor to jjrck and pljrce into paition with 5.23028 urpporting krdrinw. 6. Install jrckstcmd undsr wUi& frme rail on oppolite side of vehicle. 7. RrJre 5-a028 enough to remwe both pivot bolts. 8. Lowr 5-23028 crretully, rr drown below. 9. Rmove wring and insulator te inruleto! to spring.
10. Rmwe ball joint from knuckle using 5-24292A as wllined erdier. 11. Rqlrce $uhin@ in L.C.A. 12. Install prm in wane order of removal.
FRONT CROSSMEMBER
SPRING TO BE INSTALLED
WlTH TAPE AT
LOWEST POSITION'BOTTOM OF SPRING IS
COILED HELICAL, AND THE TOP IS COILED
FLAT
WlTH A GRIPPER NOTCH NEAR END
OF WIRE.
LOWER CONTROL
AFTER ASSEMBLY, END OF SPRING
ARM COIL MUST COVER ALL OR PART OF
ONE INSPECTION DRAIN HOLE. THE
OTHER HOLE MUST BE PARTLY
EXPOSED OR COMPLETELY UNCOVERED.
FRONT
CROSSMEMBER
BOLT MUST BE INSTALLED
DIRECTION SHOWN.
INSTALL THE FRONT LEG
OF THE LOWER
CONTROL ARM INTO THE CROSSMEMBER
PRIOR TO INSTALLING THE REAR LEG.
CONTROL ARM MUST BE POSITIONED
TO
"2" CURB HEIGHT DIMENSION
WHEN BOLTS ARE TORQUED.
520087-3C
Fig. 607 Removing and Installing Coil Spring/LCA
Page 219 of 1825
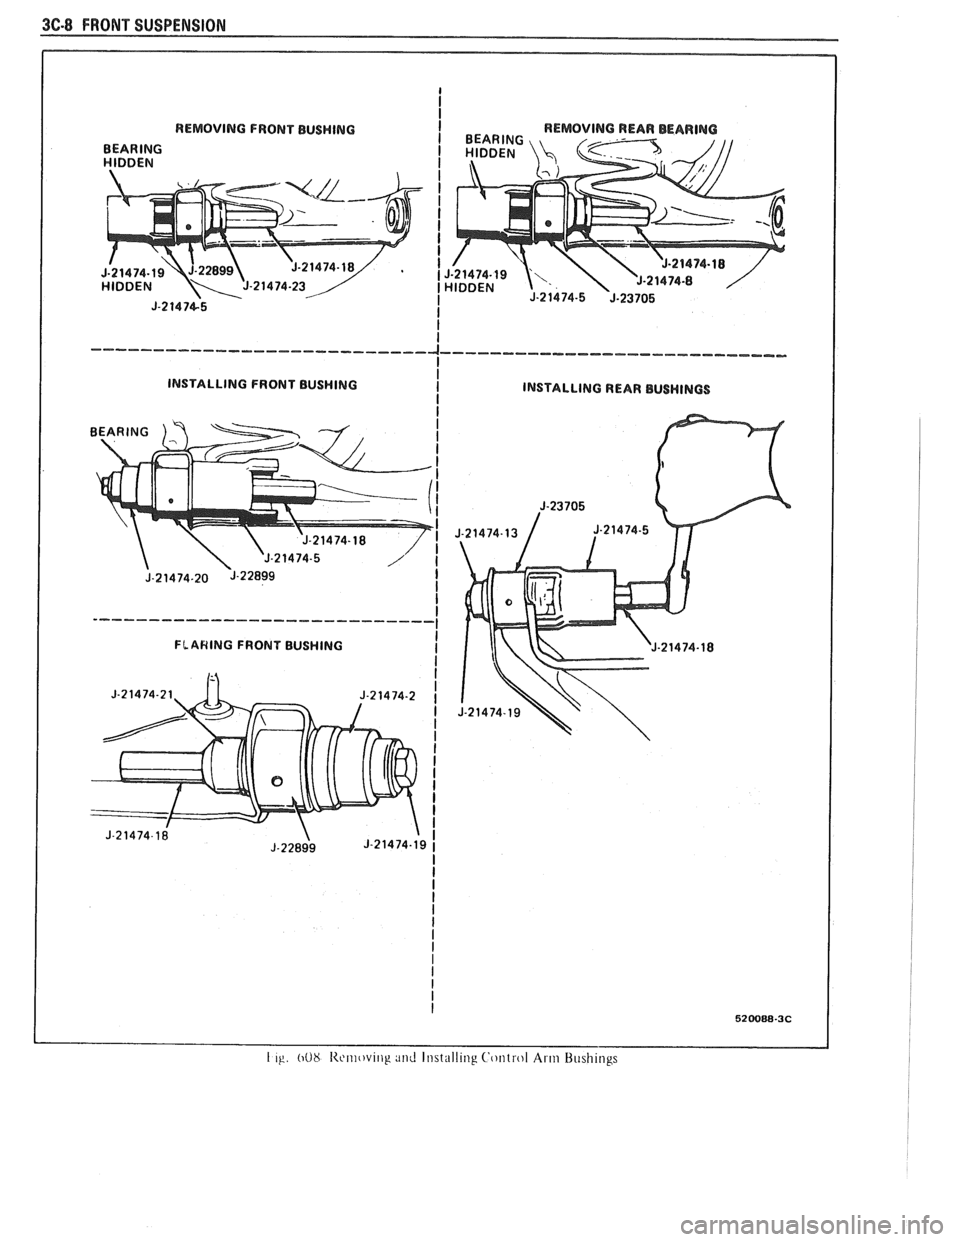
3C-8 FRONT SUSPENSION
REMOVING FRONT BUSHING
I -----------------------~-~~ddddddddddddd-~----~~-~--~--~ I
INSTALLING FRONT BUSHING I I INSTALLING REAR BUSHINGS
............................
FLAWING FRONT BUSHING
I I
I
I I I I I I I 1 520088-3C
Page 220 of 1825
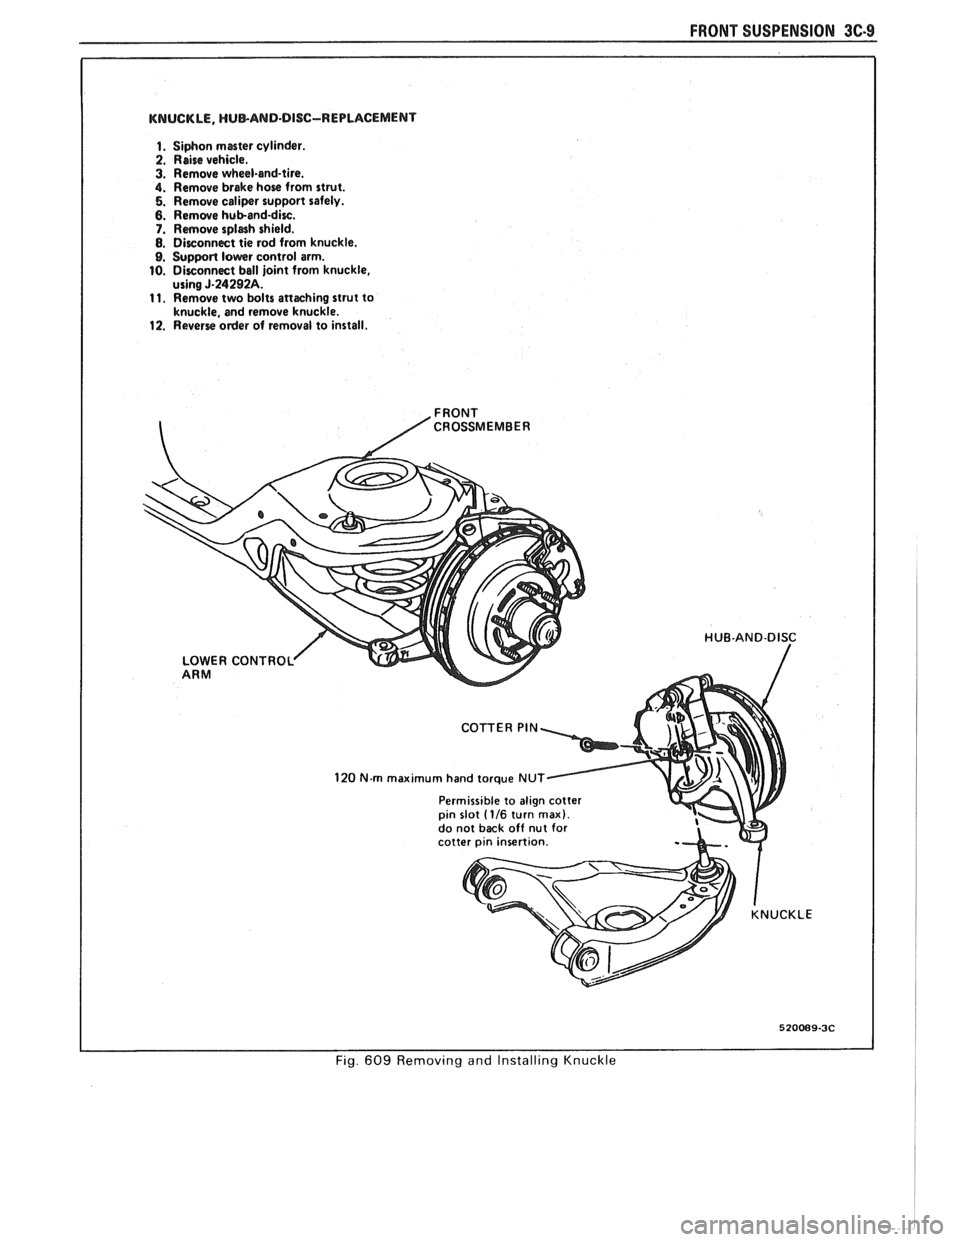
FRONT SUSPENSION 3C
KNUCKLE, HUBAND-DISC-REPLACEMENT
1. Siphon master cylinder.
2. Raise vehicle. 3. Remove wheel-and-tire. 4. Remove brake hose from strut. 5. Remove caliper support safely. 6. Remove huband-disc. 7. Remove splash shield. 8. Disconnect tie rod from knuckle. 9. Support lower control arm. 10. Disconnect ball joint from knuckle,
using J-24292A. 11. Remove two bolts attaching strut to
knuckle, and remove knuckle.
12. Reverse order of removal to install.
CROSSMEMBE R
LOWER CONTROL
ARM
COTTER PIN
120 N.m maximum hand torque NUT
Permissible to align cotter
pin slot
(1/6 turn max). do not back off nut for
cotter pln insert~on.
520089-3C
Fig. 609 Removing and Installing Knuckle