RENAULT ALASKAN 2017 Owners Manual
Manufacturer: RENAULT, Model Year: 2017, Model line: ALASKAN, Model: RENAULT ALASKAN 2017Pages: 340, PDF Size: 6.93 MB
Page 131 of 340

NOTE
Pre-driving checks and adjustments
3-27
Page 132 of 340
4
Display screen, heater and air conditioner,
and audio system Display screen, heater and air conditioner,
and audio system
Safety precautions ................................................... 4-2
Centre multi-function control panel (models with
navigation system) ................................................... 4-2 How to use touch screen display ........................ 4-3
How to use brightness control/display on·off
button ................................................................. 4-3
How to use
How to use BACK button ................................... 4-4
Vehicle information and settings (models with
navigation system) ................................................... 4-4 How to use INFO button..................................... 4-4
How to use
Reversing Camera (where fitted).............................. 4-7 How to read the displayed lines .......................... 4-8
Difference between predictive and actual
distances ............................................................ 4-8
How to adjust the screen .................................... 4-10
Operating tips..................................................... 4-10
360° Camera (where fitted) ..................................... 4-11 Operation ........................................................... 4-14
Guide lines ......................................................... 4-15
Difference between predictive and actual
distances ............................................................ 4-17
How to adjust the screen view ............................ 4-19
Operating tips..................................................... 4-19
Vents ....................................................................... 4-20
Centre vents ....................................................... 4-20
Side vents .......................................................... 4-20
Rear vents (where fitted) ..................................... 4-20
Heater and air conditioner ........................................ 4-21 Operating tips (models with automatic air
conditioner) ........................................................ 4-22
Manual air conditioner and heater (Type A) ......... 4-23
Manual air conditioner and heater (Type B) ......... 4-26
Automatic air conditioner .................................... 4-28
Servicing air conditioner ..................................... 4-30
Audio system (where fitted)...................................... 4-31 Audio operation precautions ............................... 4-31
Antenna .............................................................. 4-35
USB (Universal Serial Bus) connection port ........ 4-35
AUX (Auxiliary) input jack .................................... 4-36
CD/USB memory care and cleaning ................... 4-36
FM AM radio with compact disc (CD) player
(Type A) .................................................................. 4-37 Audio main operation .......................................... 4-38
Radio operation .................................................. 4-38
SETUP button .................................................... 4-39
Compact Disc (CD) operation ............................ 4-41
AUX (Auxiliary) socket......................................... 4-43
USB (Universal Serial Bus) connection port
(where fitted) ...................................................... 4-43
iPod player operation (where fitted)..................... 4-45
Bluetooth® operation.......................................... 4-46
FM-AM radio with compact disc (CD) player
(Type B) .................................................................. 4-52 Audio main operation .......................................... 4-52
Touchscreen Navigation (where fitted) ..................... 4-57
Steering wheel switch for audio control (where
fitted) ....................................................................... 4-58
Audio control ...................................................... 4-58
Page 133 of 340

Phone control buttons ......................................... 4-58
Bluetooth® Hands-Free Phone System (without
navigation system and colour display)....................... 4-59 Bluetooth® mobile phone feature ........................ 4-59
Hands-free telephone control .............................. 4-61Steering wheel switches (where fitted)................ 4-64
Bluetooth® Hands-Free Phone System (with
navigation system) ................................................... 4-65 Regulatory information ........................................ 4-65 Control buttons and microphone ......................... 4-66
Pairing procedure ............................................... 4-66
Phonebook ......................................................... 4-67
Making
acall ...................................................... 4-67
Receiving acall................................................... 4-67
During acall ....................................................... 4-67
Ending acall ....................................................... 4-67
Bluetooth® settings ............................................ 4-67
Telephone setup ................................................. 4-68
Page 134 of 340

WARNING
• Do not adjust the heater and air conditioner
controls or audio controls while driving so that full attention may be given to vehicle opera-
tion.
• If you noticed any foreign objects entering the
system hardware, spilled liquid on the sys-
tem, or noticed smoke or fumes coming out
from the system, or any other unusual opera-
tion is observed, stop using the system imme-
diately and contact the nearest approved
dealer or qualified workshop. Ignoring such
conditions may lead to an accident, fire or electric shock.
• Do not disassemble or modify this system. If
you do, it may lead to an accident, fire, or
electric shock.
CAUTION
Do not use the system when the engine is not
running for extended periods of time to prevent
battery discharge.
1.Phone button (P. 4-65)
2. Power/VOL (volume) dial
3. Display screen (P. 4-3)
4.
5.
6. Audio control buttons 7.
8. For navigation system control buttons refer to
the separate Navigation System Owner’s
Manual.
9. Brightness control/display ON·OFF button
(P. 4-3)
10.
SAFETY PRECAUTIONS
CENTRE MULTI-FUNCTION CONTROL PANEL (models with navigation
system)
4-2 Display screen, heater and air conditioner, and audio system
Page 135 of 340
11.
HOW TO USE TOUCH SCREEN
DISPLAY WARNING
• The glass display screen may break if it is hit
with ahard or sharp object. If the glass screen
breaks, do not touch it. Doing so could result
in an injury.
• To clean the display, never use
arough cloth,
alcohol, benzine, thinner or any kind of sol-
vent or paper towel with achemical cleaning
agent. They will scratch or deteriorate the
panel.
• Do not splash any liquid such as water or car
fragrance on the display. Contact with liquid
will cause the system to malfunction.
To help ensure safe driving, some functions cannot
be operated while driving.
The on-screen functions that are not available while
driving will be “greyed out” or muted.
Park the vehicle in asafe location and then operate
the navigation system.
CAUTION
• ALWAYS give your full attention to driving.
• Avoid using vehicle features that could dis-
tract you. If distracted, you could lose control
of your vehicle and cause an accident. Touch screen operation
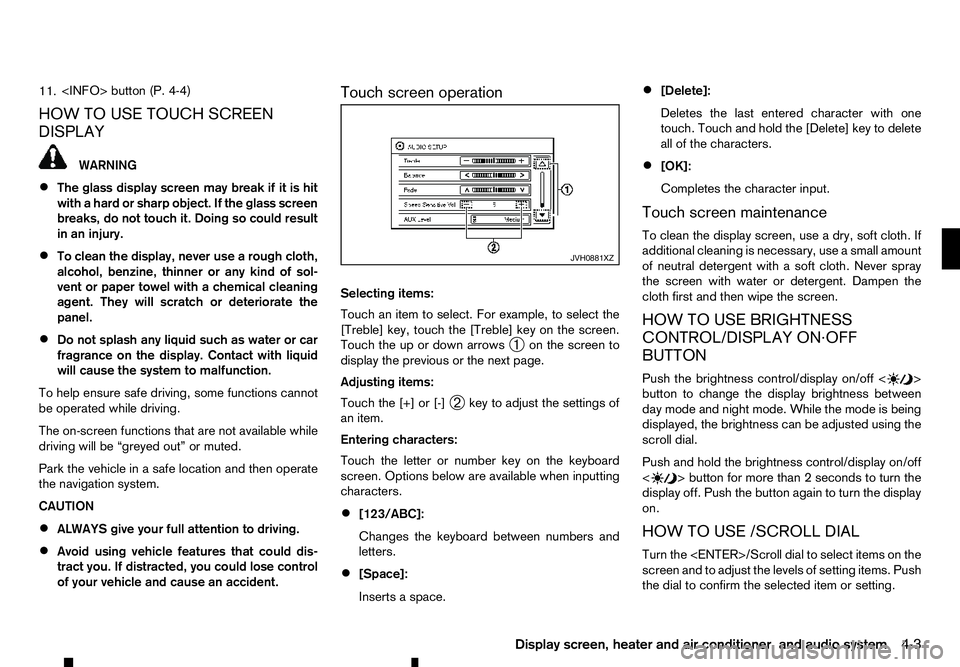
Selecting items:
Touch an item to select. For example, to select the
[Treble] key, touch the [Treble] key on the screen.
Touch the up or down arrows
➀on the screen to
display the previous or the next page.
Adjusting items:
Touch the [+] or [-] ➁key to adjust the settings of
an item.
Entering characters:
Touch the letter or number key on the keyboard
screen. Options below are available when inputting
characters.
• [123/ABC]:
Changes the keyboard between numbers and
letters.
• [Space]:
Inserts
aspace. •
[Delete]:
Deletes the last entered character with one
touch. Touch and hold the [Delete] key to delete
all of the characters.
• [OK]:
Completes the character input.
Touch screen maintenance
To clean the display screen, use adry, soft cloth. If
additional cleaning is necessary, use asmall amount
of neutral detergent with asoft cloth. Never spray
the screen with water or detergent. Dampen the
cloth first and then wipe the screen.
HOW TO USE BRIGHTNESS
CONTROL/DISPLAY ON·OFF
BUTTON
Push the brightness control/display on/off < >
button to change the display brightness between
day mode and night mode. While the mode is being
displayed, the brightness can be adjusted using the
scroll dial.
Push and hold the brightness control/display on/off
< >b
utton for more than
2seconds to turn the
display off. Push the button again to turn the display
on.
HOW TO USE /SCROLL DIAL
Turn the
screen and to adjust the levels of setting items. Push
the dial to confirm the selected item or setting. JVH0881XZ
Display screen, heater and air conditioner, and audio system
4-3
Page 136 of 340
HOW TO USE BACK BUTTON
Push the
screen. Vehicle information can be checked and various set-
tings can be adjusted on the display.
NOTE
Designs and items displayed on the screen may
vary depending on the models and specifications.
HOW TO USE INFO BUTTON
Push the
menu items on the display screen.
Available items:
• [Traffic Messages]
• [Eco Score]
[Traffic Messages] (where fitted)
Traffic Messages can be displayed on the display
screen when available. Refer to the separate Navi-
gation System Owner’s Manual for details.
[Eco Score] (where fitted)
The [Eco Score] feature analyses driving behaviour
and provides an overall score. Refer to the separate
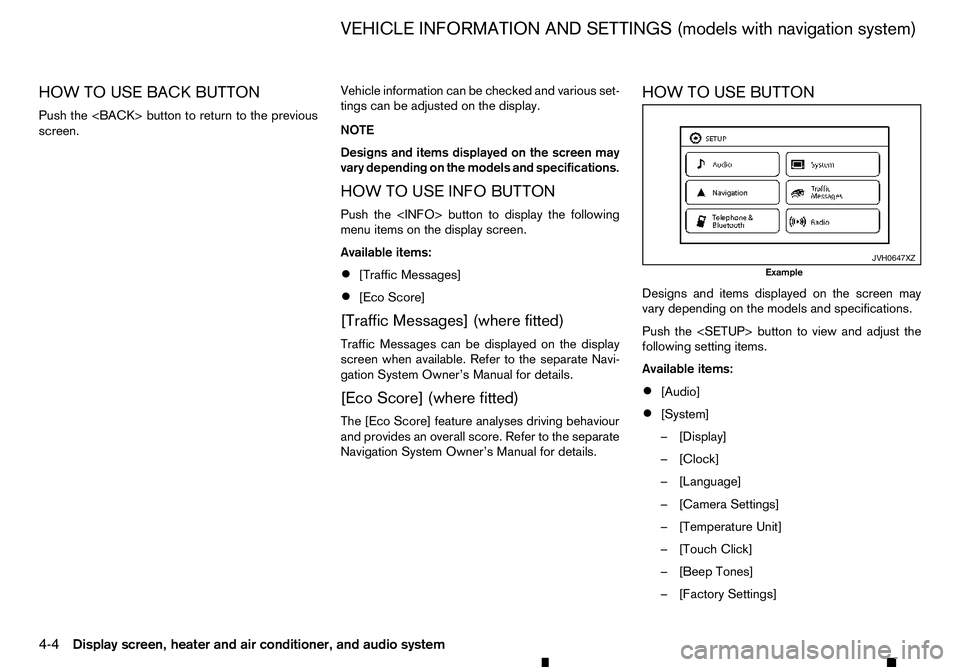
Navigation System Owner’s Manual for details. HOW TO USE BUTTON
Designs and items displayed on the screen may
vary depending on the models and specifications.
Push the
following setting items.
Available items:
•
[Audio]
• [System]
–[
Display]
–[ Clock]
–[ Language]
–[ Camera Settings]
–[ Temperature Unit]
–[ Touch Click]
–[ Beep Tones]
–[ Factory Settings] JVH0647XZ
Example
VEHICLE INFORMATION AND SETTINGS (models with navigation system)
4-4 Display screen, heater and air conditioner, and audio system
Page 137 of 340
![RENAULT ALASKAN 2017 Owners Manual –[
Software Licenses]
• [Navigation]
• [Telephone
&Bluetooth]
• [Traffic Messages]
• [Radio]
[Audio] settings
Audio settings can be adjusted from the audio setup
screen.
This item is availab RENAULT ALASKAN 2017 Owners Manual –[
Software Licenses]
• [Navigation]
• [Telephone
&Bluetooth]
• [Traffic Messages]
• [Radio]
[Audio] settings
Audio settings can be adjusted from the audio setup
screen.
This item is availab](/img/7/58394/w960_58394-136.png)
–[
Software Licenses]
• [Navigation]
• [Telephone
&Bluetooth]
• [Traffic Messages]
• [Radio]
[Audio] settings
Audio settings can be adjusted from the audio setup
screen.
This item is available only when the audio system is
turned on.
1. Push the
2. Touch the [Audio] key.
3. Select the item you wish to adjust.
[Bass]/[Treble]/[Balance]/[Fade]:
Touch the adjustment bar next to the corresponding
keys on the display to adjust the tone quality and
speaker balance.
The levels of these features can also be adjusted
with the
[Speed Sensitive Vol.]:
Speed sensitive volume function increases the vol-
ume of the audio system as the speed of the vehicle
increases. Choose the desired effect level from 0
(OFF) to 5. The higher the setting, the more the vol-
ume increases in relation to vehicle speed. [AUX Level]:
This feature controls the volume level of incoming
sound when an auxiliary device is connected to the
system. Select the level from [Quiet], [Medium], and
[Loud].
[System settings]
Various system settings can be adjusted from the
system settings.
1. Push the
2. Select the [System] key.
3. Select the item you wish to adjust.
[Display]:
Select the corresponding keys to adjust the set-
tings.
• [Brightness]:
Adjusts the brightness of the display.
• [Display Mode]:
Adjusts to fit the level of lighting in the vehicle.
Touch the [Display Mode] key to cycle through
options of the mode ([Day], [Night] and [Auto]).
• [Scroll Direction]:
Adjusts the direction of the menu scroll. Choose
either the up arrow or down arrow. [Clock]:
Select the corresponding keys to adjust the set-
tings.
• [Time Format]:
The time format setting can be selected from 12
hour and 24 hour formats.
• [Date Format]:
The day, month and year display can be selected
from five formats.
• [Clock Mode]:
Select the clock mode from [Manual], [Time
Zone] and [Auto].
When [Manual] is selected, you can set the clock
mode manually with the [Set Clock Manually]
key.
Select [Auto] to automatically maintain the time
using GPS.
• [Set Clock Manually]:
Mode (AM/PM) (where fitted), Hours, Minutes,
Day, Month and Year can be set manually if
“Manual” is selected in the Clock Mode setting.
• [Daylight Savings Time]:
Turns the daylight savings time ON or OFF.
• [Time Zone]:
Select the applicable time zone from the list.
Display screen, heater and air conditioner, and audio system 4-5
Page 138 of 340
![RENAULT ALASKAN 2017 Owners Manual [Language]:
Select
alanguage to be displayed on the screen.
[Camera Settings] (where fitted):
See “How to adjust the screen” later in this section
for details.
[Temperature Unit]:
Select the tempe RENAULT ALASKAN 2017 Owners Manual [Language]:
Select
alanguage to be displayed on the screen.
[Camera Settings] (where fitted):
See “How to adjust the screen” later in this section
for details.
[Temperature Unit]:
Select the tempe](/img/7/58394/w960_58394-137.png)
[Language]:
Select
alanguage to be displayed on the screen.
[Camera Settings] (where fitted):
See “How to adjust the screen” later in this section
for details.
[Temperature Unit]:
Select the temperature unit from °C and °F.
[Touch Click]:
Turns the touch screen click feature on or off. When
turned on, aclick sound will be heard every time a
key on the screen is touched.
[Beep Tones]:
Turns the beep tones feature on or off. When turned
on, abeep sound will be heard as apop-up mes-
sage appears on the screen.
[Factory Settings]:
Select this key to return all settings to default.
[Software Licenses] (where fitted):
Select this key to view software licence information.
[System Software Version:]:
This key shows the current software version num-
ber.
[Navigation] settings
Navigation settings can be changed. See Naviga-
tion System Owner’s Manual for details. [Telephone
&Bluetooth] settings
Telephone &Bluetooth settings can be changed.
See “Bluetooth® Hands-Free Phone System (with
navigation system)” later in this section for details.
[Traffic Messages] settings
Traffic information guidance, announcement and
warning settings can be adjusted.
Traffic Announcement (TA) information can be re-
ceived only in areas where the service is available.
[Radio] settings
[RDS Reg]:
RDS messages can be turned ON or OFF. When
this item is turned ON, the received RDS informa-
tion will be shown on the audio screen.
RDS information can be received only in areas
where the service is available.
[Traffic Announcement]:
Traffic Announcement (TA) related messages can
be turned ON or OFF. When this item is turned ON,
the received traffic announcement information will
be tuned to automatically when received.
Traffic Announcement (TA) information can be re-
ceived only in areas where the service is available.
4-6 Display screen, heater and air conditioner, and audio system
Page 139 of 340
j
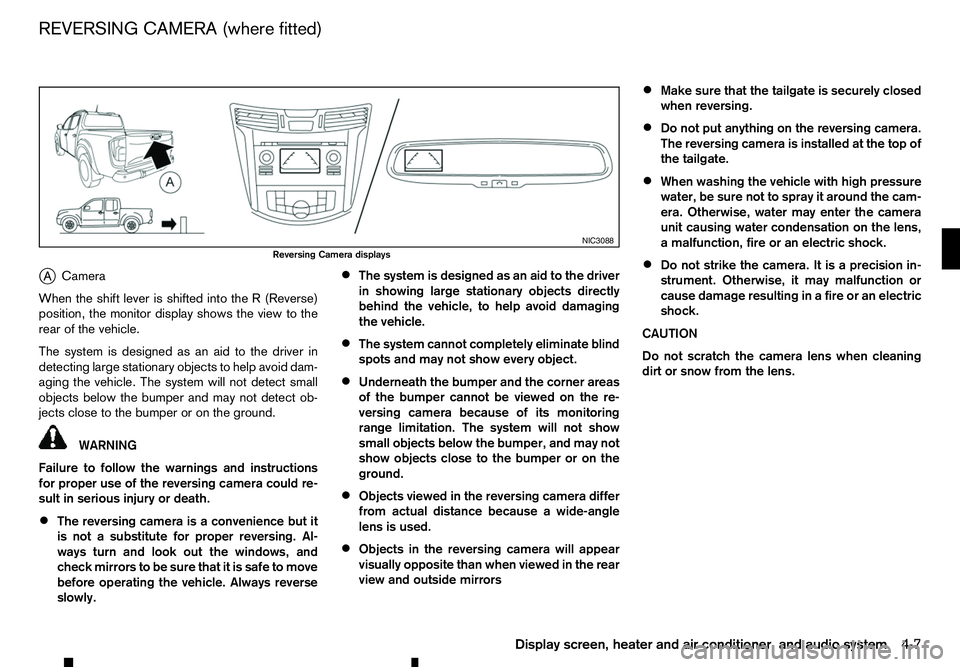
A Camera
When the shift lever is shifted into the
R(Reverse)
position, the monitor display shows the view to the
rear of the vehicle.
The system is designed as an aid to the driver in
detecting large stationary objects to help avoid dam-
aging the vehicle. The system will not detect small
objects below the bumper and may not detect ob-
jects close to the bumper or on the ground. WARNING
Failure to follow the warnings and instructions
for proper use of the reversing camera could re-
sult in serious injury or death.
• The reversing camera is
aconvenience but it
is not asubstitute for proper reversing. Al-
ways turn and look out the windows, and
check mirrors to be sure that it is safe to move
before operating the vehicle. Always reverse
slowly. •
The system is designed as an aid to the driver
in showing large stationary objects directly
behind the vehicle, to help avoid damaging
the vehicle.
• The system cannot completely eliminate blind
spots and may not show every object.
• Underneath the bumper and the corner areas
of the bumper cannot be viewed on the re-
versing camera because of its monitoring
range limitation. The system will not show
small objects below the bumper, and may not
show objects close to the bumper or on the
ground.
• Objects viewed in the reversing camera differ
from actual distance because
awide-angle
lens is used.
• Objects in the reversing camera will appear
visually opposite than when viewed in the rear
view and outside mirrors •
Make sure that the tailgate is securely closed
when reversing.
• Do not put anything on the reversing camera.
The reversing camera is installed at the top of
the tailgate.
• When washing the vehicle with high pressure
water, be sure not to spray it around the cam-
era. Otherwise, water may enter the camera
unit causing water condensation on the lens,
am
alfunction, fire or an electric shock.
• Do not strike the camera. It is
aprecision in-
strument. Otherwise, it may malfunction or
cause damage resulting in afire or an electric
shock.
CAUTION
Do not scratch the camera lens when cleaning
dirt or snow from the lens. NIC3088
Reversing Camera displays
REVERSING CAMERA (where fitted)
Display screen, heater and air conditioner, and audio system4-7
Page 140 of 340
HOW TO READ THE DISPLAYED
LINES
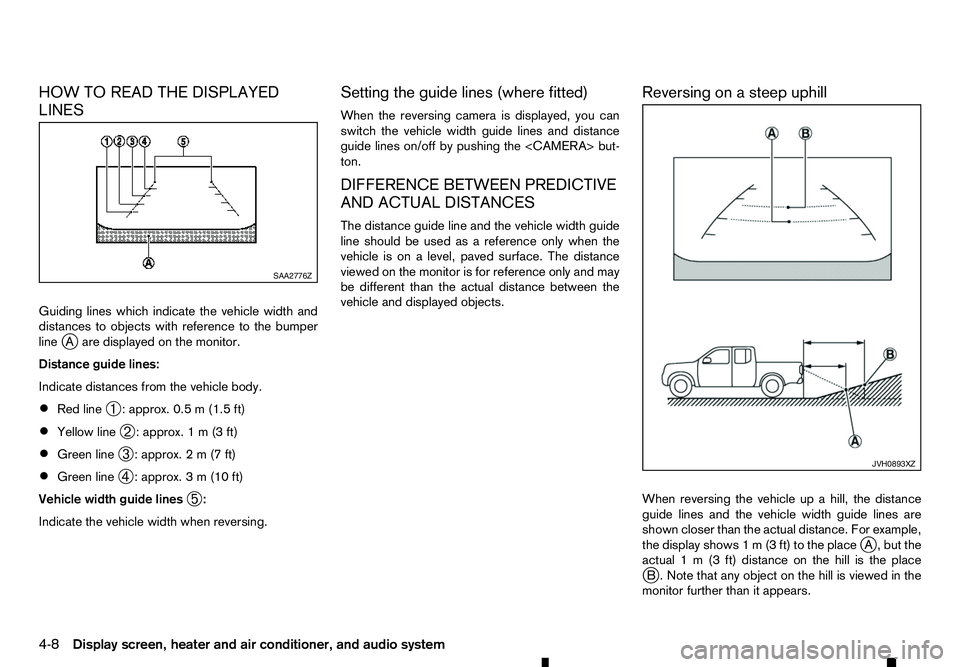
Guiding lines which indicate the vehicle width and
distances to objects with reference to the bumper
line j
Aa re displayed on the monitor.
Distance guide lines:
Indicate distances from the vehicle body.
• Red line
➀:a
pprox. 0.5 m(1.5 ft)
• Yellow line
➁:a
pprox. 1m(3f t)
• Green line
➂:a
pprox. 2m(7f t)
• Green line
➃:a
pprox. 3m(10 ft)
Vehicle width guide lines ➄:
Indicate the vehicle width when reversing. Setting the guide lines (where fitted)
When the reversing camera is displayed, you can
switch the vehicle width guide lines and distance
guide lines on/off by pushing the
ton.
DIFFERENCE BETWEEN PREDICTIVE
AND ACTUAL DISTANCES
The distance guide line and the vehicle width guide
line should be used as
areference only when the
vehicle is on alevel, paved surface. The distance
viewed on the monitor is for reference only and may
be different than the actual distance between the
vehicle and displayed objects. Reversing on
asteep uphill
When reversing the vehicle up ahill, the distance
guide lines and the vehicle width guide lines are
shown closer than the actual distance. For example,
the display shows 1m(3ft) to the place j
A, but the
actual 1m(3f t) distance on the hill is the place
j B. Note that any object on the hill is viewed in the
monitor further than it appears. SAA2776Z
JVH0893XZ
4-8 Display screen, heater and air conditioner, and audio system