Seat Alhambra 2011 Owner's Manual
Manufacturer: SEAT, Model Year: 2011, Model line: Alhambra, Model: Seat Alhambra 2011Pages: 385, PDF Size: 7.92 MB
Page 321 of 385
319
If and when
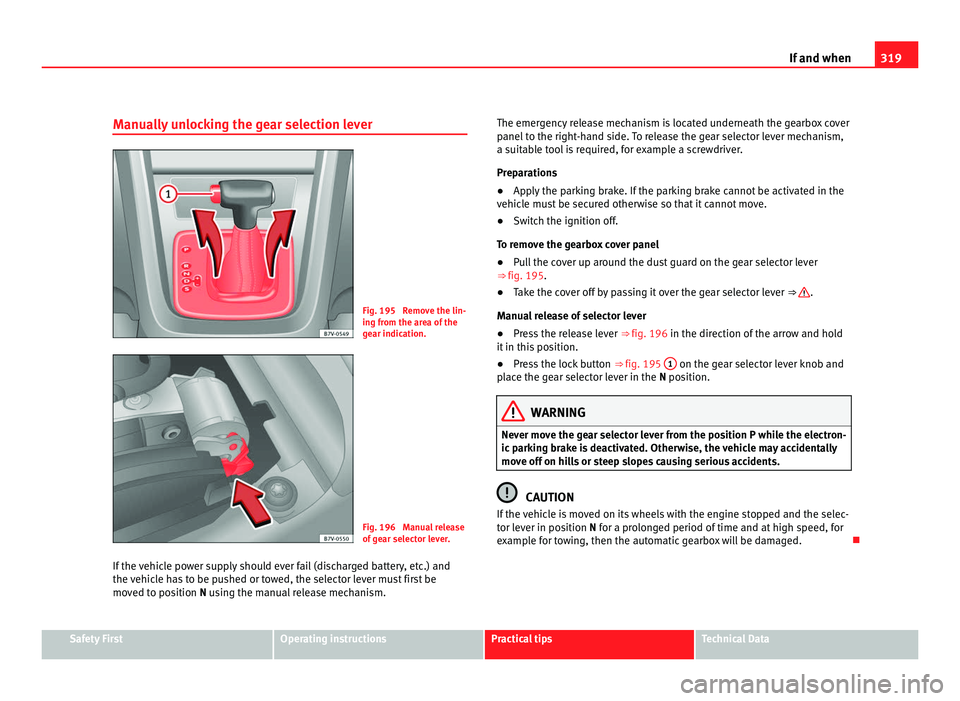
Manually unlocking the gear selection lever Fig. 195 Remove the lin-
ing fr
om the ar
ea of the
gear indication. Fig. 196 Manual release
of g
e
ar selector lever.
If the vehicle power supply should ever fail (discharged battery, etc.) and
the vehic
le has to be pushed or towed, the selector lever must first be
moved to position N using the manual release mechanism. The emergency release mechanism is located underneath the gearbox cover
panel t
o the right-hand side. To release the gear selector lever mechanism,
a suitable tool is required, for example a screwdriver.
Preparations
● Apply the parking brake. If the parking brake cannot be activated in the
vehicl
e must be secured otherwise so that it cannot move.
● Switch the ignition off.
To remo
ve the gearbox cover panel
● Pull the cover up around the dust guard on the gear selector lever
⇒ fig. 195.
● Take the cover off by passing it over the gear selector lever ⇒ .
Manua l
release of selector lever
● Press the release lever ⇒ fig. 196 in the direction of the arr
ow and hold
it in this position.
● Press the lock button ⇒ fig. 195 1 on the gear selector lever knob and
pl ac
e the gear selector lever in the N position. WARNING
Never move the gear selector lever from the position P while the electron-
ic p ark
ing brake is deactivated. Otherwise, the vehicle may accidentally
move off on hills or steep slopes causing serious accidents. CAUTION
If the vehicle is moved on its wheels with the engine stopped and the selec-
tor l ev
er in position N for a prolonged period of time and at high speed, for
example for towing, then the automatic gearbox will be damaged. Safety First Operating instructions Practical tips Technical Data
Page 322 of 385
320
If and when
Tools*
Introduction When securing the vehicle in case of a breakdown, please note the legal re-
quirements
f
or each country.
Additional information and warnings:
● Working in the engine compartment ⇒ page 275
● Ch
ange wheel ⇒ pag
e 305
● In case of emergency ⇒ pag
e 312WARNING
Loose objects in the passenger compartment can be violently fired
through the c omp
artment in case of a sudden manoeuvre or braking and
especially in accidents causing serious injury.
● Make sure that the vehicle tools are stored safely in the luggage com-
partment
. WARNING
Unsuitable or damaged on-board tools can cause injury or accidents.
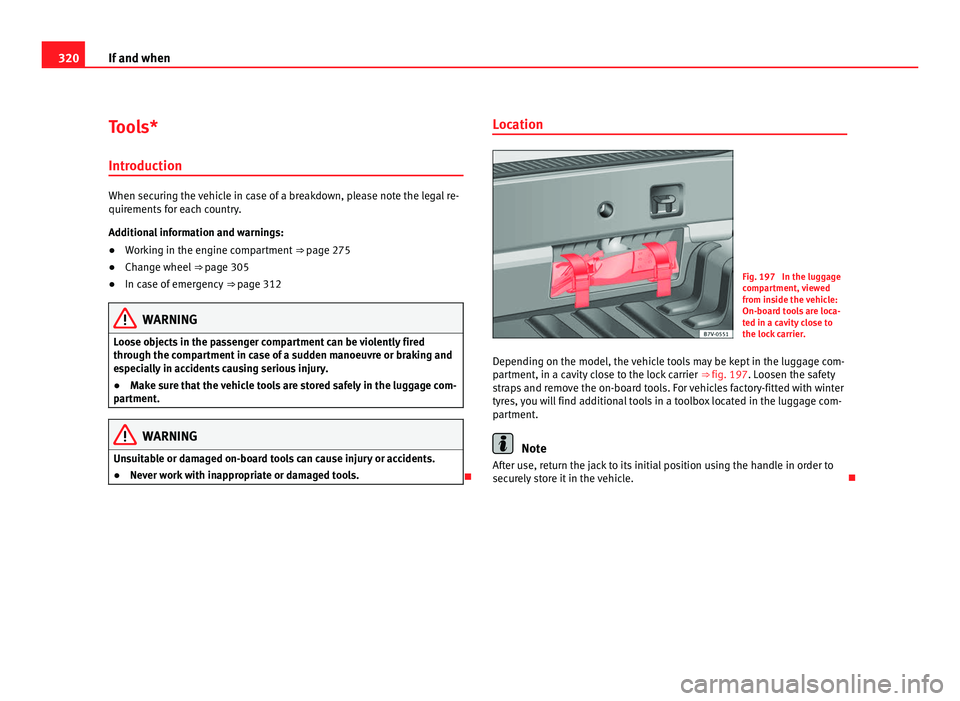
● Never work with inappropriate or damaged tools. Location Fig. 197 In the luggage
comp
ar
tment, viewed
from inside the vehicle:
On-board tools are loca-
ted in a cavity close to
the lock carrier.
Depending on the model, the vehicle tools may be kept in the luggage com-
partment, in a c
avity close to the lock carrier ⇒ fig. 197. Loosen the safety
straps and remove the on-board tools. For vehicles factory-fitted with winter
tyres, you will find additional tools in a toolbox located in the luggage com-
partment. Note
After use, return the jack to its initial position using the handle in order to
secur ely
store it in the vehicle.
Page 323 of 385
321
If and when
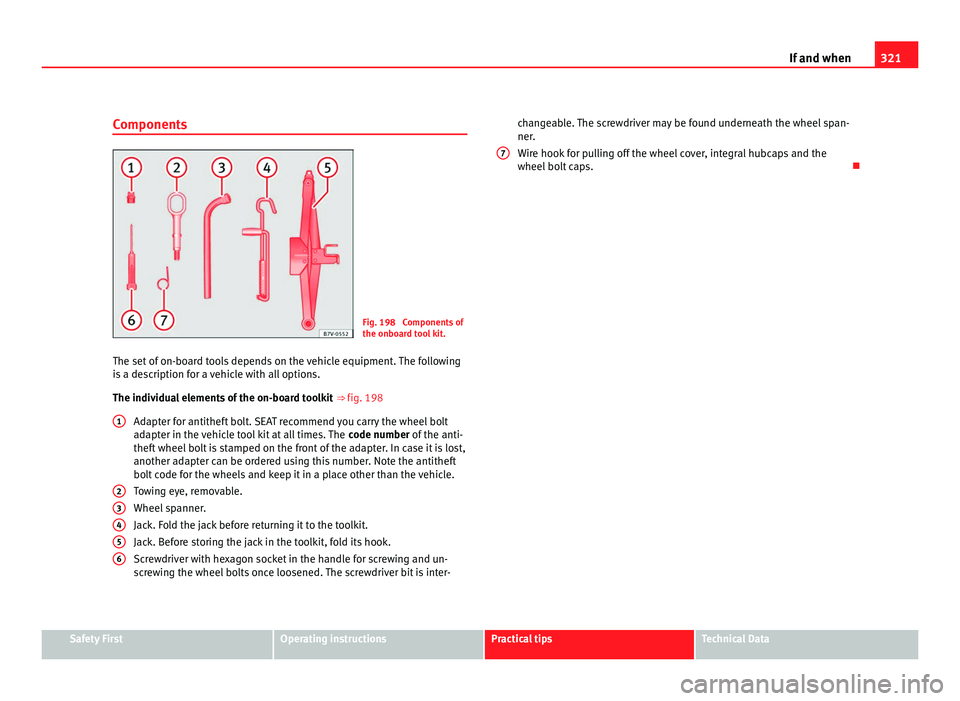
Components Fig. 198 Components of
the onboar
d t
ool kit.
The set of on-board tools depends on the vehicle equipment. The following
is a de
scription for a vehicle with all options.
The individual elements of the on-board toolkit ⇒ fig. 198
Adapter for antitheft bolt. SEAT recommend you carry the wheel bolt
adapter in the vehicle tool kit at all times. The code number of the anti-
theft wheel bolt is stamped on the front of the adapter. In case it is lost,
another adapter can be ordered using this number. Note the antitheft
bolt code for the wheels and keep it in a place other than the vehicle.
Towing eye, removable.
Wheel spanner.
Jack. Fold the jack before returning it to the toolkit.
Jack. Before storing the jack in the toolkit, fold its hook.
Screwdriver with hexagon socket in the handle for screwing and un-
screwing the wheel bolts once loosened. The screwdriver bit is inter-
1 2
3
4
5
6 changeable. The screwdriver may be found underneath the wheel span-
ner.
W
ir
e hook for pulling off the wheel cover, integral hubcaps and the
wheel bolt caps. 7
Safety First Operating instructions Practical tips Technical Data
Page 324 of 385
322
If and when
Fuses
Introduction Due to the constant update of vehicles, fuse assignments depending on
equipment and the u
se of
the same fuse for various electrical components,
at the time of printing this manual it is not possible to provide an up-to-date
summary of the electrical components fuse positions. For detailed informa-
tion about the fuse positions, please consult a Technical Service.
In general, a fuse can be assigned to various electrical components. Like-
wise, an electrical component can be protected by several fuses.
Only replace fuses when the cause of the problem has been solved. If a
newly inserted fuse blows after a short time, you must have the electrical
system checked by a qualified dealership as soon as possible.
Additional information and warnings:
● Working in the engine compartment ⇒ page 275WARNING
The high voltages in the electrical system can give serious electrical
shock s, c
ausing burns and even death!
● Never touch the electrical wiring of the ignition system.
● Take care not to cause short circuits in the electrical system. WARNING
Using unsuitable fuses, repairing fuses or bridging a current circuit with-
out f u
ses can cause a fire and serious injury.
● Never use a fuse with a higher value. Only replace fuses with a fuse of
the same amperag
e (same colour and markings) and size.
● Never repair a fuse.
● Never replace a fuse by a metal strip, staple or similar. CAUTION
● To avoid damage to the vehicles electric system, before replacing a fuse
t urn off
the ignition, the lights and all electrical elements and remove the
keys from the ignition.
● If you replace a fuse with higher-rating fuse, you could cause damage to
another part
of the electrical system.
● Protect the fuse boxes when open to avoid the entry of dust or humidity.
Dirt and humidity
inside fuse boxes can cause damage to the electrical sys-
tem. Note
● One single consumer could have more than one fuse.
● Sev er
al consumers could run over one single fuse.
Page 325 of 385
323
If and when
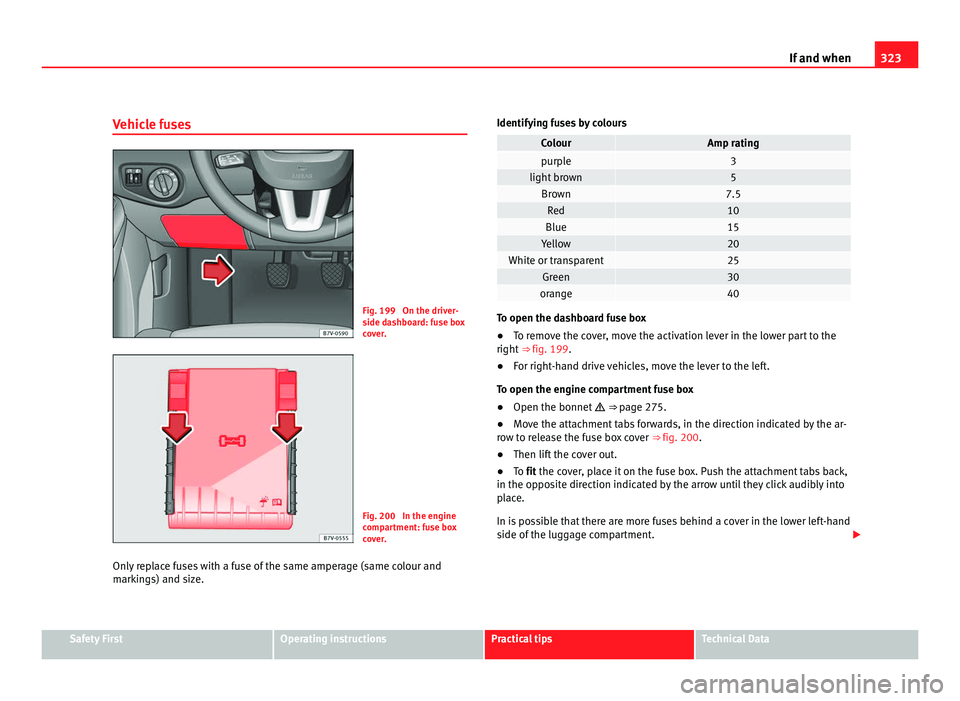
Vehicle fuses Fig. 199 On the driver-
side d
a
shboard: fuse box
cover. Fig. 200 In the engine
comp
ar
tment: fuse box
cover.
Only replace fuses with a fuse of the same amperage (same colour and
markin
gs) and size. Identifying fuses by colours Colour Amp rating
purple 3
light brown 5
Brown 7.5
Red 10
Blue 15
Yellow 20
White or transparent 25
Green 30
orange 40
To open the dashboard fuse box
●
To remove the cover, move the activation lever in the lower part to the
right ⇒ fig. 199 .
● F
or right-hand drive vehicles, move the lever to the left.
To open the engine c
ompartment fuse box
● Open the bonnet ⇒ pag
e 275.
● Move the attachment tabs forwards, in the direction indicated by the ar-
row t
o release the fuse box cover ⇒ fig. 200.
● Then lift the cover out.
● To fit the cover, place it on the fuse box. Push the attachment tabs back,
in the oppo
site direction indicated by the arrow until they click audibly into
place.
In is possible that there are more fuses behind a cover in the lower left-hand
side of the luggage compartment. Safety First Operating instructions Practical tips Technical Data
Page 326 of 385
324
If and when CAUTION
● Always carefully remove the fuse box covers and refit them correctly to
av oid pr
oblems with your vehicle.
● Protect the fuse boxes when open to avoid the entry of dust or humidity.
Dirt and humidity
inside fuse boxes can cause damage to the electrical sys-
tem. Note
In the vehicle, there are more fuses than those indicated in this chapter.
These shoul
d only be changed by a specialist workshop.
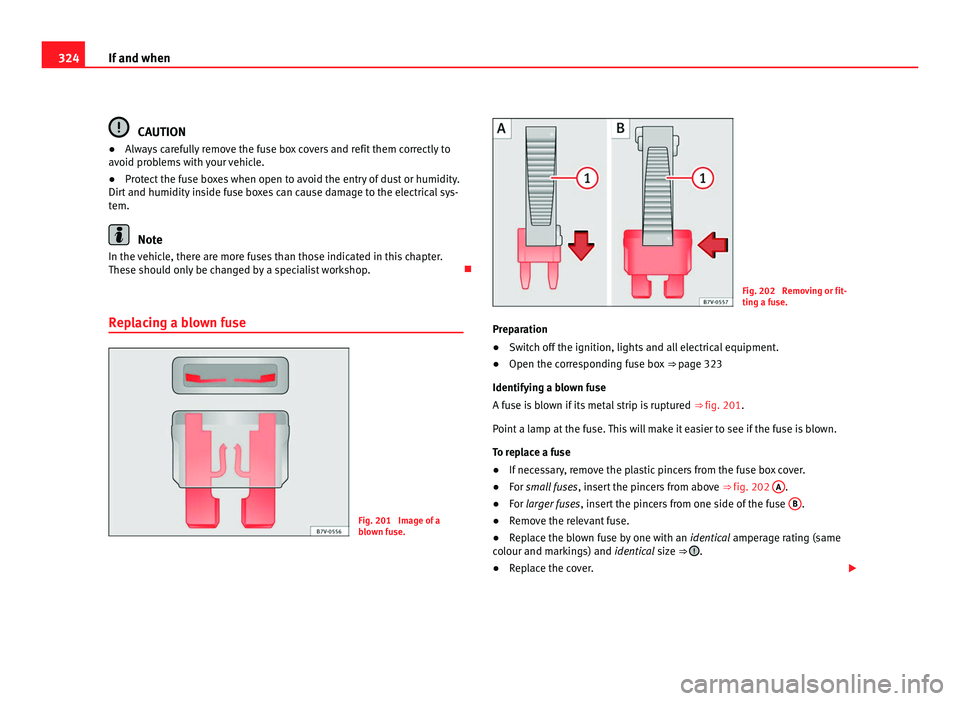
Replacing a blown fuse Fig. 201 Image of a
blo
wn f
use. Fig. 202 Removing or fit-
ting a f
u
se.
Preparation
● Switch off the ignition, lights and all electrical equipment.
● Open the corresponding fuse box ⇒ page 323
Identif
ying a blown fuse
A fuse is blown if its metal strip is ruptured ⇒ fig. 201.
Point a lamp at the fuse. This will make it easier to see if the fuse is blown.
To replace a fuse
● If necessary, remove the plastic pincers from the fuse box cover.
● For small fuses, insert the pincers from above ⇒ fig. 202 A .
● For larger fuses , inser
t the pincers from one side of the fuse B .
● Remove the relevant fuse.
● Replace the blown fuse by one with an identica
l amperage rating (same
colour and markings) and identical size ⇒ .
● Replace the cover.
Page 327 of 385
325
If and when CAUTION
If you replace a fuse with higher-rating fuse, you could cause damage to an-
other par t
of the electrical system. Safety First Operating instructions Practical tips Technical Data
Page 328 of 385
326
If and when
Changing bulbs
Introduction Changing bulbs requires a certain amount of manual skill. If you are unsure,
SEA
T r
ecommends that you consult an qualified workshop or request assis-
tance from a specialist. In general, a specialist is required if other vehicle
components must be removed or if the discharge lamps must be replaced.
You should store spare light bulbs in the vehicle for safety-relevant lights.
Spare bulbs may be obtained from the Official dealers and workshops. In
some countries, it is a legal requirement to carry spare bulbs in the vehicle.
Driving with faults and blown bulbs on the vehicle exterior lighting is
against the law.
Additional bulb specifications
The specifications of some headlamp bulbs and bulbs for the tail lamps fit-
ted at the factory may be different to those of conventional bulbs. Bulb in-
formation is displayed on the bulb socket or on the bulb itself.
Additional information and warnings:
● Lights and visibility ⇒ page 95
● W
orking in the engine compartment ⇒ page 275
● V
ehicle tools ⇒ page 320
● F
uses ⇒ page 322 WARNING
If the road is not well-lit and the vehicle is not clearly visible to other
driver s, ther
e is a risk of accident. WARNING
Failure to replace bulbs correctly may cause serious accidents.
● Before carrying out any work in the engine compartment please read
and ob ser
ve the warnings ⇒ page 275. In any vehicle, the engine com-
partment is a hazardous area and could cause severe injury.
● Discharge lamps work with high-voltage and can cause serious or fa-
tal
injury if handled incorrectly.
● H7 and discharge lamps are highly pressurised and could explode
when being ch
anged.
● Only replace the bulbs concerned when they have cooled.
● Never replace bulbs alone if you are not familiar with the operations
neces
sary. If you are not sure about procedures then visit a Technical
Service to carry out the necessary work.
● Never touch the bulb glass directly. Fingerprints will be evaporated by
the heat of
the operating bulb thus “fogging” up the reflector.
● The headlamp frameworks in the engine compartment and the tail
lamps
contain sharp elements. Always protect your hands when chang-
ing bulbs. CAUTION
After changing a bulb, if the rubber covers and plastic caps are not replaced
corr ectly
on the headlamp framework, the electrical installation may be
damaged, especially if water is allowed to enter.
Indicator lights up Possible cause Solution
A vehicle exterior lighting
bu
l
b is not working. Replace the faulty bulb.
Page 329 of 385
327
If and when
Several warning and control lamps should light up for a few seconds when
the ignition is sw
itched. This signals that the lamp is working properly. They
will switch off after a few seconds.
Checking the bulbs of a trailer
For vehicles with the factory fitted trailer system, certain trailer lights are al-
so controlled if the socket is correctly connected.
A fault on a trailer turn indicator is indicated on the instrument panel by the
indicator blinking twice as fast ( or ) ⇒ page 95.
● General fault of all indicators on one side.
● Fault in one tail light (on some models, also the registration light).
● Fault in two brake lights. WARNING
If the warning lamps and messages are ignored, the vehicle may stall in
traffic, or m a
y cause accidents and severe injuries.
● Never ignore the warning lamps or text messages.
● Stop the vehicle safely as soon as possible. CAUTION
Failure to heed the warning lamps and text messages when they appear
ma y
result in faults in the vehicle. Note
A fault in the LED on the tail lights will not be indicated. However, if the fault
affects al
l the LEDs then this will be indicated by the indicator . Information for replacing bulbs Checklist
To r
ep
lace a bulb, carry out the following operations always in the order giv-
en ⇒ :
Park the
vehicle a safe distance from traffic and on suitable ground.
Connect the electronic parking brake ⇒ page 183.
Turn the light switch to position 0 ⇒ page 95.
Move the gear lever into the neutral position ⇒ page 95.
Automatic gearbox: Move selector lever to position P ⇒ page 174.
Stop the engine and remove the key from the ignition ⇒ page 170.
Manual gearbox: Select a gear ⇒ page 174.
Wait until all of the passenger compartment lights are turned off
⇒ page 95.
Allow the corresponding bulb to cool. Visually inspect fuses to see if any are blown ⇒ page 322.
Replace the bulb according to the instructions ⇒ . Bulbs should only
be rep l
aced by new identical models. Bulb information is displayed on
the bulb socket or on the bulb itself.
In general, never touch the bulb glass directly. The heat of the bulb
would cause the fingerprint to evaporate and condense on the reflector.
This will impair the brightness of the headlight.
Check if the new bulb is working. If the bulb is not working, it may not
have been correctly fitted, it could be damaged or the connector may
not be correctly connected.
Every time a bulb for the headlights is replaced, visit a specialised
workshop to check the headlights.
1.
2.
3.
4.
5.
6.
7.
8.
9.
10.
11.
12.
13.
14.
Safety First Operating instructions Practical tips Technical Data
Page 330 of 385
328
If and when WARNING
Failure to follow the checklist prepared for your own safety could lead to
acc ident
s and severe injuries.
● Always complete the operations given in the checklist and observe
the genera
l rules of safety. CAUTION
Always remove and fit headlights carefully to avoid damage to the paint-
work and other
vehicle parts.
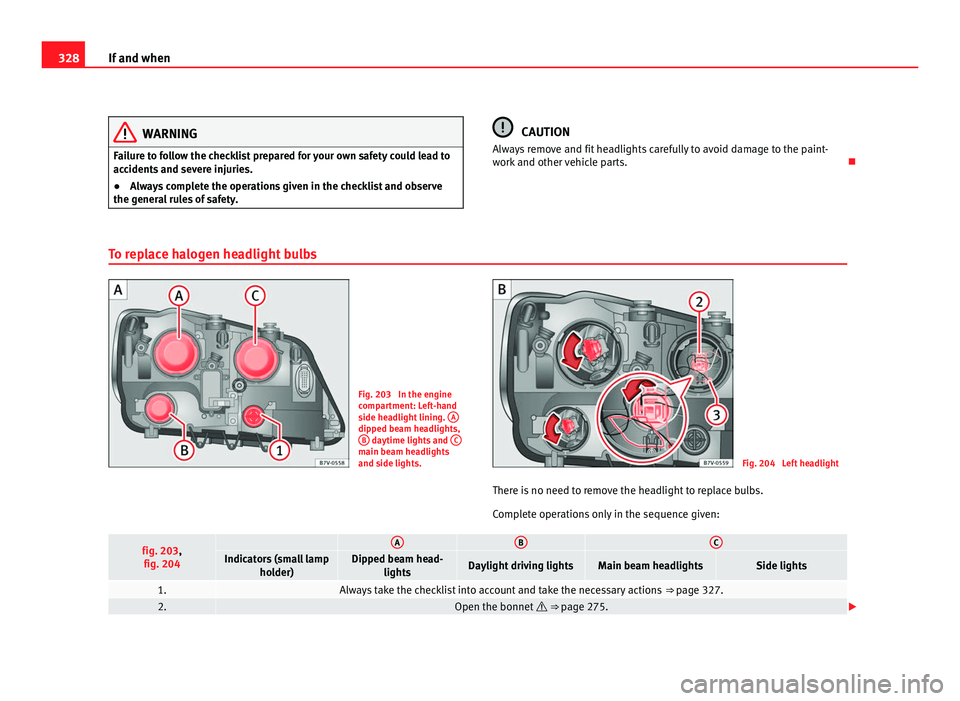
To replace halogen headlight bulbs Fig. 203 In the engine
comp
ar
tment: Left-hand
side headlight lining. A dipped beam headlights,
B daytime lights and
C main beam headlights
and side light
s. Fig. 204 Left headlight
There is no need to remove the headlight to replace bulbs.
Comp l
ete operations only in the sequence given: fig. 203,
fig. 204 A B C
Indicators (small lamp
holder) Dipped beam head-
lights Daylight driving lights Main beam headlights Side lights
1. Always take the checklist into account and take the necessary actions
⇒ pag
e 327.2. Open the bonnet
⇒ page 275.