Seat Alhambra 2011 Owner's Manual
Manufacturer: SEAT, Model Year: 2011, Model line: Alhambra, Model: Seat Alhambra 2011Pages: 385, PDF Size: 7.92 MB
Page 341 of 385
339
If and when
The vehicles should not touch. Otherwise, current may be allowed to flow
when the pos itiv
e poles are connected.
Connect the clamps so they have good metal-to-metal contact with the ter-
minals.
If the engine fails to start straight-away, switch off the starter after about 10
seconds and try again after about a minute.
Complete operations only in the sequence given.
Jump lead terminal connections
● Switch off the ignition of both vehicles ⇒ page 170.
● Lik
ewise, open the battery cover in the engine compartment
⇒ pag
e 288, or remove the positive pole cap from one side 1)
, in the direc-
tion of the arrow ⇒ fig. 215.
● Connect one end of the red
jump lead to the positive terminal
⇒ fig. 216 + or ⇒
fig. 215 + of the vehicle with the flat battery
A ⇒ .
● Connect the other end of the red
jump lead to the positive terminal + in
the v ehic
le providing assistance B .
● For vehicles without
Start-Stop system: Connect one end of the black
jump lead to the negative terminal - in the vehicle providing assistance
B ⇒ fig. 216.
● For vehicles with St
art-Stop system: Connect one end of the black X jump lead to a suitable ground connection, a solid piece of metal in the en-
gine bloc
k, or t
o the engine block ⇒ fig. 217.
● Connect the other end of the black
jump lead X to a solid metal compo-
nent c onnect
ed to the engine block, or onto the engine block itself of the
vehicle with the flat battery however, connect it as far away as possible from
the battery A ⇒ .
● Place the leads so that they cannot be caught by any moving parts in the
engine c omp
artment. Switching on
●
Start the engine of the vehicle supplying current and let it run at idling
speed.
● Star
t the engine of the car with the flat battery and wait two or three mi-
nutes
until the engine is “running smoothly”.
Removing the jump leads
● Before you remove the jump leads, switch off the headlights (if they are
switc
hed on).
● Turn on the heating and rear window heater in the vehicle with the flat
batter
y. This helps minimise voltage peaks which are generated when the
leads are disconnected.
● With the engines running, disconnect the leads in reverse order to con-
nection.
● Close the battery cover, or replace the positive pole cap 1)
. WARNING
Incorrectly jump starting could cause the battery to explode resulting in
serious injur
y. Please observe the following rules to minimise the risk of
a battery explosion:
● All work involving the vehicle battery and electrical system can cause
corro
sion, fire and serious electric shocks. Always read and take into ac-
count the safety warnings and standards before beginning work on the
battery ⇒ page 288, Vehicle battery.
● Always protect your eyes with suitable working goggles and never
lean o
ver the vehicle battery.
● The jump leads must be connected in the correct order: first the posi-
tive cab
le, then the negative cable. 1)
Vehicles whose battery is not located in the engine compartment ⇒ page 338. Safety First Operating instructions Practical tips Technical Data
Page 342 of 385
340
If and when WARNING (Continued)
● Do not attach the negative cable to parts of the fuel system or to the
br ak
e hose/pipe.
● The non-insulated parts of the battery clamps must not be allowed to
touch. A
lso, the cable connected to the positive pole of the battery
should never enter into contact with electrically conductive parts of the
vehicle.
● Check the magic eye on the battery; use a lamp if necessary. If it is
cle
ar yellow or clear, do not start the vehicle: obtain specialist technical
assistance.
● Avoid static electricity discharges in the area around the battery. In
the event of
sparks, explosive gases coming from the battery could ig-
nite.
● Never use starting assistance if the vehicle battery is damaged, fro-
zen or ha
s been frozen.
Towing and tow starting Introduction When towing, always respect legal requirements.
For t
ec
hnical reasons, it is not possible to tow a vehicle if the battery is flat.
Additional information and warnings:
● Electronic power control and exhaust gases purification system
⇒ pag
e 228 WARNING
A vehicle with a flat battery should never be towed.
● Never remove the key from the ignition lock. The electronic steering
lock c
ould engage. Then the vehicle will be uncontrollable. You may lose
control of the vehicle and there is a risk of serious accident. WARNING
When towing the vehicle, the handling and braking efficiency change
cons
iderably. Please observe the following instructions to minimise the
risk of serious accidents and injury:
● As the driver of the vehicle being towed:
– The brake must be depressed must harder as the brake servo does
not operat
e. Always remain aware to avoid collision with the towing
vehicle.
– More strength is required at the steering wheel as the power steer-
ing does
not operate when the engine is switched off.
● As the driver of the towing vehicle:
– Accelerate gently and carefully.
– Avoid sudden braking and manoeuvres.
– Brake well in advance than usual and brake gently. CAUTION
● Carefully fit and remove the towing ring and its cover to avoid damage to
the v
ehicle (for example, paintwork).
● When towing, fuel could enter the catalytic converter and cause dam-
age!
Page 343 of 385
341
If and when
Instructions for tow starting In general, the vehicle should not be started by towing. Jump-starting is
much mor
e pr
eferable ⇒ page 337.
For technical reasons, the following vehicles can not be tow started:
● Vehicles with an automatic gearbox.
● Vehicles with an electronic parking brake, given that it is possible that
the brake w
ill not be disengaged.
● If the vehicle battery is flat, it is possible that the engine control units do
not operat
e correctly.
However, if your vehicle must absolutely be tow-started (manual gearbox):
● Engage the 2nd or 3rd gear.
● Keep the clutch pressed down.
● Switch on the ignition and the hazard warning lights.
● Release the clutch when both vehicles are moving.
● As soon as the engine starts, press the clutch and move the gear lever
into neutral
. This helps to prevent a collision with the towing vehicle. CAUTION
When tow-starting, fuel could enter the catalytic converter and damage it.
Towing instructions Tow-rope or tow-bar
When to
w
ing, the tow bar is the safest and vehicle friendly way. You should
only use a tow-rope if you do not have a tow-bar. A tow-rope should be slightly elastic to avoid damage to both vehicles. It is
advi
sable to use a tow-rope made of synthetic fibre or similarly elastic mate-
rial.
Only secure the tow rope or tow bar to the tow ring or specially designed
fitting.
Vehicles with a factory fitted towing device , can only be used for towing
with a tow-bar, specially designed to fit on a tow hitch ball ⇒ page 233.
Towing vehicles with an automatic gearbox
Note the following for a towed vehicle:
● Make sure the gear selector lever is in the N position.
● Do not
drive faster than 50 km/h (30 mph) when towing a vehicle.
● Do not tow further than 50 km (30 miles).
● If a breakdown truck is used, the vehicle must be towed with the front
wheels r
aised. Note the following instructions for towing four wheel drive
vehicles.
Instructions for towing four-wheel-drive vehicles
Four wheel drive vehicles can be towed using a toolbar or tow rope. If the
vehicle is towed with the front or rear axle raised, the engine must be turned
off to avoid transmission damage.
For vehicles with a double clutched DSG ®
(direct shift gearbox) the instruc-
tions for towing vehicles with an automatic gearbox apply ⇒ page 341.
Situations in which the vehicle should not be towed
In the following cases, the vehicle should not be towed but transported on a
trailer or special vehicle:
● If the vehicle gearbox does not contain lubricant due to a fault.
● If the vehicle battery is flat and, as a result, the electronic steering lock
and electronic
parking brake cannot be disengaged if applied.
● If the vehicle to be towed has an automatic gearbox and the distance to
be cov
ered is greater than 50 km (30 miles). Safety First Operating instructions Practical tips Technical Data
Page 344 of 385
342
If and when Note
The vehicle can only be towed if the electronic parking brake and steering
lock ar
e deactivated. If the vehicle has no power supply or there is an elec-
tric system fault, the engine must be started using jump leads to deactivate
the electronic parking brake and electronic steering lock.
Fitting the front tow ring Fig. 218 On the right-
hand s
ide of
the front
bumper: Screw in the
towing ring.
The location for the removable tow ring is on the right-hand side of the front
bumper ⇒ fig. 218. The t
owing eye should always be kept in the vehicle.
Note the instructions for towing ⇒ page 341.
To fit the tow ring
● Take the tow ring from the vehicle tool kit ⇒ page 320.
● Pr
ess on the upper cover and carefully remove it forwards. Allow the cov-
er to han
g. ●
Screw in the tow ring into its position anticloc
kwise as far as it will go
⇒ fig. 218 ⇒ . Use a suitable tool to firmly tighten the tow ring in its loca-
tion.
● After towing, remove the tow ring by turning it clock
wise and put the
cover back in place. CAUTION
The tow ring must always be completely and firmly tightened. Otherwise, it
cou l
d be released while towing and tow-starting.
Fitting the rear tow ring Fig. 219 On the rear
bumper
, t
o the right hand
side: Tow ring in position.
The location for the removable tow ring is on the right-hand side of the rear
bumper ⇒ fig. 219. F
or vehicles with a factory fitted trailer system , there is
no fitting behind the cover to insert the tow ring. For towing, fit and use the
trailer hitch ⇒ page 233, ⇒ .
Note the in s
tructions for towing ⇒ page 341.
Page 345 of 385
343
If and when
Fitting the tow ring to the rear for vehicles without factory fitted tow hitch
● Take the tow ring from the on-board tools ⇒ page 320.
● Pr
ess on the upper cover and carefully remove it back. This may require
some stren
gth. Allow the cover to hang.
● Screw in the tow ring into its position anticlock
wise as far as it will go
⇒ . Use a suitable tool to firmly tighten the tow ring in its location.
● After towing, remove the tow ring by turning it clock
wise and put the
cover back in place. CAUTION
● The tow ring must always be completely and firmly tightened. Other-
w i
se, it could be released while towing and tow-starting.
● Vehicles with a factory fitted towing device, can on
ly be used for towing
with a tow-bar, specially designed to fit on a tow hitch ball. Otherwise, the
tow hitch ball and the vehicle may be damaged. Otherwise, a tow rope
should be used.
Towing advice Towing requires some experience, especially when using a tow-rope. Both
driver
s
should be familiar with the technique required for towing. For this
reason, inexperienced drivers should abstain.
While driving, avoid excessive traction forces and jerking. When towing on
an unpaved road, there is always a risk of overloading and damaging the
anchorage points.
If the vehicle is towed, with the hazard warning lights on and the ignition
switched on, the turn signal may be used to indicate changes of direction.
Simply operate the turn indicator lever as usual. Meanwhile, the hazard
warning lights will go off. When the turn signal lever is returned to the rest
position, the hazard warning lights will be turned on automatically. Notes for the driver of the towed vehicle
●
Leave the ignition on to avoid locking the steering wheel, to release the
electronic
parking brake and to activate the turn signal indicators, the horn
as well as the window wipers and window washers.
● As the power assisted steering does not work if the engine is not run-
ning, y
ou will need more strength to steer than normally.
● The brake must be depressed must harder as the brake servo does not
operate. A
void hitting the towing vehicle.
● Note the instructions and information contained in the instruction man-
ual for the
vehicle to be towed.
Notes for the driver of the towing vehicle
● Accelerate gently and carefully. Avoid sudden manoeuvres.
● Brake well in advance than usual and brake gently.
● Note the instructions and information contained in the instruction man-
ual for the
vehicle to be towed. Safety First Operating instructions Practical tips Technical Data
Page 346 of 385
344
General notes on the technical data
Technical Data
Genera l
notes on the technical data
Outstanding information
Important All data in the official vehicle documents take precedence
ov
er
this data.
All data provided in this manual are valid for the standard model in Spain.
The vehicle data card included in the Inspection and Maintenance Plan in
the vehicles registration documents show which engine is installed in the
vehicle.
The figures may be different depending on if additional equipment is fitted,
for different models, for special vehicles and for other countries.
Additional information and warnings:
● Transporting ⇒ page 13
● E
cological driving ⇒ page 225
● F
uel ⇒ page 267
● Engine oi
l ⇒ page 279
● En
gine coolant ⇒ page 283
● Wheel
s and tyres ⇒ page 293
● Not
es for the user ⇒ page 255 Abbr
eviations used in the Technical Data section Abbrevia-
tion Meaning
kW Kilowatt, engine power measurement.
PS Pferdestärke (horsepower), formerly used to denote engine
pow
er
. rpm Revolutions per minute - engine speed.
Nm Newton metres, unit of engine torque.
l/100 km Fuel consumption in litres per 100 km.
g/km Carbon dioxide emissions in grams per km travelled.
CO
2 Carbon dioxide
CN Cetane number, indication of the diesel combustion power.
RON Research octane number, indication of the knock resistance
of petr
o
l. WARNING
Failure to observe requirements for weight, loads, dimensions and maxi-
mum speed m a
y lead to severe accident.
Page 347 of 385
345
General notes on the technical data
Vehicle code Fig. 220 Vehicle identifi-
cation number
.
V
ehicle identification number
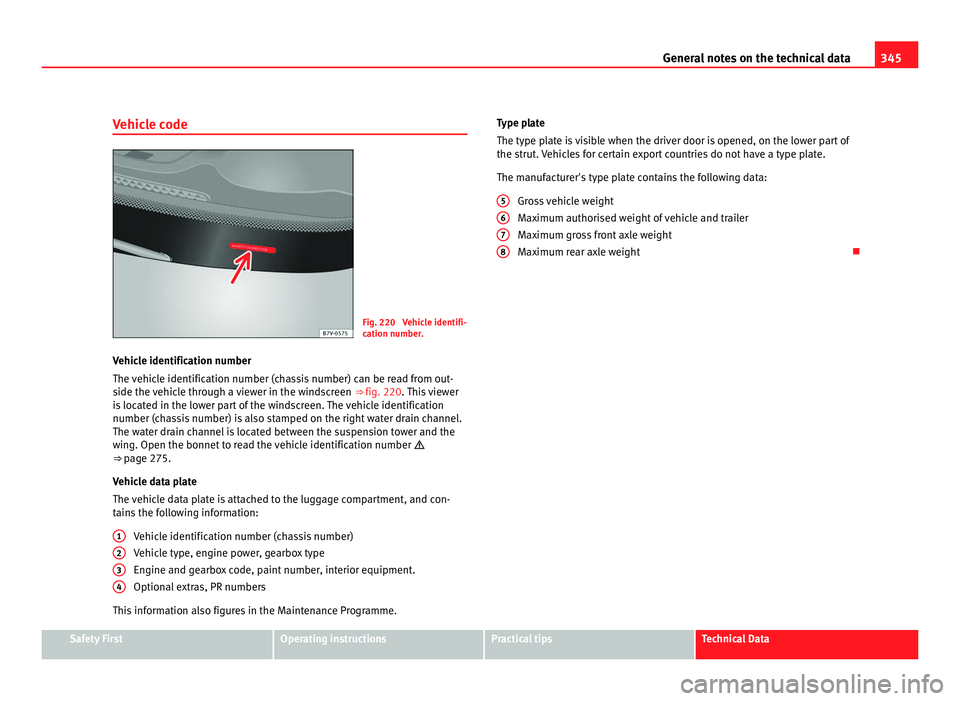
The vehic
le identification number (chassis number) can be read from out-
side the vehicle through a viewer in the windscreen ⇒ fig. 220. This viewer
is located in the lower part of the windscreen. The vehicle identification
number (chassis number) is also stamped on the right water drain channel.
The water drain channel is located between the suspension tower and the
wing. Open the bonnet to read the vehicle identification number
⇒ page 275.
Vehicle data plate
The vehicle data plate is attached to the luggage compartment, and con-
tains the following information:
Vehicle identification number (chassis number)
Vehicle type, engine power, gearbox type
Engine and gearbox code, paint number, interior equipment.
Optional extras, PR numbers
This information also figures in the Maintenance Programme. 1 2
3
4 Type plate
The type pl
at
e is visible when the driver door is opened, on the lower part of
the strut. Vehicles for certain export countries do not have a type plate.
The manufacturer's type plate contains the following data:
Gross vehicle weight
Maximum authorised weight of vehicle and trailer
Maximum gross front axle weight
Maximum rear axle weight 5
6
7
8
Safety First Operating instructions Practical tips Technical Data
Page 348 of 385
346
General notes on the technical data
Data on fuel consumption
Fuel c
onsumption The consumption and emission details shown on the vehicle
data
s
ticker differ from one vehicle to another.
The fuel consumption, CO 2 emissions and actual kerb weight of the vehicle
are noted on the vehicle data sticker.
The fuel consumption and emissions figures given are based on the vehicle
weight category, which is determined according to the engine/gearbox
combination and the equipment fitted.
The consumption and emission figures are calculated in accordance with
the EC test requirements 1999/100/EC. These test requirements specify a
realistic test method based on normal everyday driving.
The following test conditions are applied: Urban cycle The urban cycle starts with an engine cold start. City driving
is
then s
imulated. Extra urban
cyc
l
e In the extra urban cycle simulation the vehicle frequently ac-
cel
er
ates and brakes in all gears, as in normal everyday driv-
ing. The road speed ranges from 0 to 120 km/h. Total con-
sumption The average total consumption is calculated with a weight-
ing of
ar
ound 37% for the urban cycle and 63% for the extra
urban cycle. CO
2 emis-
s ion
s The exhaust gases are collected during both driving cycles
to c
alc
ulate carbon dioxide emissions. The gas composition
is then analysed to evaluate the CO 2 content and other
emissions. Note
● Actual consumption may vary from quoted test values, depending on
per son
al driving style, road and traffic conditions, the weather and the vehi-
cle condition.
Weights Kerb weight refers to the basic model with a fuel tank filled to 90% capacity
and without
option
al extras. The figure quoted includes 75 kg to allow for
the weight of the driver.
For special versions and optional equipment fittings or for the addition of
accessories, the weight of the vehicle will increase ⇒ .
WARNING
● Please note that the centre of gravity may shift when transporting
he avy
objects; this may affect the vehicle's handling and lead to an acci-
dent. Always adjust your speed and driving style to suit road conditions
and requirements.
● Never exceed the gross axle weight rating or the gross vehicle weight
rating. If
the allowed axle load or the allowed total weight is exceeded,
the driving characteristics of the vehicle may change, leading to acci-
dents, injuries and damage to the vehicle.
Page 349 of 385
347
General notes on the technical data
Towing a trailer Tr ai
ler weights Trailer weight
The trai
l
er weights and drawbar loads approved are selected in intensive tri-
als according to precisely defined criteria. The approved trailer weights are
valid for vehicles in the EU for maximum speeds of 80 km/h (in certain cir-
cumstances up to 100 km/h). The figures may be different in other coun-
tries. All data in the official vehicle documents take precedence over these
data ⇒ .
Dra wb
ar load
The maximum permitted weight exerted by the trailer drawbar on the ball
joint of the towing bracket must not exceed 85 kg.
In the interest of road safety, we recommend that you always tow approach-
ing the maximum drawbar load. The response of the trailer on the road will
be poor if the drawbar load is too small.
If the maximum permitted drawbar load is not reached (e.g. in the case of
small single-axle trailers, light and without load, or tandem axle trailers with
a wheelbase of less than 1 m) it is compulsory for the drawbar load to be at
least 4% of the trailer's weight. WARNING
● For safety reasons, do not exceed the 80 km/h limit. This is also valid
in c ou
ntries where higher speeds are permitted.
● Never exceed the maximum trailer weights or the drawbar load. If the
permiss
ible axle load or the permissible total weight is exceeded, the
driving characteristics of the vehicle may change, leading to accidents,
injuries and damage to the vehicle. Wheels
Ty r
e pressure, snow chains, wheel bolts Tyre pressures
The stic
k
er with the tyre pressure values can be found on the inside of the
tank flap. The tyre pressure values given there are for cold tyres. The slightly
raised pressures of warm tyres must not be reduced. ⇒ Snow chains
Snow c
h
ains may be fitted only to the front wheels.
Consult the chapter “wheels” of this manual.
Wheel bolts
After the wheels have been changed, the tightening torque of the wheel
bolts should be checked as soon as possible with a torque wrench ⇒ .
The tightenin g t
orque for steel and alloy wheels is 120 Nm. WARNING
● Check the tyre pressure at least once per month. Checking tyre pres-
s ur
e value is very important. If the tyre pressure is too high or too low,
there is an increased danger of accidents, particularly at high speeds.
● If the torque of the wheel bolts is too low, they could loosen while the
vehicl
e is in motion. Risk of accident! If the tightening torque is too high,
the wheel bolts and threads can be damaged. Note
We recommend that you ask your Authorised Service Centre for information
about ap pr
opriate wheel, tyre and snow chain size. Safety First Operating instructions Practical tips Technical Data
Page 350 of 385
348
Technical Data
Technical Data
Checking fluid levels From time to time, the levels of the different fluids in the ve-
hicle must
be c
hecked. Never fill with incorrect fluids, other-
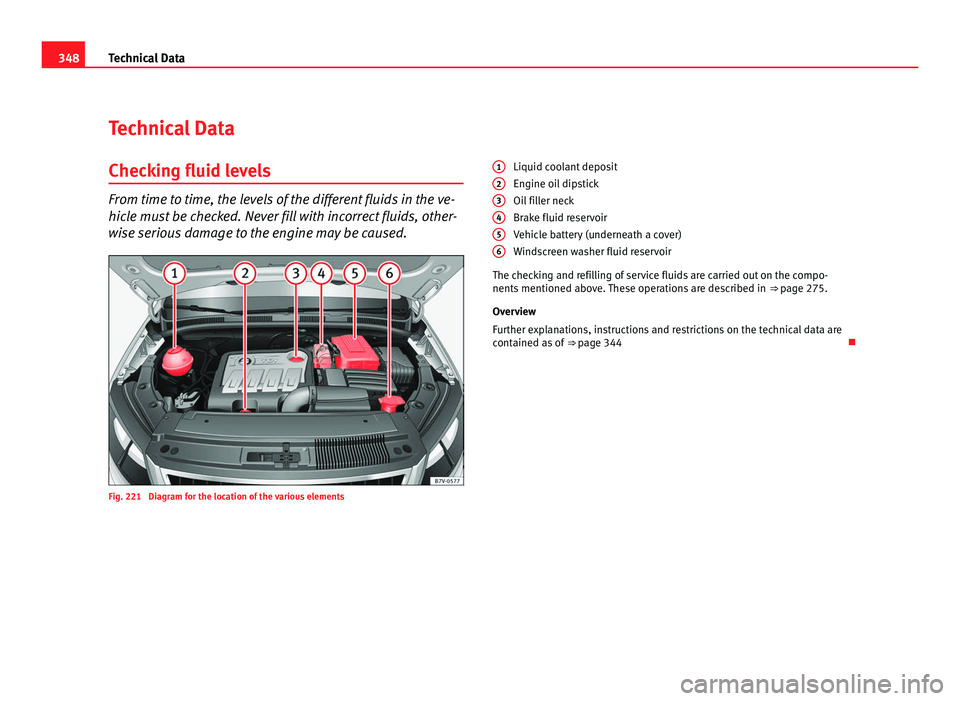
wise serious damage to the engine may be caused. Fig. 221 Diagram for the location of the various elements Liquid coolant deposit
Engine oi
l
dipstick
Oil filler neck
Brake fluid reservoir
Vehicle battery (underneath a cover)
Windscreen washer fluid reservoir
The checking and refilling of service fluids are carried out on the compo-
nents mentioned above. These operations are described in ⇒ page 275.
Overview
Further explanations, instructions and restrictions on the technical data are
contained as of ⇒ page 344
1 2
3
4
5
6