ignition Seat Alhambra 2011 Workshop Manual
[x] Cancel search | Manufacturer: SEAT, Model Year: 2011, Model line: Alhambra, Model: Seat Alhambra 2011Pages: 385, PDF Size: 7.92 MB
Page 153 of 385
151
Seats and storage compartments
Emptying the ashtray
● Remove the ashtray from the cup holder or lining of the door by pulling
it up w
ards.
● After emptying the ashtray, insert it from above into the cup holder or
door lining.
Cig
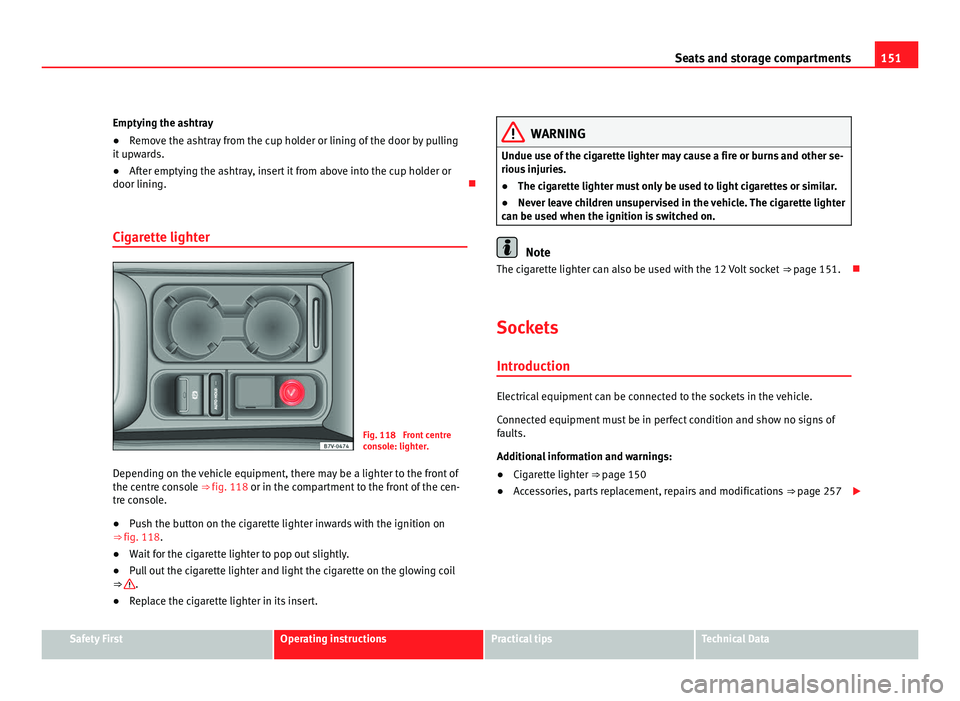
arette lighter Fig. 118 Front centre
con
so
le: lighter.
Depending on the vehicle equipment, there may be a lighter to the front of
the centre c
onsole ⇒ fig. 118 or in the compartment to the front of the cen-
tre console.
● Push the button on the cigarette lighter inwards with the ignition on
⇒ fig. 118.
● Wait for the cigarette lighter to pop out slightly.
● Pull out the cigarette lighter and light the cigarette on the glowing coil
⇒ .
● Replace the cigarette lighter in its insert. WARNING
Undue use of the cigarette lighter may cause a fire or burns and other se-
rious injurie
s.
● The cigarette lighter must only be used to light cigarettes or similar.
● Never leave children unsupervised in the vehicle. The cigarette lighter
can be used when the ignition i
s switched on. Note
The cigarette lighter can also be used with the 12 Volt socket ⇒ pag
e 151.
Sockets Intr oduction Electrical equipment can be connected to the sockets in the vehicle.
Connect
ed equipment
must be in perfect condition and show no signs of
faults.
Additional information and warnings:
● Cigarette lighter
⇒ page 150
● A
ccessories, parts replacement, repairs and modifications ⇒ page 257
Safety First Operating instructions Practical tips Technical Data
Page 154 of 385
152
Seats and storage compartments WARNING
Improper use of the sockets or electrical devices could lead to a fire and
cau se seriou
s injuries.
● Never leave children unsupervised in the vehicle. The sockets and
equipment connect
ed to them can be used when the ignition is switched
on.
● Should a connected electrical device overheat, switch it off and un-
plug it immedi
ately. CAUTION
● To avoid damage to the vehicle's electrical system, never connect equip-
ment th
at generates electrical current, such as solar panels or battery charg-
ers, to the 12 Volt sockets in order to charge the vehicle's battery.
● Only use accessories with approved electromagnetic compatibility ac-
cordin
g to current regulations.
● To avoid damage due to voltage variations, switch off all appliances con-
nected to the 12
V sockets before switching the ignition on or off and before
starting the engine.
● Never connect an appliance to the 12 Volt socket that consumes more
than the pow
er indicated in watts. Exceeding the maximum power absorp-
tion could damage the vehicle's electrical system. For the sake of the environment
Do not leave the engine running when the vehicle is at a standstill. Note
● Using electrical appliances with the engine stopped and the ignition
sw it
ched on will drain the battery.
● Unshielded equipment can cause interference on the radio equipment
and the vehic
le's electrical system.
● Interference can occur on the radio's AM waveband if electrical applian-
ces
are used near the rear window aerial.
Page 155 of 385
153
Seats and storage compartments
Vehicle sockets Depending on your vehicle's version, you may have a 12-
volt
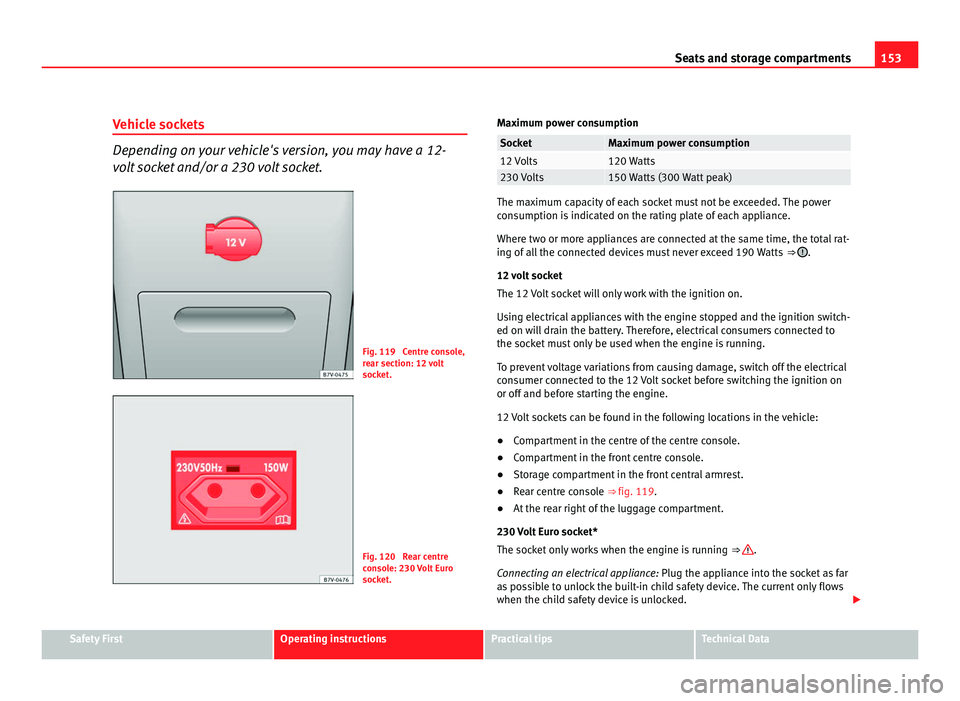
socket and/or a 230 volt socket. Fig. 119 Centre console,
re
ar section: 12
volt
socket. Fig. 120 Rear centre
con
so
le: 230 Volt Euro
socket. Maximum power consumption Socket Maximum power consumption
12 Volts 120 Watts
230 Volts 150 Watts (300 Watt peak)
The maximum capacity of each socket must not be exceeded. The power
con
s
umption is indicated on the rating plate of each appliance.
Where two or more appliances are connected at the same time, the total rat-
ing of all the connected devices must never exceed 190 Watts ⇒ .
12 v o
lt socket
The 12 Volt socket will only work with the ignition on.
Using electrical appliances with the engine stopped and the ignition switch-
ed on will drain the battery. Therefore, electrical consumers connected to
the socket must only be used when the engine is running.
To prevent voltage variations from causing damage, switch off the electrical
consumer connected to the 12 Volt socket before switching the ignition on
or off and before starting the engine.
12 Volt sockets can be found in the following locations in the vehicle:
● Compartment in the centre of the centre console.
● Compartment in the front centre console.
● Storage compartment in the front central armrest.
● Rear centre console ⇒ fig. 119.
● At the rear right of the luggage compartment.
230 Vo
lt Euro socket*
The socket only works when the engine is running ⇒ .
Conn e
cting an electrical appliance: Plug the appliance into the socket as far
as possible to unlock the built-in child safety device. The current only flows
when the child safety device is unlocked. Safety First Operating instructions Practical tips Technical Data
Page 160 of 385
158
Heating, Ventilation and Air conditioning
Some Climatronic controls may also be on the climate control system con-
tro l
panel located in the rear centre console. These controls are used to
make the appropriate settings for the rear seats. Control
butt on Additional information. Climatic
⇒ fig. 121; Climatr
onic
⇒ fig. 122. 1
Tem-
perat ur
e
... Climatic: rotate the control to adjust the temperature accord-
in
gly
.
Climatronic: the settings for the left hand side, the right-hand
side and the rear seats are made separately. Rotate the con-
trol to adjust the temperature accordingly. The temperature is
indicated on the outside ring. 2
Fan
... Climatic: setting 0, f
an and C
limatic switched off;
setting 4, fan set to maximum.
Climatronic: the Fan speed is automatically adjusted depend-
ing on the vehicle speed to avoid annoying noises. The fan
can also be adjusted manually. 3
Air dis-
tribution Climatic: rotate the continuous control to direct the airflow to
the de
s
ired area.
Climatronic: manually adjustable using the controls. Climatic: defro
s
t function. The airflow is directed at the wind-
screen. In this position, air recirculation is automatically
switched off or is not switched on. Climatronic: defro
s
t function. The air drawn in from outside
the vehicle is directed at the windscreen and air recirculation
is automatically switched off. To defrost the windscreen more
quickly, the air is dehumidified at temperatures over approxi-
mately +1.5°C (+35°F) and the fan runs at maximum output. The air is directed at the chest of driver and passengers by the
da
shbo
ard air vents. – Air distribution towards the footwell.
Air distribution towards the windscreen and the footwell.
AC Climatic, Climatronic: Pre
s
s the button to turn off/on cooling. Control
butt on Additional information. Climatic
⇒ fig. 121; Climatr
onic
⇒ fig. 122. Heated rear window: this only works when the engine is run-
ning and sw
it
ches off automatically after a maximum of 10 mi-
nutes. Air recirculation mode ⇒ pag
e 161. Climatronic: Autom
atic
air recirculation ⇒ page 161. Windscreen heating: only works when the engine is running
and swit
c
hes off automatically after a few minutes. Instant auxiliary heating on/off button
⇒ page 163. Switching
off
OFF Climatic: turn the fan switch to setting 0.
C
lim
atronic: press the OFF button or set the fan manually to
0. When the sy s
tem switches off, the OFF button will light up.
REAR Climatronic: pre
s
s the REAR button to adjust the climate con-
tro l
for the rear seats from the front. The REAR button will light
up when the fu nction i
s switched on. The settings for the rear
seats will be displayed. Press the button again to switch the
function off or do not touch any other button for around 10
seconds. REST Climatronic: pre
s
s the button REST to use residual heat. When
the engine i s
still warm but the ignition switched off, the heat
given off by the engine can be used to keep the passenger
compartment warm. The REST button will light up when the
fu nction i
s switched on. The function will switch off after
around 30 minutes and if the battery level is low.
Page 165 of 385
163
Heating, Ventilation and Air conditioning
Auxiliary heater* (additional heater) Introduction The auxiliary heater is powered by fuel from the vehicle's fuel tank and can
be used whi
l
e the vehicle is in motion and at a standstill. Select the mode
required (heat or fan) ⇒ page 165 on the instrument panel.
In winter, the auxiliary heater can be used in heat mode before switching on
the ignition to remove any ice, mist or snow from the windscreen (thin lay-
ers only).
Additional information and warnings:
● SEAT information system ⇒ pag
e 62
● Refuelling ⇒ pag
e 264 WARNING
The auxiliary heater fumes contain carbon dioxide, an odourless and col-
ourle s
s toxic gas. Carbon monoxide can cause people to lose conscious-
ness. It can also cause death.
● Never switch on the auxiliary heater or leave it running in places that
are enclo
sed or unventilated.
● Never program the independent heating system to be activated and
operated in c
losed, unventilated areas. WARNING
The components of the auxiliary heater exhaust system heat up a great
dea l
. This could cause a fire.
● Always park your vehicle so that no part of the exhaust system can
come in cont
act with flammable materials (such as dried grass). CAUTION
Never place food, medicines or other heat-sensitive objects close to the air
vents. F ood, medic
ines and other heat-sensitive objects may be damaged
or made unsuitable for use by the air coming from the air vents.
Switching the auxiliary heater on and off Switching the auxiliary heater on:
Manually using the instant on/off button. ⇒ page 157
ON
Manually using the remote control. ⇒ page 164
Automatically at the programmed and enabled on
time. ⇒ page 165
Switching the auxiliary heater off:
Manually using the instant on/off button for the
clim
at
e control system. ⇒ page 157
OFF
Manually using the remote control. ⇒ page 164
Automatically after the programmed time. ⇒ page 165
Automatically when the light comes on
(fuel r
e-
serve). ⇒ page 264
Automatically when the battery power drops to a
ver
y
low level. ⇒ page 288
Things to note
Aft
er sw
itching the auxiliary heater off, it continues to run for a short period
to completely burn any fuel remaining in the auxiliary heater. The exhaust
fumes are also extracted from the system. Safety First Operating instructions Practical tips Technical Data
Page 168 of 385
166
Heating, Ventilation and Air conditioning
Checking programming
If the timer h
as been switched on after switching the ignition off, the instant
on button will remain lit for around ten seconds.
WARNING
Never program the independent heating system to be activated and oper-
ated in c lo
sed, unventilated areas. The auxiliary heater fumes contain
carbon dioxide, an odourless and colourless toxic gas. Carbon monoxide
can cause people to lose consciousness. It can also cause death.
Operating instructions The auxiliary heater exhaust system located below the vehicle must be kept
cl
e
ar of snow, mud and other objects. The exhaust fumes must not be ob-
structed in any way. The exhaust fumes generated by the auxiliary heater
are removed via an exhaust pipe fitted underneath the vehicle.
On heating the vehicle interior, depending on the outside temperature the
warm air is first directed at the windscreen and then to the rest of the pas-
senger compartment through the air vents. If the air vents are turned to-
wards the windows, for example, the form of air distribution may be affec-
ted.
Depending on the outside temperature, the temperature at which the auxili-
ary heater warms the vehicle interior may be somewhat higher if the heating
or climate control temperature control is set to maximum before switching
the heating on.
Depending on the engine, vehicles with auxiliary heater may be fitted with a
second battery in the luggage compartment that is responsible for powering
the auxiliary heater. Cases in which the auxiliary heater will not switch on
●
The auxiliary heater requires about as much power as the dipped head-
lights. If the batt
ery charge is low, the auxiliary heater will switch off auto-
matically or will not even switch on. This avoids problems when starting the
engine.
● The heater will switch just once each time. The timer will also have to be
switc
hed back on every time it is required. Note
● Noise will be heard while the auxiliary heater is running.
● When the air humidity i
s high and the outside temperature low, the
heating sy
stem may evaporate condensation from the auxiliary heater. In
this case, steam may be released from underneath the vehicle. This is com-
pletely normal and there is no need to suspect a fault!
● If the auxiliary heater runs several times over a prolonged period, the ve-
hicle b
attery may run flat. To re-charge the battery, drive the vehicle for a
long distance. In general: drive for as much time as the auxiliary heating
was working.
Page 169 of 385
167
Driving
Driving SteeringIntroduction The power steering is not hydraulic but electromechanical. The advantage
of thi
s
steering system is that it disposes of hydraulic tubes, hydraulic oil,
the pump, filter and other components. The electromechanical system
saves fuel. While a hydraulic system requires oil pressure to be maintained,
electromechanical steering only requires energy when the steering wheel is
turned.
With the power steering system, the assisted steering function automatical-
ly adjusts according to the vehicle speed, the steering torque and the wheel
turning angle. The power steering only works when the engine is running.
Additional information and warnings:
● Start and stop the engine ⇒ page 170
● V
ehicle battery ⇒ page 288
● T
ow-starting and towing away ⇒ page 340WARNING
If the power steering is not working then the steering wheel is much
more diffic u
lt to turn and the vehicle more difficult to control.
● The power steering only works when the engine is running.
● Never allow the vehicle to move when the engine is switched off.
● Never remove the key from the ignition if the vehicle is in motion. The
steerin
g may lock and it will not be possible to turn the steering wheel. Control and warning lamps lights up Possible cause Solution
(red) Power steering faulty. The steering system should be
chec
k
ed by a Technical Service
as soon as possible.
(yel-
lo w) Power steering operation re-
duced. The steering system should be
chec
k
ed by a Technical Service
as soon as possible.
If, after restarting the engine
and driving for a short distance,
the yellow warning light no lon-
ger comes on, it will not be nec-
essary to take the vehicle to a
specialised workshop. The vehicle battery was dis-
connect
ed and h
as been re-
connected. Drive for a short distance at 15 –
20 km/h.
Safety First Operating instructions Practical tips Technical Data
Page 170 of 385
168
Driving flashes Possible cause Solution
(red) Fault in the steering column
electr
onic
lock.
Do not drive on!
Seek pr
ofessional advice.
(yel-
lo w) Steering column deviation. Gently turn the steering wheel to
and fro
. Steering wheel not unlocked
or lock
ed. Remove the key from the igni-
tion and then swit
c
h the ignition
back on. Check the messages
displayed on the instrument
panel at the same time.
Do not drive on, if the steering
column remains locked after the
ignition has been switched on.
You should obtain professional
assistance. Several warning and control lamps should light up for a few seconds when
the ignition is
sw
itched. This signals that the lamp is working properly. They
will switch off after a few seconds. WARNING
If the warning lamps and messages are ignored, the vehicle may stall in
traffic, or m a
y cause accidents and severe injuries.
● Never ignore the warning lamps or text messages.
● Stop the vehicle safely as soon as possible. CAUTION
Failure to heed the warning lamps and text messages when they appear
ma y
result in faults in the vehicle. Information on the steering Steering column electronic lock
If the driv
er's
door is opened before the ignition is switched off, the steering
column electronic lock is activated via the ignition key or the sensor built
into the door handle.
Mechanical steering lock
To prevent theft, we recommend you lock the steering before leaving the ve-
hicle. Please engage steering lock Unlocking the steering
Parking the vehicle
⇒ page 183. Turn the steering wheel slightly to
rel
e
ase the steering lock. Remove the key from the ignition. Insert the key in the ignition lock.
Turn the steering wheel slightly until
you he
ar the s
teering lock. Hold the steering wheel in this posi-
tion and swit
c
h on the ignition. Electromechanical power steering
With the po
w
er steering system, the assisted steering function automatical-
ly adjusts according to the vehicle speed, the steering torque and the wheel
turning angle. The power steering only works when the engine is running.
You should remember that you will need considerably more power than nor-
mal to steer the vehicle if the power steering is not working correctly or not
at all.
Counter steering assistance system
The counter steering assistance system helps the driver in critical situa-
tions. Additional steering power helps the driver when counter steering.
Page 173 of 385
171
Driving WARNING
The components of the exhaust system reach very high temperatures.
This c
ould cause a fire and considerable damage.
● Always park your vehicle so that no part of the exhaust system can
come in cont
act with flammable materials (such as wood, leaves, spilled
fuel, dried grass, etc).
● Do not apply additional underseal or anti-corrosion coatings to the
exhau
st pipes, catalytic converter, heat shields or the diesel particulate
filter.
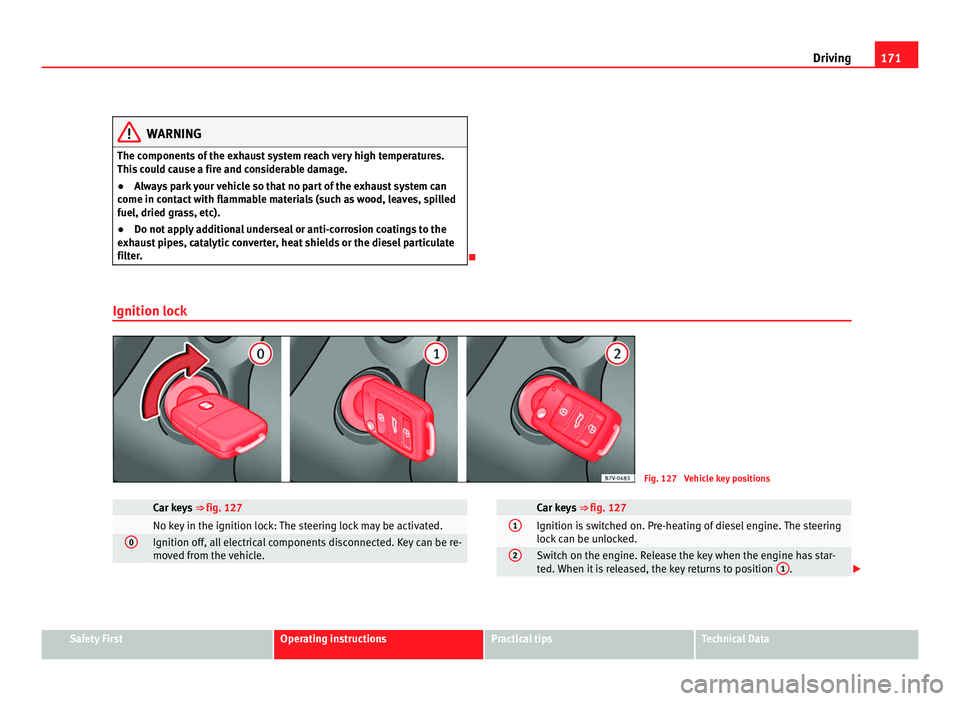
Ignition lock Fig. 127 Vehicle key positions
Car keys
⇒ fig. 127 No key in the ignition lock: The steering lock may be activated.
0
Ignition off, all electrical components disconnected. Key can be re-
mov
ed fr
om the vehicle. Car keys
⇒ fig. 127 1
Ignition is switched on. Pre-heating of diesel engine. The steering
lock
c
an be unlocked. 2
Switch on the engine. Release the key when the engine has star-
ted.
When it
is released, the key returns to position 1 .
Safety First Operating instructions Practical tips Technical Data
Page 174 of 385
172
Driving
Key not authorised for the vehicle
If a k ey
which is not authorised for this vehicle is inserted in the ignition
lock, it can be removed as follows:
● Automatic gearbox: the key cannot be removed from the ignition lock.
Pres
s and release the selector lever locking button. Key can be removed
from the vehicle.
● Manual gearbox: Remove the key from the ignition. WARNING
Unsuitable or careless use of the vehicle key could result in serious in-
jury .
● A
lways take all the keys with you whenever you leave the vehicle. The
engine cou
ld accidentally be started and electrical equipment such as
the windows could accidentally be operated resulting in serious injury.
● Never leave children or disabled people alone in the car. They could
be trapped in the c
ar in an emergency and will not be able to get them-
selves to safety. For example, depending on the time of the year, temper-
atures inside a locked and closed vehicle can be extremely high or ex-
tremely low resulting in serious injuries and illness or even death, partic-
ularly for young children.
● Never remove the key from the ignition if the vehicle is in motion. The
steerin
g may lock and it will not be possible to turn the steering wheel. Note
● If the key is left in the ignition lock with the engine off for long periods,
the v
ehicle battery will run flat.
● For automatic gearbox vehicles the key
can only be removed from the ig-
nition lock if the gear selector lever is in position P. In this case, press and
release the selector lever locking button. Starting the engine Complete operations only in the sequence given:
Step
1. Press the brake pedal and keep pressed until step 5 has been
comp
l
eted. 1 a. In vehicles with a manual gearbox:
Pres
s the clutch pedal all
the way and keep pressed until the engine starts. 2. Put the gearstick in neutral or the selector lever in position
P
or N. 3. Only in vehicles with diesel engine:
To prehe
at, turn the key
in the ignition lock to position ⇒ fig. 127 1 . A warning lamp
lights up in the c ontr
ol panel . 4. Turn the key in the ignition lock to position
⇒ fig. 127 2 ; do
not pr e
ss the accelerator. 5. When the engine has started, release the key in the ignition
lock.
6. If the engine does not start, stop the process and try again af-
ter one minut
e. 7. Disconnect the electronic parking brake when you wish to
st
ar
t driving ⇒ page 183. WARNING
Never leave the vehicle unattended if the engine is running. The vehicle
cou l
d move off suddenly, especially if it is in gear, resulting in an acci-
dent and serious injury.