torque SSANGYONG KORANDO 1997 Service Repair Manual
[x] Cancel search | Manufacturer: SSANGYONG, Model Year: 1997, Model line: KORANDO, Model: SSANGYONG KORANDO 1997Pages: 2053, PDF Size: 88.33 MB
Page 1193 of 2053

5A-98 AUTOMATIC TRANSMISSION
SSANGYONG MY2002
Circuit Description
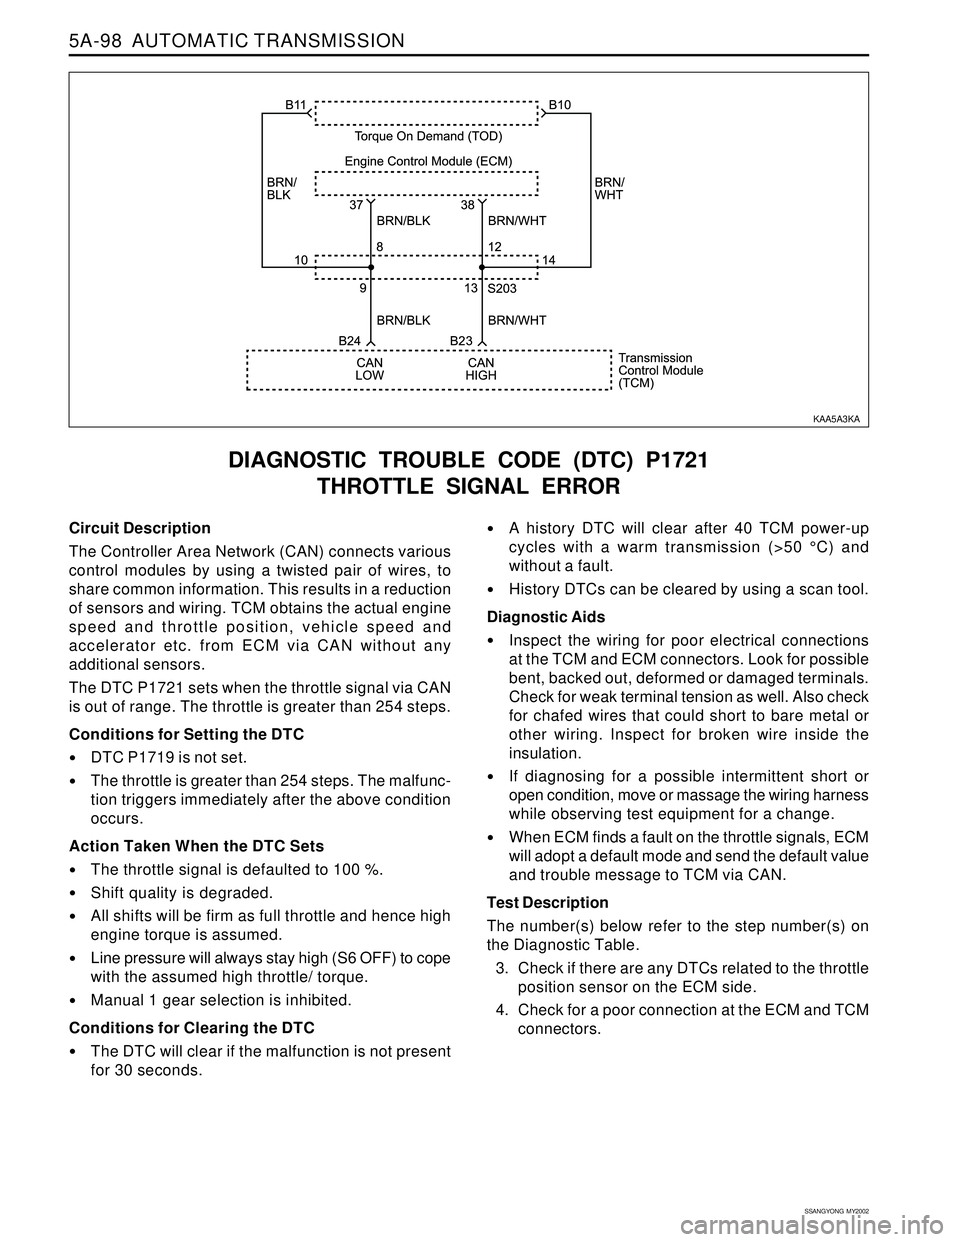
The Controller Area Network (CAN) connects various
control modules by using a twisted pair of wires, to
share common information. This results in a reduction
of sensors and wiring. TCM obtains the actual engine
speed and throttle position, vehicle speed and
accelerator etc. from ECM via CAN without any
additional sensors.
The DTC P1721 sets when the throttle signal via CAN
is out of range. The throttle is greater than 254 steps.
Conditions for Setting the DTC
DTC P1719 is not set.
The throttle is greater than 254 steps. The malfunc-
tion triggers immediately after the above condition
occurs.
Action Taken When the DTC Sets
The throttle signal is defaulted to 100 %.
Shift quality is degraded.
All shifts will be firm as full throttle and hence high
engine torque is assumed.
Line pressure will always stay high (S6 OFF) to cope
with the assumed high throttle/ torque.
Manual 1 gear selection is inhibited.
Conditions for Clearing the DTC
The DTC will clear if the malfunction is not present
for 30 seconds.
DIAGNOSTIC TROUBLE CODE (DTC) P1721
THROTTLE SIGNAL ERROR
A history DTC will clear after 40 TCM power-up
cycles with a warm transmission (>50 °C) and
without a fault.
History DTCs can be cleared by using a scan tool.
Diagnostic Aids
Inspect the wiring for poor electrical connections
at the TCM and ECM connectors. Look for possible
bent, backed out, deformed or damaged terminals.
Check for weak terminal tension as well. Also check
for chafed wires that could short to bare metal or
other wiring. Inspect for broken wire inside the
insulation.
If diagnosing for a possible intermittent short or
open condition, move or massage the wiring harness
while observing test equipment for a change.
When ECM finds a fault on the throttle signals, ECM
will adopt a default mode and send the default value
and trouble message to TCM via CAN.
Test Description
The number(s) below refer to the step number(s) on
the Diagnostic Table.
3. Check if there are any DTCs related to the throttle
position sensor on the ECM side.
4. Check for a poor connection at the ECM and TCM
connectors.
KAA5A3KA
Page 1221 of 2053

5A-126 AUTOMATIC TRANSMISSION
SSANGYONG MY2002
Circuit Description
The solenoid 7 is a normally open ON/OFF type sole-
noid that is used to control the application of the
Torque Converter Clutch (TCC).
The Solenoid 7 (S7) ON activates the TCC and the S7
is attached to the pump body within the transmission.
Voltage is supplied directly to the solenoid through
the Transmission Control Module (TCM).
The DTC P1739 sets when the solenoid 7, Torque Con-
verter Clutch Solenoid, circuit is open or the switched
leg of the solenoid 7 is shorted to battery positive.
The solenoid 7's driver Integrated Chip (IC) status
indicates a faulty circuit.
Conditions for Setting the DTC
DTCs P1717 and P1718 are not set.
S7 is OFF.
S3 is OFF.
The solenoid 7's driver Integrated Chip (IC) status
indicates a faulty circuit. This condition must be
continuously present for 60 milliseconds.
Action Taken When the DTC Sets
The solenoid 7 is always disabled (OFF) resulting
in the TCC being unlocked always.
DIAGNOSTIC TROUBLE CODE (DTC) P1739
SOLENOID 7 CIRCUIT OPEN
Conditions for Clearing the DTC
The DTC will clear when the malfunction has not
occurred after ignition cycle.
A history DTC will clear after 40 TCM power-up
cycles with a warm transmission (>50 °C) and
without a fault.
History DTCs can be cleared by using a scan tool.
Diagnostic Aids
During the TCM's testing, solenoid 7 is turned OFF/
ON by a very small (4 millisecond) pulses. This
pulse is too short for the solenoid to react so the
transmission operation is not affected.
The solenoid feedback voltage is measured before
the (4 millisecond) pulse and again during the pulse.
If the difference is outside the acceptable limits
the relevant fault is recorede.
Typical causes would be an open circuit in the wiring
to or within the solenoid, or a short circuit to power
in the wiring to or within the solenoid.
If several faults of solenoids are present, check the
wiring or connectors that are common to the selected
solenoids, especially the earth connections.
Inspect the wiring for poor electrical connections
at the TCM and at the 10-way transmission
connector.
KAC5A030
Page 1245 of 2053

AUTOMATIC TRANSMISSION 5A-157
SSANGYONG MY2002
ON-VEHICLE SERVICE
TRANSMISSION
Removal and Installation Procedure
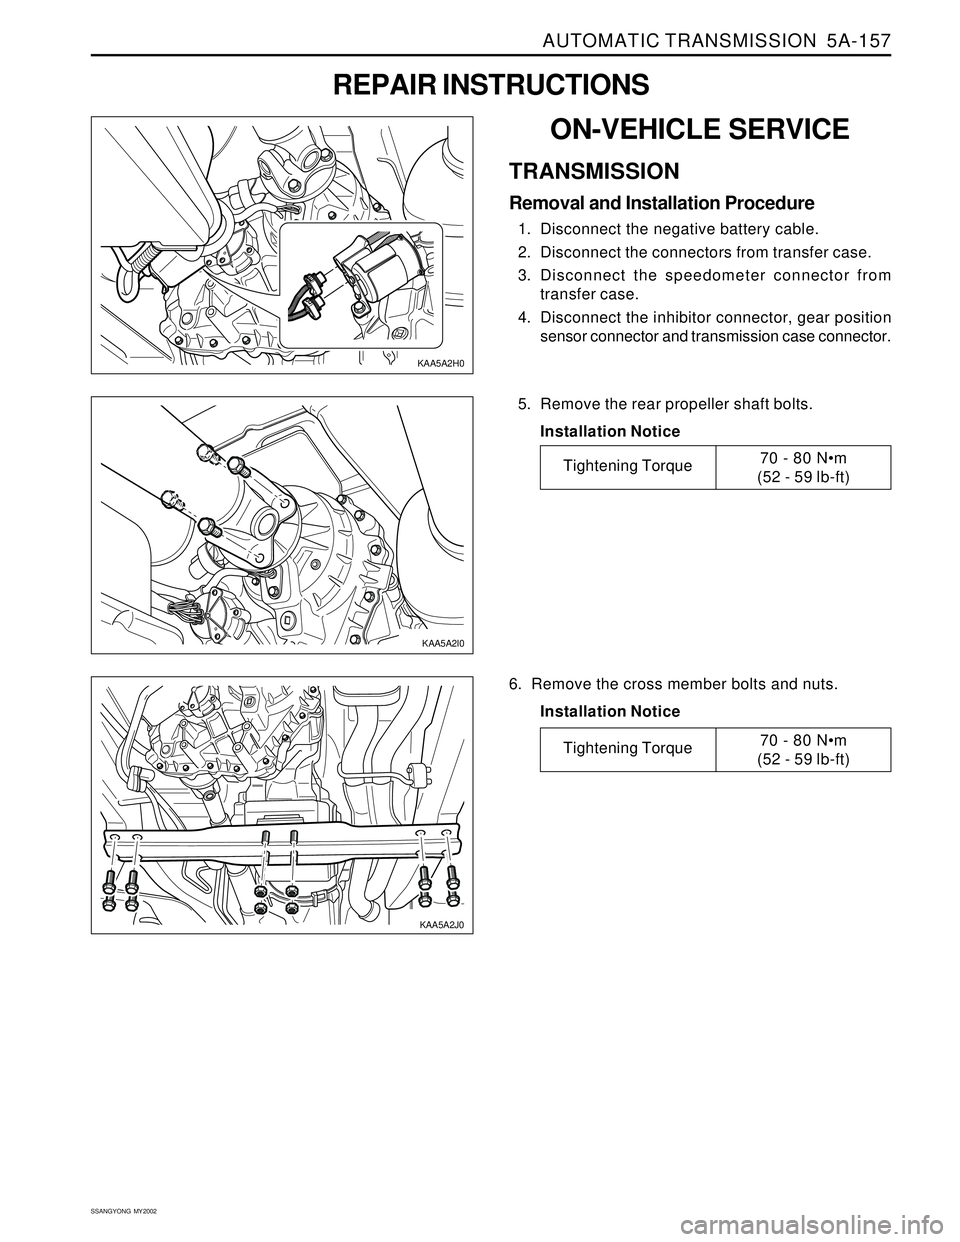
1. Disconnect the negative battery cable.
2. Disconnect the connectors from transfer case.
3. Disconnect the speedometer connector from
transfer case.
4. Disconnect the inhibitor connector, gear position
sensor connector and transmission case connector.
REPAIR INSTRUCTIONS
5. Remove the rear propeller shaft bolts.
Installation Notice
6. Remove the cross member bolts and nuts.
Installation Notice
KAA5A2I0
Tightening Torque70 - 80 N•m
(52 - 59 lb-ft)
Tightening Torque70 - 80 Nm
(52 - 59 lb-ft)
KAA5A2H0
KAA5A2J0
Page 1246 of 2053

5A-158 AUTOMATIC TRANSMISSION
SSANGYONG MY2002
8. Remove the transfer case-to-transmission housing
bolts and remove the transfer case.
Installation Notice
10. Separate the locking clip on shift lever and remove
the shift rod.
Notice: Removal and installation performed when
the shift procedure should be lever is in ’D’ range.
11. Remove the oil cooler pipes.
Installation Notice 9. Disconnect the 10-Pins Plug connector from trans-
mission.
7. Remove the front propeller shaft bolts from transfer
case.
Installation Notice
KAA5A5V0
KAA5A2K0
KAA5A2L0
KAA5A2M0
Tightening Torque70 - 80 Nm
(52 - 59 lb-ft)
Tightening Torque35 - 60 Nm
(28 - 44 lb-ft)
Tightening Torque40 - 45 Nm
(29 - 33 lb-ft)
Page 1247 of 2053

AUTOMATIC TRANSMISSION 5A-159
SSANGYONG MY2002
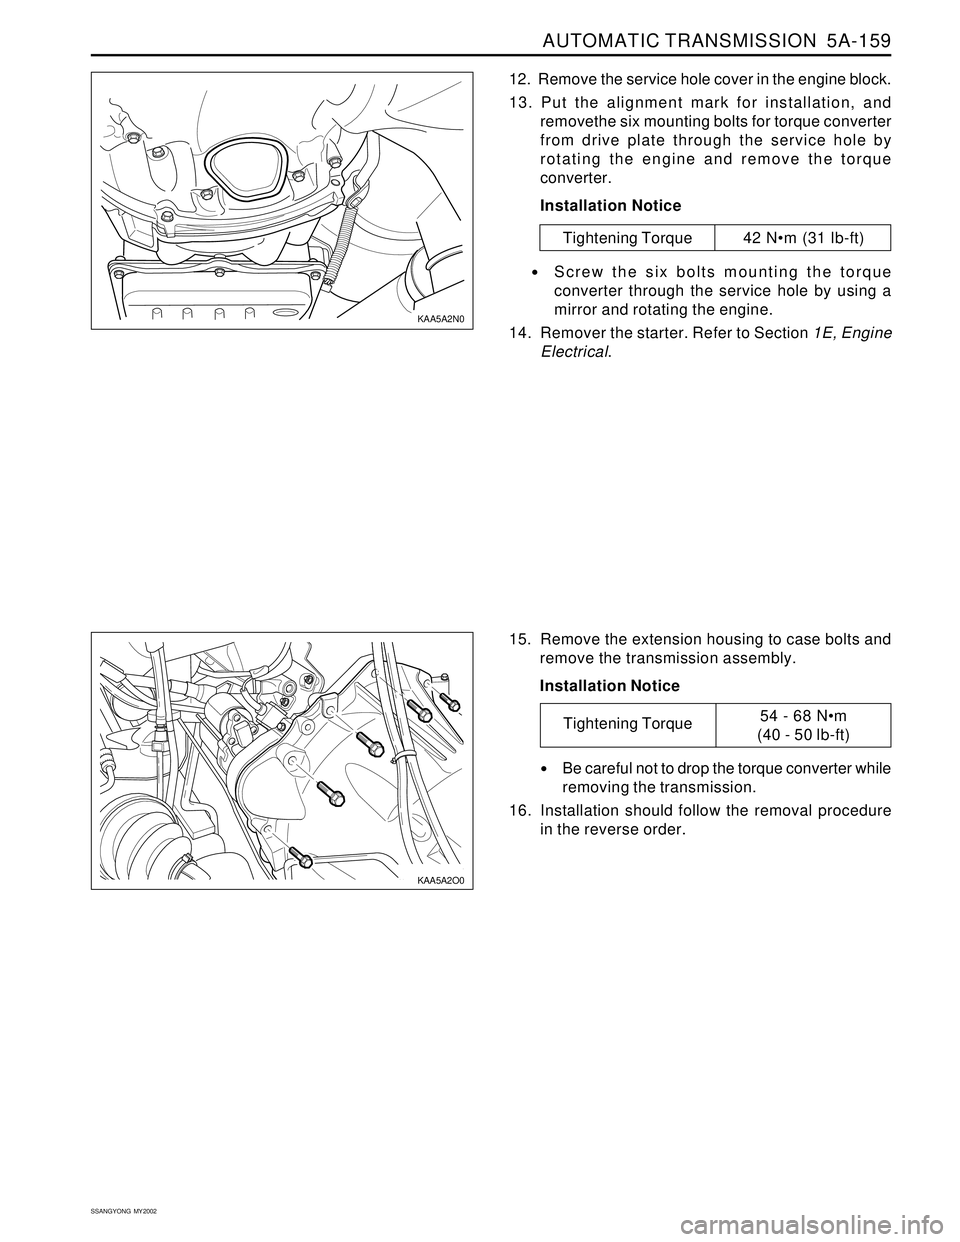
12. Remove the service hole cover in the engine block.
13. Put the alignment mark for installation, and
removethe six mounting bolts for torque converter
from drive plate through the service hole by
rotating the engine and remove the torque
converter.
Installation Notice
Screw the six bolts mounting the torque
converter through the service hole by using a
mirror and rotating the engine.
14. Remover the starter. Refer to Section 1E, Engine
Electrical.
15. Remove the extension housing to case bolts and
remove the transmission assembly.
Installation Notice
Be careful not to drop the torque converter while
removing the transmission.
16. Installation should follow the removal procedure
in the reverse order.
KAA5A2N0
KAA5A2O0
Tightening Torque54 - 68 Nm
(40 - 50 lb-ft)
Tightening Torque 42 Nm (31 lb-ft)
Page 1252 of 2053

5A-154 AUTOMATIC TRANSMISSION
SSANGYONG MY2002
DIAGNOSTIC TROUBLE CODE (DTC) P1747
SOLENOID 7 CIRCUIT SHORT
Circuit Description
The solenoid 7 is a normally open ON/OFF type sole-
noid that is used to control the application of the
Torque Converter Clutch (TCC).
The Solenoid 7 (S7) ON activates the TCC and is at-
tached to the pump body within the transmission. Volt-
age is supplied directly to the solenoid through the
Transmission Control Module (TCM).
The DTC P1747 sets when the solenoid 7, Torque
Converter Clutch Solenoid, circuit is shorted to ground.
The solenoid 7’s driver Integrated Chip (IC) status
indicates a faulty circuit.
Conditions for Setting the DTC
DTCs P1717 and P1718 are not set.
S7 is ON.
The solenoid 7’s driver Integrated Chip (IC) status
indicates a faulty circuit. This condition must be
continuously present for 60 milliseconds.
Action Taken When the DTC Sets
The solenoid 7 is always disabled (OFF) resulting
in the TCC being unlocked continuously.
Conditions for Clearing the DTC
The DTC will clear when the malfunction has not
occurred after ignition cycle.
A history DTC will clear after 40 TCM power-up
cycles with a warm transmission (>50 °C) and
without a fault.
History DTCs can be cleared by using a scan tool.
Diagnostic Aids
During the TCM’s testing, solenoid 7 is turned OFF/
ON by a very small (4 millisecond) pulses. This
pulse is too short for the solenoid to react so the
transmission operation is not affected.
The solenoid feedback voltage is measured before
the (4 millisecond) pulse and again during the
pulse. If the difference is outside the acceptable
limits the relevant fault is recorded.
Typical causes would be a short circuit to ground
in the wiring to or within the solenoid.
If several faults of solenoids are present, check
the wiring or connectors that are common to the
selected solenoids, especially the earth
connections.
Inspect the wiring for poor electrical connections
at the TCM and at the 10-way transmission
connector. Look for possible bent, backed out,
deformed or damaged terminals. Check for weak
terminal tension as well. Also check for chafed wires
that could short tobare metal or other wiring. Inspect
for broken wire inside the insulation.
KAC5A030YAD1E080
Page 1268 of 2053

AUTOMATIC TRANSMISSION 5A-173
SSANGYONG MY2002
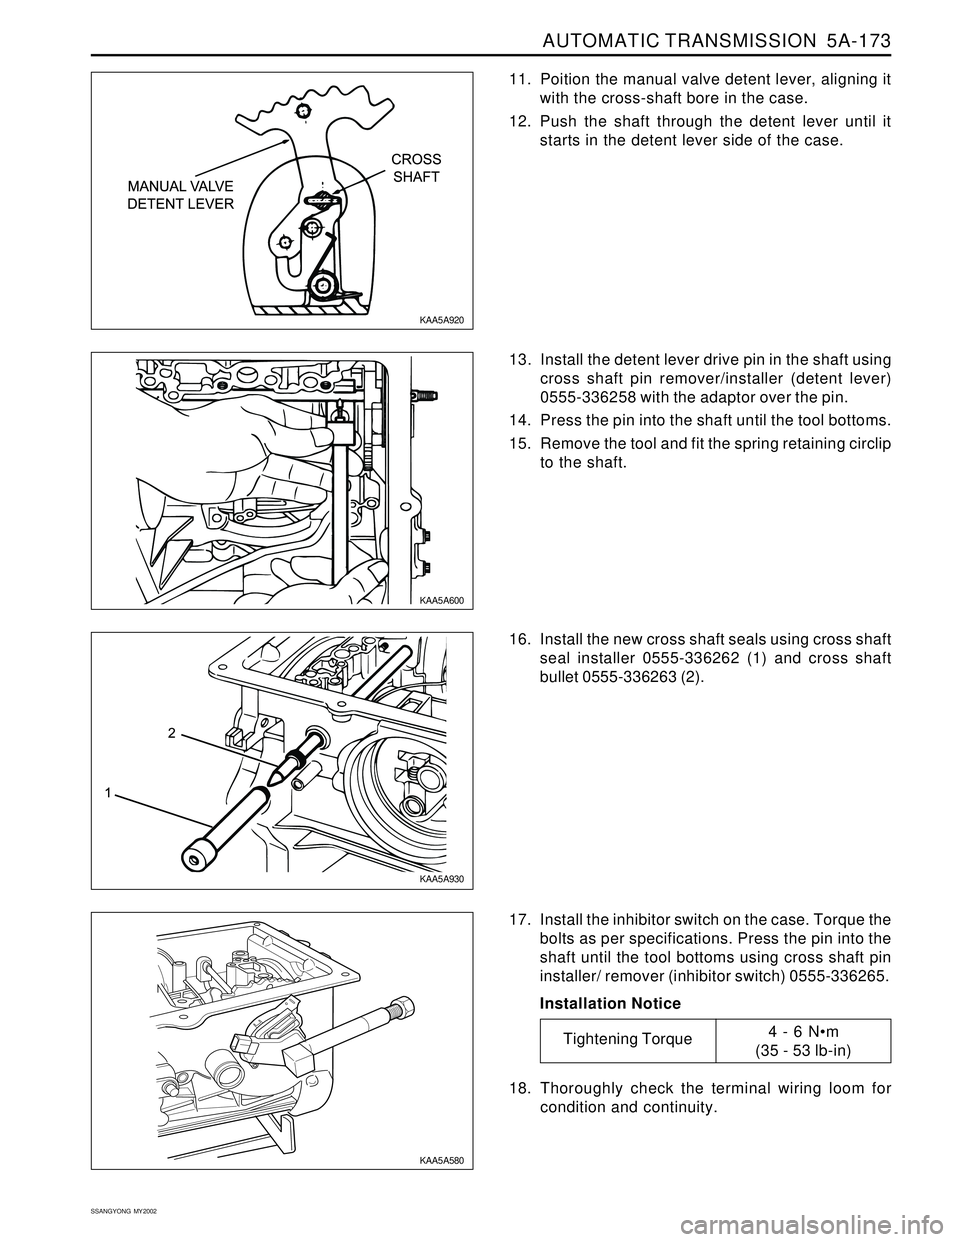
11. Poition the manual valve detent lever, aligning it
with the cross-shaft bore in the case.
12. Push the shaft through the detent lever until it
starts in the detent lever side of the case.
16. Install the new cross shaft seals using cross shaft
seal installer 0555-336262 (1) and cross shaft
bullet 0555-336263 (2).
17. Install the inhibitor switch on the case. Torque the
bolts as per specifications. Press the pin into the
shaft until the tool bottoms using cross shaft pin
installer/ remover (inhibitor switch) 0555-336265.
Installation Notice
18. Thoroughly check the terminal wiring loom for
condition and continuity. 13. Install the detent lever drive pin in the shaft using
cross shaft pin remover/installer (detent lever)
0555-336258 with the adaptor over the pin.
14. Press the pin into the shaft until the tool bottoms.
15. Remove the tool and fit the spring retaining circlip
to the shaft.
KAA5A920
KAA5A600
KAA5A930
KAA5A580
Tightening Torque4 - 6 Nm
(35 - 53 lb-in)
Page 1270 of 2053

AUTOMATIC TRANSMISSION 5A-175
SSANGYONG MY2002
Rear Band Assembly
1. Check the rear band for any cracks or damage
along the lining and metal backing.
2. Install the reaction anchor strut into the main case,
without shims.
3. Carefully install the rear band into the transmission
case and ensure that it is properly fitted in the
case.
Notice: If fitting a new band, soak the new band in
automatic transmission fluid for a minimum of five
minutes prior to assembly.
4. Position the apply strut on the rear band then
engage the apply strut in the servo lever.
5. Install the cam plate and tighten the screws to
specification.
Installation Notice
Rear Servo Assembly
1. Check the servo piston ‘O’ rings and gasket for
any damage.
2. Lubricate the servo piston ‘O’ rings with
automatic transmission fluid, and fit the ‘O’ rings
to the piston grooves.
3. Assemble the piston to the cover, ensuring that
‘O’ ring compression is adequate but not
excessive.
4. Align the spring on the piston spigot, then position
the rear servo rod into the spigot.
5. Assemble the gasket to the cover and fit the
assembly to the case.
Notice: Do not use petroleum jelly on the gasket.
6. Apply additional Loctite 202 or equivalent as
required to the rear servo to case bolts. Install
the bolts and tighten to specification.
Installation Notice
KAA5A950
KAA5A960
KAA5A630
KAA5A990
Tightening Torque30 - 35 Nm
(22 - 26 lb-ft)
Tightening Torque16 - 22 Nm
(12 - 16 lb-ft)
Page 1271 of 2053

5A-176 AUTOMATIC TRANSMISSION
SSANGYONG MY2002
Planet Carrier Assembly and Centre Support
1. Check the carrier and planet assembly for any
damage or irregularity and ensure that all pinions
rotate freely and that the pinion end float is within
0.10 mm - 0.50 mm.
2. Install the One Way Clutch (OWC) retainer (1) to
the planet carrier with the inner edge pointing down-
wards. Inspect the OWC race and the sprag
assemblies for wear or damage. Replace if
necessary.
3. Install the outer (3) race in the drum. Press the
race to the bottom of the drum and install the
retaining circlip (2). Ensure the circlip is firmly
seated in its groove.
4. Install the OWC (1) into the outer race with the lip
edge uppermost. Lubricate the sprags with auto-
matic transmission fluid.
5. Check that the plugs are fitted to the centre
support, then assemble the centre support into
the OWC, ensuring that the support will rotate in
an anti-clock-wise direction only.
6. Lubricate the No. 9 needle bearing and washer
with petroleum jelly and fit them to the rear face
of the planet carrier.
7. In s t a l l th e
KAA5A0A0
KAA5A760
KAA5A750
KAA5A560
Tightening Torque20 - 27 Nm
(15 - 20 lb-ft)
Page 1272 of 2053

AUTOMATIC TRANSMISSION 5A-177
SSANGYONG MY2002
Adaptor Housing Assembly
1. Install a new seal to the adaptor housing.
2. Position a new gasket onto the adaptor housing.
Notice: Do not use petroleum jelly to hold the gasket
in position.
3. Apply additional Loctite 202 or equivalent as required
to the adapter housing bolts. Install the adaptor
housing and torque the bolts to specification.
Installation Notice
Front Servo Assembly
1. Lubricate the cover ‘O’ ring with automatic
transmission fluid and fit to the cover.
2. Lubricatethepiston‘O’ rings with automatic trans-
mission fluid and fit to the piston.
3. Assemble the piston, push rod, spring, belleville
washer, seat and retaining ring.
4. Fit the piston push rod assembly into the front
servo cover.
5. Install the front servo block and spring into the
case.
6. Install the front servo assembly into the case.
KAA5A0C0
KAA5A520 KAA5A0B0
Tightening Torque30 - 35 Nm
(22 - 26 lb-ft)
7. Compress the servo cover and fit the servo cover
retaining circlip, aligning the gap with the pan rail,
and ensuring that it is completely seated in its
groove.
Notice: Ensure that the front servo snap ring is
installed correctly. Orient the circlip with the gap at
the bottom, near the pan rail.
KAA5A0D0