SUBARU FORESTER 2004 Service Repair Manual
Manufacturer: SUBARU, Model Year: 2004, Model line: FORESTER, Model: SUBARU FORESTER 2004Pages: 2870, PDF Size: 38.67 MB
Page 1561 of 2870
ME(H4DOTC)-101
MECHANICAL
Cylinder Block
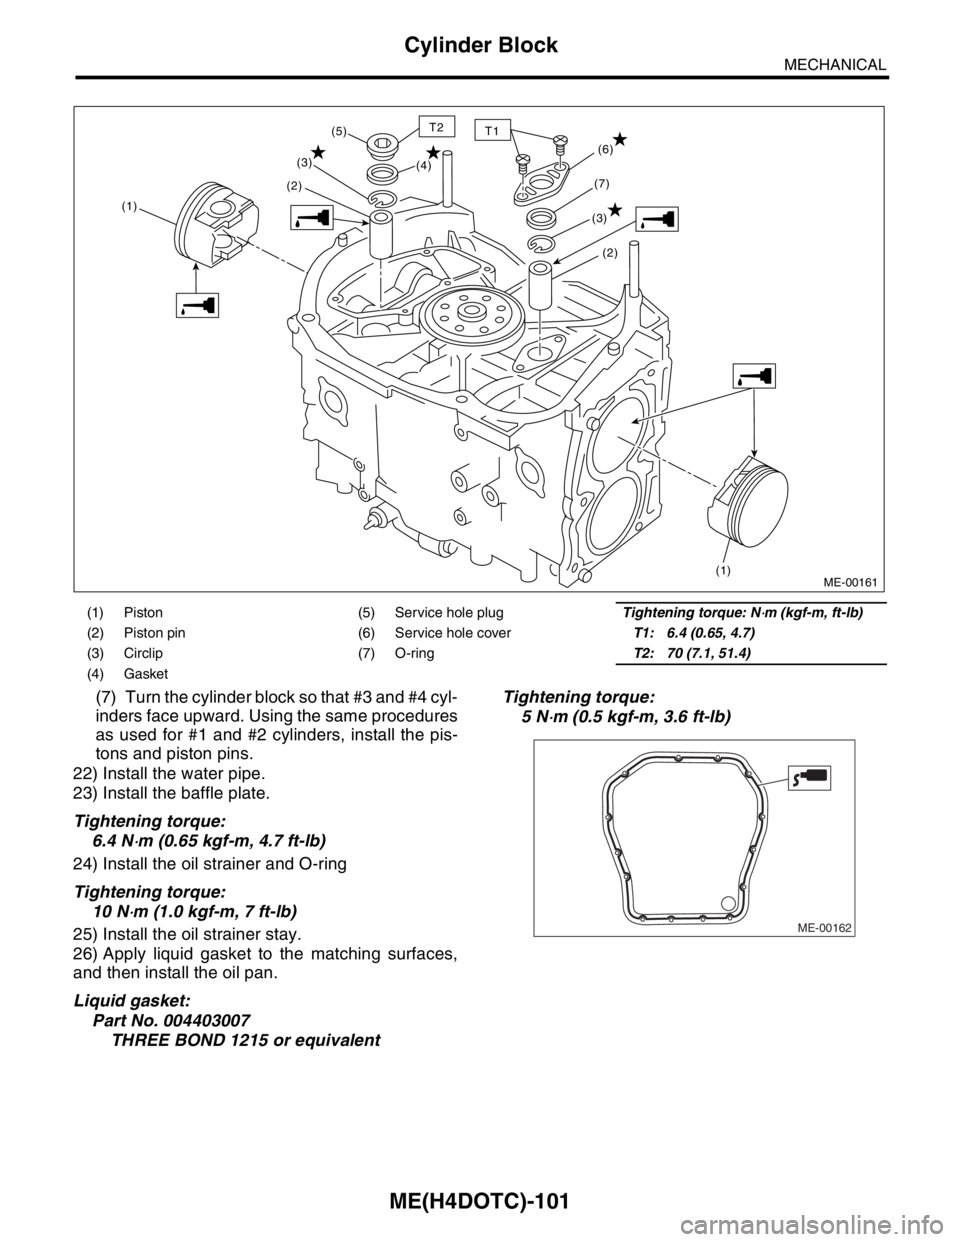
(7) Turn the cylinder block so that #3 and #4 cyl-
inders face upward. Using the same procedures
as used for #1 and #2 cylinders, install the pis-
tons and piston pins.
22) Install the water pipe.
23) Install the baffle plate.
Tightening torque:
6.4 N
⋅m (0.65 kgf-m, 4.7 ft-lb)
24) Install the oil strainer and O-ring
Tightening torque:
10 N
⋅m (1.0 kgf-m, 7 ft-lb)
25) Install the oil strainer stay.
26) Apply liquid gasket to the matching surfaces,
and then install the oil pan.
Liquid gasket:
Part No. 004403007
THREE BOND 1215 or equivalentTightening torque:
5 N
⋅m (0.5 kgf-m, 3.6 ft-lb)
(1) Piston (5) Service hole plugTightening torque: N⋅m (kgf-m, ft-lb)
(2) Piston pin (6) Service hole coverT1: 6.4 (0.65, 4.7)
(3) Circlip (7) O-ringT2: 70 (7.1, 51.4)
(4) Gasket
(1)(2)(3)
(1)
(2) (6)
(3)(7) (4) (5)
ME-00161
T2T1
ME-00162
Page 1562 of 2870
ME(H4DOTC)-102
MECHANICAL
Cylinder Block
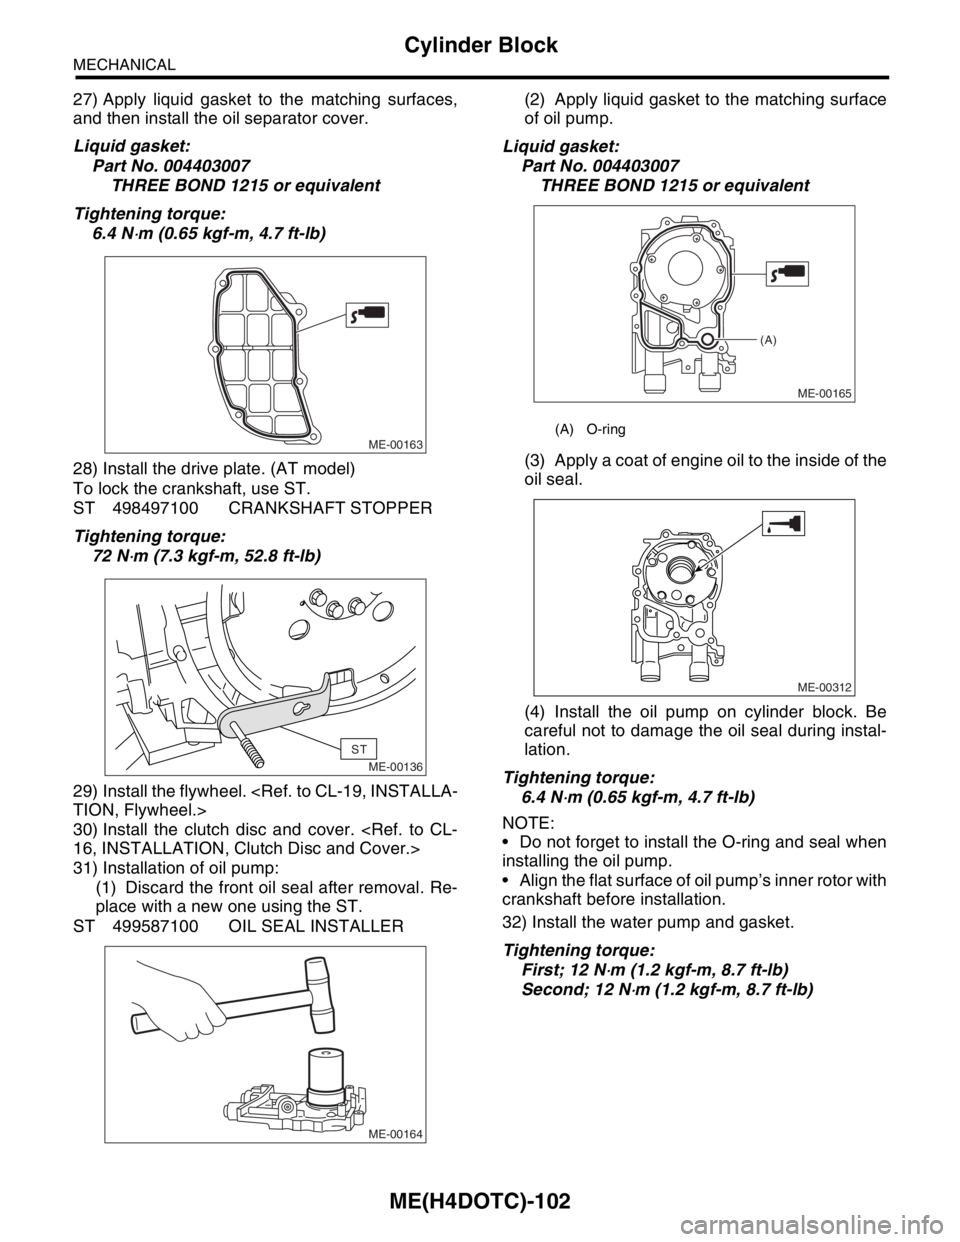
27) Apply liquid gasket to the matching surfaces,
and then install the oil separator cover.
Liquid gasket:
Part No. 004403007
THREE BOND 1215 or equivalent
Tightening torque:
6.4 N
⋅m (0.65 kgf-m, 4.7 ft-lb)
28) Install the drive plate. (AT model)
To lock the crankshaft, use ST.
ST 498497100 CRANKSHAFT STOPPER
Tightening torque:
72 N
⋅m (7.3 kgf-m, 52.8 ft-lb)
29) Install the flywheel.
30) Install the clutch disc and cover.
31) Installation of oil pump:
(1) Discard the front oil seal after removal. Re-
place with a new one using the ST.
ST 499587100 OIL SEAL INSTALLER(2) Apply liquid gasket to the matching surface
of oil pump.
Liquid gasket:
Part No. 004403007
THREE BOND 1215 or equivalent
(3) Apply a coat of engine oil to the inside of the
oil seal.
(4) Install the oil pump on cylinder block. Be
careful not to damage the oil seal during instal-
lation.
Tightening torque:
6.4 N
⋅m (0.65 kgf-m, 4.7 ft-lb)
NOTE:
Do not forget to install the O-ring and seal when
installing the oil pump.
Align the flat surface of oil pump’s inner rotor with
crankshaft before installation.
32) Install the water pump and gasket.
Tightening torque:
First; 12 N
⋅m (1.2 kgf-m, 8.7 ft-lb)
Second; 12 N
⋅m (1.2 kgf-m, 8.7 ft-lb)
ME-00163
ME-00136
ST
ME-00164
(A) O-ring
ME-00165
(A)
ME-00312
Page 1563 of 2870
ME(H4DOTC)-103
MECHANICAL
Cylinder Block
NOTE:
Be sure to use a new gasket.
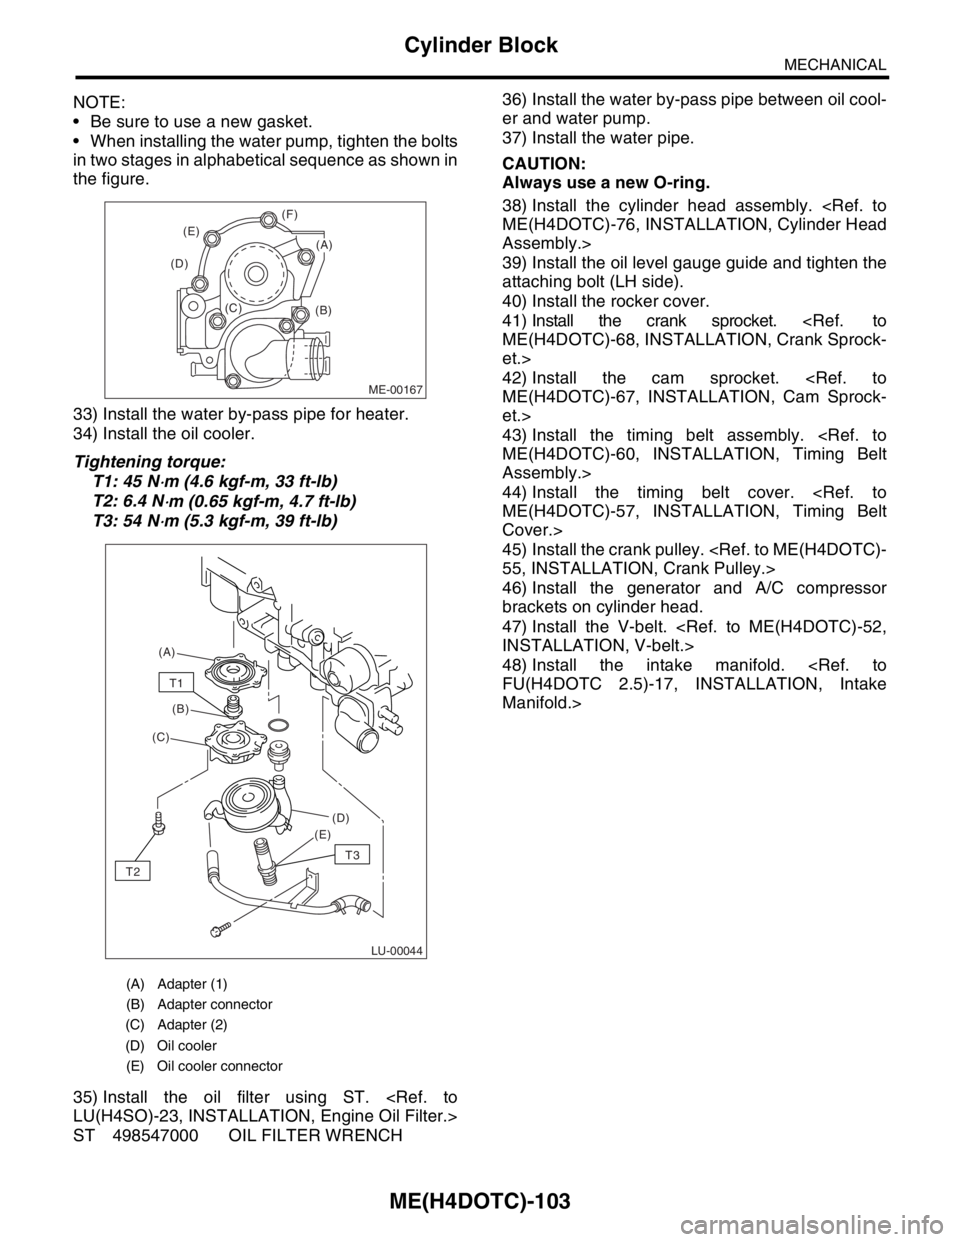
When installing the water pump, tighten the bolts
in two stages in alphabetical sequence as shown in
the figure.
33) Install the water by-pass pipe for heater.
34) Install the oil cooler.
Tightening torque:
T1: 45 N
⋅m (4.6 kgf-m, 33 ft-lb)
T2: 6.4 N
⋅m (0.65 kgf-m, 4.7 ft-lb)
T3: 54 N
⋅m (5.3 kgf-m, 39 ft-lb)
35) Install the oil filter using ST.
ST 498547000 OIL FILTER WRENCH36) Install the water by-pass pipe between oil cool-
er and water pump.
37) Install the water pipe.
CAUTION:
Always use a new O-ring.
38) Install the cylinder head assembly.
Assembly.>
39) Install the oil level gauge guide and tighten the
attaching bolt (LH side).
40) Install the rocker cover.
41) Install the crank sprocket.
et.>
42) Install the cam sprocket.
et.>
43) Install the timing belt assembly.
Assembly.>
44) Install the timing belt cover.
Cover.>
45) Install the crank pulley.
46) Install the generator and A/C compressor
brackets on cylinder head.
47) Install the V-belt.
48) Install the intake manifold.
Manifold.>
(A) Adapter (1)
(B) Adapter connector
(C) Adapter (2)
(D) Oil cooler
(E) Oil cooler connector
ME-00167
(B) (C) (D)(E)(F)
(A)
LU-00044
(A)
(B)
(C)
(D)
(E)
T1
T2
T3
Page 1564 of 2870
ME(H4DOTC)-104
MECHANICAL
Cylinder Block
C: DISASSEMBLY
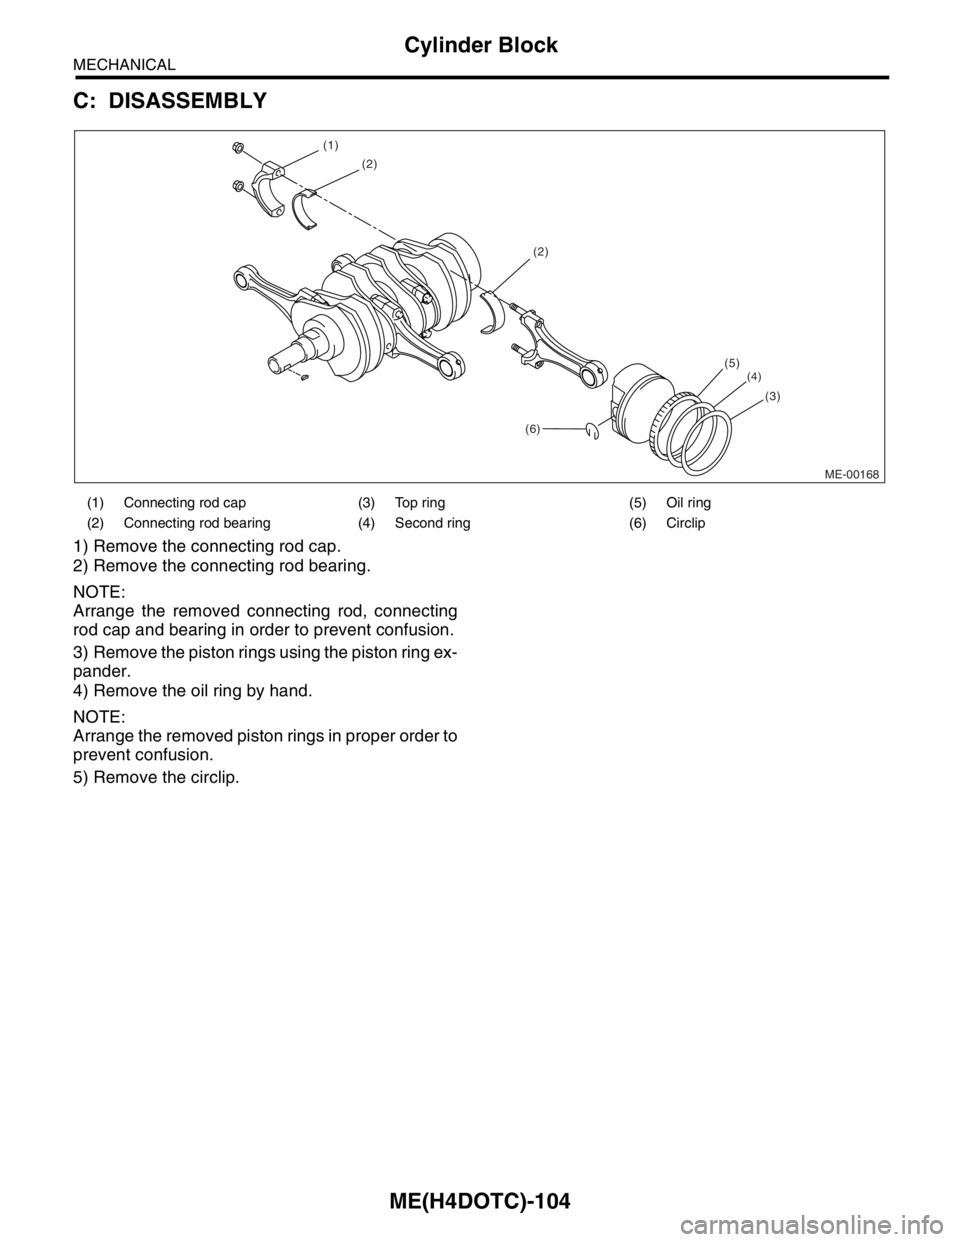
1) Remove the connecting rod cap.
2) Remove the connecting rod bearing.
NOTE:
Arrange the removed connecting rod, connecting
rod cap and bearing in order to prevent confusion.
3) Remove the piston rings using the piston ring ex-
pander.
4) Remove the oil ring by hand.
NOTE:
Arrange the removed piston rings in proper order to
prevent confusion.
5) Remove the circlip.
(1) Connecting rod cap (3) Top ring (5) Oil ring
(2) Connecting rod bearing (4) Second ring (6) Circlip
ME-00168
(2)
(2)
(6)(5)
(4)
(3) (1)
Page 1565 of 2870
ME(H4DOTC)-105
MECHANICAL
Cylinder Block
D: ASSEMBLY
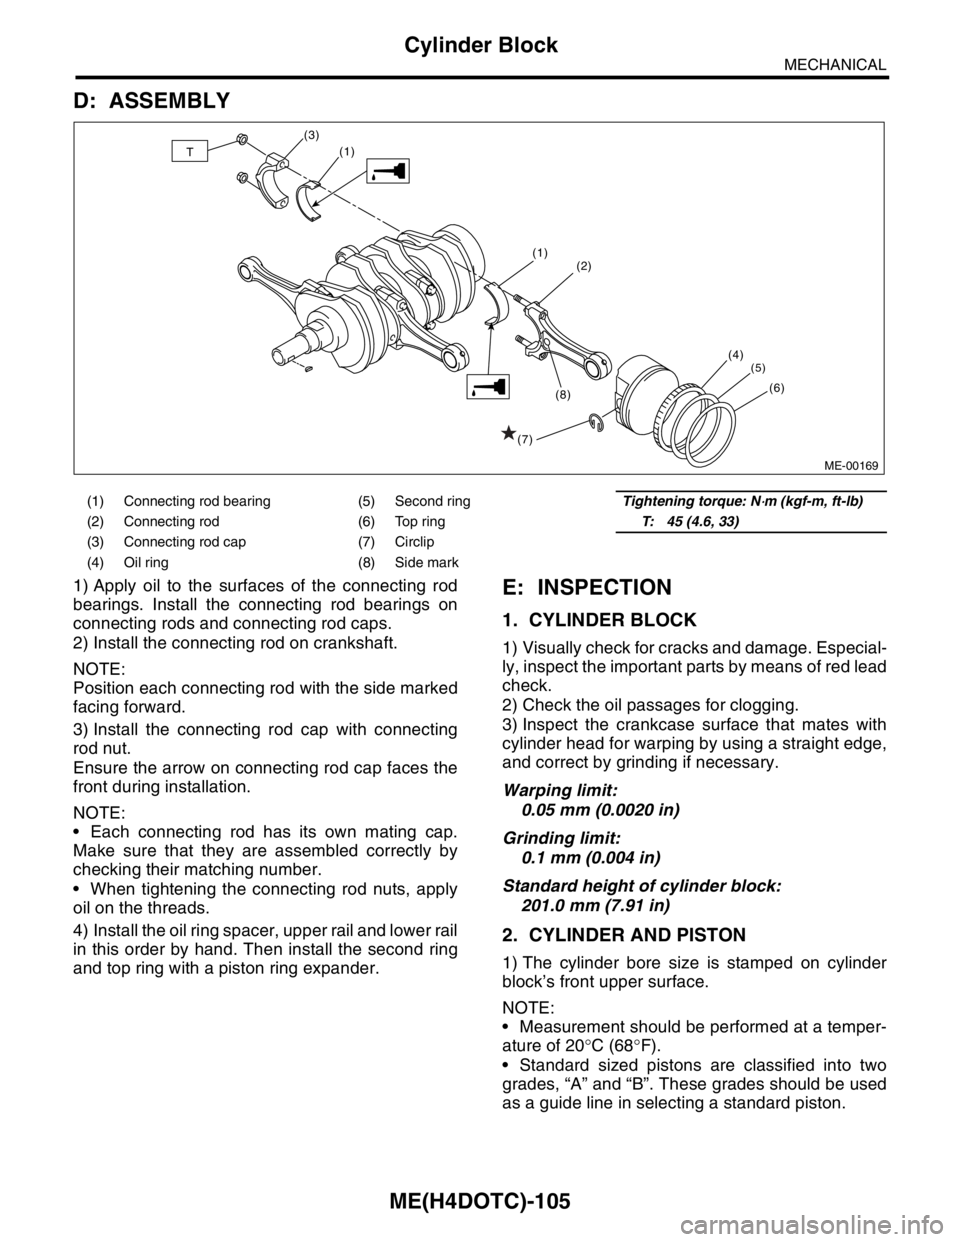
1) Apply oil to the surfaces of the connecting rod
bearings. Install the connecting rod bearings on
connecting rods and connecting rod caps.
2) Install the connecting rod on crankshaft.
NOTE:
Position each connecting rod with the side marked
facing forward.
3) Install the connecting rod cap with connecting
rod nut.
Ensure the arrow on connecting rod cap faces the
front during installation.
NOTE:
Each connecting rod has its own mating cap.
Make sure that they are assembled correctly by
checking their matching number.
When tightening the connecting rod nuts, apply
oil on the threads.
4) Install the oil ring spacer, upper rail and lower rail
in this order by hand. Then install the second ring
and top ring with a piston ring expander.E: INSPECTION
1. CYLINDER BLOCK
1) Visually check for cracks and damage. Especial-
ly, inspect the important parts by means of red lead
check.
2) Check the oil passages for clogging.
3) Inspect the crankcase surface that mates with
cylinder head for warping by using a straight edge,
and correct by grinding if necessary.
Warping limit:
0.05 mm (0.0020 in)
Grinding limit:
0.1 mm (0.004 in)
Standard height of cylinder block:
201.0 mm (7.91 in)
2. CYLINDER AND PISTON
1) The cylinder bore size is stamped on cylinder
block’s front upper surface.
NOTE:
Measurement should be performed at a temper-
ature of 20°C (68°F).
Standard sized pistons are classified into two
grades, “A” and “B”. These grades should be used
as a guide line in selecting a standard piston.
(1) Connecting rod bearing (5) Second ringTightening torque: N⋅m (kgf-m, ft-lb)
(2) Connecting rod (6) Top ringT: 45 (4.6, 33)
(3) Connecting rod cap (7) Circlip
(4) Oil ring (8) Side mark
ME-00169
(2)
(4)
(5)
(6)
(1)
(1)
(7)(8) (3)T
Page 1566 of 2870
ME(H4DOTC)-106
MECHANICAL
Cylinder Block
2.0 L MODEL
Standard diameter:
A: 92.005 — 92.015 mm (3.6222 — 3.6226 in)
B: 91.995 — 92.005 mm (3.6218 — 3.6222 in)
2.5 L MODEL
Standard diameter:
A: 99.505 — 99.515 mm (3.9175 — 3.9179 in)
B: 99.495 — 99.505 mm (3.9171 — 3.9175 in)
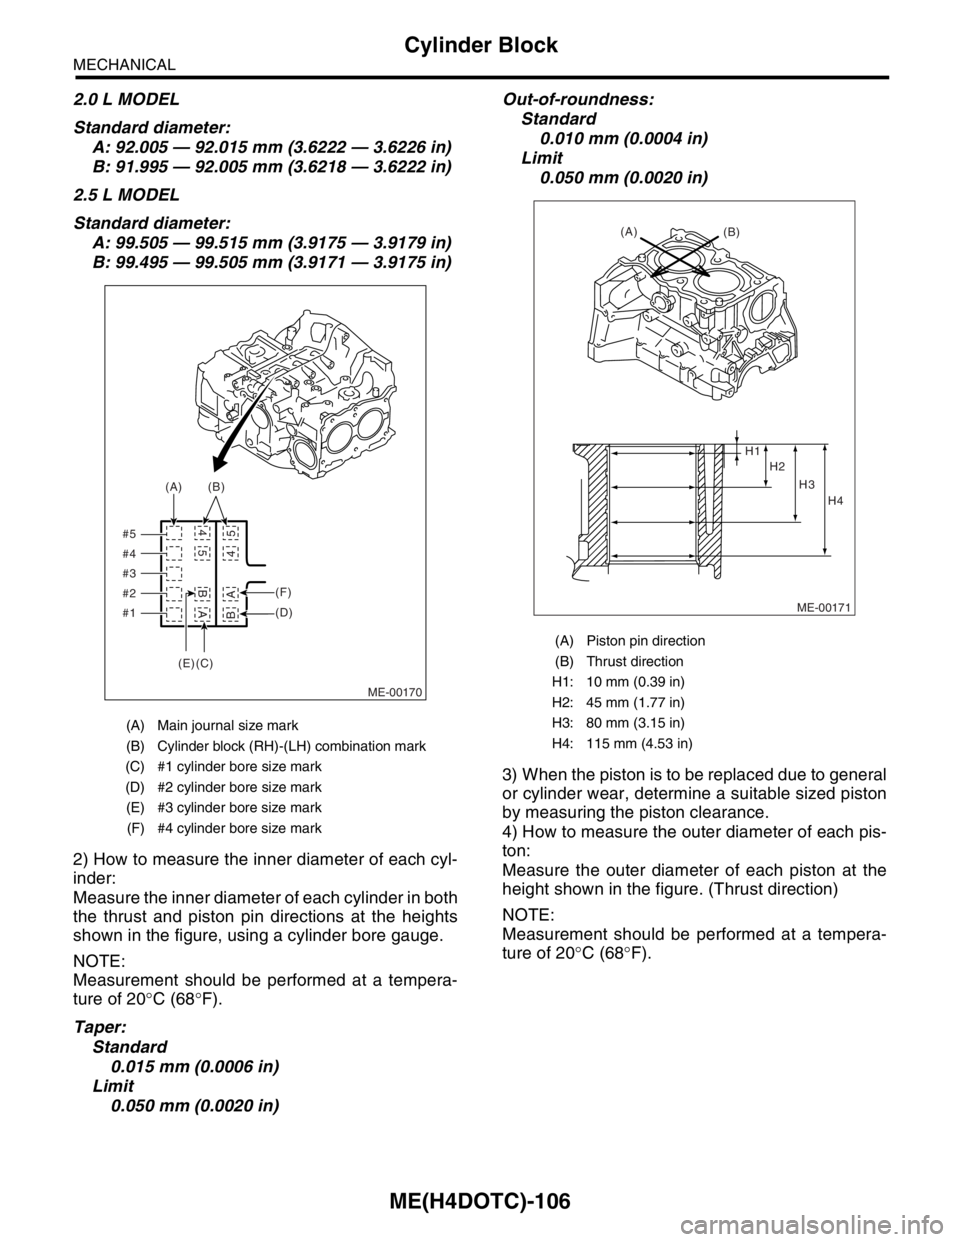
2) How to measure the inner diameter of each cyl-
inder:
Measure the inner diameter of each cylinder in both
the thrust and piston pin directions at the heights
shown in the figure, using a cylinder bore gauge.
NOTE:
Measurement should be performed at a tempera-
ture of 20°C (68°F).
Taper:
Standard
0.015 mm (0.0006 in)
Limit
0.050 mm (0.0020 in)Out-of-roundness:
Standard
0.010 mm (0.0004 in)
Limit
0.050 mm (0.0020 in)
3) When the piston is to be replaced due to general
or cylinder wear, determine a suitable sized piston
by measuring the piston clearance.
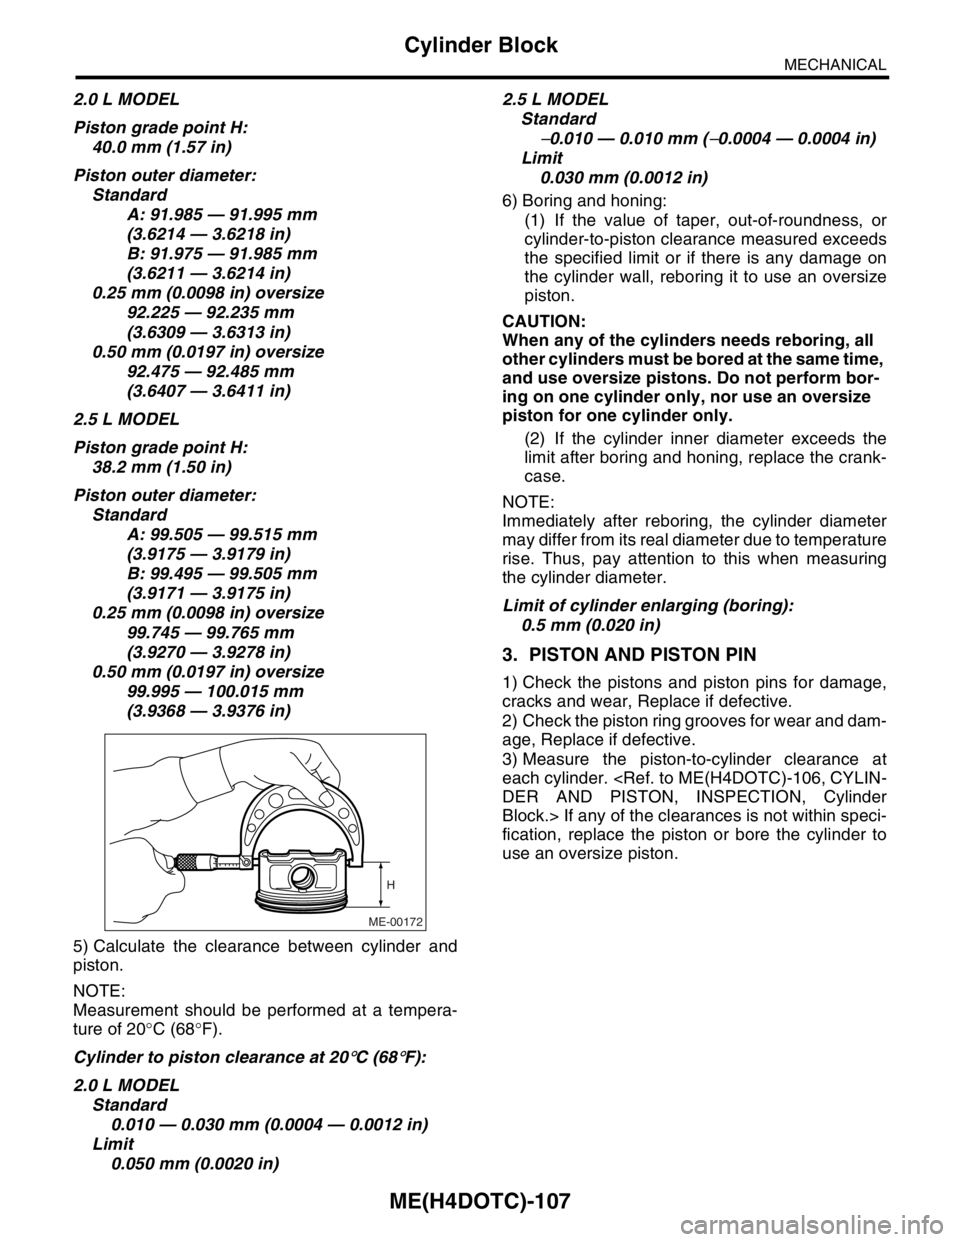
4) How to measure the outer diameter of each pis-
ton:
Measure the outer diameter of each piston at the
height shown in the figure. (Thrust direction)
NOTE:
Measurement should be performed at a tempera-
ture of 20°C (68°F).
(A) Main journal size mark
(B) Cylinder block (RH)-(LH) combination mark
(C) #1 cylinder bore size mark
(D) #2 cylinder bore size mark
(E) #3 cylinder bore size mark
(F) #4 cylinder bore size mark
ME-00170 #5
#4
#3
#2
#1(A)(B)
(F)
(D)
A BA B
5 45 4
(C) (E)
(A) Piston pin direction
(B) Thrust direction
H1: 10 mm (0.39 in)
H2: 45 mm (1.77 in)
H3: 80 mm (3.15 in)
H4: 115 mm (4.53 in)
ME-00171
(A)
(B)
H2 H1
H3
H4
Page 1567 of 2870
ME(H4DOTC)-107
MECHANICAL
Cylinder Block
2.0 L MODEL
Piston grade point H:
40.0 mm (1.57 in)
Piston outer diameter:
Standard
A: 91.985 — 91.995 mm
(3.6214 — 3.6218 in)
B: 91.975 — 91.985 mm
(3.6211 — 3.6214 in)
0.25 mm (0.0098 in) oversize
92.225 — 92.235 mm
(3.6309 — 3.6313 in)
0.50 mm (0.0197 in) oversize
92.475 — 92.485 mm
(3.6407 — 3.6411 in)
2.5 L MODEL
Piston grade point H:
38.2 mm (1.50 in)
Piston outer diameter:
Standard
A: 99.505 — 99.515 mm
(3.9175 — 3.9179 in)
B: 99.495 — 99.505 mm
(3.9171 — 3.9175 in)
0.25 mm (0.0098 in) oversize
99.745 — 99.765 mm
(3.9270 — 3.9278 in)
0.50 mm (0.0197 in) oversize
99.995 — 100.015 mm
(3.9368 — 3.9376 in)
5) Calculate the clearance between cylinder and
piston.
NOTE:
Measurement should be performed at a tempera-
ture of 20°C (68°F).
Cylinder to piston clearance at 20
°C (68°F):
2.0 L MODEL
Standard
0.010 — 0.030 mm (0.0004 — 0.0012 in)
Limit
0.050 mm (0.0020 in)2.5 L MODEL
Standard
−0.010 — 0.010 mm (−0.0004 — 0.0004 in)
Limit
0.030 mm (0.0012 in)
6) Boring and honing:
(1) If the value of taper, out-of-roundness, or
cylinder-to-piston clearance measured exceeds
the specified limit or if there is any damage on
the cylinder wall, reboring it to use an oversize
piston.
CAUTION:
When any of the cylinders needs reboring, all
other cylinders must be bored at the same time,
and use oversize pistons. Do not perform bor-
ing on one cylinder only, nor use an oversize
piston for one cylinder only.
(2) If the cylinder inner diameter exceeds the
limit after boring and honing, replace the crank-
case.
NOTE:
Immediately after reboring, the cylinder diameter
may differ from its real diameter due to temperature
rise. Thus, pay attention to this when measuring
the cylinder diameter.
Limit of cylinder enlarging (boring):
0.5 mm (0.020 in)
3. PISTON AND PISTON PIN
1) Check the pistons and piston pins for damage,
cracks and wear, Replace if defective.
2) Check the piston ring grooves for wear and dam-
age, Replace if defective.
3) Measure the piston-to-cylinder clearance at
each cylinder.
Block.> If any of the clearances is not within speci-
fication, replace the piston or bore the cylinder to
use an oversize piston.
ME-00172
H
Page 1568 of 2870
ME(H4DOTC)-108
MECHANICAL
Cylinder Block
4) Make sure that the piston pin can be inserted
into the piston pin hole with a thumb at 20°C (68°F).
Replace if defective.
Standard clearance between piston pin and
hole in piston:
Standard
0.004 — 0.008 mm (0.0002 — 0.0003 in)
Limit
0.020 mm (0.0008 in)
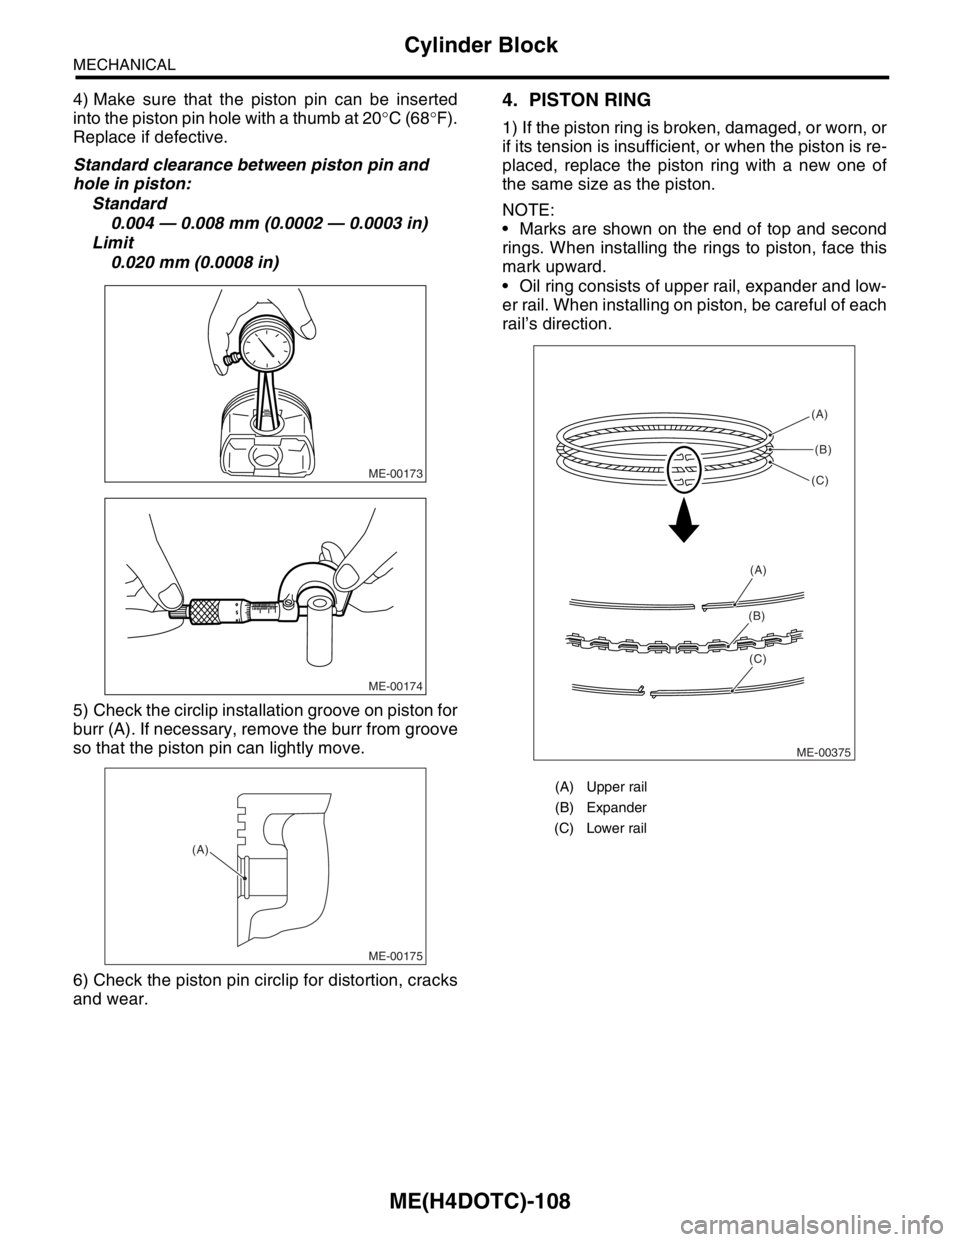
5) Check the circlip installation groove on piston for
burr (A). If necessary, remove the burr from groove
so that the piston pin can lightly move.
6) Check the piston pin circlip for distortion, cracks
and wear.4. PISTON RING
1) If the piston ring is broken, damaged, or worn, or
if its tension is insufficient, or when the piston is re-
placed, replace the piston ring with a new one of
the same size as the piston.
NOTE:
Marks are shown on the end of top and second
rings. When installing the rings to piston, face this
mark upward.
Oil ring consists of upper rail, expander and low-
er rail. When installing on piston, be careful of each
rail’s direction.
ME-00173
ME-00174
ME-00175
(A)
(A) Upper rail
(B) Expander
(C) Lower rail
ME-00375(A)
(B)
(C)
(A)
(B)
(C)
Page 1569 of 2870
ME(H4DOTC)-109
MECHANICAL
Cylinder Block
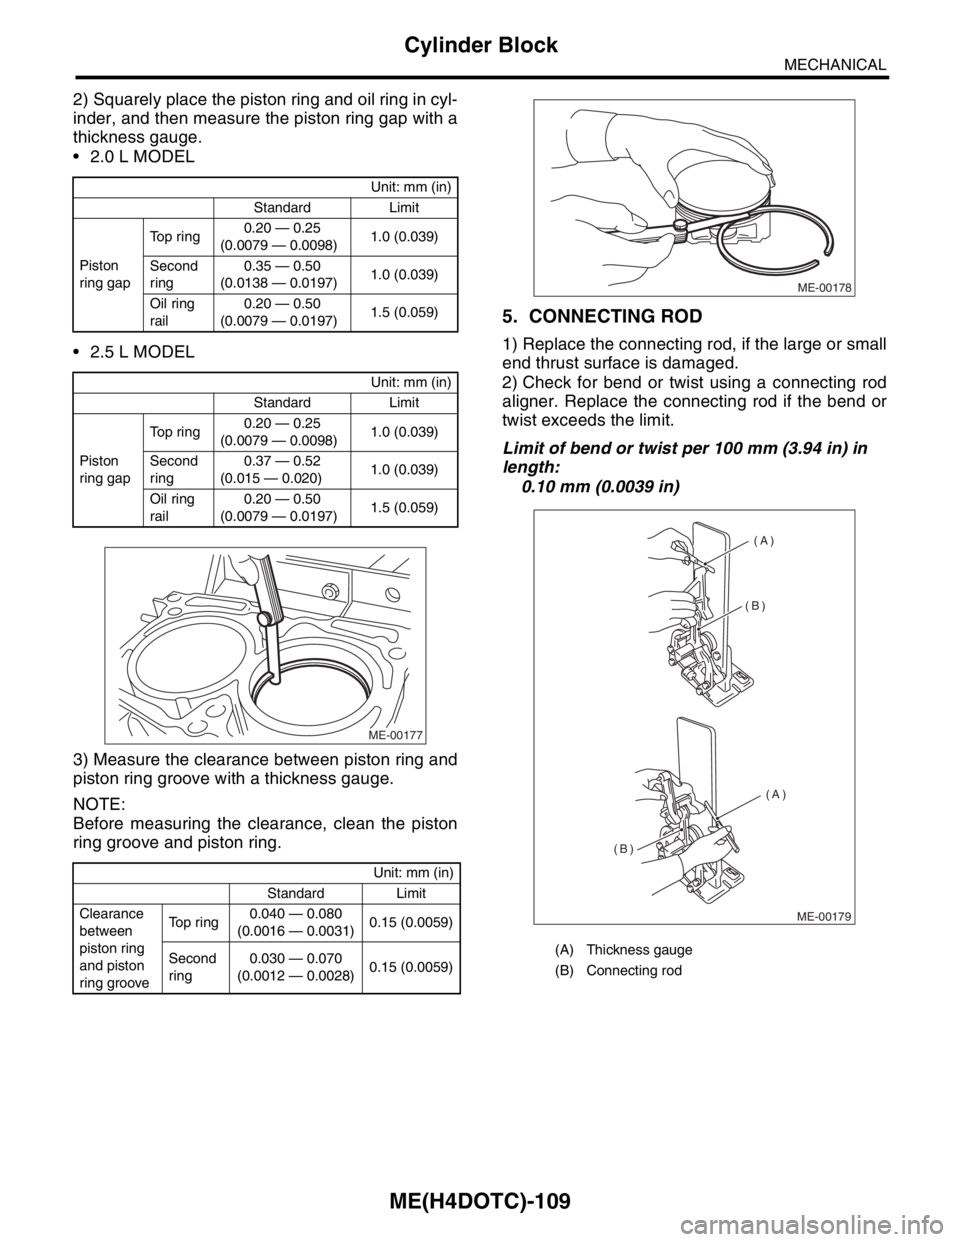
2) Squarely place the piston ring and oil ring in cyl-
inder, and then measure the piston ring gap with a
thickness gauge.
2.0 L MODEL
2.5 L MODEL
3) Measure the clearance between piston ring and
piston ring groove with a thickness gauge.
NOTE:
Before measuring the clearance, clean the piston
ring groove and piston ring.
5. CONNECTING ROD
1) Replace the connecting rod, if the large or small
end thrust surface is damaged.
2) Check for bend or twist using a connecting rod
aligner. Replace the connecting rod if the bend or
twist exceeds the limit.
Limit of bend or twist per 100 mm (3.94 in) in
length:
0.10 mm (0.0039 in)
Unit: mm (in)
Standard Limit
Piston
ring gapTop ring0.20 — 0.25
(0.0079 — 0.0098)1.0 (0.039)
Second
ring0.35 — 0.50
(0.0138 — 0.0197)1.0 (0.039)
Oil ring
rail0.20 — 0.50
(0.0079 — 0.0197)1.5 (0.059)
Unit: mm (in)
Standard Limit
Piston
ring gapTop ring0.20 — 0.25
(0.0079 — 0.0098)1.0 (0.039)
Second
ring0.37 — 0.52
(0.015 — 0.020)1.0 (0.039)
Oil ring
rail0.20 — 0.50
(0.0079 — 0.0197)1.5 (0.059)
Unit: mm (in)
Standard Limit
Clearance
between
piston ring
and piston
ring grooveTop ring0.040 — 0.080
(0.0016 — 0.0031)0.15 (0.0059)
Second
ring0.030 — 0.070
(0.0012 — 0.0028)0.15 (0.0059)
ME-00177
(A) Thickness gauge
(B) Connecting rod
ME-00178
(A)
(A) (B)
(B)
ME-00179
Page 1570 of 2870
ME(H4DOTC)-110
MECHANICAL
Cylinder Block
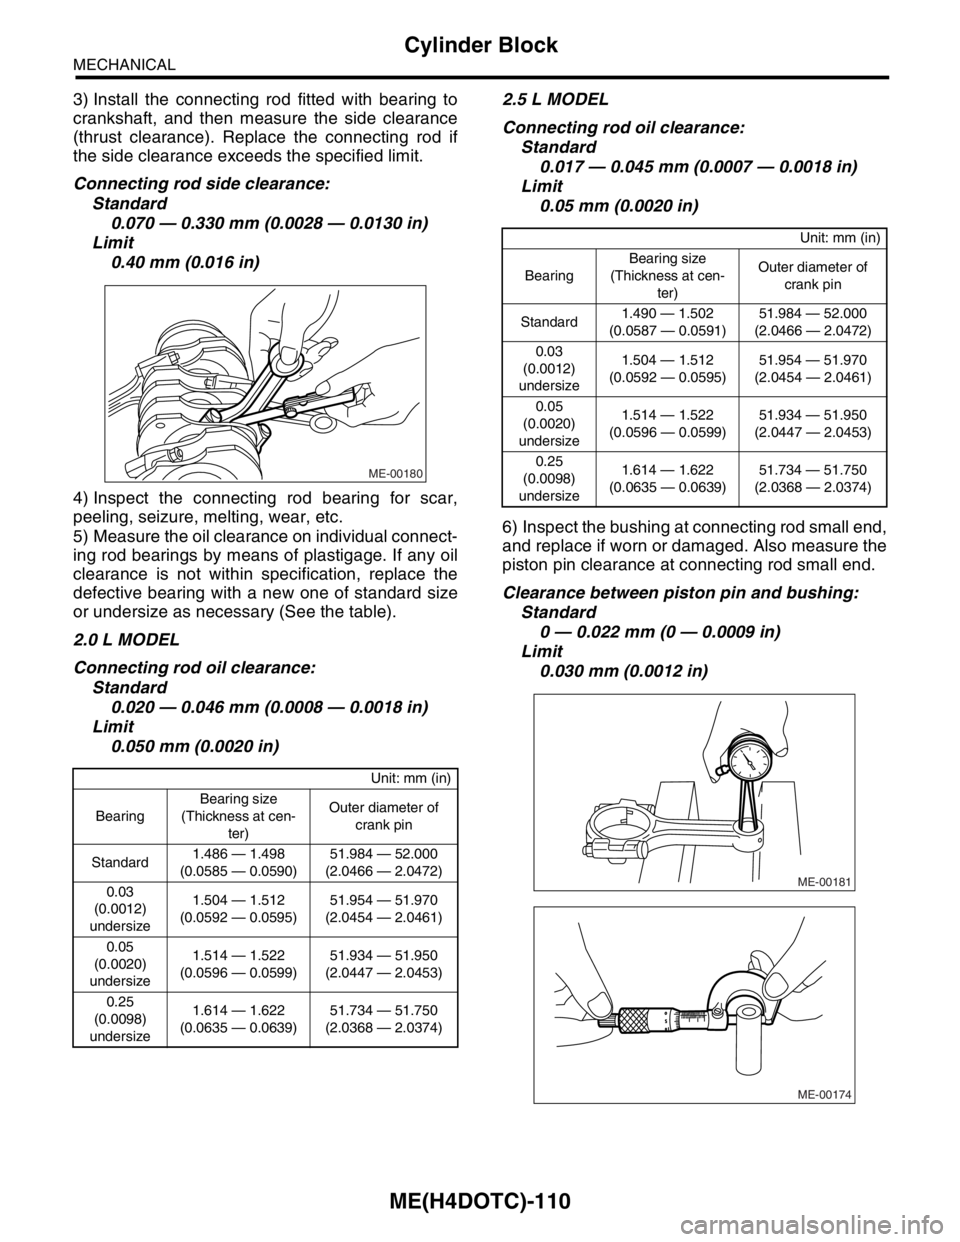
3) Install the connecting rod fitted with bearing to
crankshaft, and then measure the side clearance
(thrust clearance). Replace the connecting rod if
the side clearance exceeds the specified limit.
Connecting rod side clearance:
Standard
0.070 — 0.330 mm (0.0028 — 0.0130 in)
Limit
0.40 mm (0.016 in)
4) Inspect the connecting rod bearing for scar,
peeling, seizure, melting, wear, etc.
5) Measure the oil clearance on individual connect-
ing rod bearings by means of plastigage. If any oil
clearance is not within specification, replace the
defective bearing with a new one of standard size
or undersize as necessary (See the table).
2.0 L MODEL
Connecting rod oil clearance:
Standard
0.020 — 0.046 mm (0.0008 — 0.0018 in)
Limit
0.050 mm (0.0020 in)2.5 L MODEL
Connecting rod oil clearance:
Standard
0.017 — 0.045 mm (0.0007 — 0.0018 in)
Limit
0.05 mm (0.0020 in)
6) Inspect the bushing at connecting rod small end,
and replace if worn or damaged. Also measure the
piston pin clearance at connecting rod small end.
Clearance between piston pin and bushing:
Standard
0 — 0.022 mm (0 — 0.0009 in)
Limit
0.030 mm (0.0012 in)
Unit: mm (in)
BearingBearing size
(Thickness at cen-
ter)Outer diameter of
crank pin
Standard1.486 — 1.498
(0.0585 — 0.0590)51.984 — 52.000
(2.0466 — 2.0472)
0.03
(0.0012)
undersize1.504 — 1.512
(0.0592 — 0.0595)51.954 — 51.970
(2.0454 — 2.0461)
0.05
(0.0020)
undersize1.514 — 1.522
(0.0596 — 0.0599)51.934 — 51.950
(2.0447 — 2.0453)
0.25
(0.0098)
undersize1.614 — 1.622
(0.0635 — 0.0639)51.734 — 51.750
(2.0368 — 2.0374)
ME-00180
Unit: mm (in)
BearingBearing size
(Thickness at cen-
ter)Outer diameter of
crank pin
Standard1.490 — 1.502
(0.0587 — 0.0591)51.984 — 52.000
(2.0466 — 2.0472)
0.03
(0.0012)
undersize1.504 — 1.512
(0.0592 — 0.0595)51.954 — 51.970
(2.0454 — 2.0461)
0.05
(0.0020)
undersize1.514 — 1.522
(0.0596 — 0.0599)51.934 — 51.950
(2.0447 — 2.0453)
0.25
(0.0098)
undersize1.614 — 1.622
(0.0635 — 0.0639)51.734 — 51.750
(2.0368 — 2.0374)
ME-00181
ME-00174