SUBARU FORESTER 2004 Service Repair Manual
Manufacturer: SUBARU, Model Year: 2004, Model line: FORESTER, Model: SUBARU FORESTER 2004Pages: 2870, PDF Size: 38.67 MB
Page 1591 of 2870
EX(H4DOTC)-5
EXHAUST
General Description
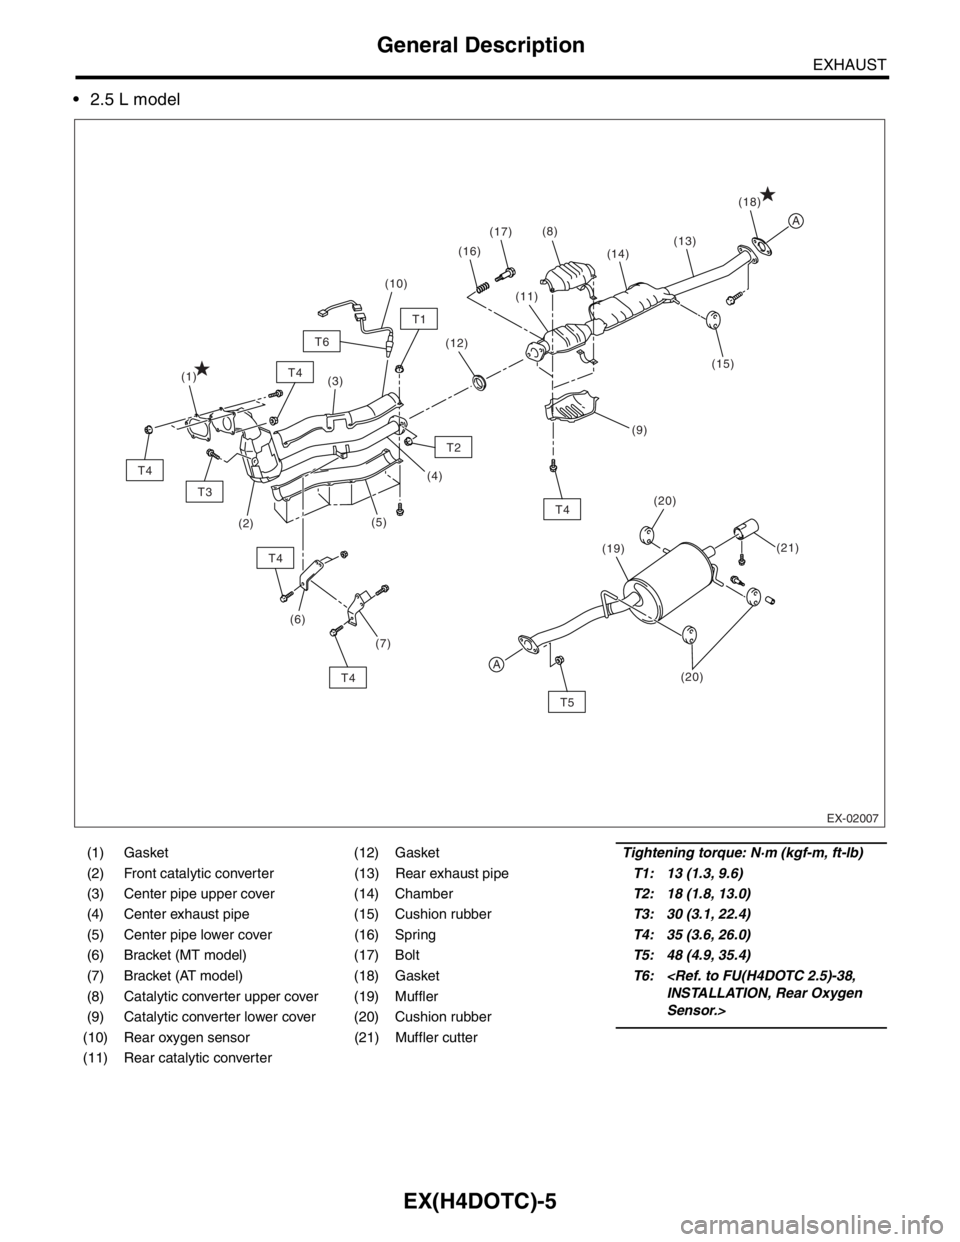
2.5 L model
(1) Gasket (12) GasketTightening torque: N·m (kgf-m, ft-lb)
(2) Front catalytic converter (13) Rear exhaust pipeT1: 13 (1.3, 9.6)
(3) Center pipe upper cover (14) ChamberT2: 18 (1.8, 13.0)
(4) Center exhaust pipe (15) Cushion rubberT3: 30 (3.1, 22.4)
(5) Center pipe lower cover (16) SpringT4: 35 (3.6, 26.0)
(6) Bracket (MT model) (17) BoltT5: 48 (4.9, 35.4)
(7) Bracket (AT model) (18) GasketT6:
Sensor.> (8) Catalytic converter upper cover (19) Muffler
(9) Catalytic converter lower cover (20) Cushion rubber
(10) Rear oxygen sensor (21) Muffler cutter
(11) Rear catalytic converter
A
A
T5
T4
T3
T4
T4
T4
T4
T2
(21) (20)
(19)(18)
(15) (14)
(1)
(2)(3)
(5)
(6)(4)(11) (17)
(16)(8)
(12)
(10)
(13)
T1
T6
(7)
EX-02007
(9)
(20)
Page 1592 of 2870

EX(H4DOTC)-6
EXHAUST
General Description
B: CAUTION
Wear working clothing, including a cap, protec-
tive goggles, and protective shoes during opera-
tion.
Remove contamination including dirt and corro-
sion before removal, installation or disassembly.
Keep the disassembled parts in order and pro-
tect them from dust or dirt.
Before removal, installation or disassembly, be
sure to clarify the failure. Avoid unnecessary re-
moval, installation, disassembly, and replacement.
Be careful not to burn yourself, because each
part on the vehicle is hot after running.
Be sure to tighten fasteners including bolts and
nuts to the specified torque.
Place shop jacks or rigid racks at the specified
points.
Before disconnecting electrical connectors of
sensors or units, be sure to disconnect the ground
cable from battery.
Page 1593 of 2870
EX(H4DOTC)-7
EXHAUST
Front Exhaust Pipe
2. Front Exhaust Pipe
A: REMOVAL
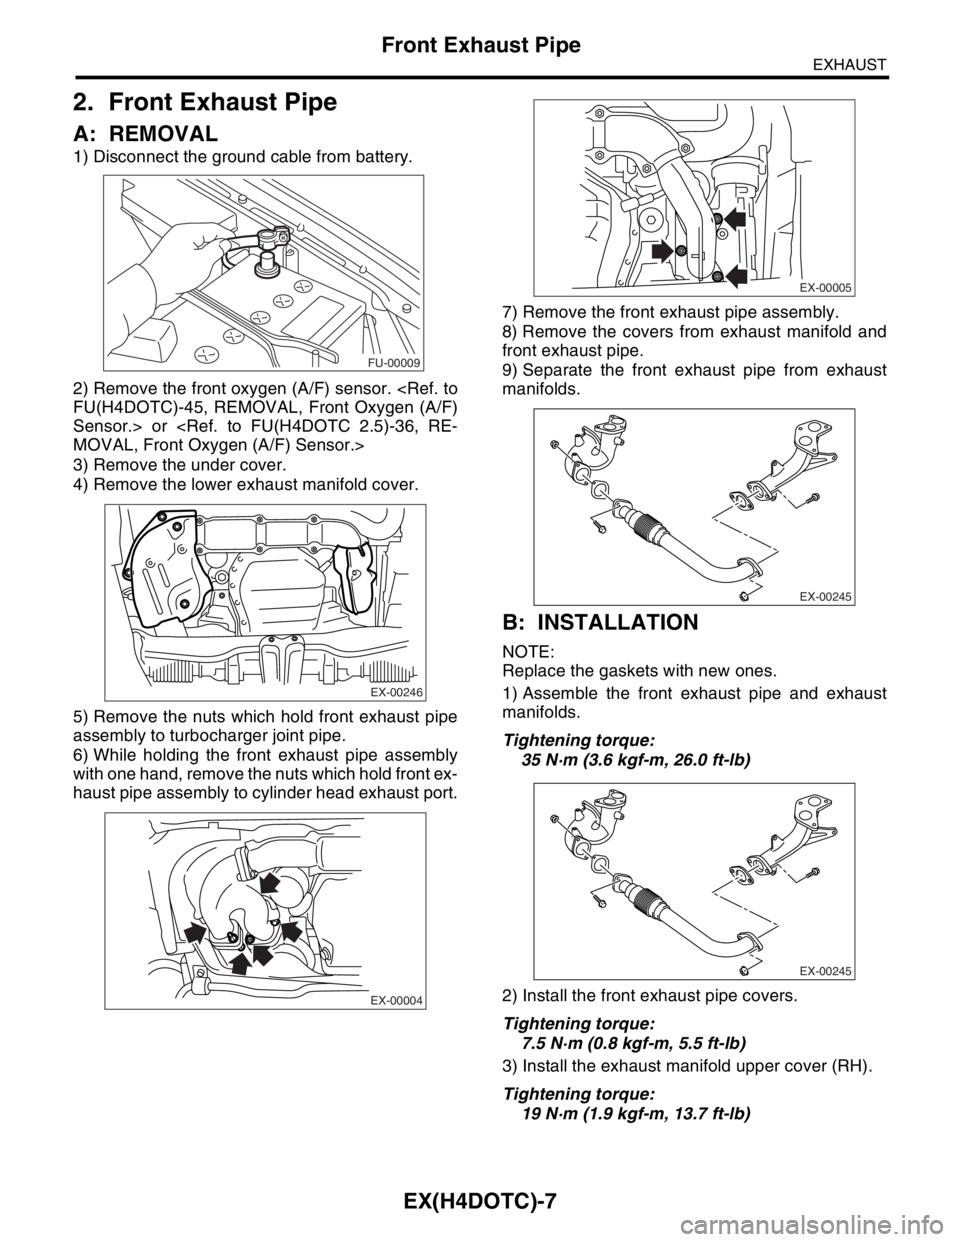
1) Disconnect the ground cable from battery.
2) Remove the front oxygen (A/F) sensor.
Sensor.> or
3) Remove the under cover.
4) Remove the lower exhaust manifold cover.
5) Remove the nuts which hold front exhaust pipe
assembly to turbocharger joint pipe.
6) While holding the front exhaust pipe assembly
with one hand, remove the nuts which hold front ex-
haust pipe assembly to cylinder head exhaust port.7) Remove the front exhaust pipe assembly.
8) Remove the covers from exhaust manifold and
front exhaust pipe.
9) Separate the front exhaust pipe from exhaust
manifolds.
B: INSTALLATION
NOTE:
Replace the gaskets with new ones.
1) Assemble the front exhaust pipe and exhaust
manifolds.
Tightening torque:
35 N·m (3.6 kgf-m, 26.0 ft-lb)
2) Install the front exhaust pipe covers.
Tightening torque:
7.5 N·m (0.8 kgf-m, 5.5 ft-lb)
3) Install the exhaust manifold upper cover (RH).
Tightening torque:
19 N·m (1.9 kgf-m, 13.7 ft-lb)
FU-00009
EX-00246
EX-00004
EX-00005
EX-00245
EX-00245
Page 1594 of 2870
EX(H4DOTC)-8
EXHAUST
Front Exhaust Pipe
4) Install the front exhaust pipe assembly.
Tightening torque:
35 N·m (3.6 kgf-m, 26.0 ft-lb)
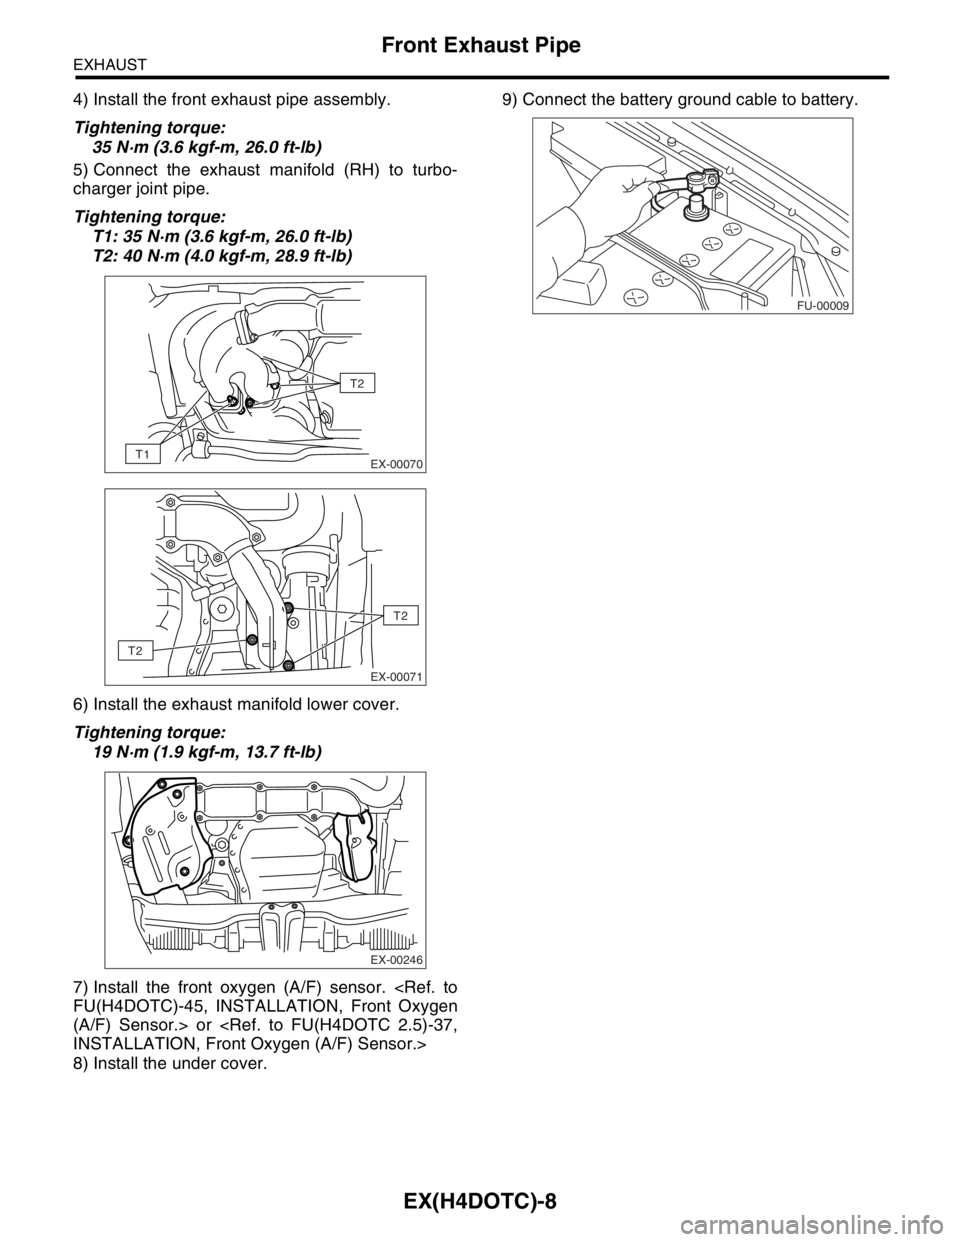
5) Connect the exhaust manifold (RH) to turbo-
charger joint pipe.
Tightening torque:
T1: 35 N·m (3.6 kgf-m, 26.0 ft-lb)
T2: 40 N·m (4.0 kgf-m, 28.9 ft-lb)
6) Install the exhaust manifold lower cover.
Tightening torque:
19 N·m (1.9 kgf-m, 13.7 ft-lb)
7) Install the front oxygen (A/F) sensor.
(A/F) Sensor.> or
8) Install the under cover.9) Connect the battery ground cable to battery.
EX-00070
T2
T1
EX-00071
T2
T2
EX-00246
FU-00009
Page 1595 of 2870
EX(H4DOTC)-9
EXHAUST
Center Exhaust Pipe
3. Center Exhaust Pipe
A: REMOVAL
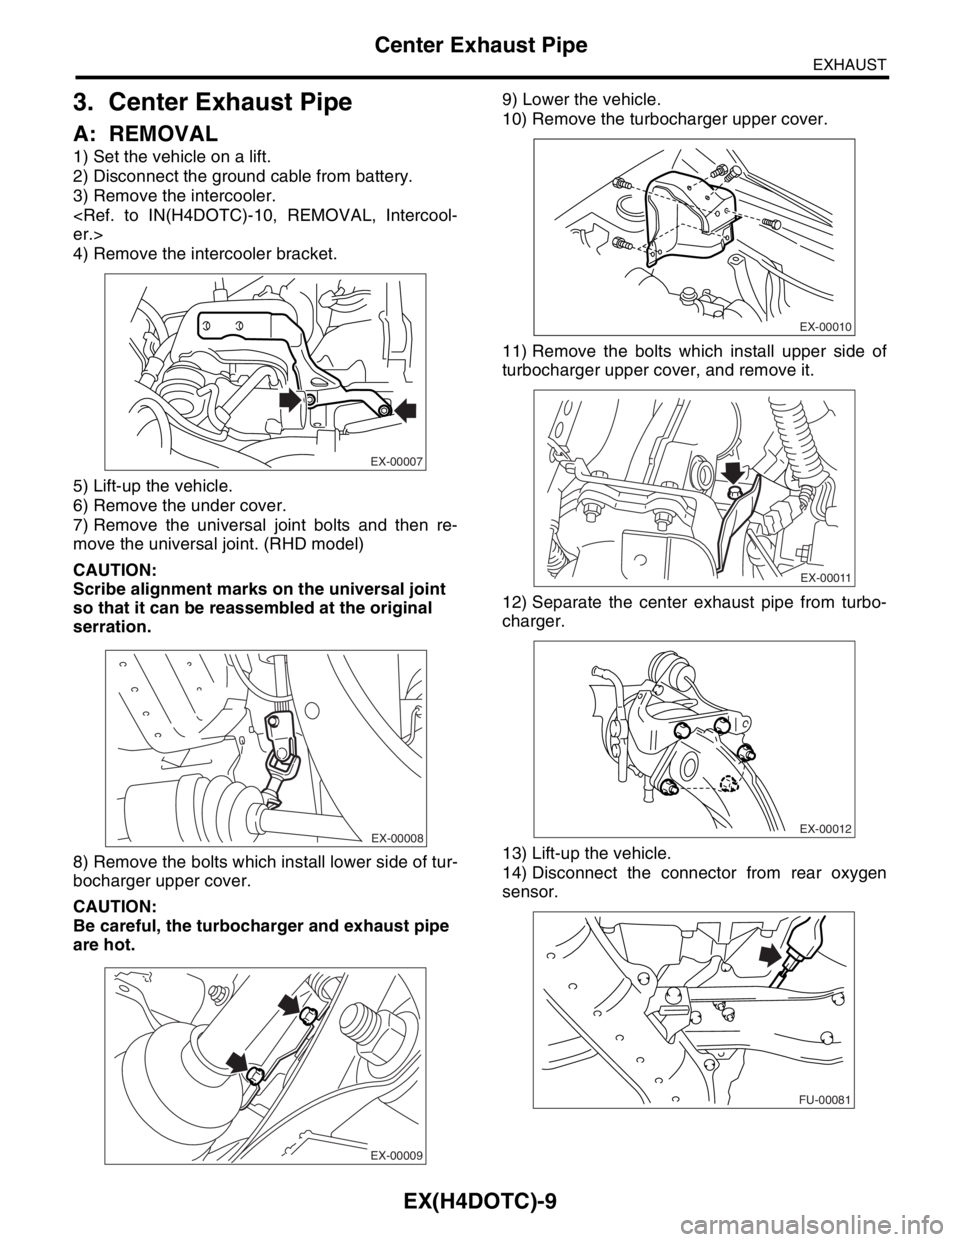
1) Set the vehicle on a lift.
2) Disconnect the ground cable from battery.
3) Remove the intercooler.
4) Remove the intercooler bracket.
5) Lift-up the vehicle.
6) Remove the under cover.
7) Remove the universal joint bolts and then re-
move the universal joint. (RHD model)
CAUTION:
Scribe alignment marks on the universal joint
so that it can be reassembled at the original
serration.
8) Remove the bolts which install lower side of tur-
bocharger upper cover.
CAUTION:
Be careful, the turbocharger and exhaust pipe
are hot.9) Lower the vehicle.
10) Remove the turbocharger upper cover.
11) Remove the bolts which install upper side of
turbocharger upper cover, and remove it.
12) Separate the center exhaust pipe from turbo-
charger.
13) Lift-up the vehicle.
14) Disconnect the connector from rear oxygen
sensor.
EX-00007
EX-00008
EX-00009
EX-00010
EX-00011
EX-00012
FU-00081
Page 1596 of 2870
EX(H4DOTC)-10
EXHAUST
Center Exhaust Pipe
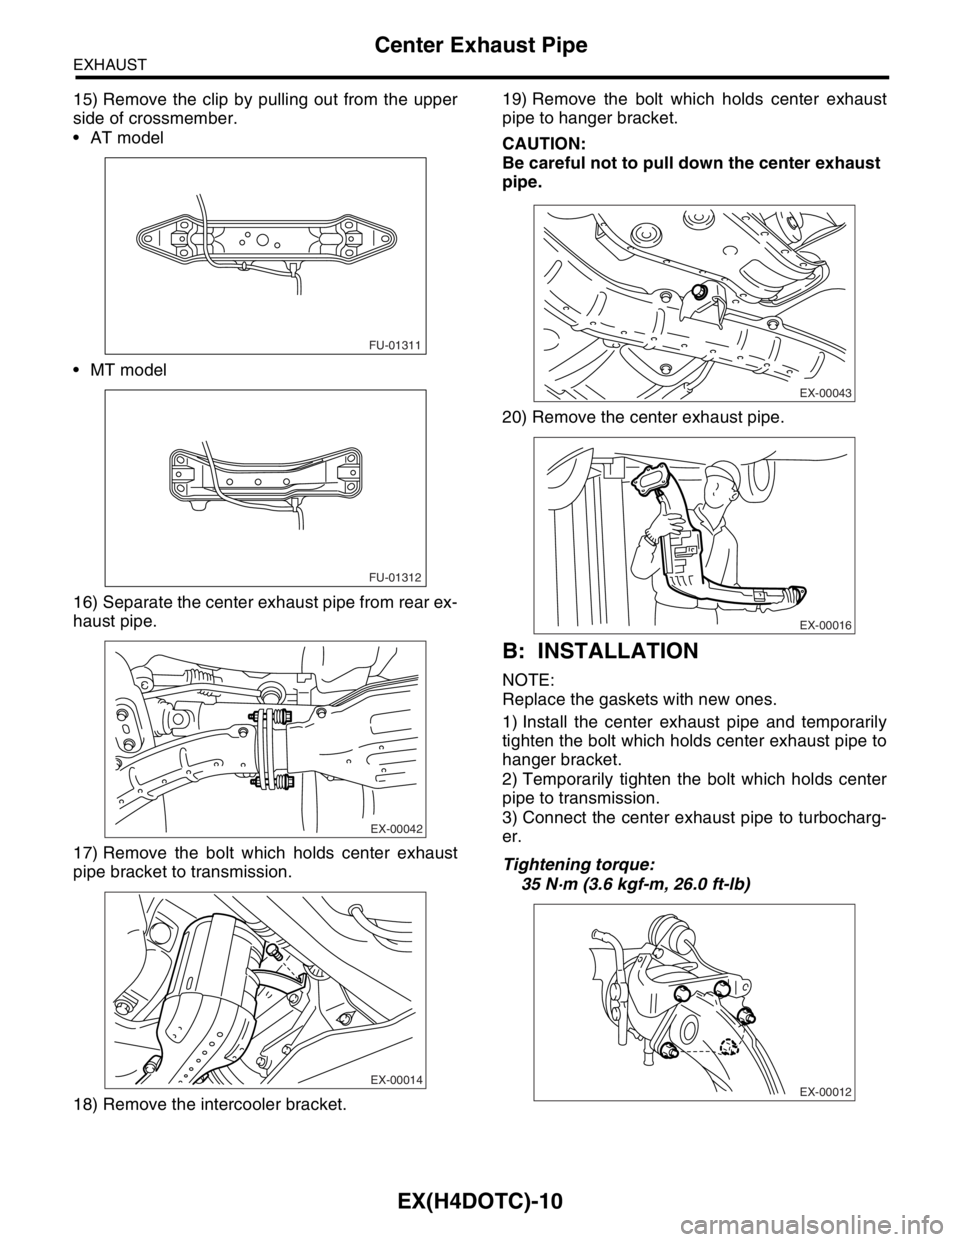
15) Remove the clip by pulling out from the upper
side of crossmember.
AT model
MT model
16) Separate the center exhaust pipe from rear ex-
haust pipe.
17) Remove the bolt which holds center exhaust
pipe bracket to transmission.
18) Remove the intercooler bracket.19) Remove the bolt which holds center exhaust
pipe to hanger bracket.
CAUTION:
Be careful not to pull down the center exhaust
pipe.
20) Remove the center exhaust pipe.
B: INSTALLATION
NOTE:
Replace the gaskets with new ones.
1) Install the center exhaust pipe and temporarily
tighten the bolt which holds center exhaust pipe to
hanger bracket.
2) Temporarily tighten the bolt which holds center
pipe to transmission.
3) Connect the center exhaust pipe to turbocharg-
er.
Tightening torque:
35 N·m (3.6 kgf-m, 26.0 ft-lb)
FU-01311
FU-01312
EX-00042
EX-00014
EX-00043
EX-00016
EX-00012
Page 1597 of 2870
EX(H4DOTC)-11
EXHAUST
Center Exhaust Pipe
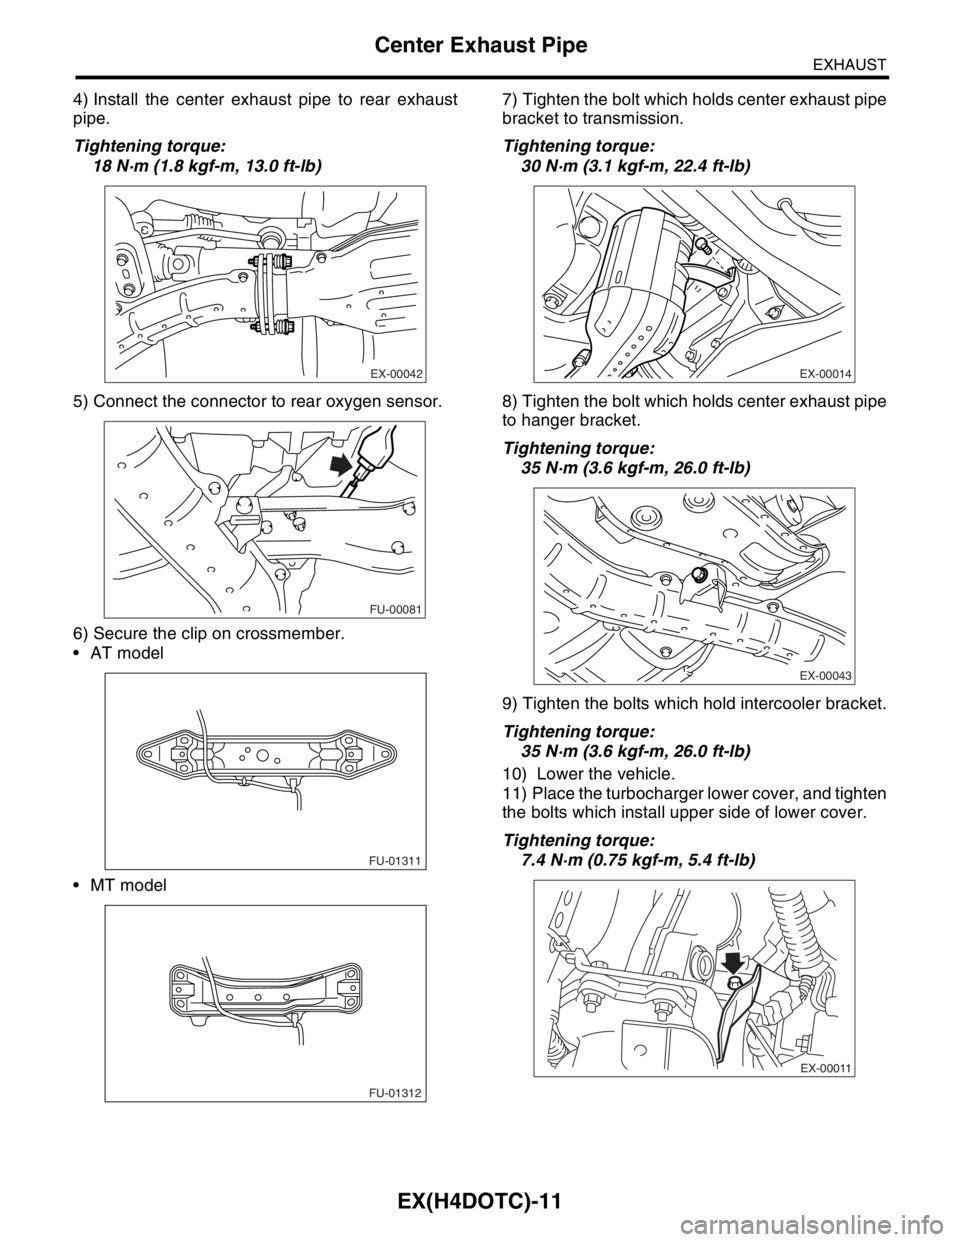
4) Install the center exhaust pipe to rear exhaust
pipe.
Tightening torque:
18 N·m (1.8 kgf-m, 13.0 ft-lb)
5) Connect the connector to rear oxygen sensor.
6) Secure the clip on crossmember.
AT model
MT model7) Tighten the bolt which holds center exhaust pipe
bracket to transmission.
Tightening torque:
30 N·m (3.1 kgf-m, 22.4 ft-lb)
8) Tighten the bolt which holds center exhaust pipe
to hanger bracket.
Tightening torque:
35 N·m (3.6 kgf-m, 26.0 ft-lb)
9) Tighten the bolts which hold intercooler bracket.
Tightening torque:
35 N·m (3.6 kgf-m, 26.0 ft-lb)
10) Lower the vehicle.
11) Place the turbocharger lower cover, and tighten
the bolts which install upper side of lower cover.
Tightening torque:
7.4 N·m (0.75 kgf-m, 5.4 ft-lb)
EX-00042
FU-00081
FU-01311
FU-01312
EX-00014
EX-00043
EX-00011
Page 1598 of 2870
EX(H4DOTC)-12
EXHAUST
Center Exhaust Pipe
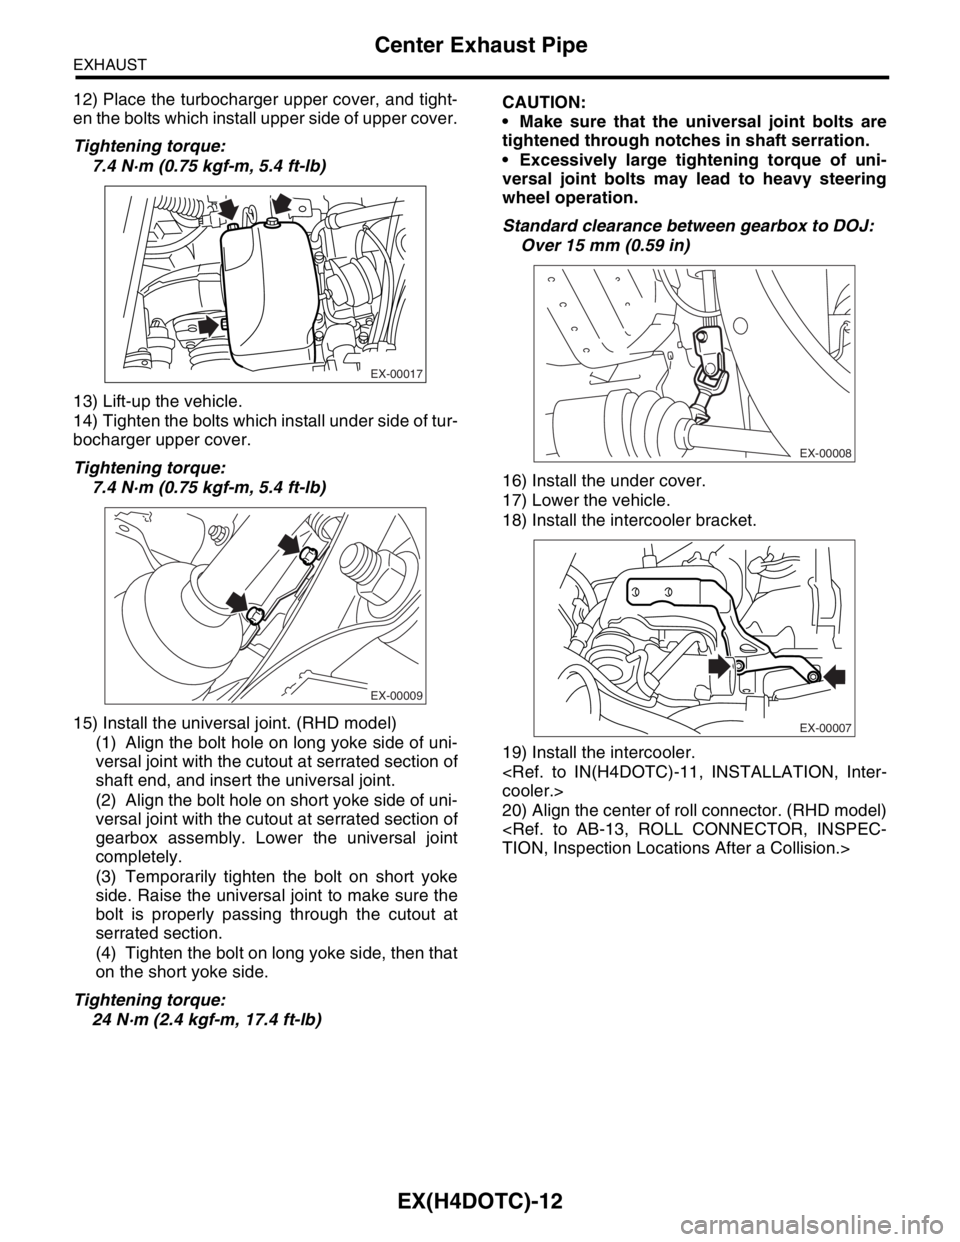
12) Place the turbocharger upper cover, and tight-
en the bolts which install upper side of upper cover.
Tightening torque:
7.4 N·m (0.75 kgf-m, 5.4 ft-lb)
13) Lift-up the vehicle.
14) Tighten the bolts which install under side of tur-
bocharger upper cover.
Tightening torque:
7.4 N·m (0.75 kgf-m, 5.4 ft-lb)
15) Install the universal joint. (RHD model)
(1) Align the bolt hole on long yoke side of uni-
versal joint with the cutout at serrated section of
shaft end, and insert the universal joint.
(2) Align the bolt hole on short yoke side of uni-
versal joint with the cutout at serrated section of
gearbox assembly. Lower the universal joint
completely.
(3) Temporarily tighten the bolt on short yoke
side. Raise the universal joint to make sure the
bolt is properly passing through the cutout at
serrated section.
(4) Tighten the bolt on long yoke side, then that
on the short yoke side.
Tightening torque:
24 N·m (2.4 kgf-m, 17.4 ft-lb)CAUTION:
Make sure that the universal joint bolts are
tightened through notches in shaft serration.
Excessively large tightening torque of uni-
versal joint bolts may lead to heavy steering
wheel operation.
Standard clearance between gearbox to DOJ:
Over 15 mm (0.59 in)
16) Install the under cover.
17) Lower the vehicle.
18) Install the intercooler bracket.
19) Install the intercooler.
20) Align the center of roll connector. (RHD model)
EX-00017
EX-00009
EX-00008
EX-00007
Page 1599 of 2870
EX(H4DOTC)-13
EXHAUST
Joint Pipe
4. Joint Pipe
A: REMOVAL
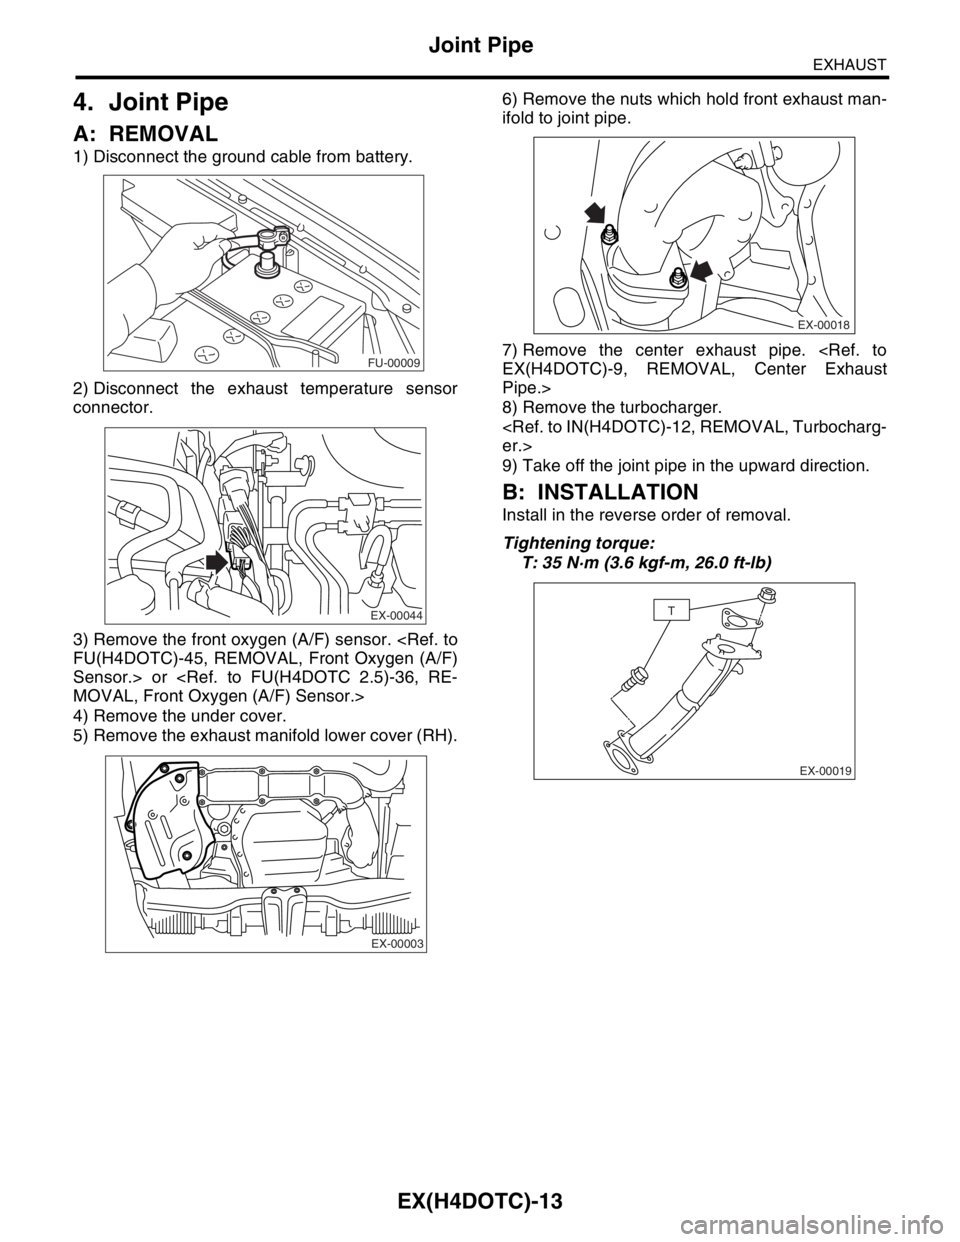
1) Disconnect the ground cable from battery.
2) Disconnect the exhaust temperature sensor
connector.
3) Remove the front oxygen (A/F) sensor.
Sensor.> or
4) Remove the under cover.
5) Remove the exhaust manifold lower cover (RH).6) Remove the nuts which hold front exhaust man-
ifold to joint pipe.
7) Remove the center exhaust pipe.
Pipe.>
8) Remove the turbocharger.
9) Take off the joint pipe in the upward direction.
B: INSTALLATION
Install in the reverse order of removal.
Tightening torque:
T: 35 N·m (3.6 kgf-m, 26.0 ft-lb)
FU-00009
EX-00044
EX-00003
EX-00018
EX-00019
T
Page 1600 of 2870
EX(H4DOTC)-14
EXHAUST
Rear Exhaust Pipe
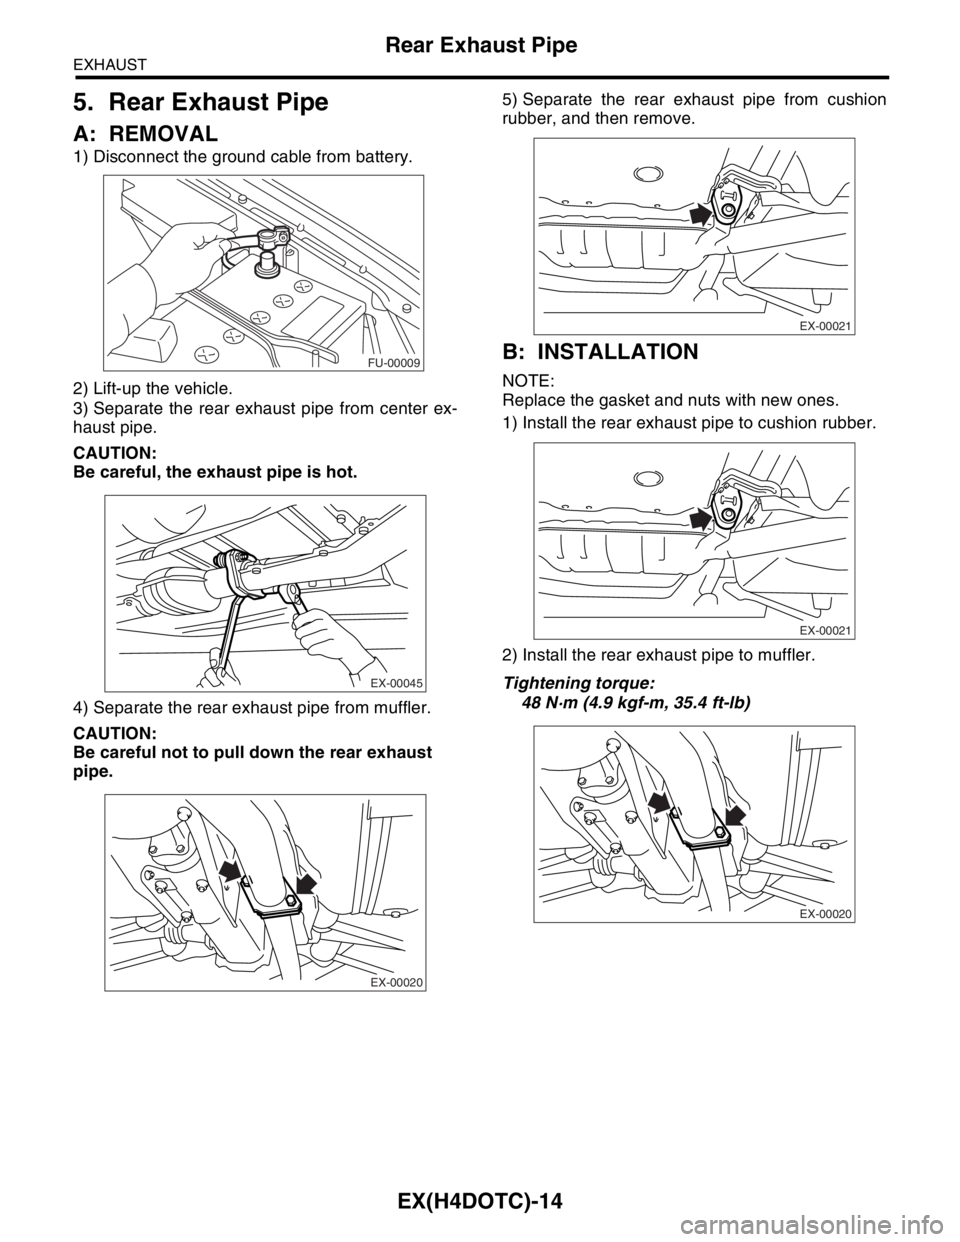
5. Rear Exhaust Pipe
A: REMOVAL
1) Disconnect the ground cable from battery.
2) Lift-up the vehicle.
3) Separate the rear exhaust pipe from center ex-
haust pipe.
CAUTION:
Be careful, the exhaust pipe is hot.
4) Separate the rear exhaust pipe from muffler.
CAUTION:
Be careful not to pull down the rear exhaust
pipe.5) Separate the rear exhaust pipe from cushion
rubber, and then remove.
B: INSTALLATION
NOTE:
Replace the gasket and nuts with new ones.
1) Install the rear exhaust pipe to cushion rubber.
2) Install the rear exhaust pipe to muffler.
Tightening torque:
48 N·m (4.9 kgf-m, 35.4 ft-lb)
FU-00009
EX-00045
EX-00020
EX-00021
EX-00021
EX-00020