SUBARU FORESTER 2004 Service Repair Manual
Manufacturer: SUBARU, Model Year: 2004, Model line: FORESTER, Model: SUBARU FORESTER 2004Pages: 2870, PDF Size: 38.67 MB
Page 251 of 2870
SB-17
SEAT BELT SYSTEM
Disposal of Pretensioner
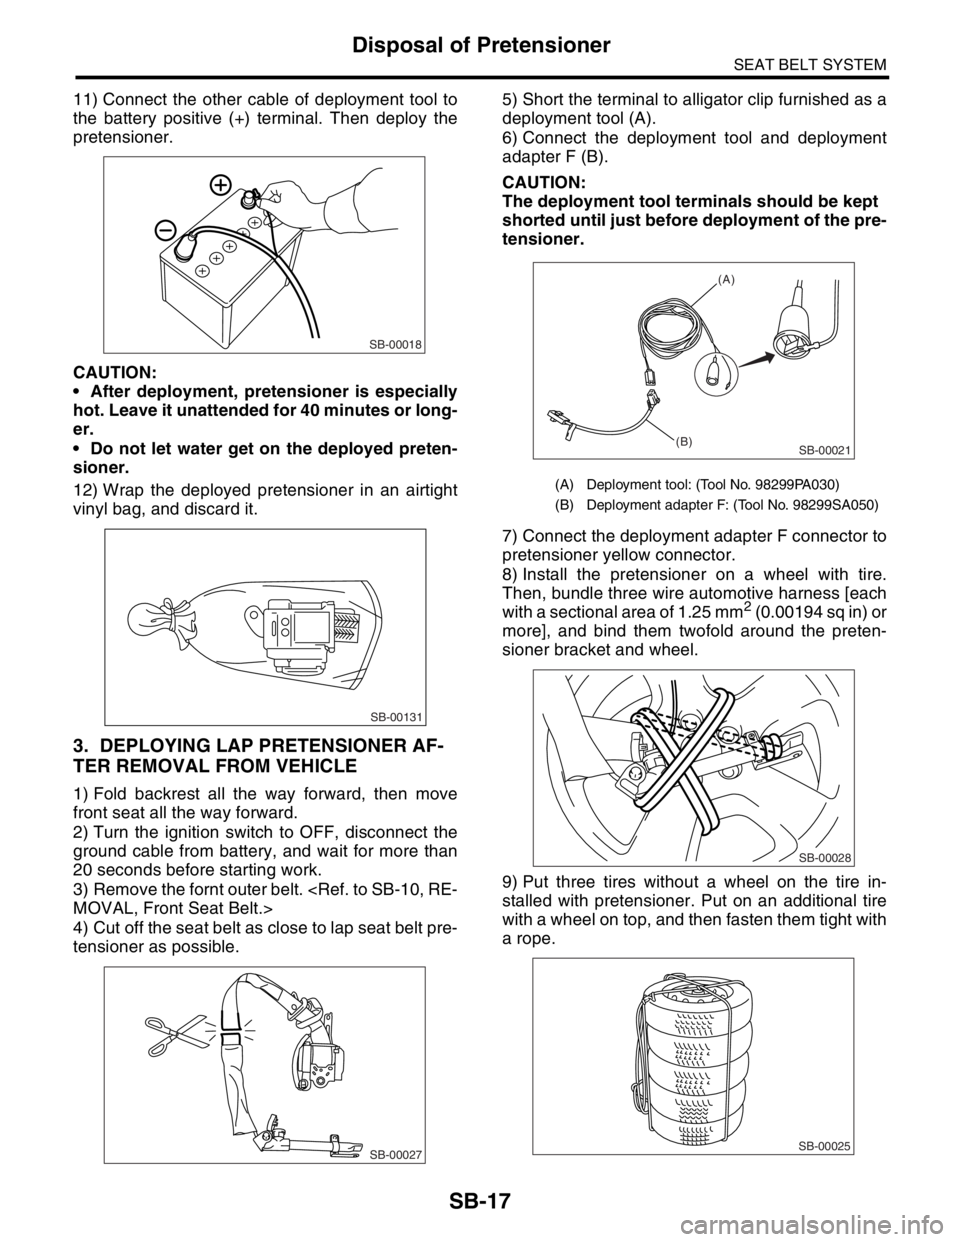
11) Connect the other cable of deployment tool to
the battery positive (+) terminal. Then deploy the
pretensioner.
CAUTION:
After deployment, pretensioner is especially
hot. Leave it unattended for 40 minutes or long-
er.
Do not let water get on the deployed preten-
sioner.
12) Wrap the deployed pretensioner in an airtight
vinyl bag, and discard it.
3. DEPLOYING LAP PRETENSIONER AF-
TER REMOVAL FROM VEHICLE
1) Fold backrest all the way forward, then move
front seat all the way forward.
2) Turn the ignition switch to OFF, disconnect the
ground cable from battery, and wait for more than
20 seconds before starting work.
3) Remove the fornt outer belt.
4) Cut off the seat belt as close to lap seat belt pre-
tensioner as possible.5) Short the terminal to alligator clip furnished as a
deployment tool (A).
6) Connect the deployment tool and deployment
adapter F (B).
CAUTION:
The deployment tool terminals should be kept
shorted until just before deployment of the pre-
tensioner.
7) Connect the deployment adapter F connector to
pretensioner yellow connector.
8) Install the pretensioner on a wheel with tire.
Then, bundle three wire automotive harness [each
with a sectional area of 1.25 mm
2 (0.00194 sq in) or
more], and bind them twofold around the preten-
sioner bracket and wheel.
9) Put three tires without a wheel on the tire in-
stalled with pretensioner. Put on an additional tire
with a wheel on top, and then fasten them tight with
a rope.
SB-00018
SB-00131
SB-00027
(A) Deployment tool: (Tool No. 98299PA030)
(B) Deployment adapter F: (Tool No. 98299SA050)
SB-00021
(A)
(B)
SB-00028
SB-00025
Page 252 of 2870
SB-18
SEAT BELT SYSTEM
Disposal of Pretensioner
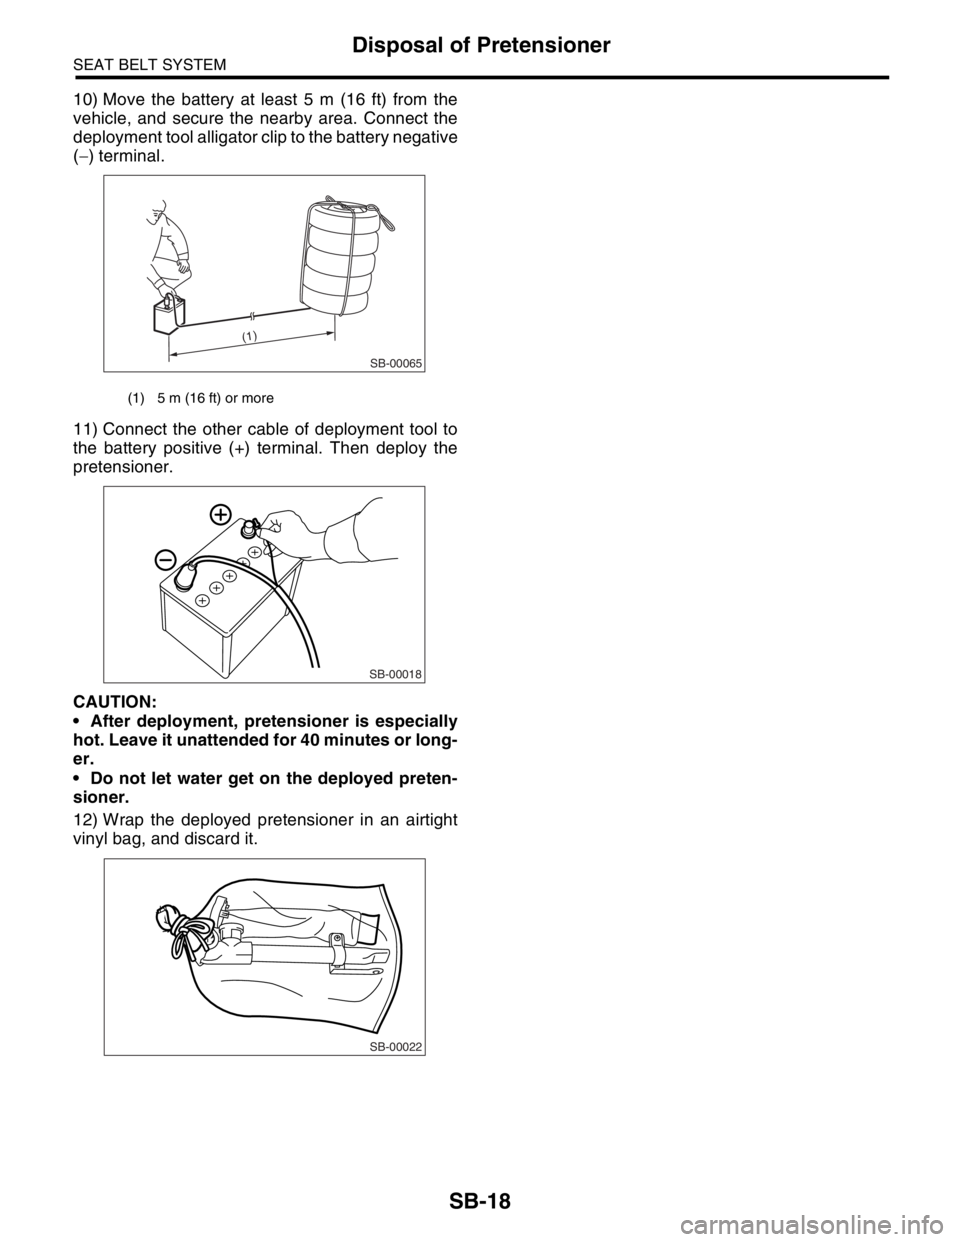
10) Move the battery at least 5 m (16 ft) from the
vehicle, and secure the nearby area. Connect the
deployment tool alligator clip to the battery negative
(−) terminal.
11) Connect the other cable of deployment tool to
the battery positive (+) terminal. Then deploy the
pretensioner.
CAUTION:
After deployment, pretensioner is especially
hot. Leave it unattended for 40 minutes or long-
er.
Do not let water get on the deployed preten-
sioner.
12) Wrap the deployed pretensioner in an airtight
vinyl bag, and discard it.
(1) 5 m (16 ft) or more
SB-00065
(1)
SB-00018
SB-00022
Page 253 of 2870
FUJI HEAVY INDUSTRIES LTD. G8080GE7
2004 FORESTER SERVICE MANUAL QUICK REFERENCE INDEX
BODY SECTION
This service manual has been prepared
to provide SUBARU service personnel
with the necessary information and data
for the correct maintenance and repair
of SUBARU vehicles.
This manual includes the procedures
for maintenance, disassembling, reas-
sembling, inspection and adjustment of
components and diagnostics for guid-
ance of experienced mechanics.
Please peruse and utilize this manual
fully to ensure complete repair work for
satisfying our customers by keeping
their vehicle in optimum condition.
When replacement of parts during
repair work is needed, be sure to use
SUBARU genuine parts.
All information, illustration and specifi-
cations contained in this manual are
based on the latest product information
available at the time of publication
approval.HVAC SYSTEM
(HEATER, VENTILATOR AND A/C)AC
HVAC SYSTEM (AUTO A/C)
(DIAGNOSTIC)AC
AIRBAG SYSTEM AB
AIRBAG SYSTEM (DIAGNOSTIC) AB
SEAT BELT SYSTEM SB
LIGHTING SYSTEM LI
WIPER AND WASHER SYSTEM WW
ENTERTAINMENT ET
COMMUNICATION SYSTEM COM
GLASS/WINDOW/MIRROR GW
BODY STRUCTURE BS
INSTRUMENTATION/DRIVER INFO IDI
SEAT SE
SECURITY AND LOCK SL
SUNROOF/T-TOP/CONVERTIBLE TOP
(SUNROOF)SR
EXTERIOR/INTERIOR TRIM EI
EXTERIOR BODY PANEL EB
Page 254 of 2870
2004 FORESTER SERVICE MANUAL QUICK REFERENCE INDEX
BODY SECTION
G8080GE7
CRUISE CONTROL SYSTEM CC
CRUISE CONTROL SYSTEM
(DIAGNOSTIC)CC(H4SO)
CRUISE CONTROL SYSTEM
(DIAGNOSTIC)CC(H4DOTC)
CRUISE CONTROL SYSTEM
(DIAGNOSTIC)CC(H4DOTC 2.5)
IMMOBILIZER (DIAGNOSTIC) IM
Page 255 of 2870

LIGHTING SYSTEM
LI
Page
1. General Description ....................................................................................2
2. Headlight and Tail Light System .................................................................3
3. Front Fog Light System ...............................................................................4
4. Rear Fog Light System ...............................................................................5
5. Turn Signal Light and Hazard Light System................................................6
6. Back-up Light System .................................................................................7
7. Stop Light System .......................................................................................8
8. Room Light System .....................................................................................9
9. Headlight Beam Leveler System ...............................................................10
10. Combination Switch (Light) .......................................................................11
11. Headlight Assembly ..................................................................................13
12. Headlight Bulb ...........................................................................................16
13. Front Turn Signal Light Bulb .....................................................................17
14. Clearance Light Bulb .................................................................................18
15. Front Fog Light Assembly .........................................................................19
16. Front Fog Light Bulb..................................................................................20
17. Rear Combination Light Assembly ............................................................21
18. Tail/Stop Light Bulb ...................................................................................22
19. Back-up Light Bulb ....................................................................................23
20. Rear Turn Signal Light Bulb ......................................................................24
21. Rear Fog Light Bulb ..................................................................................25
22. License Plate Light ....................................................................................26
23. High-mounted Stop Light ..........................................................................27
24. Side Turn Signal Light ...............................................................................28
25. Spot Map Light ..........................................................................................29
26. Room Light ................................................................................................30
27. Luggage Room Light .................................................................................31
28. Glove Box Light .........................................................................................32
Page 256 of 2870

LI-2
LIGHTING SYSTEM
General Description
1. General Description
A: SPECIFICATION
B: PRECAUTIONS
Before removing and installing parts, always disconnect the battery ground cable. When replacing audio,
control module, and other parts provided with memory functions, record memory contents before disconnect-
ing the battery ground cable. Otherwise, the memory will be erased.
Reassemble in reverse order of disassembly, unless otherwise indicated.
Adjust parts to the given specifications.
Connect the connectors and hoses securely during reassembly.
After reassembly, make sure functional parts operate smoothly.
WARNING:
Airbag system wiring harness is routed near electrical parts and switches. All airbag system wiring
harnesses and connectors are yellow. Do not use electric test equipment on these circuits.
Be careful not to damage the airbag system wiring harness when servicing electrical parts and
switches.
C: PREPARATION TOOL
1. GENERAL TOOL
Headlight12 V — 55 W/60 W
Front turn signal light 12 V — 21 W
Clearance light12 V — 5 W
Side marker light12 V — 5 W
Front fog light12 V — 55 W
Rear combination lightTail/Stop light 12 V — 5/21 W
Turn signal light 12 V — 21 W
Back-up light 12 V — 16 W
License plate light12 V — 5 W
High-mounted stop lightStandard type 12 V — 13 W
Rear spoiler built-in type 12 V — 1.2 W
Room light12 V — 8 W
Spot light12 V — 8 W
Luggage room light12 V — 5 W
TOOL NAME REMARKS
Circuit tester Used for measuring resistance and voltage.
Page 257 of 2870
LI-3
LIGHTING SYSTEM
Headlight and Tail Light System
2. Headlight and Tail Light Sys-
tem
A: WIRING DIAGRAM
1. HEADLIGHT
2. CLEARANCE LIGHT AND ILLUMINA-
TION LIGHT
B: INSPECTION
1. HEADLIGHT SWITCH
2. HEADLIGHT RELAY
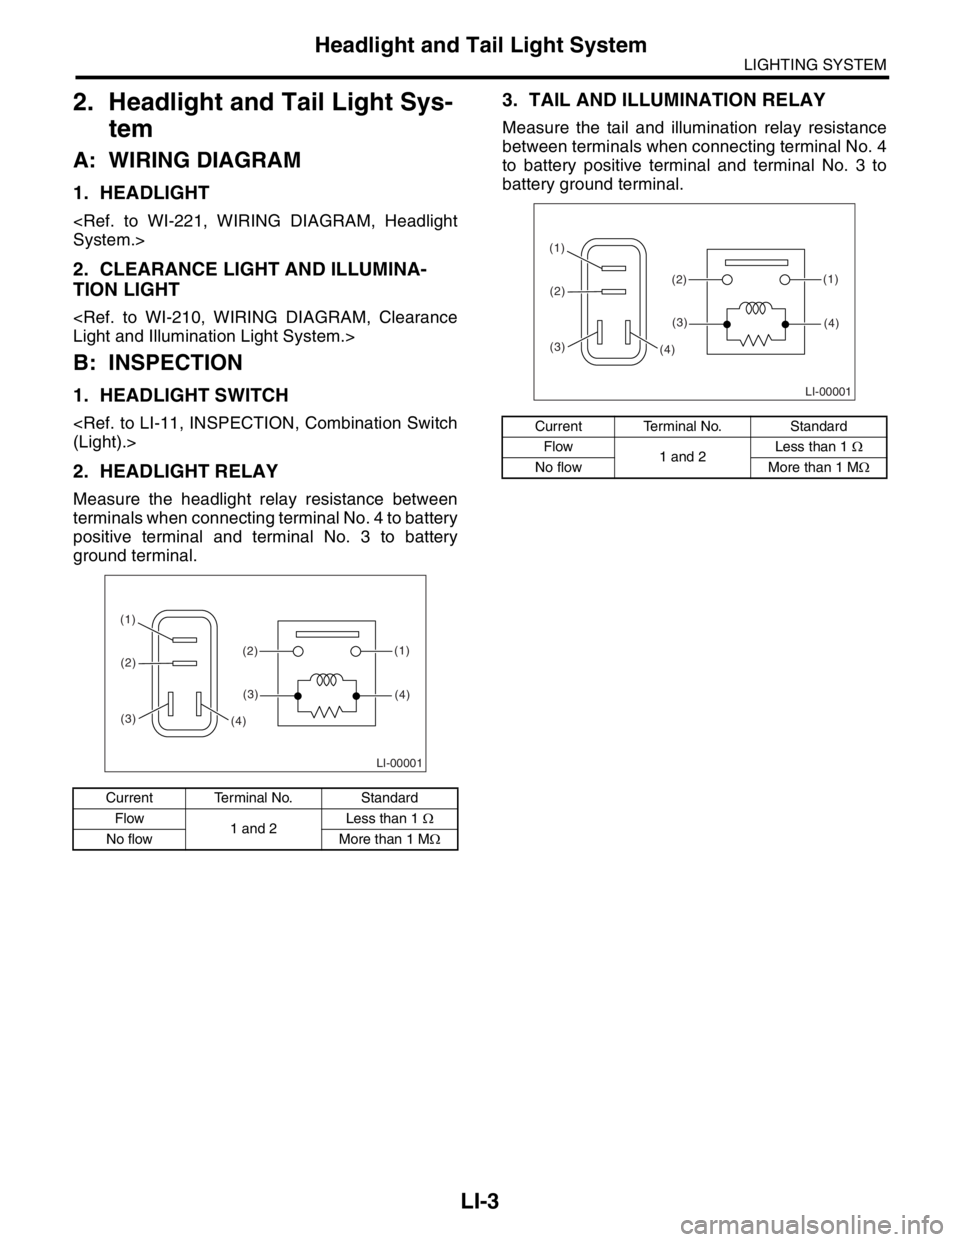
Measure the headlight relay resistance between
terminals when connecting terminal No. 4 to battery
positive terminal and terminal No. 3 to battery
ground terminal.
3. TAIL AND ILLUMINATION RELAY
Measure the tail and illumination relay resistance
between terminals when connecting terminal No. 4
to battery positive terminal and terminal No. 3 to
battery ground terminal.
Current Terminal No. Standard
Flow
1 and 2Less than 1 Ω
No flow More than 1 MΩ
LI-00001
(1)
(2) (1)
(4)(2)
(3)
(3)(4)
Current Terminal No. Standard
Flow
1 and 2Less than 1 Ω
No flow More than 1 MΩ
LI-00001
(1)
(2) (1)
(4)(2)
(3)
(3)(4)
Page 258 of 2870
LI-4
LIGHTING SYSTEM
Front Fog Light System
3. Front Fog Light System
A: WIRING DIAGRAM
1. FRONT FOG LIGHT
B: INSPECTION
1. FRONT FOG LIGHT SWITCH
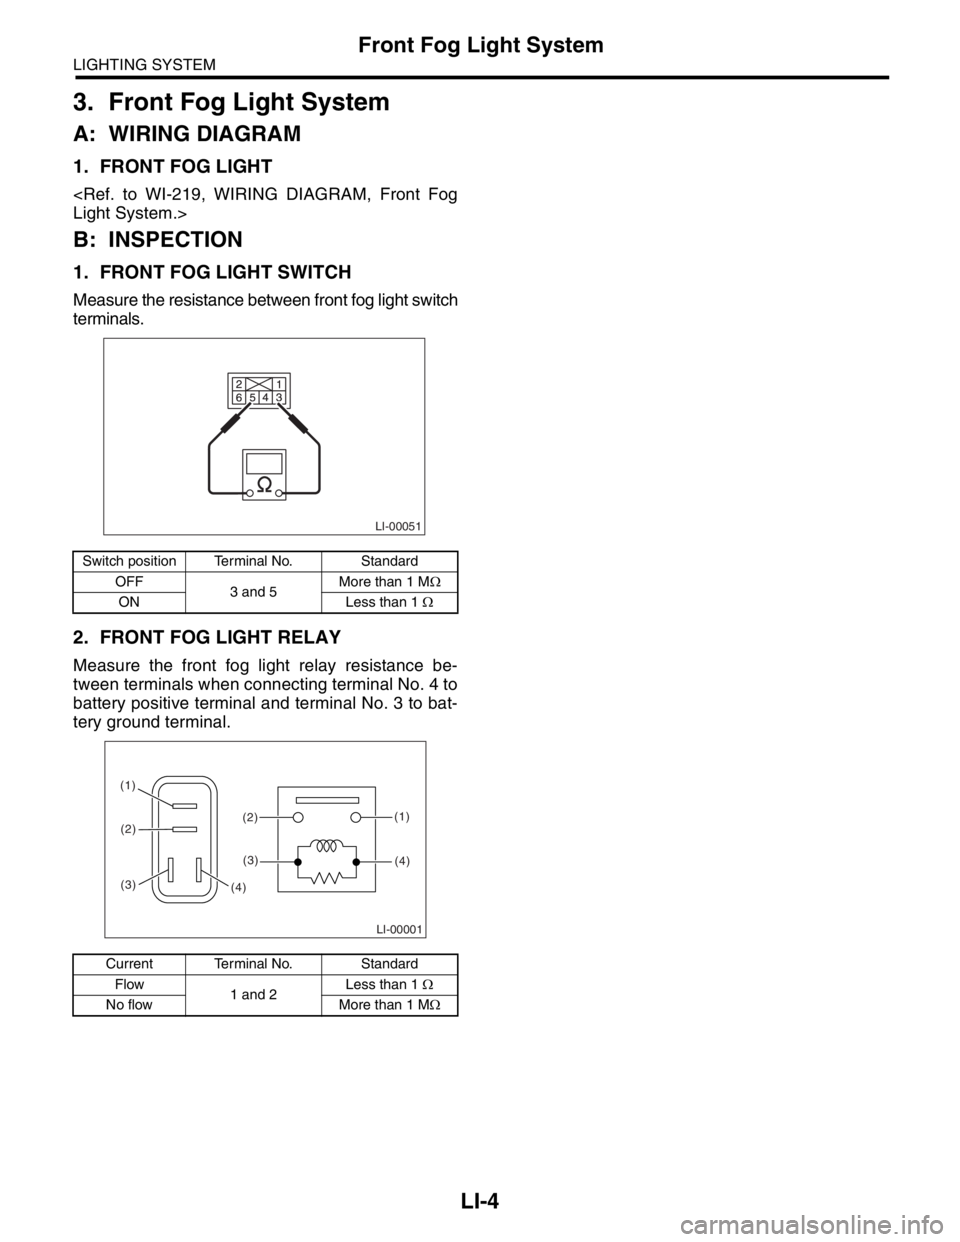
Measure the resistance between front fog light switch
terminals.
2. FRONT FOG LIGHT RELAY
Measure the front fog light relay resistance be-
tween terminals when connecting terminal No. 4 to
battery positive terminal and terminal No. 3 to bat-
tery ground terminal.
Switch position Terminal No. Standard
OFF
3 and 5More than 1 MΩ
ON Less than 1 Ω
Current Terminal No. Standard
Flow
1 and 2Less than 1 Ω
No flow More than 1 MΩ
LI-00051
LI-00001
(1)
(2) (1)
(4)(2)
(3)
(3)(4)
Page 259 of 2870
LI-5
LIGHTING SYSTEM
Rear Fog Light System
4. Rear Fog Light System
A: WIRING DIAGRAM
1. REAR FOG LIGHT
B: INSPECTION
1. REAR FOG LIGHT SWITCH
1) Turn the ignition switch to ON.
2) Turn on the headlight or front fog light.
3) Push the rear fog light switch and check if the
rear fog light turns on.
2. REAR FOG LIGHT RELAY
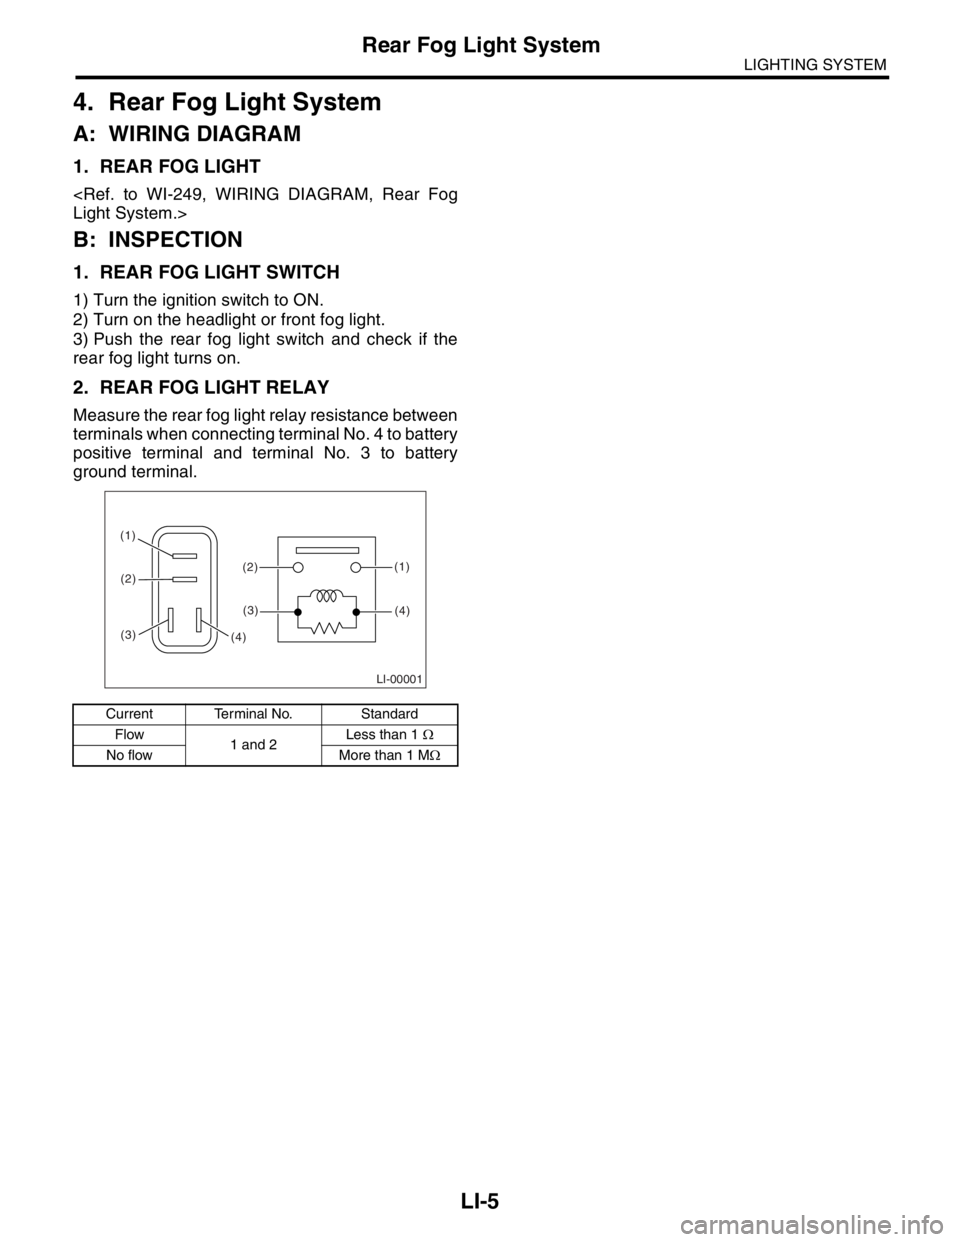
Measure the rear fog light relay resistance between
terminals when connecting terminal No. 4 to battery
positive terminal and terminal No. 3 to battery
ground terminal.
Current Terminal No. Standard
Flow
1 and 2Less than 1 Ω
No flow More than 1 MΩ
LI-00001
(1)
(2) (1)
(4)(2)
(3)
(3)(4)
Page 260 of 2870

LI-6
LIGHTING SYSTEM
Turn Signal Light and Hazard Light System
5. Turn Signal Light and Hazard
Light System
A: WIRING DIAGRAM
1. TURN SIGNAL LIGHT AND HAZARD
LIGHT
B: INSPECTION
1. TURN SIGNAL SWITCH
2. HAZARD SWITCH
Measure the resistance between hazard switch ter-
minals.
3. TURN SIGNAL AND HAZARD MODULE
Connect the battery and the turn signal light bulb to
module, as shown in the figure. The module is
properly functioning if it blinks when power is sup-
plied to the circuit.
Switch position Terminal No. Standard
OFF 6 and 7 Less than 1 Ω
ON1, 3 and 4 Less than 1 Ω
7 and 8 Less than 1 Ω
LI-00002
43 21
5 6 7 8
LI-00003