sensor SUBARU TRIBECA 2009 1.G Service Workshop Manual
[x] Cancel search | Manufacturer: SUBARU, Model Year: 2009, Model line: TRIBECA, Model: SUBARU TRIBECA 2009 1.GPages: 2453, PDF Size: 46.32 MB
Page 831 of 2453
DS-14
Front Axle
DRIVE SHAFT SYSTEM
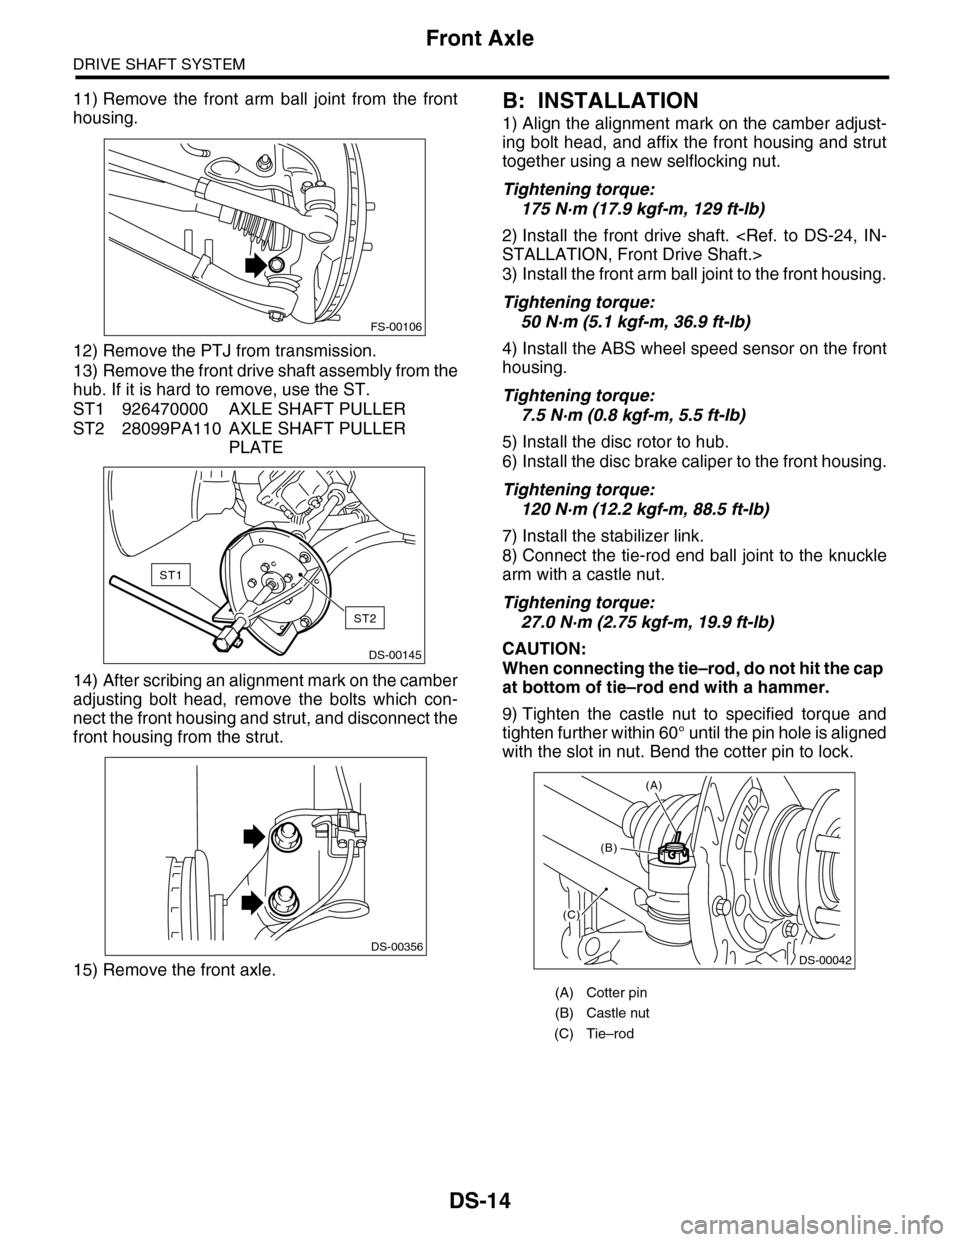
11) Remove the front arm ball joint from the front
housing.
12) Remove the PTJ from transmission.
13) Remove the front drive shaft assembly from the
hub. If it is hard to remove, use the ST.
ST1 926470000 AXLE SHAFT PULLER
ST2 28099PA110 AXLE SHAFT PULLER
PLATE
14) After scribing an alignment mark on the camber
adjusting bolt head, remove the bolts which con-
nect the front housing and strut, and disconnect the
front housing from the strut.
15) Remove the front axle.
B: INSTALLATION
1) Align the alignment mark on the camber adjust-
ing bolt head, and affix the front housing and strut
together using a new selflocking nut.
Tightening torque:
175 N·m (17.9 kgf-m, 129 ft-lb)
2) Install the front drive shaft.
3) Install the front arm ball joint to the front housing.
Tightening torque:
50 N·m (5.1 kgf-m, 36.9 ft-lb)
4) Install the ABS wheel speed sensor on the front
housing.
Tightening torque:
7.5 N·m (0.8 kgf-m, 5.5 ft-lb)
5) Install the disc rotor to hub.
6) Install the disc brake caliper to the front housing.
Tightening torque:
120 N·m (12.2 kgf-m, 88.5 ft-lb)
7) Install the stabilizer link.
8) Connect the tie-rod end ball joint to the knuckle
arm with a castle nut.
Tightening torque:
27.0 N·m (2.75 kgf-m, 19.9 ft-lb)
CAUTION:
When connecting the tie–rod, do not hit the cap
at bottom of tie–rod end with a hammer.
9) Tighten the castle nut to specified torque and
tighten further within 60° until the pin hole is aligned
with the slot in nut. Bend the cotter pin to lock.
FS-00106
DS-00145
ST2
ST1
DS-00356
(A) Cotter pin
(B) Castle nut
(C) Tie–rod
DS-00042
(C)
(B)
(A)
Page 834 of 2453
DS-17
Rear Axle
DRIVE SHAFT SYSTEM
4. Rear Axle
A: REMOVAL
1) Disconnect the ground cable from the battery.
2) Lift-up the vehicle, and then remove the rear
wheels.
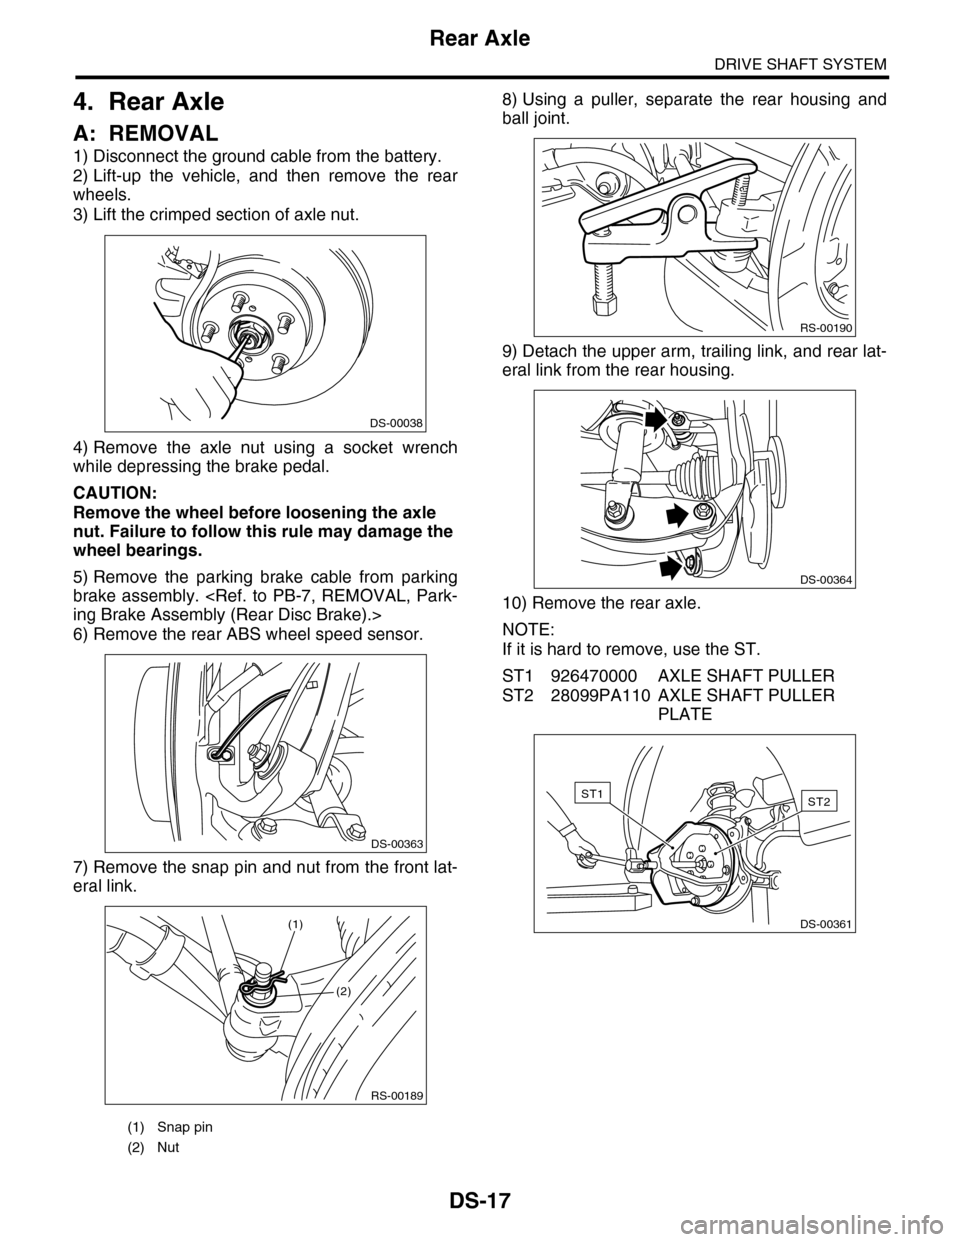
3) Lift the crimped section of axle nut.
4) Remove the axle nut using a socket wrench
while depressing the brake pedal.
CAUTION:
Remove the wheel before loosening the axle
nut. Failure to follow this rule may damage the
wheel bearings.
5) Remove the parking brake cable from parking
brake assembly.
6) Remove the rear ABS wheel speed sensor.
7) Remove the snap pin and nut from the front lat-
eral link.
8) Using a puller, separate the rear housing and
ball joint.
9) Detach the upper arm, trailing link, and rear lat-
eral link from the rear housing.
10) Remove the rear axle.
NOTE:
If it is hard to remove, use the ST.
ST1 926470000 AXLE SHAFT PULLER
ST2 28099PA110 AXLE SHAFT PULLER
PLATE
(1) Snap pin
(2) Nut
DS-00038
DS-00363
RS-00189
(2)
(1)
RS-00190
DS-00364
ST2ST1
DS-00361
Page 867 of 2453
FS-19
Front Strut
FRONT SUSPENSION
7. Front Strut
A: REMOVAL
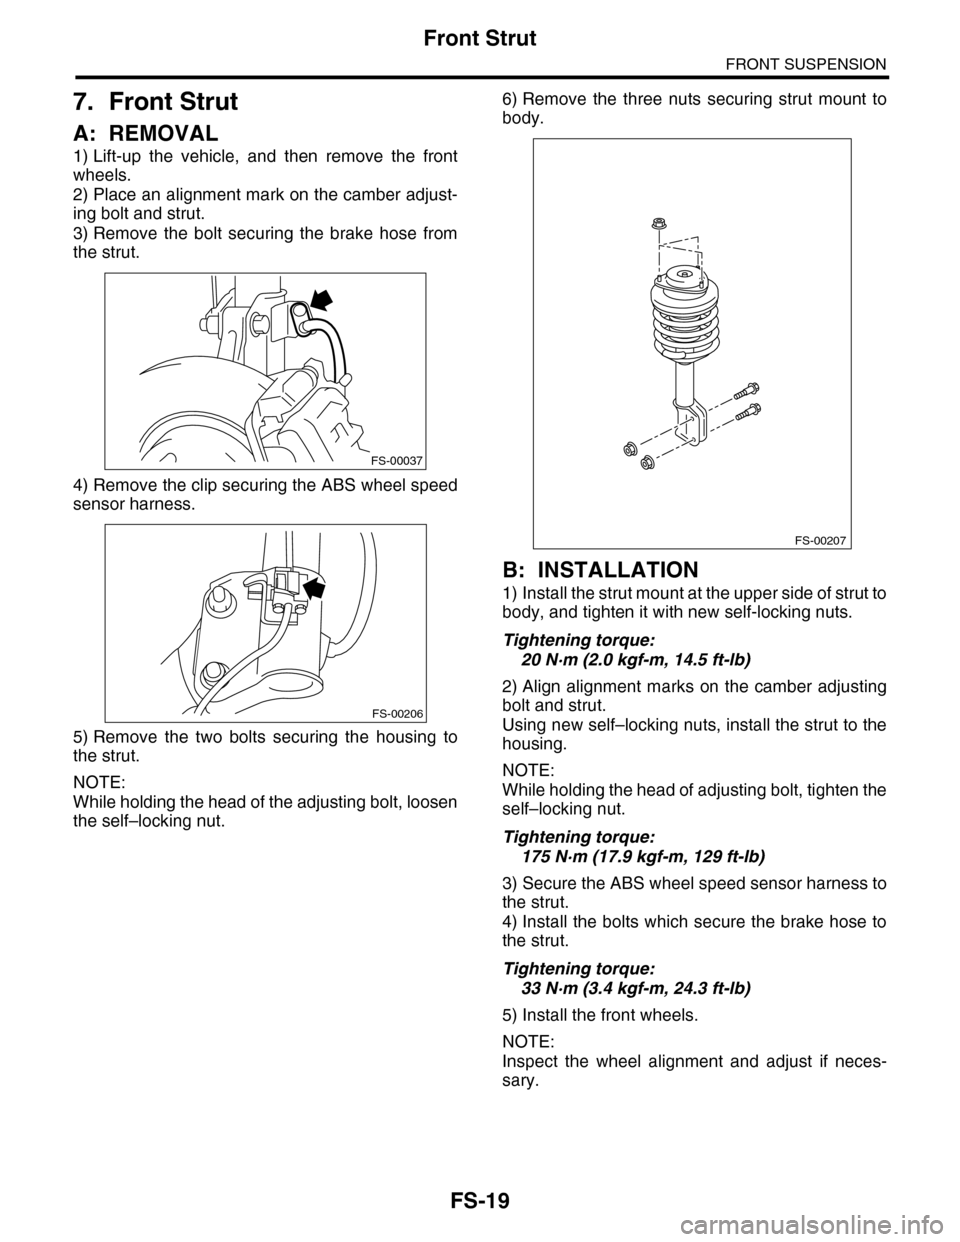
1) Lift-up the vehicle, and then remove the front
wheels.
2) Place an alignment mark on the camber adjust-
ing bolt and strut.
3) Remove the bolt securing the brake hose from
the strut.
4) Remove the clip securing the ABS wheel speed
sensor harness.
5) Remove the two bolts securing the housing to
the strut.
NOTE:
While holding the head of the adjusting bolt, loosen
the self–locking nut.
6) Remove the three nuts securing strut mount to
body.
B: INSTALLATION
1) Install the strut mount at the upper side of strut to
body, and tighten it with new self-locking nuts.
Tightening torque:
20 N·m (2.0 kgf-m, 14.5 ft-lb)
2) Align alignment marks on the camber adjusting
bolt and strut.
Using new self–locking nuts, install the strut to the
housing.
NOTE:
While holding the head of adjusting bolt, tighten the
self–locking nut.
Tightening torque:
175 N·m (17.9 kgf-m, 129 ft-lb)
3) Secure the ABS wheel speed sensor harness to
the strut.
4) Install the bolts which secure the brake hose to
the strut.
Tightening torque:
33 N·m (3.4 kgf-m, 24.3 ft-lb)
5) Install the front wheels.
NOTE:
Inspect the wheel alignment and adjust if neces-
sary.
FS-00037
FS-00206
FS-00207
Page 933 of 2453
PS-53
General Diagnostic Table
POWER ASSISTED SYSTEM (POWER STEERING)
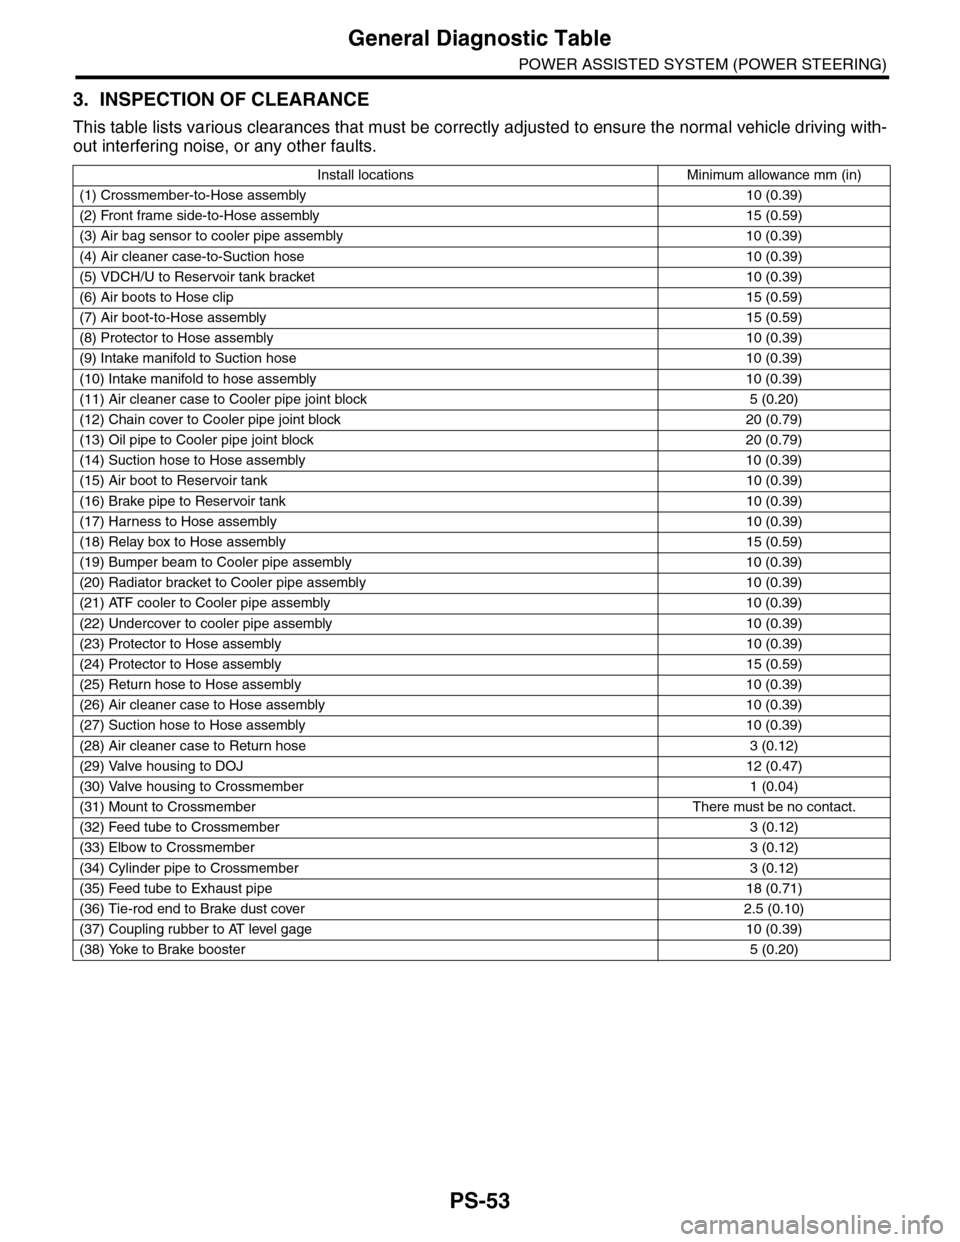
3. INSPECTION OF CLEARANCE
This table lists various clearances that must be correctly adjusted to ensure the normal vehicle driving with-
out interfering noise, or any other faults.
Install locations Minimum allowance mm (in)
(1) Crossmember-to-Hose assembly 10 (0.39)
(2) Front frame side-to-Hose assembly 15 (0.59)
(3) Air bag sensor to cooler pipe assembly 10 (0.39)
(4) Air cleaner case-to-Suction hose 10 (0.39)
(5) VDCH/U to Reservoir tank bracket 10 (0.39)
(6) Air boots to Hose clip15 (0.59)
(7) Air boot-to-Hose assembly15 (0.59)
(8) Protector to Hose assembly10 (0.39)
(9) Intake manifold to Suction hose 10 (0.39)
(10) Intake manifold to hose assembly 10 (0.39)
(11) Air cleaner case to Cooler pipe joint block 5 (0.20)
(12) Chain cover to Cooler pipe joint block 20 (0.79)
(13) Oil pipe to Cooler pipe joint block 20 (0.79)
(14) Suction hose to Hose assembly 10 (0.39)
(15) Air boot to Reservoir tank10 (0.39)
(16) Brake pipe to Reservoir tank10 (0.39)
(17) Harness to Hose assembly10 (0.39)
(18) Relay box to Hose assembly15 (0.59)
(19) Bumper beam to Cooler pipe assembly 10 (0.39)
(20) Radiator bracket to Cooler pipe assembly 10 (0.39)
(21) ATF cooler to Cooler pipe assembly 10 (0.39)
(22) Undercover to cooler pipe assembly 10 (0.39)
(23) Protector to Hose assembly10 (0.39)
(24) Protector to Hose assembly15 (0.59)
(25) Return hose to Hose assembly 10 (0.39)
(26) Air cleaner case to Hose assembly 10 (0.39)
(27) Suction hose to Hose assembly 10 (0.39)
(28) Air cleaner case to Return hose 3 (0.12)
(29) Valve housing to DOJ12 (0.47)
(30) Valve housing to Crossmember 1 (0.04)
(31) Mount to Crossmember There must be no contact.
(32) Feed tube to Crossmember3 (0.12)
(33) Elbow to Crossmember3 (0.12)
(34) Cylinder pipe to Crossmember 3 (0.12)
(35) Feed tube to Exhaust pipe18 (0.71)
(36) Tie-rod end to Brake dust cover 2.5 (0.10)
(37) Coupling rubber to AT level gage 10 (0.39)
(38) Yoke to Brake booster5 (0.20)
Page 942 of 2453
RS-9
Rear Trailing Link
REAR SUSPENSION
4. Rear Trailing Link
A: REMOVAL
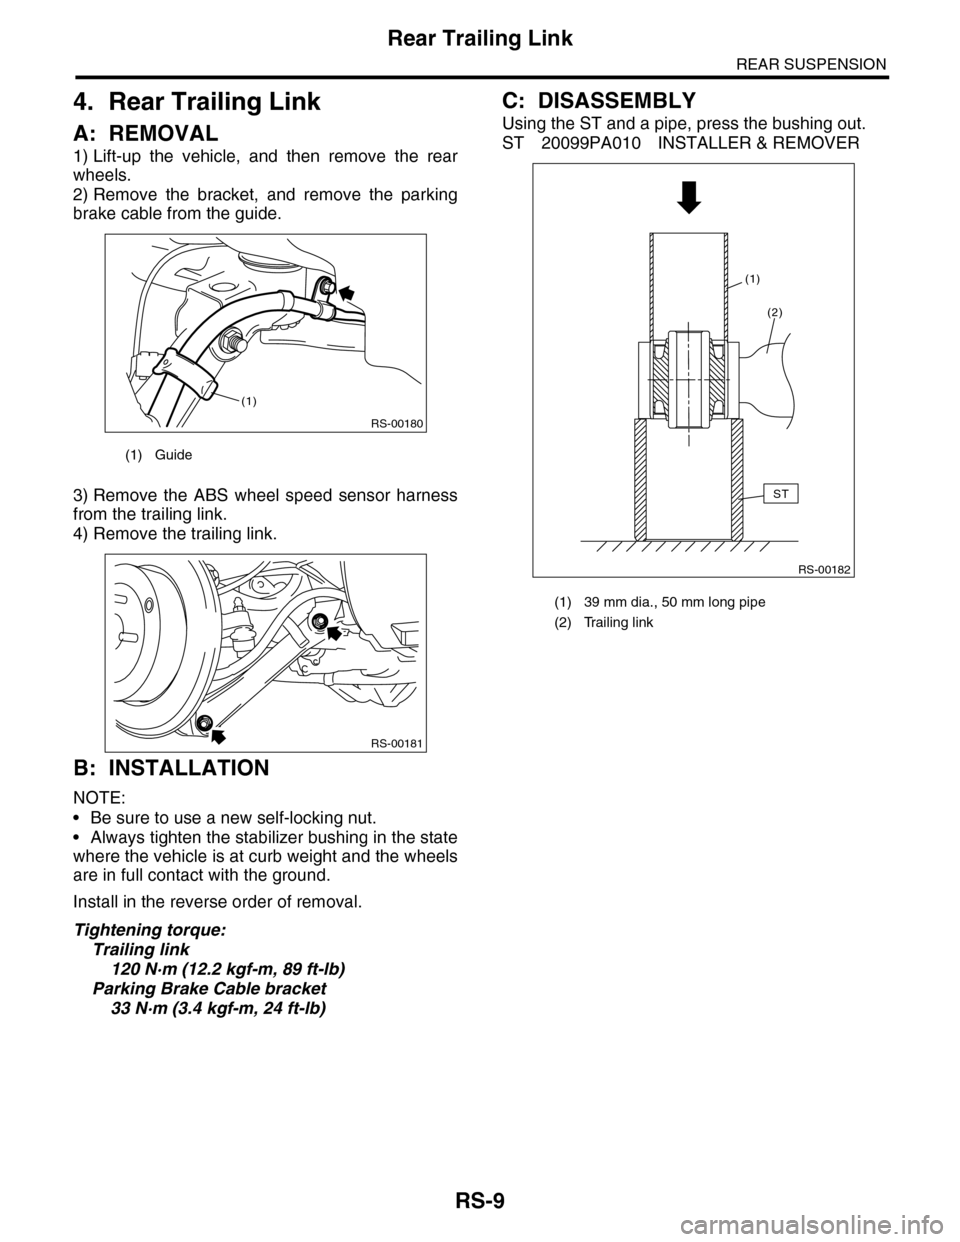
1) Lift-up the vehicle, and then remove the rear
wheels.
2) Remove the bracket, and remove the parking
brake cable from the guide.
3) Remove the ABS wheel speed sensor harness
from the trailing link.
4) Remove the trailing link.
B: INSTALLATION
NOTE:
•Be sure to use a new self-locking nut.
•Always tighten the stabilizer bushing in the state
where the vehicle is at curb weight and the wheels
are in full contact with the ground.
Install in the reverse order of removal.
Tightening torque:
Trailing link
120 N·m (12.2 kgf-m, 89 ft-lb)
Parking Brake Cable bracket
33 N·m (3.4 kgf-m, 24 ft-lb)
C: DISASSEMBLY
Using the ST and a pipe, press the bushing out.
ST 20099PA010 INSTALLER & REMOVER
(1) Guide
RS-00180
(1)
RS-00181
(1) 39 mm dia., 50 mm long pipe
(2) Trailing link
RS-00182
ST
(2)
(1)
Page 949 of 2453
RS-16
Rear Sub Frame
REAR SUSPENSION
9. Rear Sub Frame
A: REMOVAL
1) Separate the front exhaust pipe and rear ex-
haust pipe.
2) Remove the rear exhaust pipe and muffler.
3) Remove the propeller shaft.
4) Remove the spare tire hoist.
5) Remove the rear parking brake cable from the
parking brake assembly.
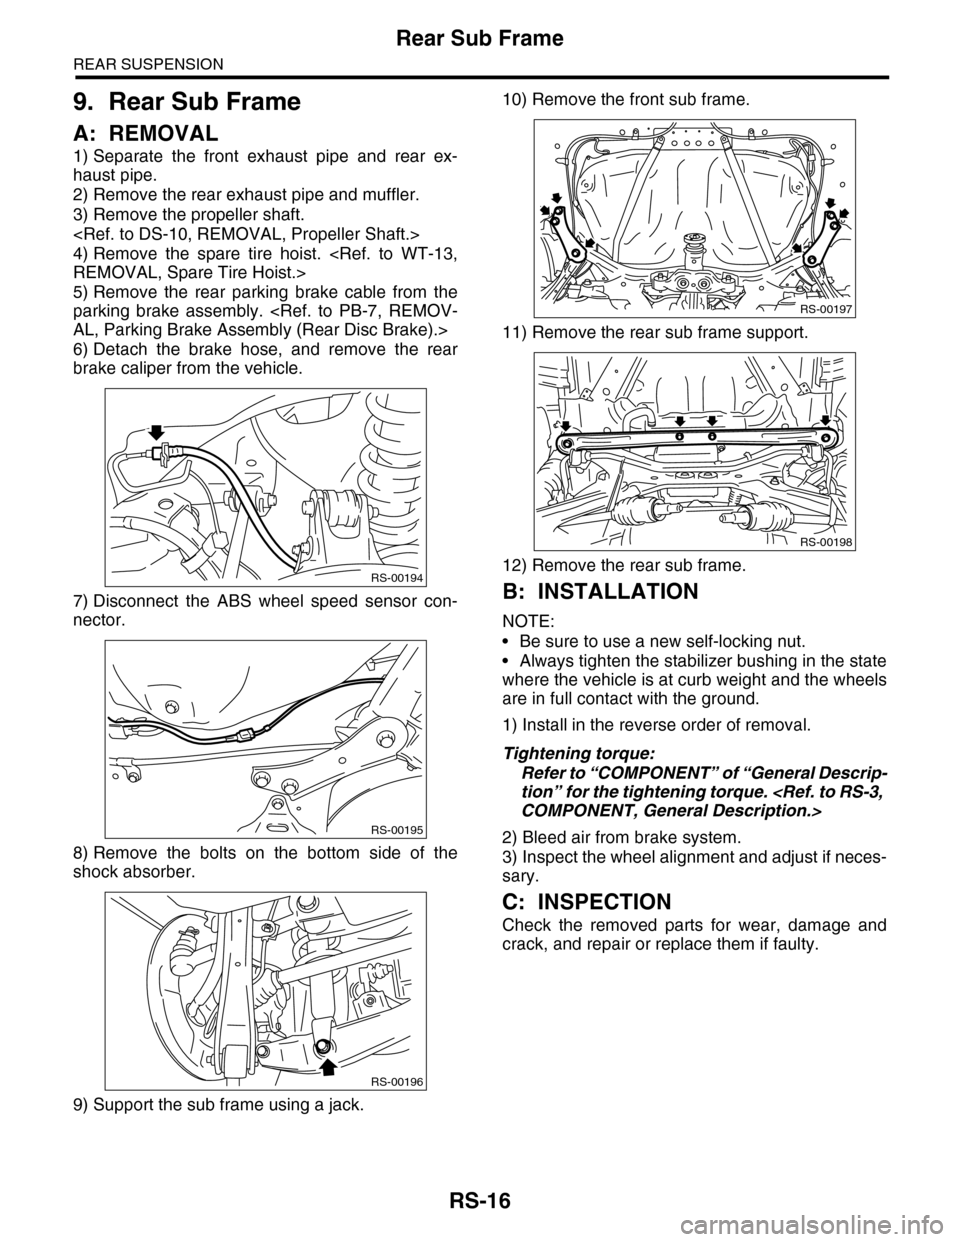
6) Detach the brake hose, and remove the rear
brake caliper from the vehicle.
7) Disconnect the ABS wheel speed sensor con-
nector.
8) Remove the bolts on the bottom side of the
shock absorber.
9) Support the sub frame using a jack.
10) Remove the front sub frame.
11) Remove the rear sub frame support.
12) Remove the rear sub frame.
B: INSTALLATION
NOTE:
•Be sure to use a new self-locking nut.
•Always tighten the stabilizer bushing in the state
where the vehicle is at curb weight and the wheels
are in full contact with the ground.
1) Install in the reverse order of removal.
Tightening torque:
Refer to “COMPONENT” of “General Descrip-
tion” for the tightening torque.
2) Bleed air from brake system.
3) Inspect the wheel alignment and adjust if neces-
sary.
C: INSPECTION
Check the removed parts for wear, damage and
crack, and repair or replace them if faulty.
RS-00194
RS-00195
RS-00196
RS-00197
RS-00198
Page 956 of 2453
TPM(diag)-6
Control Module I/O Signal
TIRE PRESSURE MONITORING SYSTEM (DIAGNOSTICS)
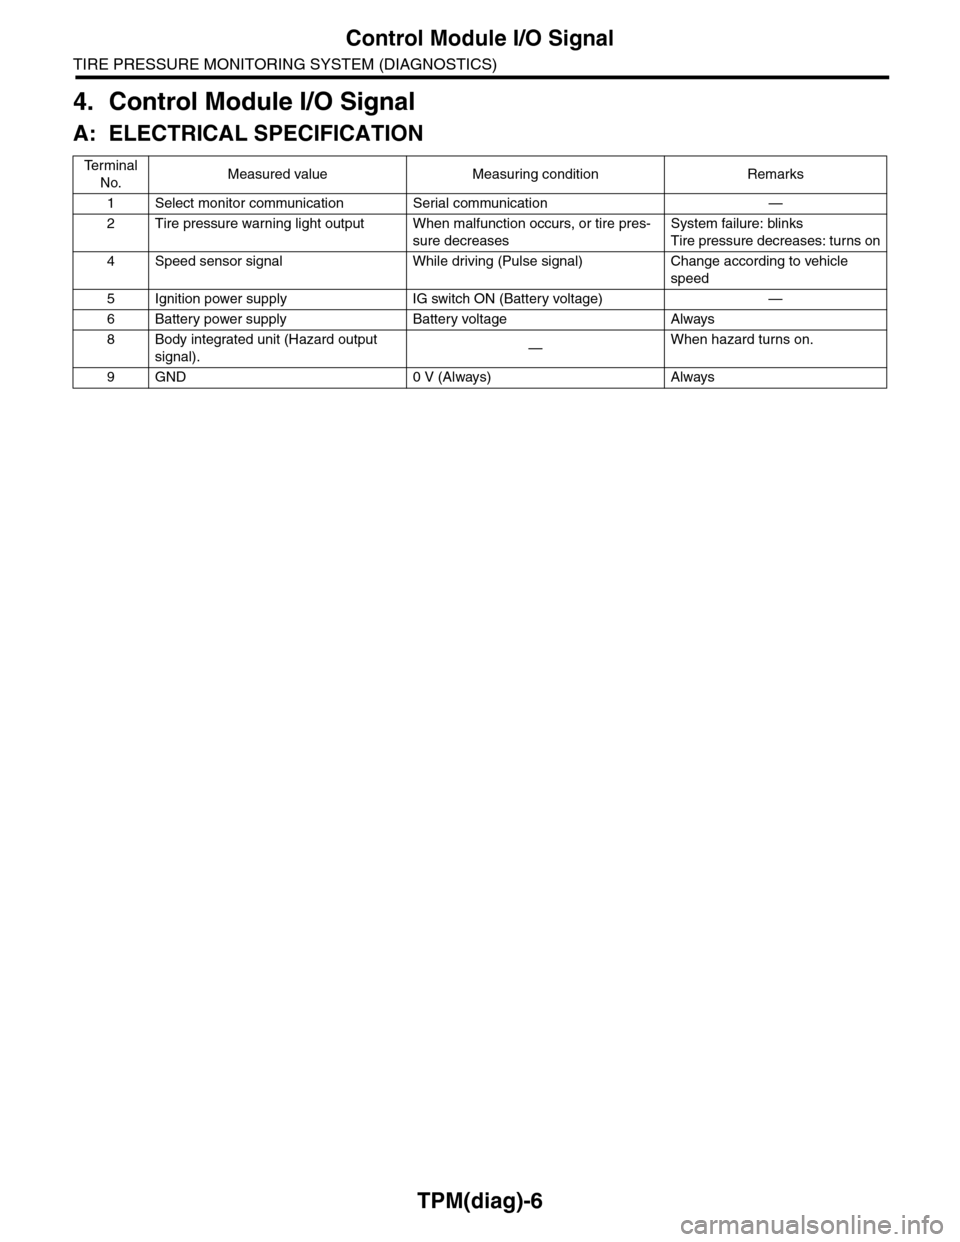
4. Control Module I/O Signal
A: ELECTRICAL SPECIFICATION
Te r m i n a l
No.Measured value Measuring condition Remarks
1Select monitor communication Serial communication —
2Tire pressure warning light output When malfunction occurs, or tire pres-
sure decreases
System failure: blinks
Tire pressure decreases: turns on
4Speed sensor signal While driving (Pulse signal) Change according to vehicle
speed
5Ignition power supply IG switch ON (Battery voltage) —
6Battery power supply Battery voltage Always
8Body integrated unit (Hazard output
signal).—When hazard turns on.
9GND 0 V (Always) Always
Page 976 of 2453
TPM(diag)-26
List of Diagnostic Trouble Code (DTC)
TIRE PRESSURE MONITORING SYSTEM (DIAGNOSTICS)
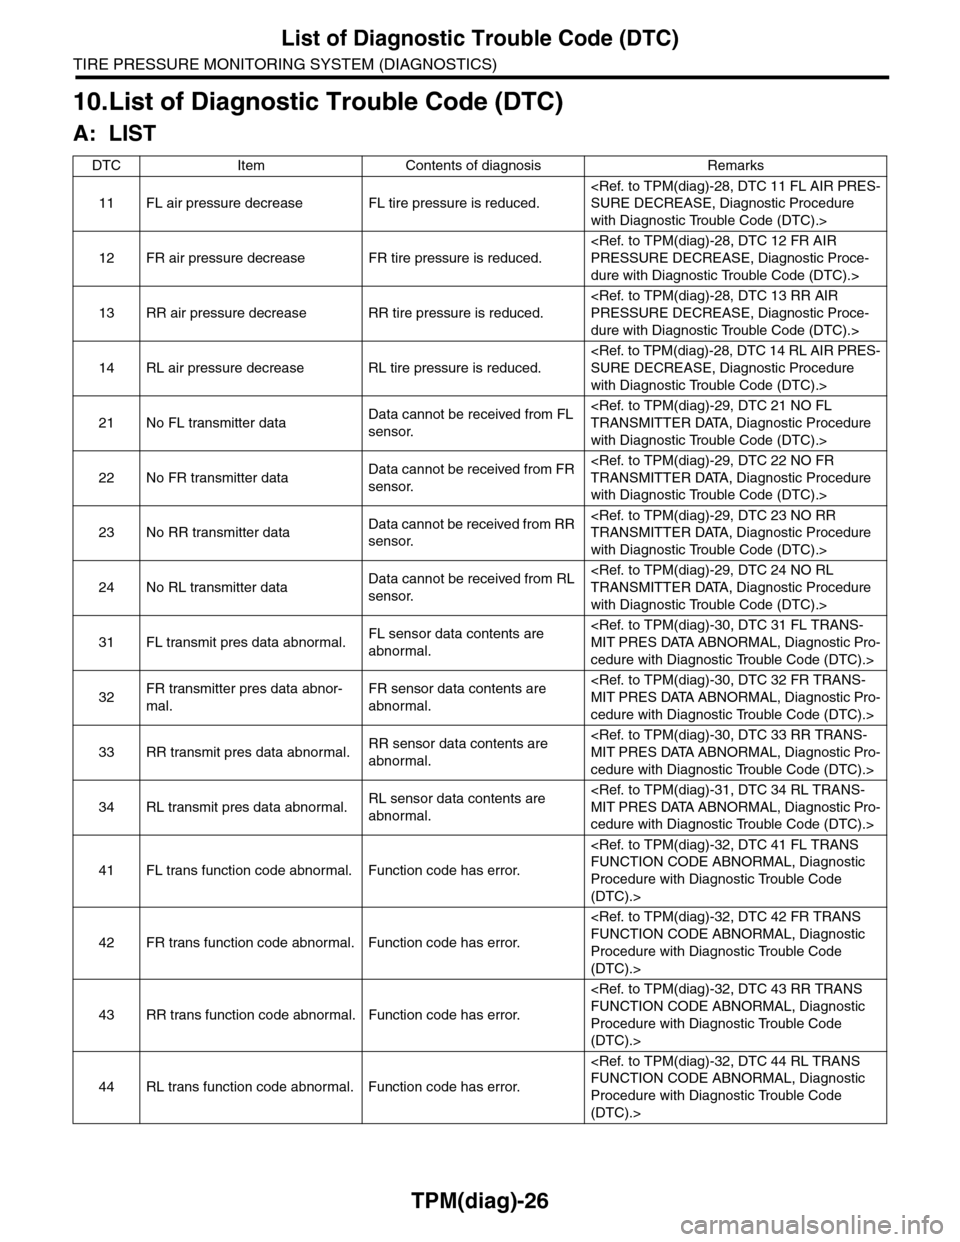
10.List of Diagnostic Trouble Code (DTC)
A: LIST
DTC Item Contents of diagnosis Remarks
11 FL air pressure decrease FL tire pressure is reduced.
with Diagnostic Trouble Code (DTC).>
12 FR air pressure decrease FR tire pressure is reduced.
dure with Diagnostic Trouble Code (DTC).>
13 RR air pressure decrease RR tire pressure is reduced.
dure with Diagnostic Trouble Code (DTC).>
14 RL air pressure decrease RL tire pressure is reduced.
with Diagnostic Trouble Code (DTC).>
21 No FL transmitter dataData cannot be received from FL
sensor.
with Diagnostic Trouble Code (DTC).>
22 No FR transmitter dataData cannot be received from FR
sensor.
with Diagnostic Trouble Code (DTC).>
23 No RR transmitter dataData cannot be received from RR
sensor.
with Diagnostic Trouble Code (DTC).>
24 No RL transmitter dataData cannot be received from RL
sensor.
with Diagnostic Trouble Code (DTC).>
31 FL transmit pres data abnormal.FL sensor data contents are
abnormal.
cedure with Diagnostic Trouble Code (DTC).>
32FR transmitter pres data abnor-
mal.
FR sensor data contents are
abnormal.
cedure with Diagnostic Trouble Code (DTC).>
33 RR transmit pres data abnormal.RR sensor data contents are
abnormal.
cedure with Diagnostic Trouble Code (DTC).>
34 RL transmit pres data abnormal.RL sensor data contents are
abnormal.
cedure with Diagnostic Trouble Code (DTC).>
41 FL trans function code abnormal. Function code has error.
Procedure with Diagnostic Trouble Code
(DTC).>
42 FR trans function code abnormal. Function code has error.
Procedure with Diagnostic Trouble Code
(DTC).>
43 RR trans function code abnormal. Function code has error.
Procedure with Diagnostic Trouble Code
(DTC).>
44 RL trans function code abnormal. Function code has error.
Procedure with Diagnostic Trouble Code
(DTC).>
Page 978 of 2453
TPM(diag)-28
Diagnostic Procedure with Diagnostic Trouble Code (DTC)
TIRE PRESSURE MONITORING SYSTEM (DIAGNOSTICS)
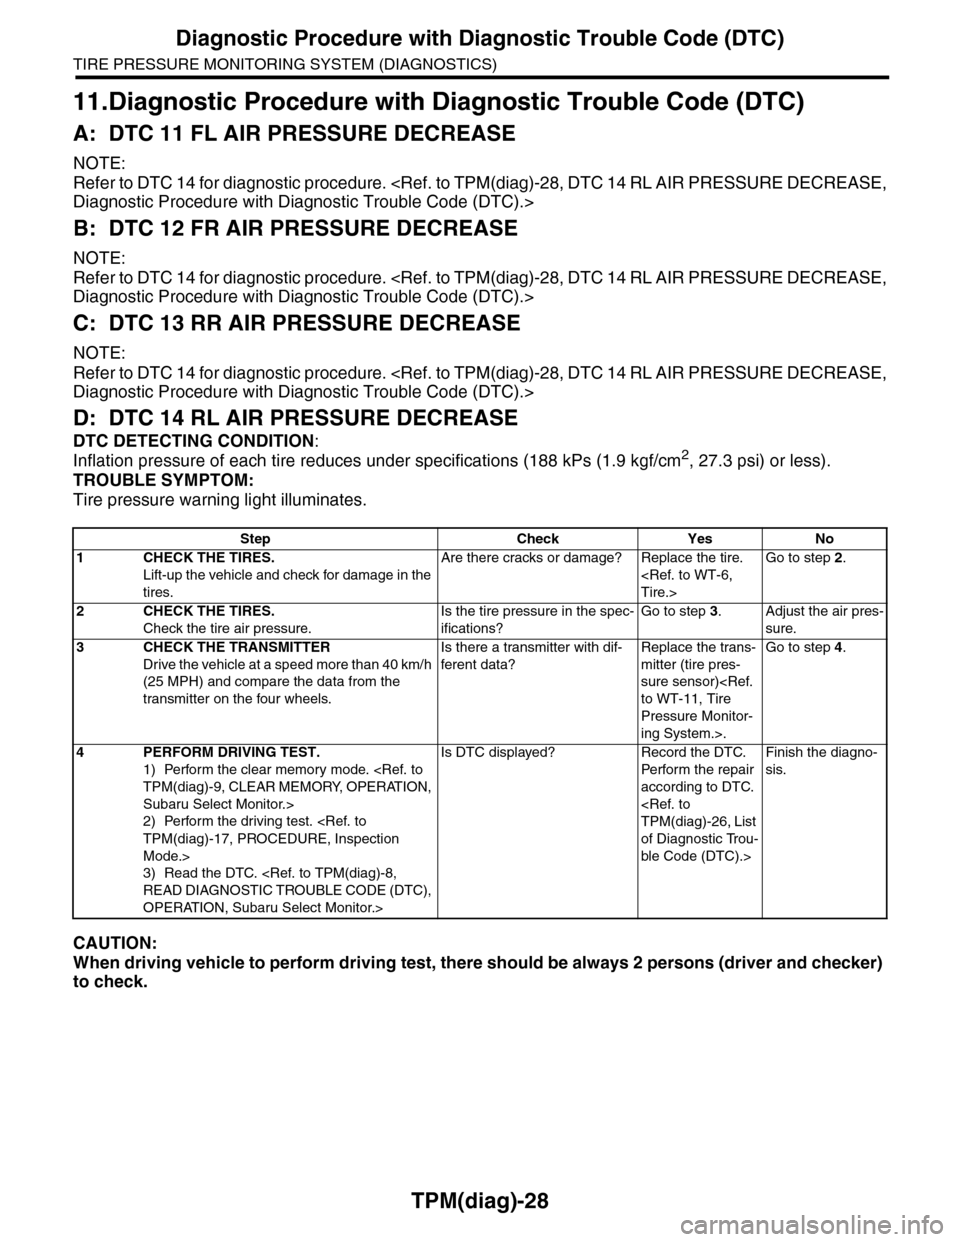
11.Diagnostic Procedure with Diagnostic Trouble Code (DTC)
A: DTC 11 FL AIR PRESSURE DECREASE
NOTE:
Refer to DTC 14 for diagnostic procedure.
B: DTC 12 FR AIR PRESSURE DECREASE
NOTE:
Refer to DTC 14 for diagnostic procedure.
C: DTC 13 RR AIR PRESSURE DECREASE
NOTE:
Refer to DTC 14 for diagnostic procedure.
D: DTC 14 RL AIR PRESSURE DECREASE
DTC DETECTING CONDITION:
Inflation pressure of each tire reduces under specifications (188 kPs (1.9 kgf/cm2, 27.3 psi) or less).
TROUBLE SYMPTOM:
Tire pressure warning light illuminates.
CAUTION:
When driving vehicle to perform driving test, there should be always 2 persons (driver and checker)
to check.
Step Check Yes No
1CHECK THE TIRES.
Lift-up the vehicle and check for damage in the
tires.
Are there cracks or damage? Replace the tire.
Go to step 2.
2CHECK THE TIRES.
Check the tire air pressure.
Is the tire pressure in the spec-
ifications?
Go to step 3.Adjust the air pres-
sure.
3CHECK THE TRANSMITTER
Drive the vehicle at a speed more than 40 km/h
(25 MPH) and compare the data from the
transmitter on the four wheels.
Is there a transmitter with dif-
ferent data?
Replace the trans-
mitter (tire pres-
sure sensor)
Pressure Monitor-
ing System.>.
Go to step 4.
4PERFORM DRIVING TEST.
1) Perform the clear memory mode.
Subaru Select Monitor.>
2) Perform the driving test.
Mode.>
3) Read the DTC.
OPERATION, Subaru Select Monitor.>
Is DTC displayed? Record the DTC.
Pe r for m t h e r e pa i r
according to DTC.
of Diagnostic Trou-
ble Code (DTC).>
Finish the diagno-
sis.
Page 986 of 2453
TPM(diag)-36
General Diagnostic Table
TIRE PRESSURE MONITORING SYSTEM (DIAGNOSTICS)
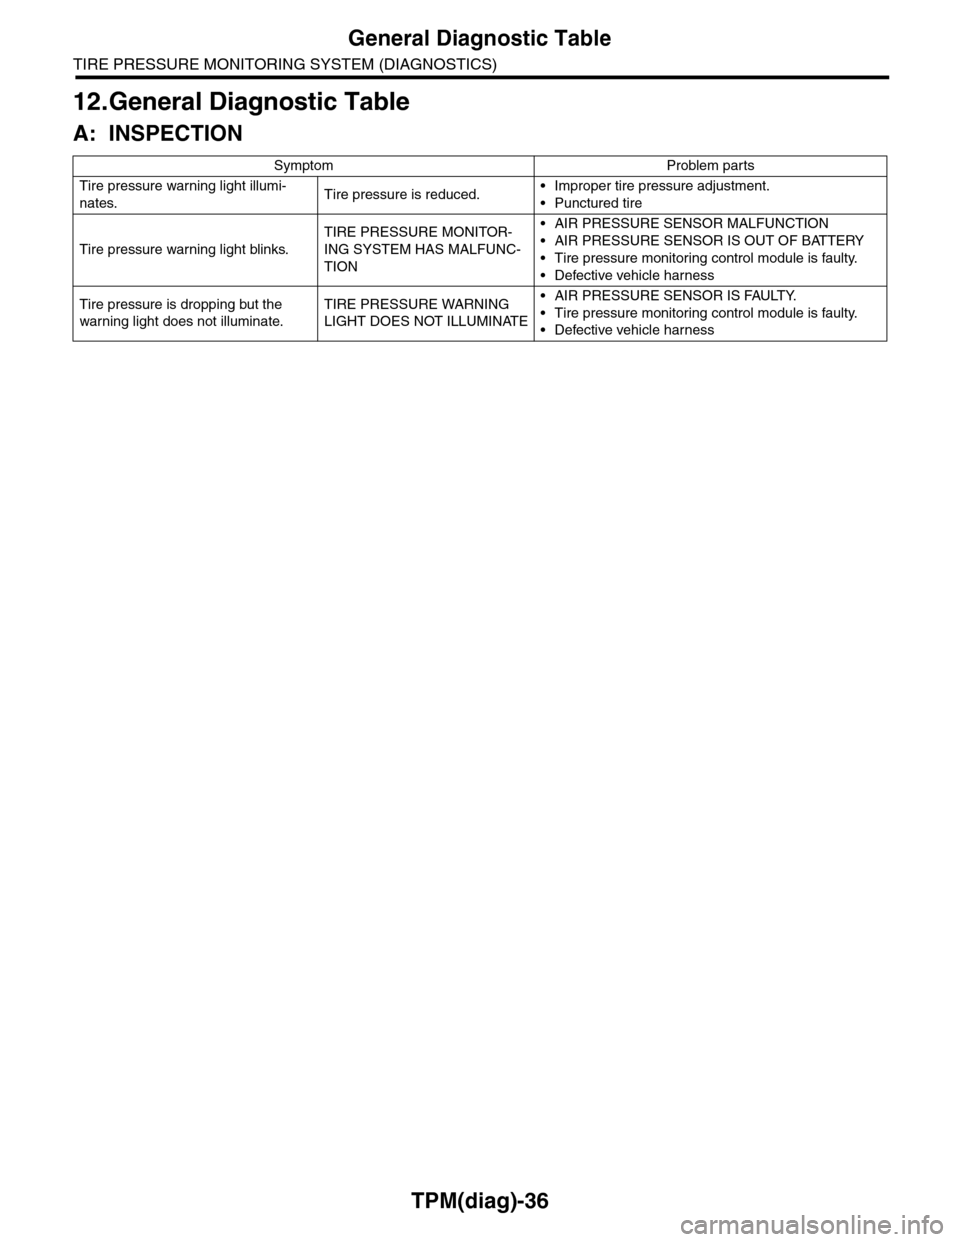
12.General Diagnostic Table
A: INSPECTION
Symptom Problem parts
Tire pressure warning light illumi-
nates.Tire pressure is reduced.•Improper tire pressure adjustment.
•Punctured tire
Tire pressure warning light blinks.
TIRE PRESSURE MONITOR-
ING SYSTEM HAS MALFUNC-
TION
•AIR PRESSURE SENSOR MALFUNCTION
•AIR PRESSURE SENSOR IS OUT OF BATTERY
•Tire pressure monitoring control module is faulty.
•Defective vehicle harness
Tire pressure is dropping but the
warning light does not illuminate.
TIRE PRESSURE WARNING
LIGHT DOES NOT ILLUMINATE
•AIR PRESSURE SENSOR IS FAULTY.
•Tire pressure monitoring control module is faulty.
•Defective vehicle harness