SUBARU TRIBECA 2009 1.G Service Workshop Manual
Manufacturer: SUBARU, Model Year: 2009, Model line: TRIBECA, Model: SUBARU TRIBECA 2009 1.GPages: 2453, PDF Size: 46.32 MB
Page 341 of 2453
AC-15
General Description
HVAC SYSTEM (HEATER, VENTILATOR AND A/C)
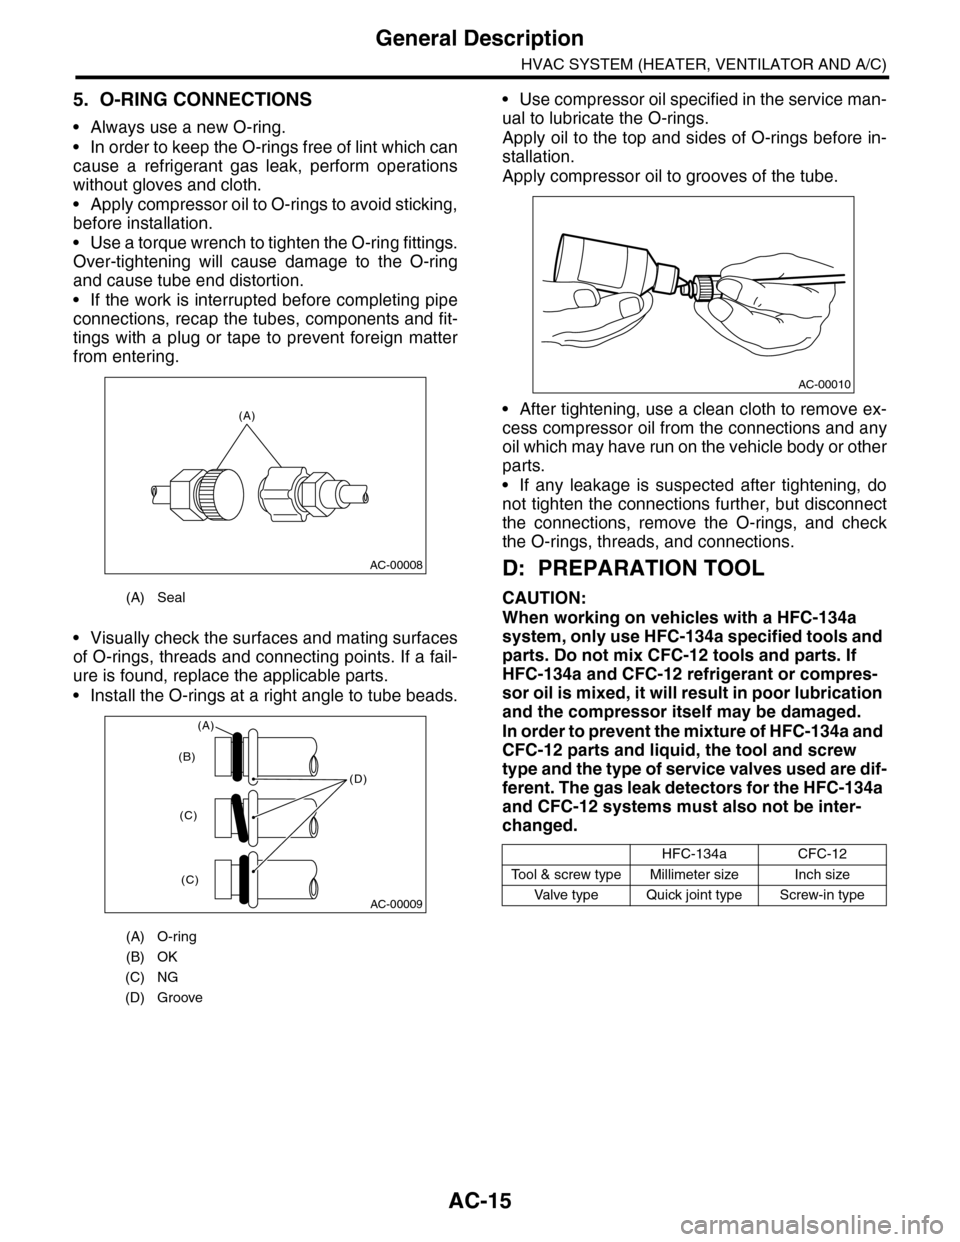
5. O-RING CONNECTIONS
•Always use a new O-ring.
•In order to keep the O-rings free of lint which can
cause a refrigerant gas leak, perform operations
without gloves and cloth.
•Apply compressor oil to O-rings to avoid sticking,
before installation.
•Use a torque wrench to tighten the O-ring fittings.
Over-tightening will cause damage to the O-ring
and cause tube end distortion.
•If the work is interrupted before completing pipe
connections, recap the tubes, components and fit-
tings with a plug or tape to prevent foreign matter
from entering.
•Visually check the surfaces and mating surfaces
of O-rings, threads and connecting points. If a fail-
ure is found, replace the applicable parts.
•Install the O-rings at a right angle to tube beads.
•Use compressor oil specified in the service man-
ual to lubricate the O-rings.
Apply oil to the top and sides of O-rings before in-
stallation.
Apply compressor oil to grooves of the tube.
•After tightening, use a clean cloth to remove ex-
cess compressor oil from the connections and any
oil which may have run on the vehicle body or other
parts.
•If any leakage is suspected after tightening, do
not tighten the connections further, but disconnect
the connections, remove the O-rings, and check
the O-rings, threads, and connections.
D: PREPARATION TOOL
CAUTION:
When working on vehicles with a HFC-134a
system, only use HFC-134a specified tools and
parts. Do not mix CFC-12 tools and parts. If
HFC-134a and CFC-12 refrigerant or compres-
sor oil is mixed, it will result in poor lubrication
and the compressor itself may be damaged.
In order to prevent the mixture of HFC-134a and
CFC-12 parts and liquid, the tool and screw
type and the type of service valves used are dif-
ferent. The gas leak detectors for the HFC-134a
and CFC-12 systems must also not be inter-
changed.
(A) Seal
(A) O-ring
(B) OK
(C) NG
(D) Groove
(A)
AC-00008
AC-00009
(D)
(B)
(C)
(C)
(A)
HFC-134aCFC-12
To o l & s c r e w t y p e M i l l i m e t e r s i z e I n c h s i z e
Va l ve t y p e Q u i ck j o i n t t y p e S c r ew - i n t y p e
AC-00010
Page 342 of 2453
AC-16
General Description
HVAC SYSTEM (HEATER, VENTILATOR AND A/C)
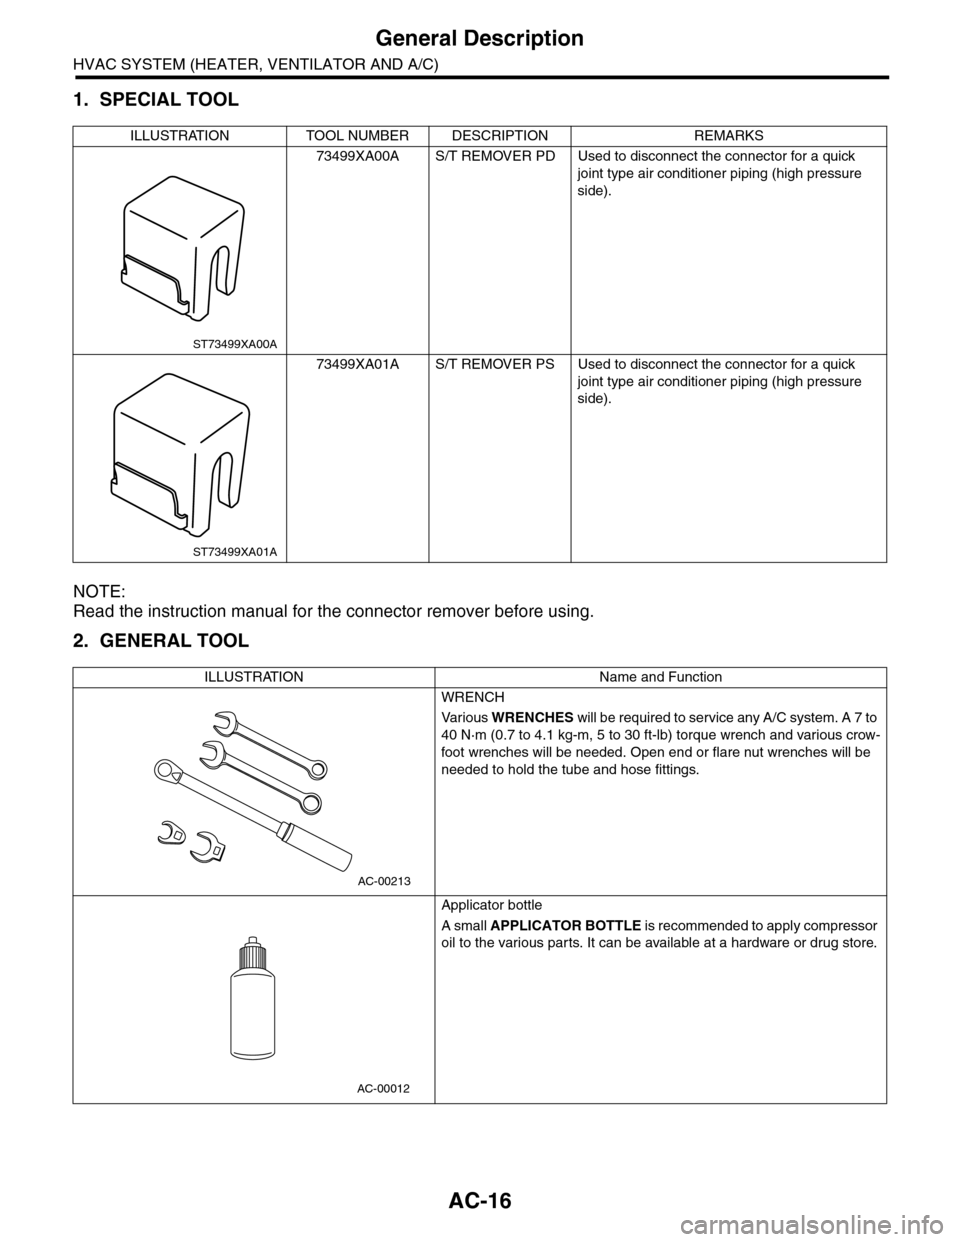
1. SPECIAL TOOL
NOTE:
Read the instruction manual for the connector remover before using.
2. GENERAL TOOL
ILLUSTRATION TOOL NUMBER DESCRIPTION REMARKS
73499XA00A S/T REMOVER PD Used to disconnect the connector for a quick
joint type air conditioner piping (high pressure
side).
73499XA01A S/T REMOVER PS Used to disconnect the connector for a quick
joint type air conditioner piping (high pressure
side).
ILLUSTRATION Name and Function
WRENCH
Va r i o u s WRENCHES will be required to service any A/C system. A 7 to
40 N·m (0.7 to 4.1 kg-m, 5 to 30 ft-lb) torque wrench and various crow-
foot wrenches will be needed. Open end or flare nut wrenches will be
needed to hold the tube and hose fittings.
Applicator bottle
A small APPLICATOR BOTTLE i s r e c om me nd e d to a p pl y co mp r e ss or
oil to the various parts. It can be available at a hardware or drug store.
ST73499XA00A
ST73499XA01A
AC-00213
AC-00012
Page 343 of 2453
AC-17
General Description
HVAC SYSTEM (HEATER, VENTILATOR AND A/C)
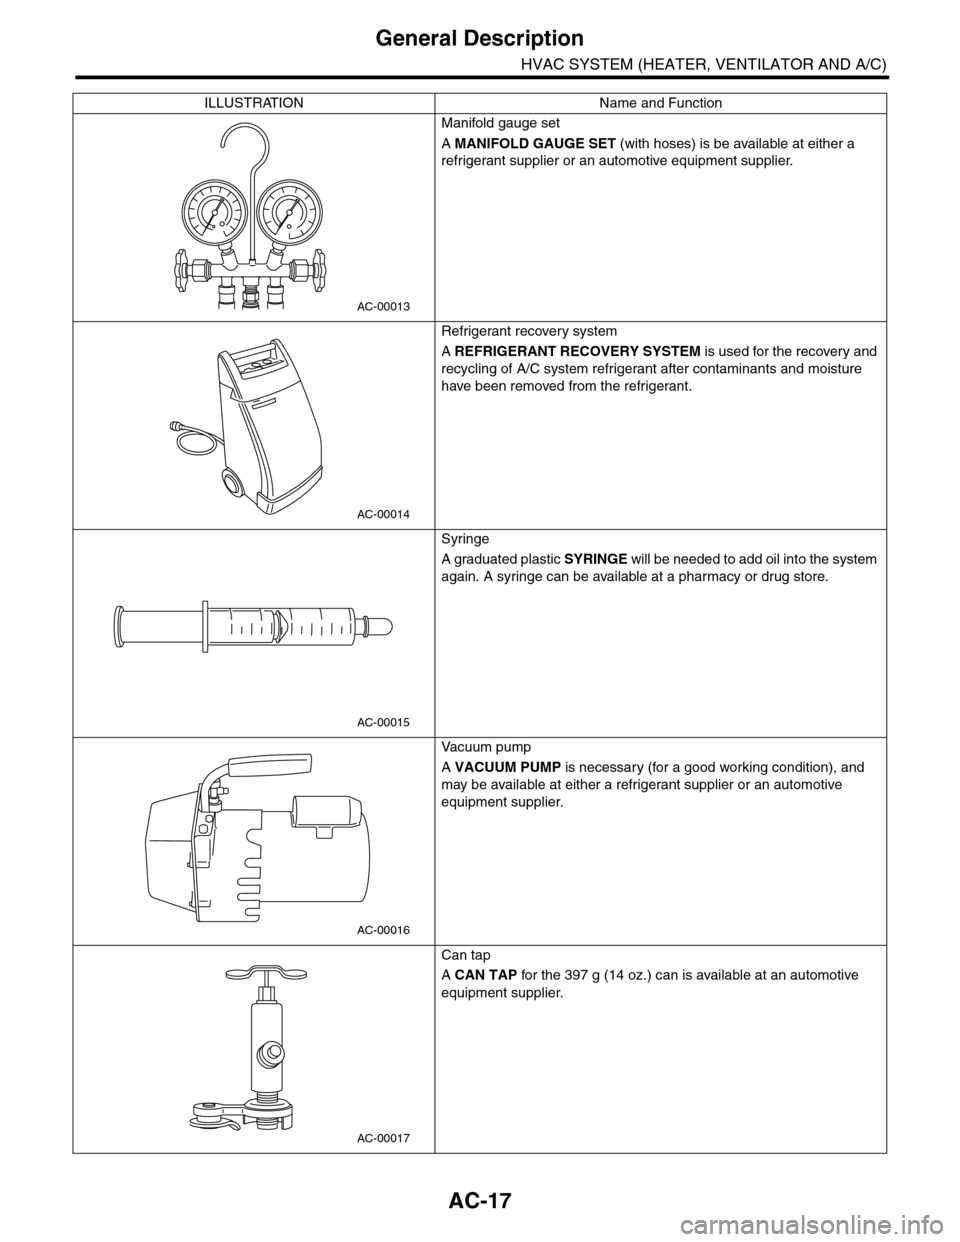
Manifold gauge set
A MANIFOLD GAUGE SET (with hoses) is be available at either a
refrigerant supplier or an automotive equipment supplier.
Refrigerant recovery system
A REFRIGERANT RECOVERY SYSTEM is used for the recovery and
recycling of A/C system refrigerant after contaminants and moisture
have been removed from the refrigerant.
Syringe
A graduated plastic SYRINGE will be needed to add oil into the system
again. A syringe can be available at a pharmacy or drug store.
Va c u u m p u m p
A VACUUM PUMP is necessary (for a good working condition), and
may be available at either a refrigerant supplier or an automotive
equipment supplier.
Can tap
A CAN TAP for the 397 g (14 oz.) can is available at an automotive
equipment supplier.
ILLUSTRATION Name and Function
AC-00013
AC-00014
AC-00015
AC-00016
AC-00017
Page 344 of 2453
AC-18
General Description
HVAC SYSTEM (HEATER, VENTILATOR AND A/C)
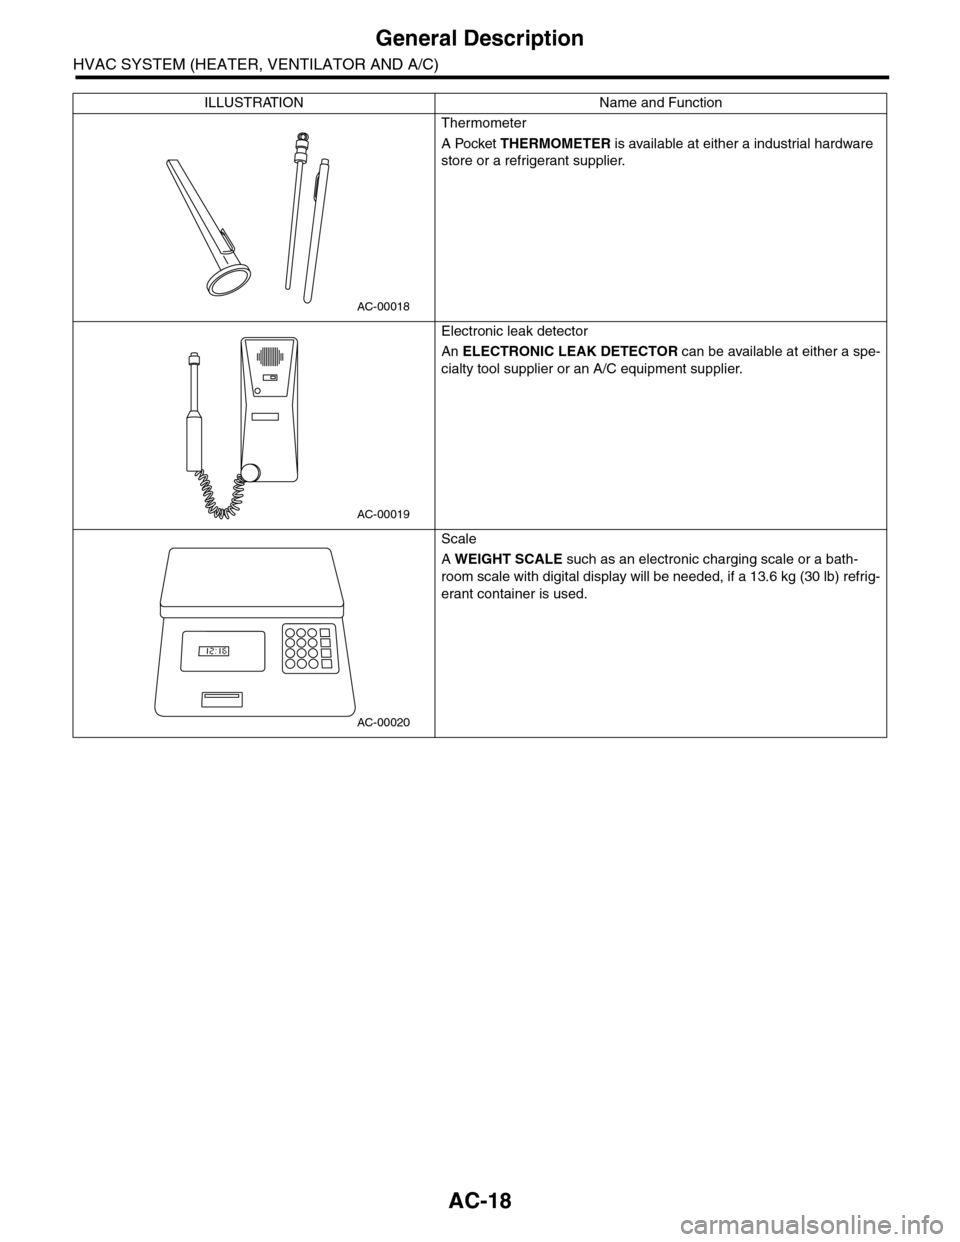
Thermometer
A Pocket THERMOMETER is available at either a industrial hardware
store or a refrigerant supplier.
Electronic leak detector
An ELECTRONIC LEAK DETECTOR can be available at either a spe-
cialty tool supplier or an A/C equipment supplier.
Scale
A WEIGHT SCALE such as an electronic charging scale or a bath-
room scale with digital display will be needed, if a 13.6 kg (30 lb) refrig-
erant container is used.
ILLUSTRATION Name and Function
AC-00018
AC-00019
AC-00020
Page 345 of 2453
AC-19
Refrigerant Pressure with Manifold Gauge Set
HVAC SYSTEM (HEATER, VENTILATOR AND A/C)
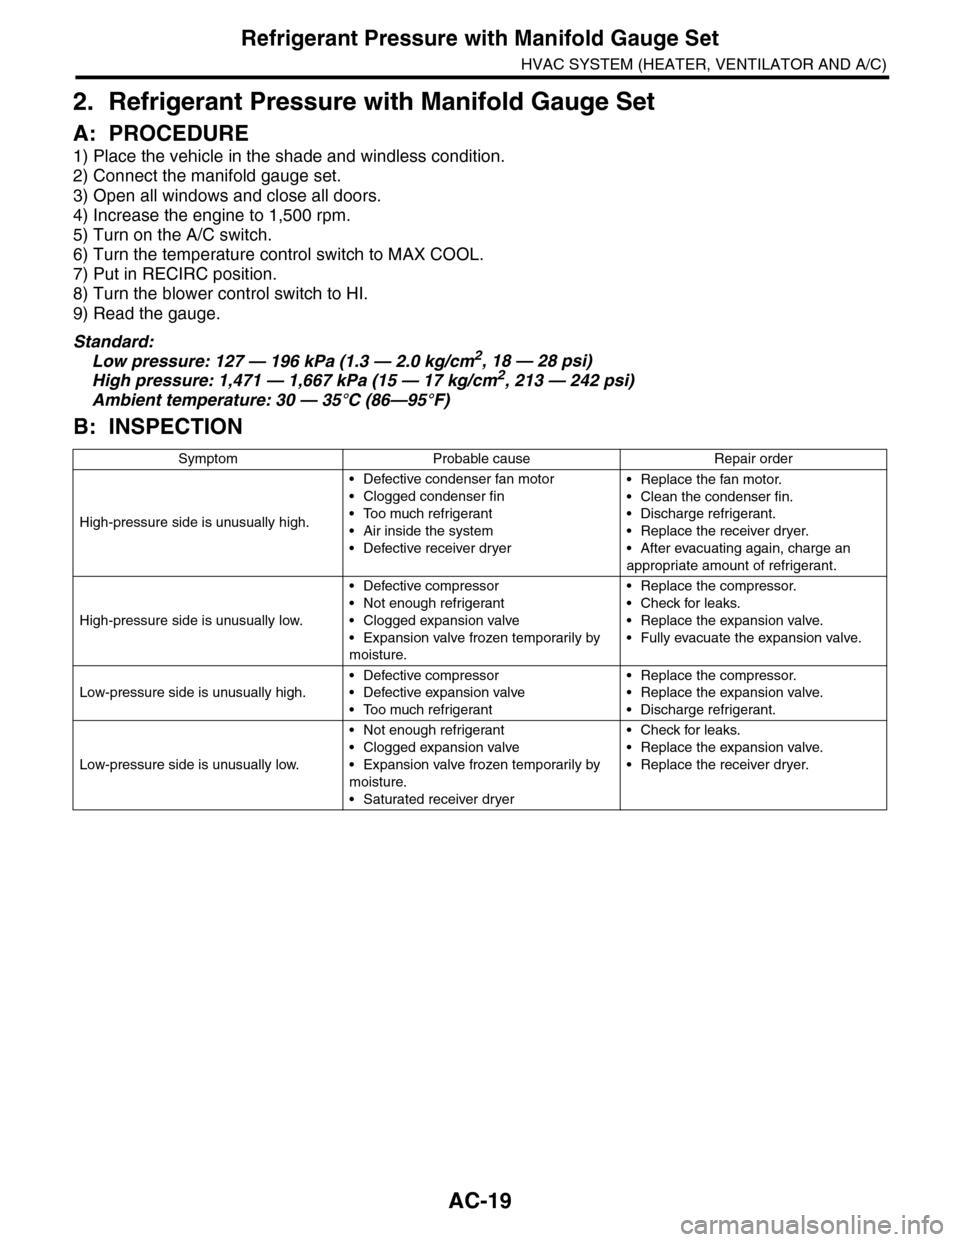
2. Refrigerant Pressure with Manifold Gauge Set
A: PROCEDURE
1) Place the vehicle in the shade and windless condition.
2) Connect the manifold gauge set.
3) Open all windows and close all doors.
4) Increase the engine to 1,500 rpm.
5) Turn on the A/C switch.
6) Turn the temperature control switch to MAX COOL.
7) Put in RECIRC position.
8) Turn the blower control switch to HI.
9) Read the gauge.
Standard:
Low pressure: 127 — 196 kPa (1.3 — 2.0 kg/cm2, 18 — 28 psi)
High pressure: 1,471 — 1,667 kPa (15 — 17 kg/cm2, 213 — 242 psi)
Ambient temperature: 30 — 35°C (86—95°F)
B: INSPECTION
Symptom Probable cause Repair order
High-pressure side is unusually high.
•Defective condenser fan motor
•Clogged condenser fin
•Too much refrigerant
•Air inside the system
•Defective receiver dryer
•Replace the fan motor.
•Clean the condenser fin.
•Discharge refrigerant.
•Replace the receiver dryer.
•After evacuating again, charge an
appropriate amount of refrigerant.
High-pressure side is unusually low.
•Defective compressor
•Not enough refrigerant
•Clogged expansion valve
•Expansion valve frozen temporarily by
moisture.
•Replace the compressor.
•Check for leaks.
•Replace the expansion valve.
•Fully evacuate the expansion valve.
Low-pressure side is unusually high.
•Defective compressor
•Defective expansion valve
•Too much refrigerant
•Replace the compressor.
•Replace the expansion valve.
•Discharge refrigerant.
Low-pressure side is unusually low.
•Not enough refrigerant
•Clogged expansion valve
•Expansion valve frozen temporarily by
moisture.
•Saturated receiver dryer
•Check for leaks.
•Replace the expansion valve.
•Replace the receiver dryer.
Page 346 of 2453
AC-20
Refrigerant Recovery Procedure
HVAC SYSTEM (HEATER, VENTILATOR AND A/C)
3. Refrigerant Recovery Proce-
dure
A: PROCEDURE
CAUTION:
•During operation, be sure to wear protective
goggles and protective gloves.
•Connect the refrigerant recovery system with
the manifold gauge set to discharge the refrig-
erant from the A/C system and recycle the gas.
•When recycling the discharged refrigerant,
keep service cans on hand. Because the recov-
ery rate with the recovery system is approx.
90%, service cans are necessary to charge the
refrigerant.
•Follow the detailed operation procedure de-
scribed in the operation manual attached to the
refrigerant recovery system.
1) Perform the compressor oil return operation.
2) Stop the engine.
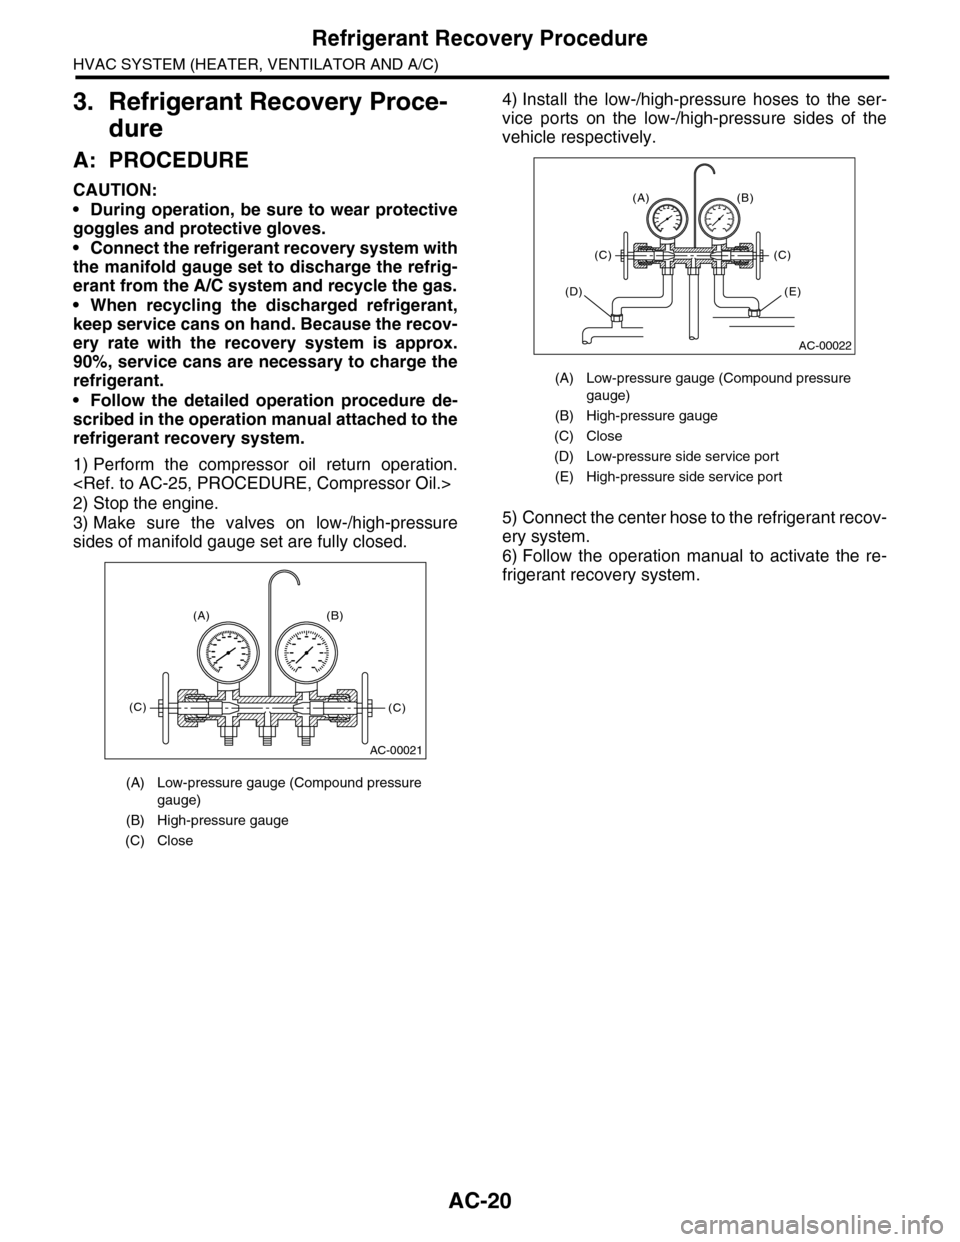
3) Make sure the valves on low-/high-pressure
sides of manifold gauge set are fully closed.
4) Install the low-/high-pressure hoses to the ser-
vice ports on the low-/high-pressure sides of the
vehicle respectively.
5) Connect the center hose to the refrigerant recov-
ery system.
6) Follow the operation manual to activate the re-
frigerant recovery system.
(A) Low-pressure gauge (Compound pressure
gauge)
(B) High-pressure gauge
(C) Close
AC-00021
(A) (B)
(C)(C)
(A) Low-pressure gauge (Compound pressure
gauge)
(B) High-pressure gauge
(C) Close
(D) Low-pressure side service port
(E) High-pressure side service port
AC-00022
(A) (B)
(C)(C)
(E)(D)
Page 347 of 2453
AC-21
Refrigerant Charging Procedure
HVAC SYSTEM (HEATER, VENTILATOR AND A/C)
4. Refrigerant Charging Proce-
dure
A: PROCEDURE
CAUTION:
•During operation, be sure to wear protective
goggles and protective gloves.
•Before charging the refrigerant, evacuate the
system to remove small amounts of moisture
remaining in the system.
The moisture in the system can be completely
evacuated only under the minimum vacuum
level. The minimum vacuum level affects the
temperature in the system.
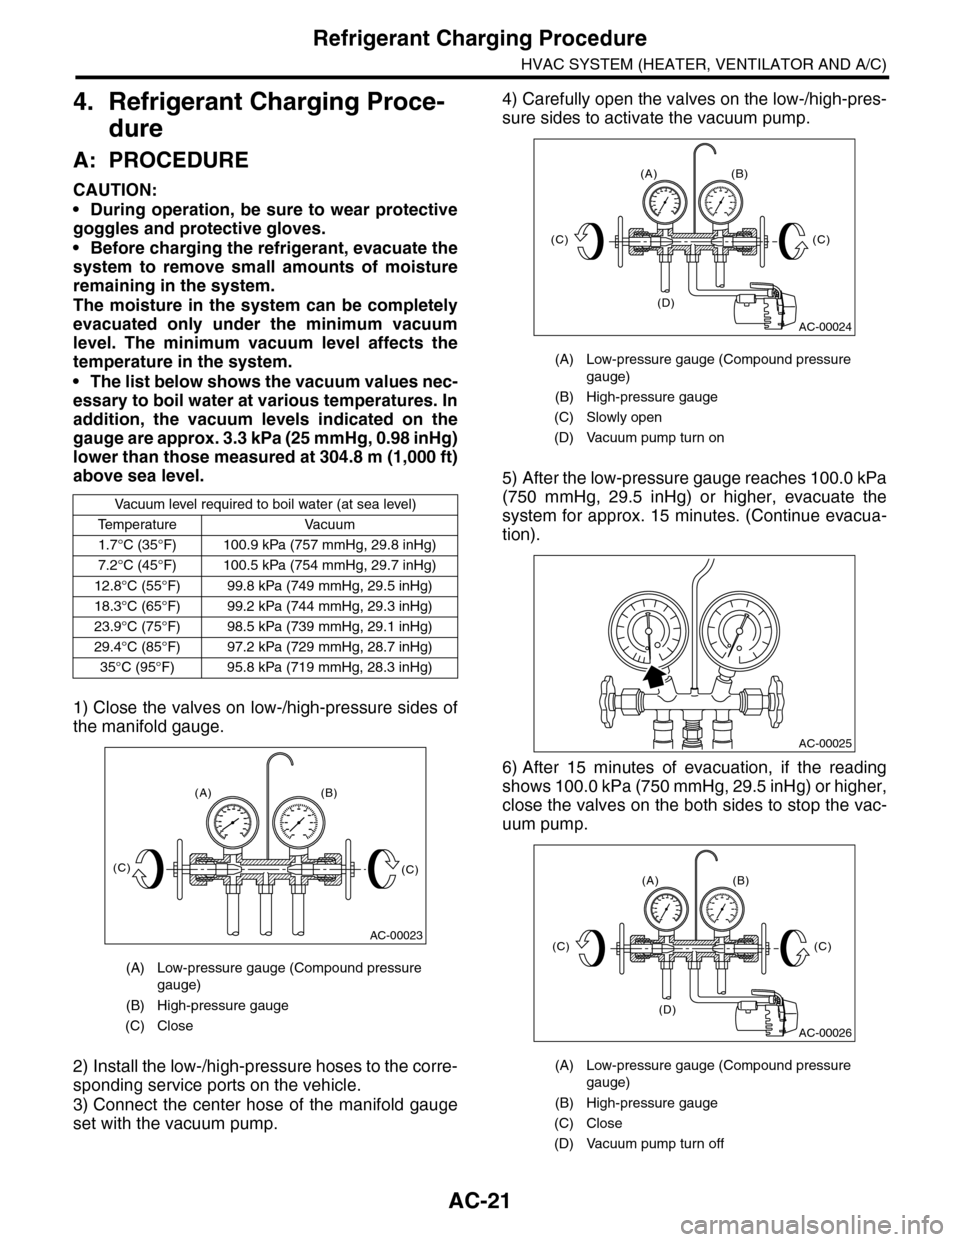
•The list below shows the vacuum values nec-
essary to boil water at various temperatures. In
addition, the vacuum levels indicated on the
gauge are approx. 3.3 kPa (25 mmHg, 0.98 inHg)
lower than those measured at 304.8 m (1,000 ft)
above sea level.
1) Close the valves on low-/high-pressure sides of
the manifold gauge.
2) Install the low-/high-pressure hoses to the corre-
sponding service ports on the vehicle.
3) Connect the center hose of the manifold gauge
set with the vacuum pump.
4) Carefully open the valves on the low-/high-pres-
sure sides to activate the vacuum pump.
5) After the low-pressure gauge reaches 100.0 kPa
(750 mmHg, 29.5 inHg) or higher, evacuate the
system for approx. 15 minutes. (Continue evacua-
tion).
6) After 15 minutes of evacuation, if the reading
shows 100.0 kPa (750 mmHg, 29.5 inHg) or higher,
close the valves on the both sides to stop the vac-
uum pump.
Va c u u m l eve l r e q u i r e d t o b o i l w a t e r ( a t s e a l eve l )
Te m p e r a t u r e Va c u u m
1.7°C (35°F) 100.9 kPa (757 mmHg, 29.8 inHg)
7.2°C (45°F) 100.5 kPa (754 mmHg, 29.7 inHg)
12.8°C (55°F) 99.8 kPa (749 mmHg, 29.5 inHg)
18.3°C (65°F) 99.2 kPa (744 mmHg, 29.3 inHg)
23.9°C (75°F) 98.5 kPa (739 mmHg, 29.1 inHg)
29.4°C (85°F) 97.2 kPa (729 mmHg, 28.7 inHg)
35°C (95°F) 95.8 kPa (719 mmHg, 28.3 inHg)
(A) Low-pressure gauge (Compound pressure
gauge)
(B) High-pressure gauge
(C) Close
AC-00023
(A) (B)
(C)(C)
(A) Low-pressure gauge (Compound pressure
gauge)
(B) High-pressure gauge
(C) Slowly open
(D) Vacuum pump turn on
(A) Low-pressure gauge (Compound pressure
gauge)
(B) High-pressure gauge
(C) Close
(D) Vacuum pump turn off
AC-00024
(A) (B)
(D)
(C)(C)
AC-00025
AC-00026
(A) (B)
(D)
(C)(C)
Page 348 of 2453
AC-22
Refrigerant Charging Procedure
HVAC SYSTEM (HEATER, VENTILATOR AND A/C)
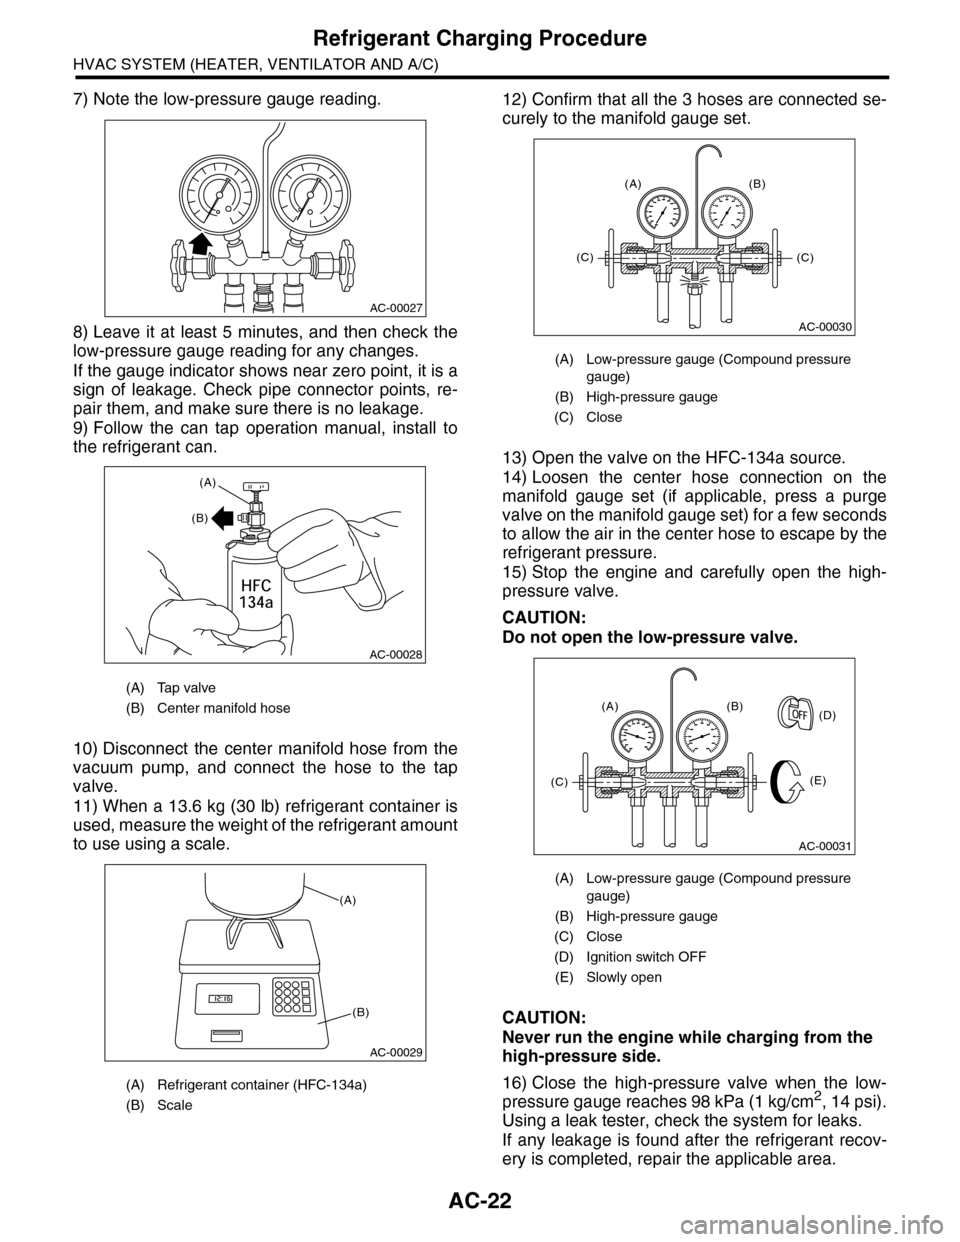
7) Note the low-pressure gauge reading.
8) Leave it at least 5 minutes, and then check the
low-pressure gauge reading for any changes.
If the gauge indicator shows near zero point, it is a
sign of leakage. Check pipe connector points, re-
pair them, and make sure there is no leakage.
9) Follow the can tap operation manual, install to
the refrigerant can.
10) Disconnect the center manifold hose from the
vacuum pump, and connect the hose to the tap
valve.
11) When a 13.6 kg (30 lb) refrigerant container is
used, measure the weight of the refrigerant amount
to use using a scale.
12) Confirm that all the 3 hoses are connected se-
curely to the manifold gauge set.
13) Open the valve on the HFC-134a source.
14) Loosen the center hose connection on the
manifold gauge set (if applicable, press a purge
valve on the manifold gauge set) for a few seconds
to allow the air in the center hose to escape by the
refrigerant pressure.
15) Stop the engine and carefully open the high-
pressure valve.
CAUTION:
Do not open the low-pressure valve.
CAUTION:
Never run the engine while charging from the
high-pressure side.
16) Close the high-pressure valve when the low-
pressure gauge reaches 98 kPa (1 kg/cm2, 14 psi).
Using a leak tester, check the system for leaks.
If any leakage is found after the refrigerant recov-
ery is completed, repair the applicable area.
(A) Tap valve
(B) Center manifold hose
(A) Refrigerant container (HFC-134a)
(B) Scale
AC-00027
AC-00028
(A)
(B)
AC-00029
(A)
(B)
(A) Low-pressure gauge (Compound pressure
gauge)
(B) High-pressure gauge
(C) Close
(A) Low-pressure gauge (Compound pressure
gauge)
(B) High-pressure gauge
(C) Close
(D) Ignition switch OFF
(E) Slowly open
AC-00030
(A) (B)
(C)(C)
AC-00031
(A) (B)
(E)
(D)
(C)
Page 349 of 2453
AC-23
Refrigerant Charging Procedure
HVAC SYSTEM (HEATER, VENTILATOR AND A/C)
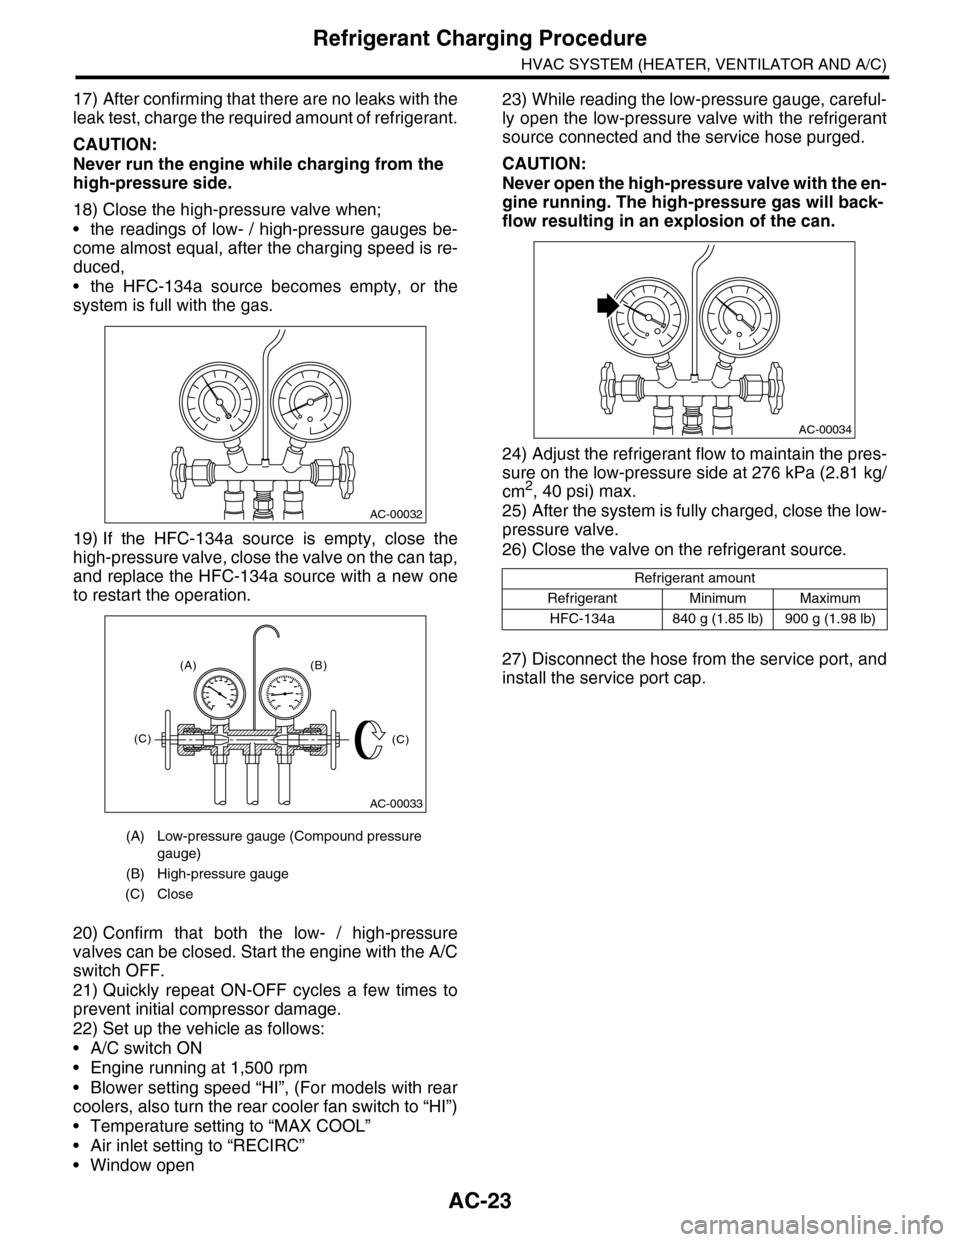
17) After confirming that there are no leaks with the
leak test, charge the required amount of refrigerant.
CAUTION:
Never run the engine while charging from the
high-pressure side.
18) Close the high-pressure valve when;
•the readings of low- / high-pressure gauges be-
come almost equal, after the charging speed is re-
duced,
•the HFC-134a source becomes empty, or the
system is full with the gas.
19) If the HFC-134a source is empty, close the
high-pressure valve, close the valve on the can tap,
and replace the HFC-134a source with a new one
to restart the operation.
20) Confirm that both the low- / high-pressure
valves can be closed. Start the engine with the A/C
switch OFF.
21) Quickly repeat ON-OFF cycles a few times to
prevent initial compressor damage.
22) Set up the vehicle as follows:
•A/C switch ON
•Engine running at 1,500 rpm
•Blower setting speed “HI”, (For models with rear
coolers, also turn the rear cooler fan switch to “HI”)
•Temperature setting to “MAX COOL”
•Air inlet setting to “RECIRC”
•Window open
23) While reading the low-pressure gauge, careful-
ly open the low-pressure valve with the refrigerant
source connected and the service hose purged.
CAUTION:
Never open the high-pressure valve with the en-
gine running. The high-pressure gas will back-
flow resulting in an explosion of the can.
24) Adjust the refrigerant flow to maintain the pres-
sure on the low-pressure side at 276 kPa (2.81 kg/
cm2, 40 psi) max.
25) After the system is fully charged, close the low-
pressure valve.
26) Close the valve on the refrigerant source.
27) Disconnect the hose from the service port, and
install the service port cap.
(A) Low-pressure gauge (Compound pressure
gauge)
(B) High-pressure gauge
(C) Close
AC-00032
AC-00033
(A) (B)
(C)(C)
Refrigerant amount
Refrigerant Minimum Maximum
HFC-134a 840 g (1.85 lb) 900 g (1.98 lb)
AC-00034
Page 350 of 2453
AC-24
Refrigerant Leak Check
HVAC SYSTEM (HEATER, VENTILATOR AND A/C)
5. Refrigerant Leak Check
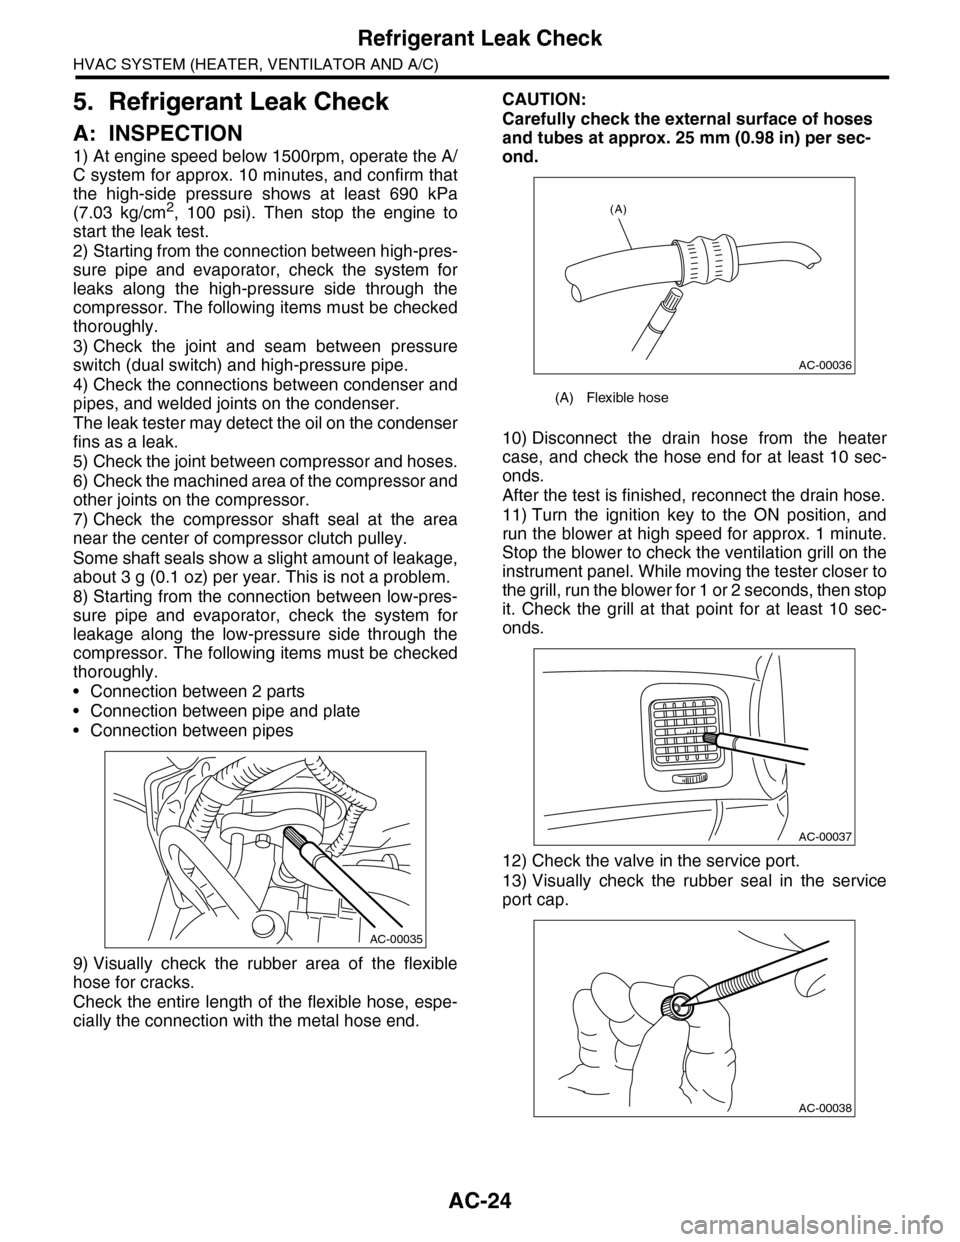
A: INSPECTION
1) At engine speed below 1500rpm, operate the A/
C system for approx. 10 minutes, and confirm that
the high-side pressure shows at least 690 kPa
(7.03 kg/cm2, 100 psi). Then stop the engine to
start the leak test.
2) Starting from the connection between high-pres-
sure pipe and evaporator, check the system for
leaks along the high-pressure side through the
compressor. The following items must be checked
thoroughly.
3) Check the joint and seam between pressure
switch (dual switch) and high-pressure pipe.
4) Check the connections between condenser and
pipes, and welded joints on the condenser.
The leak tester may detect the oil on the condenser
fins as a leak.
5) Check the joint between compressor and hoses.
6) Check the machined area of the compressor and
other joints on the compressor.
7) Check the compressor shaft seal at the area
near the center of compressor clutch pulley.
Some shaft seals show a slight amount of leakage,
about 3 g (0.1 oz) per year. This is not a problem.
8) Starting from the connection between low-pres-
sure pipe and evaporator, check the system for
leakage along the low-pressure side through the
compressor. The following items must be checked
thoroughly.
•Connection between 2 parts
•Connection between pipe and plate
•Connection between pipes
9) Visually check the rubber area of the flexible
hose for cracks.
Check the entire length of the flexible hose, espe-
cially the connection with the metal hose end.
CAUTION:
Carefully check the external surface of hoses
and tubes at approx. 25 mm (0.98 in) per sec-
ond.
10) Disconnect the drain hose from the heater
case, and check the hose end for at least 10 sec-
onds.
After the test is finished, reconnect the drain hose.
11) Turn the ignition key to the ON position, and
run the blower at high speed for approx. 1 minute.
Stop the blower to check the ventilation grill on the
instrument panel. While moving the tester closer to
the grill, run the blower for 1 or 2 seconds, then stop
it. Check the grill at that point for at least 10 sec-
onds.
12) Check the valve in the service port.
13) Visually check the rubber seal in the service
port cap.
AC-00035
(A) Flexible hose
AC-00036
(A)
AC-00037
AC-00038