TOYOTA CAMRY V20 1986 Service Information
CAMRY V20 1986
TOYOTA
TOYOTA
https://www.carmanualsonline.info/img/14/57449/w960_57449-0.png
TOYOTA CAMRY V20 1986 Service Information
Trending: air filter, jump cable, panel, sensor, ground clearance, trunk release, door lock
Page 1971 of 2389
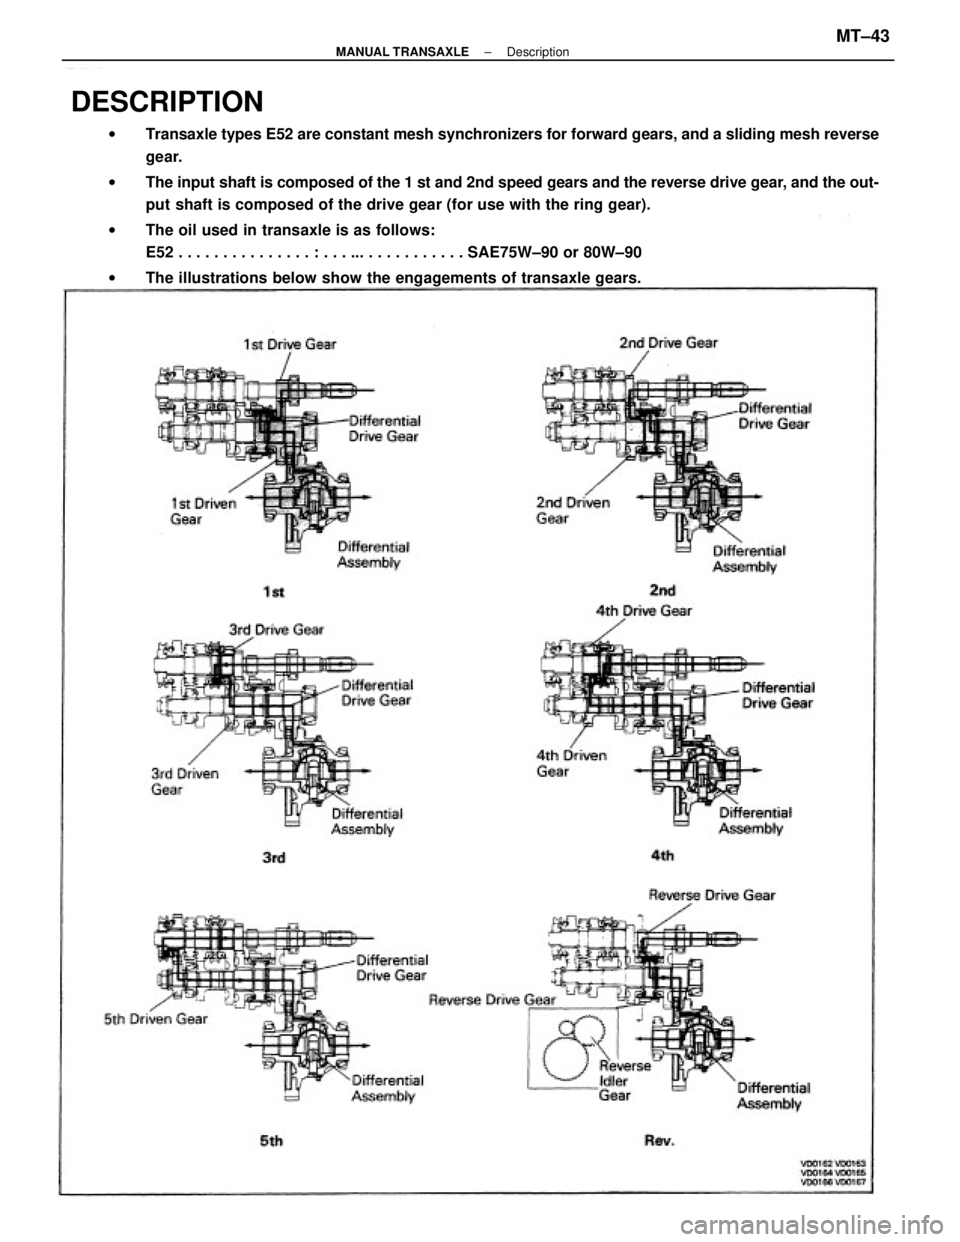
DESCRIPTION
wTransaxle types E52 are constant mesh synchronizers for forward gears, and a sliding mesh reverse
gear.
wThe input shaft is composed of the 1 st and 2nd speed gears and the reverse drive gear, and the out-
put shaft is composed of the drive gear (for use with the ring gear).
wThe oil used in transaxle is as follows:
E52 . . . . . . . . . . . . . . . : . . . ... . . . . . . . . . . . SAE75W±90 or 80W±90
wThe illustrations below show the engagements of transaxle gears.
± MANUAL TRANSAXLEDescriptionMT±43
Page 1972 of 2389
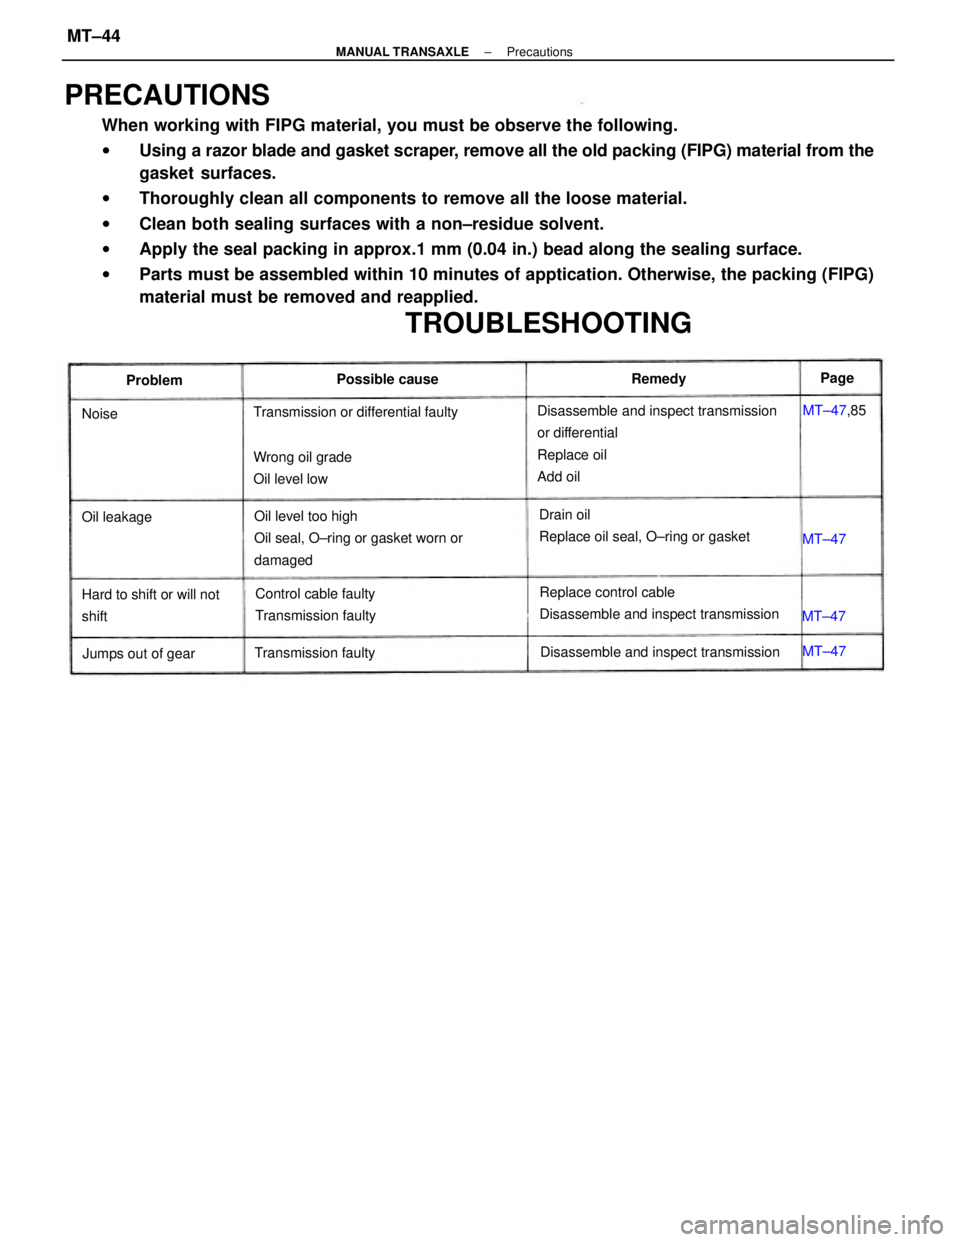
PRECAUTIONS
When working with FIPG material, you must be observe the following.
wUsing a razor blade and gasket scraper, remove all the old packing (FIPG) material from the
gasket surfaces.
wThoroughly clean all components to remove all the loose material.
wClean both sealing surfaces with a non±residue solvent.
wApply the seal packing in approx.1 mm (0.04 in.) bead along the sealing surface.
wParts must be assembled within 10 minutes of apptication. Otherwise, the packing (FIPG)
material must be removed and reapplied.
Disassemble and inspect transmission
or differential
Replace oil
Add oil
Oil level too high
Oil seal, O±ring or gasket worn or
damaged
Replace control cable
Disassemble and inspect transmission Drain oil
Replace oil seal, O±ring or gasket
TROUBLESHOOTING
Control cable faulty
Transmission faulty
Disassemble and inspect transmission Transmission or differential faulty
Hard to shift or will not
shiftWrong oil grade
Oil level low
Transmission faulty
Jumps out of gearPossible cause
Oil leakageMT±47,85 ProblemRemedy
MT±47 MT±47MT±47 NoisePage
± MANUAL TRANSAXLEPrecautionsMT±44
Page 1973 of 2389
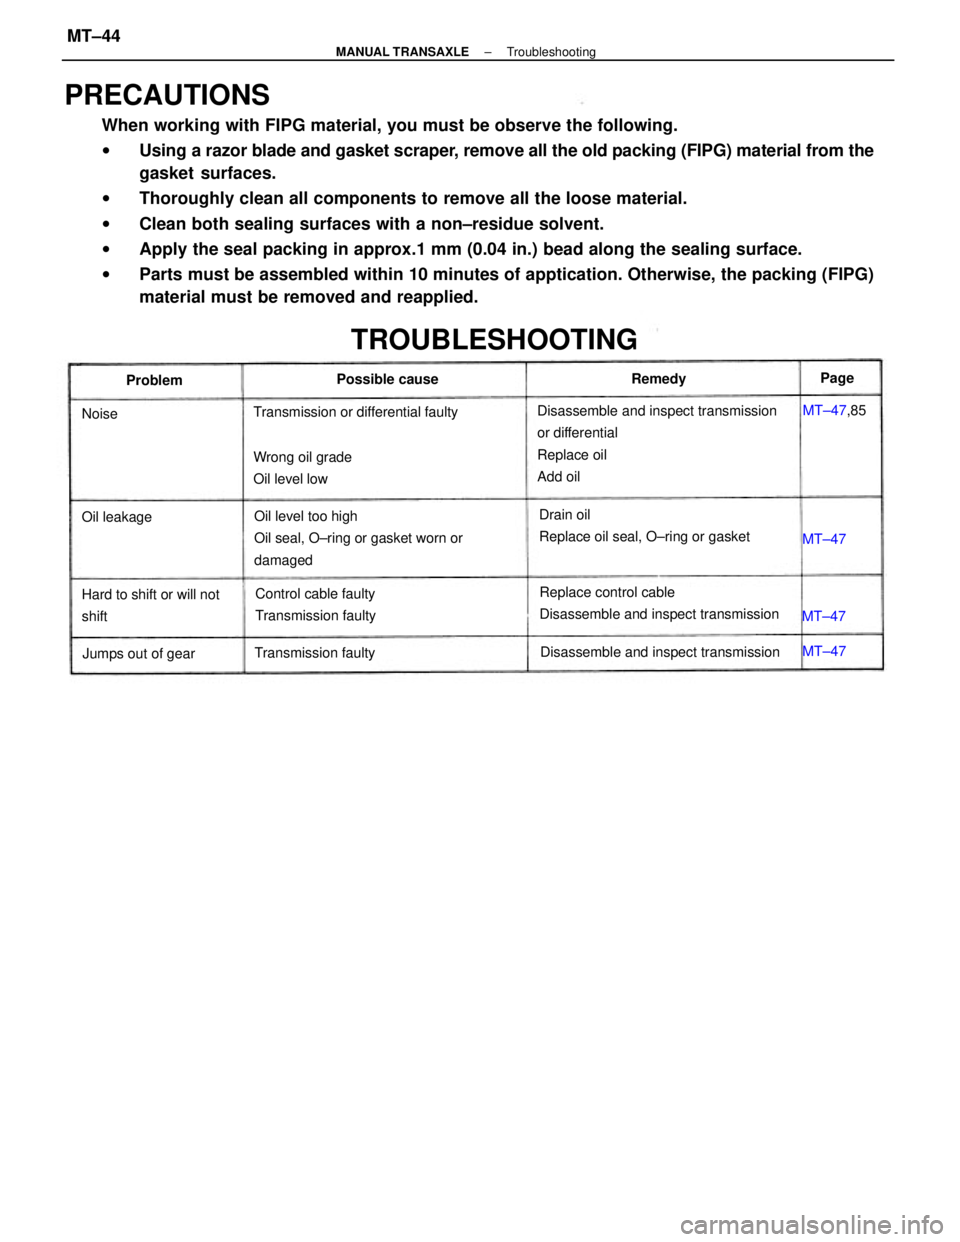
PRECAUTIONS
When working with FIPG material, you must be observe the following.
wUsing a razor blade and gasket scraper, remove all the old packing (FIPG) material from the
gasket surfaces.
wThoroughly clean all components to remove all the loose material.
wClean both sealing surfaces with a non±residue solvent.
wApply the seal packing in approx.1 mm (0.04 in.) bead along the sealing surface.
wParts must be assembled within 10 minutes of apptication. Otherwise, the packing (FIPG)
material must be removed and reapplied.
Disassemble and inspect transmission
or differential
Replace oil
Add oil
Oil level too high
Oil seal, O±ring or gasket worn or
damaged
Replace control cable
Disassemble and inspect transmission Drain oil
Replace oil seal, O±ring or gasket
TROUBLESHOOTING
Control cable faulty
Transmission faulty
Disassemble and inspect transmission Transmission or differential faulty
Hard to shift or will not
shiftWrong oil grade
Oil level low
Transmission faulty
Jumps out of gearPossible cause
Oil leakageMT±47,85 ProblemRemedy
MT±47 MT±47MT±47 NoisePage
± MANUAL TRANSAXLETroubleshootingMT±44
Page 1974 of 2389
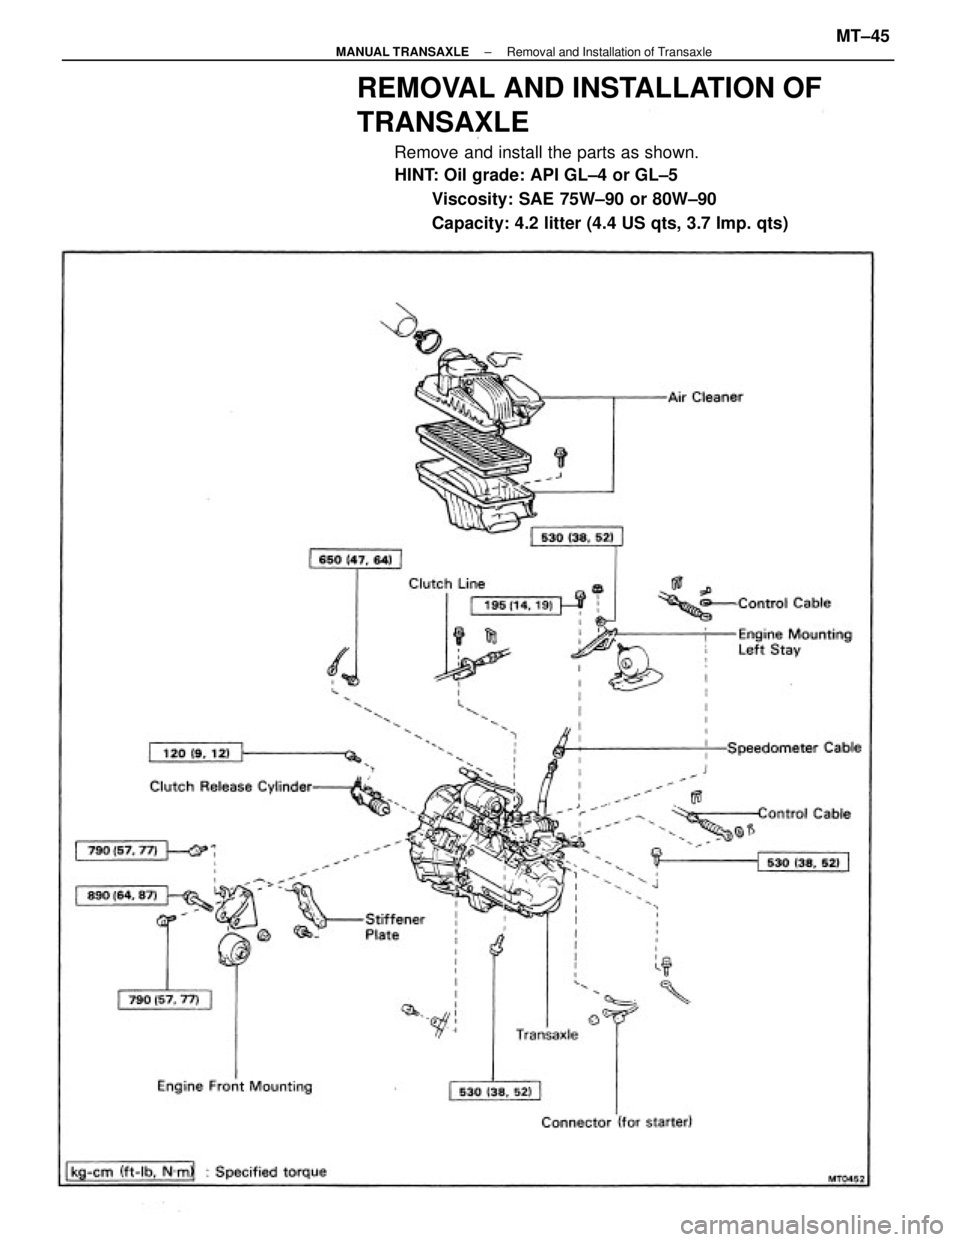
REMOVAL AND INSTALLATION OF
TRANSAXLE
Remove and install the parts as shown.
HINT: Oil grade: API GL±4 or GL±5
Viscosity: SAE 75W±90 or 80W±90
Capacity: 4.2 litter (4.4 US qts, 3.7 Imp. qts)
± MANUAL TRANSAXLERemoval and Installation of TransaxleMT±45
Page 1975 of 2389
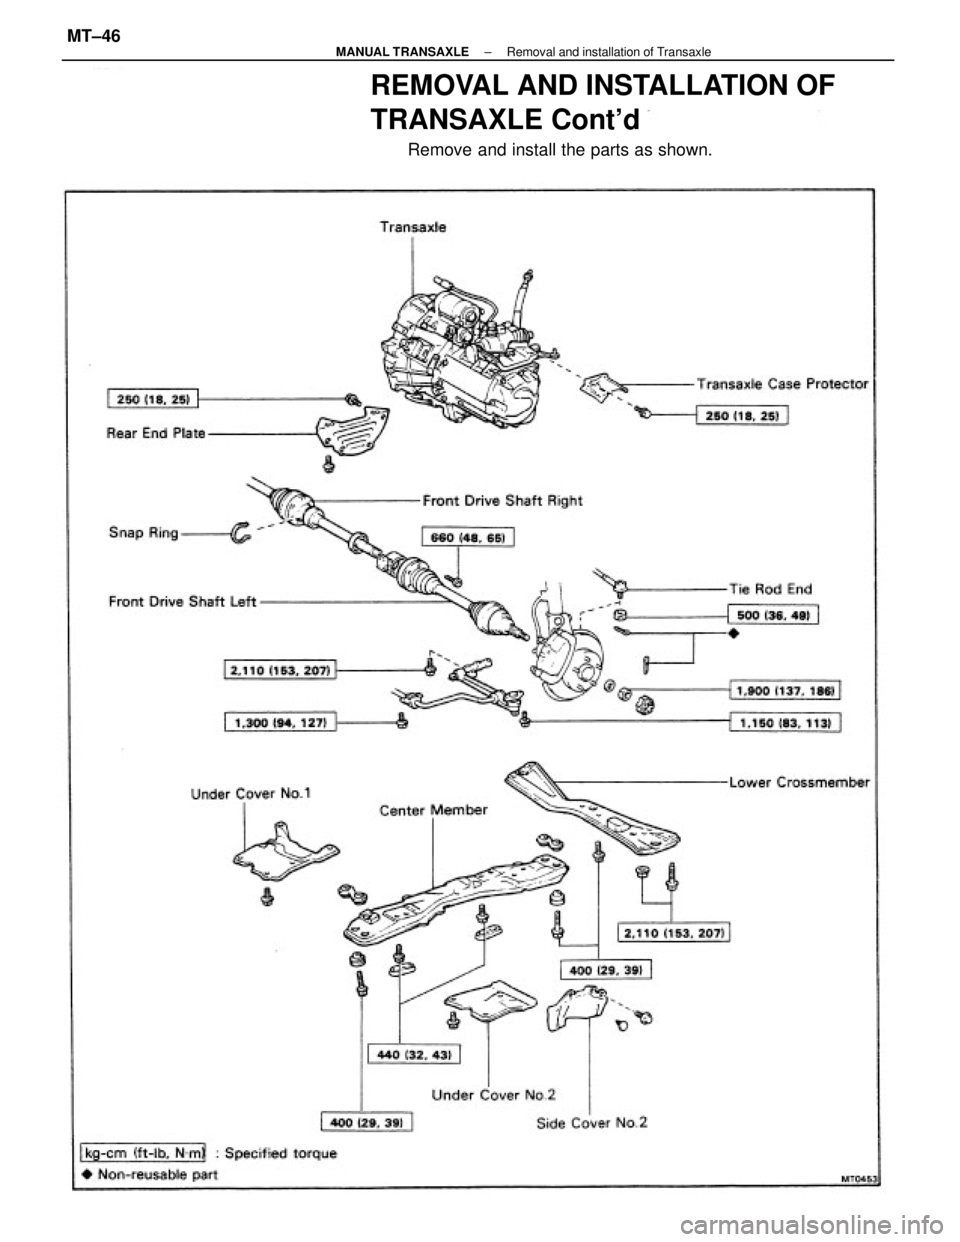
REMOVAL AND INSTALLATION OF
TRANSAXLE Cont'd
Remove and install the parts as shown.
± MANUAL TRANSAXLERemoval and installation of TransaxleMT±46
Page 1976 of 2389
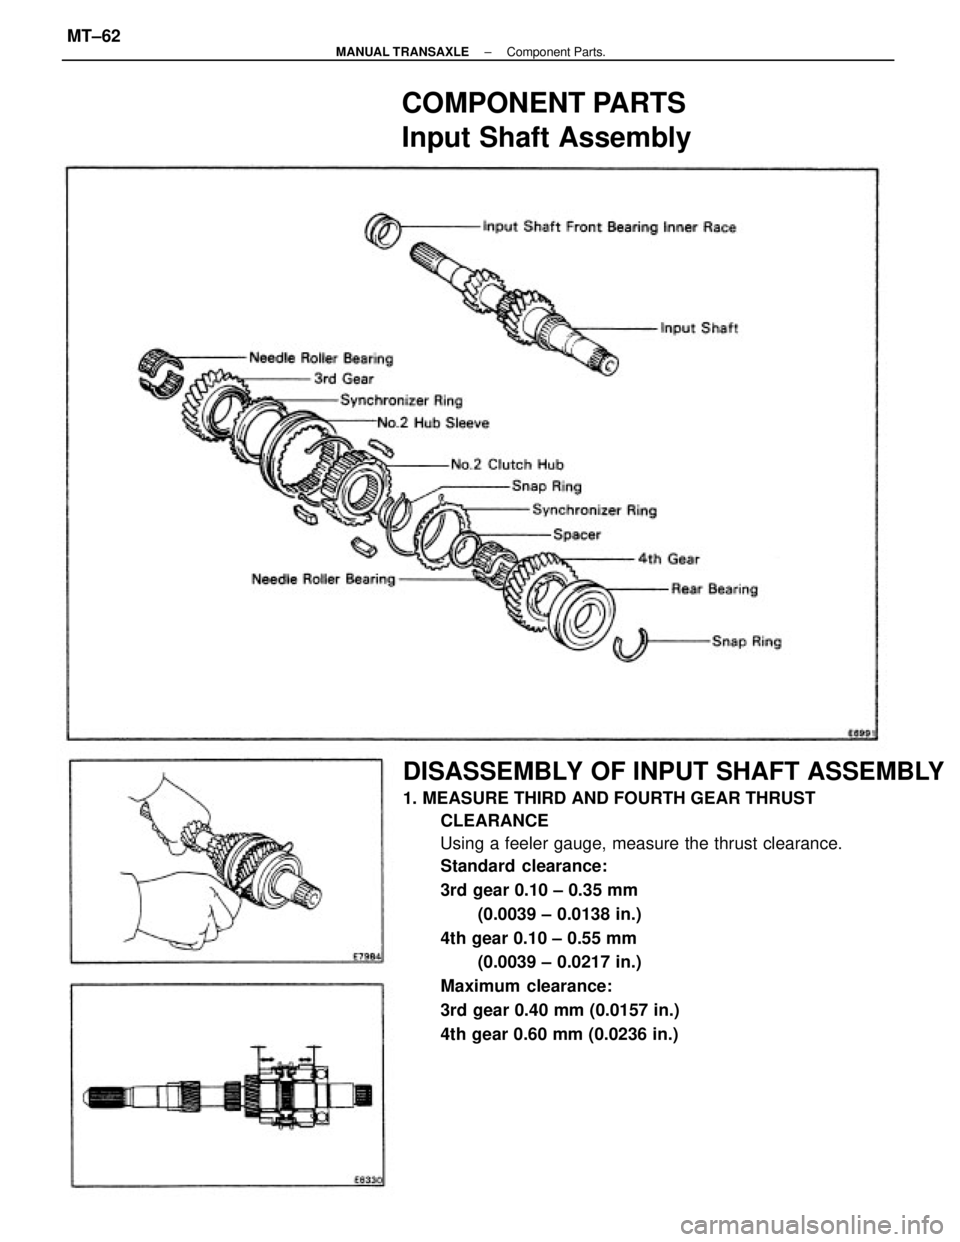
DISASSEMBLY OF INPUT SHAFT ASSEMBLY
1. MEASURE THIRD AND FOURTH GEAR THRUST
CLEARANCE
Using a feeler gauge, measure the thrust clearance.
Standard clearance:
3rd gear 0.10 ± 0.35 mm
(0.0039 ± 0.0138 in.)
4th gear 0.10 ± 0.55 mm
(0.0039 ± 0.0217 in.)
Maximum clearance:
3rd gear 0.40 mm (0.0157 in.)
4th gear 0.60 mm (0.0236 in.)
COMPONENT PARTS
Input Shaft Assembly
± MANUAL TRANSAXLEComponent Parts.MT±62
Page 1977 of 2389
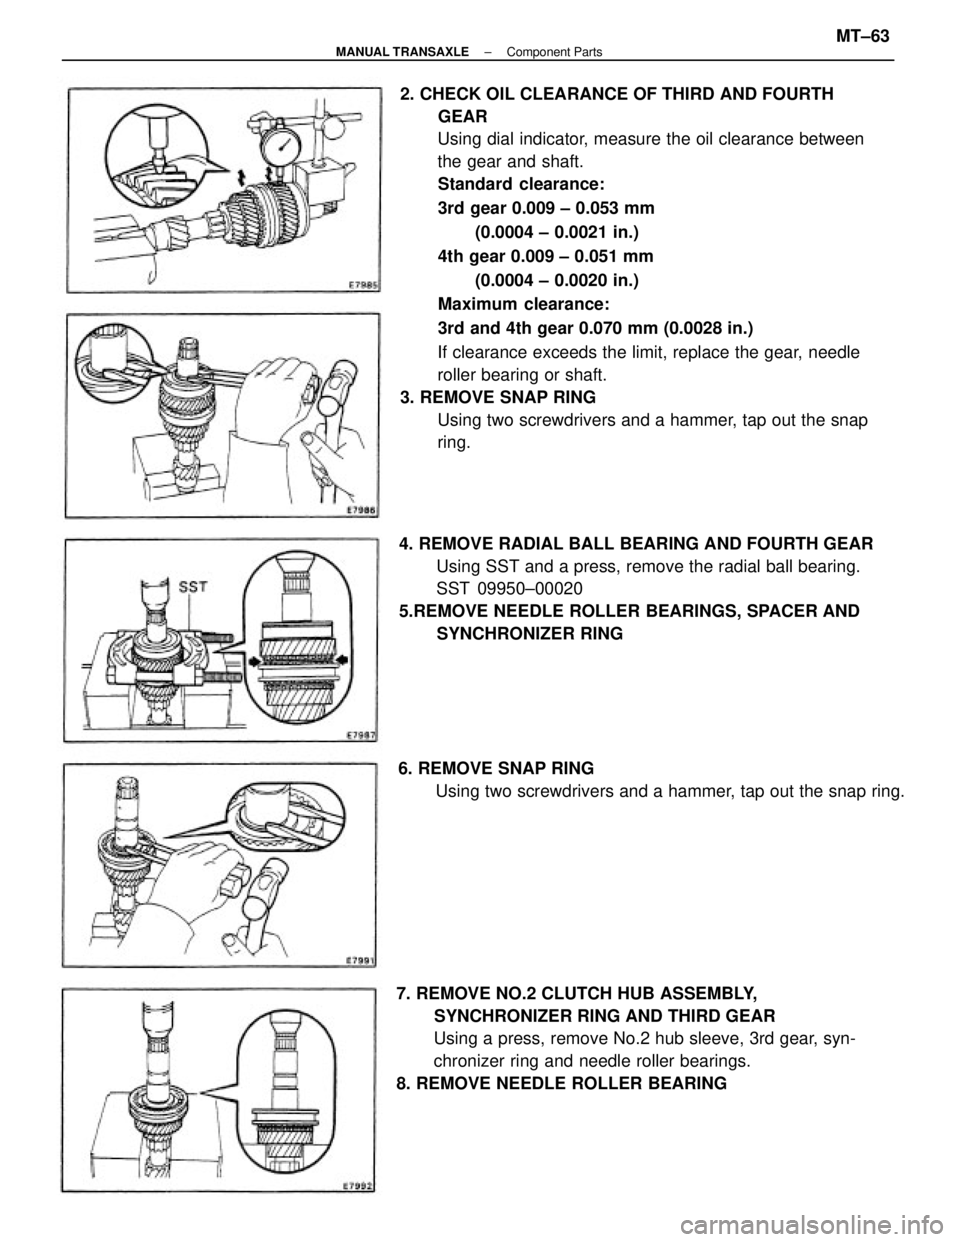
2. CHECK OIL CLEARANCE OF THIRD AND FOURTH
GEAR
Using dial indicator, measure the oil clearance between
the gear and shaft.
Standard clearance:
3rd gear 0.009 ± 0.053 mm
(0.0004 ± 0.0021 in.)
4th gear 0.009 ± 0.051 mm
(0.0004 ± 0.0020 in.)
Maximum clearance:
3rd and 4th gear 0.070 mm (0.0028 in.)
If clearance exceeds the limit, replace the gear, needle
roller bearing or shaft.
3. REMOVE SNAP RING
Using two screwdrivers and a hammer, tap out the snap
ring.
4. REMOVE RADIAL BALL BEARING AND FOURTH GEAR
Using SST and a press, remove the radial ball bearing.
SST 09950±00020
5.REMOVE NEEDLE ROLLER BEARINGS, SPACER AND
SYNCHRONIZER RING
7. REMOVE NO.2 CLUTCH HUB ASSEMBLY,
SYNCHRONIZER RING AND THIRD GEAR
Using a press, remove No.2 hub sleeve, 3rd gear, syn-
chronizer ring and needle roller bearings.
8. REMOVE NEEDLE ROLLER BEARING6. REMOVE SNAP RING
Using two screwdrivers and a hammer, tap out the snap ring.
± MANUAL TRANSAXLEComponent PartsMT±63
Page 1978 of 2389
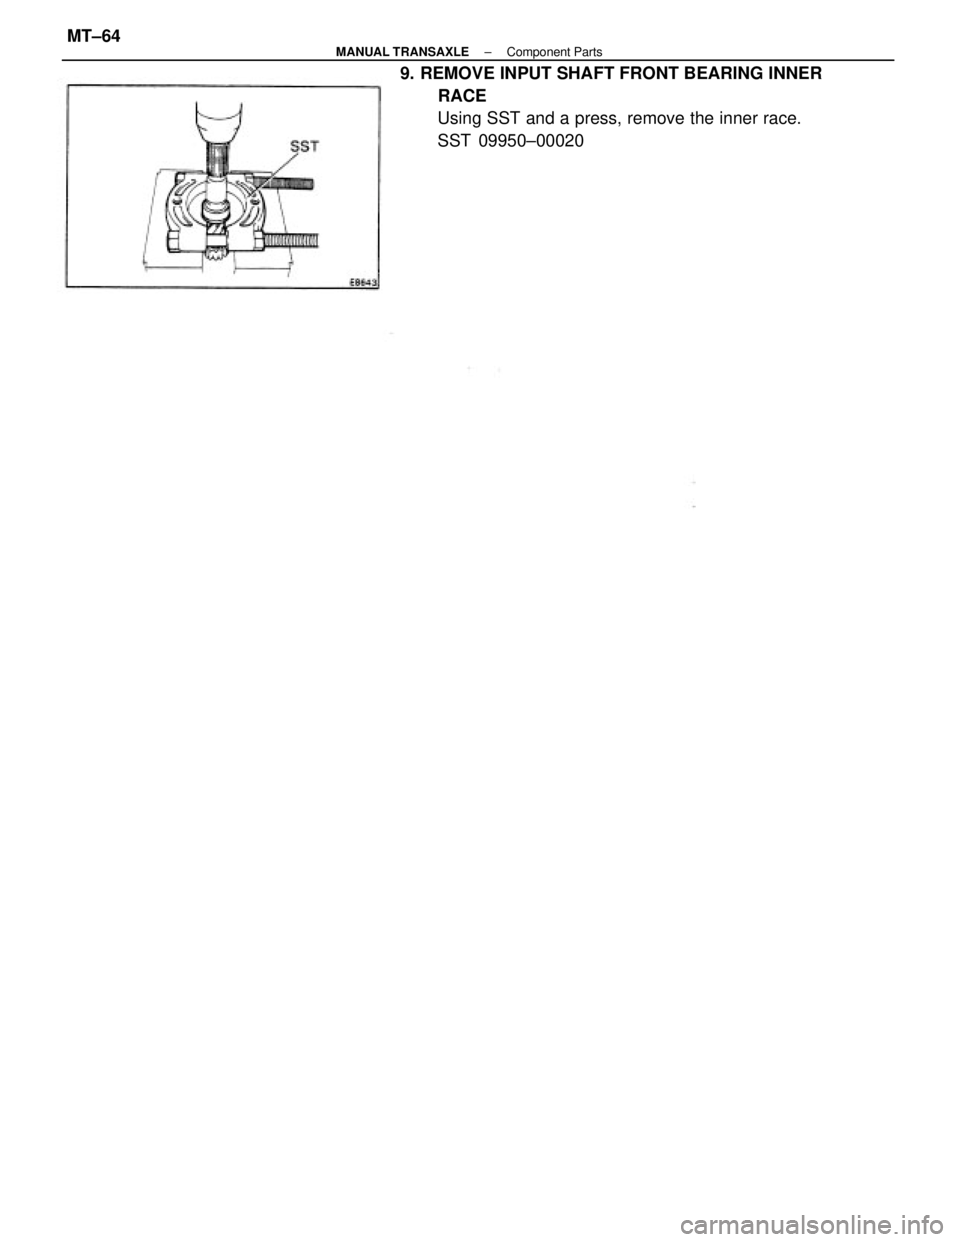
9. REMOVE INPUT SHAFT FRONT BEARING INNER
RACE
Using SST and a press, remove the inner race.
SST 09950±00020
± MANUAL TRANSAXLEComponent PartsMT±64
Page 1979 of 2389
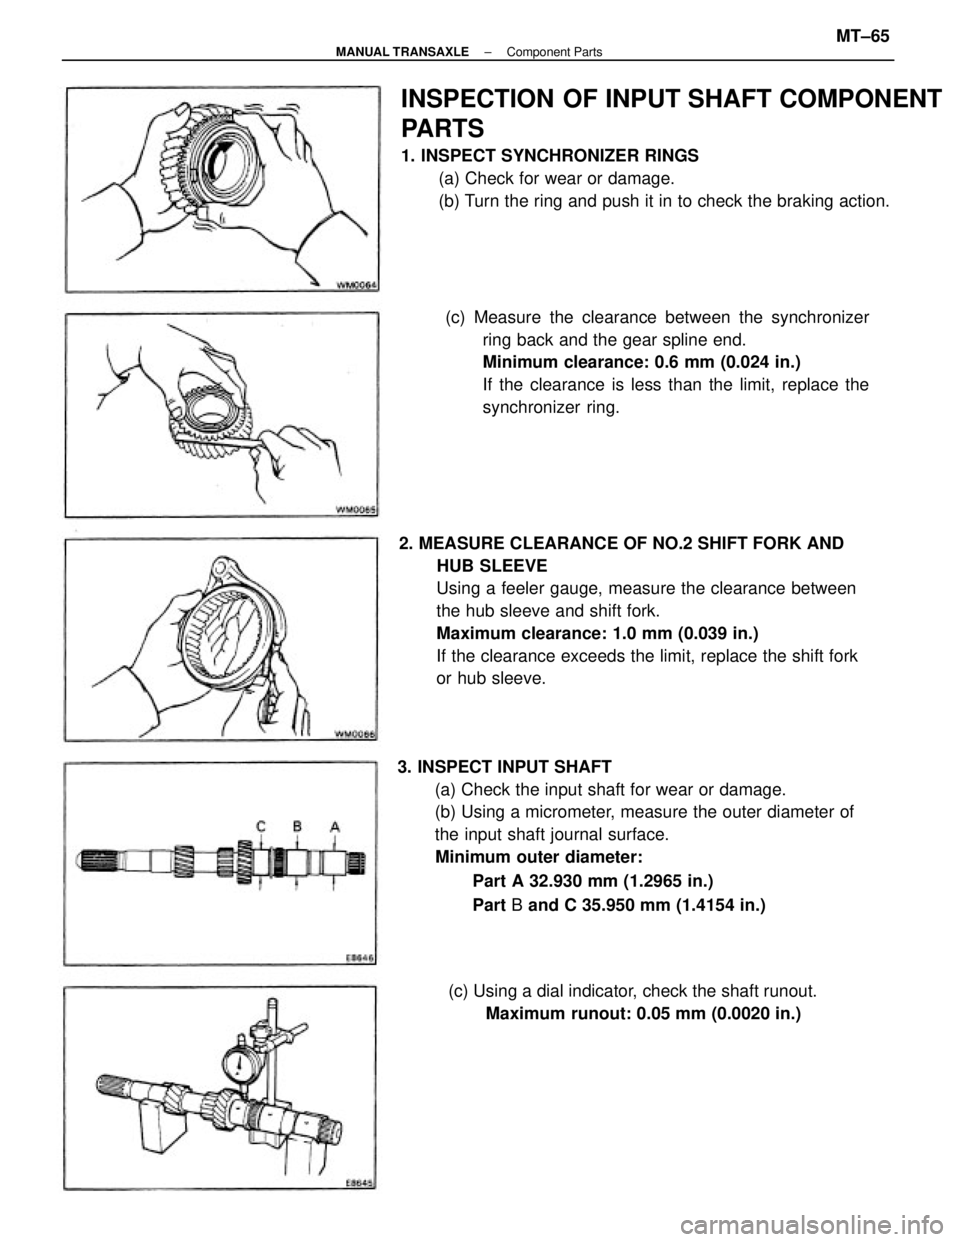
3. INSPECT INPUT SHAFT
(a) Check the input shaft for wear or damage.
(b) Using a micrometer, measure the outer diameter of
the input shaft journal surface.
Minimum outer diameter:
Part A 32.930 mm (1.2965 in.)
Part B and C 35.950 mm (1.4154 in.) 2. MEASURE CLEARANCE OF NO.2 SHIFT FORK AND
HUB SLEEVE
Using a feeler gauge, measure the clearance between
the hub sleeve and shift fork.
Maximum clearance: 1.0 mm (0.039 in.)
If the clearance exceeds the limit, replace the shift fork
or hub sleeve.
INSPECTION OF INPUT SHAFT COMPONENT
PARTS
1. INSPECT SYNCHRONIZER RINGS
(a) Check for wear or damage.
(b) Turn the ring and push it in to check the braking action.
(c) Measure the clearance between the synchronizer
ring back and the gear spline end.
Minimum clearance: 0.6 mm (0.024 in.)
If the clearance is less than the limit, replace the
synchronizer ring.
(c) Using a dial indicator, check the shaft runout.
Maximum runout: 0.05 mm (0.0020 in.)
± MANUAL TRANSAXLEComponent PartsMT±65
Page 1980 of 2389
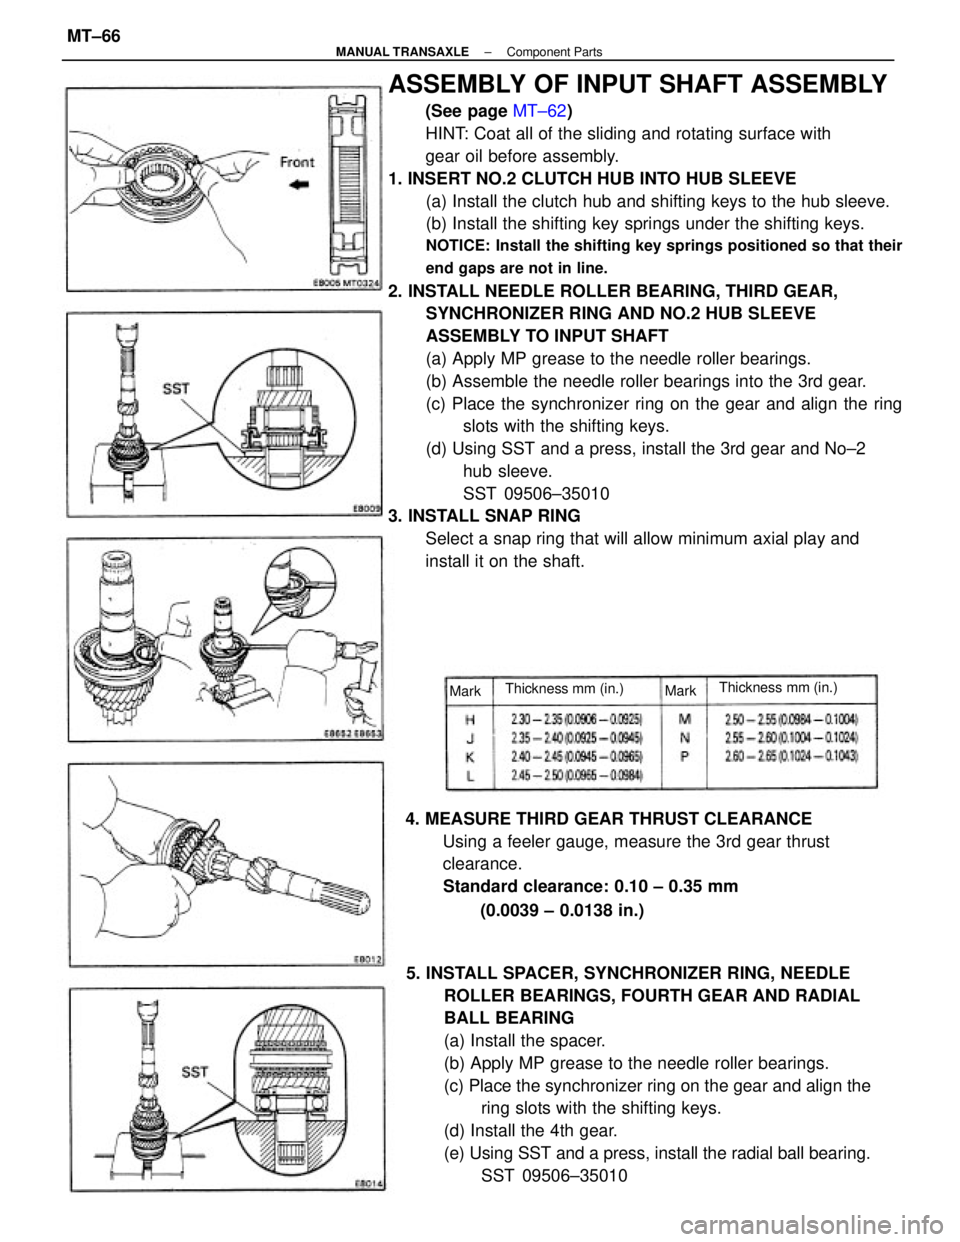
ASSEMBLY OF INPUT SHAFT ASSEMBLY
(See page MT±62)
HINT: Coat all of the sliding and rotating surface with
gear oil before assembly.
1. INSERT NO.2 CLUTCH HUB INTO HUB SLEEVE
(a) Install the clutch hub and shifting keys to the hub sleeve.
(b) Install the shifting key springs under the shifting keys.
NOTICE: Install the shifting key springs positioned so that their
end gaps are not in line.
2. INSTALL NEEDLE ROLLER BEARING, THIRD GEAR,
SYNCHRONIZER RING AND NO.2 HUB SLEEVE
ASSEMBLY TO INPUT SHAFT
(a) Apply MP grease to the needle roller bearings.
(b) Assemble the needle roller bearings into the 3rd gear.
(c) Place the synchronizer ring on the gear and align the ring
slots with the shifting keys.
(d) Using SST and a press, install the 3rd gear and No±2
hub sleeve.
SST 09506±35010
3. INSTALL SNAP RING
Select a snap ring that will allow minimum axial play and
install it on the shaft.
5. INSTALL SPACER, SYNCHRONIZER RING, NEEDLE
ROLLER BEARINGS, FOURTH GEAR AND RADIAL
BALL BEARING
(a) Install the spacer.
(b) Apply MP grease to the needle roller bearings.
(c) Place the synchronizer ring on the gear and align the
ring slots with the shifting keys.
(d) Install the 4th gear.
(e) Using SST and a press, install the radial ball bearing.
SST 09506±35010 4. MEASURE THIRD GEAR THRUST CLEARANCE
Using a feeler gauge, measure the 3rd gear thrust
clearance.
Standard clearance: 0.10 ± 0.35 mm
(0.0039 ± 0.0138 in.)
Thickness mm (in.)
Thickness mm (in.)
MarkMark
± MANUAL TRANSAXLEComponent PartsMT±66
Trending: tire size, battery capacity, trunk release, ECO mode, air bleeding, roof rack, brake
