TOYOTA CAMRY V20 1986 Service Information
CAMRY V20 1986
TOYOTA
TOYOTA
https://www.carmanualsonline.info/img/14/57449/w960_57449-0.png
TOYOTA CAMRY V20 1986 Service Information
Trending: headlight aiming, roof, alternator, airbag, park assist, towing, Air
Page 1991 of 2389
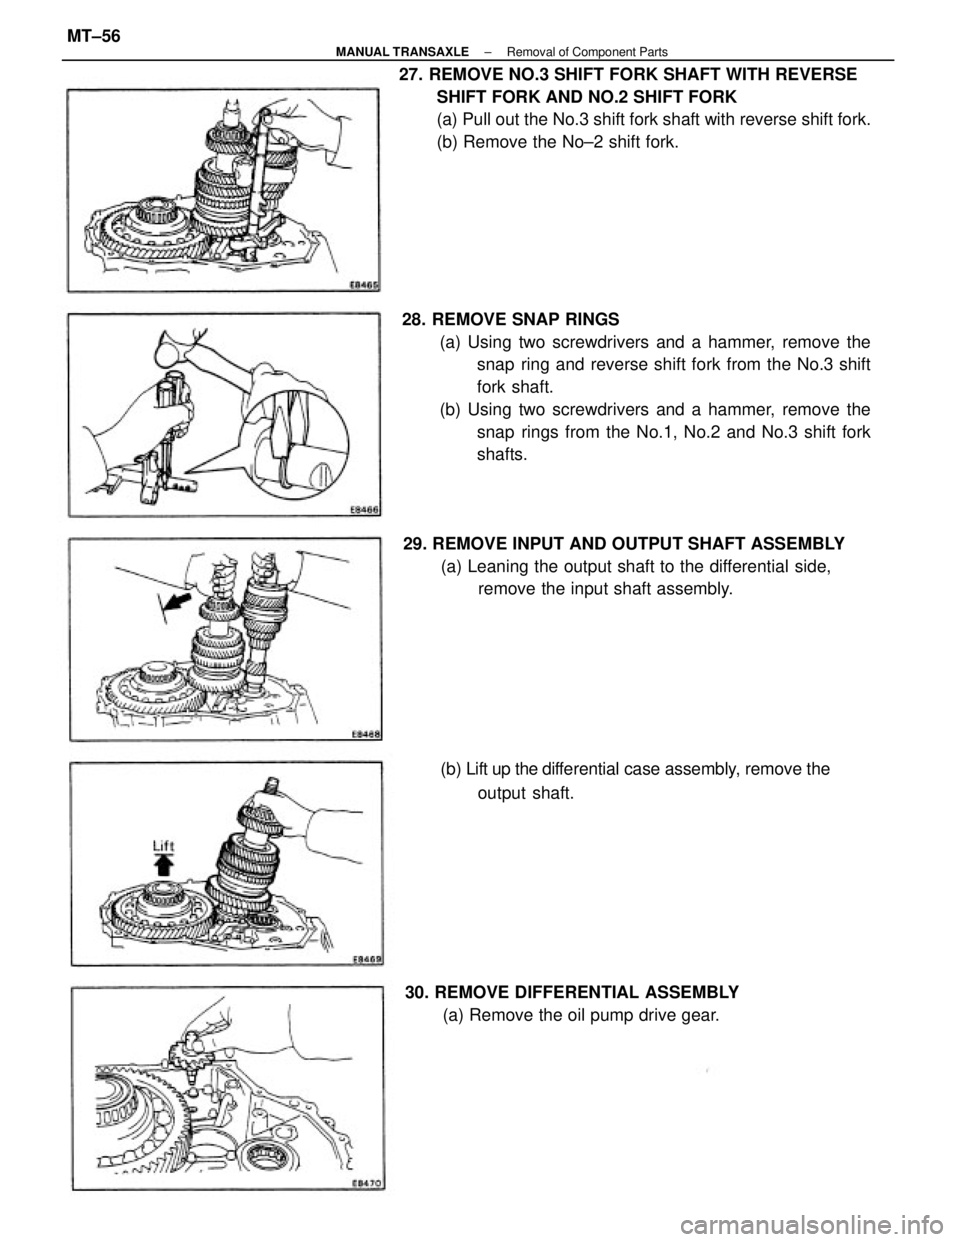
28. REMOVE SNAP RINGS
(a) Using two screwdrivers and a hammer, remove the
snap ring and reverse shift fork from the No.3 shift
fork shaft.
(b) Using two screwdrivers and a hammer, remove the
snap rings from the No.1, No.2 and No.3 shift fork
shafts. 27. REMOVE NO.3 SHIFT FORK SHAFT WITH REVERSE
SHIFT FORK AND NO.2 SHIFT FORK
(a) Pull out the No.3 shift fork shaft with reverse shift fork.
(b) Remove the No±2 shift fork.
29. REMOVE INPUT AND OUTPUT SHAFT ASSEMBLY
(a) Leaning the output shaft to the differential side,
remove the input shaft assembly.
(b) Lift up the differential case assembly, remove the
output shaft.
30. REMOVE DIFFERENTIAL ASSEMBLY
(a) Remove the oil pump drive gear.
± MANUAL TRANSAXLERemoval of Component PartsMT±56
Page 1992 of 2389
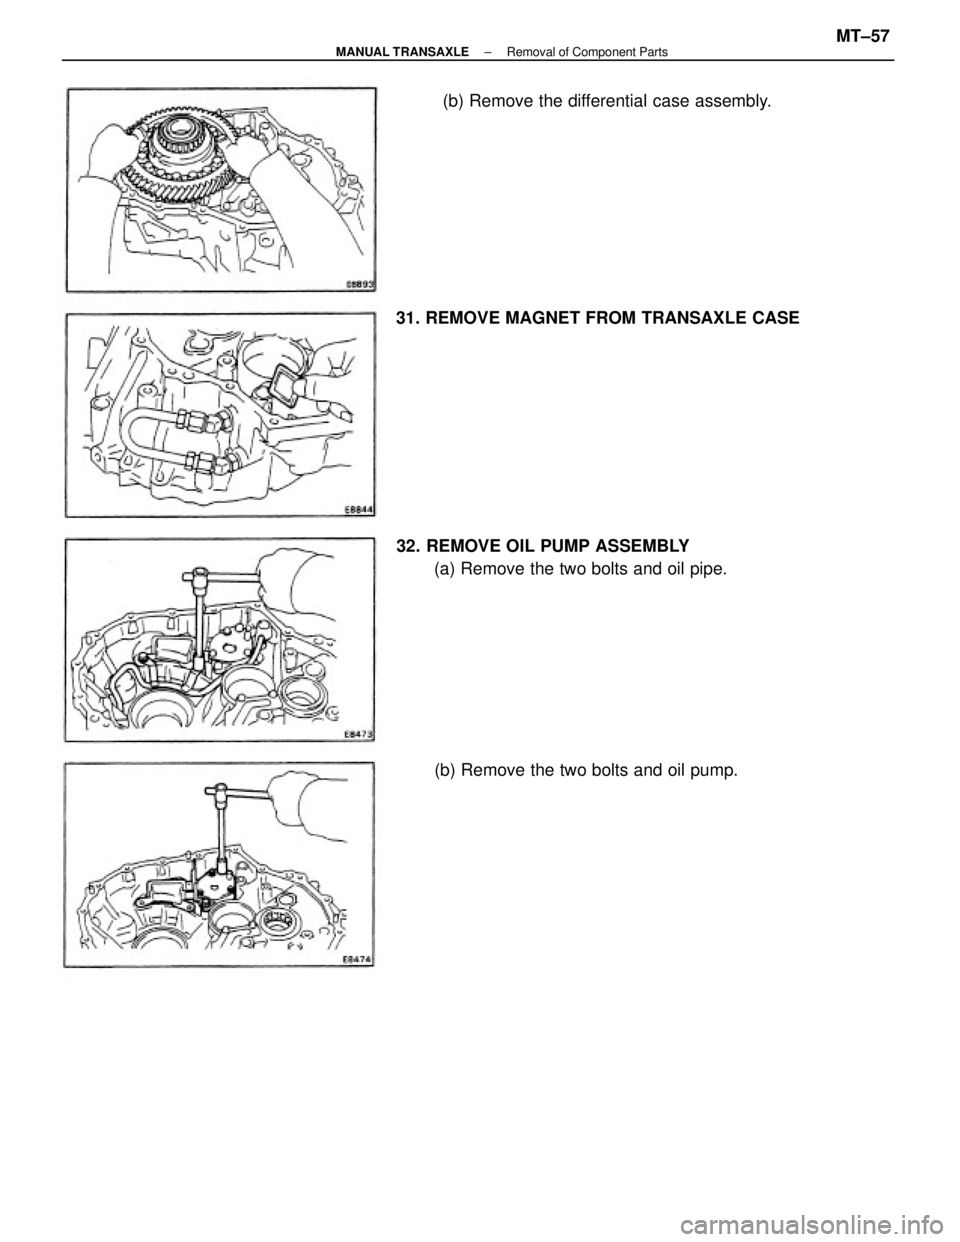
32. REMOVE OIL PUMP ASSEMBLY
(a) Remove the two bolts and oil pipe.(b) Remove the differential case assembly.
31. REMOVE MAGNET FROM TRANSAXLE CASE
(b) Remove the two bolts and oil pump.
± MANUAL TRANSAXLERemoval of Component PartsMT±57
Page 1993 of 2389
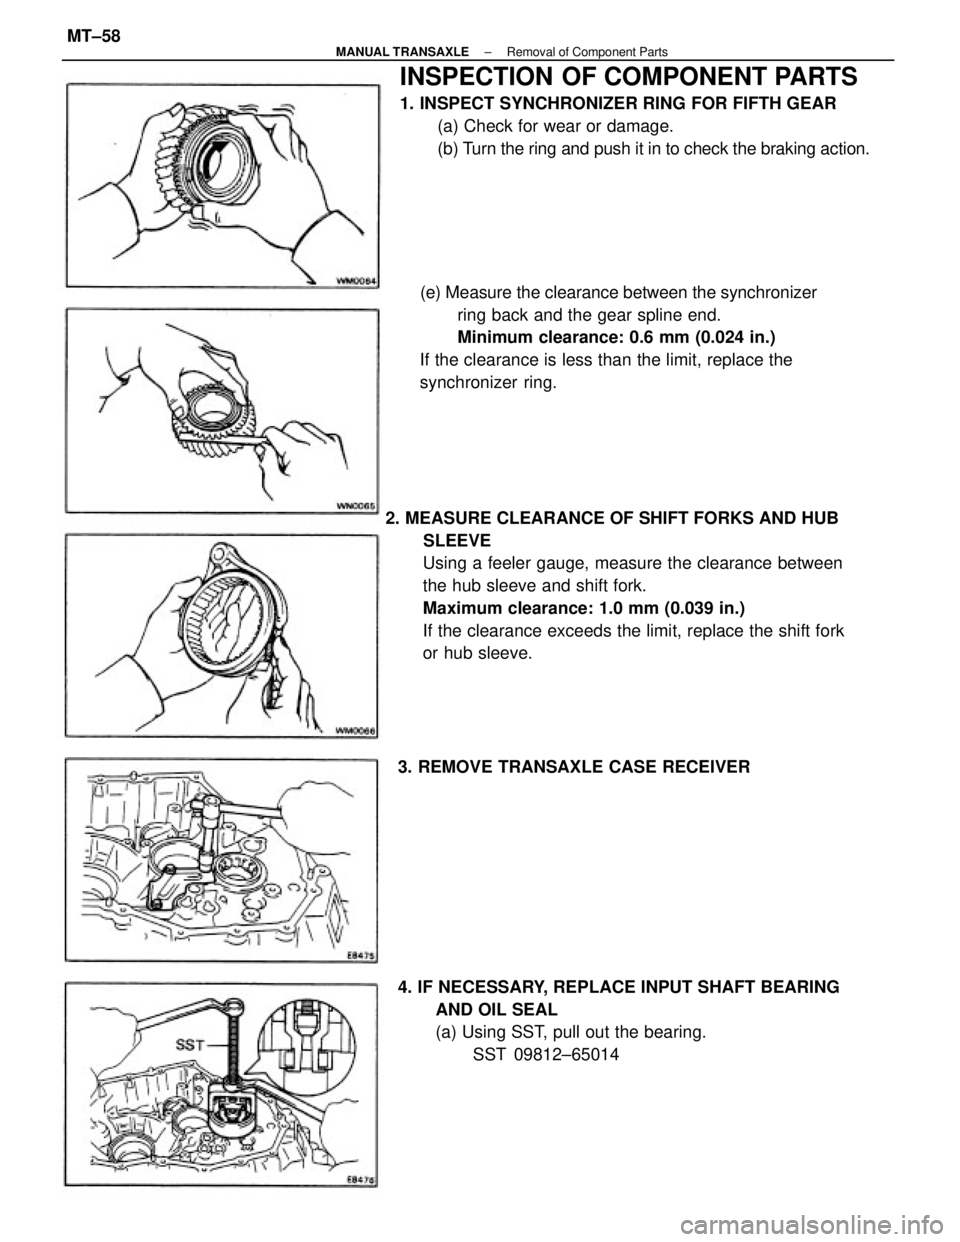
2. MEASURE CLEARANCE OF SHIFT FORKS AND HUB
SLEEVE
Using a feeler gauge, measure the clearance between
the hub sleeve and shift fork.
Maximum clearance: 1.0 mm (0.039 in.)
If the clearance exceeds the limit, replace the shift fork
or hub sleeve.
INSPECTION OF COMPONENT PARTS
1. INSPECT SYNCHRONIZER RING FOR FIFTH GEAR
(a) Check for wear or damage.
(b) Turn the ring and push it in to check the braking action.
(e) Measure the clearance between the synchronizer
ring back and the gear spline end.
Minimum clearance: 0.6 mm (0.024 in.)
If the clearance is less than the limit, replace the
synchronizer ring.
4. IF NECESSARY, REPLACE INPUT SHAFT BEARING
AND OIL SEAL
(a) Using SST, pull out the bearing.
SST 09812±65014 3. REMOVE TRANSAXLE CASE RECEIVER
± MANUAL TRANSAXLERemoval of Component PartsMT±58
Page 1994 of 2389
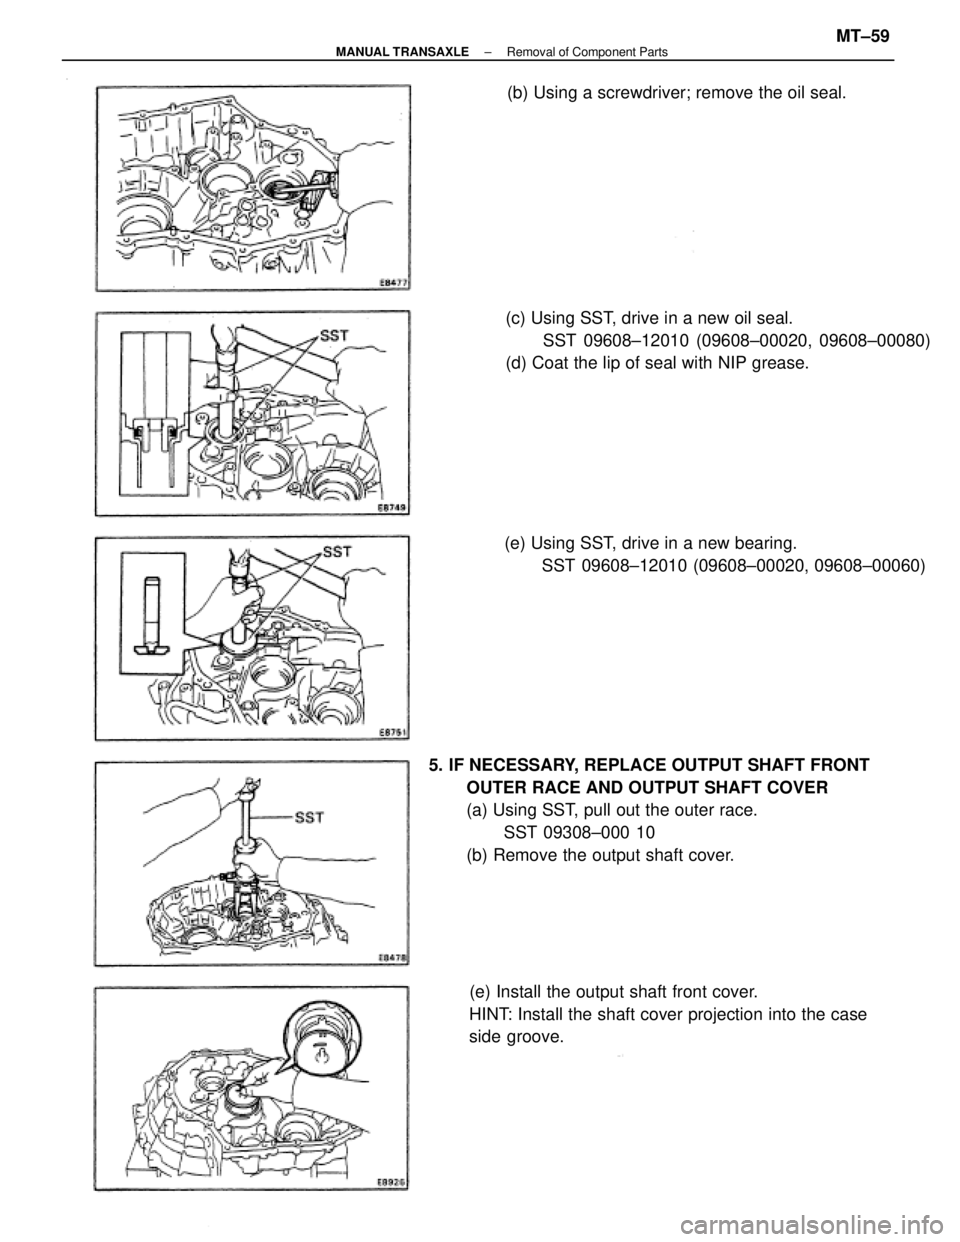
5. IF NECESSARY, REPLACE OUTPUT SHAFT FRONT
OUTER RACE AND OUTPUT SHAFT COVER
(a) Using SST, pull out the outer race.
SST 09308±000 10
(b) Remove the output shaft cover.(c) Using SST, drive in a new oil seal.
SST 09608±12010 (09608±00020, 09608±00080)
(d) Coat the lip of seal with NIP grease.
(e) Install the output shaft front cover.
HINT: Install the shaft cover projection into the case
side groove.(e) Using SST, drive in a new bearing.
SST 09608±12010 (09608±00020, 09608±00060) (b) Using a screwdriver; remove the oil seal.
± MANUAL TRANSAXLERemoval of Component PartsMT±59
Page 1995 of 2389
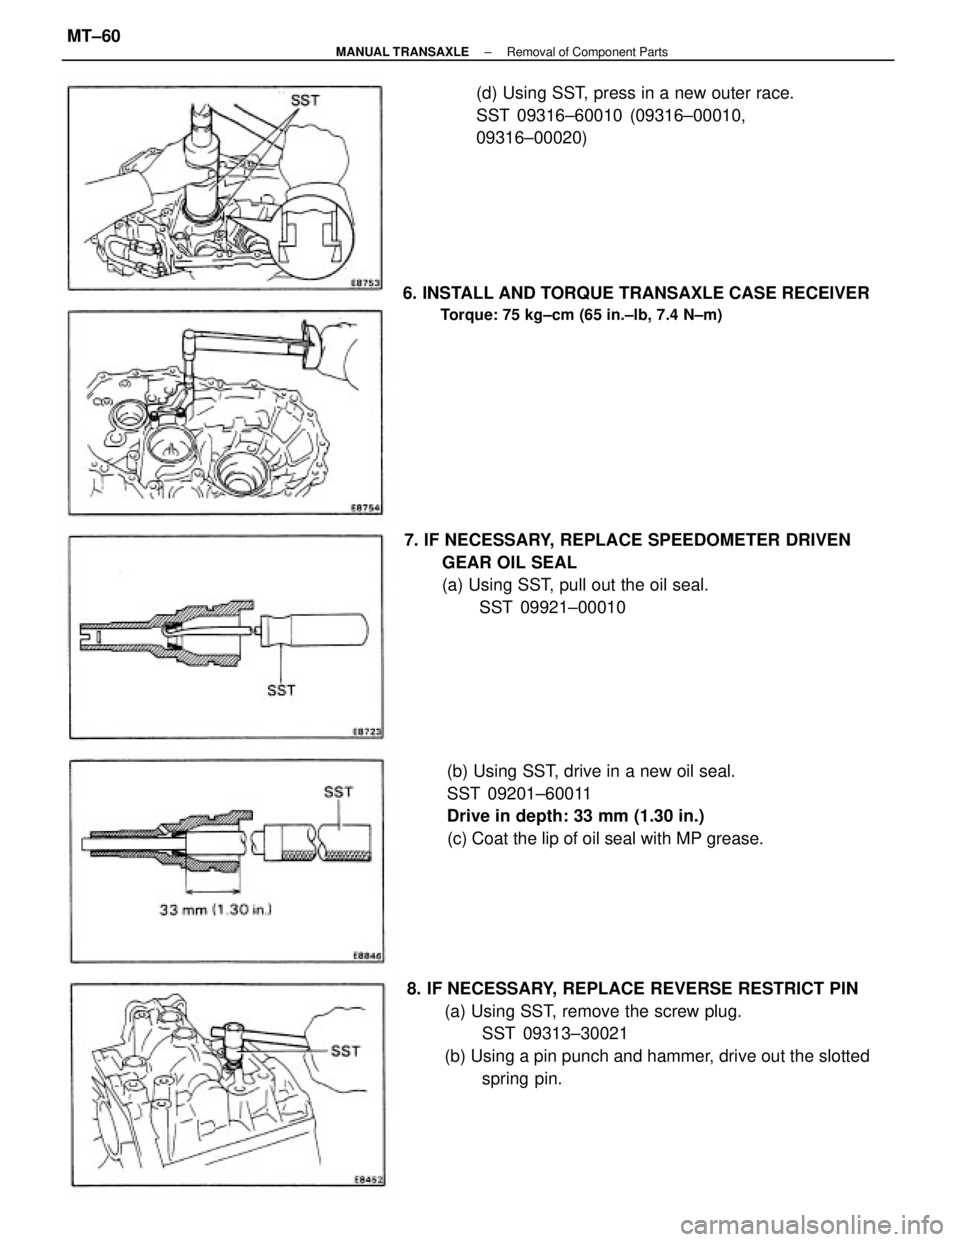
8. IF NECESSARY, REPLACE REVERSE RESTRICT PIN
(a) Using SST, remove the screw plug.
SST 09313±30021
(b) Using a pin punch and hammer, drive out the slotted
spring pin. 7. IF NECESSARY, REPLACE SPEEDOMETER DRIVEN
GEAR OIL SEAL
(a) Using SST, pull out the oil seal.
SST 09921±00010 6. INSTALL AND TORQUE TRANSAXLE CASE RECEIVER
Torque: 75 kg±cm (65 in.±lb, 7.4 N±m)
(b) Using SST, drive in a new oil seal.
SST 09201±60011
Drive in depth: 33 mm (1.30 in.)
(c) Coat the lip of oil seal with MP grease.(d) Using SST, press in a new outer race.
SST 09316±60010 (09316±00010,
09316±00020)
± MANUAL TRANSAXLERemoval of Component PartsMT±60
Page 1996 of 2389
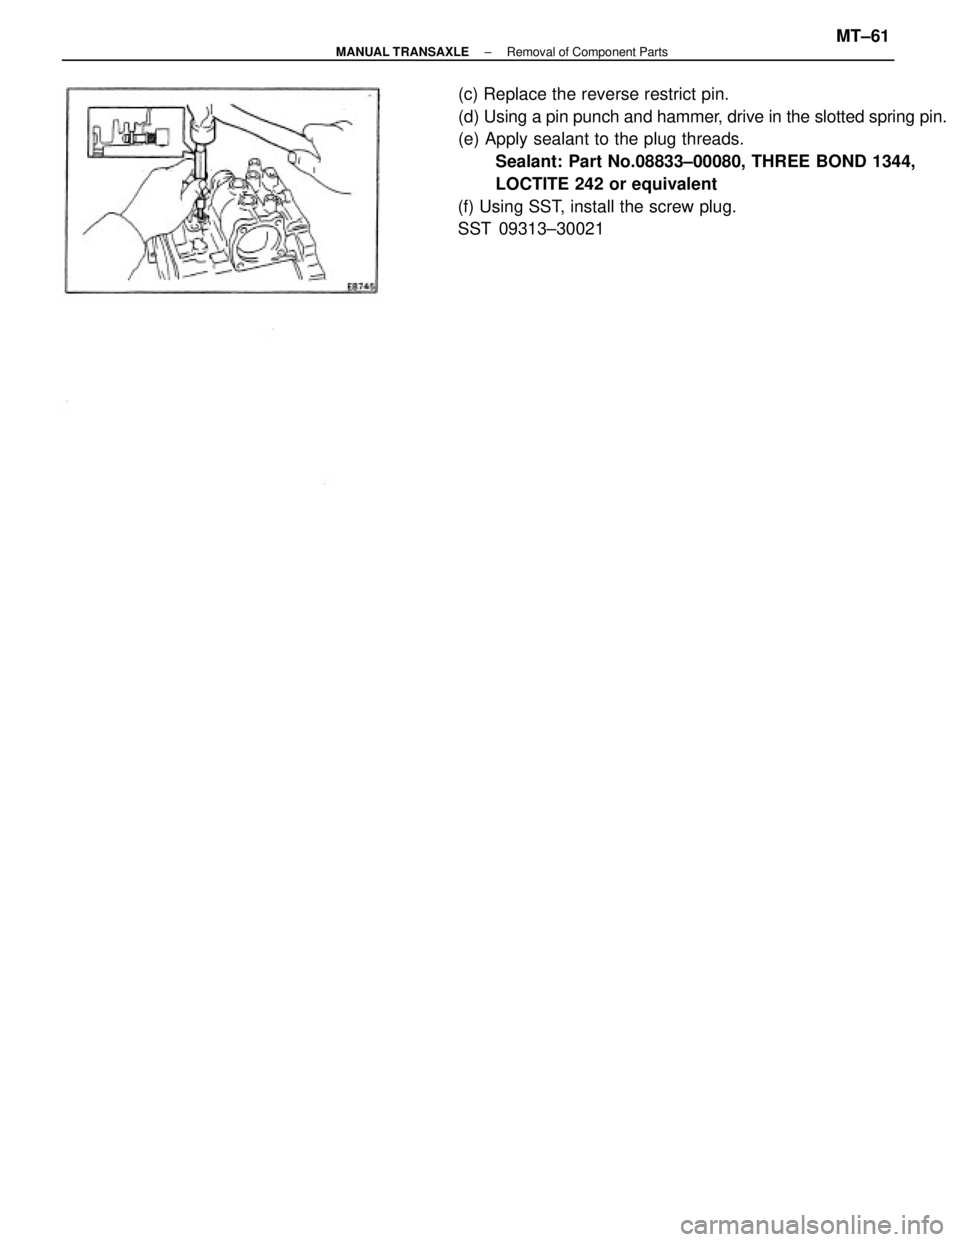
(c) Replace the reverse restrict pin.
(d) Using a pin punch and hammer, drive in the slotted spring pin.
(e) Apply sealant to the plug threads.
Sealant: Part No.08833±00080, THREE BOND 1344,
LOCTITE 242 or equivalent
(f) Using SST, install the screw plug.
SST 09313±30021
± MANUAL TRANSAXLERemoval of Component PartsMT±61
Page 1997 of 2389
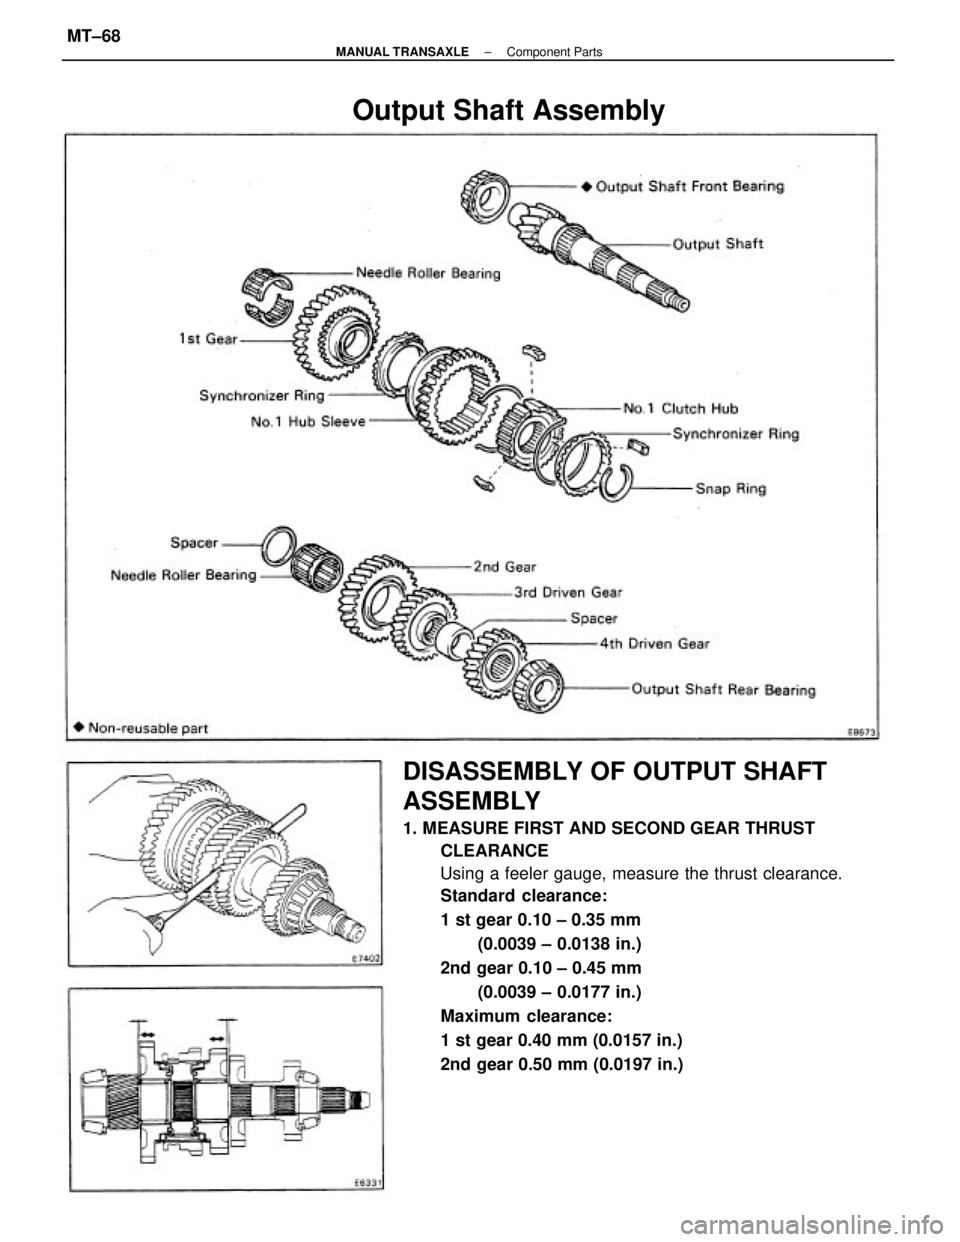
DISASSEMBLY OF OUTPUT SHAFT
ASSEMBLY
1. MEASURE FIRST AND SECOND GEAR THRUST
CLEARANCE
Using a feeler gauge, measure the thrust clearance.
Standard clearance:
1 st gear 0.10 ± 0.35 mm
(0.0039 ± 0.0138 in.)
2nd gear 0.10 ± 0.45 mm
(0.0039 ± 0.0177 in.)
Maximum clearance:
1 st gear 0.40 mm (0.0157 in.)
2nd gear 0.50 mm (0.0197 in.)
Output Shaft Assembly
± MANUAL TRANSAXLEComponent PartsMT±68
Page 1998 of 2389
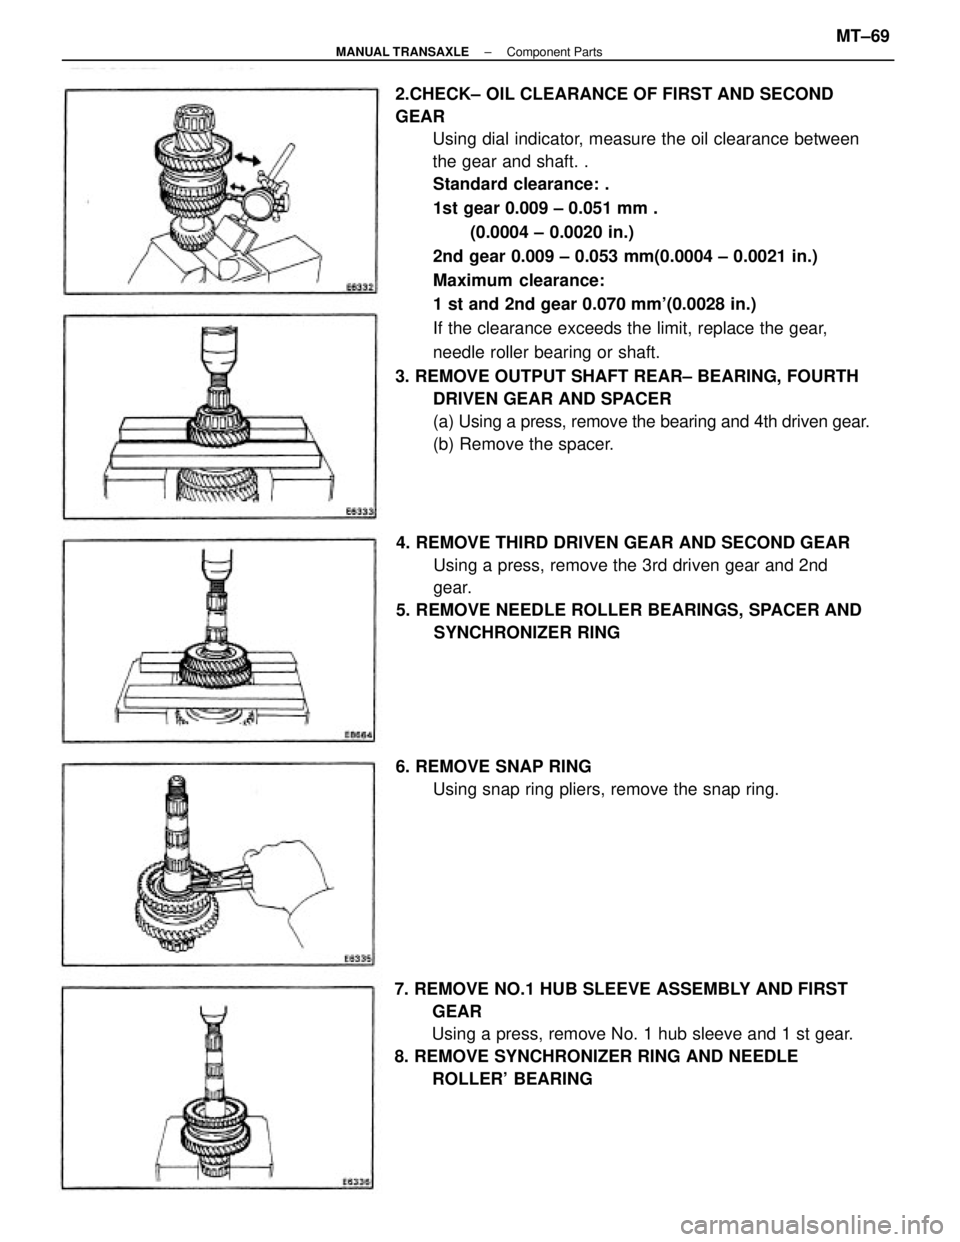
2.CHECK± OIL CLEARANCE OF FIRST AND SECOND
GEAR
Using dial indicator, measure the oil clearance between
the gear and shaft. .
Standard clearance: .
1st gear 0.009 ± 0.051 mm .
(0.0004 ± 0.0020 in.)
2nd gear 0.009 ± 0.053 mm(0.0004 ± 0.0021 in.)
Maximum clearance:
1 st and 2nd gear 0.070 mm'(0.0028 in.)
If the clearance exceeds the limit, replace the gear,
needle roller bearing or shaft.
3. REMOVE OUTPUT SHAFT REAR± BEARING, FOURTH
DRIVEN GEAR AND SPACER
(a) Using a press, remove the bearing and 4th driven gear.
(b) Remove the spacer.
7. REMOVE NO.1 HUB SLEEVE ASSEMBLY AND FIRST
GEAR
Using a press, remove No. 1 hub sleeve and 1 st gear.
8. REMOVE SYNCHRONIZER RING AND NEEDLE
ROLLER' BEARING 4. REMOVE THIRD DRIVEN GEAR AND SECOND GEAR
Using a press, remove the 3rd driven gear and 2nd
gear.
5. REMOVE NEEDLE ROLLER BEARINGS, SPACER AND
SYNCHRONIZER RING
6. REMOVE SNAP RING
Using snap ring pliers, remove the snap ring.
± MANUAL TRANSAXLEComponent PartsMT±69
Page 1999 of 2389
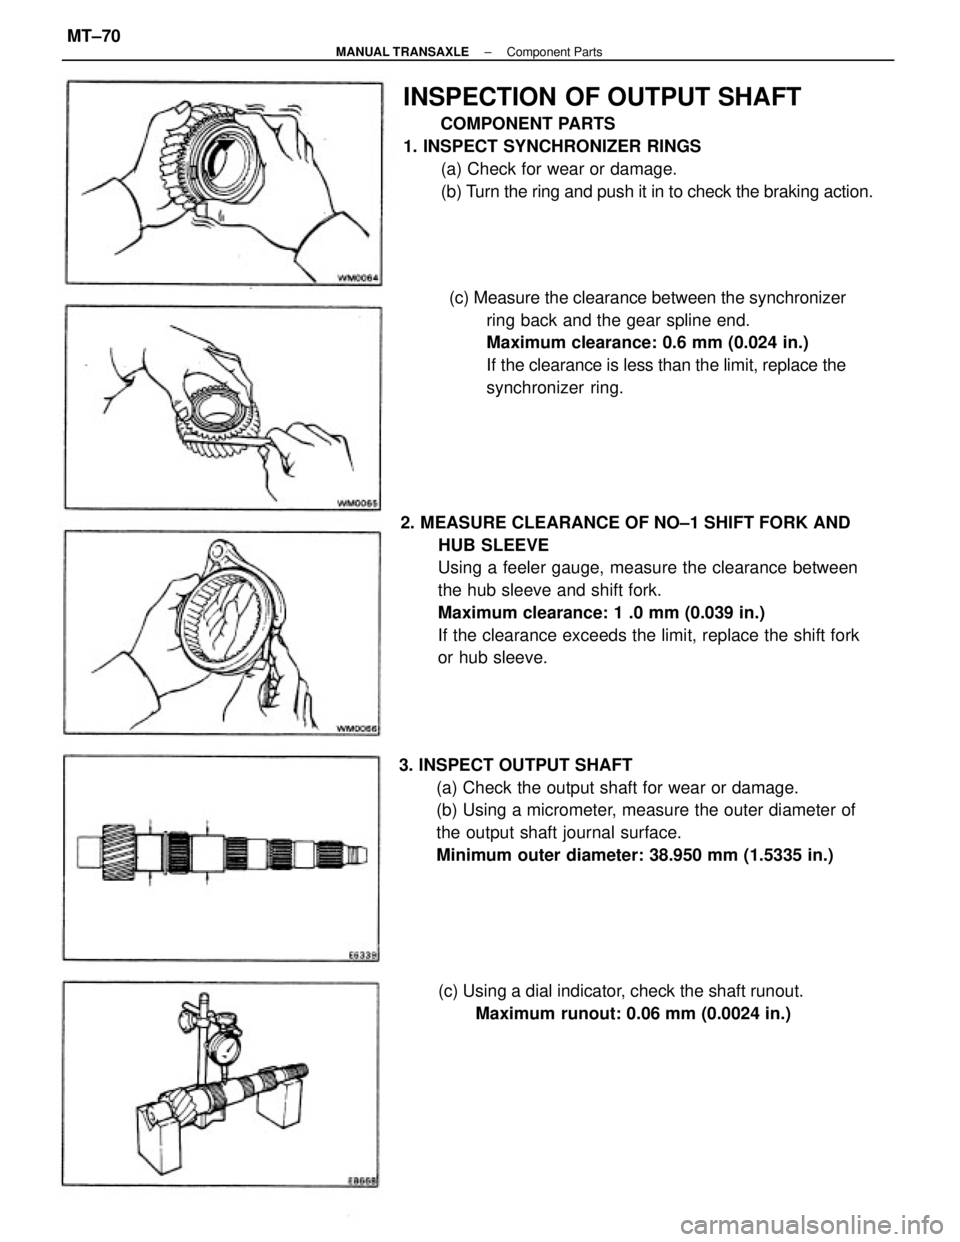
2. MEASURE CLEARANCE OF NO±1 SHIFT FORK AND
HUB SLEEVE
Using a feeler gauge, measure the clearance between
the hub sleeve and shift fork.
Maximum clearance: 1 .0 mm (0.039 in.)
If the clearance exceeds the limit, replace the shift fork
or hub sleeve.
INSPECTION OF OUTPUT SHAFT
COMPONENT PARTS
1. INSPECT SYNCHRONIZER RINGS
(a) Check for wear or damage.
(b) Turn the ring and push it in to check the braking action.
(c) Measure the clearance between the synchronizer
ring back and the gear spline end.
Maximum clearance: 0.6 mm (0.024 in.)
If the clearance is less than the limit, replace the
synchronizer ring.
3. INSPECT OUTPUT SHAFT
(a) Check the output shaft for wear or damage.
(b) Using a micrometer, measure the outer diameter of
the output shaft journal surface.
Minimum outer diameter: 38.950 mm (1.5335 in.)
(c) Using a dial indicator, check the shaft runout.
Maximum runout: 0.06 mm (0.0024 in.)
± MANUAL TRANSAXLEComponent PartsMT±70
Page 2000 of 2389
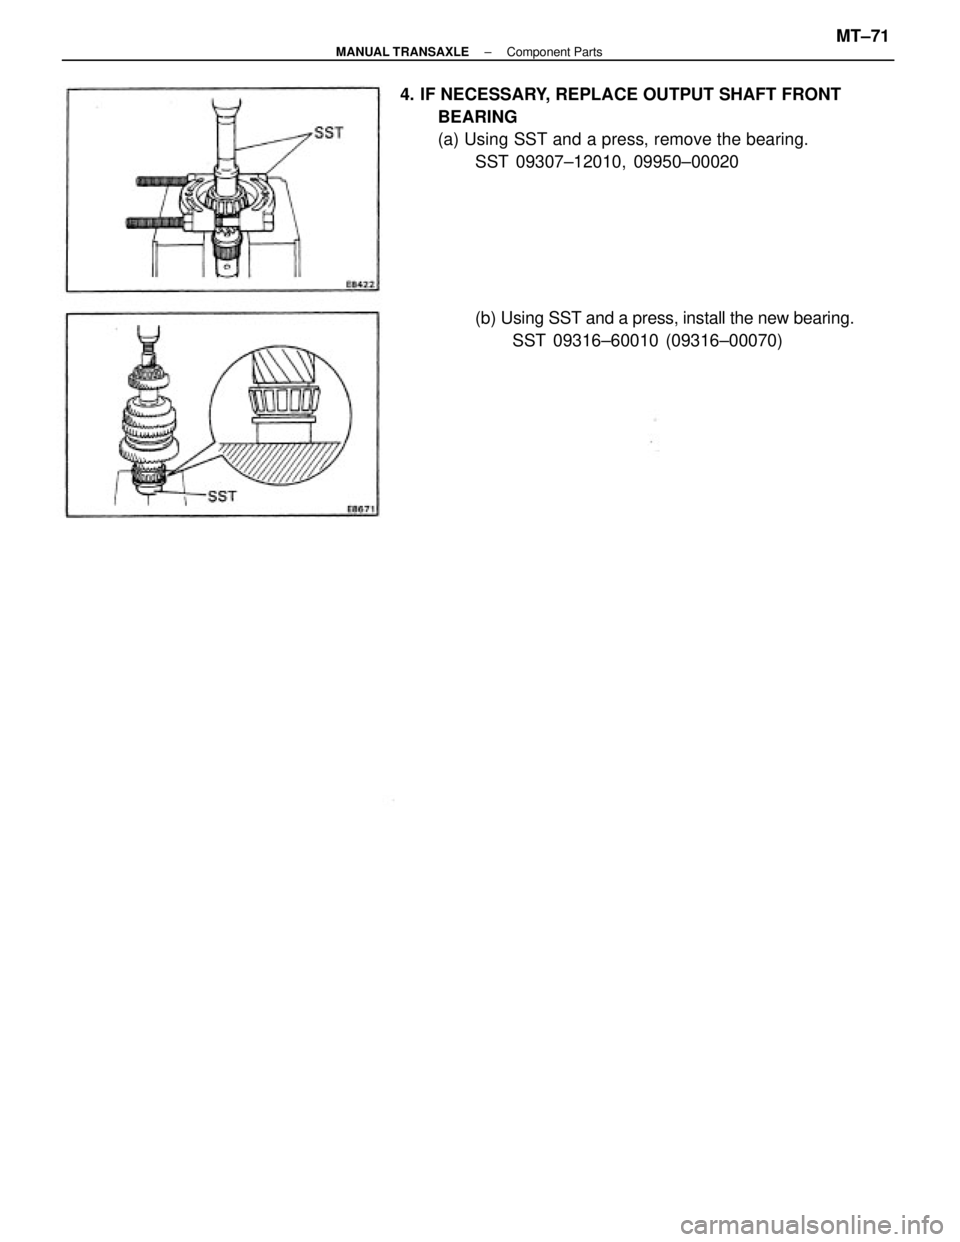
4. IF NECESSARY, REPLACE OUTPUT SHAFT FRONT
BEARING
(a) Using SST and a press, remove the bearing.
SST 09307±12010, 09950±00020
(b) Using SST and a press, install the new bearing.
SST 09316±60010 (09316±00070)
± MANUAL TRANSAXLEComponent PartsMT±71
Trending: door lock, seats, relay, ABS, airbag, engine coolant, service schedule
