TOYOTA CAMRY V20 1986 Service Information
Manufacturer: TOYOTA, Model Year: 1986, Model line: CAMRY V20, Model: TOYOTA CAMRY V20 1986Pages: 2389, PDF Size: 84.44 MB
Page 231 of 2389
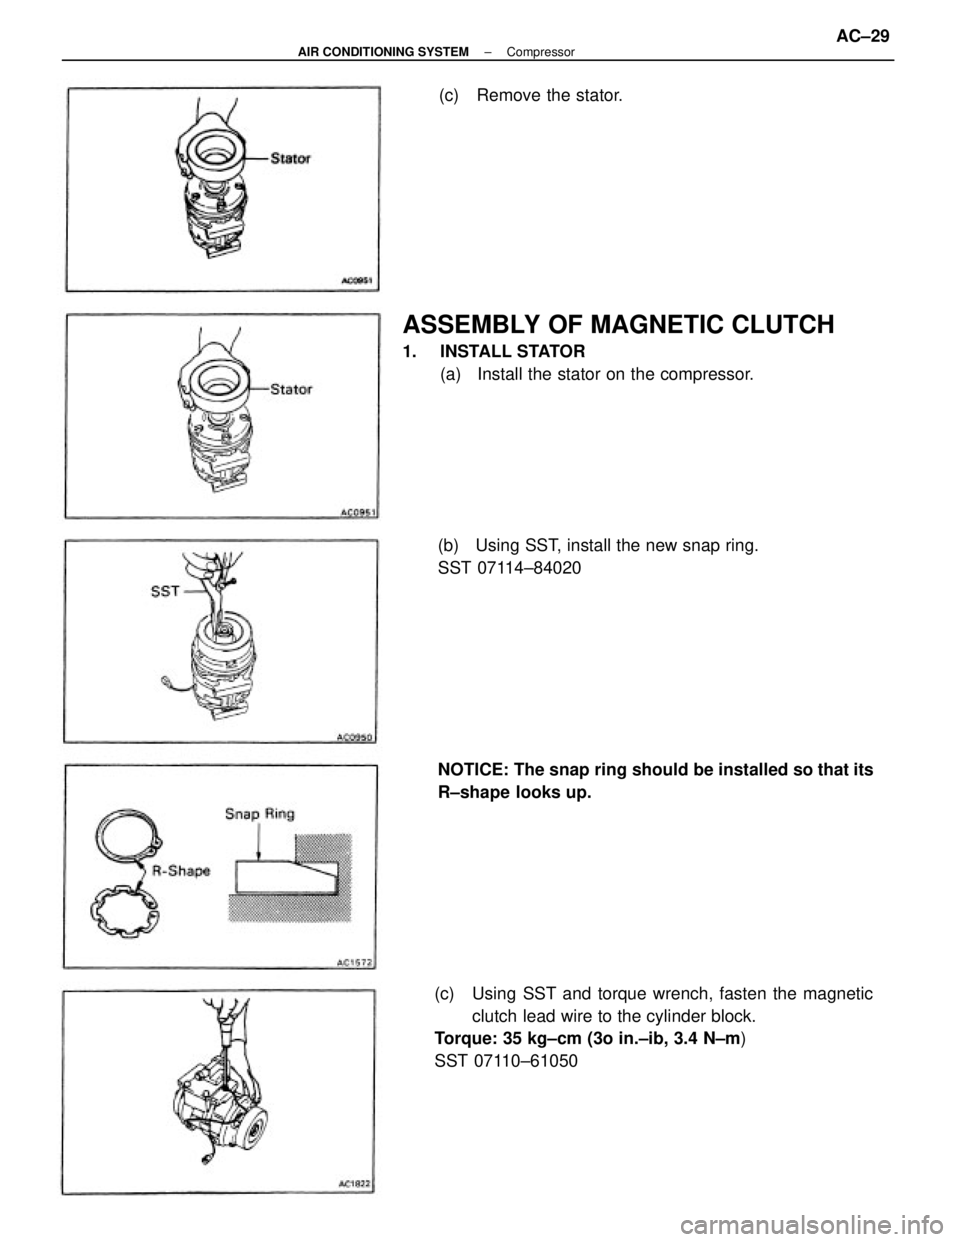
(c) Using SST and torque wrench, fasten the magnetic
clutch lead wire to the cylinder block.
Torque: 35 kg±cm (3o in.±ib, 3.4 N±m)
SST 07110±61050
ASSEMBLY OF MAGNETIC CLUTCH
1. INSTALL STATOR
(a) Install the stator on the compressor.
NOTICE: The snap ring should be installed so that its
R±shape looks up. (b) Using SST, install the new snap ring.
SST 07114±84020(c) Remove the stator.
± AIR CONDITIONING SYSTEMCompressorAC±29
Page 232 of 2389
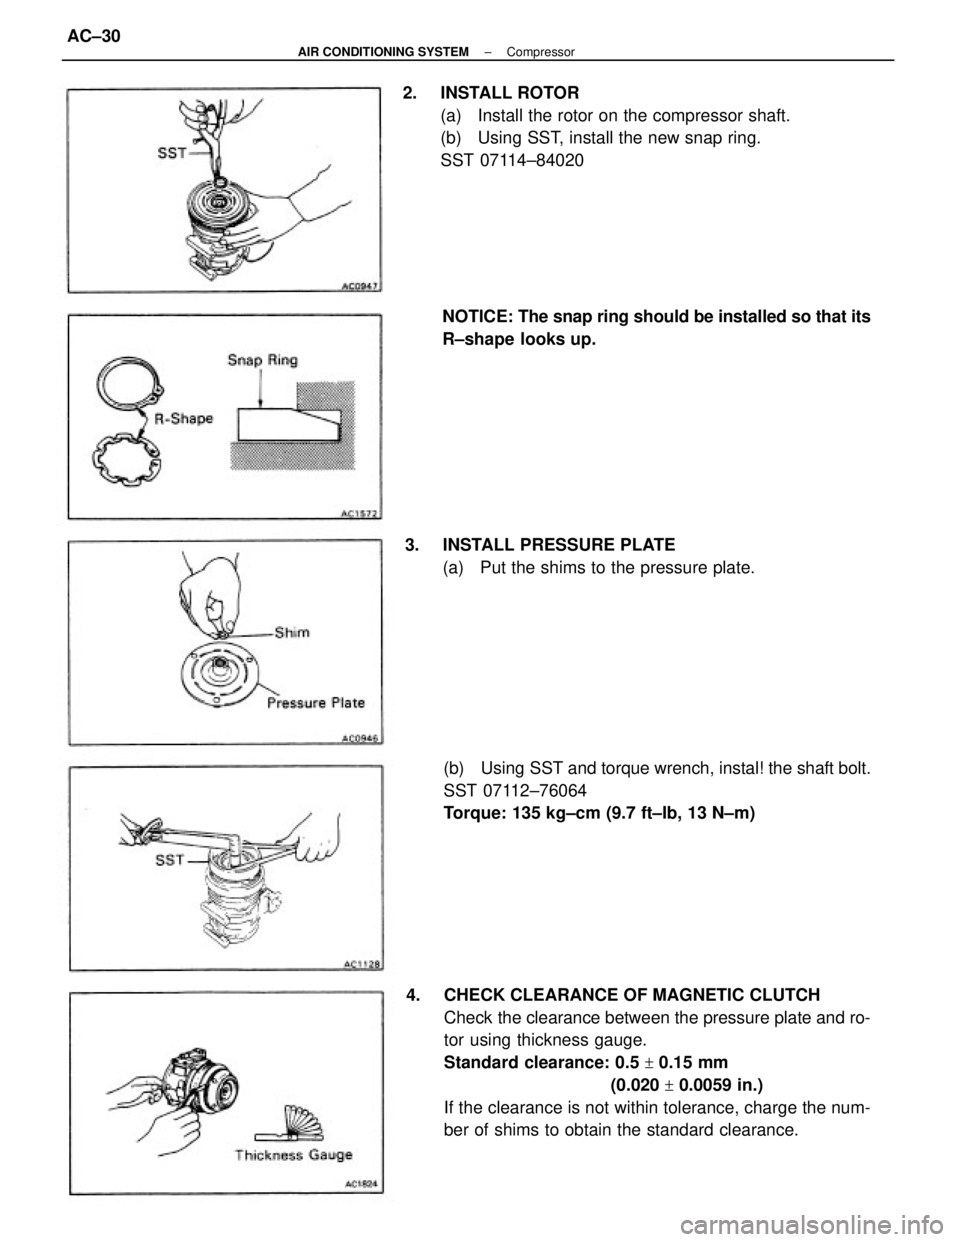
4. CHECK CLEARANCE OF MAGNETIC CLUTCH
Check the clearance between the pressure plate and ro-
tor using thickness gauge.
Standard clearance: 0.5
+ 0.15 mm
(0.020
+ 0.0059 in.)
If the clearance is not within tolerance, charge the num-
ber of shims to obtain the standard clearance. 2. INSTALL ROTOR
(a) Install the rotor on the compressor shaft.
(b) Using SST, install the new snap ring.
SST 07114±84020
(b) Using SST and torque wrench, instal! the shaft bolt.
SST 07112±76064
Torque: 135 kg±cm (9.7 ft±Ib, 13 N±m) NOTICE: The snap ring should be installed so that its
R±shape looks up.
3. INSTALL PRESSURE PLATE
(a) Put the shims to the pressure plate.
± AIR CONDITIONING SYSTEMCompressorAC±30
Page 233 of 2389
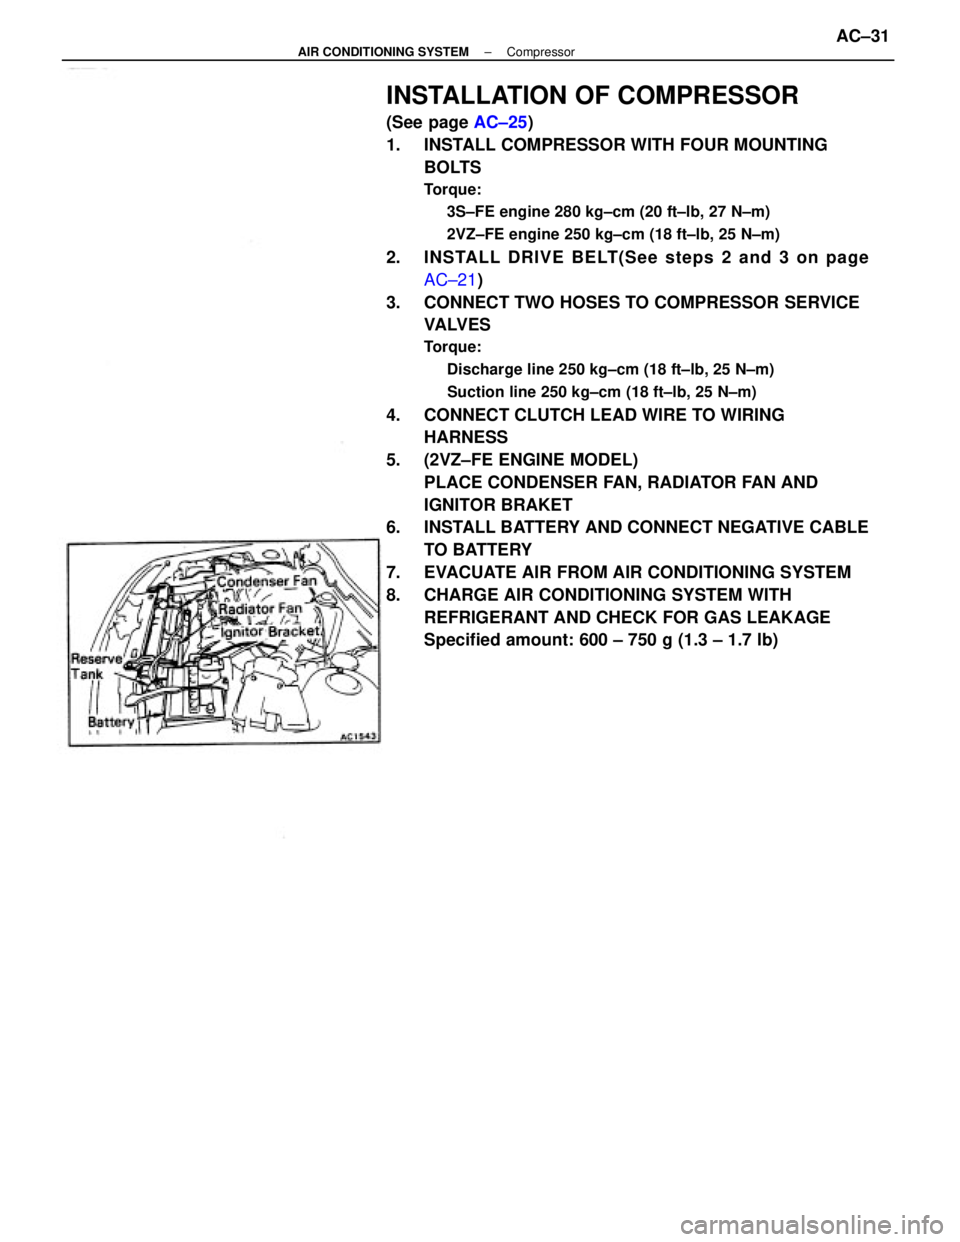
INSTALLATION OF COMPRESSOR
(See page AC±25)
1. INSTALL COMPRESSOR WITH FOUR MOUNTING
BOLTS
Torque:
3S±FE engine 280 kg±cm (20 ft±lb, 27 N±m)
2VZ±FE engine 250 kg±cm (18 ft±lb, 25 N±m)
2. INS TALL DRIV E BE LT(S e e ste ps 2 and 3 on pa ge
AC±21)
3. CONNECT TWO HOSES TO COMPRESSOR SERVICE
VALVES
Torque:
Discharge line 250 kg±cm (18 ft±lb, 25 N±m)
Suction line 250 kg±cm (18 ft±lb, 25 N±m)
4. CONNECT CLUTCH LEAD WIRE TO WIRING
HARNESS
5. (2VZ±FE ENGINE MODEL)
PLACE CONDENSER FAN, RADIATOR FAN AND
IGNITOR BRAKET
6. INSTALL BATTERY AND CONNECT NEGATIVE CABLE
TO BATTERY
7. EVACUATE AIR FROM AIR CONDITIONING SYSTEM
8. CHARGE AIR CONDITIONING SYSTEM WITH
REFRIGERANT AND CHECK FOR GAS LEAKAGE
Specified amount: 600 ± 750 g (1.3 ± 1.7 lb)
± AIR CONDITIONING SYSTEMCompressorAC±31
Page 234 of 2389
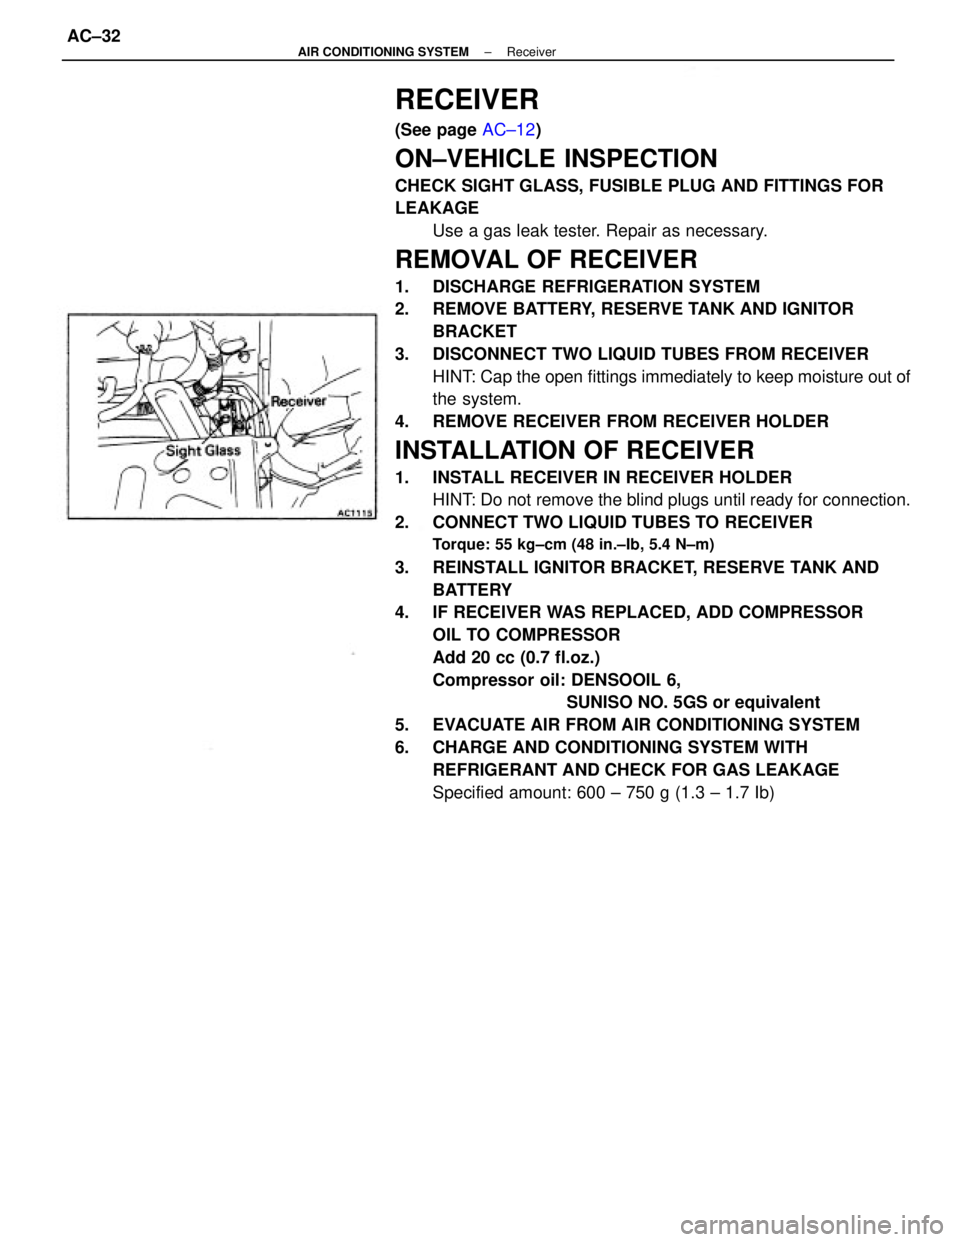
RECEIVER
(See page AC±12)
ON±VEHICLE INSPECTION
CHECK SIGHT GLASS, FUSIBLE PLUG AND FITTINGS FOR
LEAKAGE
Use a gas leak tester. Repair as necessary.
REMOVAL OF RECEIVER
1. DISCHARGE REFRIGERATION SYSTEM
2. REMOVE BATTERY, RESERVE TANK AND IGNITOR
BRACKET
3. DISCONNECT TWO LIQUID TUBES FROM RECEIVER
HINT: Cap the open fittings immediately to keep moisture out of
the system.
4. REMOVE RECEIVER FROM RECEIVER HOLDER
INSTALLATION OF RECEIVER
1. INSTALL RECEIVER IN RECEIVER HOLDER
HINT: Do not remove the blind plugs until ready for connection.
2. CONNECT TWO LIQUID TUBES TO RECEIVER
Torque: 55 kg±cm (48 in.±Ib, 5.4 N±m)
3. REINSTALL IGNITOR BRACKET, RESERVE TANK AND
BATTERY
4. IF RECEIVER WAS REPLACED, ADD COMPRESSOR
OIL TO COMPRESSOR
Add 20 cc (0.7 fl.oz.)
Compressor oil: DENSOOIL 6,
SUNISO NO. 5GS or equivalent
5. EVACUATE AIR FROM AIR CONDITIONING SYSTEM
6. CHARGE AND CONDITIONING SYSTEM WITH
REFRIGERANT AND CHECK FOR GAS LEAKAGE
Specified amount: 600 ± 750 g (1.3 ± 1.7 Ib)
± AIR CONDITIONING SYSTEMReceiverAC±32
Page 235 of 2389
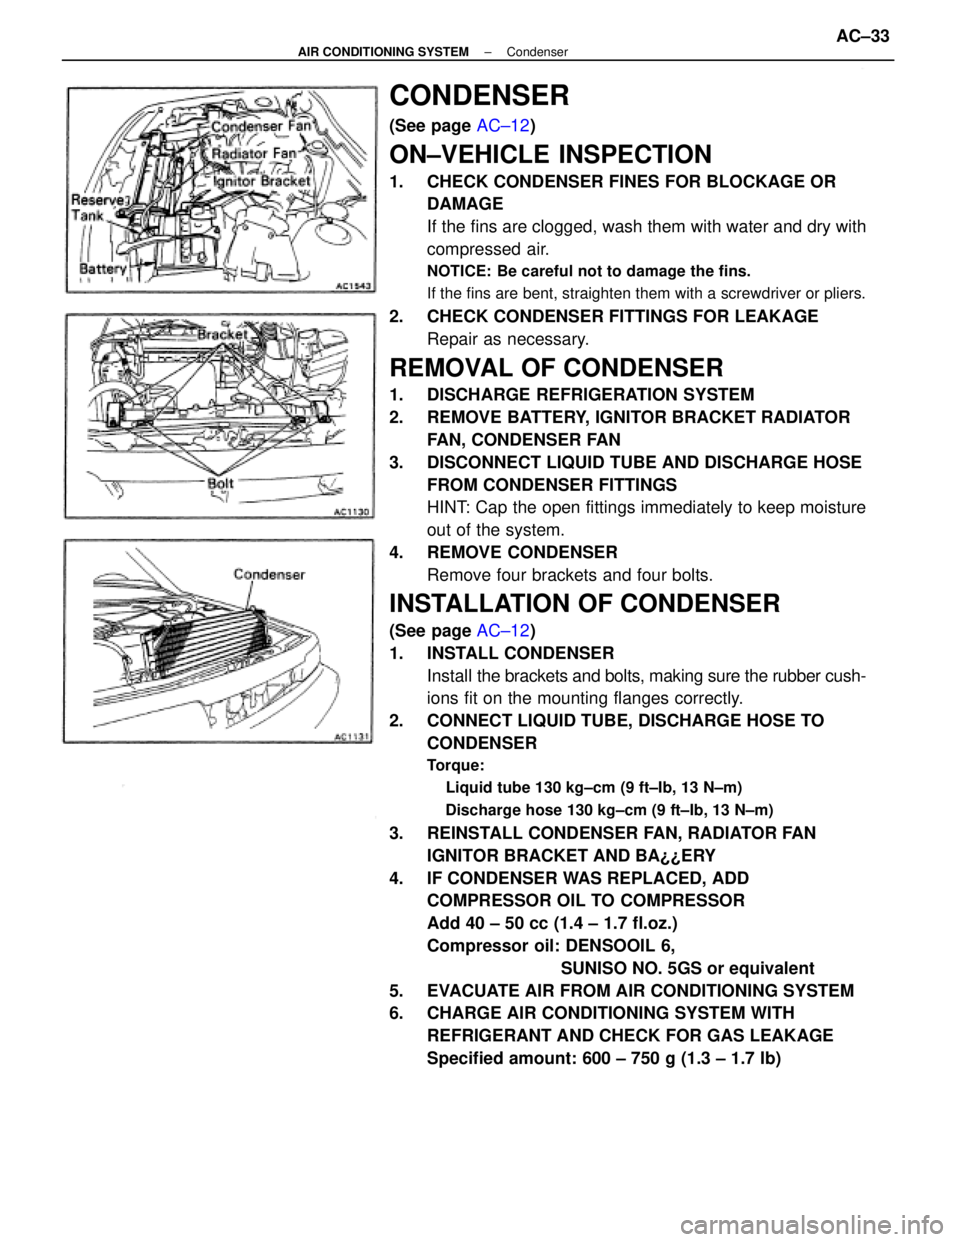
CONDENSER
(See page AC±12)
ON±VEHICLE INSPECTION
1. CHECK CONDENSER FINES FOR BLOCKAGE OR
DAMAGE
If the fins are clogged, wash them with water and dry with
compressed air.
NOTICE: Be careful not to damage the fins.
If the fins are bent, straighten them with a screwdriver or pliers.
2. CHECK CONDENSER FITTINGS FOR LEAKAGE
Repair as necessary.
REMOVAL OF CONDENSER
1. DISCHARGE REFRIGERATION SYSTEM
2. REMOVE BATTERY, IGNITOR BRACKET RADIATOR
FAN, CONDENSER FAN
3. DISCONNECT LIQUID TUBE AND DISCHARGE HOSE
FROM CONDENSER FITTINGS
HINT: Cap the open fittings immediately to keep moisture
out of the system.
4. REMOVE CONDENSER
Remove four brackets and four bolts.
INSTALLATION OF CONDENSER
(See page AC±12)
1. INSTALL CONDENSER
Install the brackets and bolts, making sure the rubber cush-
ions fit on the mounting flanges correctly.
2. CONNECT LIQUID TUBE, DISCHARGE HOSE TO
CONDENSER
Torque:
Liquid tube 130 kg±cm (9 ft±Ib, 13 N±m)
Discharge hose 130 kg±cm (9 ft±Ib, 13 N±m)
3. REINSTALL CONDENSER FAN, RADIATOR FAN
IGNITOR BRACKET AND BA¿¿ERY
4. IF CONDENSER WAS REPLACED, ADD
COMPRESSOR OIL TO COMPRESSOR
Add 40 ± 50 cc (1.4 ± 1.7 fl.oz.)
Compressor oil: DENSOOIL 6,
SUNISO NO. 5GS or equivalent
5. EVACUATE AIR FROM AIR CONDITIONING SYSTEM
6. CHARGE AIR CONDITIONING SYSTEM WITH
REFRIGERANT AND CHECK FOR GAS LEAKAGE
Specified amount: 600 ± 750 g (1.3 ± 1.7 Ib)
± AIR CONDITIONING SYSTEMCondenserAC±33
Page 236 of 2389
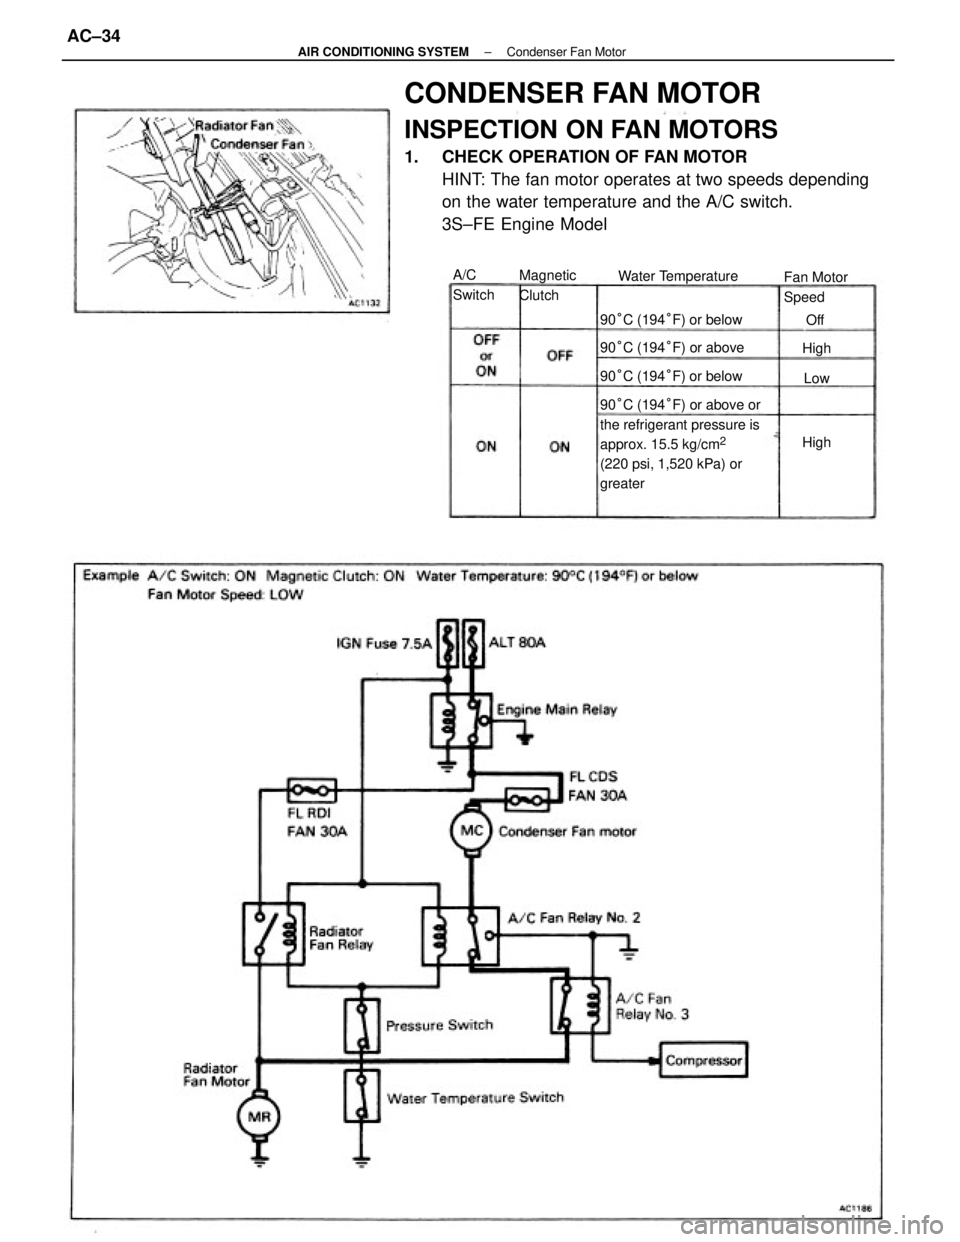
CONDENSER FAN MOTOR
INSPECTION ON FAN MOTORS
1. CHECK OPERATION OF FAN MOTOR
HINT: The fan motor operates at two speeds depending
on the water temperature and the A/C switch.
3S±FE Engine Model
90°C (194°F) or above or
the refrigerant pressure is
approx. 15.5 kg/cm
2
(220 psi, 1,520 kPa) or
greater 90°C (194°F) or below
90°C (194°F) or above
90°C (194°F) or below Water Temperature
Fan Motor
Speed Magnetic
Clutch A/C
Switch
High
HighLowOff
± AIR CONDITIONING SYSTEMCondenser Fan MotorAC±34
Page 237 of 2389

96°C (205°F) or above or the
refrigerant pressure is approx.
15.5 kg/cm2 (220psi, 1,520 kPa)
or greater91 °C (196°F)
± 96°C (205°F)
(2VZ±FE Engine Model)
91 °C (196°F) or below
96°C (205°F) or above
91 °C (196°F) or below
Water TemperatureFan Motor
Speed Magnetic
ClutchA/C
Switch
High
HighLow
Low
Off
± AIR CONDITIONING SYSTEMCondenser Fan MotorAC±35
Page 238 of 2389
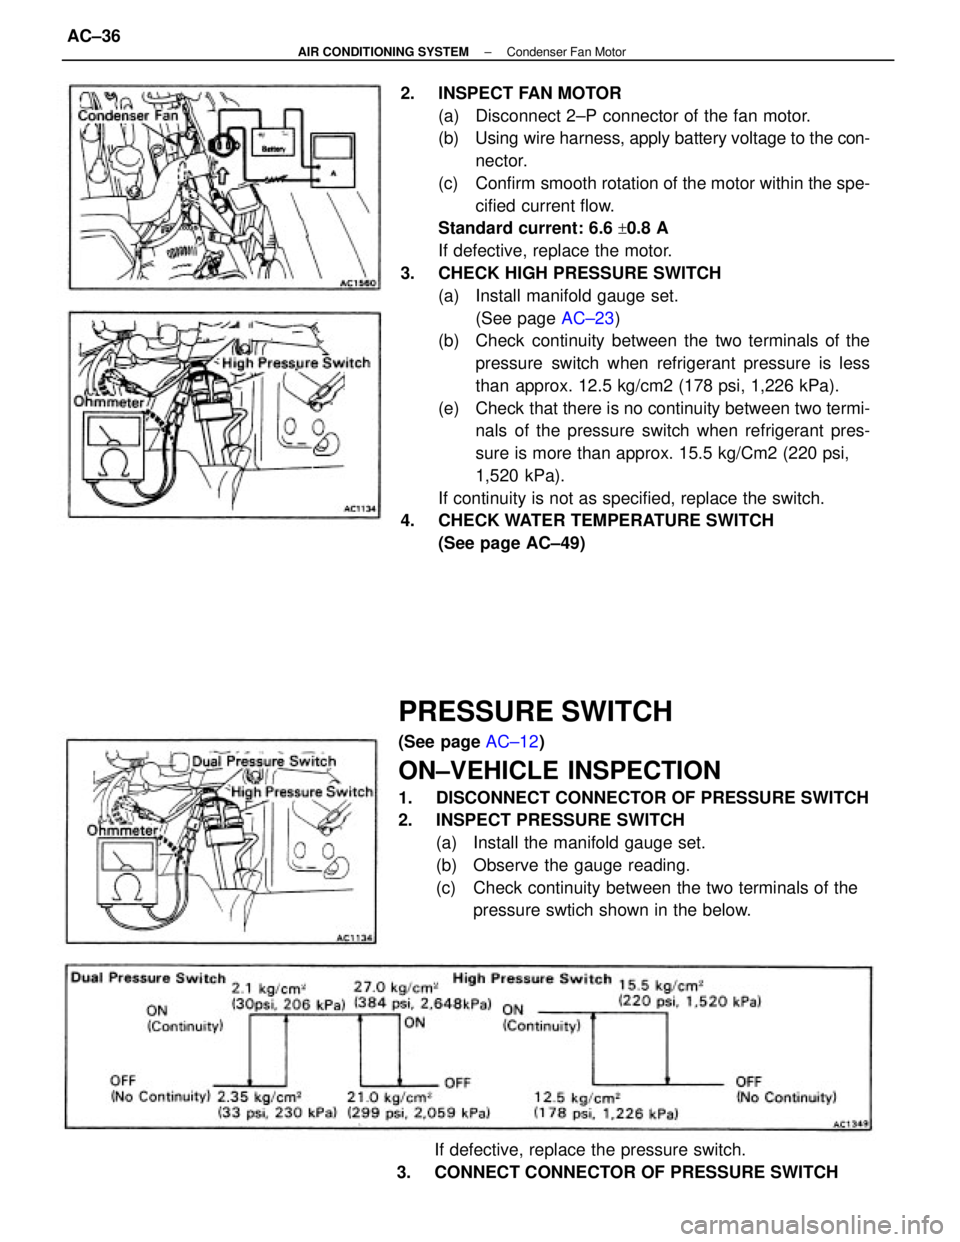
2. INSPECT FAN MOTOR
(a) Disconnect 2±P connector of the fan motor.
(b) Using wire harness, apply battery voltage to the con-
nector.
(c) Confirm smooth rotation of the motor within the spe-
cified current flow.
Standard current: 6.6
+0.8 A
If defective, replace the motor.
3. CHECK HIGH PRESSURE SWITCH
(a) Install manifold gauge set.
(See page AC±23)
(b) Check continuity between the two terminals of the
pressure switch when refrigerant pressure is less
than approx. 12.5 kg/cm2 (178 psi, 1,226 kPa).
(e) Check that there is no continuity between two termi-
nals of the pressure switch when refrigerant pres-
sure is more than approx. 15.5 kg/Cm2 (220 psi,
1,520 kPa).
If continuity is not as specified, replace the switch.
4. CHECK WATER TEMPERATURE SWITCH
(See page AC±49)
PRESSURE SWITCH
(See page AC±12)
ON±VEHICLE INSPECTION
1. DISCONNECT CONNECTOR OF PRESSURE SWITCH
2. INSPECT PRESSURE SWITCH
(a) Install the manifold gauge set.
(b) Observe the gauge reading.
(c) Check continuity between the two terminals of the
pressure swtich shown in the below.
If defective, replace the pressure switch.
3. CONNECT CONNECTOR OF PRESSURE SWITCH
± AIR CONDITIONING SYSTEMCondenser Fan MotorAC±36
Page 239 of 2389
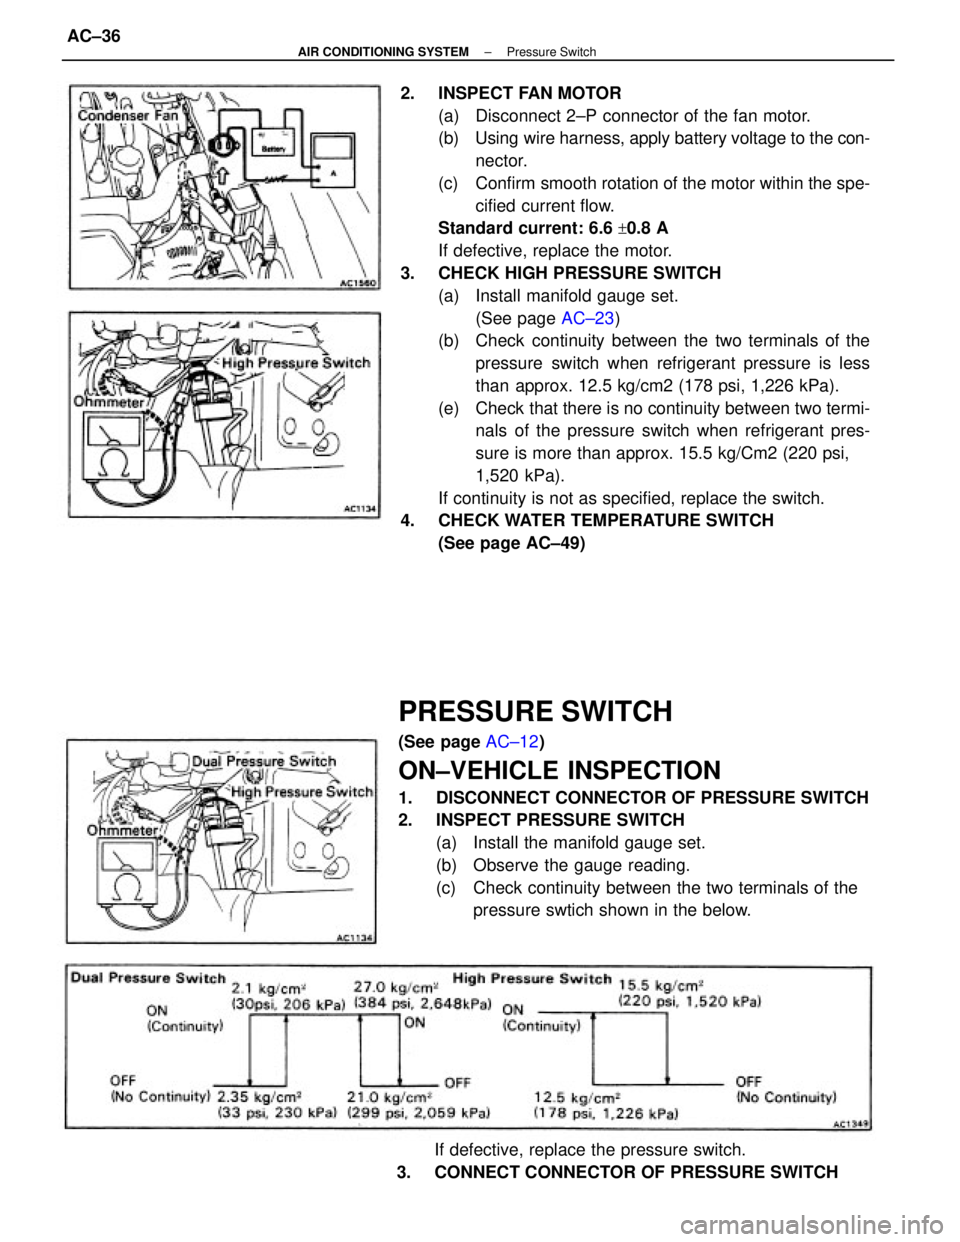
2. INSPECT FAN MOTOR
(a) Disconnect 2±P connector of the fan motor.
(b) Using wire harness, apply battery voltage to the con-
nector.
(c) Confirm smooth rotation of the motor within the spe-
cified current flow.
Standard current: 6.6
+0.8 A
If defective, replace the motor.
3. CHECK HIGH PRESSURE SWITCH
(a) Install manifold gauge set.
(See page AC±23)
(b) Check continuity between the two terminals of the
pressure switch when refrigerant pressure is less
than approx. 12.5 kg/cm2 (178 psi, 1,226 kPa).
(e) Check that there is no continuity between two termi-
nals of the pressure switch when refrigerant pres-
sure is more than approx. 15.5 kg/Cm2 (220 psi,
1,520 kPa).
If continuity is not as specified, replace the switch.
4. CHECK WATER TEMPERATURE SWITCH
(See page AC±49)
PRESSURE SWITCH
(See page AC±12)
ON±VEHICLE INSPECTION
1. DISCONNECT CONNECTOR OF PRESSURE SWITCH
2. INSPECT PRESSURE SWITCH
(a) Install the manifold gauge set.
(b) Observe the gauge reading.
(c) Check continuity between the two terminals of the
pressure swtich shown in the below.
If defective, replace the pressure switch.
3. CONNECT CONNECTOR OF PRESSURE SWITCH
± AIR CONDITIONING SYSTEMPressure SwitchAC±36
Page 240 of 2389
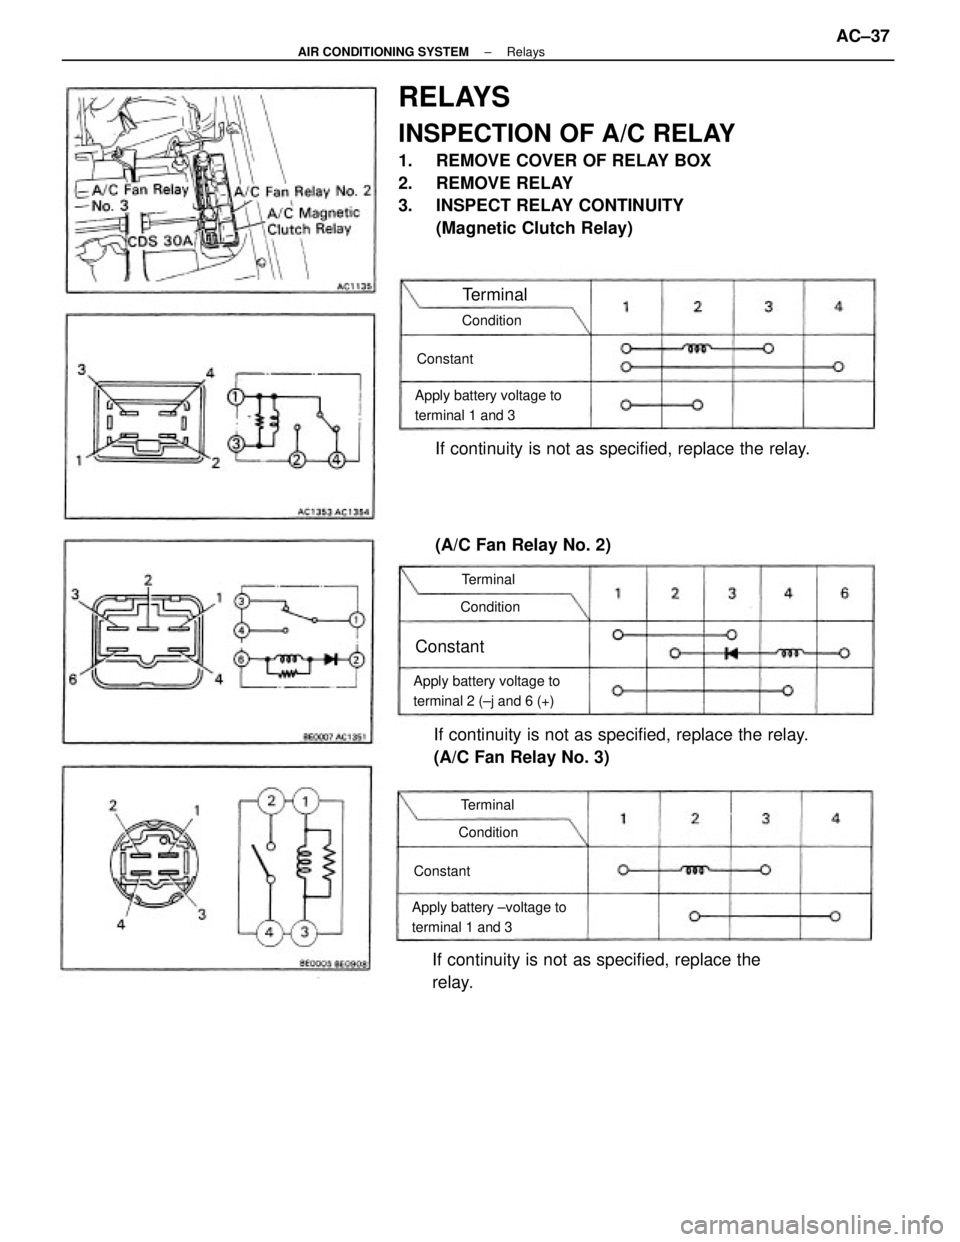
RELAYS
INSPECTION OF A/C RELAY
1. REMOVE COVER OF RELAY BOX
2. REMOVE RELAY
3. INSPECT RELAY CONTINUITY
(Magnetic Clutch Relay)
If continuity is not as specified, replace the relay.
(A/C Fan Relay No. 3)If continuity is not as specified, replace the relay.
If continuity is not as specified, replace the
relay.
Apply battery voltage to
terminal 2 (±j and 6 (+)Apply battery voltage to
terminal 1 and 3
Apply battery ±voltage to
terminal 1 and 3
(A/C Fan Relay No. 2)
Condition
ConditionCondition
Terminal
Terminal
Terminal
Constant
ConstantConstant
± AIR CONDITIONING SYSTEMRelaysAC±37