TOYOTA CAMRY V20 1986 Service Information
Manufacturer: TOYOTA, Model Year: 1986, Model line: CAMRY V20, Model: TOYOTA CAMRY V20 1986Pages: 2389, PDF Size: 84.44 MB
Page 411 of 2389
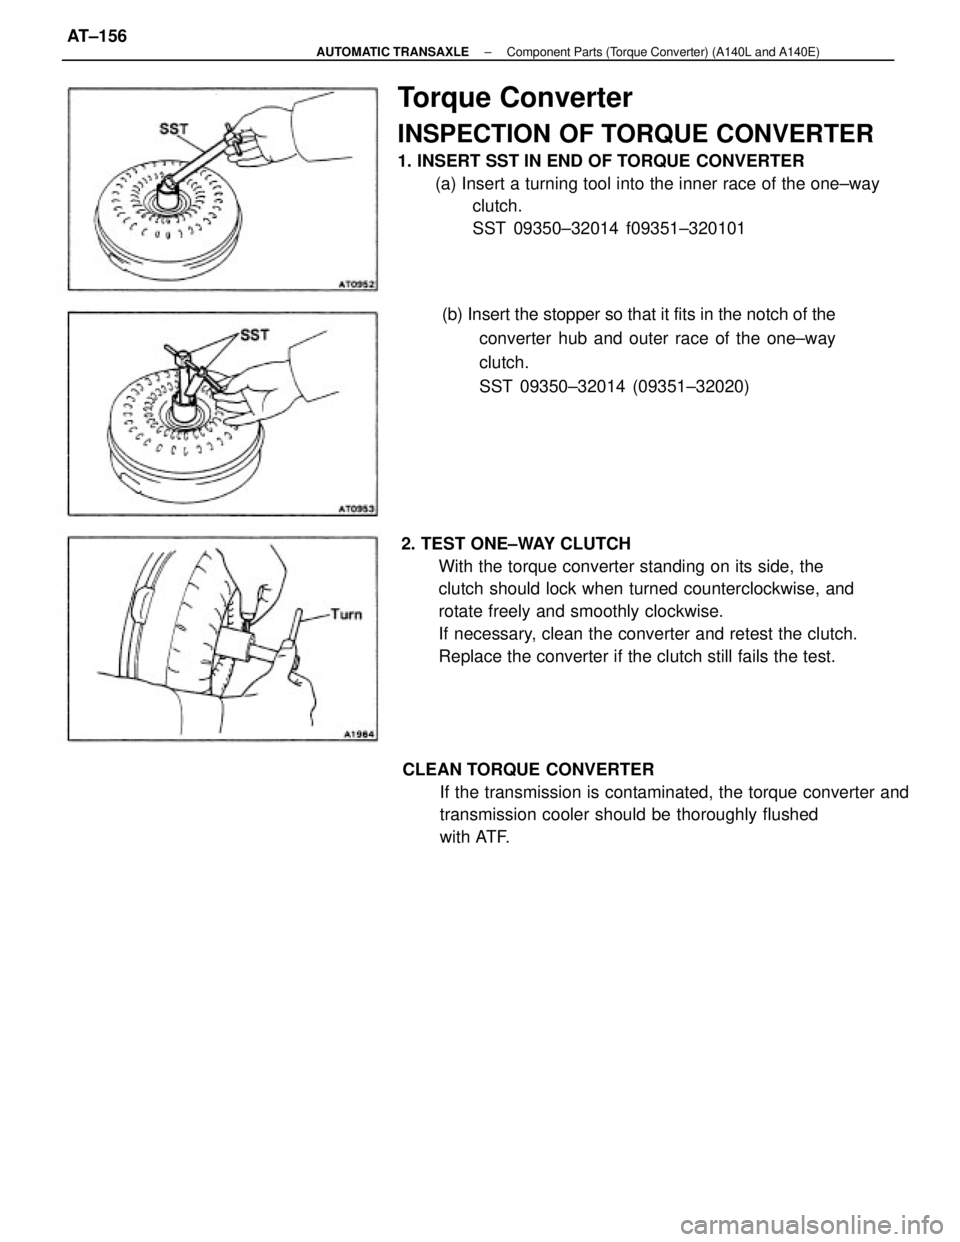
Torque Converter
INSPECTION OF TORQUE CONVERTER
1. INSERT SST IN END OF TORQUE CONVERTER
(a) Insert a turning tool into the inner race of the one±way
clutch.
SST 09350±32014 f09351±320101
2. TEST ONE±WAY CLUTCH
With the torque converter standing on its side, the
clutch should lock when turned counterclockwise, and
rotate freely and smoothly clockwise.
If necessary, clean the converter and retest the clutch.
Replace the converter if the clutch still fails the test.
CLEAN TORQUE CONVERTER
If the transmission is contaminated, the torque converter and
transmission cooler should be thoroughly flushed
with ATF.(b) Insert the stopper so that it fits in the notch of the
converter hub and outer race of the one±way
clutch.
SST 09350±32014 (09351±32020)
± AUTOMATIC TRANSAXLEComponent Parts (Torque Converter) (A140L and A140E)AT±156
Page 412 of 2389
INSTALLATION OF COMPONENT PARTS
Disassembly, inspection and assembly of each component group have been indicated in the preceding
chapter. Before assembly, make sure, again, that all component groups are assembled correctly.
If something wrong is found in a certain component group during assembly, inspect and repair this group
immediately.
Recommended ATF: DEXRON) ll
GENERAL INSTALLATION NOTES:
1. The automatic transaxle is composed of highly precision±finished parts, necessitating careful inspection be-
fore assembly because even a small nick could cause fluid leakage or affect performance.
2. Before assembling new clutch discs, soak them in automatic transaxle fluid for at least two hours.
3. Apply automatic transaxle fluid on the sliding or rotating surfaces of parts before assembly.
4. Use petroleum jelly to keep small parts in their places.
5. Do not use adhesive cements on gaskets and similar parts.
6. When assembling the transaxle, be sure to use new gaskets and O±rings.
7. Dry all parts with compressed air±never use shop rags.
± AUTOMATIC TRANSAXLEInstallation of Component Parts (A14 0L and A140E)AT±157
Page 413 of 2389
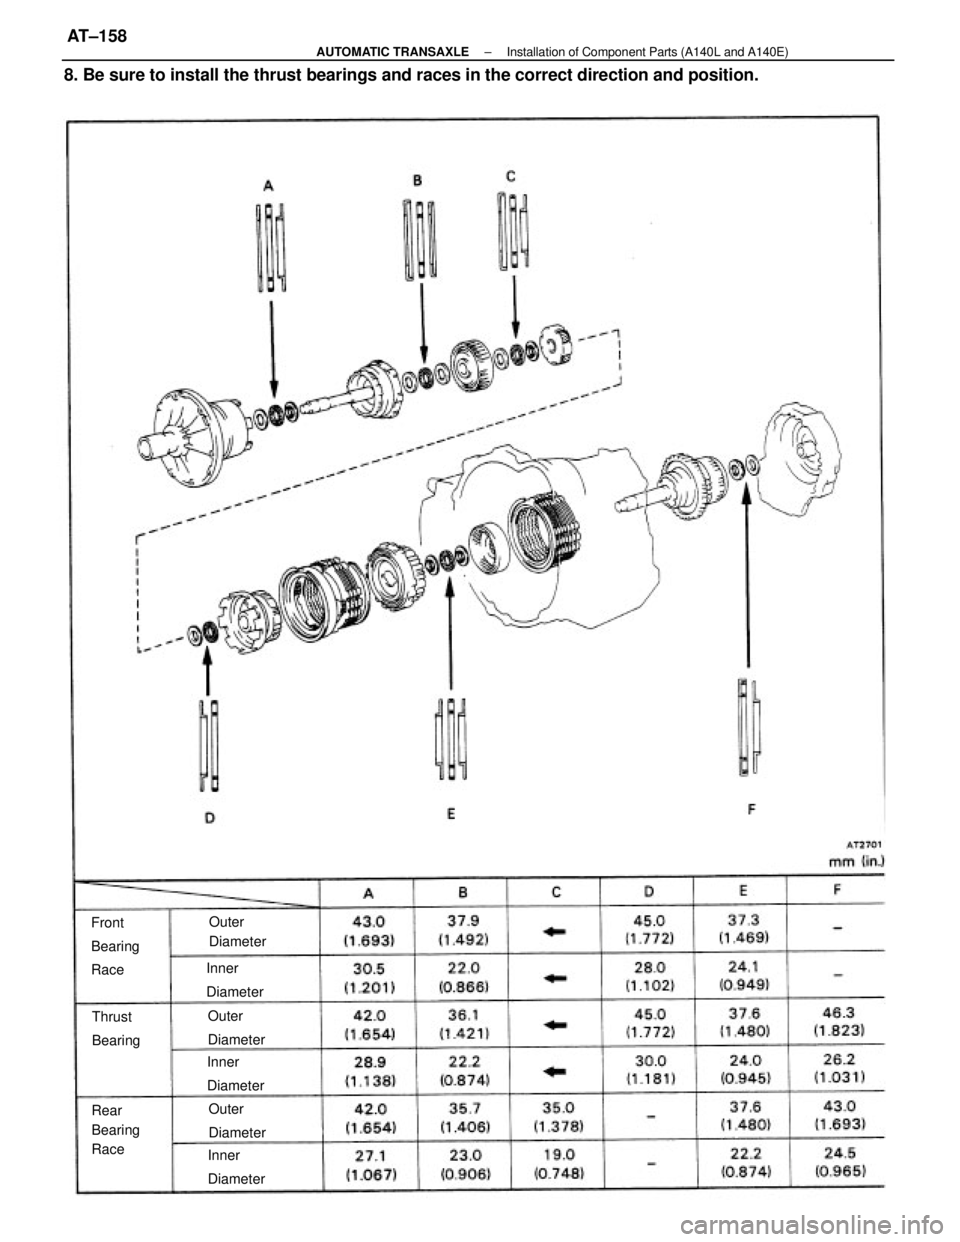
8. Be sure to install the thrust bearings and races in the correct direction and position.
Rear
Bearing
Race Front
Bearing
Race
Inner
Diameter Inner
Diameter
Inner
DiameterOuter
Diameter
Outer
Diameter Outer
Diameter Thrust
Bearing
± AUTOMATIC TRANSAXLEInstallation of Component Parts (A140L and A140E)AT±158
Page 414 of 2389
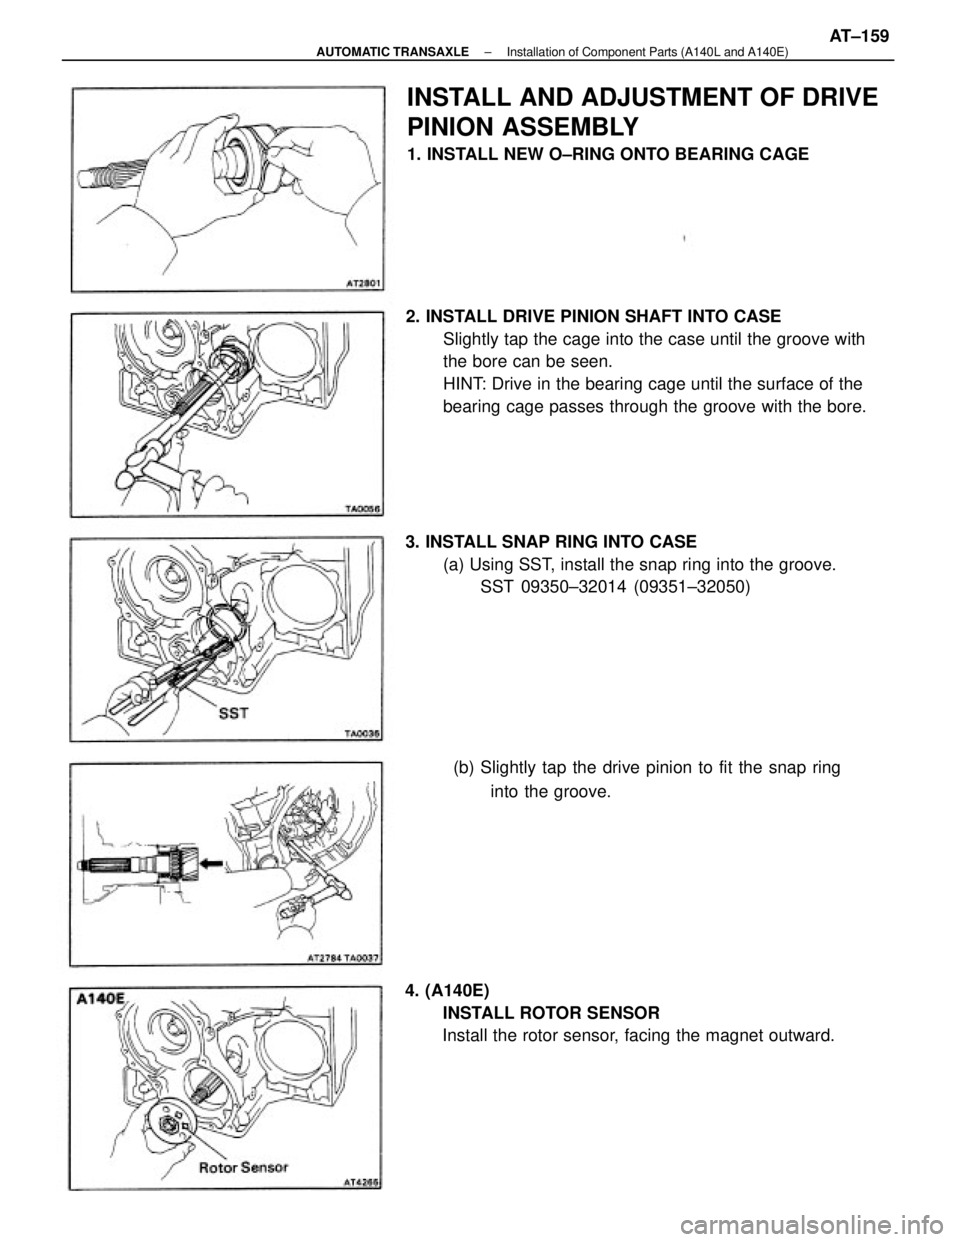
2. INSTALL DRIVE PINION SHAFT INTO CASE
Slightly tap the cage into the case until the groove with
the bore can be seen.
HINT: Drive in the bearing cage until the surface of the
bearing cage passes through the groove with the bore.
INSTALL AND ADJUSTMENT OF DRIVE
PINION ASSEMBLY
1. INSTALL NEW O±RING ONTO BEARING CAGE
3. INSTALL SNAP RING INTO CASE
(a) Using SST, install the snap ring into the groove.
SST 09350±32014 (09351±32050)
4. (A140E)
INSTALL ROTOR SENSOR
Install the rotor sensor, facing the magnet outward.(b) Slightly tap the drive pinion to fit the snap ring
into the groove.
± AUTOMATIC TRANSAXLEInstallation of Component Parts (A140L and A140E)AT±159
Page 415 of 2389
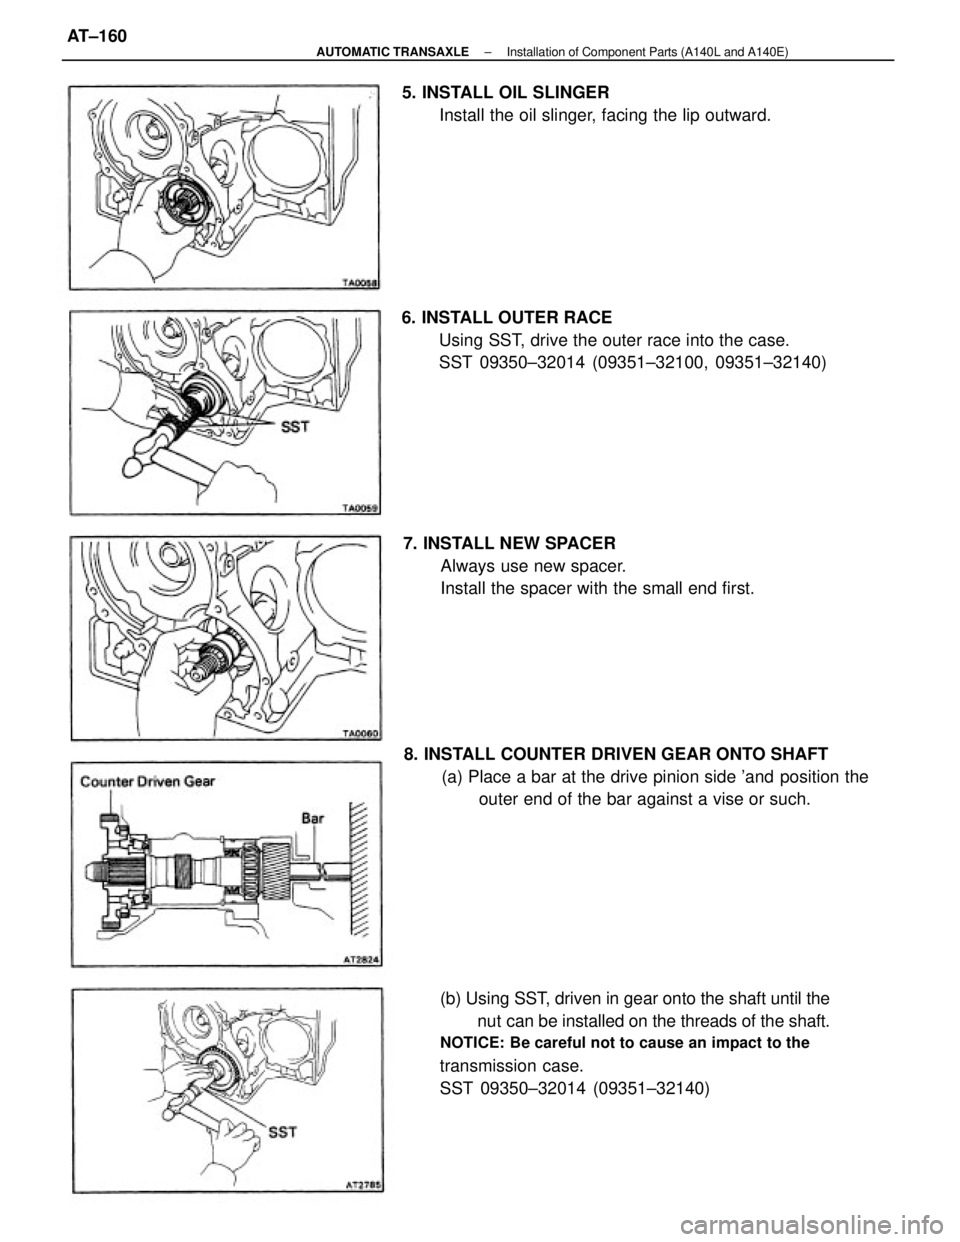
(b) Using SST, driven in gear onto the shaft until the
nut can be installed on the threads of the shaft.
NOTICE: Be careful not to cause an impact to the
transmission case.
SST 09350±32014 (09351±32140) 8. INSTALL COUNTER DRIVEN GEAR ONTO SHAFT
(a) Place a bar at the drive pinion side 'and position the
outer end of the bar against a vise or such. 6. INSTALL OUTER RACE
Using SST, drive the outer race into the case.
SST 09350±32014 (09351±32100, 09351±32140)
7. INSTALL NEW SPACER
Always use new spacer.
Install the spacer with the small end first. 5. INSTALL OIL SLINGER
Install the oil slinger, facing the lip outward.
± AUTOMATIC TRANSAXLEInstallation of Component Parts (A140L and A140E)AT±160
Page 416 of 2389
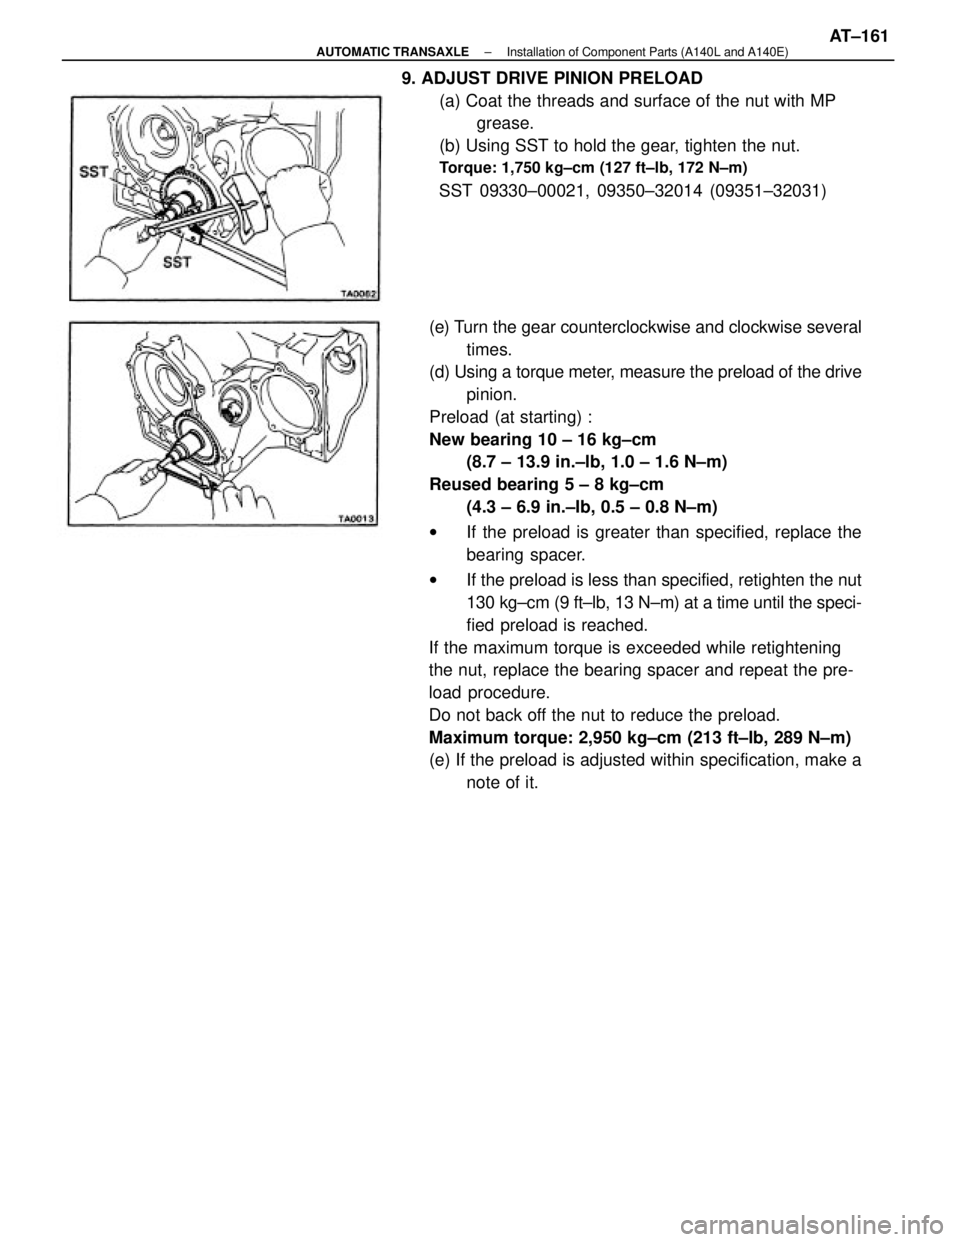
(e) Turn the gear counterclockwise and clockwise several
times.
(d) Using a torque meter, measure the preload of the drive
pinion.
Preload (at starting) :
New bearing 10 ± 16 kg±cm
(8.7 ± 13.9 in.±lb, 1.0 ± 1.6 N±m)
Reused bearing 5 ± 8 kg±cm
(4.3 ± 6.9 in.±Ib, 0.5 ± 0.8 N±m)
wIf the preload is greater than specified, replace the
bearing spacer.
wIf the preload is less than specified, retighten the nut
130 kg±cm (9 ft±lb, 13 N±m) at a time until the speci-
fied preload is reached.
If the maximum torque is exceeded while retightening
the nut, replace the bearing spacer and repeat the pre-
load procedure.
Do not back off the nut to reduce the preload.
Maximum torque: 2,950 kg±cm (213 ft±Ib, 289 N±m)
(e) If the preload is adjusted within specification, make a
note of it. 9. ADJUST DRIVE PINION PRELOAD
(a) Coat the threads and surface of the nut with MP
grease.
(b) Using SST to hold the gear, tighten the nut.
Torque: 1,750 kg±cm (127 ft±lb, 172 N±m)
SST 09330±00021, 09350±32014 (09351±32031)
± AUTOMATIC TRANSAXLEInstallation of Component Parts (A140L and A140E)AT±161
Page 417 of 2389
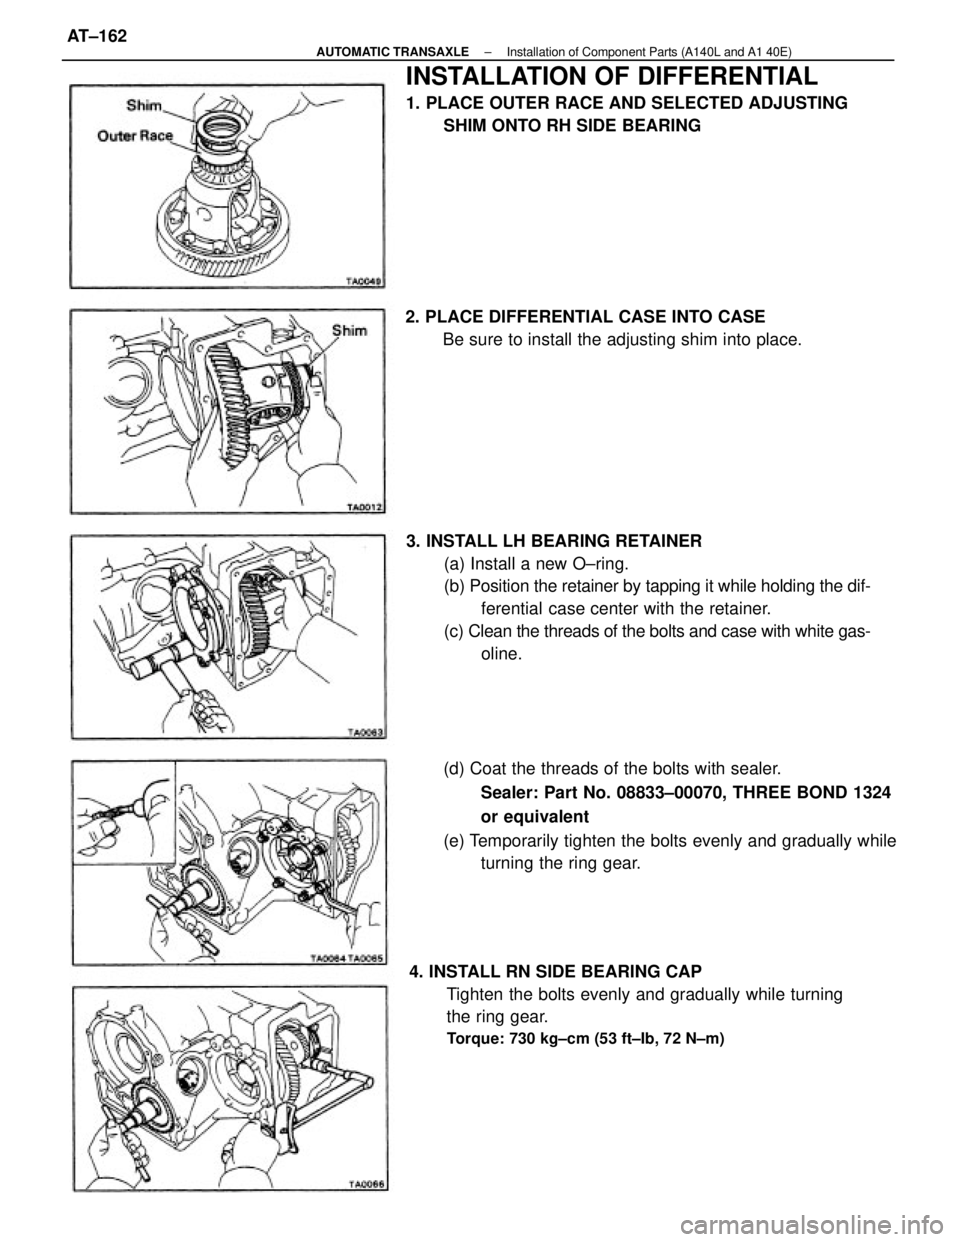
3. INSTALL LH BEARING RETAINER
(a) Install a new O±ring.
(b) Position the retainer by tapping it while holding the dif-
ferential case center with the retainer.
(c) Clean the threads of the bolts and case with white gas-
oline.
4. INSTALL RN SIDE BEARING CAP
Tighten the bolts evenly and gradually while turning
the ring gear.
Torque: 730 kg±cm (53 ft±Ib, 72 N±m)
(d) Coat the threads of the bolts with sealer.
Sealer: Part No. 08833±00070, THREE BOND 1324
or equivalent
(e) Temporarily tighten the bolts evenly and gradually while
turning the ring gear.
INSTALLATION OF DIFFERENTIAL
1. PLACE OUTER RACE AND SELECTED ADJUSTING
SHIM ONTO RH SIDE BEARING
2. PLACE DIFFERENTIAL CASE INTO CASE
Be sure to install the adjusting shim into place.
± AUTOMATIC TRANSAXLEInstallation of Component Parts (A140L and A1 40E)AT±162
Page 418 of 2389
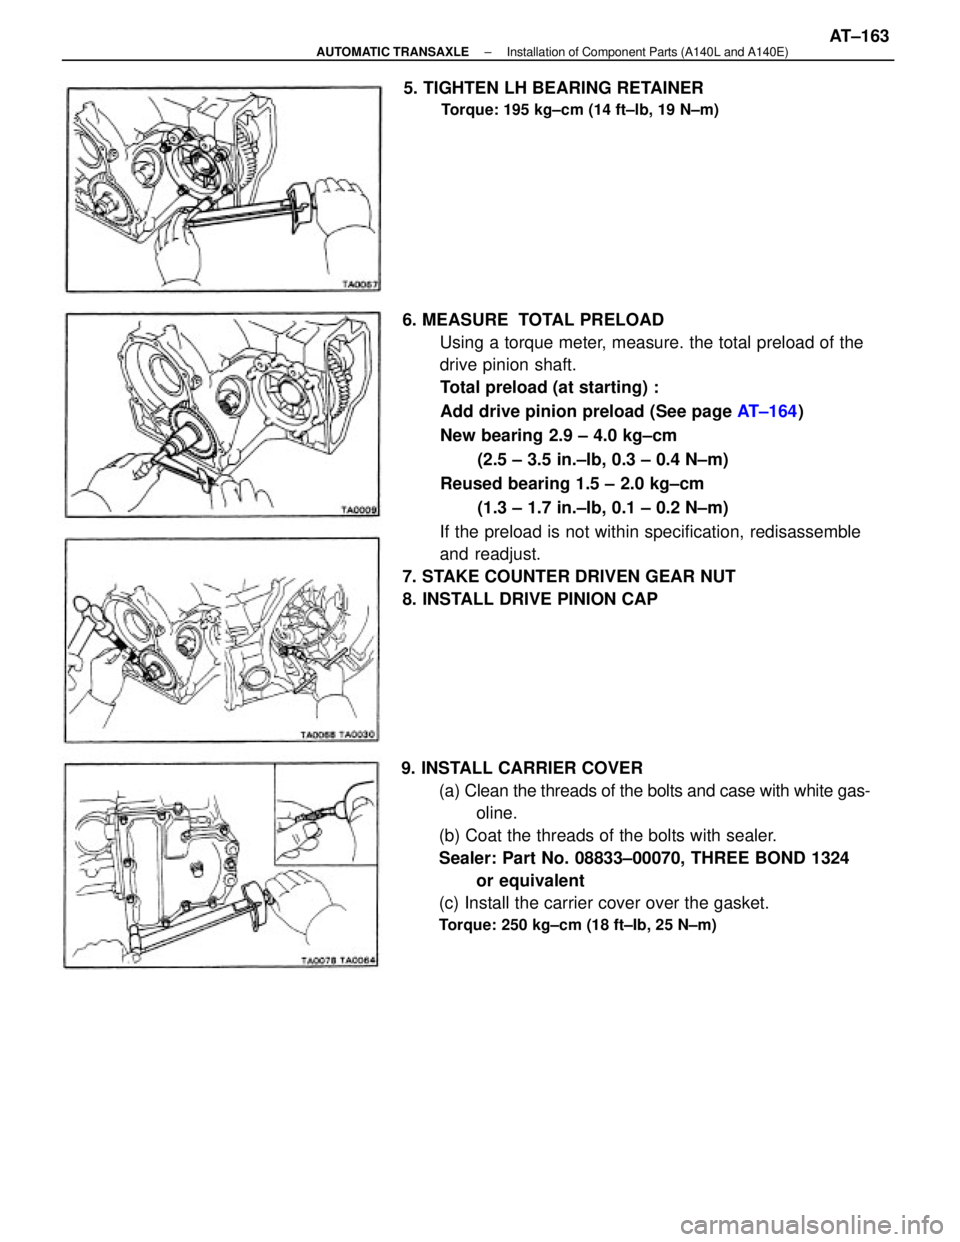
6. MEASURE TOTAL PRELOAD
Using a torque meter, measure. the total preload of the
drive pinion shaft.
Total preload (at starting) :
Add drive pinion preload (See page AT±164)
New bearing 2.9 ± 4.0 kg±cm
(2.5 ± 3.5 in.±Ib, 0.3 ± 0.4 N±m)
Reused bearing 1.5 ± 2.0 kg±cm
(1.3 ± 1.7 in.±Ib, 0.1 ± 0.2 N±m)
If the preload is not within specification, redisassemble
and readjust.
7. STAKE COUNTER DRIVEN GEAR NUT
8. INSTALL DRIVE PINION CAP
9. INSTALL CARRIER COVER
(a) Clean the threads of the bolts and case with white gas-
oline.
(b) Coat the threads of the bolts with sealer.
Sealer: Part No. 08833±00070, THREE BOND 1324
or equivalent
(c) Install the carrier cover over the gasket.
Torque: 250 kg±cm (18 ft±Ib, 25 N±m)
5. TIGHTEN LH BEARING RETAINER
Torque: 195 kg±cm (14 ft±lb, 19 N±m)
± AUTOMATIC TRANSAXLEInstallation of Component Parts (A140L and A140E)AT±163
Page 419 of 2389
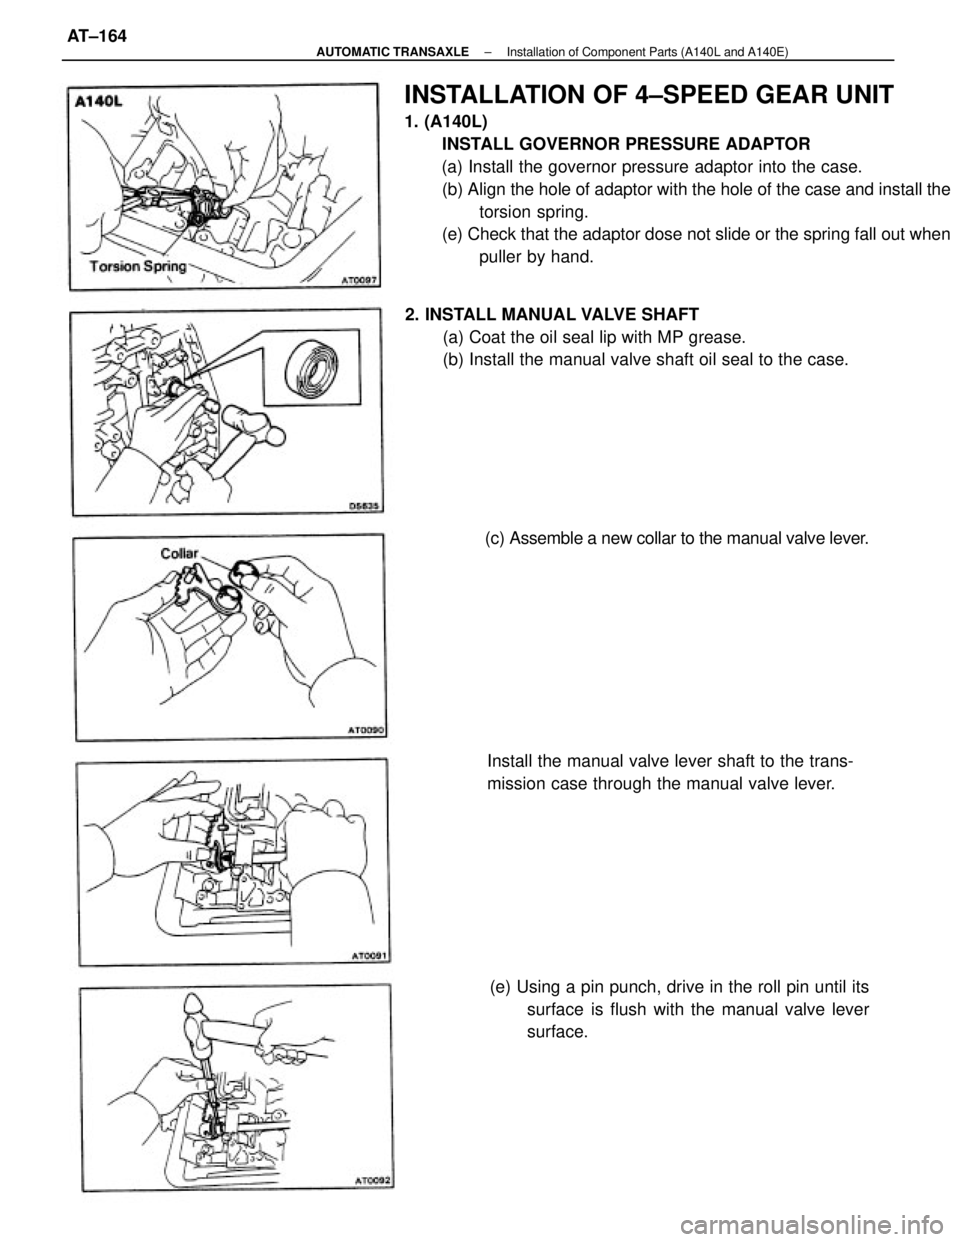
INSTALLATION OF 4±SPEED GEAR UNIT
1. (A140L)
INSTALL GOVERNOR PRESSURE ADAPTOR
(a) Install the governor pressure adaptor into the case.
(b) Align the hole of adaptor with the hole of the case and install the
torsion spring.
(e) Check that the adaptor dose not slide or the spring fall out when
puller by hand.
2. INSTALL MANUAL VALVE SHAFT
(a) Coat the oil seal lip with MP grease.
(b) Install the manual valve shaft oil seal to the case.
Install the manual valve lever shaft to the trans-
mission case through the manual valve lever.
(e) Using a pin punch, drive in the roll pin until its
surface is flush with the manual valve lever
surface. (c) Assemble a new collar to the manual valve lever.
± AUTOMATIC TRANSAXLEInstallation of Component Parts (A140L and A140E)AT±164
Page 420 of 2389
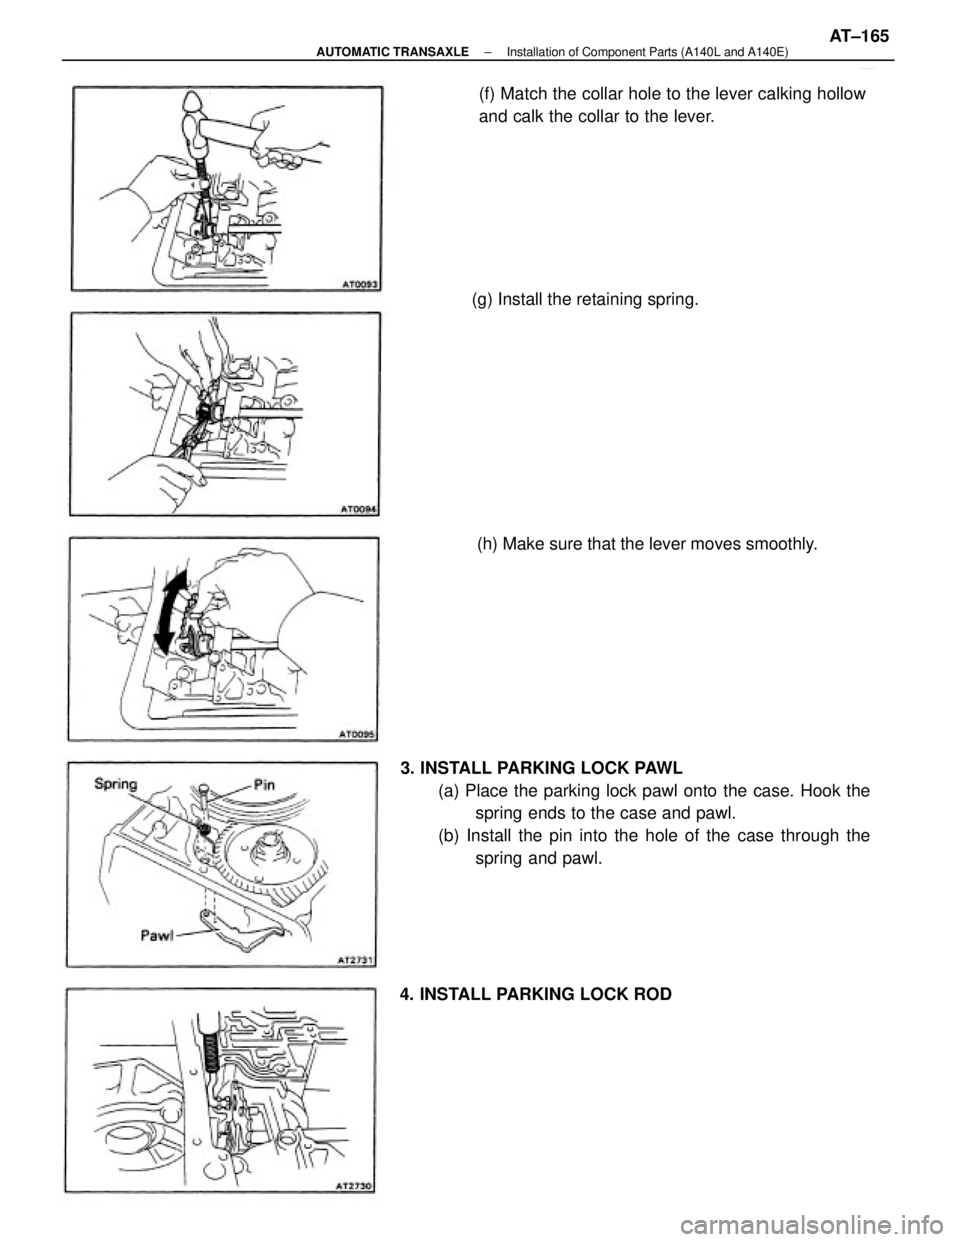
3. INSTALL PARKING LOCK PAWL
(a) Place the parking lock pawl onto the case. Hook the
spring ends to the case and pawl.
(b) Install the pin into the hole of the case through the
spring and pawl.(f) Match the collar hole to the lever calking hollow
and calk the collar to the lever.
(g) Install the retaining spring.
(h) Make sure that the lever moves smoothly.
4. INSTALL PARKING LOCK ROD
± AUTOMATIC TRANSAXLEInstallation of Component Parts (A140L and A140E)AT±165