TOYOTA RAV4 1996 Service Repair Manual
Manufacturer: TOYOTA, Model Year: 1996, Model line: RAV4, Model: TOYOTA RAV4 1996Pages: 1632, PDF Size: 41.64 MB
Page 1401 of 1632
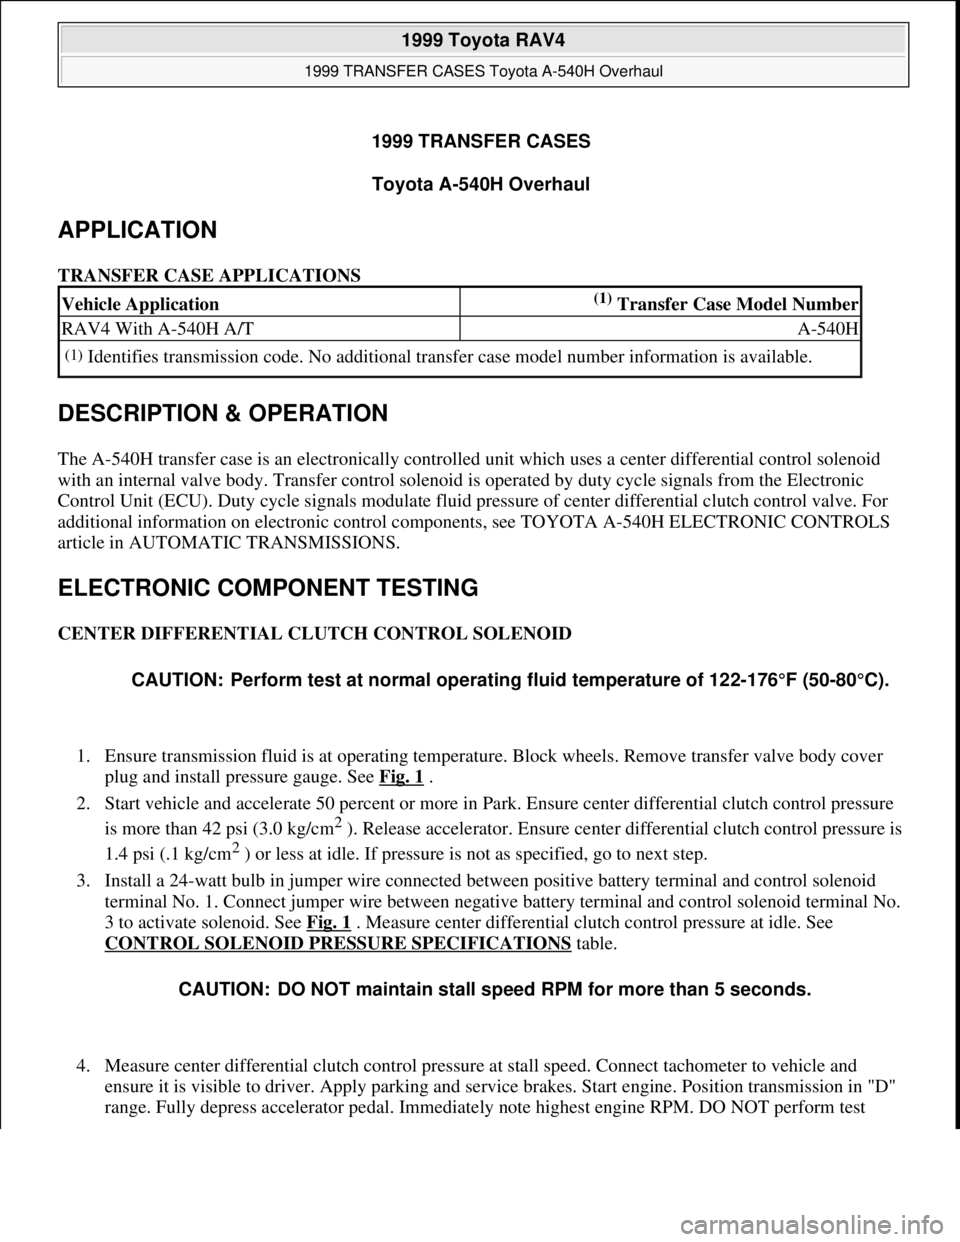
1999 TRANSFER CASES
Toyota A-540H Overhaul
APPLICATION
TRANSFER CASE APPLICATIONS
DESCRIPTION & OPERATION
The A-540H transfer case is an electronically controlled unit which uses a center differential control solenoid
with an internal valve body. Transfer control solenoid is operated by duty cycle signals from the Electronic
Control Unit (ECU). Duty cycle signals modulate fluid pressure of center differential clutch control valve. For
additional information on electronic control components, see TOYOTA A-540H ELECTRONIC CONTROLS
article in AUTOMATIC TRANSMISSIONS.
ELECTRONIC COMPONENT TESTING
CENTER DIFFERENTIAL CLUTCH CONTROL SOLENOID
1. Ensure transmission fluid is at operating temperature. Block wheels. Remove transfer valve body cover
plug and install pressure gauge. See Fig. 1
.
2. Start vehicle and accelerate 50 percent or more in Park. Ensure center differential clutch control pressure
is more than 42 psi (3.0 kg/cm
2 ). Release accelerator. Ensure center differential clutch control pressure is
1.4 psi (.1 kg/cm
2 ) or less at idle. If pressure is not as specified, go to next step.
3. Install a 24-watt bulb in jumper wire connected between positive battery terminal and control solenoid
terminal No. 1. Connect jumper wire between negative battery terminal and control solenoid terminal No.
3 to activate solenoid. See Fig. 1
. Measure center differential clutch control pressure at idle. See
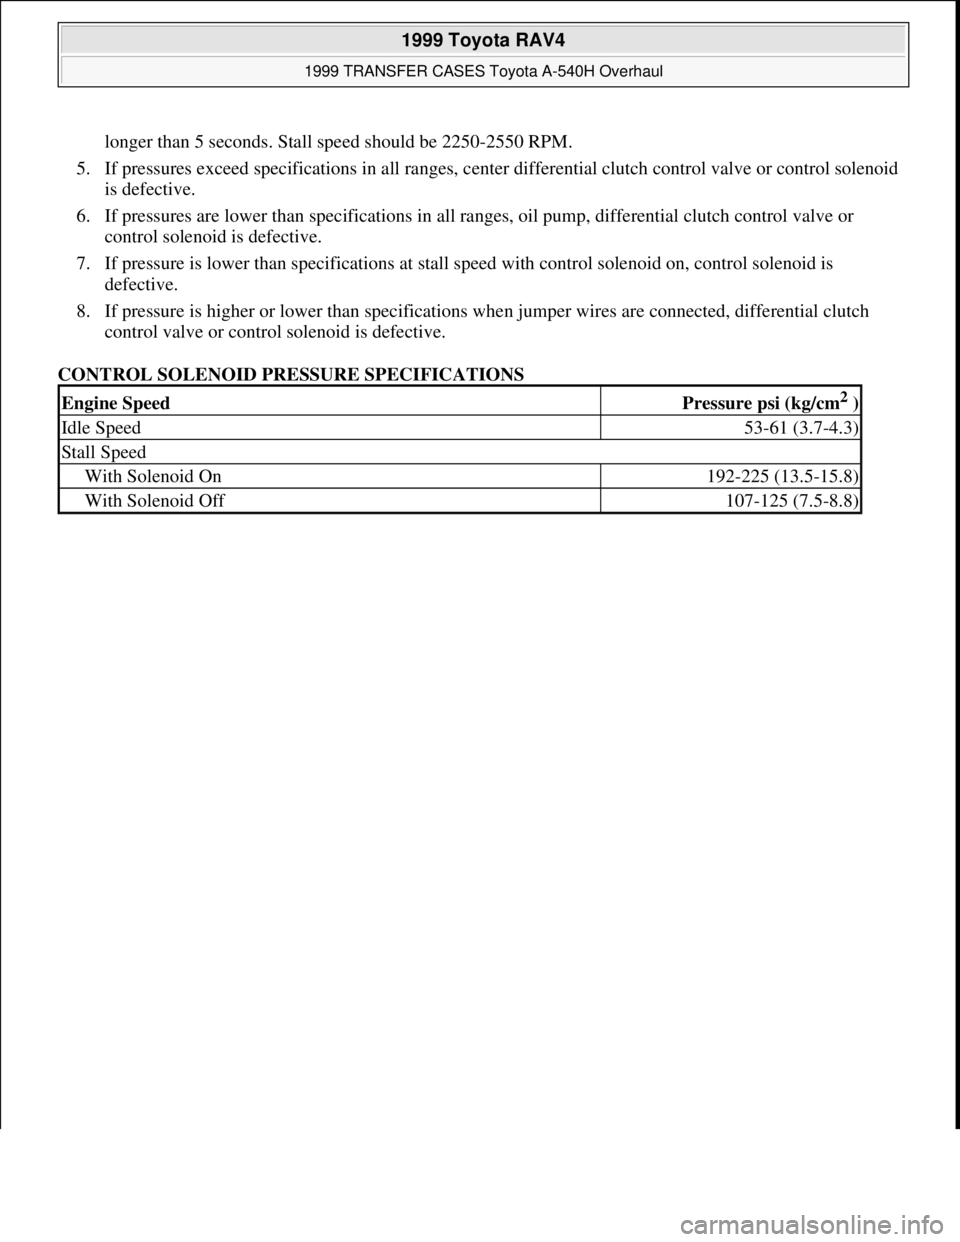
CONTROL SOLENOID PRESSURE SPECIFICATIONS
table.
4. Measure center differential clutch control pressure at stall speed. Connect tachometer to vehicle and
ensure it is visible to driver. Apply parking and service brakes. Start engine. Position transmission in "D"
ran
ge. Fully depress accelerator pedal. Immediately note highest engine RPM. DO NOT perform test
Vehicle Application(1) Transfer Case Model Number
RAV4 With A-540H A/TA-540H
(1)Identifies transmission code. No additional transfer case model number information is available.
CAUTION: Perform test at normal operating fluid temperature of 122-176°F (50-80°C).
CAUTION: DO NOT maintain stall speed RPM for more than 5 seconds.
1999 Toyota RAV4
1999 TRANSFER CASES Toyota A-540H Overhaul
1999 Toyota RAV4
1999 TRANSFER CASES Toyota A-540H Overhaul
Microsoft
Sunday, November 22, 2009 10:49:16 AMPage 1 © 2005 Mitchell Repair Information Company, LLC.
Microsoft
Sunday, November 22, 2009 10:49:19 AMPage 1 © 2005 Mitchell Repair Information Company, LLC.
Page 1402 of 1632
longer than 5 seconds. Stall speed should be 2250-2550 RPM.
5. If pressures exceed specifications in all ranges, center differential clutch control valve or control solenoid
is defective.
6. If pressures are lower than specifications in all ranges, oil pump, differential clutch control valve or
control solenoid is defective.
7. If pressure is lower than specifications at stall speed with control solenoid on, control solenoid is
defective.
8. If pressure is higher or lower than specifications when jumper wires are connected, differential clutch
control valve or control solenoid is defective.
CONTROL SOLENOID PRESSURE SPECIFICATIONS
Engine SpeedPressure psi (kg/cm2 )
Idle Speed53-61 (3.7-4.3)
Stall Speed
With Solenoid On192-225 (13.5-15.8)
With Solenoid Off107-125 (7.5-8.8)
1999 Toyota RAV4
1999 TRANSFER CASES Toyota A-540H Overhaul
Microsoft
Sunday, November 22, 2009 10:49:16 AMPage 2 © 2005 Mitchell Repair Information Company, LLC.
Page 1403 of 1632
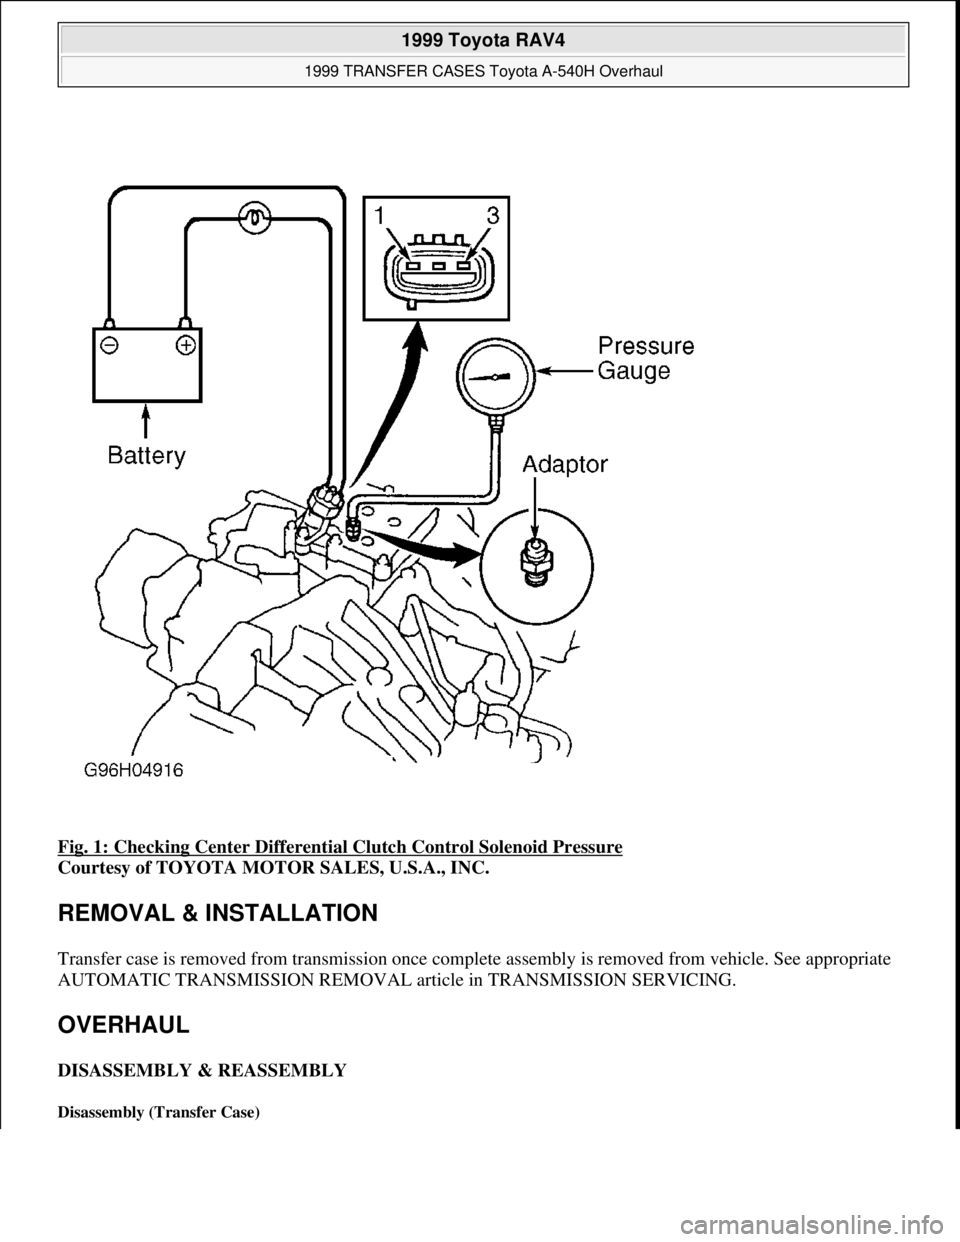
Fig. 1: Checking Center Differential Clutch Control Solenoid Pressure
Courtesy of TOYOTA MOTOR SALES, U.S.A., INC.
REMOVAL & INSTALLATION
Transfer case is removed from transmission once complete assembly is removed from vehicle. See appropriate
AUTOMATIC TRANSMISSION REMOVAL article in TRANSMISSION SERVICING.
OVERHAUL
DISASSEMBLY & REASSEMBLY
Disassembly (Transfer Case)
1999 Toyota RAV4
1999 TRANSFER CASES Toyota A-540H Overhaul
Microsoft
Sunday, November 22, 2009 10:49:16 AMPage 3 © 2005 Mitchell Repair Information Company, LLC.
Page 1404 of 1632
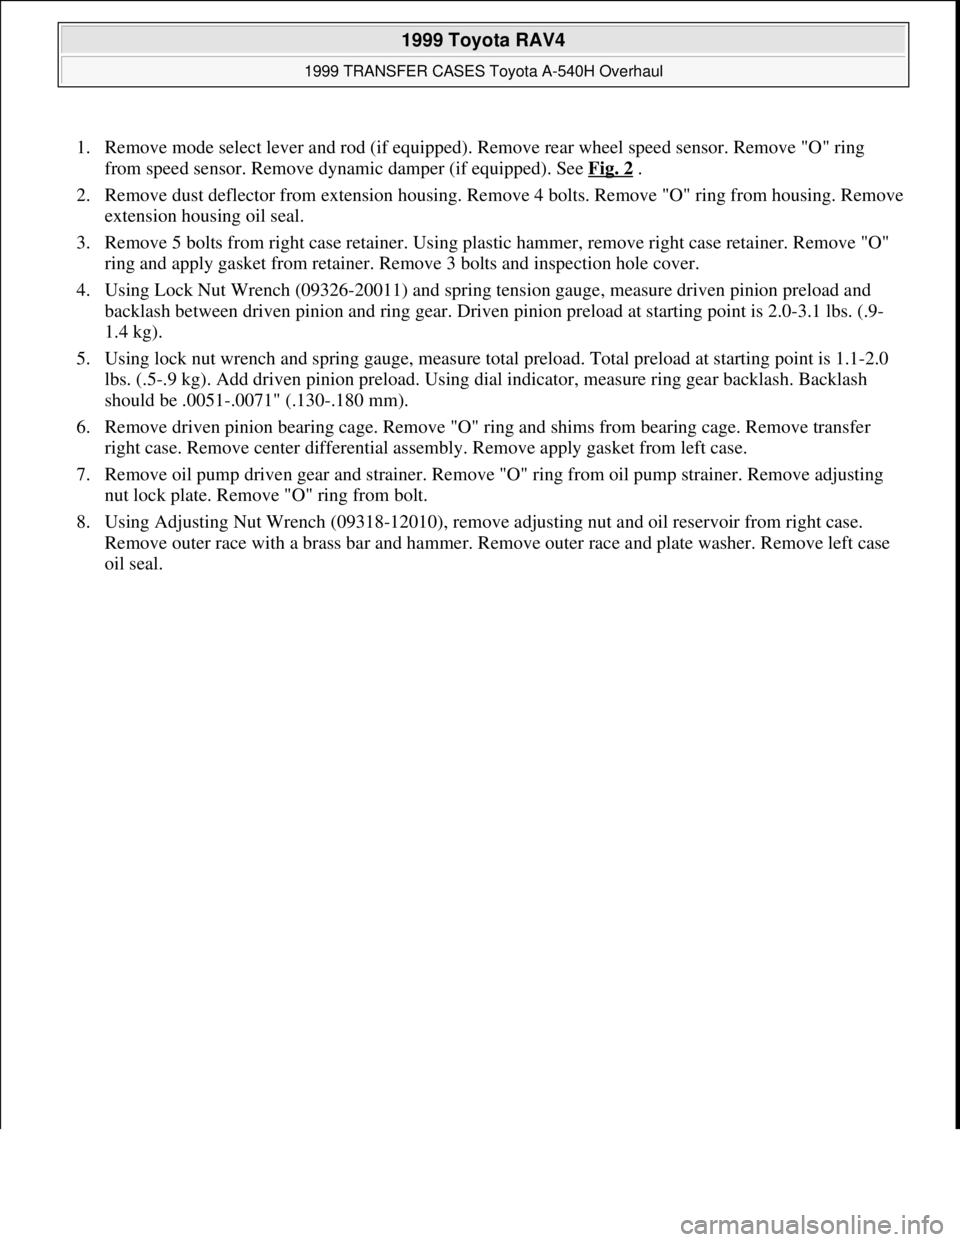
1. Remove mode select lever and rod (if equipped). Remove rear wheel speed sensor. Remove "O" ring
from speed sensor. Remove dynamic damper (if equipped). See Fig. 2
.
2. Remove dust deflector from extension housing. Remove 4 bolts. Remove "O" ring from housing. Remove
extension housing oil seal.
3. Remove 5 bolts from right case retainer. Using plastic hammer, remove right case retainer. Remove "O"
ring and apply gasket from retainer. Remove 3 bolts and inspection hole cover.
4. Using Lock Nut Wrench (09326-20011) and spring tension gauge, measure driven pinion preload and
backlash between driven pinion and ring gear. Driven pinion preload at starting point is 2.0-3.1 lbs. (.9-
1.4 kg).
5. Using lock nut wrench and spring gauge, measure total preload. Total preload at starting point is 1.1-2.0
lbs. (.5-.9 kg). Add driven pinion preload. Using dial indicator, measure ring gear backlash. Backlash
should be .0051-.0071" (.130-.180 mm).
6. Remove driven pinion bearing cage. Remove "O" ring and shims from bearing cage. Remove transfer
right case. Remove center differential assembly. Remove apply gasket from left case.
7. Remove oil pump driven gear and strainer. Remove "O" ring from oil pump strainer. Remove adjusting
nut lock plate. Remove "O" ring from bolt.
8. Using Adjusting Nut Wrench (09318-12010), remove adjusting nut and oil reservoir from right case.
Remove outer race with a brass bar and hammer. Remove outer race and plate washer. Remove left case
oil seal.
1999 Toyota RAV4
1999 TRANSFER CASES Toyota A-540H Overhaul
Microsoft
Sunday, November 22, 2009 10:49:16 AMPage 4 © 2005 Mitchell Repair Information Company, LLC.
Page 1405 of 1632
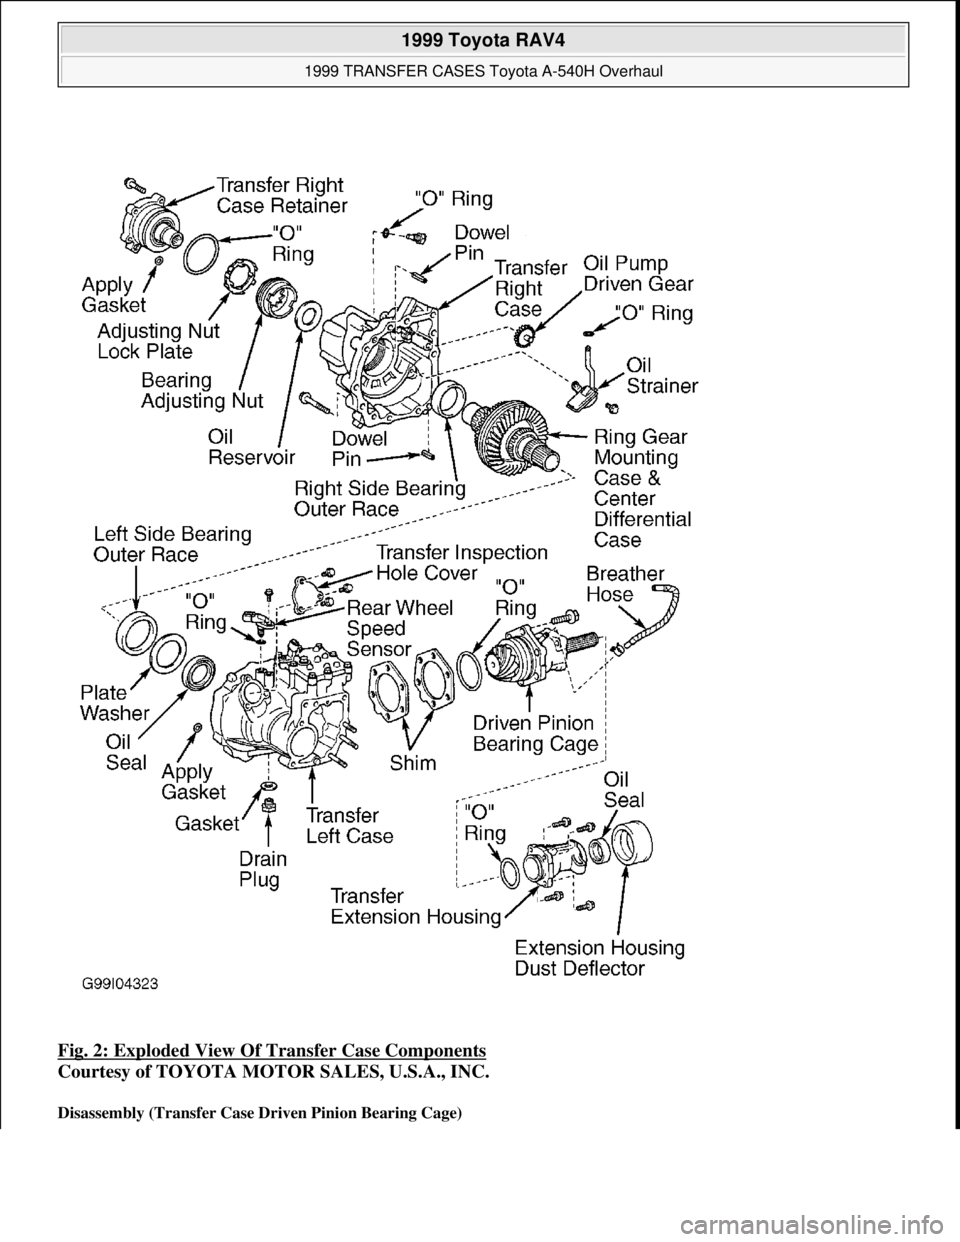
Fig. 2: Exploded View Of Transfer Case Components
Courtesy of TOYOTA MOTOR SALES, U.S.A., INC.
Disassembly (Transfer Case Driven Pinion Bearing Cage)
1999 Toyota RAV4
1999 TRANSFER CASES Toyota A-540H Overhaul
Microsoft
Sunday, November 22, 2009 10:49:16 AMPage 5 © 2005 Mitchell Repair Information Company, LLC.
Page 1406 of 1632
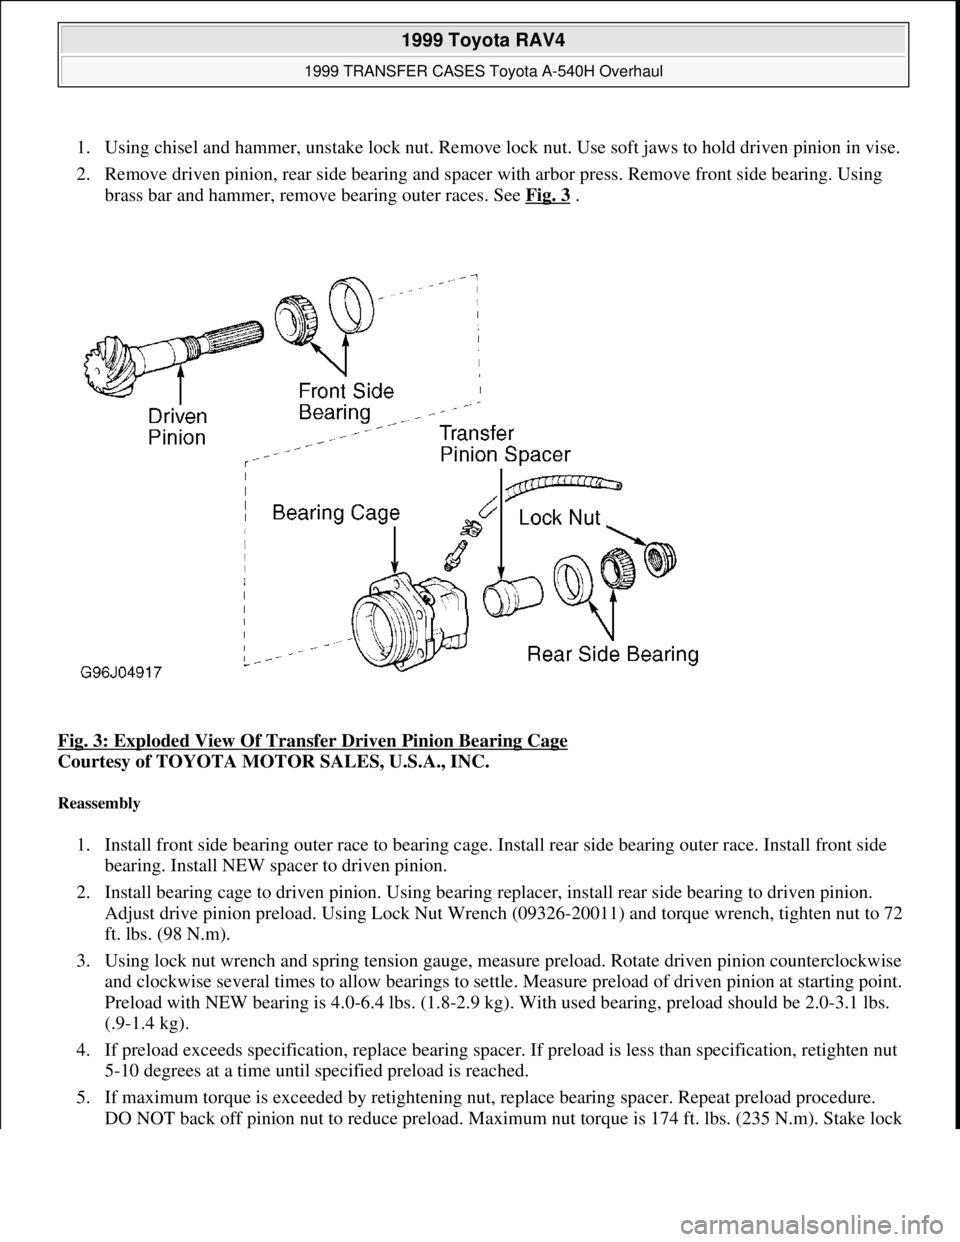
1. Using chisel and hammer, unstake lock nut. Remove lock nut. Use soft jaws to hold driven pinion in vise.
2. Remove driven pinion, rear side bearing and spacer with arbor press. Remove front side bearing. Using
brass bar and hammer, remove bearing outer races. See Fig. 3
.
Fig. 3: Exploded View Of Transfer Driven Pinion Bearing Cage
Courtesy of TOYOTA MOTOR SALES, U.S.A., INC.
Reassembly
1. Install front side bearing outer race to bearing cage. Install rear side bearing outer race. Install front side
bearing. Install NEW spacer to driven pinion.
2. Install bearing cage to driven pinion. Using bearing replacer, install rear side bearing to driven pinion.
Adjust drive pinion preload. Using Lock Nut Wrench (09326-20011) and torque wrench, tighten nut to 72
ft. lbs. (98 N.m).
3. Using lock nut wrench and spring tension gauge, measure preload. Rotate driven pinion counterclockwise
and clockwise several times to allow bearings to settle. Measure preload of driven pinion at starting point.
Preload with NEW bearing is 4.0-6.4 lbs. (1.8-2.9 kg). With used bearing, preload should be 2.0-3.1 lbs.
(.9-1.4 kg).
4. If preload exceeds specification, replace bearing spacer. If preload is less than specification, retighten nut
5-10 degrees at a time until specified preload is reached.
5. If maximum torque is exceeded by retightening nut, replace bearing spacer. Repeat preload procedure.
DO NOT back off pinion nut to reduce preload. Maximum nut torque is 174 ft. lbs. (235 N.m). Stake lock
1999 Toyota RAV4
1999 TRANSFER CASES Toyota A-540H Overhaul
Microsoft
Sunday, November 22, 2009 10:49:16 AMPage 6 © 2005 Mitchell Repair Information Company, LLC.
Page 1407 of 1632
nut.
Disassembly (Transfer Right Case Retainer)
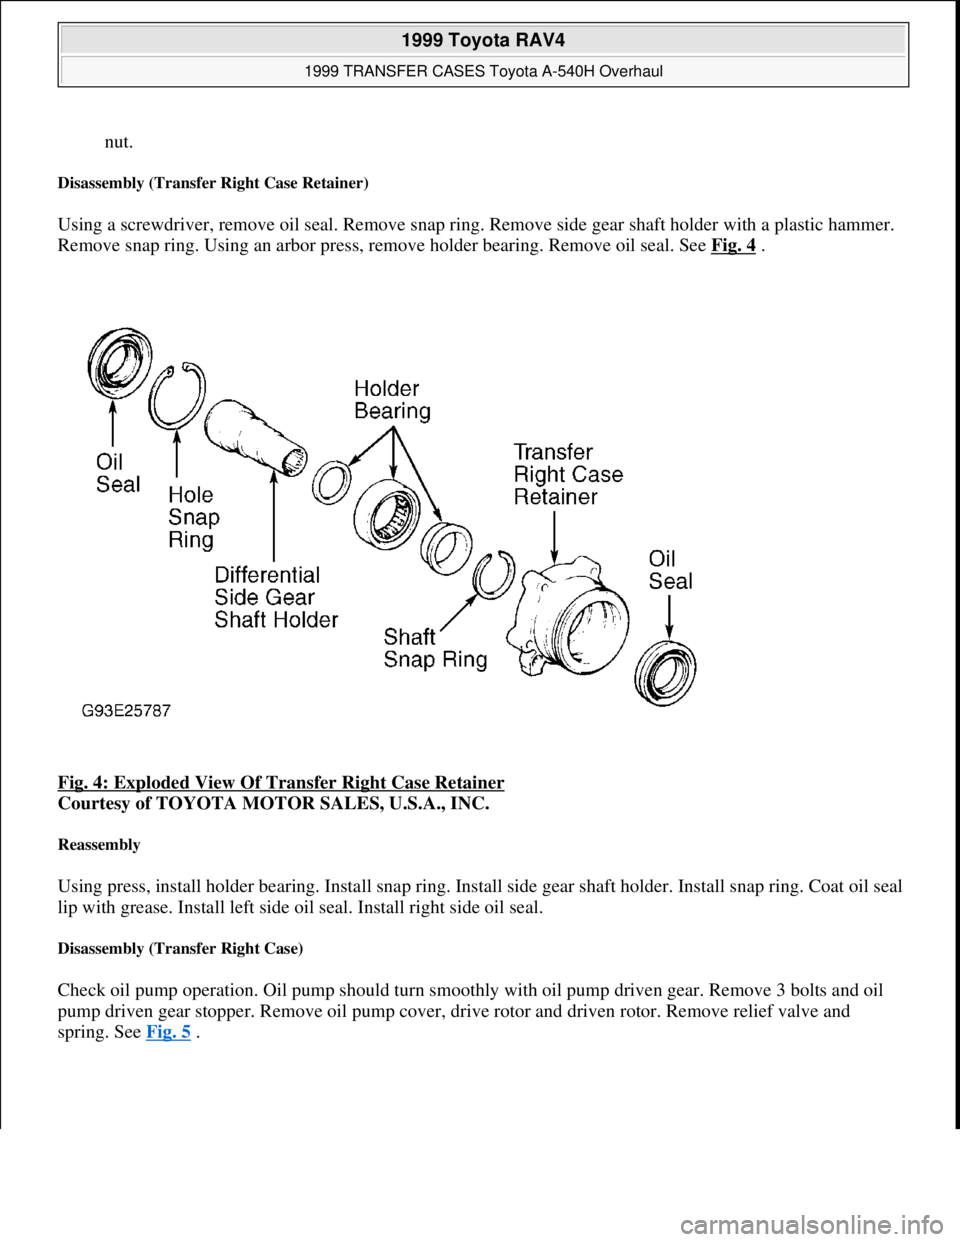
Using a screwdriver, remove oil seal. Remove snap ring. Remove side gear shaft holder with a plastic hammer.
Remove snap ring. Using an arbor press, remove holder bearing. Remove oil seal. See Fig. 4
.
Fig. 4: Exploded View Of Transfer Right Case Retainer
Courtesy of TOYOTA MOTOR SALES, U.S.A., INC.
Reassembly
Using press, install holder bearing. Install snap ring. Install side gear shaft holder. Install snap ring. Coat oil seal
lip with grease. Install left side oil seal. Install right side oil seal.
Disassembly (Transfer Right Case)
Check oil pump operation. Oil pump should turn smoothly with oil pump driven gear. Remove 3 bolts and oil
pump driven gear stopper. Remove oil pump cover, drive rotor and driven rotor. Remove relief valve and
spring. See Fig. 5
.
1999 Toyota RAV4
1999 TRANSFER CASES Toyota A-540H Overhaul
Microsoft
Sunday, November 22, 2009 10:49:16 AMPage 7 © 2005 Mitchell Repair Information Company, LLC.
Page 1408 of 1632
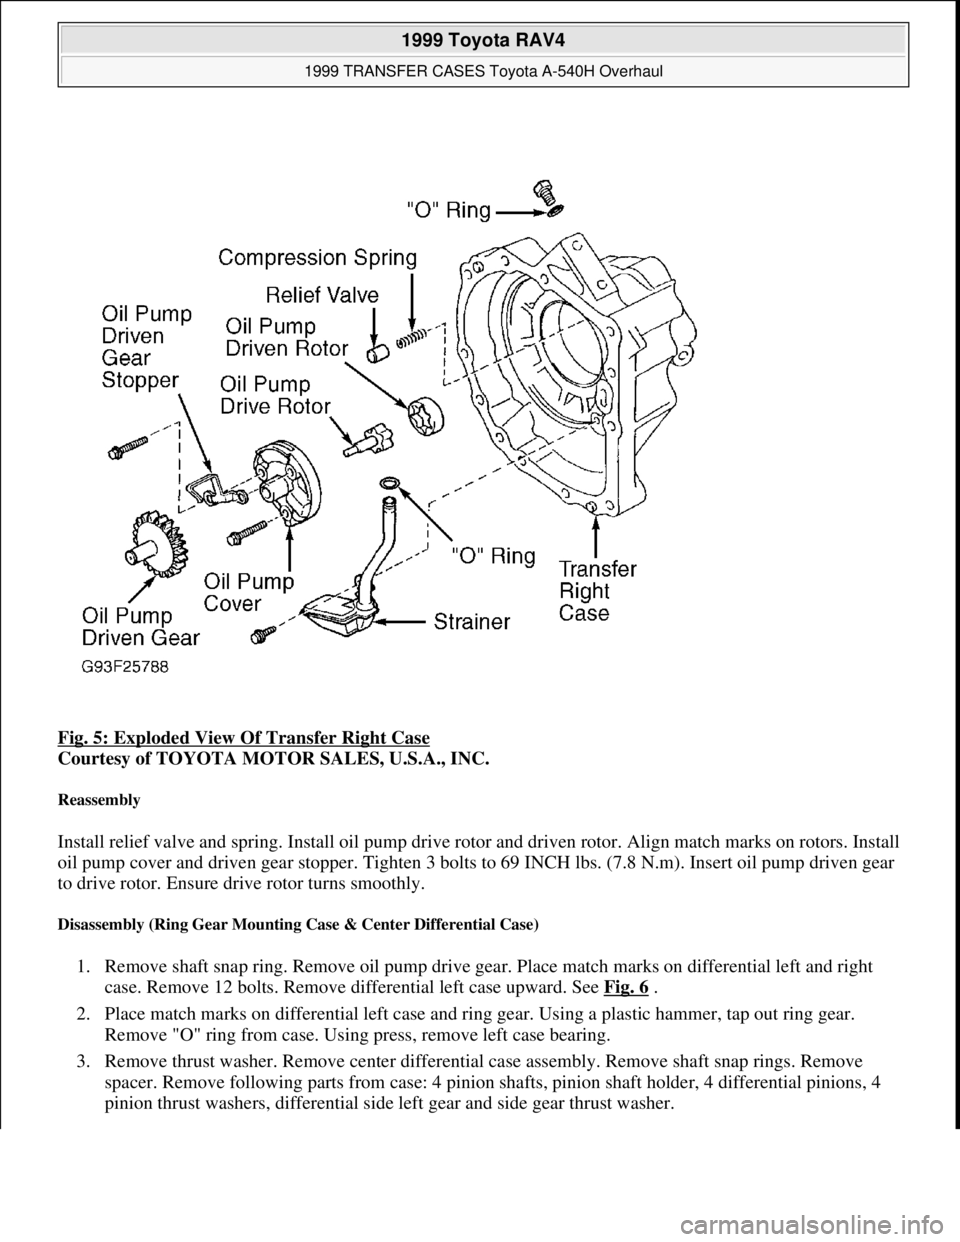
Fig. 5: Exploded View Of Transfer Right Case
Courtesy of TOYOTA MOTOR SALES, U.S.A., INC.
Reassembly
Install relief valve and spring. Install oil pump drive rotor and driven rotor. Align match marks on rotors. Install
oil pump cover and driven gear stopper. Tighten 3 bolts to 69 INCH lbs. (7.8 N.m). Insert oil pump driven gear
to drive rotor. Ensure drive rotor turns smoothly.
Disassembly (Ring Gear Mounting Case & Center Differential Case)
1. Remove shaft snap ring. Remove oil pump drive gear. Place match marks on differential left and right
case. Remove 12 bolts. Remove differential left case upward. See Fig. 6
.
2. Place match marks on differential left case and ring gear. Using a plastic hammer, tap out ring gear.
Remove "O" ring from case. Using press, remove left case bearing.
3. Remove thrust washer. Remove center differential case assembly. Remove shaft snap rings. Remove
spacer. Remove following parts from case: 4 pinion shafts, pinion shaft holder, 4 differential pinions, 4
pinion thrust washers, differential side left gear and side gear thrust washer.
1999 Toyota RAV4
1999 TRANSFER CASES Toyota A-540H Overhaul
Microsoft
Sunday, November 22, 2009 10:49:16 AMPage 8 © 2005 Mitchell Repair Information Company, LLC.
Page 1409 of 1632
4. Remove differential side right gear and conical spring washer. Note direction of conical spring washer for
reassembly reference. Using bearing puller and an arbor press, remove right case bearing.
Reassembly
1. Using Bearing Replacer (09316-12010) and Bearing Tool Set (09950-70010), press in right case bearing
with an arbor press. Using bearing replacer and bearing tool set, press in left case bearing with an arbor
press.
2. Clean contact surface of ring gear mounting left case. Heat ring gear to about 212°F (100°C) in an oil
bath. DO NOT heat ring above 230°F (110°C). Clean contact surface of ring gear with cleaning solvent.
Quickly install ring gear on ring gear mounting left case.
3. Install following parts to center differential case: side gear thrust washer, differential side left gear, 4
pinion thrust washers, 4 differential pinions, pinion shaft holder and 4 pinion shafts. Install spacer to
center differential case. Using a dial indicator, measure side gear backlash while holding one pinion
toward case. Backlash is .0020-.0079" (.050-.200 mm). If backlash exceeds specification, install correct
thrust washer on side gears. See SIDE GEAR THRUST WASHER SPECIFICATIONS
table for
available thrust washer sizes.
4. Install differential side right gear. DO NOT install conical spring washer. Install center differential case.
Install thrust washer. Align match marks on left and right cases. Install 12 bolts. Tighten to 72 ft. lbs. (97
N.m). DO NOT install "O" ring. Using a caliper, measure conical spring washer thickness. Measure thrust
clearance of center differential case while holding ring gear mounting case. See Fig. 7
and Fig. 8 .
5. See SIDE GEAR THRUST WASHER SPECIFICATIONS
table. Select thrust washer which will
ensure backlash is within specification. Install differential side gear and conical spring washer. Ensure
correct direction of conical spring washer.
6. Install center differential case. Install correct thrust washer. Install NEW "O" ring on left case. Align
match marks on right and left case. Install 12 bolts. Tighten to 72 ft. lbs. (97 N.m). Install oil pump drive
gear. Install shaft snap ring.
1999 Toyota RAV4
1999 TRANSFER CASES Toyota A-540H Overhaul
Microsoft
Sunday, November 22, 2009 10:49:16 AMPage 9 © 2005 Mitchell Repair Information Company, LLC.
Page 1410 of 1632
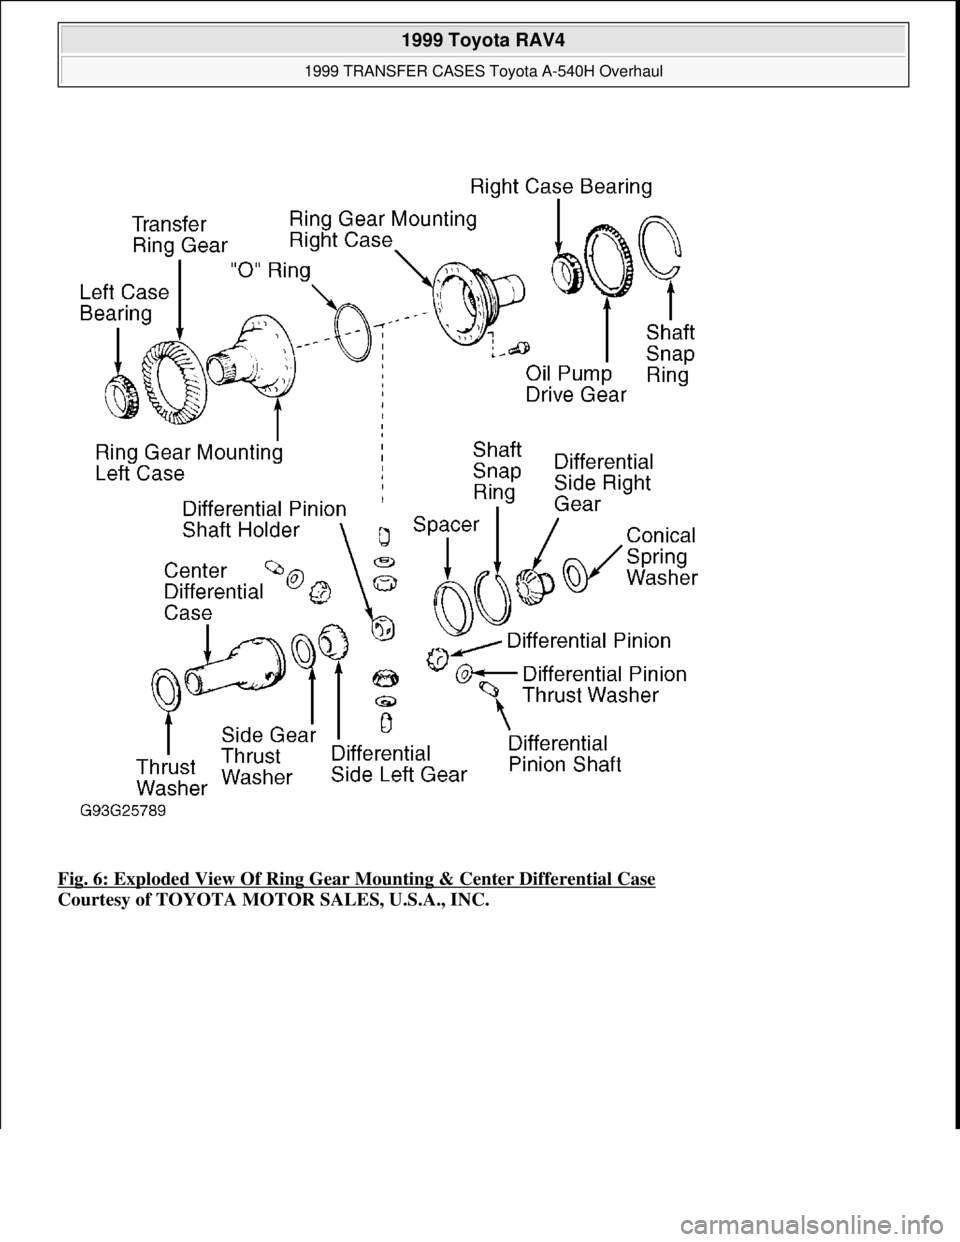
Fig. 6: Exploded View Of Ring Gear Mounting & Center Differential Case
Courtesy of TOYOTA MOTOR SALES, U.S.A., INC.
1999 Toyota RAV4
1999 TRANSFER CASES Toyota A-540H Overhaul
Microsoft
Sunday, November 22, 2009 10:49:16 AMPage 10 © 2005 Mitchell Repair Information Company, LLC.