TOYOTA RAV4 2006 Service Repair Manual
Manufacturer: TOYOTA, Model Year: 2006, Model line: RAV4, Model: TOYOTA RAV4 2006Pages: 2000, PDF Size: 45.84 MB
Page 741 of 2000
EM–1042GR-FE ENGINE MECHANICAL – ENGINE UNIT
EM
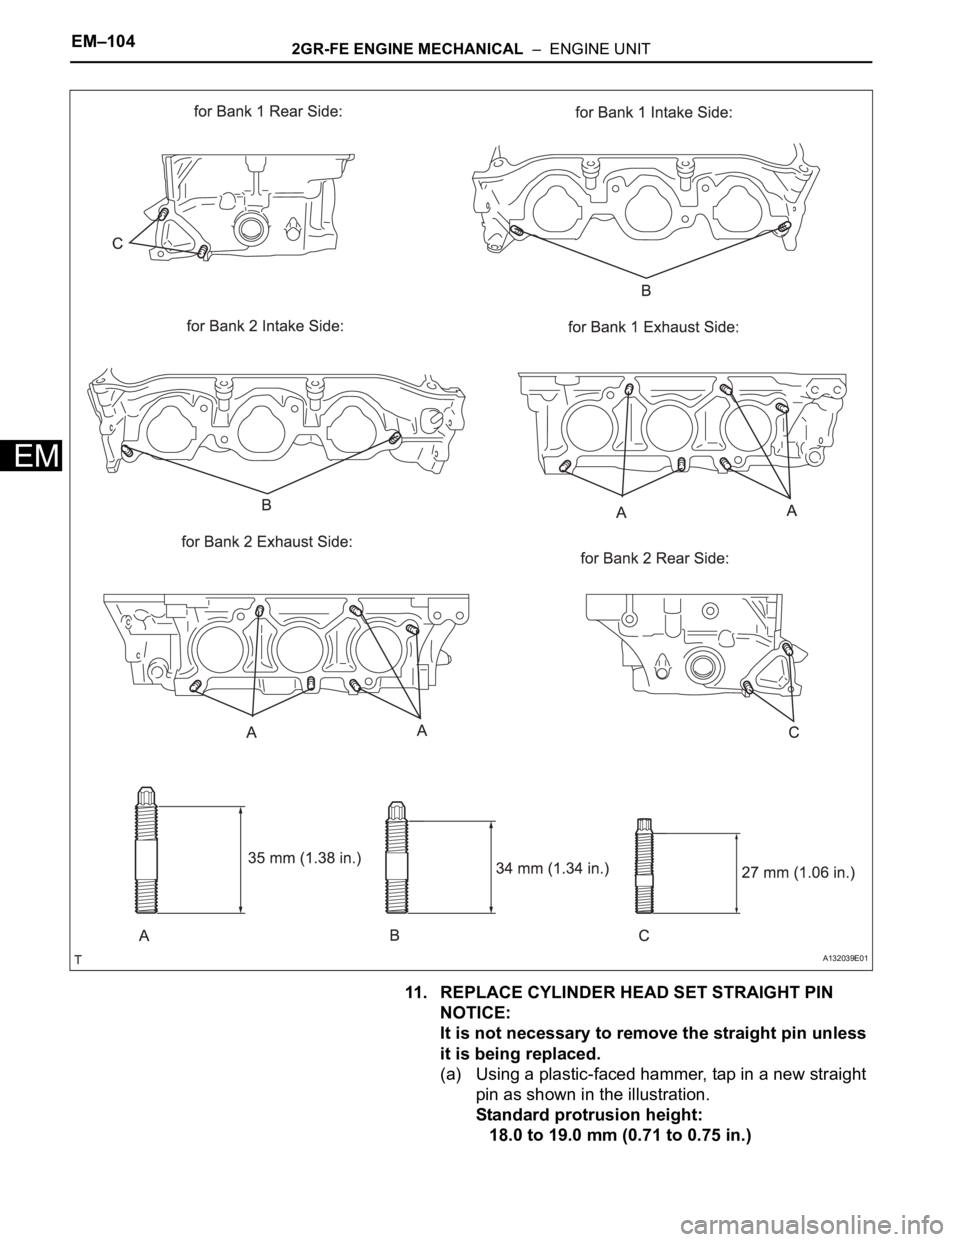
11. REPLACE CYLINDER HEAD SET STRAIGHT PIN
NOTICE:
It is not necessary to remove the straight pin unless
it is being replaced.
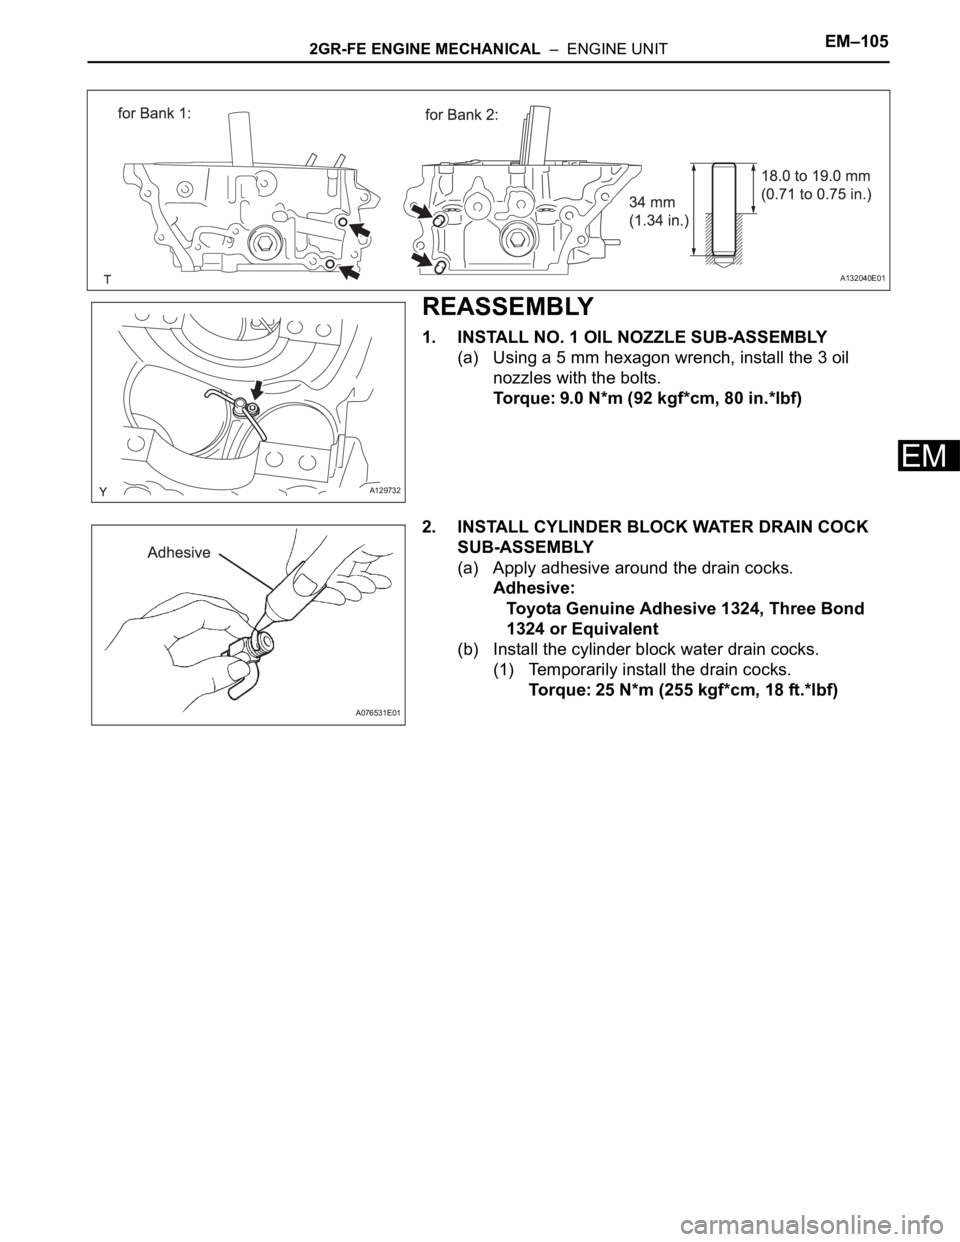
(a) Using a plastic-faced hammer, tap in a new straight
pin as shown in the illustration.
Standard protrusion height:
18.0 to 19.0 mm (0.71 to 0.75 in.)
A132039E01
Page 742 of 2000
2GR-FE ENGINE MECHANICAL – ENGINE UNITEM–105
EM
REASSEMBLY
1. INSTALL NO. 1 OIL NOZZLE SUB-ASSEMBLY
(a) Using a 5 mm hexagon wrench, install the 3 oil
nozzles with the bolts.
Torque: 9.0 N*m (92 kgf*cm, 80 in.*lbf)
2. INSTALL CYLINDER BLOCK WATER DRAIN COCK
SUB-ASSEMBLY
(a) Apply adhesive around the drain cocks.
Adhesive:
Toyota Genuine Adhesive 1324, Three Bond
1324 or Equivalent
(b) Install the cylinder block water drain cocks.
(1) Temporarily install the drain cocks.
Torque: 25 N*m (255 kgf*cm, 18 ft.*lbf)
A132040E01
A129732
A076531E01
Page 743 of 2000
EM–1062GR-FE ENGINE MECHANICAL – ENGINE UNIT
EM
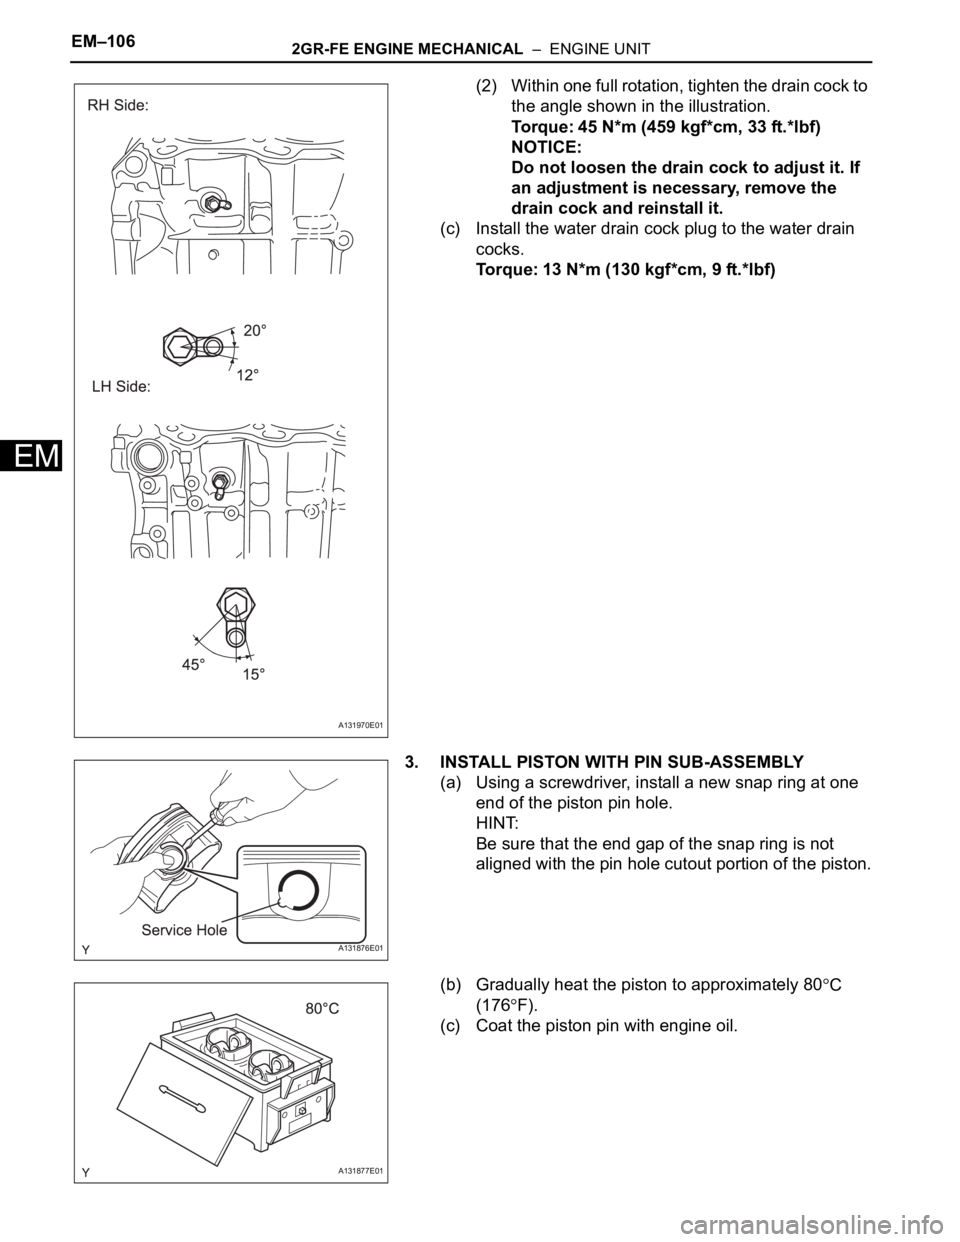
(2) Within one full rotation, tighten the drain cock to
the angle shown in the illustration.
Torque: 45 N*m (459 kgf*cm, 33 ft.*lbf)
NOTICE:
Do not loosen the drain cock to adjust it. If
an adjustment is necessary, remove the
drain cock and reinstall it.
(c) Install the water drain cock plug to the water drain
cocks.
Torque: 13 N*m (130 kgf*cm, 9 ft.*lbf)
3. INSTALL PISTON WITH PIN SUB-ASSEMBLY
(a) Using a screwdriver, install a new snap ring at one
end of the piston pin hole.
HINT:
Be sure that the end gap of the snap ring is not
aligned with the pin hole cutout portion of the piston.
(b) Gradually heat the piston to approximately 80
C
(176
F).
(c) Coat the piston pin with engine oil.
A131970E01
A131876E01
A131877E01
Page 744 of 2000
2GR-FE ENGINE MECHANICAL – ENGINE UNITEM–107
EM
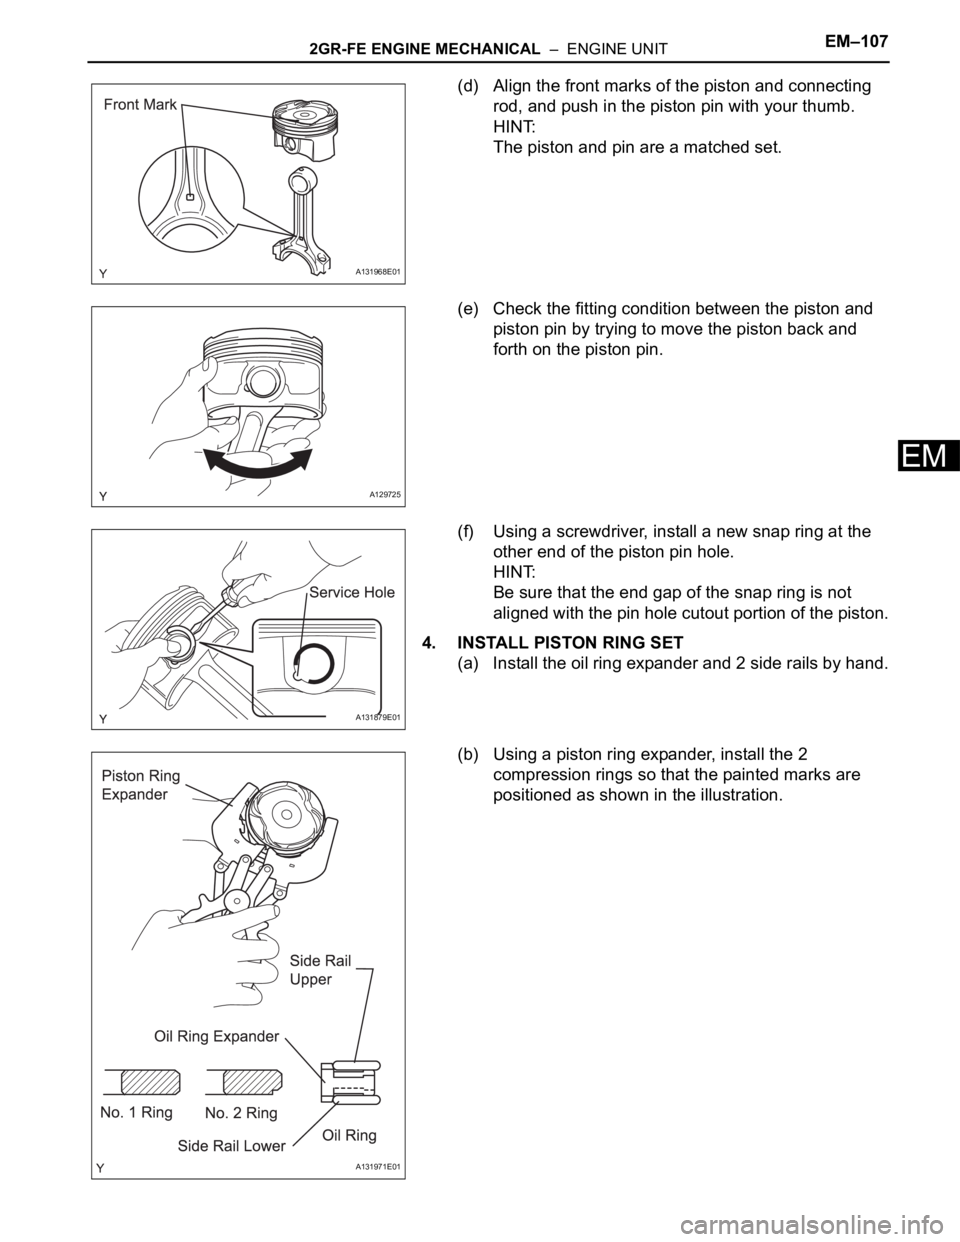
(d) Align the front marks of the piston and connecting
rod, and push in the piston pin with your thumb.
HINT:
The piston and pin are a matched set.
(e) Check the fitting condition between the piston and
piston pin by trying to move the piston back and
forth on the piston pin.
(f) Using a screwdriver, install a new snap ring at the
other end of the piston pin hole.
HINT:
Be sure that the end gap of the snap ring is not
aligned with the pin hole cutout portion of the piston.
4. INSTALL PISTON RING SET
(a) Install the oil ring expander and 2 side rails by hand.
(b) Using a piston ring expander, install the 2
compression rings so that the painted marks are
positioned as shown in the illustration.
A131968E01
A129725
A131879E01
A131971E01
Page 745 of 2000
EM–1082GR-FE ENGINE MECHANICAL – ENGINE UNIT
EM
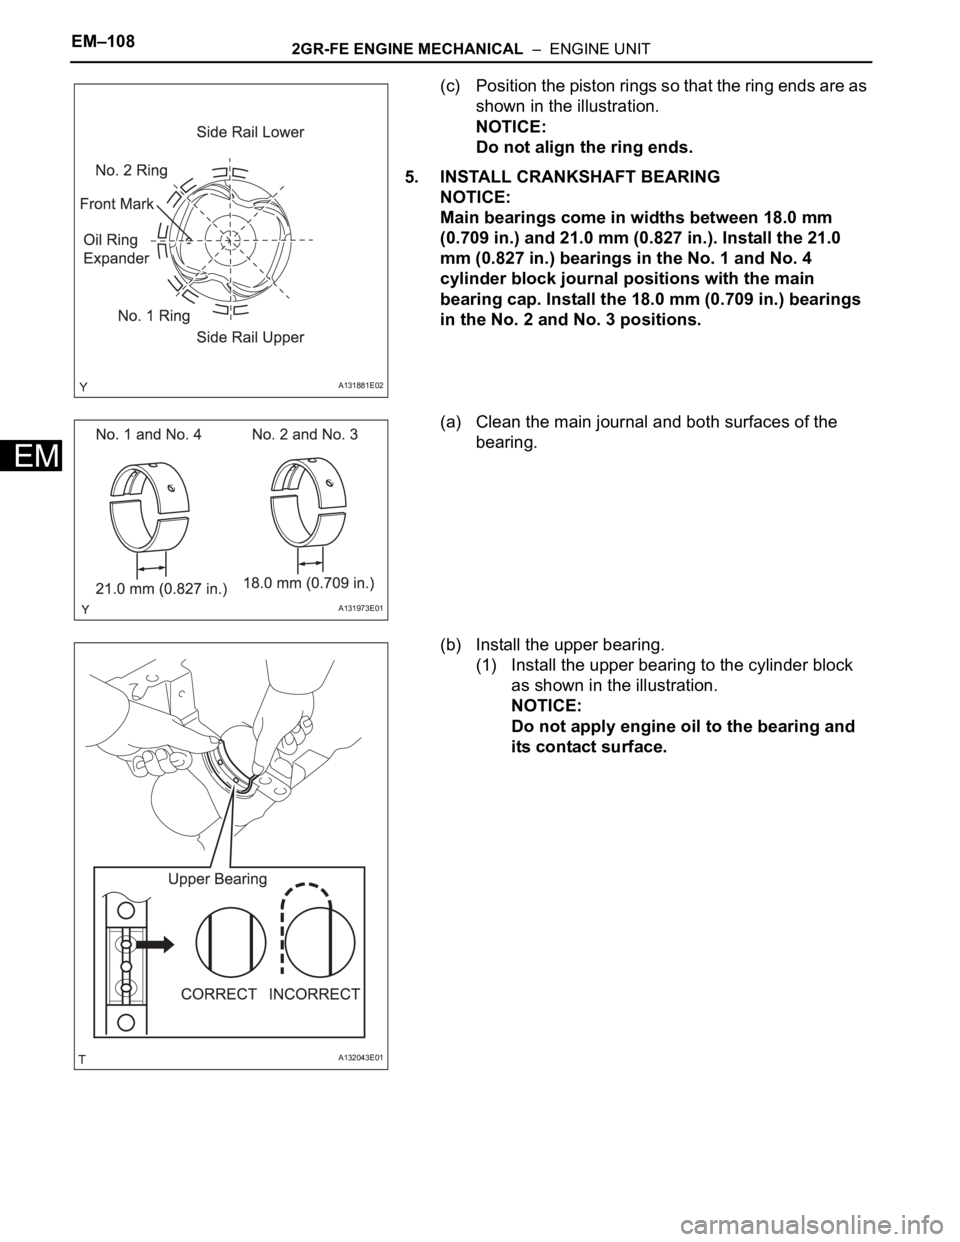
(c) Position the piston rings so that the ring ends are as
shown in the illustration.
NOTICE:
Do not align the ring ends.
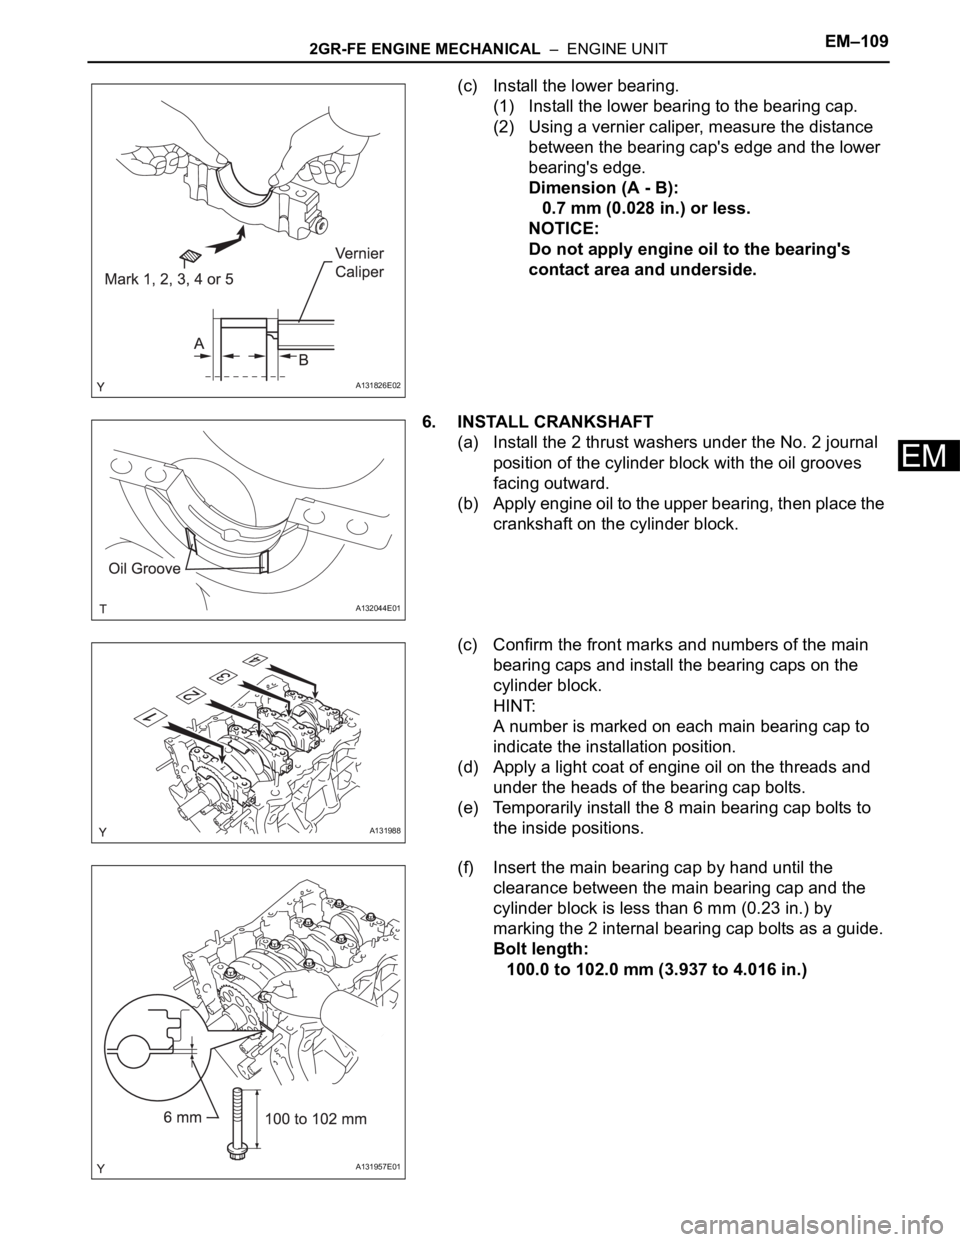
5. INSTALL CRANKSHAFT BEARING
NOTICE:
Main bearings come in widths between 18.0 mm
(0.709 in.) and 21.0 mm (0.827 in.). Install the 21.0
mm (0.827 in.) bearings in the No. 1 and No. 4
cylinder block journal positions with the main
bearing cap. Install the 18.0 mm (0.709 in.) bearings
in the No. 2 and No. 3 positions.
(a) Clean the main journal and both surfaces of the
bearing.
(b) Install the upper bearing.
(1) Install the upper bearing to the cylinder block
as shown in the illustration.
NOTICE:
Do not apply engine oil to the bearing and
its contact surface.
A131881E02
A131973E01
A132043E01
Page 746 of 2000
2GR-FE ENGINE MECHANICAL – ENGINE UNITEM–109
EM
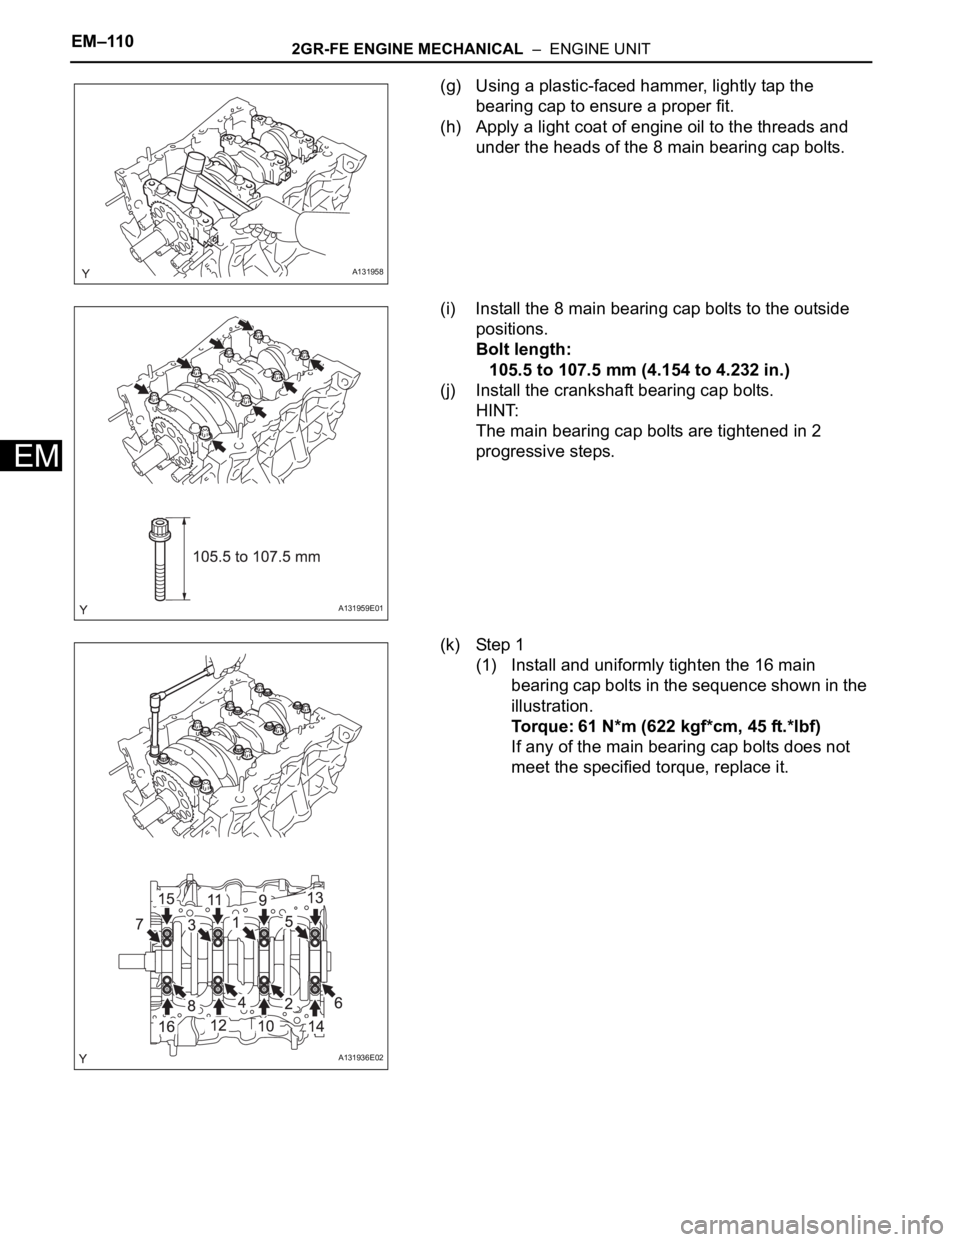
(c) Install the lower bearing.
(1) Install the lower bearing to the bearing cap.
(2) Using a vernier caliper, measure the distance
between the bearing cap's edge and the lower
bearing's edge.
Dimension (A - B):
0.7 mm (0.028 in.) or less.
NOTICE:
Do not apply engine oil to the bearing's
contact area and underside.
6. INSTALL CRANKSHAFT
(a) Install the 2 thrust washers under the No. 2 journal
position of the cylinder block with the oil grooves
facing outward.
(b) Apply engine oil to the upper bearing, then place the
crankshaft on the cylinder block.
(c) Confirm the front marks and numbers of the main
bearing caps and install the bearing caps on the
cylinder block.
HINT:
A number is marked on each main bearing cap to
indicate the installation position.
(d) Apply a light coat of engine oil on the threads and
under the heads of the bearing cap bolts.
(e) Temporarily install the 8 main bearing cap bolts to
the inside positions.
(f) Insert the main bearing cap by hand until the
clearance between the main bearing cap and the
cylinder block is less than 6 mm (0.23 in.) by
marking the 2 internal bearing cap bolts as a guide.
Bolt length:
100.0 to 102.0 mm (3.937 to 4.016 in.)
A131826E02
A132044E01
A131988
A131957E01
Page 747 of 2000
EM–1102GR-FE ENGINE MECHANICAL – ENGINE UNIT
EM
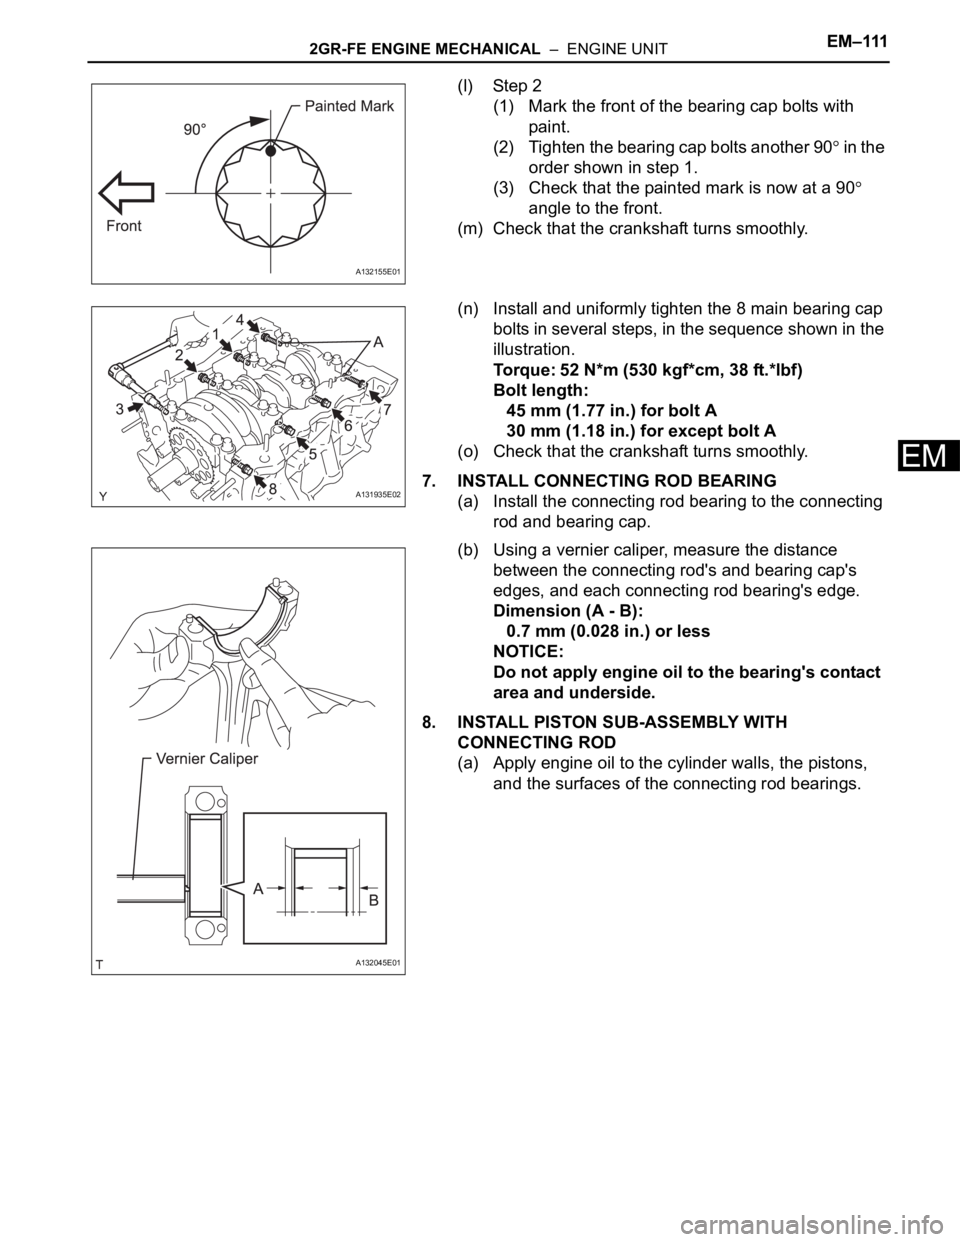
(g) Using a plastic-faced hammer, lightly tap the
bearing cap to ensure a proper fit.
(h) Apply a light coat of engine oil to the threads and
under the heads of the 8 main bearing cap bolts.
(i) Install the 8 main bearing cap bolts to the outside
positions.
Bolt length:
105.5 to 107.5 mm (4.154 to 4.232 in.)
(j) Install the crankshaft bearing cap bolts.
HINT:
The main bearing cap bolts are tightened in 2
progressive steps.
(k) Step 1
(1) Install and uniformly tighten the 16 main
bearing cap bolts in the sequence shown in the
illustration.
Torque: 61 N*m (622 kgf*cm, 45 ft.*lbf)
If any of the main bearing cap bolts does not
meet the specified torque, replace it.
A131958
A131959E01
A131936E02
Page 748 of 2000
2GR-FE ENGINE MECHANICAL – ENGINE UNITEM–111
EM
(l) Step 2
(1) Mark the front of the bearing cap bolts with
paint.
(2) Tighten the bearing cap bolts another 90
in the
order shown in step 1.
(3) Check that the painted mark is now at a 90
angle to the front.
(m) Check that the crankshaft turns smoothly.
(n) Install and uniformly tighten the 8 main bearing cap
bolts in several steps, in the sequence shown in the
illustration.
Torque: 52 N*m (530 kgf*cm, 38 ft.*lbf)
Bolt length:
45 mm (1.77 in.) for bolt A
30 mm (1.18 in.) for except bolt A
(o) Check that the crankshaft turns smoothly.
7. INSTALL CONNECTING ROD BEARING
(a) Install the connecting rod bearing to the connecting
rod and bearing cap.
(b) Using a vernier caliper, measure the distance
between the connecting rod's and bearing cap's
edges, and each connecting rod bearing's edge.
Dimension (A - B):
0.7 mm (0.028 in.) or less
NOTICE:
Do not apply engine oil to the bearing's contact
area and underside.
8. INSTALL PISTON SUB-ASSEMBLY WITH
CONNECTING ROD
(a) Apply engine oil to the cylinder walls, the pistons,
and the surfaces of the connecting rod bearings.
A132155E01
A131935E02
A132045E01
Page 749 of 2000
EM–1122GR-FE ENGINE MECHANICAL – ENGINE UNIT
EM
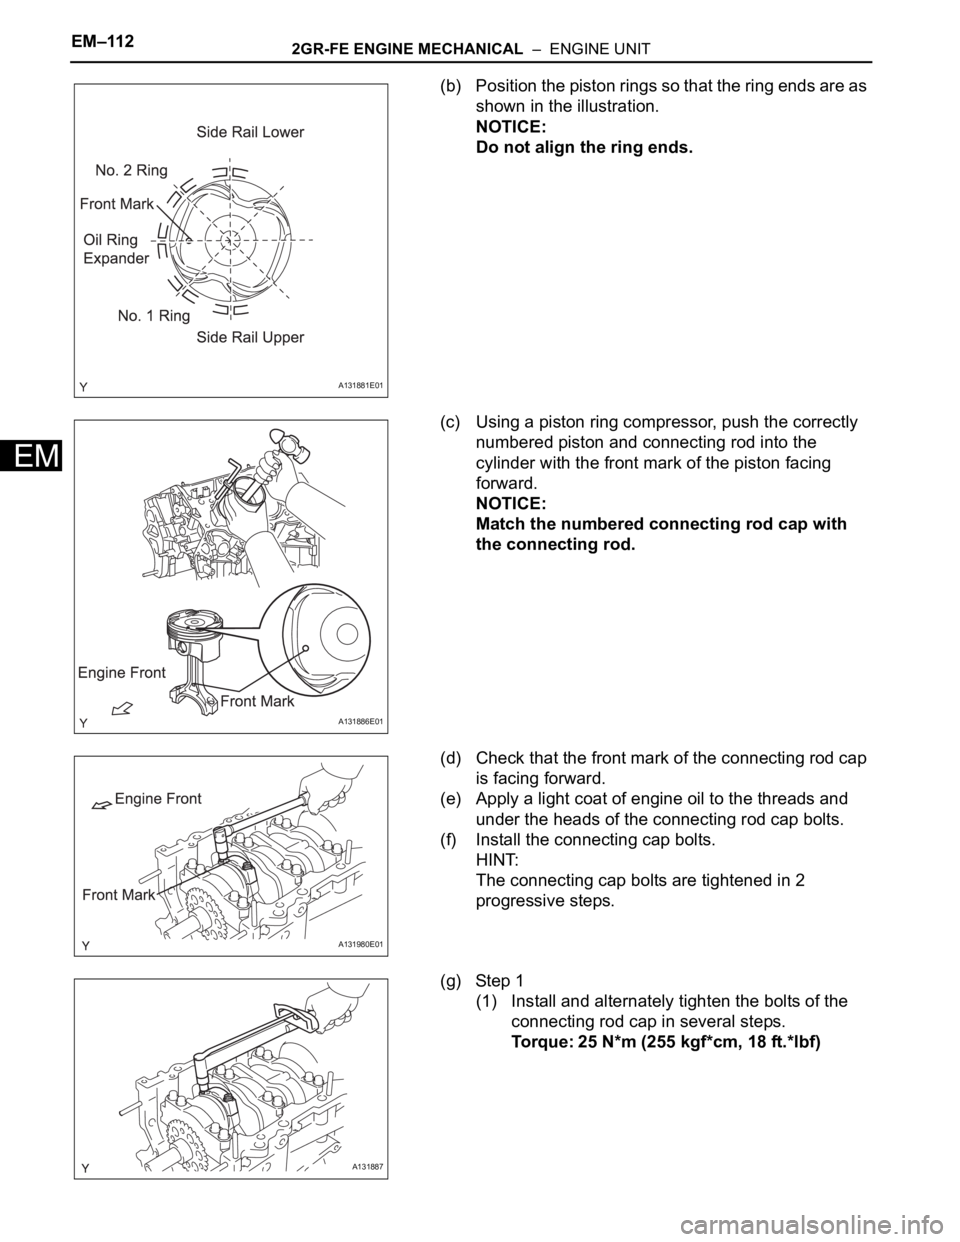
(b) Position the piston rings so that the ring ends are as
shown in the illustration.
NOTICE:
Do not align the ring ends.
(c) Using a piston ring compressor, push the correctly
numbered piston and connecting rod into the
cylinder with the front mark of the piston facing
forward.
NOTICE:
Match the numbered connecting rod cap with
the connecting rod.
(d) Check that the front mark of the connecting rod cap
is facing forward.
(e) Apply a light coat of engine oil to the threads and
under the heads of the connecting rod cap bolts.
(f) Install the connecting cap bolts.
HINT:
The connecting cap bolts are tightened in 2
progressive steps.
(g) Step 1
(1) Install and alternately tighten the bolts of the
connecting rod cap in several steps.
Torque: 25 N*m (255 kgf*cm, 18 ft.*lbf)
A131881E01
A131886E01
A131980E01
A131887
Page 750 of 2000
2GR-FE ENGINE MECHANICAL – ENGINE UNITEM–113
EM
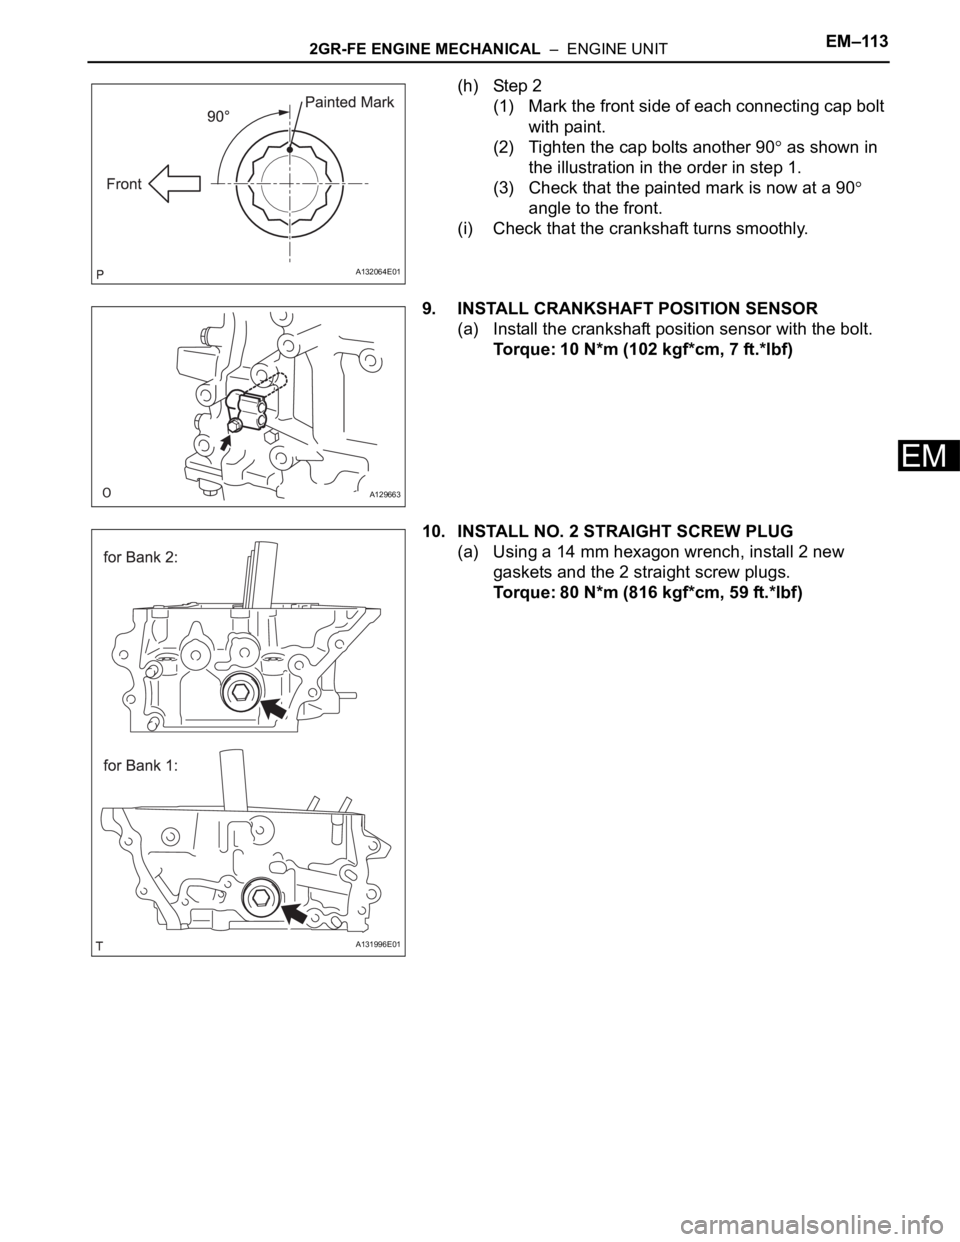
(h) Step 2
(1) Mark the front side of each connecting cap bolt
with paint.
(2) Tighten the cap bolts another 90
as shown in
the illustration in the order in step 1.
(3) Check that the painted mark is now at a 90
angle to the front.
(i) Check that the crankshaft turns smoothly.
9. INSTALL CRANKSHAFT POSITION SENSOR
(a) Install the crankshaft position sensor with the bolt.
Torque: 10 N*m (102 kgf*cm, 7 ft.*lbf)
10. INSTALL NO. 2 STRAIGHT SCREW PLUG
(a) Using a 14 mm hexagon wrench, install 2 new
gaskets and the 2 straight screw plugs.
Torque: 80 N*m (816 kgf*cm, 59 ft.*lbf)
A132064E01
A129663
A131996E01