lock TOYOTA RAV4 PLUG-IN HYBRID 2023 Owners Manual
[x] Cancel search | Manufacturer: TOYOTA, Model Year: 2023, Model line: RAV4 PLUG-IN HYBRID, Model: TOYOTA RAV4 PLUG-IN HYBRID 2023Pages: 718, PDF Size: 167.55 MB
Page 436 of 718
4346-1. Using the air conditioning system and defogger
ing system to the outside air mode.
●During use, various odors from inside and outside the vehicle may enter into
and accumulate in the air conditioning system. This may then cause odor to be emitted from the vents.
●To reduce potential odors from occur-ring:
• It is recommended that the air condi- tioning system be set to outside air mode prior to turning the vehicle off.
• The start timing of the blower may be delayed for a short period of time immediately after the air conditioning
system is started in automatic mode.
●When parking, the system automati-
cally switches to outside air mode to encourage better air circulation throughout the vehicle, helping to
reduce odors that occur when starting the vehicle.
■Using the voice control system (if equipped)
Air conditioning system can be operated using the voice control system. For details regarding the voice control sys-
tem, refer to the “Multimedia owner’s manual”.
■Air conditioning filter
P.500
■Noise from air conditioning system
Approximately 90 seconds after the power switch turned to OFF, you may hear sound coming from air conditioning
system. This is the sound of a air condi- tioning system initialize and, it does not indicate a malfunction.
■Customization
Settings (e.g. A/C Auto switch opera- tion) can be changed.(Customizable features: P.607)
1Press the “AUTO” switch.
The dehumidification function begins to operate. Air outlets and fan speed are automatically adjusted according to the
temperature setting and humidity.
2 Adjust the temperature setting.
3 To stop the operation, press the
“OFF” switch.
WARNING
■Cautions for using “My Room Mode”
Do not leave children, people who need assistance, or pets inside the vehicle. The system may turn off
automatically and the interior tem- perature may become high or low, resulting in heat stroke, dehydration
or hypothermia. Failure to do so may result in death or serious injury.
■To prevent the windshield from fogging up
Do not use the windshield defogger
switch during cool air operation in extremely humid weather.The difference between the tempera-
ture of the outside air and that of the windshield can cause the outer sur-face of the windshield to fog up,
blocking your vision.
■When the outside rear view mir-
ror defoggers are operating
Do not touch the rear view mirror sur- faces when the outside rear view mir-
ror defoggers are on.
NOTICE
■To prevent 12-volt battery dis- charge
Do not leave the air conditioning sys-
tem on longer than necessary when the hybrid system is off.
Using automatic mode
Page 441 of 718
439
6
6-1. Using the air conditioning system and defogger
Interior features
●The outside temperature is extremely
low
●When the hybrid system is cool (for
example, after being left for a long time in low temperatures)
■Windshield defogger
When defogging the windshield using
the Remote Air Conditioning System, defogging may be insufficient due to the power being restricted more than during
normal air conditioning operation. Also, the outside of the windshield may fog up due to the outside temperature, humidity
or air conditioning set temperature.
■Using the heater via the Remote Air Conditioning System
●When the outside temperature is low, heating may feel insufficient due to restricted operation of the air condi-
tioning.
●When the outside heat exchanger
becomes frosted over, heating perfor- mance may decline due to automati-cally switching to the frost removal
operation. ( P.432)
■Security feature
Any unlocked doors will be automatically locked when the system is operating.
The emergency flashers flash to indicate that the doors have been locked or the system has been turned off.
■Conditions affecting operation
P.254
■While the Remote Air Conditioning System is operating
●Depending on the operating condition of the Remote Air Conditioning Sys-tem, the air conditioning compressor
or cooling fan may spin and an operat- ing noise may be heard.However, this does not indicate a mal-
function.
●The air conditioning operation
switches, etc. will not operate while the Remote Air Conditioning System is operating.
■Electronic key battery depletion
P.232
■When the electronic key battery is fully depleted
P.511
■Customization
Setting (e.g. Operation using “A/C” on the wireless remote control) can be changed. (Customizable features:
P.607)
WARNING
■Precautions for the Remote Air Conditioning System
●Do not use the system if people are in the vehicle. Even when the system is in use, the
internal temperature may still reach a high or low level due to features such as the automatic shut-off.
Children and pets left inside the vehicle may suffer heatstroke dehy-dration or hypothermia, or could
result in death or serious injury.
●Depending on the surrounding envi-
ronment, signals from the wireless switch may transmit further than expected. Pay appropriate attention
to the vehicle’s surroundings and use the switch only when neces-sary.
●Do not operate “A/C” on the wire-less remote control if the hood is
open. The air conditioning may operate unintentionally and objects may be drawn into the electrical
cooling fan.
NOTICE
■To prevent the hybrid battery (traction battery) from being dis-charged
Use “A/C” on the wireless remote control only when necessary.
Page 445 of 718
443
6 6-2. Using the interior lights
Interior features
6-2.Using the interior lights
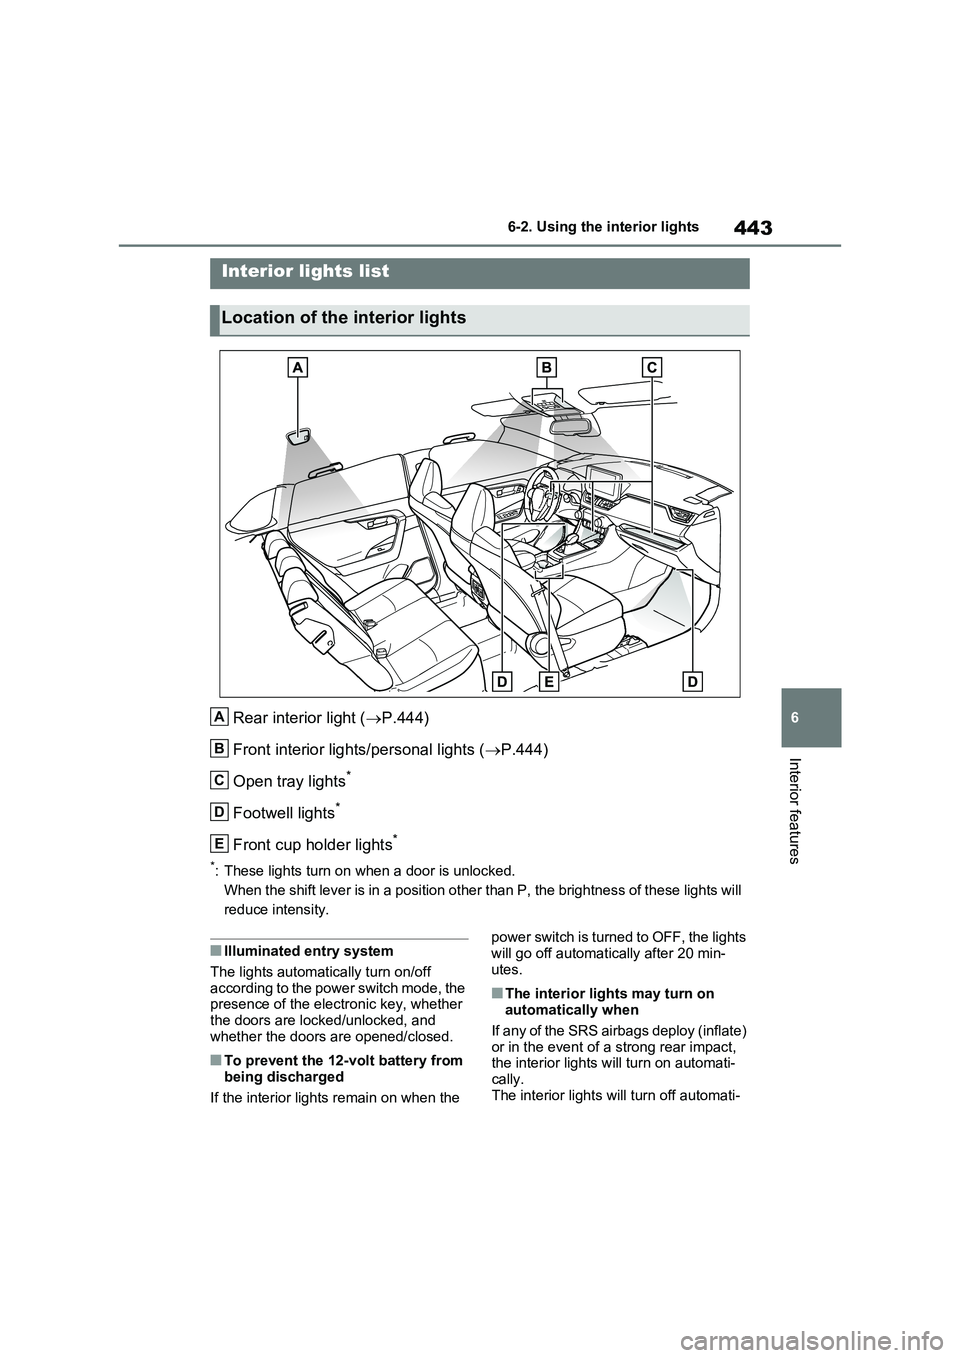
Rear interior light (P.444)
Front interior lights/personal lights (P.444)
Open tray lights
*
Footwell lights*
Front cup holder lights*
*: These lights turn on when a door is unlocked.
When the shift lever is in a position other than P, the brightness of these lights will
reduce intensity.
■Illuminated entry system
The lights automatically turn on/off
according to the power switch mode, the
presence of the electronic key, whether
the doors are locked/unlocked, and
whether the doors are opened/closed.
■To prevent the 12-volt battery from
being discharged
If the interior lights remain on when the power switch is turned to OFF, the lights
will go off automatically after 20 min-
utes.
■The interior lights may turn on
automatically when
If any of the SRS airbags deploy (inflate)
or in the event of a strong rear impact,
the interior lights will turn on automati-
cally.
The interior lights will turn off automati-
Interior lights list
Location of the interior lights
A
B
C
D
E
Page 448 of 718
4466-3. Using the storage features
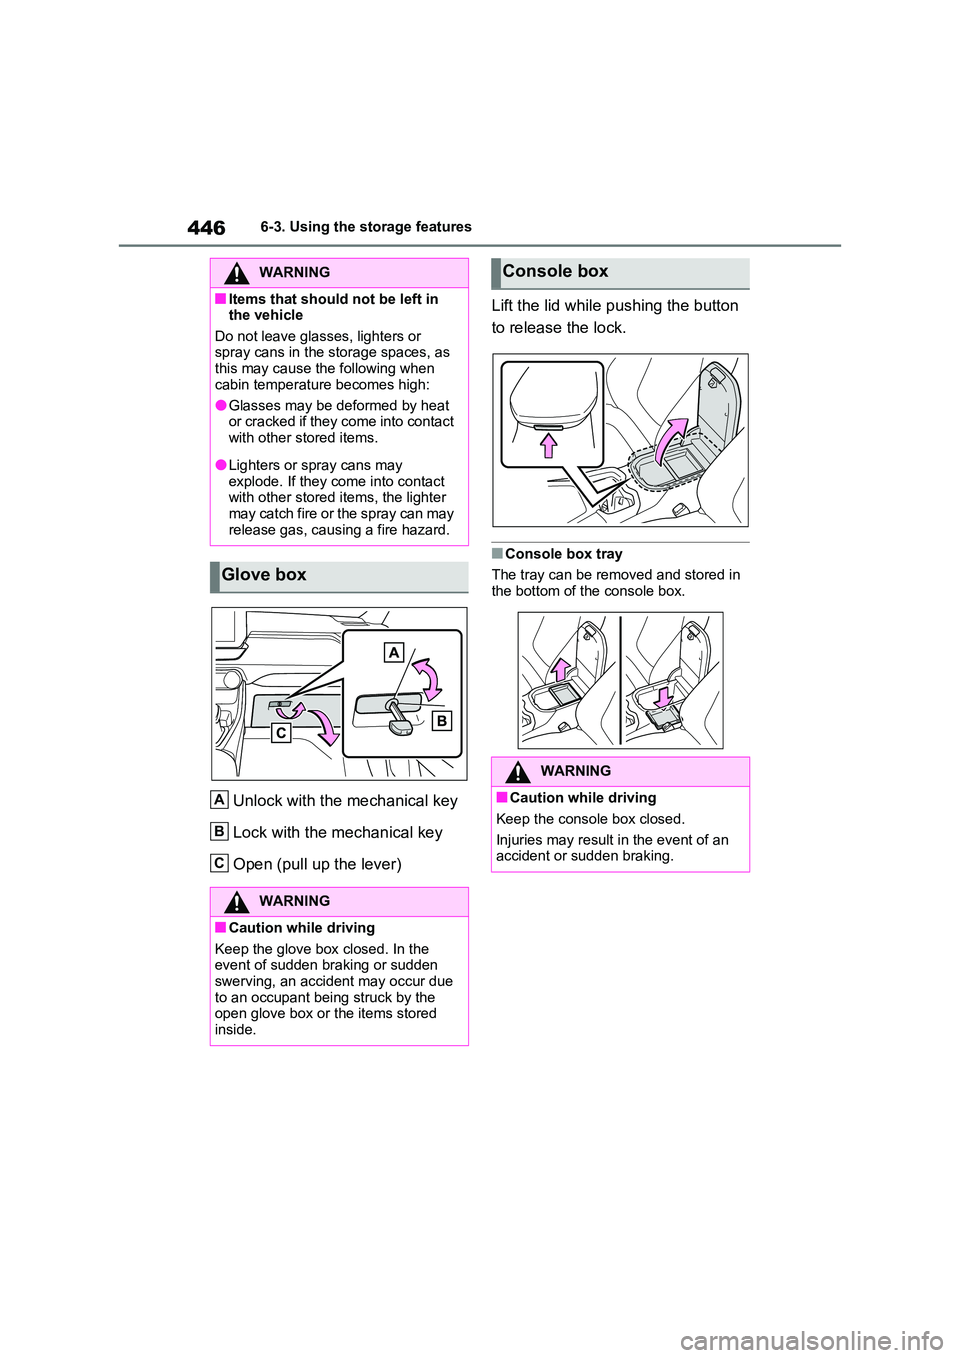
Unlock with the mechanical key
Lock with the mechanical key
Open (pull up the lever)
Lift the lid while pushing the button
to release the lock.
■Console box tray
The tray can be removed and stored in
the bottom of the console box.
WARNING
■Items that should not be left in the vehicle
Do not leave glasses, lighters or spray cans in the storage spaces, as this may cause the following when
cabin temperature becomes high:
●Glasses may be deformed by heat or cracked if they come into contact
with other stored items.
●Lighters or spray cans may
explode. If they come into contact with other stored items, the lighter may catch fire or the spray can may
release gas, causing a fire hazard.
Glove box
WARNING
■Caution while driving
Keep the glove box closed. In the event of sudden braking or sudden swerving, an accident may occur due
to an occupant being struck by the open glove box or the items stored inside.
A
B
C
Console box
WARNING
■Caution while driving
Keep the console box closed.
Injuries may result in the event of an accident or sudden braking.
Page 468 of 718
4667-1. Maintenance and care
7-1.Mainte nance a nd care
Working from top to bottom, lib-
erally apply water to the vehicle
body, wheel wells and underside
of the vehicle to remove any dirt
and dust.
Wash the vehicle body using a
sponge or soft cloth, such as a
chamois.
For hard-to-remove marks, use
car wash soap and rinse thor-
oughly with water.
Wipe away any water.
Wax the vehicle when the water-
proof coating deteriorates.
If water does not bead on a clean sur-
face, apply wax when the vehicle body
is cool.
■Before car washes
Check that the fuel filler door and
charging port lid on your vehicle are
closed properly.
■Automatic car washes
●Before washing the vehicle:
• Fold the mirrors
• Turn off the power back door (if
equipped)
Start washing from the front of the vehi-
cle. Make sure to extend the mirrors
before driving.
●Brushes used in automatic car
washes may scratch the vehicle sur-
face, parts (wheel, etc.) and harm
your vehicle’s paint.
●Rear spoiler may not be washable in
some automatic car washes. There
may also be an increased risk of dam-
age to vehicle.
■High pressure car washes
As water may enter the cabin, do not
bring the nozzle tip near the gaps
around the doors or perimeter of the
windows, or spray these areas continu-
ously.
■Note for a smart entry & start sys-
tem
If the door handle becomes wet while
the electronic key is within the effective
range, the door may lock and unlock
repeatedly. In that case, follow the fol-
lowing correction procedures to wash
the vehicle:
●Place the key in a position 2 m (6 ft.)
or more separate from the vehicle
while the vehicle is being washed.
(Take care to ensure that the key is
not stolen.)
●Set the electronic key to battery-sav-
ing mode to disable the smart entry &
start system. (P.254)
■Wheels and wheel ornaments
●Remove any dirt immediately by using
a neutral detergent.
●Wash detergent off with water imme-
diately after use.
●To protect the paint from damage,
make sure to observe the following
precautions.
• Do not use acidic, alkaline or abrasive
detergent.
• Do not use hard brushes.
• Do not use detergent on the wheels
when they are hot, such as after driv-
ing or parking in hot weather.
Cleaning and protecting
the vehicle exterior
Perform the following to pro-
tect the vehicle and maintain it
in prime condition:
Cleaning instructions
Page 478 of 718
4767-3. Do-it-yourself maintenance
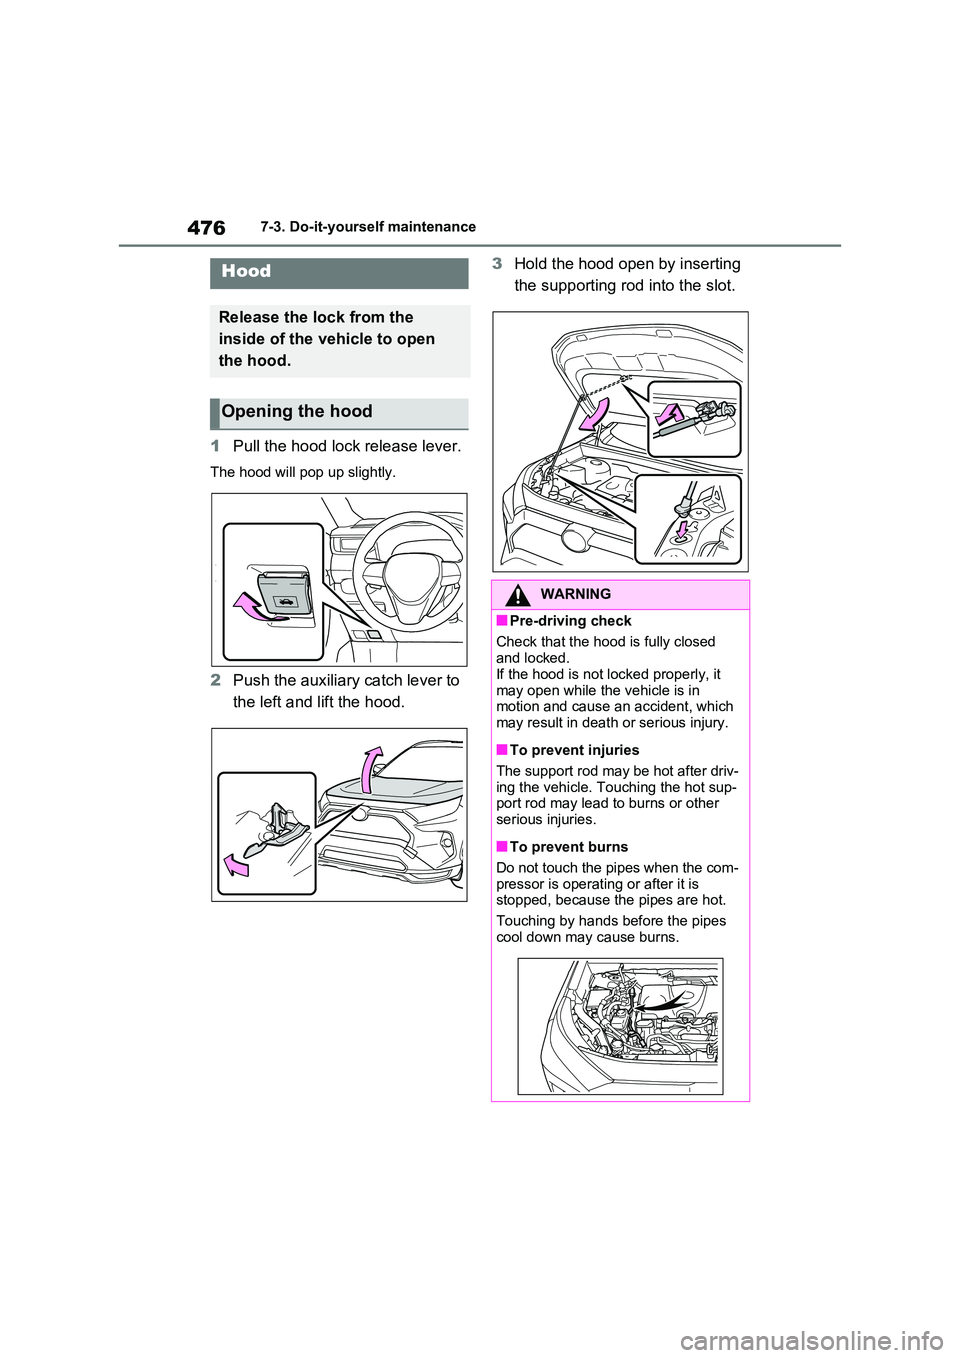
1Pull the hood lock release lever.
The hood will pop up slightly.
2Push the auxiliary catch lever to
the left and lift the hood.
3 Hold the hood open by inserting
the supporting rod into the slot.Hood
Release the lock from the
inside of the vehicle to open
the hood.
Opening the hood
WARNING
■Pre-driving check
Check that the hood is fully closed
and locked. If the hood is not locked properly, it
may open while the vehicle is in motion and cause an accident, which may result in death or serious injury.
■To prevent injuries
The support rod may be hot after driv-
ing the vehicle. Touching the hot sup- port rod may lead to burns or other serious injuries.
■To prevent burns
Do not touch the pipes when the com-
pressor is operating or after it is stopped, because the pipes are hot.
Touching by hands before the pipes
cool down may cause burns.
Page 482 of 718
4807-3. Do-it-yourself maintenance
oil level on the dipstick.
■Checking the engine oil
1Park the vehicle on level
ground. After warming up the
engine and turning off the hybrid
system, wait more than 5 min-
utes for the oil to drain back into
the bottom of the engine.
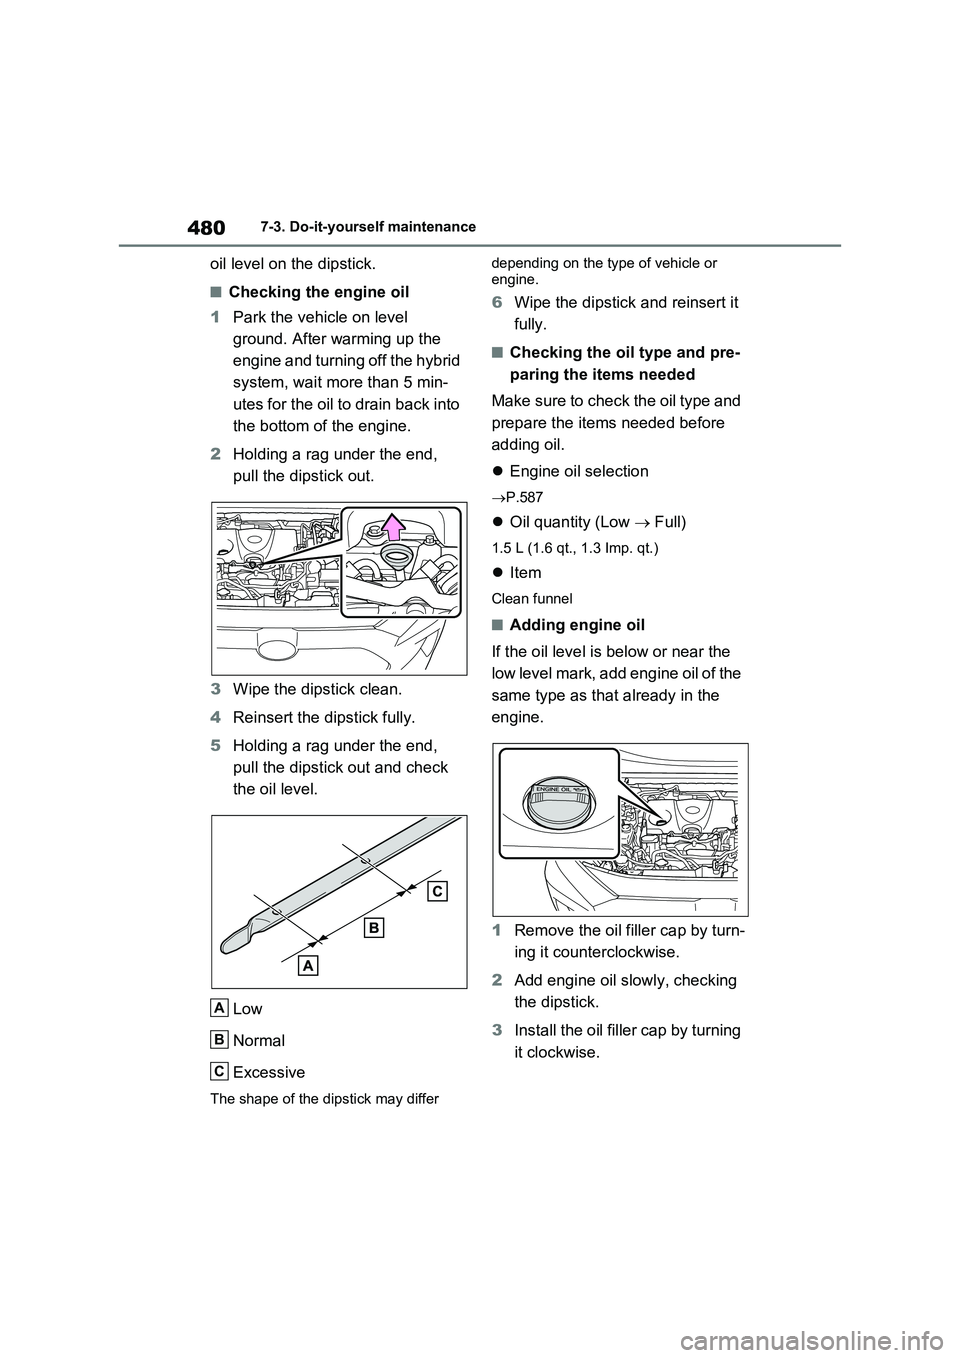
2Holding a rag under the end,
pull the dipstick out.
3Wipe the dipstick clean.
4Reinsert the dipstick fully.
5Holding a rag under the end,
pull the dipstick out and check
the oil level.
Low
Normal
Excessive
The shape of the dipstick may differ depending on the type of vehicle or
engine.
6Wipe the dipstick and reinsert it
fully.
■Checking the oil type and pre-
paring the items needed
Make sure to check the oil type and
prepare the items needed before
adding oil.
Engine oil selection
P.587
Oil quantity (Low Full)
1.5 L (1.6 qt., 1.3 Imp. qt.)
Item
Clean funnel
■Adding engine oil
If the oil level is below or near the
low level mark, add engine oil of the
same type as that already in the
engine.
1Remove the oil filler cap by turn-
ing it counterclockwise.
2Add engine oil slowly, checking
the dipstick.
3Install the oil filler cap by turning
it clockwise.
A
B
C
Page 486 of 718
4847-3. Do-it-yourself maintenance
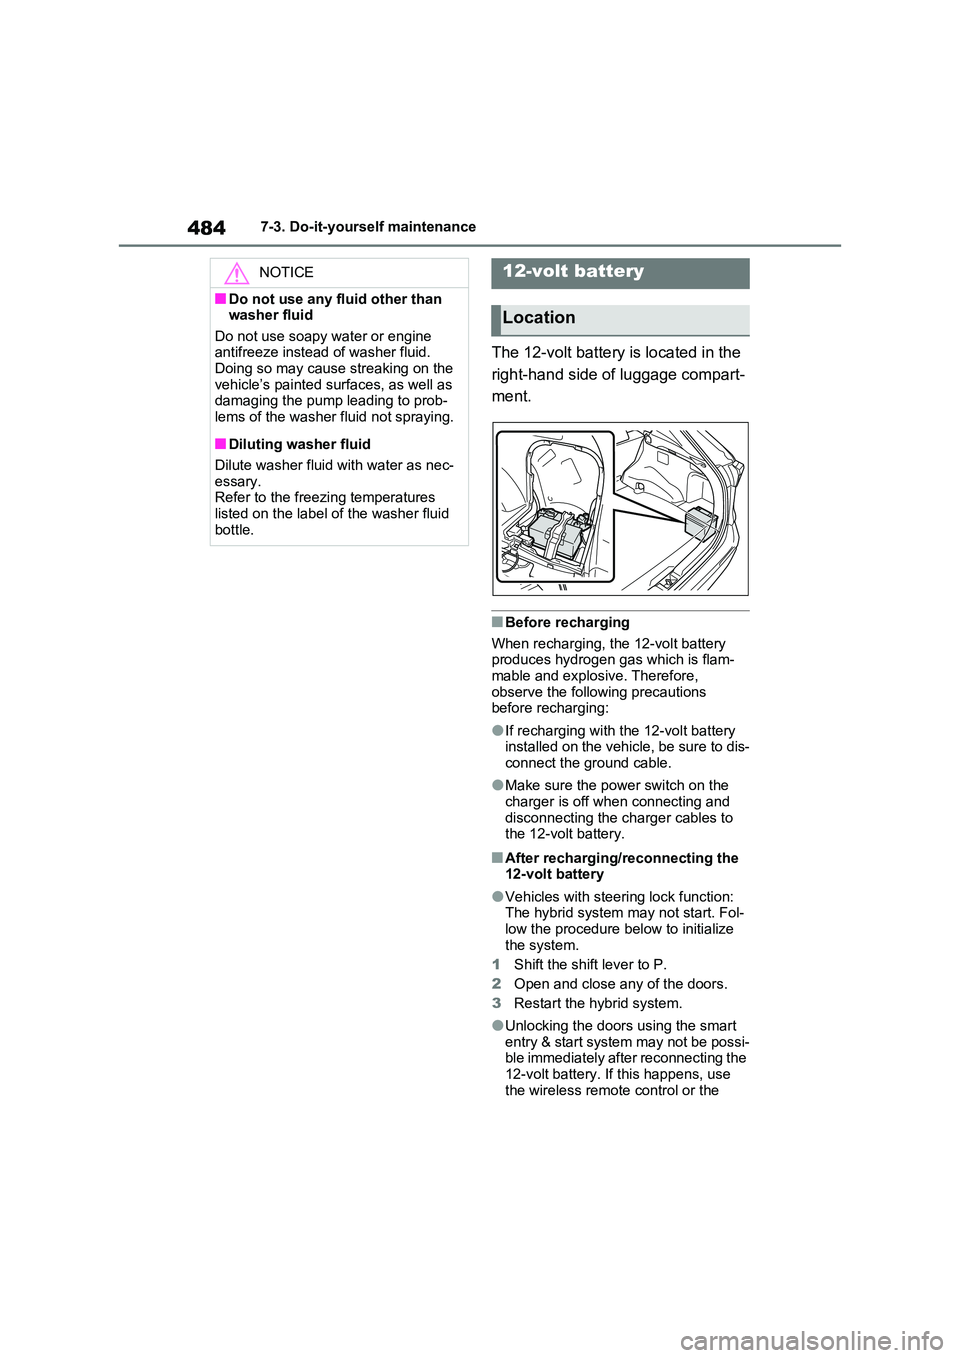
The 12-volt battery is located in the
right-hand side of luggage compart-
ment.
■Before recharging
When recharging, the 12-volt battery produces hydrogen gas which is flam-mable and explosive. Therefore,
observe the following precautions before recharging:
●If recharging with the 12-volt battery installed on the vehicle, be sure to dis-connect the ground cable.
●Make sure the power switch on the charger is off when connecting and
disconnecting the charger cables to the 12-volt battery.
■After recharging/reconnecting the 12-volt battery
●Vehicles with steering lock function: The hybrid system may not start. Fol-
low the procedure below to initialize the system.
1 Shift the shift lever to P.
2 Open and close any of the doors.
3 Restart the hybrid system.
●Unlocking the doors using the smart entry & start system may not be possi-ble immediately after reconnecting the
12-volt battery. If this happens, use the wireless remote control or the
NOTICE
■Do not use any fluid other than washer fluid
Do not use soapy water or engine antifreeze instead of washer fluid.Doing so may cause streaking on the
vehicle’s painted surfaces, as well as damaging the pump leading to prob-lems of the washer fluid not spraying.
■Diluting washer fluid
Dilute washer fluid with water as nec-
essary. Refer to the freezing temperatures listed on the label of the washer fluid
bottle.
12-volt battery
Location
Page 487 of 718
485
7
7-3. Do-it-yourself maintenance
Maintenance and care
mechanical key to lock/unlock the
doors.
●Start the hybrid system with the power
switch in ACC. The hybrid system may not start with the power switch turned off. However, the hybrid sys-
tem will operate normally from the second attempt.
●The power switch mode is recorded by the vehicle. If the 12-volt battery is reconnected, the vehicle will return
the power switch mode to the status it was in before the 12-volt battery was disconnected. Make sure to turn off
the power switch before disconnect the 12-volt battery. Take extra care when connecting the 12-volt battery if
the power switch mode prior to dis- charge is unknown.
If the hybrid system will not start even
after multiple attempts at all methods above, contact any authorized Toyota retailer or Toyota authorized repairer, or
any reliable repairer.
WARNING
■Chemicals in the 12-volt battery
The 12-volt battery contains poison-
ous and corrosive sulfuric acid and may produce hydrogen gas which is flammable and explosive. To reduce
the risk of death or serious injury, take the following precautions while work-ing on or near the 12-volt battery:
●Do not cause sparks by touching the 12-volt battery terminals with
tools.
●Do not smoke or light a match near
the 12-volt battery.
●Avoid contact with eyes, skin and
clothes.
●Never inhale or swallow electrolyte.
●Wear protective safety glasses when working near the 12-volt bat-
tery.
●Keep children away from the 12- volt battery.
■Where to safely charge the 12-volt battery
Always charge the 12-volt battery in
an open area. Do not charge the 12- volt battery in a garage or closed room where there is not sufficient
ventilation.
■Emergency measures regarding
electrolyte
●If electrolyte gets in your eyes
Flush your eyes with clean water for
at least 15 minutes and get immediate
medical attention. If possible, con-
tinue to apply water with a sponge or
cloth while traveling to the nearest
medical facility.
●If electrolyte gets on your skin
Wash the affected area thoroughly. If
you feel pain or burning, get medical
attention immediately.
●If electrolyte gets on your clothes
It can soak through clothing on to
your skin. Immediately take off the
clothing and follow the procedure
above if necessary.
●If you accidentally swallow electro- lyte
Drink a large quantity of water or milk.
Get emergency medical attention
immediately.
■When there is insufficient 12-volt
battery fluid
Do not use if there is insufficient fluid in the 12-volt battery. There is a pos-
sible danger that the 12-volt battery may explode.
Page 503 of 718
501
7
7-3. Do-it-yourself maintenance
Maintenance and care
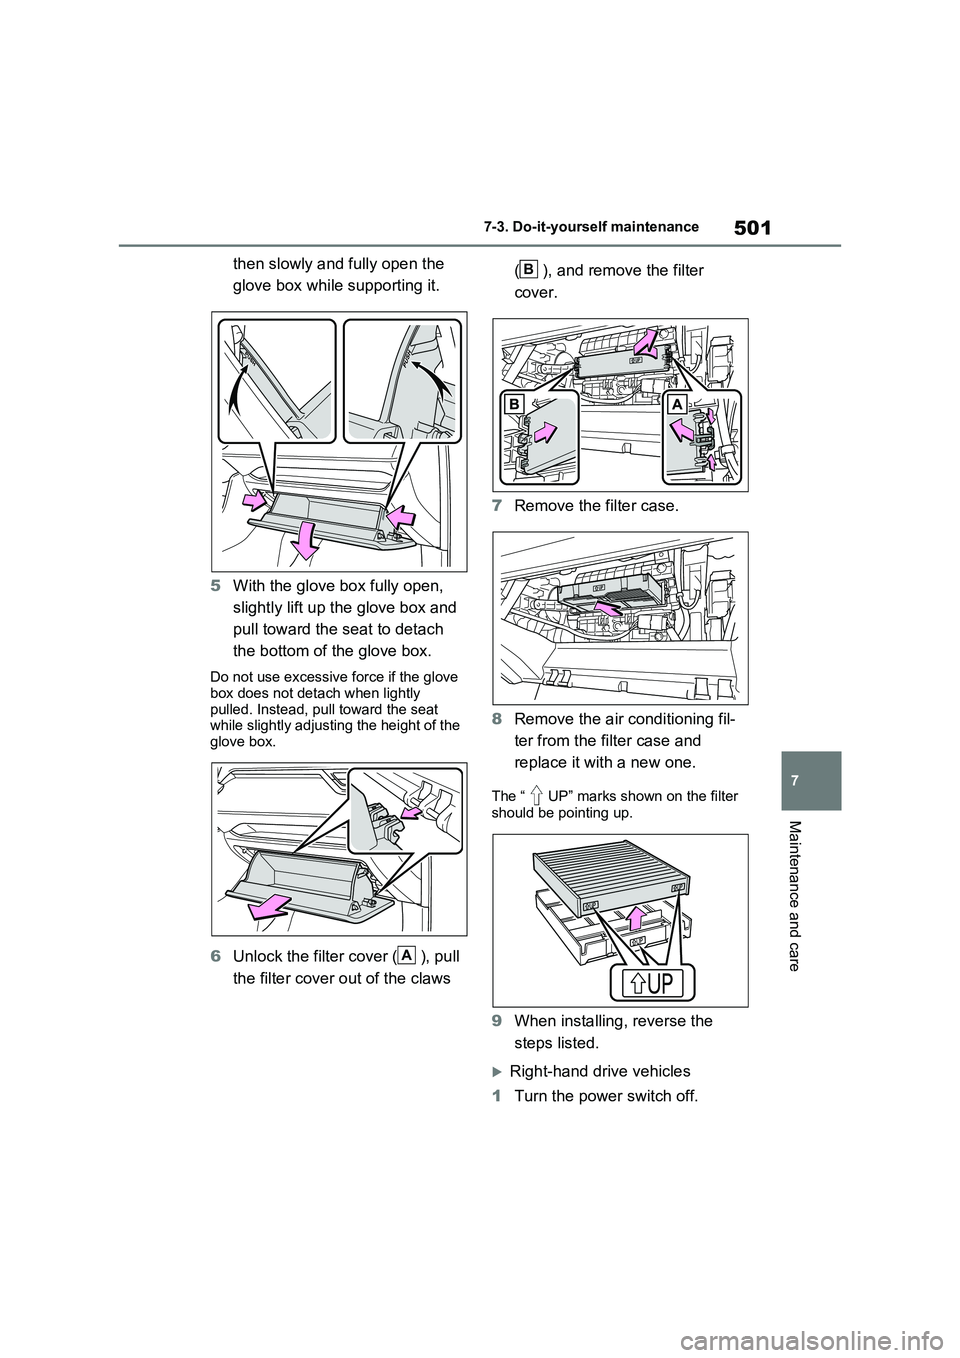
then slowly and fully open the
glove box while supporting it.
5 With the glove box fully open,
slightly lift up the glove box and
pull toward the seat to detach
the bottom of the glove box.
Do not use excessive force if the glove
box does not detach when lightly pulled. Instead, pull toward the seat while slightly adjusting the height of the
glove box.
6 Unlock the filter cover ( ), pull
the filter cover out of the claws
( ), and remove the filter
cover.
7 Remove the filter case.
8 Remove the air conditioning fil-
ter from the filter case and
replace it with a new one.
The “ UP” marks shown on the filter
should be pointing up.
9 When installing, reverse the
steps listed.
Right-hand drive vehicles
1 Turn the power switch off.
A
B