lock TOYOTA RAV4 PLUG-IN HYBRID 2023 Owners Manual
[x] Cancel search | Manufacturer: TOYOTA, Model Year: 2023, Model line: RAV4 PLUG-IN HYBRID, Model: TOYOTA RAV4 PLUG-IN HYBRID 2023Pages: 718, PDF Size: 167.55 MB
Page 525 of 718
523
7
7-3. Do-it-yourself maintenance
Maintenance and care
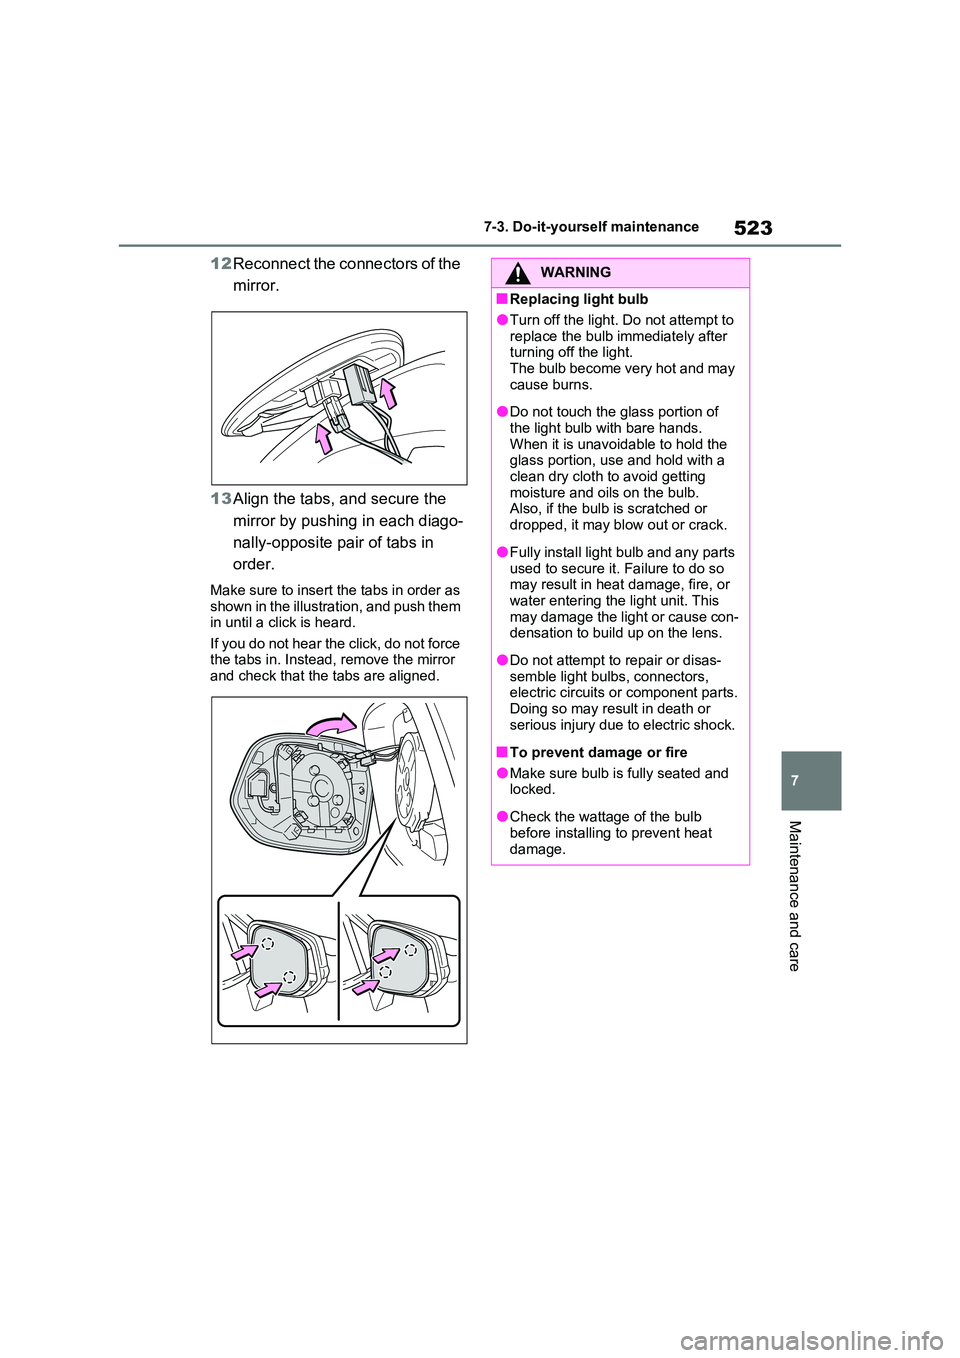
12 Reconnect the connectors of the
mirror.
13 Align the tabs, and secure the
mirror by pushing in each diago-
nally-opposite pair of tabs in
order.
Make sure to insert the tabs in order as shown in the illustration, and push them in until a click is heard.
If you do not hear the click, do not force the tabs in. Instead, remove the mirror and check that the tabs are aligned.
WARNING
■Replacing light bulb
●Turn off the light. Do not attempt to
replace the bulb immediately after turning off the light. The bulb become very hot and may
cause burns.
●Do not touch the glass portion of
the light bulb with bare hands. When it is unavoidable to hold the glass portion, use and hold with a
clean dry cloth to avoid getting moisture and oils on the bulb. Also, if the bulb is scratched or
dropped, it may blow out or crack.
●Fully install light bulb and any parts
used to secure it. Failure to do so may result in heat damage, fire, or water entering the light unit. This
may damage the light or cause con- densation to build up on the lens.
●Do not attempt to repair or disas-semble light bulbs, connectors, electric circuits or component parts.
Doing so may result in death or serious injury due to electric shock.
■To prevent damage or fire
●Make sure bulb is fully seated and locked.
●Check the wattage of the bulb before installing to prevent heat
damage.
Page 532 of 718
5308-2. Steps to take in an emergency
When using a flat-bed truck to
transport the vehicle, use tire strap-
ping belts. Refer to the owner’s
manual of the flat-bed truck for the
tire strapping method.
In order to suppress vehicle move-
ment during transportation, set the
parking brake and turn the power
switch off.
If a tow truck is not available in an
emergency, your vehicle may be
temporarily towed using cables or
chains secured to the emergency
towing eyelets. This should only be
attempted on hard surfaced roads
for short distances at under 30
km/h (18 mph).
A driver must be in the vehicle to
steer and operate the brakes. The
vehicle’s wheels, drive train, axles,
steering and brakes must be in
good condition.
WARNING
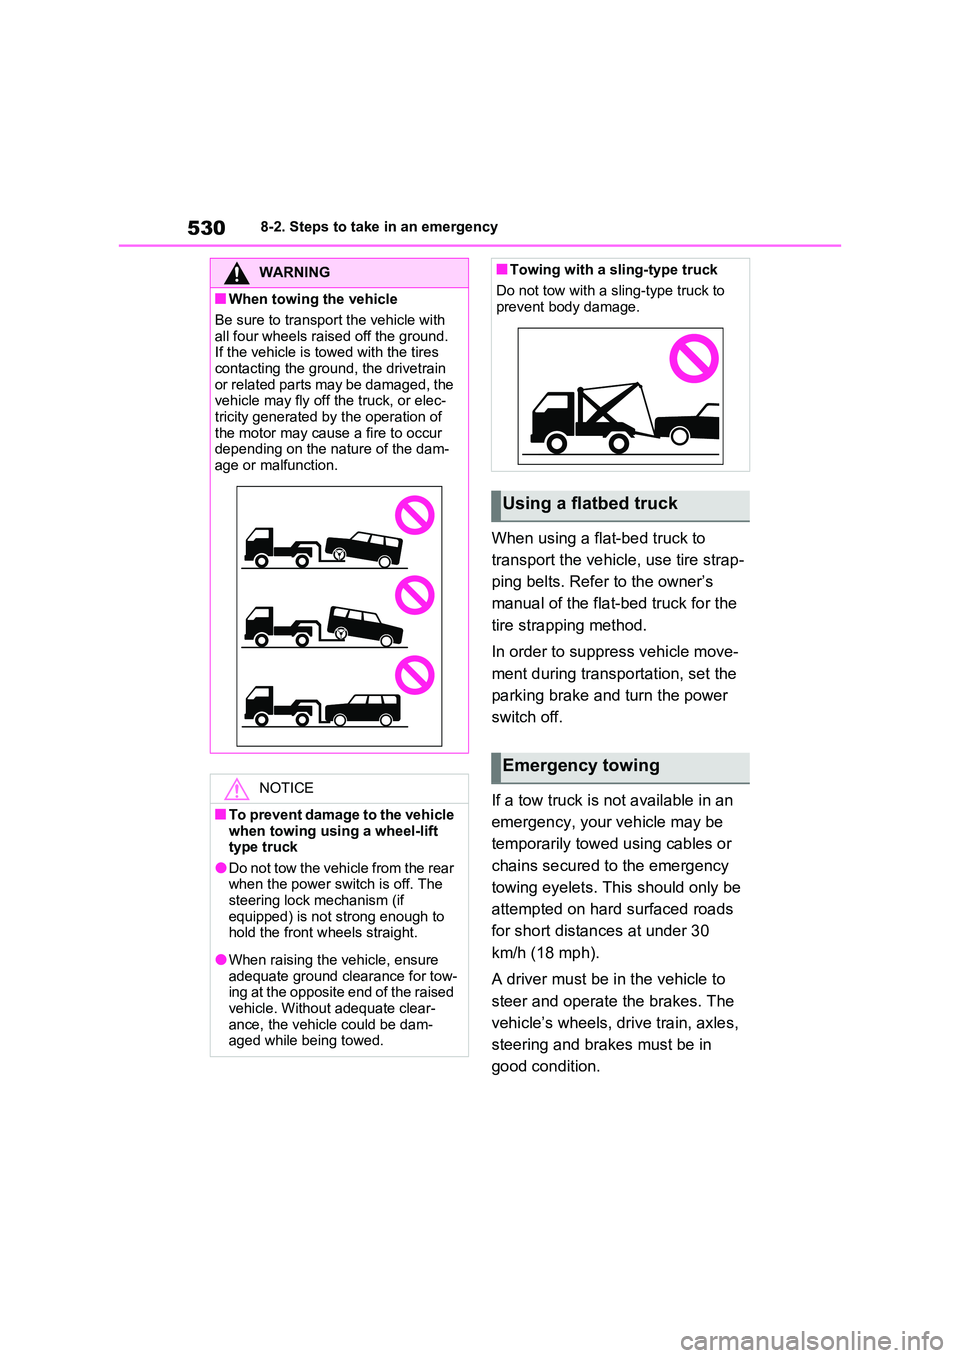
■When towing the vehicle
Be sure to transport the vehicle with
all four wheels raised off the ground. If the vehicle is towed with the tires contacting the ground, the drivetrain
or related parts may be damaged, the vehicle may fly off the truck, or elec-tricity generated by the operation of
the motor may cause a fire to occur depending on the nature of the dam-age or malfunction.
NOTICE
■To prevent damage to the vehicle when towing using a wheel-lift type truck
●Do not tow the vehicle from the rear when the power switch is off. The steering lock mechanism (if
equipped) is not strong enough to hold the front wheels straight.
●When raising the vehicle, ensure adequate ground clearance for tow-ing at the opposite end of the raised
vehicle. Without adequate clear- ance, the vehicle could be dam-aged while being towed.
■Towing with a sling-type truck
Do not tow with a sling-type truck to prevent body damage.
Using a flatbed truck
Emergency towing
Page 534 of 718
5328-2. Steps to take in an emergency
Wheel nut wrench can be purchased
at any authorized Toyota retailer or Toyota authorized repairer, or any reli-able repairer.
Fluid leaks under the vehicle
(Water dripping from the air con-
ditioning after use is normal.)
Flat-looking tires or uneven tire
wear
High coolant temperature warn-
ing light flashes or come on
Changes in exhaust sound
Excessive tire squeal when cor-
nering
Strange noises related to the
suspension system
Pinging or other noises related to
the hybrid system
Engine missing, stumbling or
running roughly
Appreciable loss of power
WARNING
Observe the following precautions. Failure to do so may result in death or serious injury.
■While towing
●When towing using cables or
chains, avoid sudden starts, etc. which place excessive stress on the towing eyelets, cables or chains.
The towing eyelets, cables or chains may become damaged, bro-ken debris may hit people, and
cause serious damage.
●Vehicles with steering lock function:
Do not turn the power switch off. There is a possibility that the steer-ing wheel is locked and cannot be
operated.
■Installing towing eyelets to the
vehicle
Make sure that towing eyelets are installed securely. If not securely
installed, towing eyelets may come loose during towing.
NOTICE
■To prevent damage to the vehicle during emergency towing
Do not secure cables or chains to the suspension components.
If you think something is
wrong
If you notice any of the follow-
ing symptoms, your vehicle
probably needs adjustment or
repair. Contact any authorized
Toyota retailer or Toyota
authorized repairer, or any reli-
able repairer as soon as possi-
ble.
Visible symptoms
Audible symptoms
Operational symptoms
Page 548 of 718

5468-2. Steps to take in an emergency
shown on the multi-information dis-
play, the vehicle may have run out of fuel. Stop the vehicle in a safe place and, if the fuel level is low, refuel the
vehicle. • “Hybrid System Stopped”• “Engine Stopped”
●If “Maintenance required for DCDC converter cooling parts See Owner’s
Manual” is shown, the filter may be clogged, the air intake vent may be blocked, or there may be a gap in the
duct. Therefore, perform the following correction procedure.• If the air intake vent or filter of the
DC/DC converter are dirty, perform the procedures on P.504 to clean them.
• If the warning message is shown when the air intake vent and filter of the DC/DC converter are not dirty,
have the vehicle inspected at any authorized Toyota retailer or Toyota authorized repairer, or any reliable
repairer.
●If “12-Volt Battery Charging System
Malfunction Stop in a Safe Place See Owner’s Manual” is shown
Indicates a malfunction in the vehicle’s
charging system. Pull over and stop the
vehicle as soon as it is safe to do so.
While the message is displayed, the
functions of the air conditioning, etc.
may be partially limited in order to
reduce the power consumption of the
12-volt battery.
■If “Hybrid System Overheated Out- put Power Reduced” is shown
The message may be shown when driv- ing under severe operating conditions. (For example, when driving up a long
steep hill or driving up a steep hill in reverse.)
Coping method: P.578
■If “Traction Battery Needs to be
Protected Refrain from the Use of N Position” is shown
This message may be displayed when
the shift lever is in N.
As the hybrid battery (traction battery) cannot be charged when the shift lever is in N, shift the shift lever to P when the
vehicle is stopped.
■If “Traction Battery Needs to be Protected Shift into P to Restart” is shown
This message is displayed when the hybrid battery (traction battery) charge has become extremely low because the
shift lever has been left in N for a certain amount of time.
When operating the vehicle, shift to P
and restart the hybrid system.
■If “Shift to P Before Exiting Vehi- cle” is shown
Message is displayed when the driver’s
door is opened without turning the power switch to OFF with the shift lever in any position other than P.
Shift the shift lever to P.
■If “Shift Out of N Release Accelera- tor Before Shifting” is shown
Message is displayed when the acceler-
ator pedal has been depressed and the shift lever is in N. Release the accelera-tor pedal and shift the shift lever to D or
R.
■If “Press Brake when vehicle is stopped Hybrid system may over-heat” is shown
Message is displayed when the acceler- ator pedal is depressed to maintain the vehicle position when stopped on a
upward slope, etc.
If this continues, the hybrid system may overheat.
Release the accelerator pedal and depress the brake pedal.
■If “Auto Power OFF to Conserve Battery” is shown
Power was turned off due to the auto- matic power off function.
Next time when starting the hybrid sys-
tem, operate the hybrid system for approximately 5 minutes to recharge the
Page 555 of 718
553
8
8-2. Steps to take in an emergency
When trouble arises
Therefore keep it in a safe place.
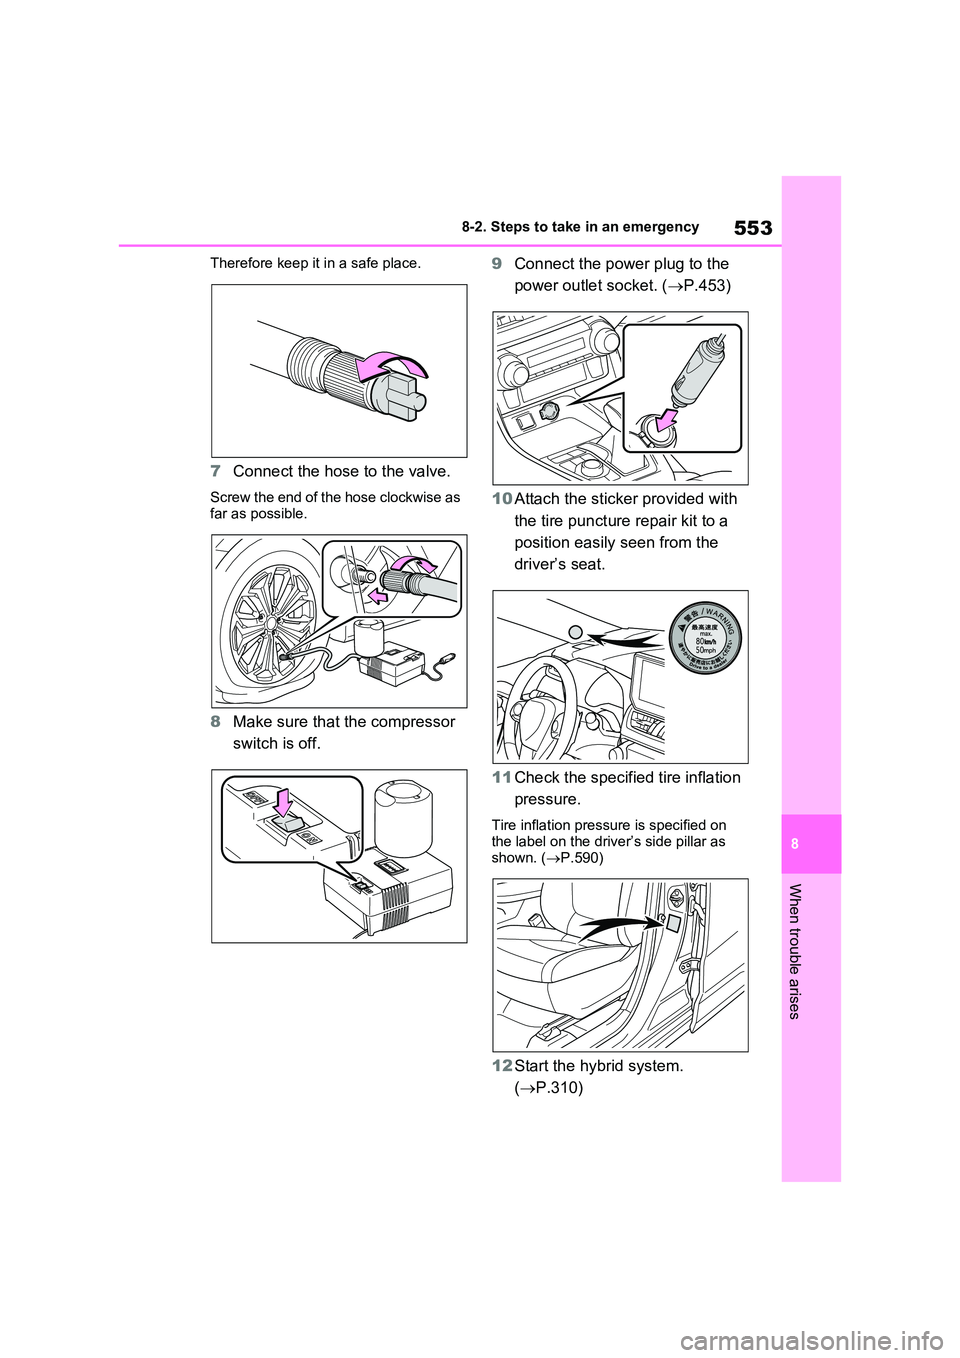
7 Connect the hose to the valve.
Screw the end of the hose clockwise as
far as possible.
8 Make sure that the compressor
switch is off.
9 Connect the power plug to the
power outlet socket. ( P.453)
10 Attach the sticker provided with
the tire puncture repair kit to a
position easily seen from the
driver’s seat.
11 Check the specified tire inflation
pressure.
Tire inflation pressure is specified on the label on the driver’s side pillar as
shown. ( P.590)
12Start the hybrid system.
( P.310)
Page 563 of 718
561
8
8-2. Steps to take in an emergency
When trouble arises
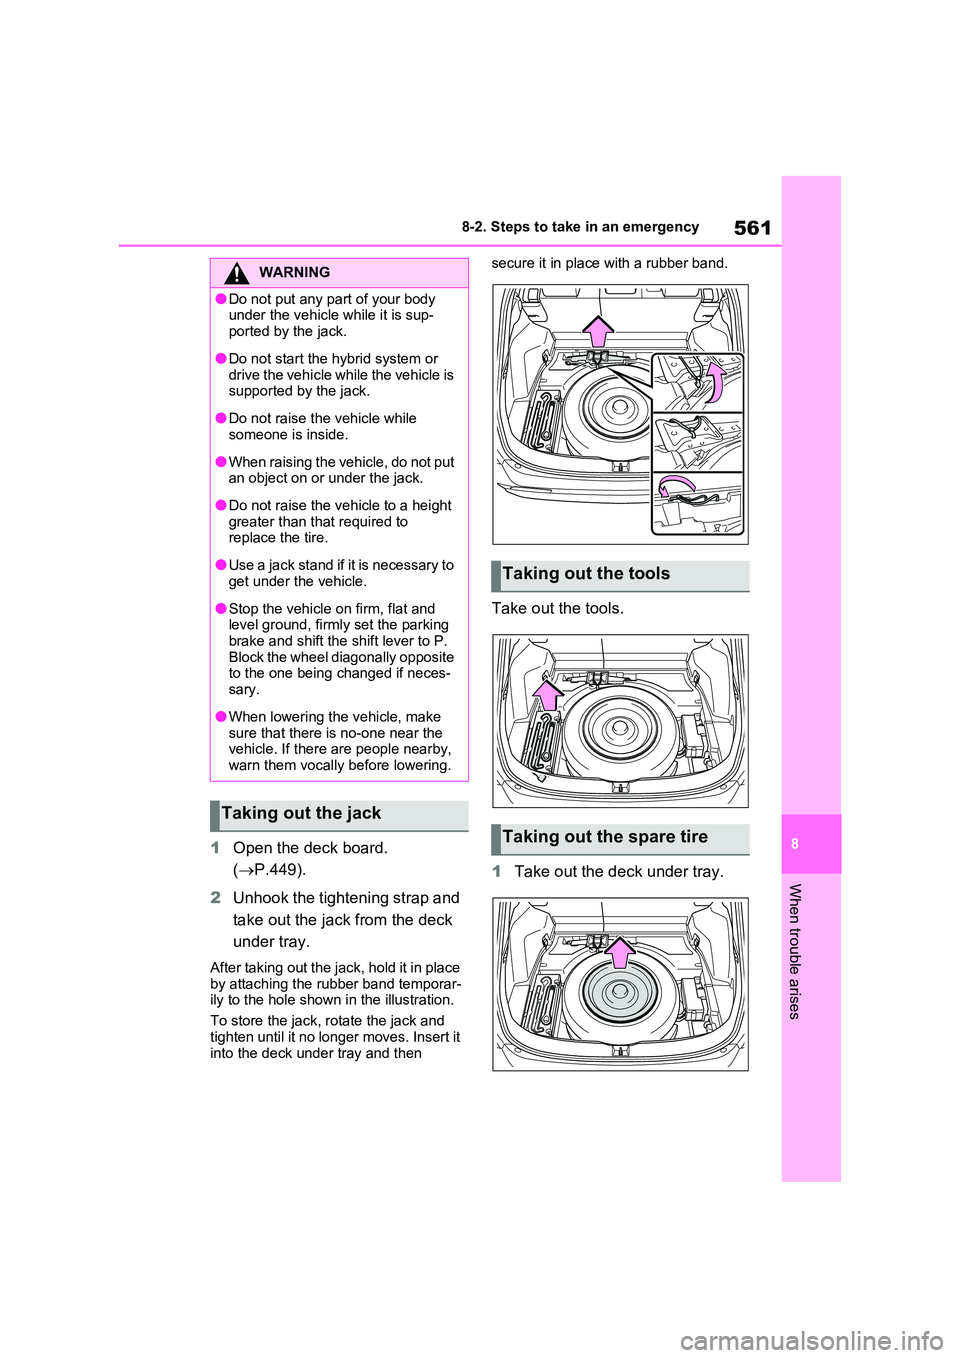
1 Open the deck board.
( P.449).
2 Unhook the tightening strap and
take out the jack from the deck
under tray.
After taking out the jack, hold it in place
by attaching the rubber band temporar- ily to the hole shown in the illustration.
To store the jack, rotate the jack and
tighten until it no longer moves. Insert it into the deck under tray and then
secure it in place with a rubber band.
Take out the tools.
1 Take out the deck under tray.
WARNING
●Do not put any part of your body under the vehicle while it is sup-
ported by the jack.
●Do not start the hybrid system or
drive the vehicle while the vehicle is supported by the jack.
●Do not raise the vehicle while someone is inside.
●When raising the vehicle, do not put an object on or under the jack.
●Do not raise the vehicle to a height greater than that required to replace the tire.
●Use a jack stand if it is necessary to get under the vehicle.
●Stop the vehicle on firm, flat and level ground, firmly set the parking
brake and shift the shift lever to P. Block the wheel diagonally opposite to the one being changed if neces-
sary.
●When lowering the vehicle, make
sure that there is no-one near the vehicle. If there are people nearby, warn them vocally before lowering.
Taking out the jack
Taking out the tools
Taking out the spare tire
Page 570 of 718
5688-2. Steps to take in an emergency
One of the following may be the
cause of the problem:
The AC charging cable may be
attached to the vehicle.
( P.135)
The electronic key may not be
functioning properly. ( P.571)
There may not be sufficient fuel
in the vehicle’s tank.
Refuel the vehicle. ( P.336)
There may be a malfunction in
the immobilizer system. ( P.77)
There may be a malfunction in
the steering lock system (if
equipped).
The hybrid system may be mal-
functioning due to an electrical
problem such as electronic key
battery depletion or a blown fuse.
However, depending on the type
of malfunction, an interim mea-
sure is available to start the
hybrid system. ( P.569)
NOTICE
■Driving with tire chains and the compact spare tire
Do not fit tire chains to the compact spare tire.
Tire chains may damage the vehicle
body and adversely affect driving per- formance.
■When replacing the tires
When removing or fitting the wheels, tires or the tire pressure warning
valve and transmitter, contact any authorized Toyota retailer or Toyota authorized repairer, or any reliable
repairer as the tire pressure warning valve and transmitter may be dam-aged if not handled correctly.
If the hybrid system will
not start
Reasons for the hybrid system
not starting vary depending on
the situation. Check the follow-
ing and perform the appropri-
ate procedure:
The hybrid system will not
start even though the cor-
rect starting procedure is
being followed ( P.310)
Page 574 of 718
5728-2. Steps to take in an emergency
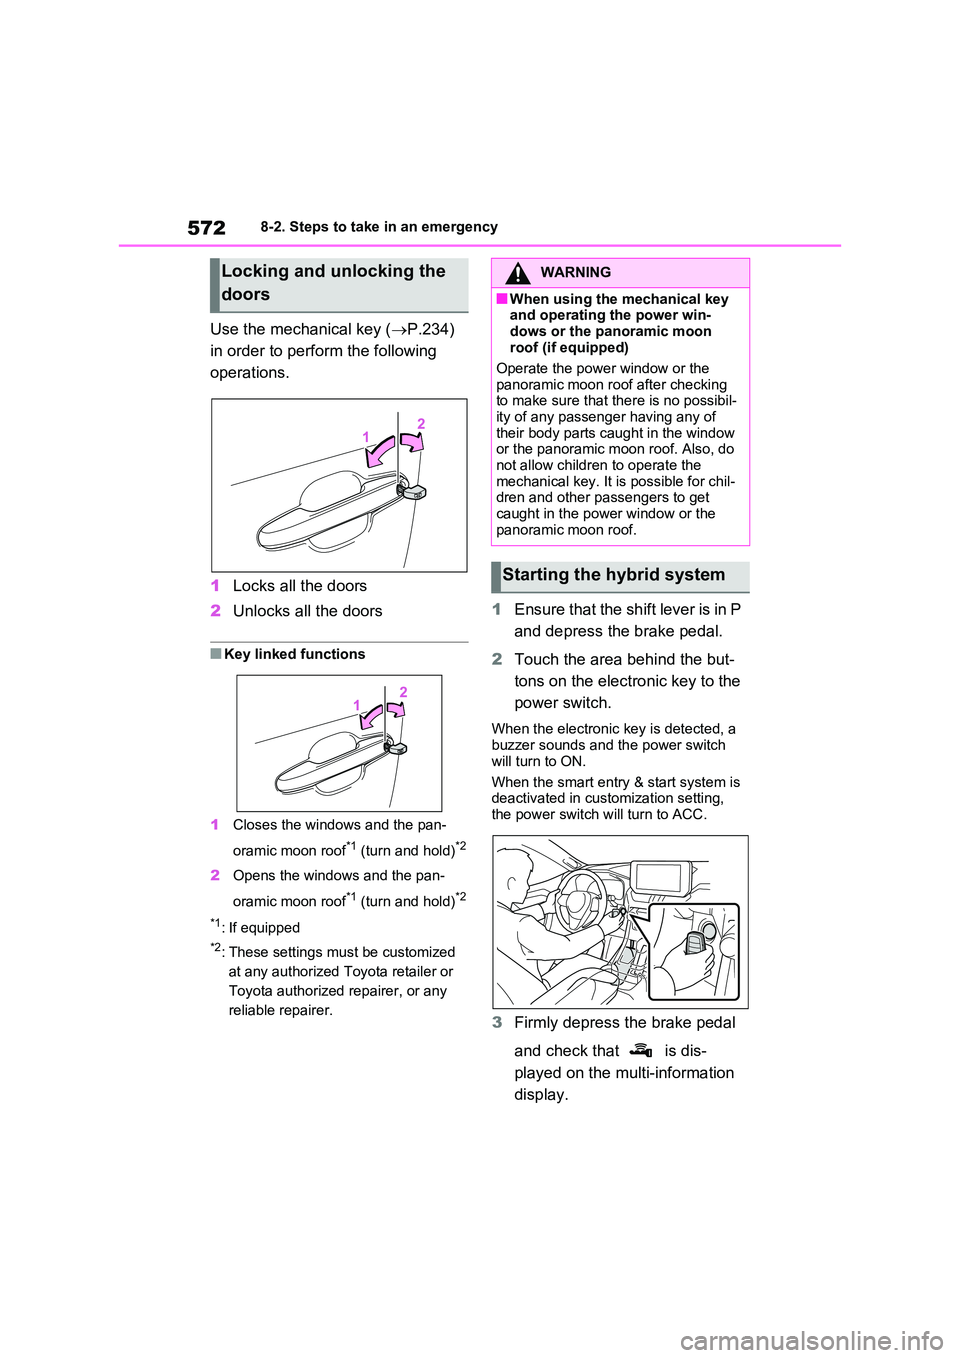
Use the mechanical key (P.234)
in order to perform the following
operations.
1 Locks all the doors
2 Unlocks all the doors
■Key linked functions
1 Closes the windows and the pan-
oramic moon roof*1 (turn and hold)*2
2 Opens the windows and the pan-
oramic moon roof*1 (turn and hold)*2
*1: If equipped
*2: These settings must be customized
at any authorized Toyota retailer or
Toyota authorized repairer, or any
reliable repairer.
1 Ensure that the shift lever is in P
and depress the brake pedal.
2 Touch the area behind the but-
tons on the electronic key to the
power switch.
When the electronic key is detected, a buzzer sounds and the power switch
will turn to ON.
When the smart entry & start system is deactivated in customization setting,
the power switch will turn to ACC.
3 Firmly depress the brake pedal
and check that is dis-
played on the multi-information
display.
Locking and unlocking the
doors
WARNING
■When using the mechanical key and operating the power win-
dows or the panoramic moon roof (if equipped)
Operate the power window or the
panoramic moon roof after checking to make sure that there is no possibil-ity of any passenger having any of
their body parts caught in the window or the panoramic moon roof. Also, do not allow children to operate the
mechanical key. It is possible for chil- dren and other passengers to get caught in the power window or the
panoramic moon roof.
Starting the hybrid system
Page 575 of 718
573
8
8-2. Steps to take in an emergency
When trouble arises
4 Press the power switch shortly
and firmly.
In the event that the hybrid system
still cannot be started, contact any
authorized Toyota retailer or Toyota
authorized repairer, or any reliable
repairer.
■Stopping the hybrid system
Shift the shift lever to P, set the parking brake and press the power switch as
you normally do when stopping the hybrid system.
■Replacing the key battery
As the above procedure is a temporary
measure, it is recommended that the electronic key battery be replaced immediately when the battery is
depleted. ( P.511)
■Alarm (if equipped)
Using the mechanical key to lock the doors will not set the alarm system.
If a door is unlocked using the mechani- cal key when the alarm system is set, the alarm may be triggered. ( P.79)
■Changing power switch modes
Release the brake pedal and press the power switch in step 3 above. The hybrid system does not start and
modes will be changed each time the switch is pressed. ( P.313)
If you have a set of jumper (or
booster) cables and a second vehi-
cle with a 12-volt battery, you can
jump start your vehicle by following
the steps below.
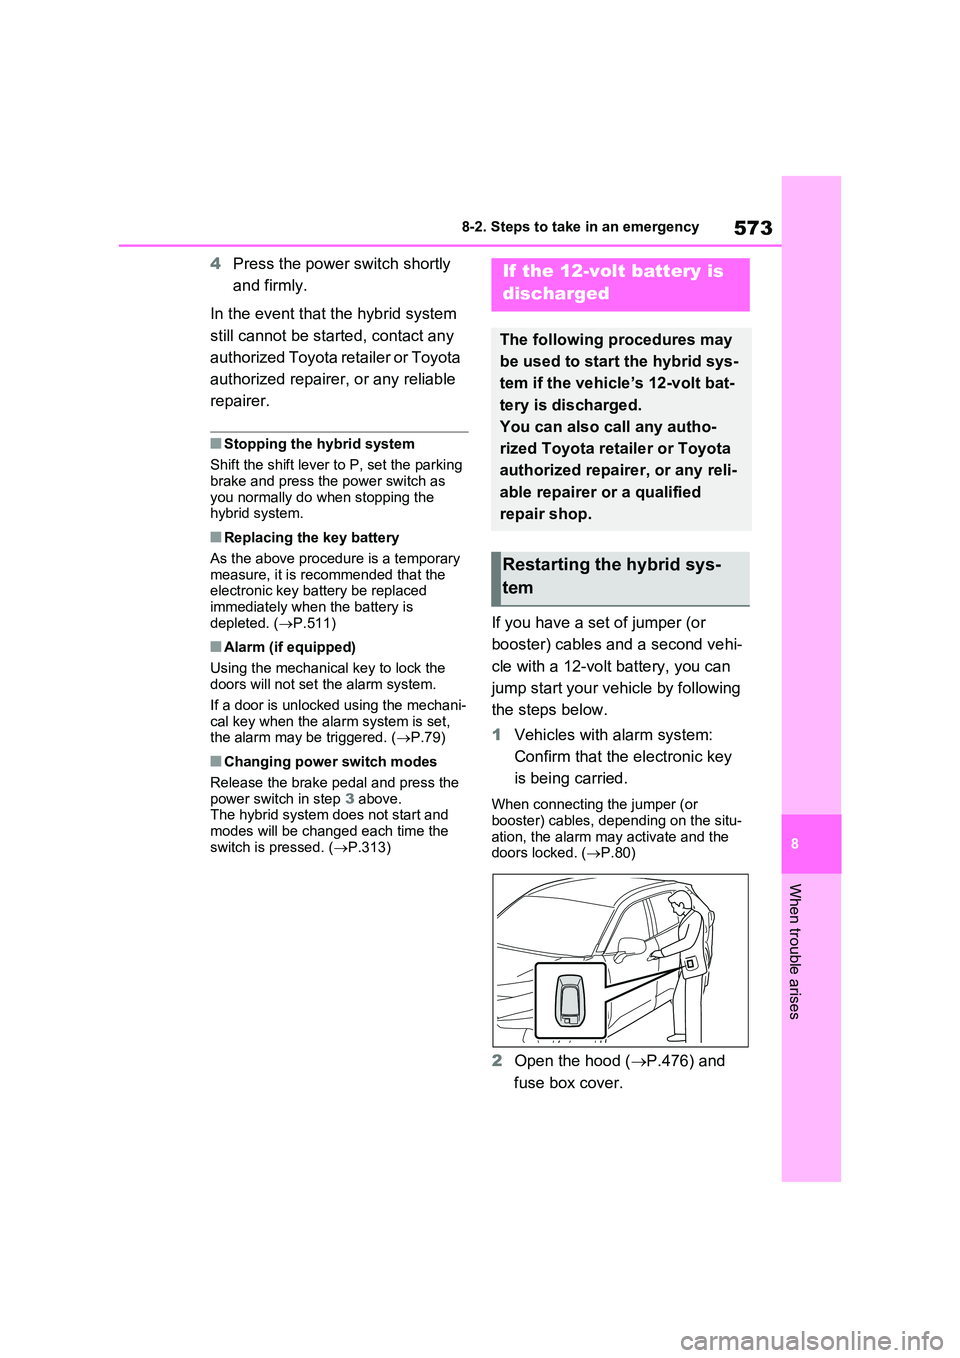
1 Vehicles with alarm system:
Confirm that the electronic key
is being carried.
When connecting the jumper (or booster) cables, depending on the situ-
ation, the alarm may activate and the doors locked. ( P.80)
2Open the hood (P.476) and
fuse box cover.
If the 12-volt battery is
discharged
The following procedures may
be used to start the hybrid sys-
tem if the vehicle’s 12-volt bat-
tery is discharged.
You can also call any autho-
rized Toyota retailer or Toyota
authorized repairer, or any reli-
able repairer or a qualified
repair shop.
Restarting the hybrid sys-
tem
Page 576 of 718
5748-2. Steps to take in an emergency
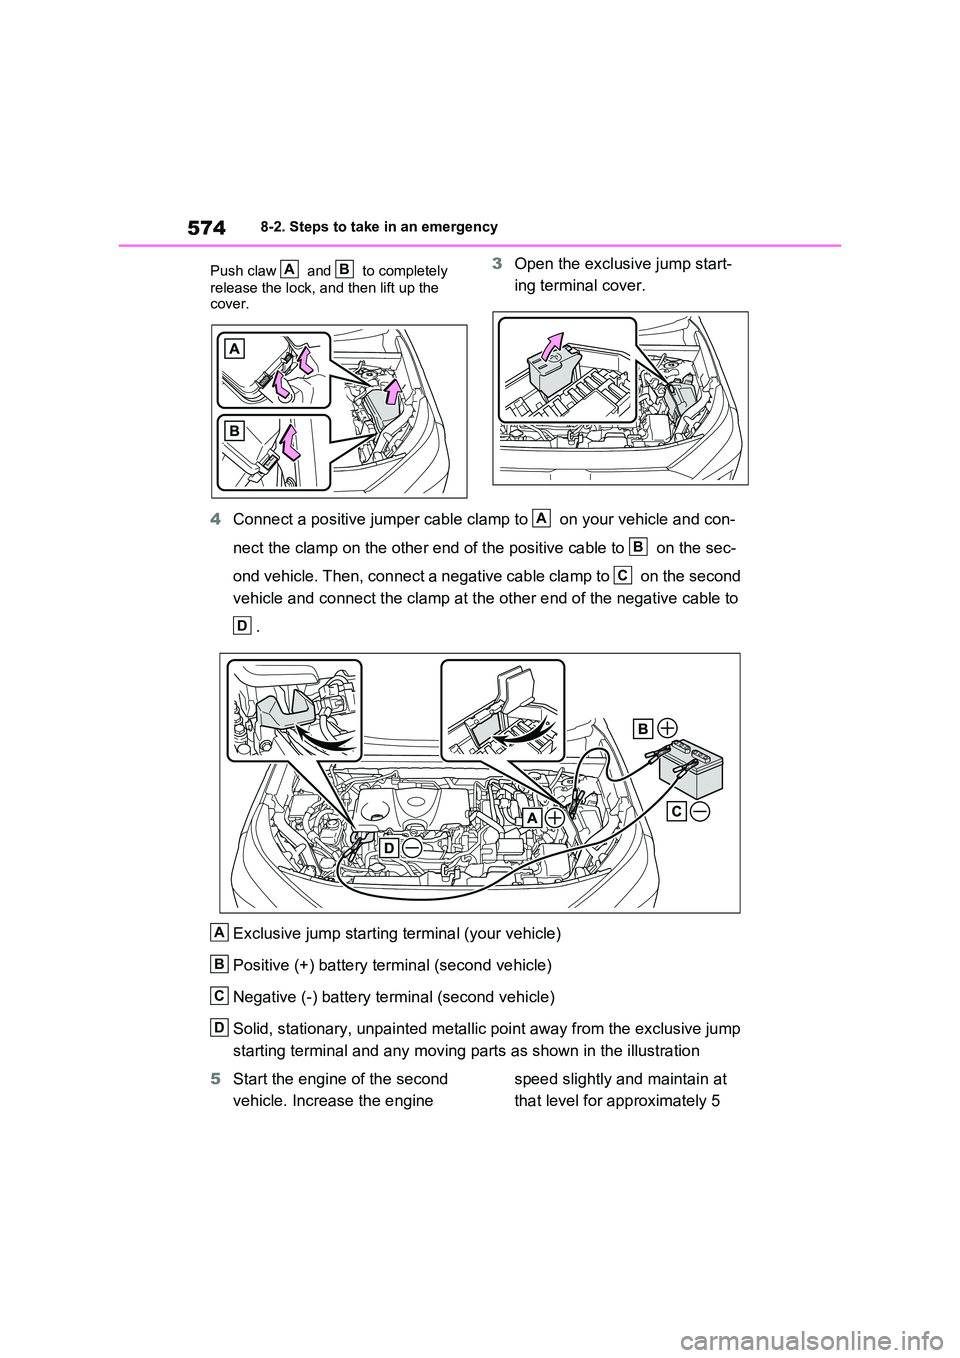
Push claw and to completely
release the lock, and then lift up the cover.
3 Open the exclusive jump start-
ing terminal cover.
4 Connect a positive jumper cable clamp to on your vehicle and con-
nect the clamp on the other end of the positive cable to on the sec-
ond vehicle. Then, connect a negative cable clamp to on the second
vehicle and connect the clamp at the other end of the negative cable to
.
Exclusive jump starting terminal (your vehicle)
Positive (+) battery terminal (second vehicle)
Negative (-) battery terminal (second vehicle)
Solid, stationary, unpainted metallic point away from the exclusive jump
starting terminal and any moving parts as shown in the illustration
5 Start the engine of the second
vehicle. Increase the engine
speed slightly and maintain at
that level for approximately 5
AB
A
B
C
D
A
B
C
D