light TOYOTA RAV4 PLUG-IN HYBRID 2023 Owners Manual
[x] Cancel search | Manufacturer: TOYOTA, Model Year: 2023, Model line: RAV4 PLUG-IN HYBRID, Model: TOYOTA RAV4 PLUG-IN HYBRID 2023Pages: 718, PDF Size: 167.55 MB
Page 544 of 718
5428-2. Steps to take in an emergency
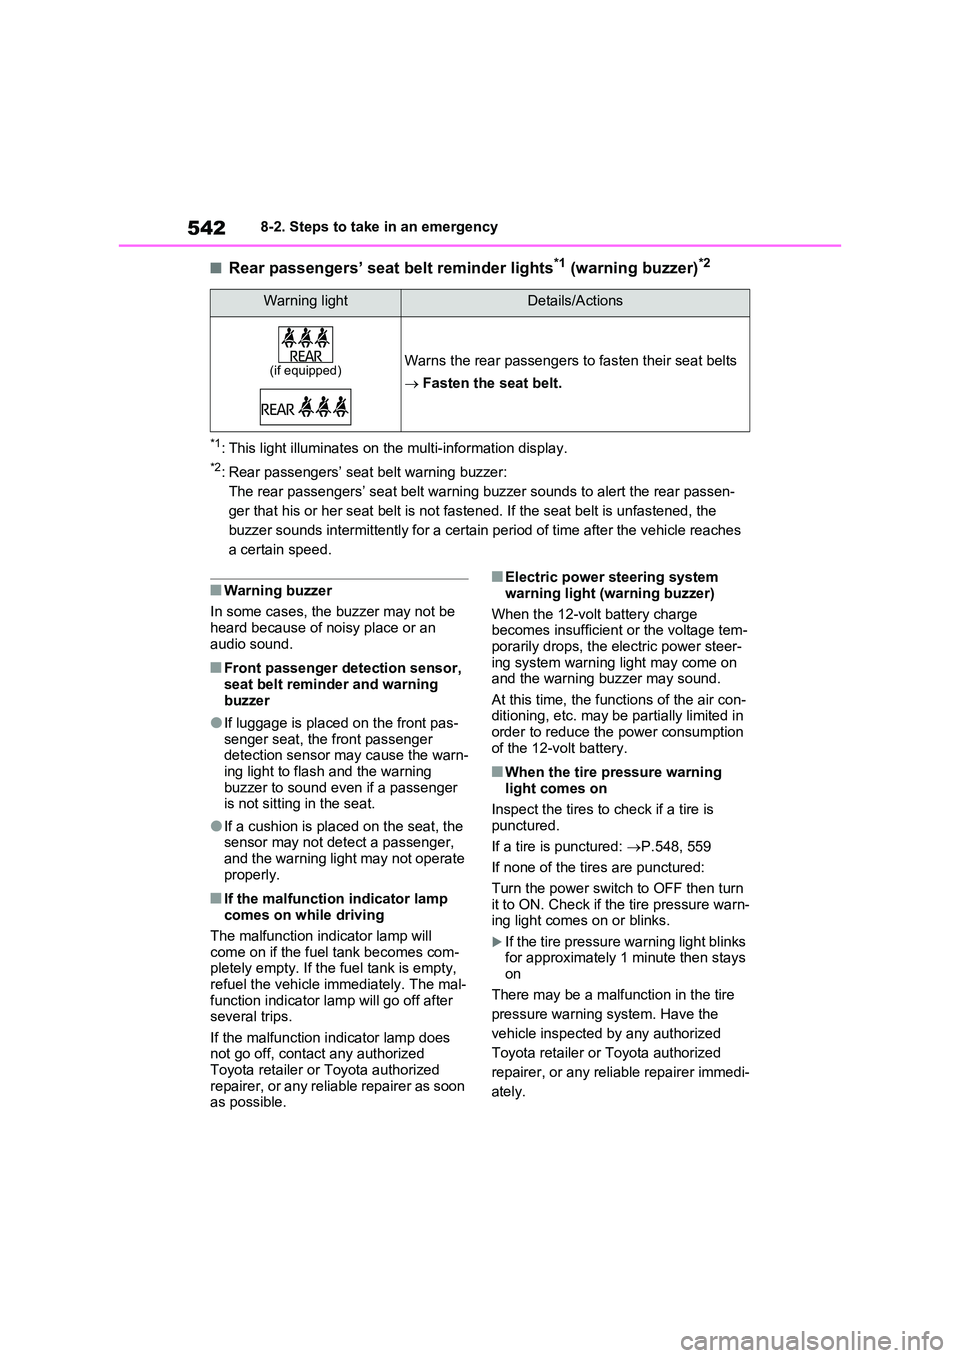
■Rear passengers’ seat belt reminder lights*1 (warning buzzer)*2
*1: This light illuminates on the multi-information display.
*2: Rear passengers’ seat belt warning buzzer:
The rear passengers’ seat belt warning buzzer sounds to alert the rear passen-
ger that his or her seat belt is not fastened. If the seat belt is unfastened, the
buzzer sounds intermittently for a certain period of time after the vehicle reaches
a certain speed.
■Warning buzzer
In some cases, the buzzer may not be
heard because of noisy place or an audio sound.
■Front passenger detection sensor, seat belt reminder and warning
buzzer
●If luggage is placed on the front pas-
senger seat, the front passenger detection sensor may cause the warn-ing light to flash and the warning
buzzer to sound even if a passenger is not sitting in the seat.
●If a cushion is placed on the seat, the sensor may not detect a passenger,
and the warning light may not operate properly.
■If the malfunction indicator lamp comes on while driving
The malfunction indicator lamp will come on if the fuel tank becomes com-pletely empty. If the fuel tank is empty,
refuel the vehicle immediately. The mal- function indicator lamp will go off after several trips.
If the malfunction indicator lamp does not go off, contact any authorized Toyota retailer or Toyota authorized
repairer, or any reliable repairer as soon as possible.
■Electric power steering system
warning light (warning buzzer)
When the 12-volt battery charge becomes insufficient or the voltage tem-
porarily drops, the electric power steer- ing system warning light may come on and the warning buzzer may sound.
At this time, the functions of the air con- ditioning, etc. may be partially limited in order to reduce the power consumption
of the 12-volt battery.
■When the tire pressure warning light comes on
Inspect the tires to check if a tire is
punctured.
If a tire is punctured: P.548, 559
If none of the tires are punctured:
Turn the power switch to OFF then turn it to ON. Check if the tire pressure warn-ing light comes on or blinks.
If the tire pressure warning light blinks for approximately 1 minute then stays on
There may be a malfunction in the tire
pressure warning system. Have the
vehicle inspected by any authorized
Toyota retailer or Toyota authorized
repairer, or any reliable repairer immedi-
ately.
Warning lightDetails/Actions
(if equipped)Warns the rear passengers to fasten their seat belts
Fasten the seat belt.
Page 545 of 718
543
8
8-2. Steps to take in an emergency
When trouble arises
If the tire pressure warning light
comes on
1 After the temperature of the tires has lowered sufficiently, check the infla-tion pressure of each tire and adjust
them to the specified level.
2 If the warning light does not turn off even after several minutes have elapsed, check that the inflation
pressure of each tire is at the speci- fied level and perform initialization. ( P.492)
■The tire pressure warning light may
come on due to natural causes
The tire pressure warning light may come on due to natural causes such as
natural air leaks and tire inflation pres- sure changes caused by temperature. In this case, adjusting the tire inflation
pressure will turn off the warning light (after a few minutes).
■When a tire is replaced with a com-pact spare tire (vehicles with com-
pact spare tire)
The compact spare tire is not equipped with a tire pressure warning valve and
transmitter. If a tire goes flat, the tire pressure warning light will not turn off even though the flat tire has been
replaced with the spare tire. Replace the spare tire with the standard tire and adjust the tire inflation pressure. The tire
pressure warning light will go off after a few minutes.
■Conditions that the tire pressure warning system may not function
properly
P.490
WARNING
■If a warning light comes on or a
warning buzzer sounds when a
warning message is shown on
the multi-information display*
Check and follow the message shown
on the multi-information display.
Failure to do so may result in death or serious injury.*: Warning lights illuminate in red or
yellow and the warning buzzer
beeps once or sounds continu-
ously.
■When the electric power steer- ing system warning light comes on
When the light comes on yellow, the assist to the power steering is restricted. When the light comes on
red, the assist to the power steering is lost and handling operations of the steering wheel become extremely
heavy. If the steering wheel becomes heavier than usual when operating, hold firmly
and operate using more force than usual.
■If the tire pressure warning light comes on
Be sure to observe the following pre-
cautions. Failure to do so could cause a loss of vehicle control and result in death or serious injury.
●Stop your vehicle in a safe place as soon as possible. Adjust the tire inflation pressure immediately.
●If the tire pressure warning light comes on even after tire inflation
pressure adjustment, it is probable that you have a flat tire. Check the tires. If a tire is flat, change it with
the spare tire and have the flat tire repaired by the nearest authorized Toyota retailer or Toyota authorized
repairer, or any reliable repairer.
Page 547 of 718
545
8
8-2. Steps to take in an emergency
When trouble arises
• A warning message about an opera-
tion of the brake pedal may be shown while the driving assist systems such as PCS (Pre-Collision system) (if
equipped) or the dynamic radar cruise control with full-speed range (if equipped) is operating. If a warning
message is shown, be sure to decel- erate the vehicle or follow the instruc-tion shown on the multi-information
display. • A warning message is shown when Brake Override System operates.
( P.289) • A warning message is shown when Drive-Start Control or Parking Support
Brake function (if equipped) operates ( P.289, 403). Follow the instructions on the multi-information display.
●If a message about an operation of the power switch is shown
An instruction for operation of the power
switch is shown when the incorrect pro-
cedure for starting the hybrid system is
performed or the power switch is oper-
ated incorrectly. Follow the instructions
shown on the multi-information display
to operate the power switch again.
●If a message about a shift lever opera- tion is shown
To prevent the shift lever from being
operated incorrectly or the vehicle from
moving unexpectedly, a message that
requires shifting the shift lever may be
shown on the multi-information display.
In that case, follow the instruction of the
message and shift the shift lever.
●If a message or image about an open/close state of a part or replen-
ishment of a consumable is shown
Confirm the part indicated by the multi-
information display or a warning light,
and then perform the coping method
such as closing the open door or replen-
ishing a consumable.
■If a message that indicates the
need for visiting any authorized Toyota retailer or Toyota autho-rized repairer, or any reliable
repairer is displayed
The system or part shown on the multi- information display is malfunctioning.
Have the vehicle inspected by any authorized Toyota retailer or Toyota authorized repairer, or any reliable
repairer immediately.
■If a message that indicates the need for referring to Owner’s Man-ual is displayed
●If the following messages are shown, follow the instructions, accordingly.
• “Blind Spot Monitor Unavailable” ( P.388) • “RCTA Unavailable” ( P.388)
• “Engine Coolant Temp High” ( P.578) • “Exhaust Filter Full” ( P.414)
●If the following messages are shown, there may be a malfunction.
Immediately have the vehicle inspected
by any authorized Toyota retailer or
Toyota authorized repairer, or any reli-
able repairer.
• “Plug-in Charging System Malfunc- tion”• “Hybrid System Malfunction”
• “Charging system malfunction” • “Check Engine”• “Traction battery system malfunction”
• “Accelerator System Malfunction” • “Smart Entry & Start System Malfunc-tion”
●If the following messages are shown, there may be a malfunction.
Immediately stop the vehicle in a safe
place and contact any authorized
Toyota retailer or Toyota authorized
repairer, or any reliable repairer. Con-
tinuing to drive the vehicle may be dan-
gerous.
•“Oil Pressure Low” • “Braking Power Low”
●If any of the following messages are
Page 549 of 718
547
8
8-2. Steps to take in an emergency
When trouble arises
12-volt battery.
■If “Engine Oil Level Low Add or
Replace” is displayed
The engine oil level may be low. Check the level of the engine oil, and add
engine oil if necessary. This message may be displayed if the vehicle is stopped on a slope. Move the vehicle to
a level surface and check if the mes- sage disappears.
■If a message that indicates the mal-function of front camera is dis-
played (if equipped)
The following systems may be sus- pended until the problem shown in the
message is resolved. ( P.341, 534)
●PCS (Pre-Collision System)*
●LTA (Lane Tracing Assist)*
●AHB (Automatic High Beam)*
●RSA (Road Sign Assist)*
●Dynamic radar cruise control with full-
speed range*
*: If equipped
■If a message that indicates the mal- function of radar sensor is dis-
played
The following systems may be sus- pended until the problem shown in the
message is resolved. ( P.341, 534)
●PCS (Pre-Collision System)*
●LTA (Lane Tracing Assist)*
●Dynamic radar cruise control with full-
speed range*
*: If equipped
■If “Radar Cruise Control Temporar- ily Unavailable See Owner’s Man-
ual” is shown
The dynamic radar cruise control with full-speed range system (if equipped) is
suspended temporarily or until the prob- lem shown in the message is resolved. (causes and coping methods: P.341)
■If “Radar Cruise Control Unavail-
able” is shown
The dynamic radar cruise control with full-speed range system (if equipped)
cannot be used temporarily. Use the system when it becomes available again.
■Warning buzzer
P.542
WARNING
■If a warning light comes on or a warning buzzer sounds when a
warning message is shown on the multi-information display
P.543
NOTICE
■“High Power Consumption Par- tial Limit On AC/Heater Opera-
tion” is frequently shown
There is a possible malfunction relat- ing to the charging system or the 12-
volt battery may be deteriorating. Have the vehicle inspected by any
authorized Toyota retailer or Toyota authorized repairer, or any reliable repairer.
■If “Maintenance Reqd. For Trac-tion Battery At Your Dealer” is
shown
The hybrid battery (traction battery) is scheduled to be inspected or
replaced. Have the vehicle inspected by any authorized Toyota retailer or Toyota authorized repairer, or any
reliable repairer immediately.
●Continuing to drive the vehicle with- out having the hybrid battery (trac-
tion battery) inspected will cause the hybrid system not to start.
●If the hybrid system does not start, contact any authorized Toyota retailer or Toyota authorized
repairer, or any reliable repairer immediately.
Page 558 of 718
5568-2. Steps to take in an emergency
may get dirty.
24 Store the bottle in the luggage
compartment while it is con-
nected to the compressor.
25 Taking precautions to avoid
sudden braking, sudden accel-
eration and sharp turns, drive
carefully at under 80 km/h (50
mph) to the nearest authorized
Toyota retailer or Toyota autho-
rized repairer, or reliable
repairer that is less than 100 km
(62 miles) away for tire repair or
replacement.
For repair and replacement of a tire or disposal of the tire puncture repair kit, contact any authorized Toyota retailer
or Toyota authorized repairer, or any reliable repairer.
When having the tire repaired or
replaced, make sure to tell the autho- rized Toyota retailer or Toyota autho-rized repairer, or reliable repairer that
the sealant is injected.
■If the tire is inflated to more than the specified air pressure
1 Disconnect the hose from the valve.
2 Install the air release cap to the end of the hose and push the protrusion
on the air release cap into the tire valve to let some air out.
3 Disconnect the hose from the valve, remove the air release cap from the hose and then reconnect the hose.
4 Turn the compressor switch on and
wait for several seconds, and then turn it off. Check that the air pres-sure indicator shows the specified
air pressure.
If the air pressure is under the desig- nated pressure, turn the compressor
switch on again and repeat the inflation procedure until the specified air pres-sure is reached.
■After a tire is repaired with the
emergency tire puncture repair kit
●The tire pressure warning valve and
transmitter should be replaced.
●Even if the tire inflation pressure is at
the recommended level, the tire pres- sure warning light may come on/flash.
■Taking out the jack (if equipped)
1 Open the deck board.
2 Unhook the tightening strap and take out the jack from the deck under
tray.
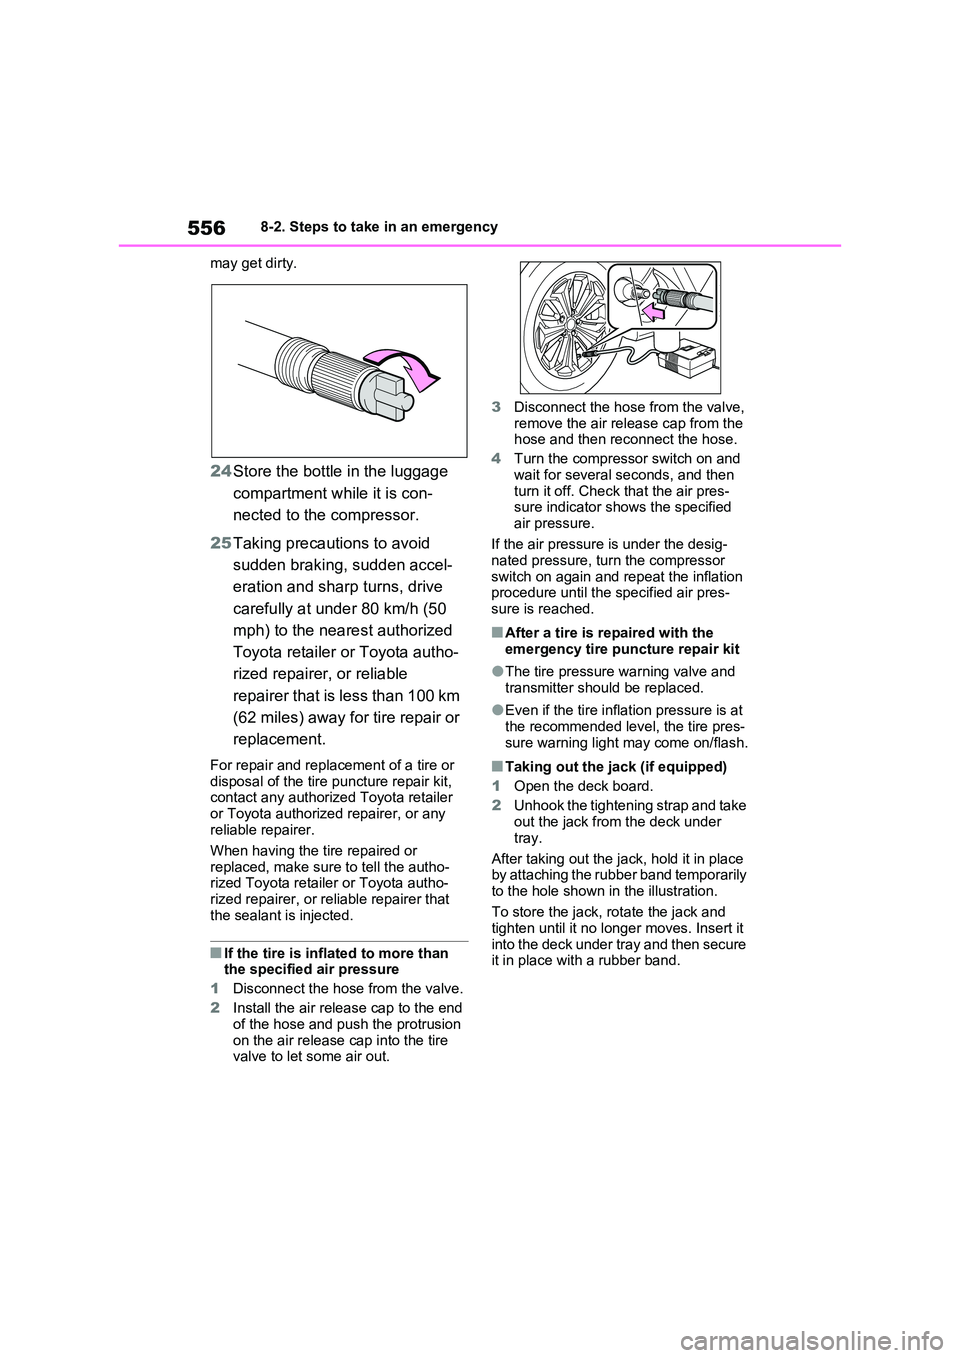
After taking out the jack, hold it in place by attaching the rubber band temporarily
to the hole shown in the illustration.
To store the jack, rotate the jack and tighten until it no longer moves. Insert it
into the deck under tray and then secure it in place with a rubber band.
Page 564 of 718
5628-2. Steps to take in an emergency
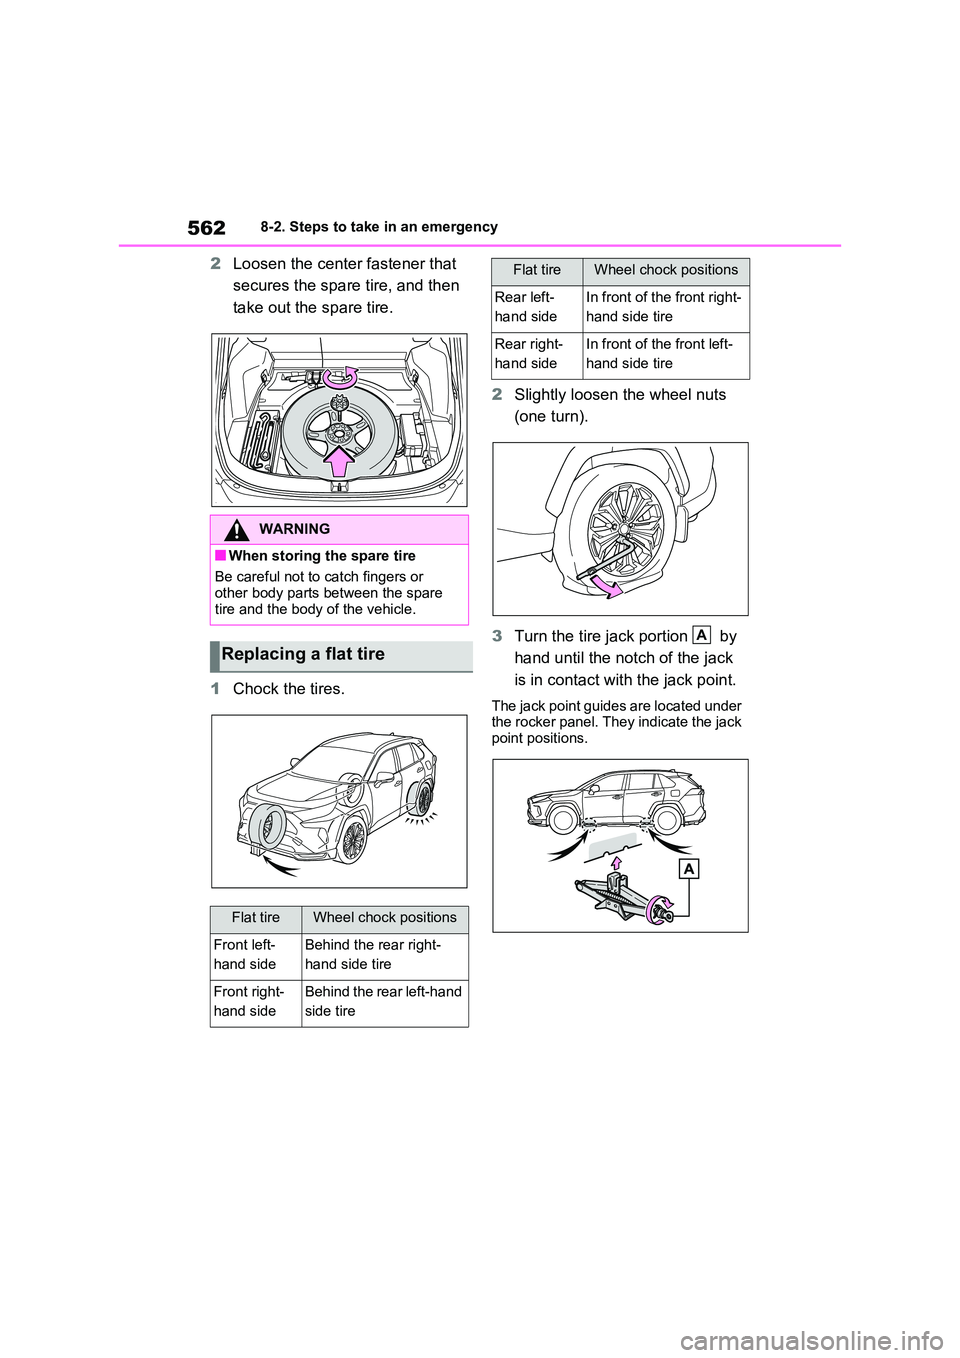
2Loosen the center fastener that
secures the spare tire, and then
take out the spare tire.
1 Chock the tires.
2 Slightly loosen the wheel nuts
(one turn).
3 Turn the tire jack portion by
hand until the notch of the jack
is in contact with the jack point.
The jack point guides are located under the rocker panel. They indicate the jack
point positions.
WARNING
■When storing the spare tire
Be careful not to catch fingers or
other body parts between the spare tire and the body of the vehicle.
Replacing a flat tire
Flat tireWheel chock positions
Front left-
hand side
Behind the rear right-
hand side tire
Front right-
hand side
Behind the rear left-hand
side tire
Rear left-
hand side
In front of the front right-
hand side tire
Rear right-
hand side
In front of the front left-
hand side tire
Flat tireWheel chock positions
A
Page 565 of 718
563
8
8-2. Steps to take in an emergency
When trouble arises
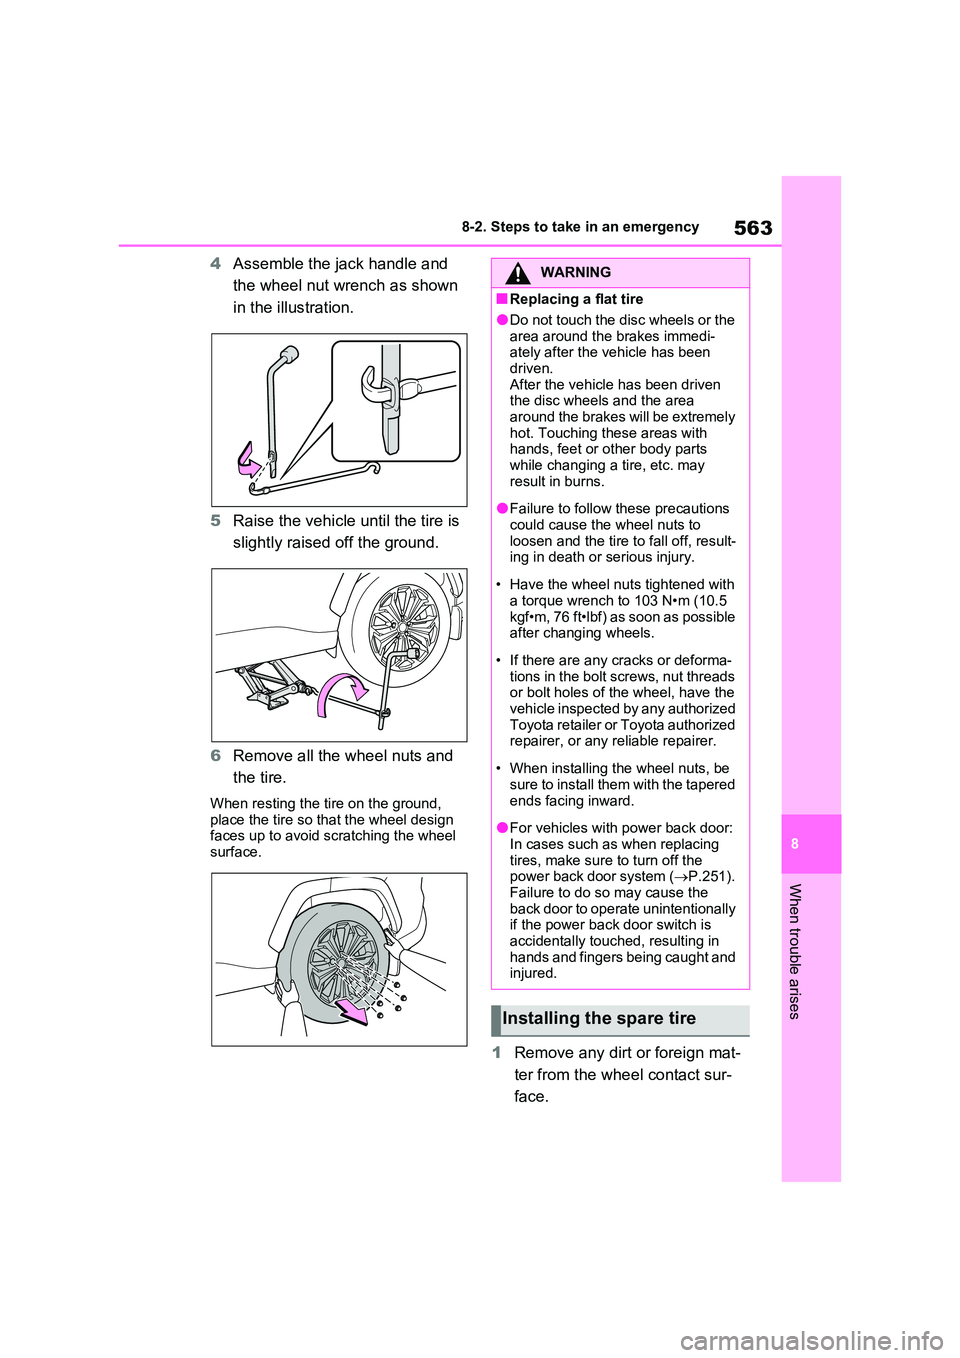
4 Assemble the jack handle and
the wheel nut wrench as shown
in the illustration.
5 Raise the vehicle until the tire is
slightly raised off the ground.
6 Remove all the wheel nuts and
the tire.
When resting the tire on the ground,
place the tire so that the wheel design faces up to avoid scratching the wheel surface.
1 Remove any dirt or foreign mat-
ter from the wheel contact sur-
face.
WARNING
■Replacing a flat tire
●Do not touch the disc wheels or the
area around the brakes immedi- ately after the vehicle has been driven.
After the vehicle has been driven the disc wheels and the area around the brakes will be extremely
hot. Touching these areas with hands, feet or other body parts while changing a tire, etc. may
result in burns.
●Failure to follow these precautions
could cause the wheel nuts to loosen and the tire to fall off, result-ing in death or serious injury.
• Have the wheel nuts tightened with a torque wrench to 103 N•m (10.5
kgf•m, 76 ft•lbf) as soon as possible after changing wheels.
• If there are any cracks or deforma- tions in the bolt screws, nut threads or bolt holes of the wheel, have the
vehicle inspected by any authorized Toyota retailer or Toyota authorized repairer, or any reliable repairer.
• When installing the wheel nuts, be sure to install them with the tapered
ends facing inward.
●For vehicles with power back door:
In cases such as when replacing tires, make sure to turn off the power back door system ( P.251).
Failure to do so may cause the back door to operate unintentionally if the power back door switch is
accidentally touched, resulting in hands and fingers being caught and injured.
Installing the spare tire
Page 566 of 718
5648-2. Steps to take in an emergency
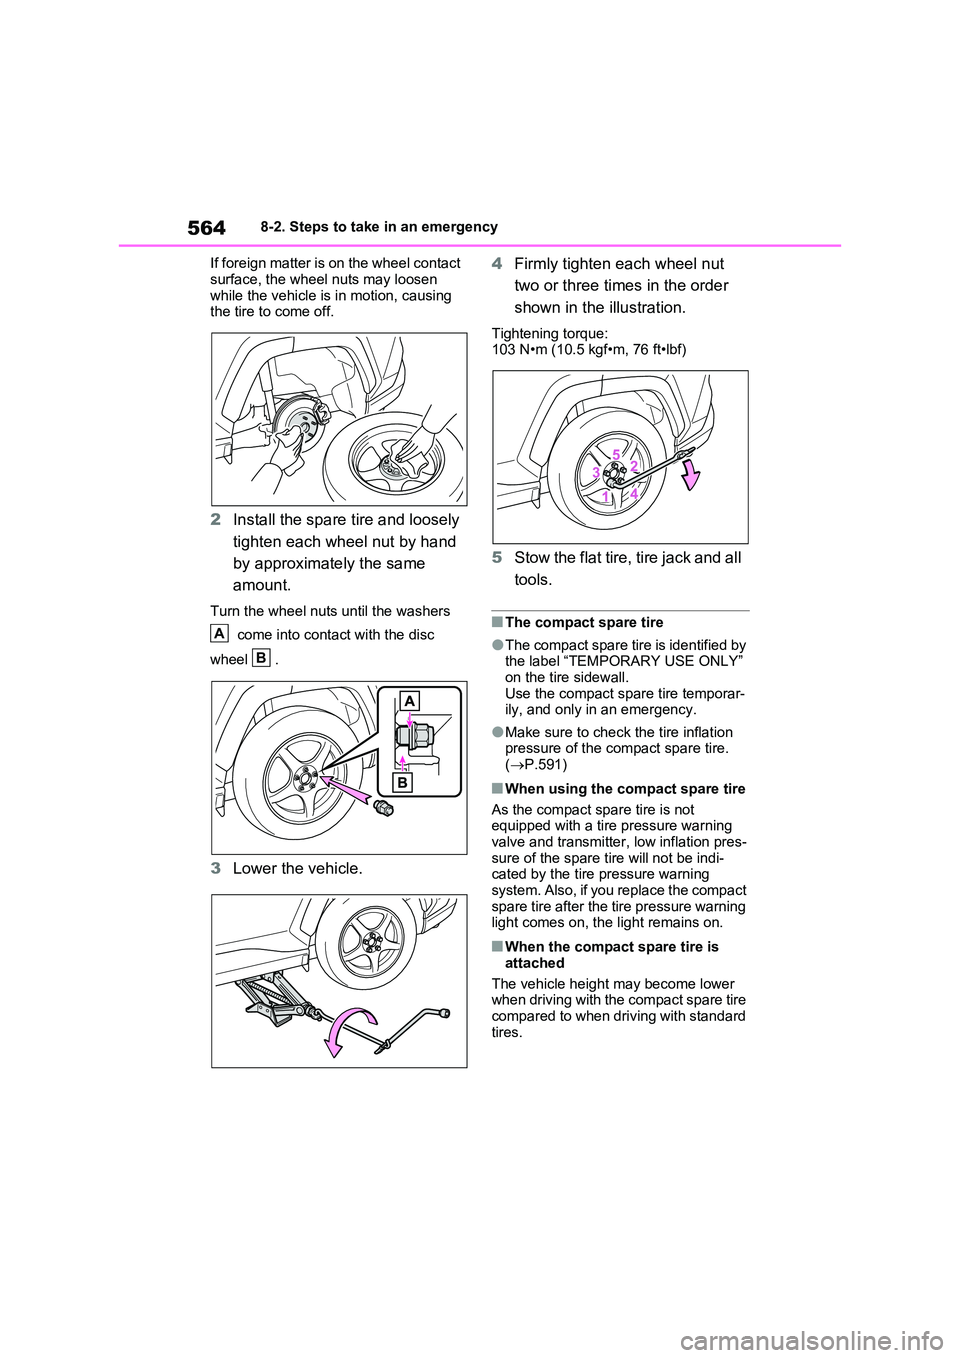
If foreign matter is on the wheel contact
surface, the wheel nuts may loosen while the vehicle is in motion, causing the tire to come off.
2 Install the spare tire and loosely
tighten each wheel nut by hand
by approximately the same
amount.
Turn the wheel nuts until the washers
come into contact with the disc
wheel .
3 Lower the vehicle.
4 Firmly tighten each wheel nut
two or three times in the order
shown in the illustration.
Tightening torque: 103 N•m (10.5 kgf•m, 76 ft•lbf)
5 Stow the flat tire, tire jack and all
tools.
■The compact spare tire
●The compact spare tire is identified by the label “TEMPORARY USE ONLY”
on the tire sidewall. Use the compact spare tire temporar-ily, and only in an emergency.
●Make sure to check the tire inflation pressure of the compact spare tire.
( P.591)
■When using the compact spare tire
As the compact spare tire is not equipped with a tire pressure warning
valve and transmitter, low inflation pres- sure of the spare tire will not be indi-cated by the tire pressure warning
system. Also, if you replace the compact spare tire after the tire pressure warning light comes on, the light remains on.
■When the compact spare tire is
attached
The vehicle height may become lower when driving with the compact spare tire
compared to when driving with standard tires.
A
B
Page 571 of 718
569
8
8-2. Steps to take in an emergency
When trouble arises
There is a possibility that the
temperature of the hybrid battery
(traction battery) is extremely low
(approximately below -30°C [-
22°F]). ( P.311)
One of the following may be the
cause of the problem:
The 12-volt battery may be dis-
charged. ( P.573)
The 12-volt battery terminal con-
nections may be loose or cor-
roded. ( P.486)
One of the following may be the
cause of the problem:
The 12-volt battery may be dis-
charged. ( P.573)
One or both of the 12-volt battery
terminals may be disconnected.
( P.486)
Contact any authorized Toyota
retailer or Toyota authorized
repairer, or any reliable repairer if
the problem cannot be repaired, or
if repair procedures are unknown.
When the hybrid system does not
start, the following steps can be
used as an interim measure to start
the hybrid system if the power
switch is functioning normally.
Do not use this starting procedure
except in cases of emergency.
1 Pull the parking brake switch to
check that the parking brake is
set. ( P.320)
Parking brake indicator will come on.
2Shift the shift lever to P.
3 Turn the power switch to ACC.
4 Press and hold the power switch
for about 15 seconds while
depressing the brake pedal
firmly.
Even if the hybrid system can be
started using the above steps, the
system may be malfunctioning.
Have the vehicle inspected by any
authorized Toyota retailer or Toyota
authorized repairer, or any reliable
repairer.
The interior lights and head-
lights are dim, or the horn
does not sound or sounds at
a low volume
The interior lights and head-
lights do not turn on, or the
horn does not sound
Starting the hybrid system
in an emergency
Page 576 of 718
5748-2. Steps to take in an emergency
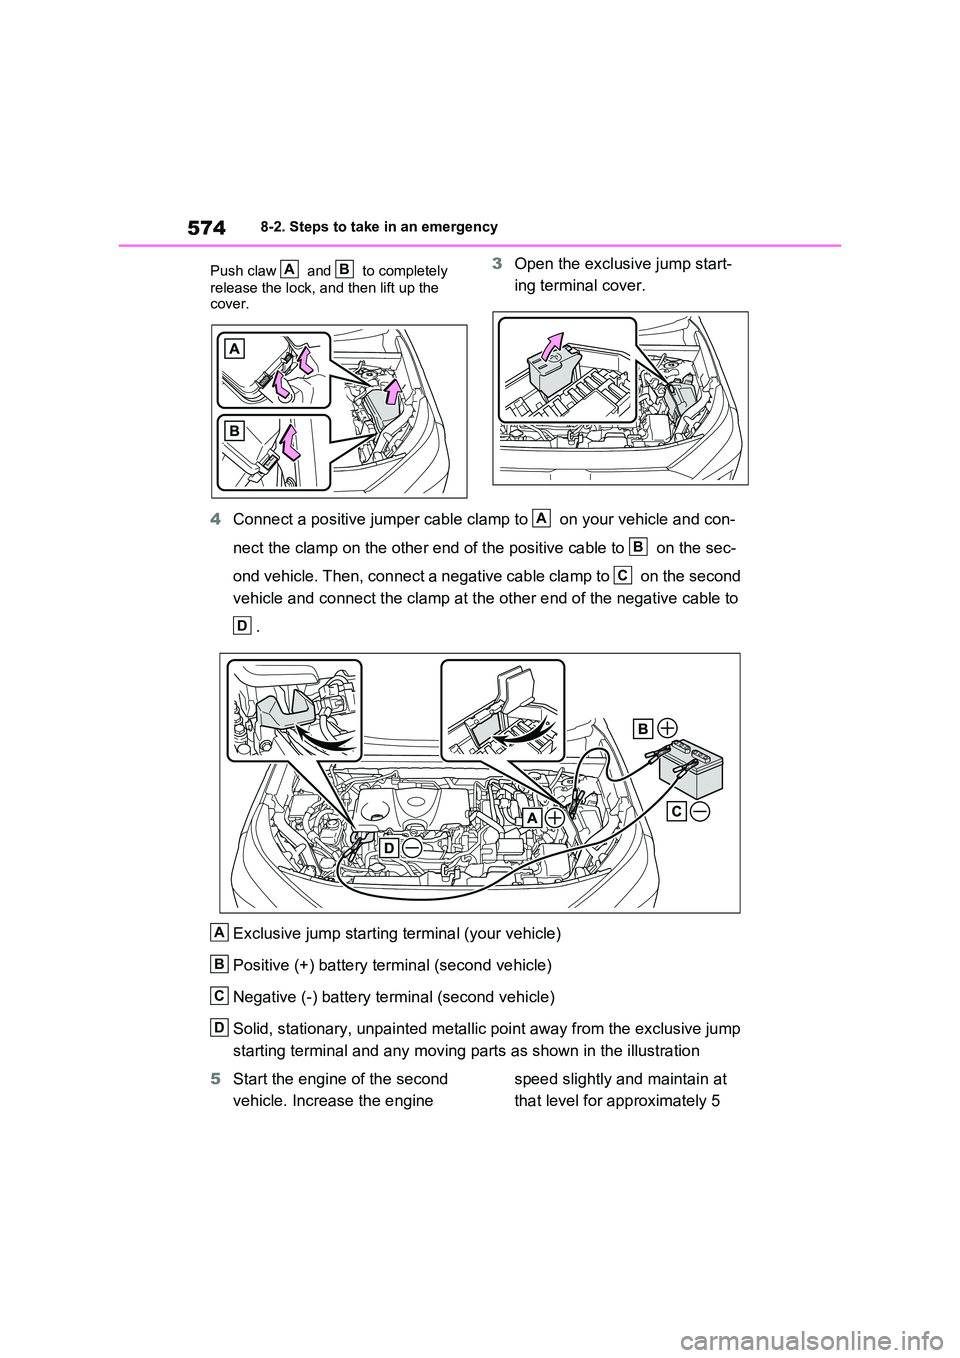
Push claw and to completely
release the lock, and then lift up the cover.
3 Open the exclusive jump start-
ing terminal cover.
4 Connect a positive jumper cable clamp to on your vehicle and con-
nect the clamp on the other end of the positive cable to on the sec-
ond vehicle. Then, connect a negative cable clamp to on the second
vehicle and connect the clamp at the other end of the negative cable to
.
Exclusive jump starting terminal (your vehicle)
Positive (+) battery terminal (second vehicle)
Negative (-) battery terminal (second vehicle)
Solid, stationary, unpainted metallic point away from the exclusive jump
starting terminal and any moving parts as shown in the illustration
5 Start the engine of the second
vehicle. Increase the engine
speed slightly and maintain at
that level for approximately 5
AB
A
B
C
D
A
B
C
D