TOYOTA YARIS LIFTBACK 2020 Accessories, Audio & Navigation (in English)
YARIS LIFTBACK 2020
TOYOTA
TOYOTA
https://www.carmanualsonline.info/img/14/43161/w960_43161-0.png
TOYOTA YARIS LIFTBACK 2020 Accessories, Audio & Navigation (in English)
Trending: fuse, CD player, wheel size, ECO mode, glove box, battery, steering
Page 41 of 164
41
BASIC FUNCTION
2
3. OTHER SETTINGS
1. GENERAL SETTINGS
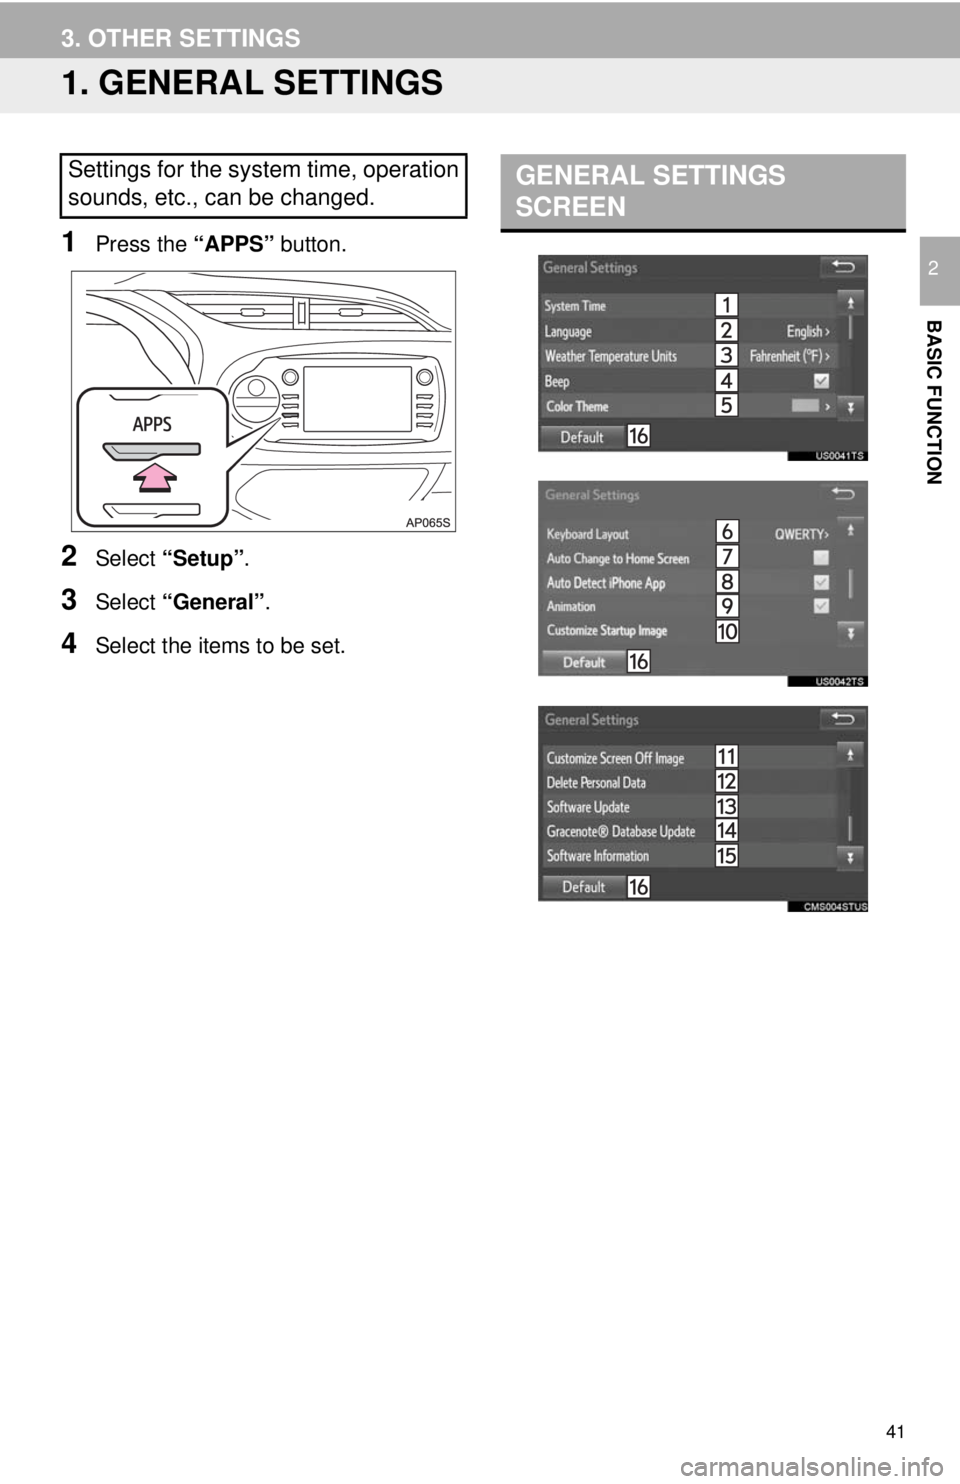
1Press the “APPS” button.
2Select “Setup” .
3Select “General” .
4Select the items to be set.
GENERAL SETTINGS
SCREENSettings for the system time, operation
sounds, etc., can be changed.
Page 42 of 164
42
3. OTHER SETTINGS
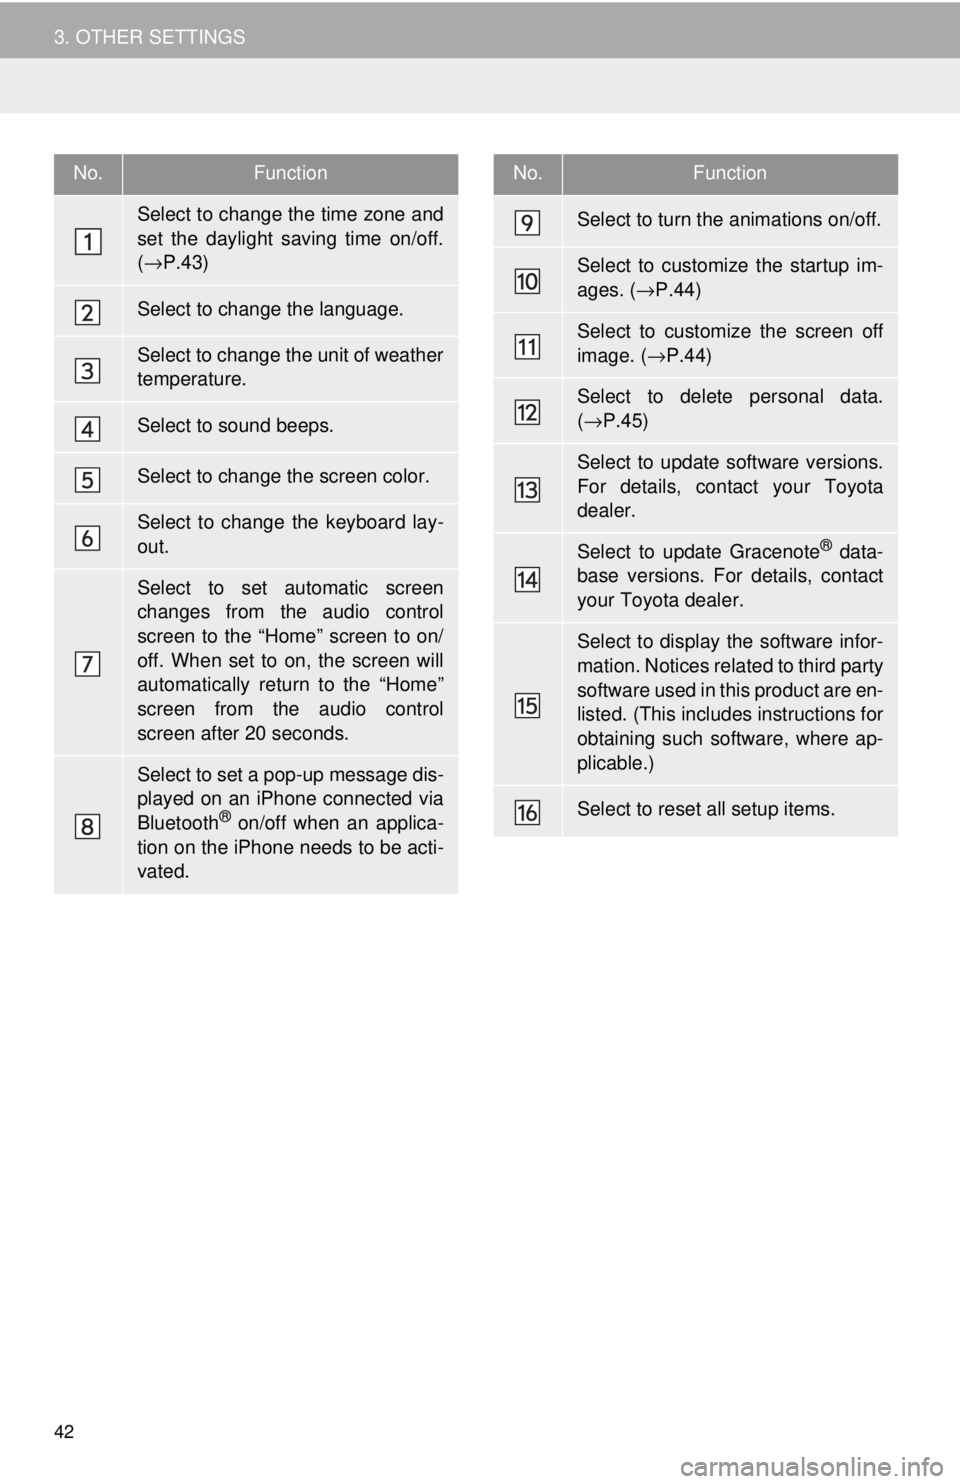
No.Function
Select to change the time zone and
set the daylight saving time on/off.
( → P.43)
Select to change the language.
Select to change the unit of weather
temperature.
Select to sound beeps.
Select to change the screen color.
Select to change the keyboard lay-
out.
Select to set automatic screen
changes from the audio control
screen to the “Home” screen to on/
off. When set to on, the screen will
automatically return to the “Home”
screen from the audio control
screen after 20 seconds.
Select to set a pop-up message dis-
played on an iPhone connected via
Bluetooth
® on/off when an applica-
tion on the iPhone needs to be acti-
vated.
Select to turn the animations on/off.
Select to customize the startup im-
ages. ( →P.44)
Select to customize the screen off
image. ( →P.44)
Select to delete personal data.
( → P.45)
Select to update software versions.
For details, contact your Toyota
dealer.
Select to update Gracenote® data-
base versions. For details, contact
your Toyota dealer.
Select to display the software infor-
mation. Notices related to third party
software used in this product are en-
listed. (This includes instructions for
obtaining such software, where ap-
plicable.)
Select to reset all setup items.
No.Function
Page 43 of 164
43
3. OTHER SETTINGS
BASIC FUNCTION
2
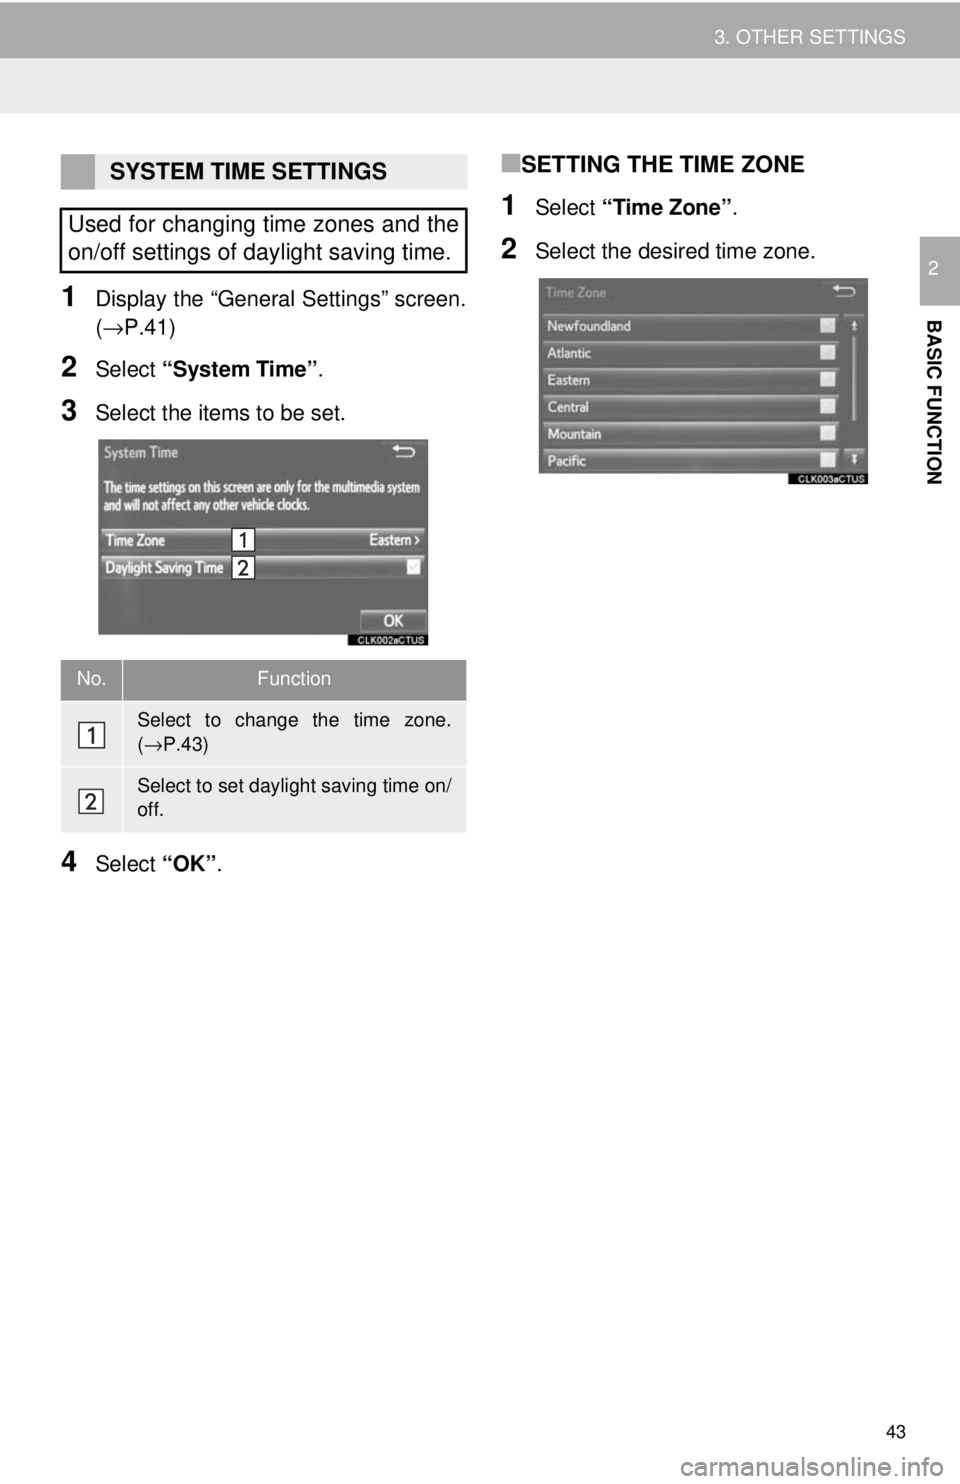
1Display the “General Settings” screen.
(→P.41 )
2Select “System Time” .
3Select the items to be set.
4Select “OK”.
■SETTING THE TIME ZONE
1Select “Time Zone” .
2Select the desired time zone.
SYSTEM TIME SETTINGS
Used for changing time zones and the
on/off settings of daylight saving time.
No.Function
Select to change the time zone.
( → P.43)
Select to set daylight saving time on/
off.
Page 44 of 164
44
3. OTHER SETTINGS
■TRANSFERRING IMAGES
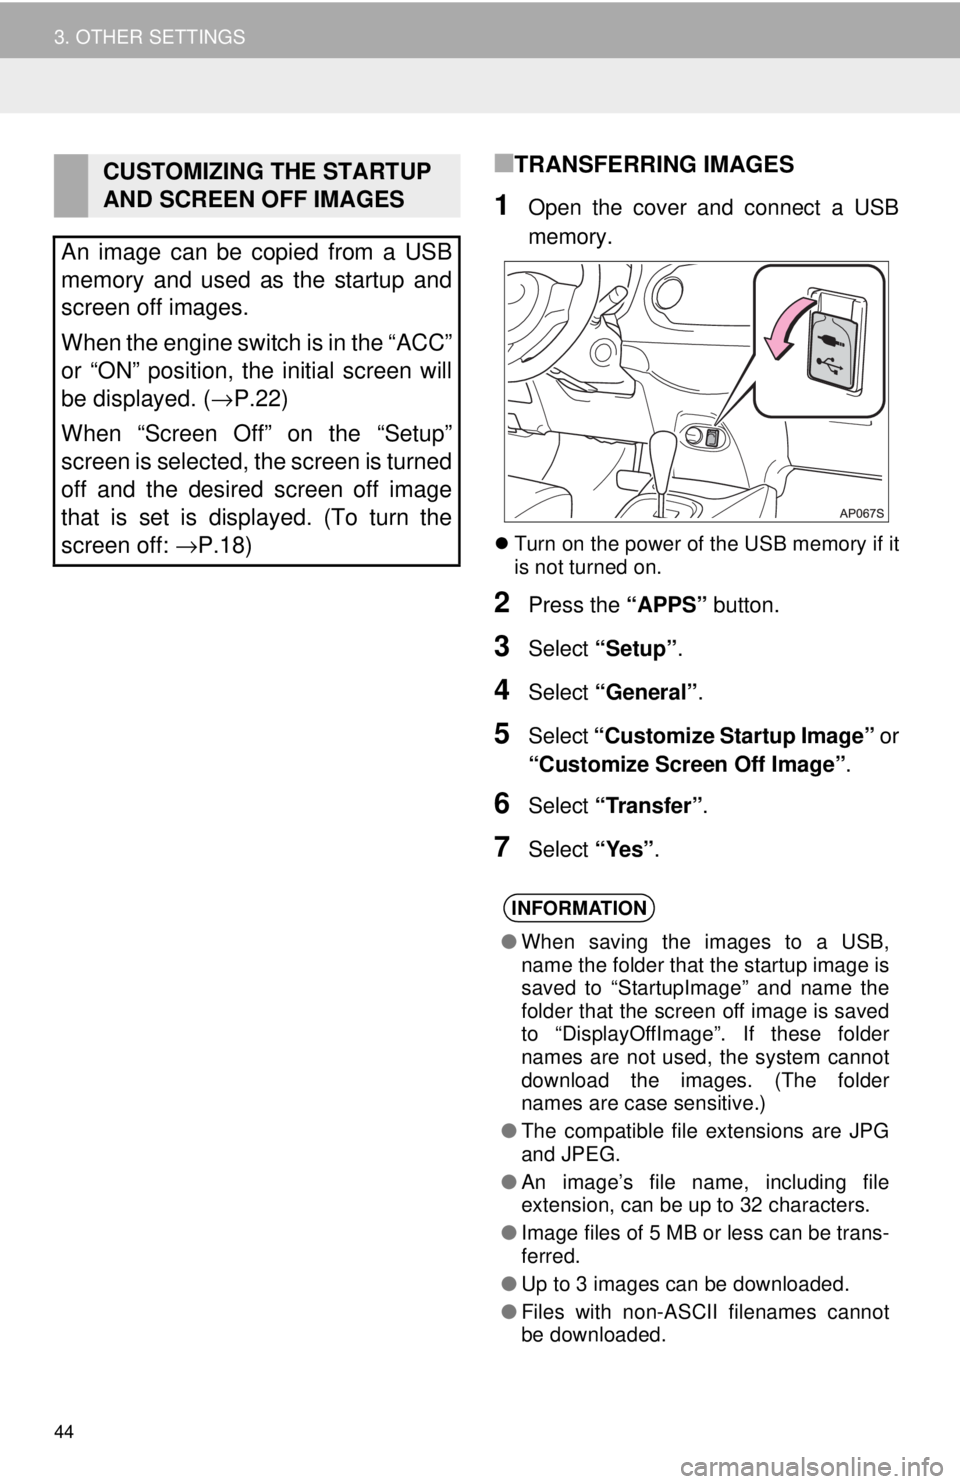
1Open the cover and connect a USB
memory.
Turn on the power of the USB memory if it
is not turned on.
2Press the “APPS” button.
3Select “Setup”.
4Select “General” .
5Select “Customize Startup Image” or
“Customize Screen Off Image” .
6Select “Transfer” .
7Select “Yes”.
CUSTOMIZING THE STARTUP
AND SCREEN OFF IMAGES
An image can be copied from a USB
memory and used as the startup and
screen off images.
When the engine switch is in the “ACC”
or “ON” position, the initial screen will
be displayed. ( →P.22)
When “Screen Off” on the “Setup”
screen is selected, the screen is turned
off and the desired screen off image
that is set is displayed. (To turn the
screen off: →P.18)
INFORMATION
● When saving the images to a USB,
name the folder that the startup image is
saved to “StartupImage” and name the
folder that the screen off image is saved
to “DisplayOffImage”. If these folder
names are not used, the system cannot
download the images. (The folder
names are case sensitive.)
● The compatible file extensions are JPG
and JPEG.
● An image’s file name, including file
extension, can be up to 32 characters.
● Image files of 5 MB or less can be trans-
ferred.
● Up to 3 images can be downloaded.
● Files with non-ASCII filenames cannot
be downloaded.
Page 45 of 164
45
3. OTHER SETTINGS
BASIC FUNCTION
2
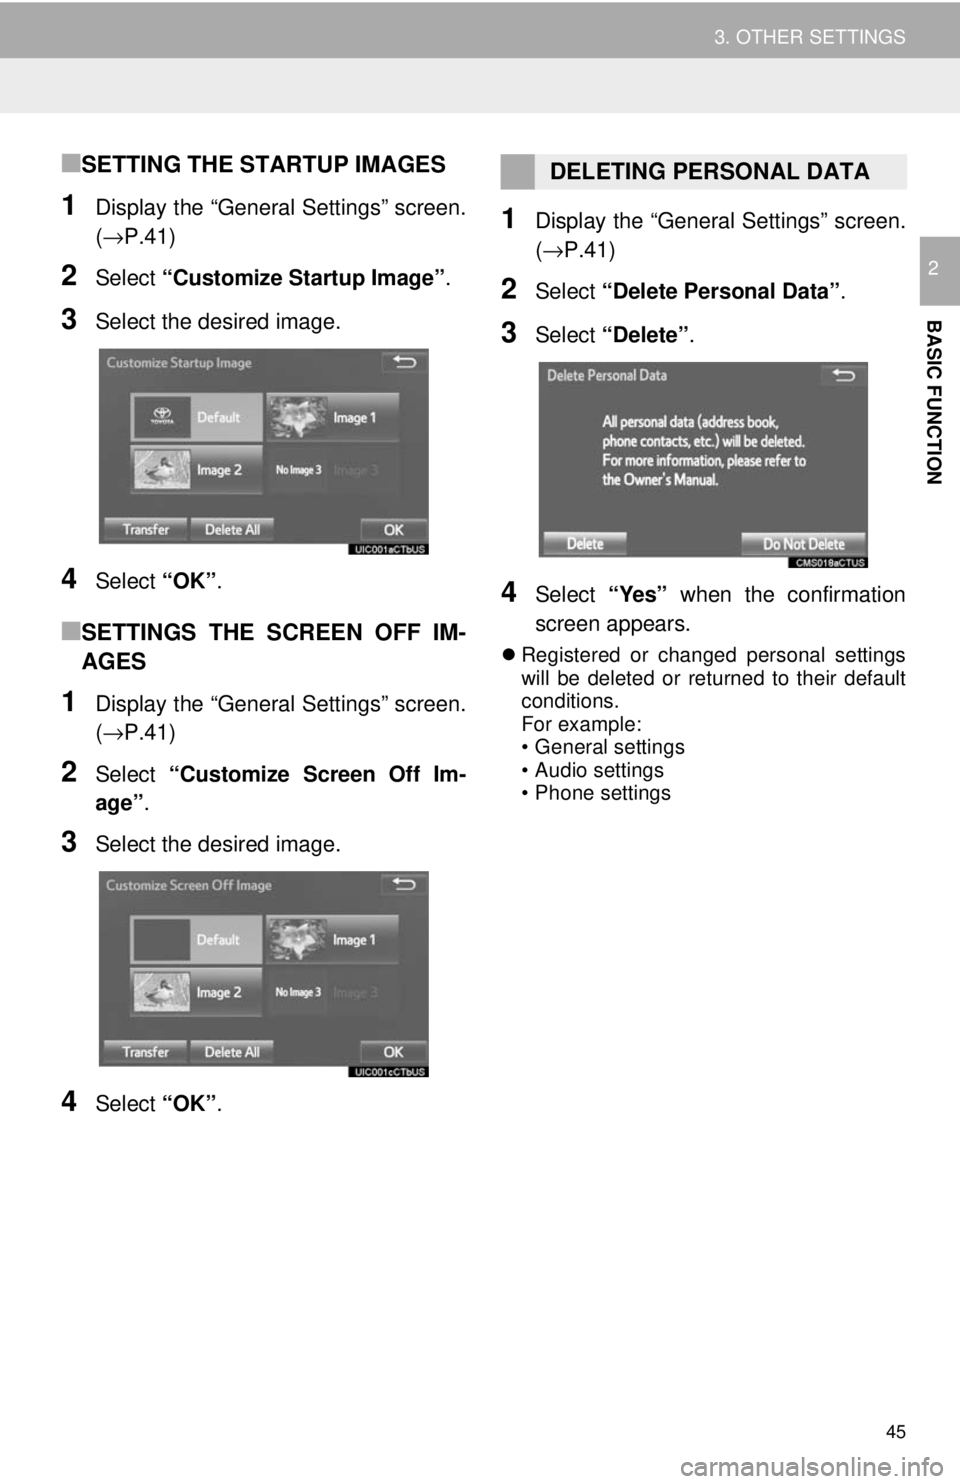
■SETTING THE STARTUP IMAGES
1Display the “General Settings” screen.
(→P.41 )
2Select “Customize Startup Image” .
3Select the desired image.
4Select “OK”.
■SETTINGS THE SCREEN OFF IM-
AGES
1Display the “General Settings” screen.
(→P.41 )
2Select “Customize Screen Off Im -
age” .
3Select the desired image.
4Select “OK”.
1Display the “General Settings” screen.
(→P.41 )
2Select “Delete Personal Data” .
3Select “Delete” .
4Select “Yes” when the confirmation
screen appears.
Registered or changed personal settings
will be deleted or returned to their default
conditions.
For example:
• General settings
• Audio settings
• Phone settings
DELETING PERSONAL DATA
Page 46 of 164
46
3. OTHER SETTINGS
2. VOICE SETTINGS
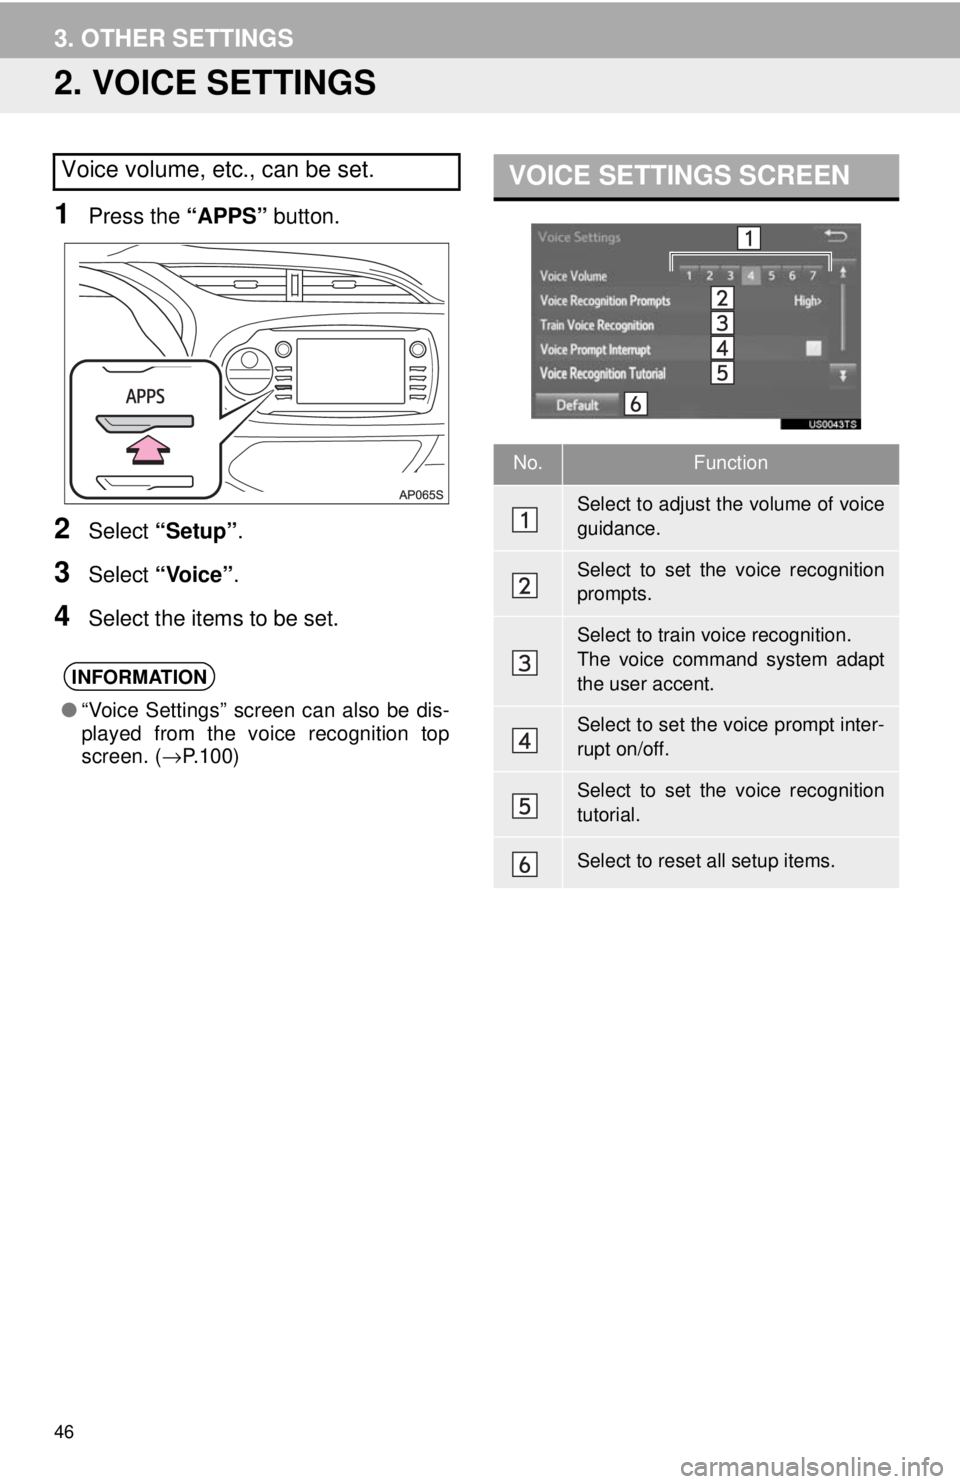
1Press the “APPS” button.
2Select “Setup” .
3Select “Voice” .
4Select the items to be set.
VOICE SETTINGS SCREENVoice volume, etc., can be set.
INFORMATION
●“Voice Settings” screen can also be dis-
played from the voice recognition top
screen. ( →P.100)
No.Function
Select to adjust the volume of voice
guidance.
Select to set the voice recognition
prompts.
Select to train voice recognition.
The voice command system adapt
the user accent.
Select to set the voice prompt inter-
rupt on/off.
Select to set the voice recognition
tutorial.
Select to reset all setup items.
Page 47 of 164
47
3. OTHER SETTINGS
BASIC FUNCTION
2
3. VEHICLE SETTINGS
1Press the “APPS” button.
2Select “Setup” .
3Select “Vehicle”.
4Select “Vehicle Customization” .
For details, refer to “Owner’s Manual”.
Vehicle customization settings can be
changed.
Page 48 of 164
48
3. OTHER SETTINGS
4. DRIVER SETTINGS
1Press the “APPS” button.
2Select “Setup” .
3Select “Driver” .
4Select “Enable this Feature” .
MANUALLY SELECT LINKED
SETTINGS
1Display the driver settings screen.
(→ P.48 )
2Select “Manually Select Linked Set -
tings” .
3Select the desired phone.
The driver settings feature will allow
the system to link some preferences
(such as audio presets, button colors,
language, etc.) to a paired Bluetooth
®
phone.
Page 49 of 164
49
3. OTHER SETTINGS
BASIC FUNCTION
2
Page 50 of 164
50
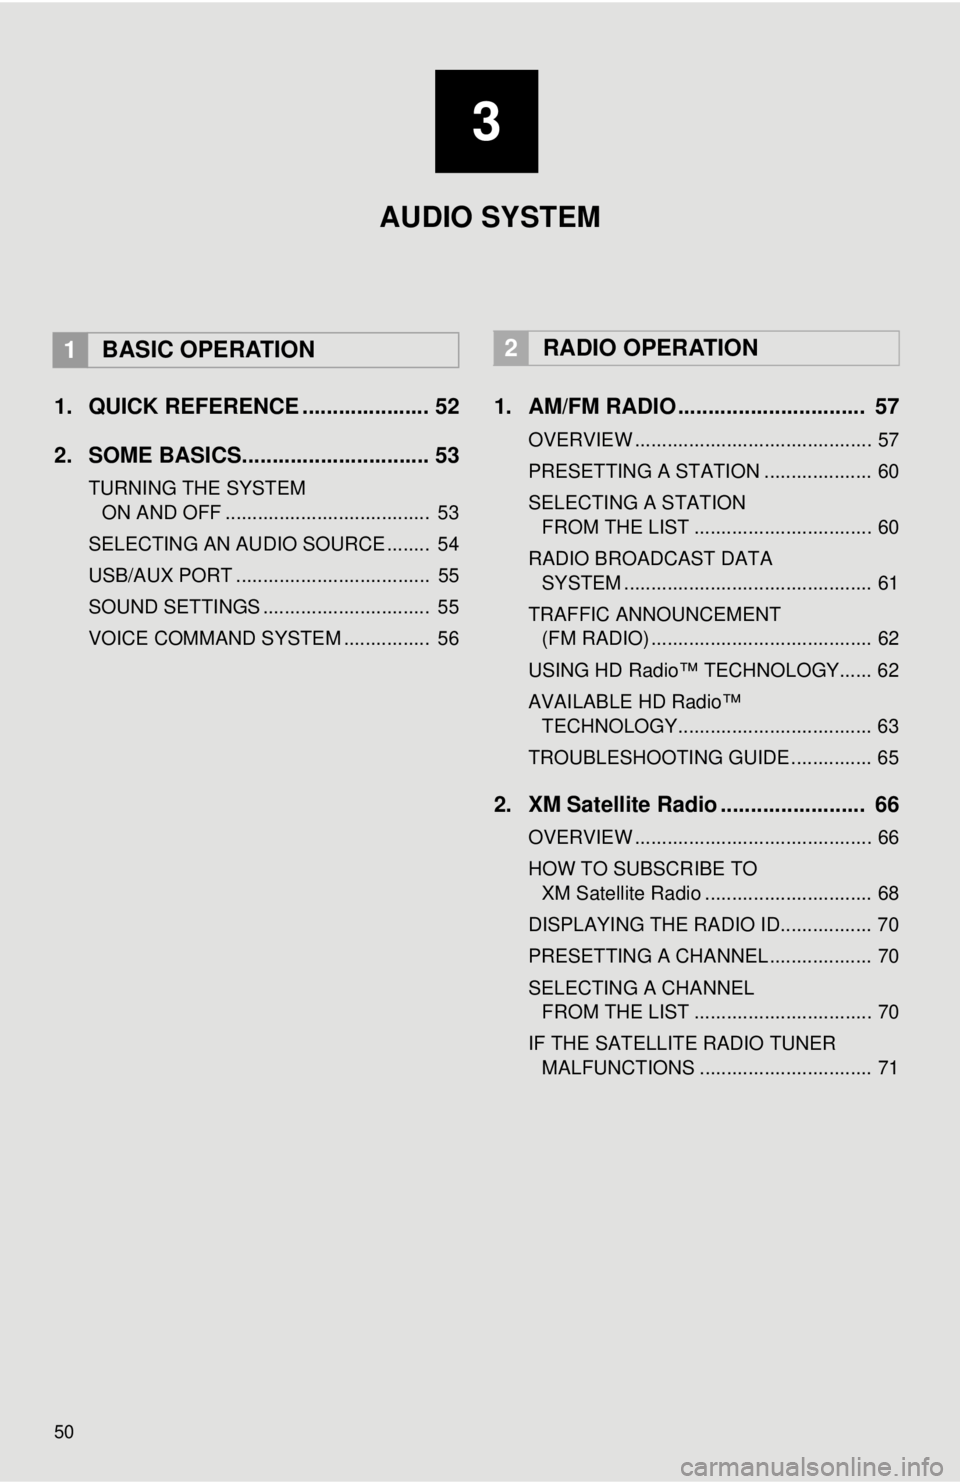
1. QUICK REFERENCE ..................... 52
2. SOME BASICS............................... 53
TURNING THE SYSTEM
ON AND OFF
...................................... 53
SELECTING AN AUDIO SOURCE ........ 54
USB/AUX PORT .................................... 55
SOUND SETTINGS ............................... 55
VOICE COMMAND SYSTEM ................ 56
1. AM/FM RADIO ............................... 57
OVERVIEW ............................................ 57
PRESETTING A STATION .................... 60
SELECTING A STATION
FROM THE LIST
................................. 60
RADIO BROADCAST DATA
SYSTEM ..........................
.................... 61
TRAFFIC ANNOUNCEMENT
(FM RADIO) .........................................
62
USING HD Radio™ TECHNOLOGY...... 62
AVAILABLE HD Radio™
TEC
HNOLOGY.................................... 63
TROUBLESHOOTING GUIDE ............... 65
2. XM Satellite Radio ........................ 66
OVERVIEW ............................................ 66
HOW TO SUBSCRIBE TO
XM Satellite Radio ...........
.................... 68
DISPLAYING THE RADIO ID................. 70
PRESETTING A CHANNEL ................... 70
SELECTING A CHANNEL
FROM THE LIST
................................. 70
IF THE SATELLITE RADIO TUNER MALFUNCTIONS ................................ 71
2RADIO OPERATION
3
AUDIO SYSTEM
1BASIC OPERATION
Trending: window, air conditioning, display, tire pressure, charging, park assist, tires
