VOLVO XC90 2006 Owners Manual
Manufacturer: VOLVO, Model Year: 2006, Model line: XC90, Model: VOLVO XC90 2006Pages: 254, PDF Size: 8.43 MB
Page 151 of 254
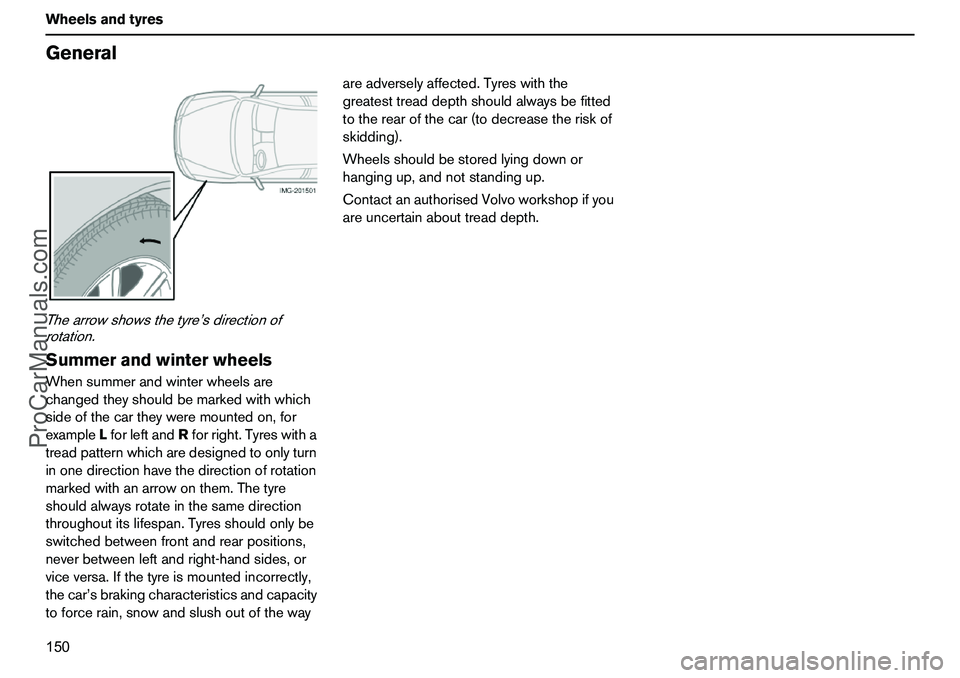
150 WheelsandtyresGeneralThearrowshowsthetyre’sdirectionof
rotation.SummerandwinterwheelsWhensummerandwinterwheelsare
changedtheyshouldbemarkedwithwhich
sideofthecartheyweremountedon,for
exampleLforleftandRforright.Tyreswitha
treadpatternwhicharedesignedtoonlyturn
inonedirectionhavethedirectionofrotation
markedwithanarrowonthem.Thetyre
shouldalwaysrotateinthesamedirection
throughoutitslifespan.Tyresshouldonlybe
switchedbetweenfrontandrearpositions,
neverbetweenleftandright-handsides,or
viceversa.Ifthetyreismountedincorrectly,
thecar’sbrakingcharacteristicsandcapacity
toforcerain,snowandslushoutofthewayareadverselyaffected.Tyreswiththe
greatesttreaddepthshouldalwaysbefitted
totherearofthecar(todecreasetheriskof
skidding).
Wheelsshouldbestoredlyingdownor
hangingup,andnotstandingup.
ContactanauthorisedVolvoworkshopifyou
areuncertainabouttreaddepth.
ProCarManuals.com
Page 152 of 254
151 Wheelsandtyres
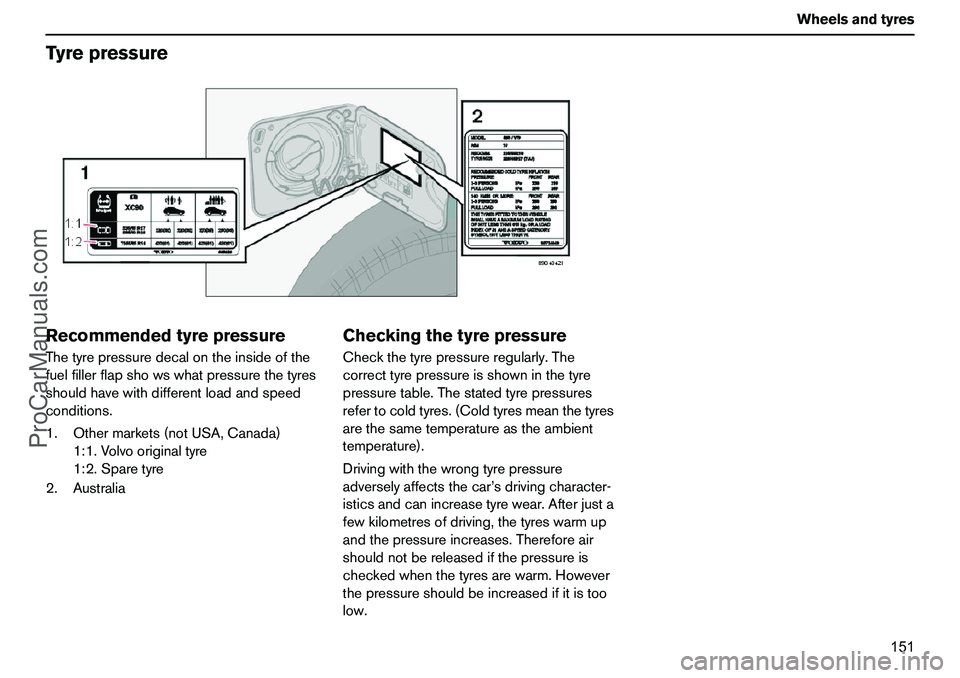
TyrepressureRecommendedtyrepressureThetyrepressuredecalontheinsideofthe
fuelfillerflapshowswhatpressurethetyres
shouldhavewithdifferentloadandspeed
conditions.
1.Othermarkets(notUSA,Canada)
1:1.Volvooriginaltyre
1:2.Sparetyre
2.Australia
CheckingthetyrepressureCheckthetyrepressureregularly.The
correcttyrepressureisshowninthetyre
pressuretable.Thestatedtyrepressures
refertocoldtyres.(Coldtyresmeanthetyres
arethesametemperatureastheambient
temperature).
Drivingwiththewrongtyrepressure
adverselyaffectsthecar’sdrivingcharacter-
isticsandcanincreasetyrewear.Afterjusta
fewkilometresofdriving,thetyreswarmup
andthepressureincreases.Thereforeair
shouldnotbereleasedifthepressureis
checkedwhenthetyresarewarm.However
thepressureshouldbeincreasedifitistoo
low.
ProCarManuals.com
Page 153 of 254
152 WheelsandtyresWarningtriangleandsparewheelWarningtriangle(certain
countries)Followthewarningtriangleregulationsofthe
countryyouarein.
Usethewarningtriangleasfollows:
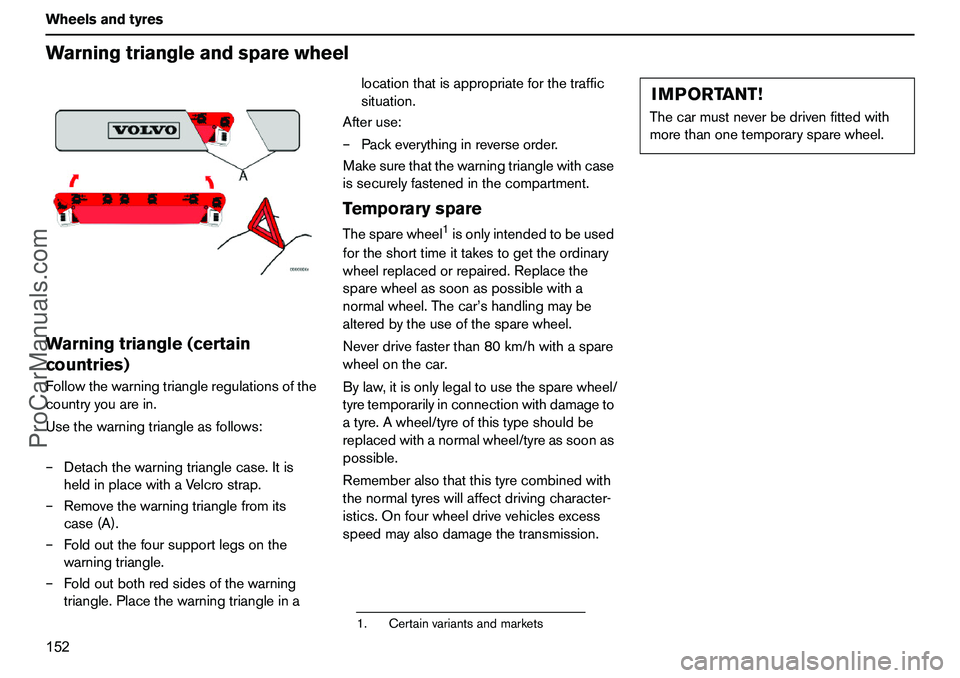
–Detachthewarningtrianglecase.Itis
heldinplacewithaVelcrostrap.
–Removethewarningtrianglefromits
case(A).
–Foldoutthefoursupportlegsonthe
warningtriangle.
–Foldoutbothredsidesofthewarning
triangle.Placethewarningtriangleinalocationthatisappropriateforthetraffic
situation.
Afteruse:
–Packeverythinginreverseorder.
Makesurethatthewarningtrianglewithcase
issecurelyfastenedinthecompartment.
TemporaryspareThesparewheel
1isonlyintendedtobeused
fortheshorttimeittakestogettheordinary
wheelreplacedorrepaired.Replacethe
sparewheelassoonaspossiblewitha
normalwheel.Thecar’shandlingmaybe
alteredbytheuseofthesparewheel.
Neverdrivefasterthan80km/hwithaspare
wheelonthecar.
Bylaw,itisonlylegaltousethesparewheel/
tyretemporarilyinconnectionwithdamageto
atyre.Awheel/tyreofthistypeshouldbe
replacedwithanormalwheel/tyreassoonas
possible.
Rememberalsothatthistyrecombinedwith
thenormaltyreswillaffectdrivingcharacter-
istics.Onfourwheeldrivevehiclesexcess
speedmayalsodamagethetransmission.
1.Certainvariantsandmarkets
IMPORTANT!Thecarmustneverbedrivenfittedwith
morethanonetemporarysparewheel.
ProCarManuals.com
Page 154 of 254
153 Wheelsandtyres
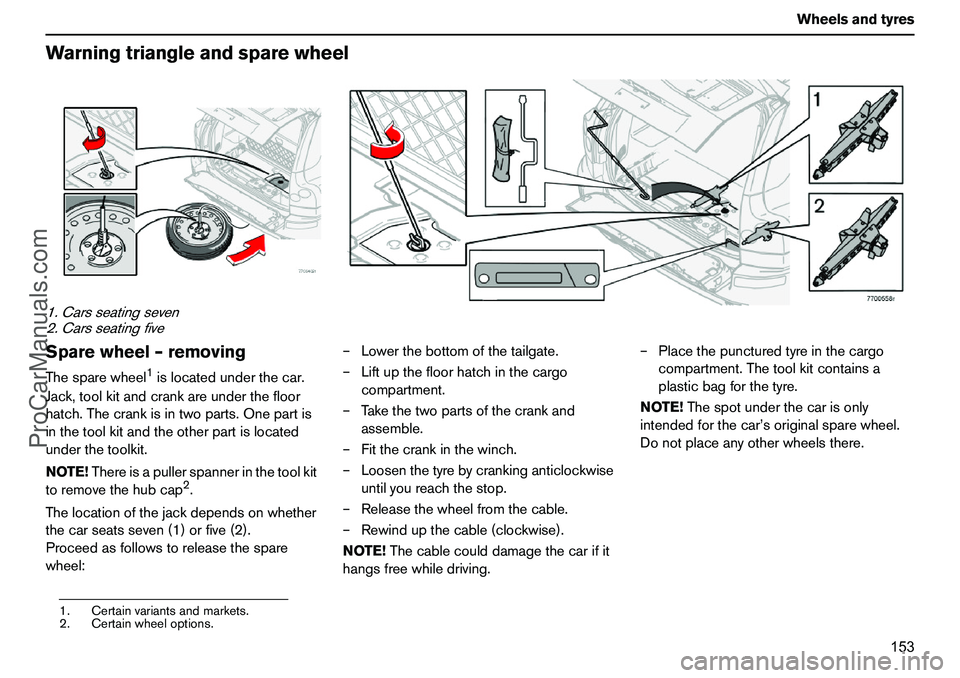
Warningtriangleandsparewheel1.Carsseatingseven
2.CarsseatingfiveSparewheel–removingThesparewheel
1islocatedunderthecar.
Jack,toolkitandcrankareunderthefloor
hatch.Thecrankisintwoparts.Onepartis
inthetoolkitandtheotherpartislocated
underthetoolkit.
NOTE!Thereisapullerspannerinthetoolkit
toremovethehubcap
2.
Thelocationofthejackdependsonwhether
thecarseatsseven(1)orfive(2).
Proceedasfollowstoreleasethespare
wheel:–Lowerthebottomofthetailgate.
–Liftupthefloorhatchinthecargo
compartment.
–Takethetwopartsofthecrankand
assemble.
–Fitthecrankinthewinch.
–Loosenthetyrebycrankinganticlockwise
untilyoureachthestop.
–Releasethewheelfromthecable.
–Rewindupthecable(clockwise).
NOTE!Thecablecoulddamagethecarifit
hangsfreewhiledriving.–Placethepuncturedtyreinthecargo
compartment.Thetoolkitcontainsa
plasticbagforthetyre.
NOTE!Thespotunderthecarisonly
intendedforthecar’soriginalsparewheel.
Donotplaceanyotherwheelsthere.
1.Certainvariantsandmarkets.
2.Certainwheeloptions.
ProCarManuals.com
Page 155 of 254
154 WheelsandtyresChangingwheelsSparewheel–refittingItisbesttohavetwopeopleputthespare
wheelbackinplace.Onepersontocrank
andtheothertoguidethewheel.
–Crankoutthecableandplaceitsanchor
inthecentreholeofthewheel.
–Slowlycrank(clockwise)thecableina
bit.
–Anglethewheelsothatitcomesinover
theexhaustsystem.
–Holddowntherearedgeofthewheel
whilecrankingitin.
–Placethewheelabovetherearaxle,
againstthefloor.
Cranktothestoppoint.
Checkthatthewheelisfirmlysecured.
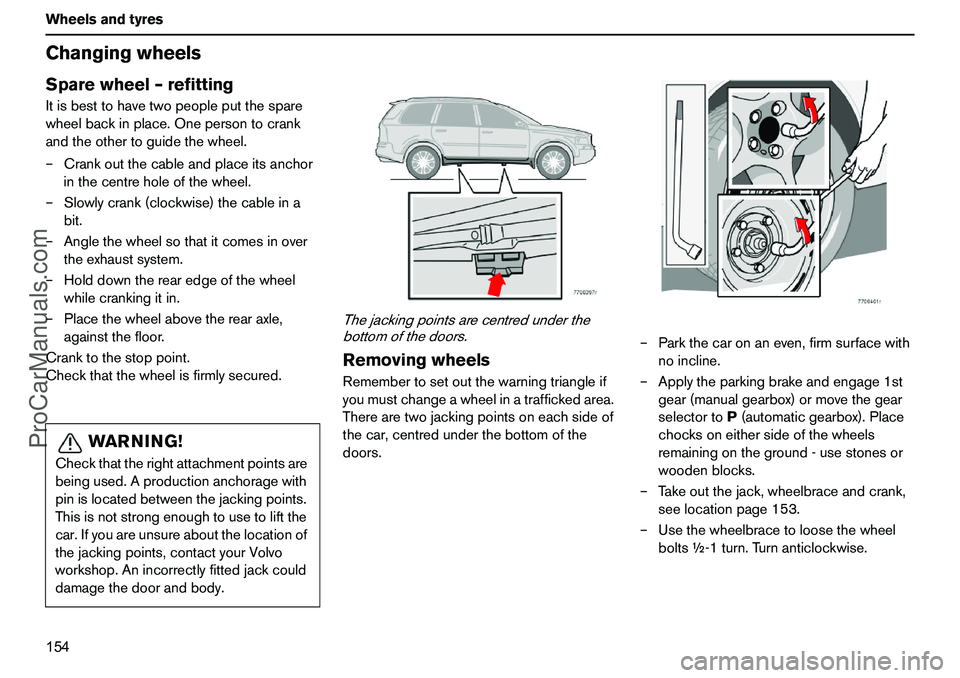
Thejackingpointsarecentredunderthe
bottomofthedoors.RemovingwheelsRemembertosetoutthewarningtriangleif
youmustchangeawheelinatraffickedarea.
Therearetwojackingpointsoneachsideof
thecar,centredunderthebottomofthe
doors.–Parkthecaronaneven,firmsurfacewith
noincline.
–Applytheparkingbrakeandengage1st
gear(manualgearbox)ormovethegear
selectortoP(automaticgearbox).Place
chocksoneithersideofthewheels
remainingontheground-usestonesor
woodenblocks.
–Takeoutthejack,wheelbraceandcrank,
seelocationpage153.
–Usethewheelbracetoloosethewheel
bolts½-1turn.Turnanticlockwise.
WARNING!
Checkthattherightattachmentpointsare
beingused.Aproductionanchoragewith
pinislocatedbetweenthejackingpoints.
Thisisnotstrongenoughtousetoliftthe
car.Ifyouareunsureaboutthelocationof
thejackingpoints,contactyourVolvo
workshop.Anincorrectlyfittedjackcould
damagethedoorandbody.
ProCarManuals.com
Page 156 of 254
155 Wheelsandtyres
Changingwheels
WARNING!
Nevercrawlunderthecarwhenitisraised
onajack!Thecarcouldfall,causing
injuries.
Thecar’soriginaljackshouldonlybeused
whenchangingwheels.Allotherworkon
thecarshouldbedoneusingworkshop
jacksandaxlestandsunderthepartofthe
carthatisraised.
Thejackscrewshouldbekeptwelllubri-
cated.
Ifthesurfaceistoosoft,thejackcould
slidetothesideandthecarcouldfall.No
oneshouldbeinthecarwhenthewheel
isbeingchanged.
ProCarManuals.com
Page 157 of 254
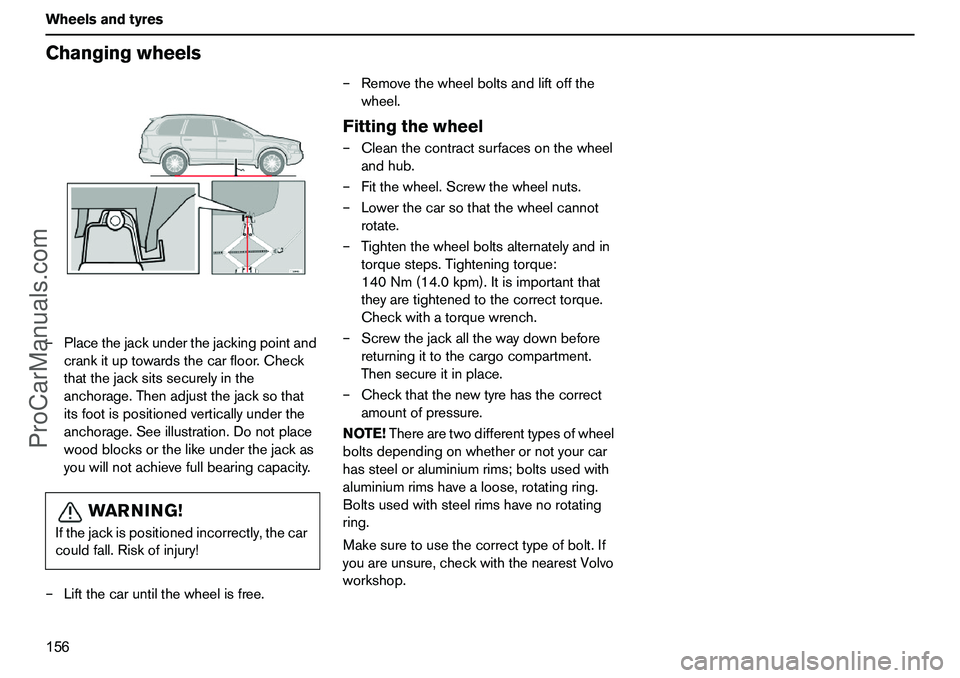
156 WheelsandtyresChangingwheels–Placethejackunderthejackingpointand
crankituptowardsthecarfloor.Check
thatthejacksitssecurelyinthe
anchorage.Thenadjustthejacksothat
itsfootispositionedverticallyunderthe
anchorage.Seeillustration.Donotplace
woodblocksorthelikeunderthejackas
youwillnotachievefullbearingcapacity.
–Liftthecaruntilthewheelisfree.–Removethewheelboltsandliftoffthe
wheel.
Fittingthewheel–Cleanthecontractsurfacesonthewheel
andhub.
–Fitthewheel.Screwthewheelnuts.
–Lowerthecarsothatthewheelcannot
rotate.
–Tightenthewheelboltsalternatelyandin
torquesteps.Tighteningtorque:
140Nm(14.0kpm).Itisimportantthat
theyaretightenedtothecorrecttorque.
Checkwithatorquewrench.
–Screwthejackallthewaydownbefore
returningittothecargocompartment.
Thensecureitinplace.
–Checkthatthenewtyrehasthecorrect
amountofpressure.
NOTE!Therearetwodifferenttypesofwheel
boltsdependingonwhetherornotyourcar
hassteeloraluminiumrims;boltsusedwith
aluminiumrimshavealoose,rotatingring.
Boltsusedwithsteelrimshavenorotating
ring.
Makesuretousethecorrecttypeofbolt.If
youareunsure,checkwiththenearestVolvo
workshop.
WARNING!
Ifthejackispositionedincorrectly,thecar
couldfall.Riskofinjury!
ProCarManuals.com
Page 158 of 254
157 Wheelsandtyres
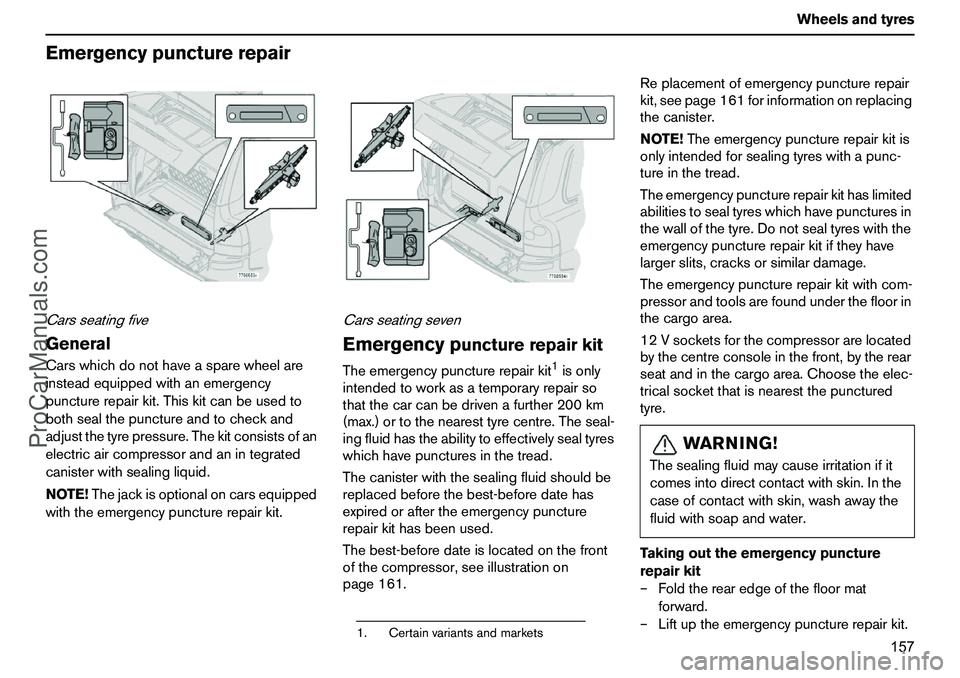
EmergencypuncturerepairCarsseatingfiveGeneralCarswhichdonothaveasparewheelare
insteadequippedwithanemergency
puncturerepairkit.Thiskitcanbeusedto
bothsealthepunctureandtocheckand
adjustthetyrepressure.Thekitconsistsofan
electricaircompressorandanintegrated
canisterwithsealingliquid.
NOTE!Thejackisoptionaloncarsequipped
withtheemergencypuncturerepairkit.
CarsseatingsevenEmergencyp
uncturerepairkit
Theemergencypuncturerepairkit
1isonly
intendedtoworkasatemporaryrepairso
thatthecarcanbedrivenafurther200km
(max.)ortothenearesttyrecentre.Theseal-
ingfluidhastheabilitytoeffectivelysealtyres
whichhavepuncturesinthetread.
Thecanisterwiththesealingfluidshouldbe
replacedbeforethebest-beforedatehas
expiredoraftertheemergencypuncture
repairkithasbeenused.
Thebest-beforedateislocatedonthefront
ofthecompressor,seeillustrationon
page161.Replacementofemergencypuncturerepair
kit,seepage161forinformationonreplacing
thecanister.
NOTE!Theemergencypuncturerepairkitis
onlyintendedforsealingtyreswithapunc-
tureinthetread.
Theemergencypuncturerepairkithaslimited
abilitiestosealtyreswhichhavepuncturesin
thewallofthetyre.Donotsealtyreswiththe
emergencypuncturerepairkitiftheyhave
largerslits,cracksorsimilardamage.
Theemergencypuncturerepairkitwithcom-
pressorandtoolsarefoundunderthefloorin
thecargoarea.
12Vsocketsforthecompressorarelocated
bythecentreconsoleinthefront,bytherear
seatandinthecargoarea.Choosetheelec-
tricalsocketthatisnearestthepunctured
tyre.
Takingouttheemergencypuncture
repairkit
–Foldtherearedgeofthefloormat
forward.
–Liftuptheemergencypuncturerepairkit.
1.Certainvariantsandmarkets
WARNING!
Thesealingfluidmaycauseirritationifit
comesintodirectcontactwithskin.Inthe
caseofcontactwithskin,washawaythe
fluidwithsoapandwater.
ProCarManuals.com
Page 159 of 254
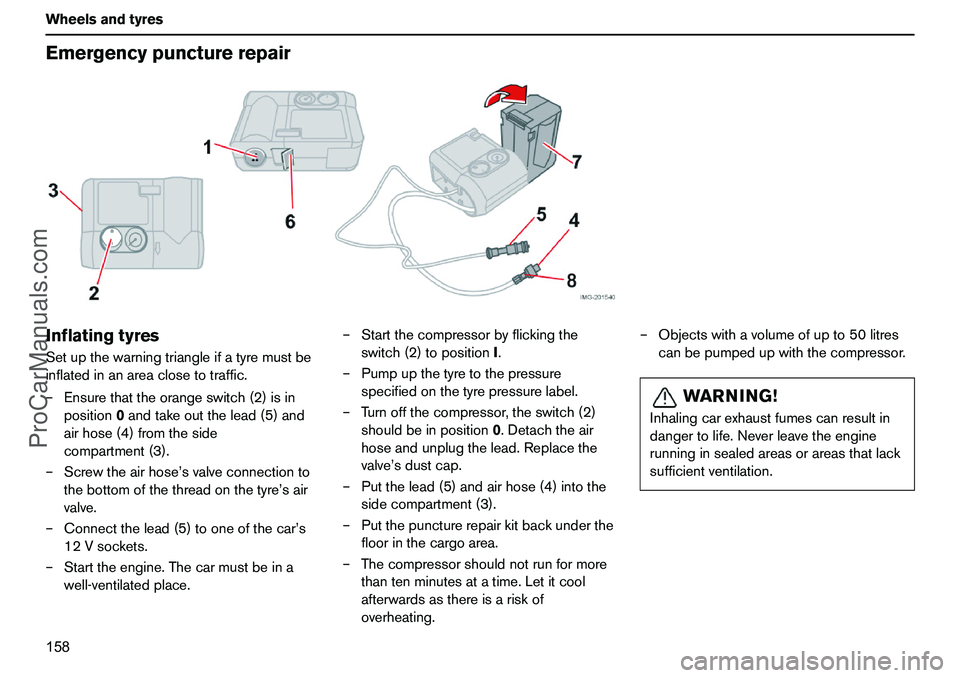
158 WheelsandtyresEmergencypuncturerepairInflatingtyresSetupthewarningtriangleifatyremustbe
inflatedinanareaclosetotraffic.
–Ensurethattheorangeswitch(2)isin
position0andtakeoutthelead(5)and
airhose(4)fromtheside
compartment(3).
–Screwtheairhose’svalveconnectionto
thebottomofthethreadonthetyre’sair
valve.
–Connectthelead(5)tooneofthecar’s
12Vsockets.
–Starttheengine.Thecarmustbeina
well-ventilatedplace.–Startthecompressorbyflickingthe
switch(2)topositionI.
–Pumpupthetyretothepressure
specifiedonthetyrepressurelabel.
–Turnoffthecompressor,theswitch(2)
shouldbeinposition0.Detachtheair
hoseandunplugthelead.Replacethe
valve’sdustcap.
–Putthelead(5)andairhose(4)intothe
sidecompartment(3).
–Putthepuncturerepairkitbackunderthe
floorinthecargoarea.
–Thecompressorshouldnotrunformore
thantenminutesatatime.Letitcool
afterwardsasthereisariskof
overheating.–Objectswithavolumeofupto50litres
canbepumpedupwiththecompressor.
WARNING!
Inhalingcarexhaustfumescanresultin
dangertolife.Neverleavetheengine
runninginsealedareasorareasthatlack
sufficientventilation.
ProCarManuals.com
Page 160 of 254
159 Wheelsandtyres
EmergencypuncturerepairSealingpuncturedtyresSetupthewarningtriangleifemergencytyre
repairsmustbecarriedoutinanareawhere
thereisothertraffic.
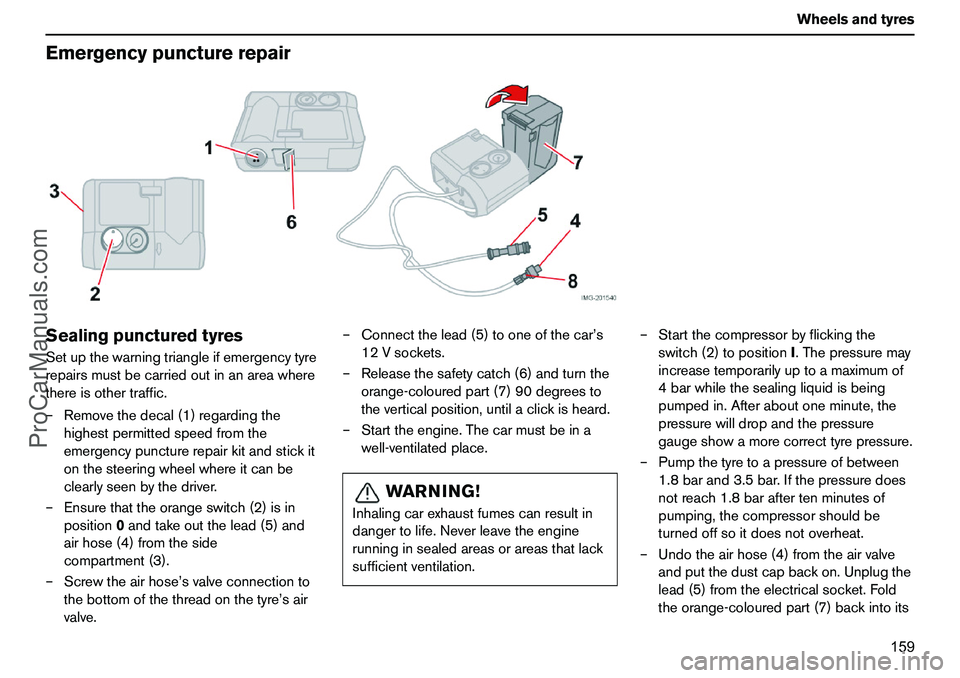
–Removethedecal(1)regardingthe
highestpermittedspeedfromthe
emergencypuncturerepairkitandstickit
onthesteeringwheelwhereitcanbe
clearlyseenbythedriver.
–Ensurethattheorangeswitch(2)isin
position0andtakeoutthelead(5)and
airhose(4)fromtheside
compartment(3).
–Screwtheairhose’svalveconnectionto
thebottomofthethreadonthetyre’sair
valve.–Connectthelead(5)tooneofthecar’s
12Vsockets.
–Releasethesafetycatch(6)andturnthe
orange-colouredpart(7)90degreesto
theverticalposition,untilaclickisheard.
–Starttheengine.Thecarmustbeina
well-ventilatedplace.–Startthecompressorbyflickingthe
switch(2)topositionI.Thepressuremay
increasetemporarilyuptoamaximumof
4barwhilethesealingliquidisbeing
pumpedin.Afteraboutoneminute,the
pressurewilldropandthepressure
gaugeshowamorecorrecttyrepressure.
–Pumpthetyretoapressureofbetween
1.8barand3.5bar.Ifthepressuredoes
notreach1.8baraftertenminutesof
pumping,thecompressorshouldbe
turnedoffsoitdoesnotoverheat.
–Undotheairhose(4)fromtheairvalve
andputthedustcapbackon.Unplugthe
lead(5)fromtheelectricalsocket.Fold
theorange-colouredpart(7)backintoits
WARNING!
Inhalingcarexhaustfumescanresultin
dangertolife.Neverleavetheengine
runninginsealedareasorareasthatlack
sufficientventilation.
ProCarManuals.com