VOLVO XC90 2006 Owners Manual
Manufacturer: VOLVO, Model Year: 2006, Model line: XC90, Model: VOLVO XC90 2006Pages: 254, PDF Size: 8.43 MB
Page 181 of 254
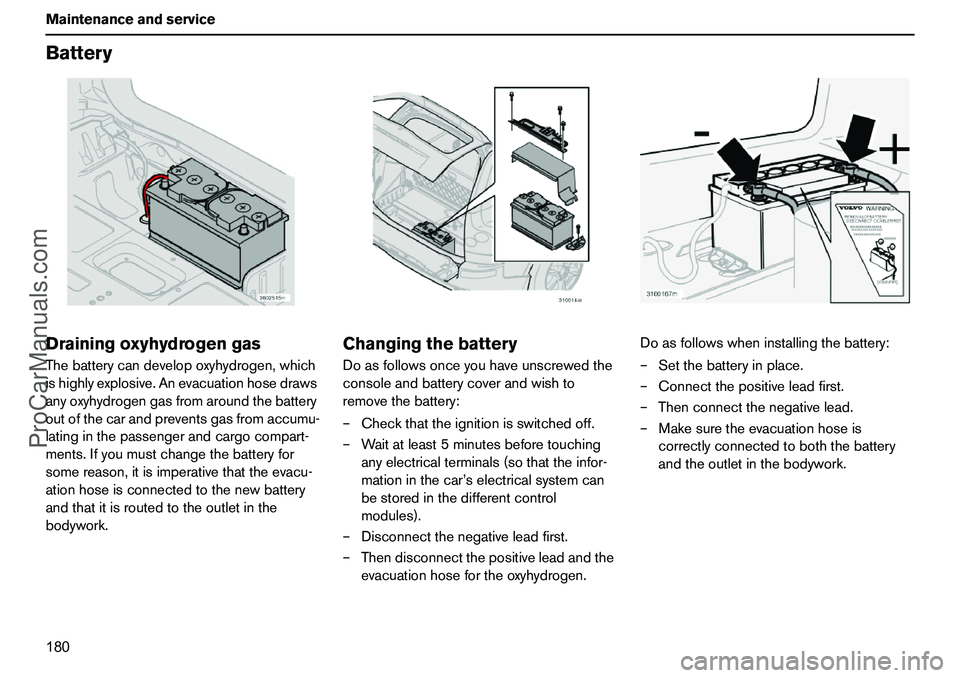
180 MaintenanceandserviceBatteryDrainingoxyhydrogengasThebatterycandevelopoxyhydrogen,which
ishighlyexplosive.Anevacuationhosedraws
anyoxyhydrogengasfromaroundthebattery
outofthecarandpreventsgasfromaccumu-
latinginthepassengerandcargocompart-
ments.Ifyoumustchangethebatteryfor
somereason,itisimperativethattheevacu-
ationhoseisconnectedtothenewbattery
andthatitisroutedtotheoutletinthe
bodywork.
ChangingthebatteryDoasfollowsonceyouhaveunscrewedthe
consoleandbatterycoverandwishto
removethebattery:
–Checkthattheignitionisswitchedoff.
–Waitatleast5minutesbeforetouching
anyelectricalterminals(sothattheinfor-
mationinthecar’selectricalsystemcan
bestoredinthedifferentcontrol
modules).
–Disconnectthenegativeleadfirst.
–Thendisconnectthepositiveleadandthe
evacuationhosefortheoxyhydrogen.Doasfollowswheninstallingthebattery:
–Setthebatteryinplace.
–Connectthepositiveleadfirst.
–Thenconnectthenegativelead.
–Makesuretheevacuationhoseis
correctlyconnectedtoboththebattery
andtheoutletinthebodywork.
ProCarManuals.com
Page 182 of 254
181 Maintenanceandservice
Battery
WARNING!
Thebatterycontainsoxyhydrogen,which
ishighlyexplosive.Besurethattheevacu-
ationhoseiscorrectlyconnected!
WARNING!
Batteriescangenerateoxyhydrogengas,
whichishighlyexplosive.Aspark,which
canbegeneratedifyouconnectthejump
leadsincorrectly,issufficienttomakethe
batteryexplode.Thebatteryalsocontains
sulphuricacid,whichcancauseserious
burns.Iftheacidcomesintocontactwith
eyes,skinorclothing,flushwithlarge
quantitiesofwater.Ifacidsplashesinto
theeyes,seekmedicaladviceimmedi-
ately.
ProCarManuals.com
Page 183 of 254
182 MaintenanceandserviceReplacingbulbsGeneralAllbulbspecificationsaregivenon
page247.
Thefollowinglistcontainsbulbsandpoint-
sourcelampsthatarespecialisedor
unsuitableforchangingexceptata
workshop:
Generalinteriorlightingintheroof
Rooflighting
Readinglamp
Gloveboxlighting
Lamps,Bi-Xenonheadlamps.IMPORTANT!Nevertouchthebulbs’glasswithyour
fingers.Greaseandoilsfromyourfingers
arevaporisedbytheheat,coatingand
damagingthereflector.
WARNING!
OncarswithBi-Xenonheadlamps,all
workonthelightsshouldbecarriedoutat
anauthorisedVolvoworkshop.
Bi-Xenonheadlampsmustbehandled
withextremecareduetothehigh-voltage
unit.
ProCarManuals.com
Page 184 of 254
183 Maintenanceandservice
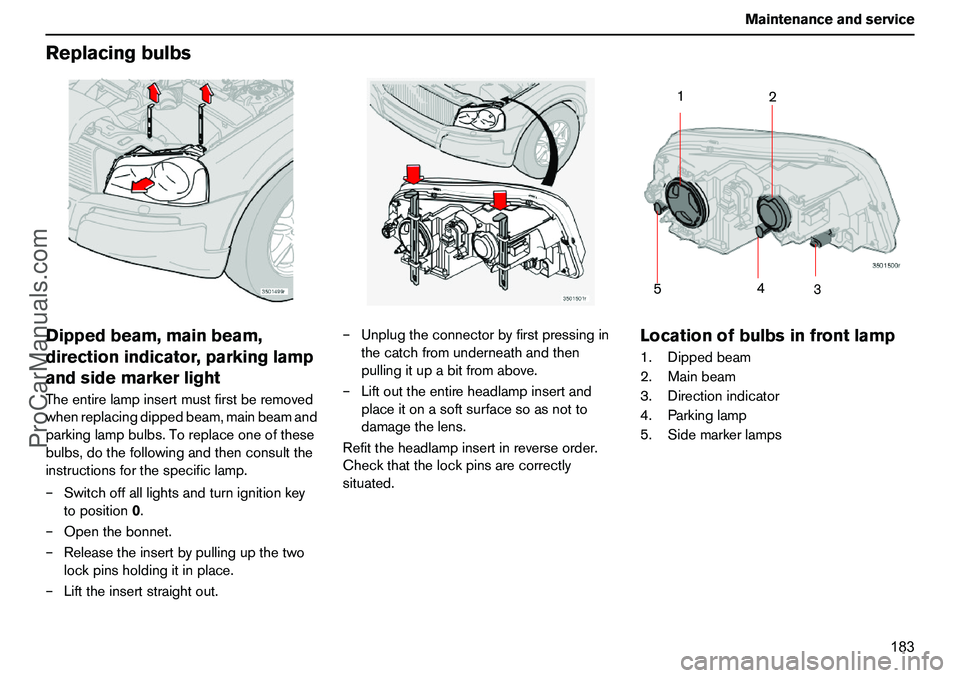
ReplacingbulbsDippedbeam,mainbeam,
directionindicator,parkinglamp
andsidemarkerlightTheentirelampinsertmustfirstberemoved
whenreplacingdippedbeam,mainbeamand
parkinglampbulbs.Toreplaceoneofthese
bulbs,dothefollowingandthenconsultthe
instructionsforthespecificlamp.
–Switchoffalllightsandturnignitionkey
toposition0.
–Openthebonnet.
–Releasetheinsertbypullingupthetwo
lockpinsholdingitinplace.
–Lifttheinsertstraightout.–Unplugtheconnectorbyfirstpressingin
thecatchfromunderneathandthen
pullingitupabitfromabove.
–Liftouttheentireheadlampinsertand
placeitonasoftsurfacesoasnotto
damagethelens.
Refittheheadlampinsertinreverseorder.
Checkthatthelockpinsarecorrectly
situated.
Locationofbulbsinfrontlamp1.Dippedbeam
2.Mainbeam
3.Directionindicator
4.Parkinglamp
5.Sidemarkerlamps
1
2
3
4
5
ProCarManuals.com
Page 185 of 254
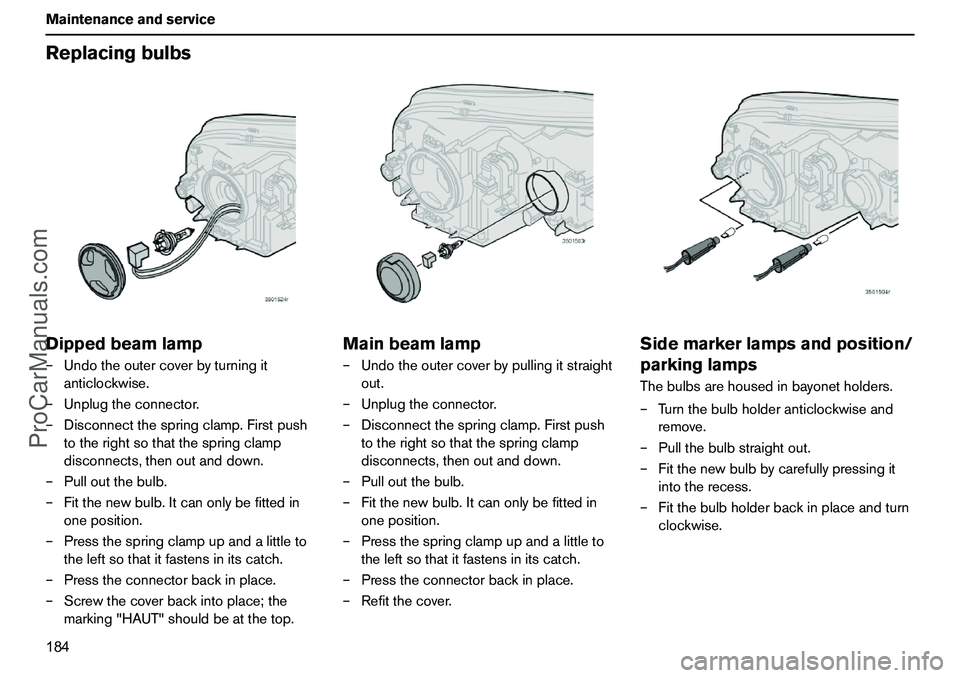
184 MaintenanceandserviceReplacingbulbsDippedbeamlamp–Undotheoutercoverbyturningit
anticlockwise.
–Unplugtheconnector.
–Disconnectthespringclamp.Firstpush
totherightsothatthespringclamp
disconnects,thenoutanddown.
–Pulloutthebulb.
–Fitthenewbulb.Itcanonlybefittedin
oneposition.
–Pressthespringclampupandalittleto
theleftsothatitfastensinitscatch.
–Presstheconnectorbackinplace.
–Screwthecoverbackintoplace;the
marking"HAUT"shouldbeatthetop.
Mainbeamlamp–Undotheoutercoverbypullingitstraight
out.
–Unplugtheconnector.
–Disconnectthespringclamp.Firstpush
totherightsothatthespringclamp
disconnects,thenoutanddown.
–Pulloutthebulb.
–Fitthenewbulb.Itcanonlybefittedin
oneposition.
–Pressthespringclampupandalittleto
theleftsothatitfastensinitscatch.
–Presstheconnectorbackinplace.
–Refitthecover.
Sidemarkerlampsandposition/
parkinglampsThebulbsarehousedinbayonetholders.
–Turnthebulbholderanticlockwiseand
remove.
–Pullthebulbstraightout.
–Fitthenewbulbbycarefullypressingit
intotherecess.
–Fitthebulbholderbackinplaceandturn
clockwise.
ProCarManuals.com
Page 186 of 254
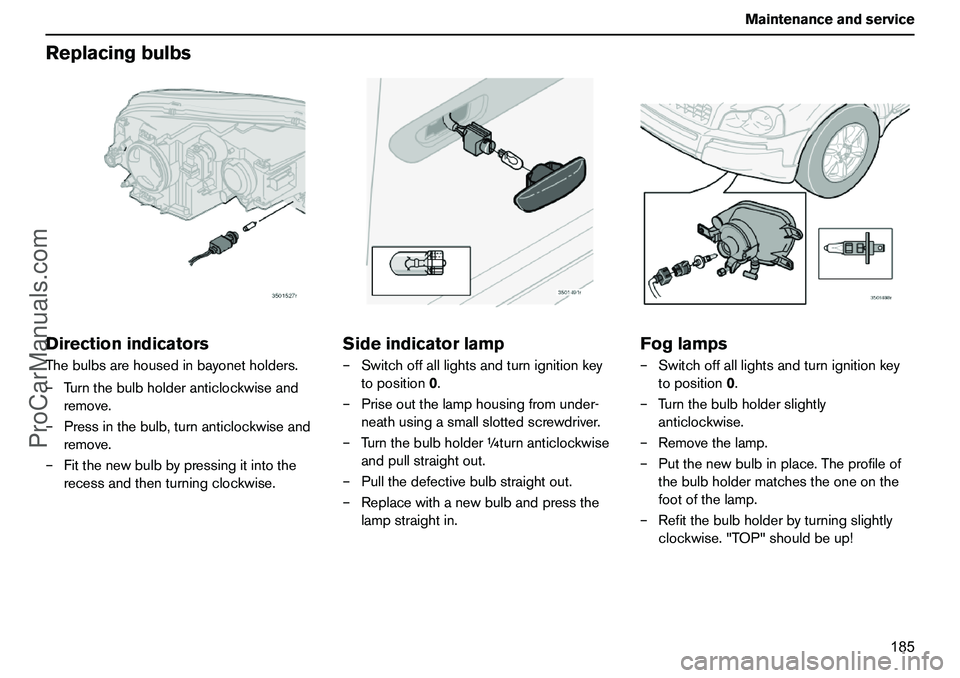
185 Maintenanceandservice
ReplacingbulbsDirectionindicatorsThebulbsarehousedinbayonetholders.
–Turnthebulbholderanticlockwiseand
remove.
–Pressinthebulb,turnanticlockwiseand
remove.
–Fitthenewbulbbypressingitintothe
recessandthenturningclockwise.
Sideindicatorlamp–Switchoffalllightsandturnignitionkey
toposition0.
–Priseoutthelamphousingfromunder-
neathusingasmallslottedscrewdriver.
–Turnthebulbholder¼turnanticlockwise
andpullstraightout.
–Pullthedefectivebulbstraightout.
–Replacewithanewbulbandpressthe
lampstraightin.
Foglamps–Switchoffalllightsandturnignitionkey
toposition0.
–Turnthebulbholderslightly
anticlockwise.
–Removethelamp.
–Putthenewbulbinplace.Theprofileof
thebulbholdermatchestheoneonthe
footofthelamp.
–Refitthebulbholderbyturningslightly
clockwise."TOP"shouldbeup!
ProCarManuals.com
Page 187 of 254
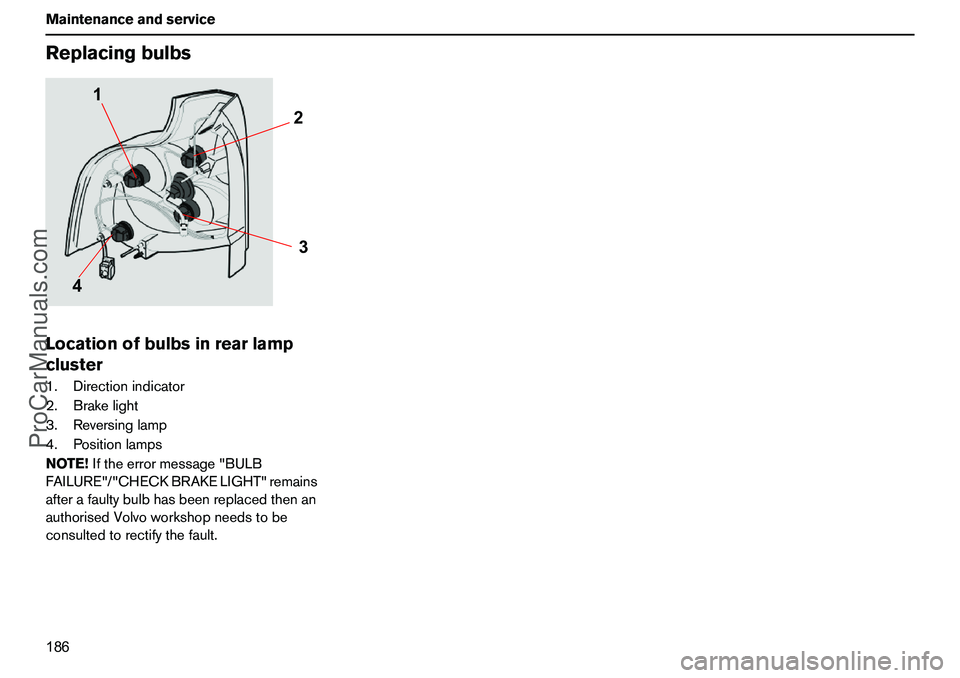
186 MaintenanceandserviceReplacingbulbsLocationofbulbsinrearlamp
cluster1.Directionindicator
2.Brakelight
3.Reversinglamp
4.Positionlamps
NOTE!Iftheerrormessage"BULB
FAILURE"/"CHECKBRAKELIGHT"remains
afterafaultybulbhasbeenreplacedthenan
authorisedVolvoworkshopneedstobe
consultedtorectifythefault.
3 2
41
ProCarManuals.com
Page 188 of 254
187 Maintenanceandservice
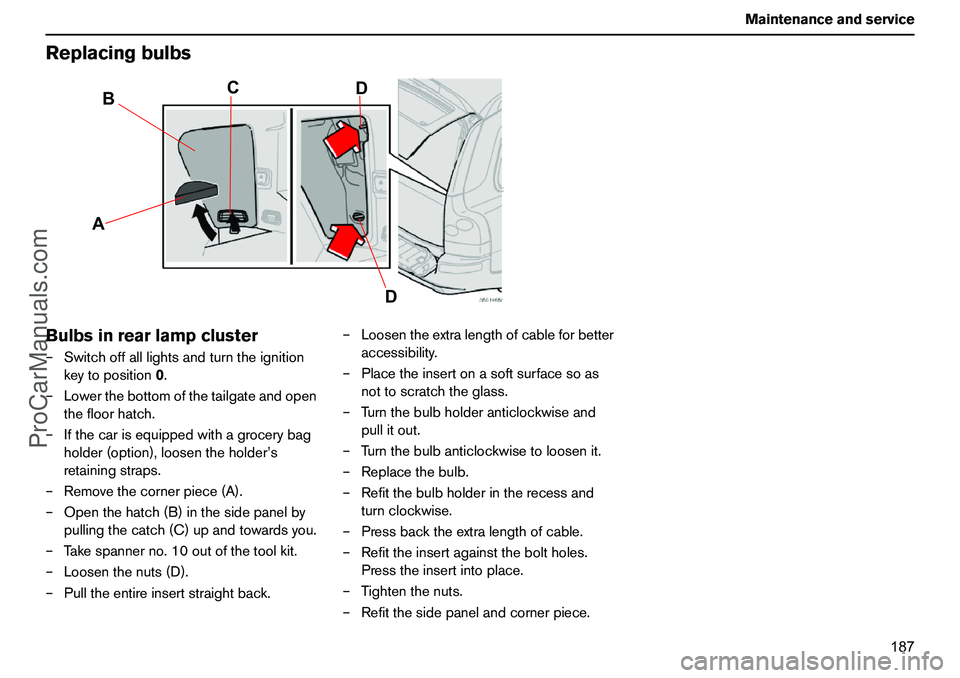
ReplacingbulbsBulbsinrearlampcluster–Switchoffalllightsandturntheignition
keytoposition0.
–Lowerthebottomofthetailgateandopen
thefloorhatch.
–Ifthecarisequippedwithagrocerybag
holder(option),loosentheholder’s
retainingstraps.
–Removethecornerpiece(A).
–Openthehatch(B)inthesidepanelby
pullingthecatch(C)upandtowardsyou.
–Takespannerno.10outofthetoolkit.
–Loosenthenuts(D).
–Pulltheentireinsertstraightback.–Loosentheextralengthofcableforbetter
accessibility.
–Placetheinsertonasoftsurfacesoas
nottoscratchtheglass.
–Turnthebulbholderanticlockwiseand
pullitout.
–Turnthebulbanticlockwisetoloosenit.
–Replacethebulb.
–Refitthebulbholderintherecessand
turnclockwise.
–Pressbacktheextralengthofcable.
–Refittheinsertagainsttheboltholes.
Presstheinsertintoplace.
–Tightenthenuts.
–Refitthesidepanelandcornerpiece.
AB
C
D
D
ProCarManuals.com
Page 189 of 254
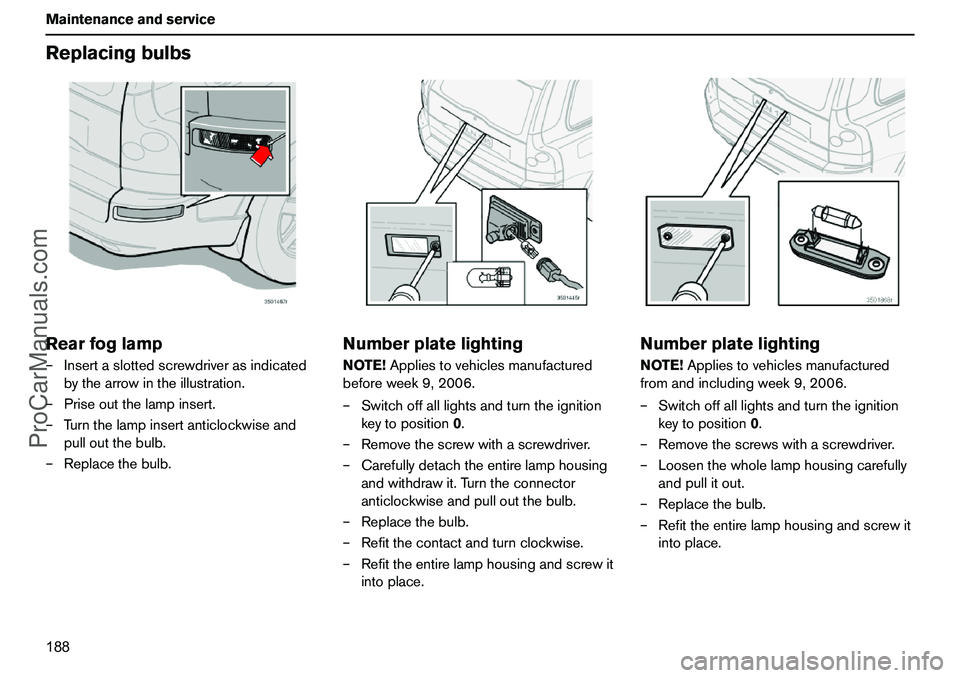
188 MaintenanceandserviceReplacingbulbsRearfoglamp–Insertaslottedscrewdriverasindicated
bythearrowintheillustration.
–Priseoutthelampinsert.
–Turnthelampinsertanticlockwiseand
pulloutthebulb.
–Replacethebulb.
NumberplatelightingNOTE!Appliestovehiclesmanufactured
beforeweek9,2006.
–Switchoffalllightsandturntheignition
keytoposition0.
–Removethescrewwithascrewdriver.
–Carefullydetachtheentirelamphousing
andwithdrawit.Turntheconnector
anticlockwiseandpulloutthebulb.
–Replacethebulb.
–Refitthecontactandturnclockwise.
–Refittheentirelamphousingandscrewit
intoplace.
NumberplatelightingNOTE!Appliestovehiclesmanufactured
fromandincludingweek9,2006.
–Switchoffalllightsandturntheignition
keytoposition0.
–Removethescrewswithascrewdriver.
–Loosenthewholelamphousingcarefully
andpullitout.
–Replacethebulb.
–Refittheentirelamphousingandscrewit
intoplace.
ProCarManuals.com
Page 190 of 254
189 Maintenanceandservice
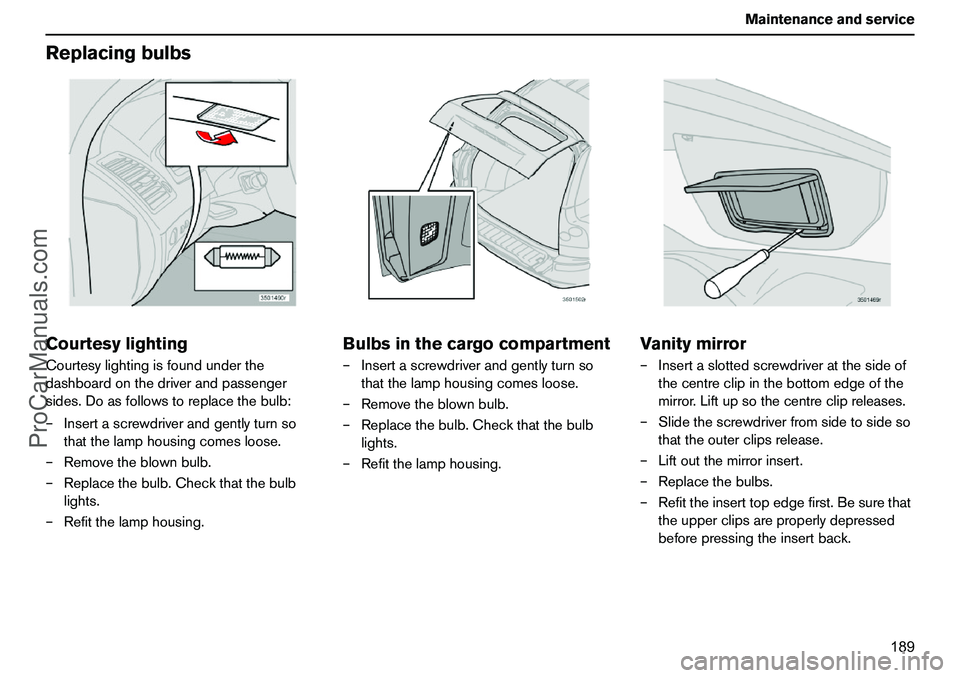
ReplacingbulbsCourtesylightingCourtesylightingisfoundunderthe
dashboardonthedriverandpassenger
sides.Doasfollowstoreplacethebulb:
–Insertascrewdriverandgentlyturnso
thatthelamphousingcomesloose.
–Removetheblownbulb.
–Replacethebulb.Checkthatthebulb
lights.
–Refitthelamphousing.
Bulbsinthecargocompartment–Insertascrewdriverandgentlyturnso
thatthelamphousingcomesloose.
–Removetheblownbulb.
–Replacethebulb.Checkthatthebulb
lights.
–Refitthelamphousing.
Vanitymirror–Insertaslottedscrewdriveratthesideof
thecentreclipinthebottomedgeofthe
mirror.Liftupsothecentreclipreleases.
–Slidethescrewdriverfromsidetosideso
thattheouterclipsrelease.
–Liftoutthemirrorinsert.
–Replacethebulbs.
–Refittheinserttopedgefirst.Besurethat
theupperclipsareproperlydepressed
beforepressingtheinsertback.
ProCarManuals.com