YAMAHA WR 250F 2007 Notices Demploi (in French)
Manufacturer: YAMAHA, Model Year: 2007, Model line: WR 250F, Model: YAMAHA WR 250F 2007Pages: 912, PDF Size: 23.95 MB
Page 851 of 912
7 - 30
–+ELEC
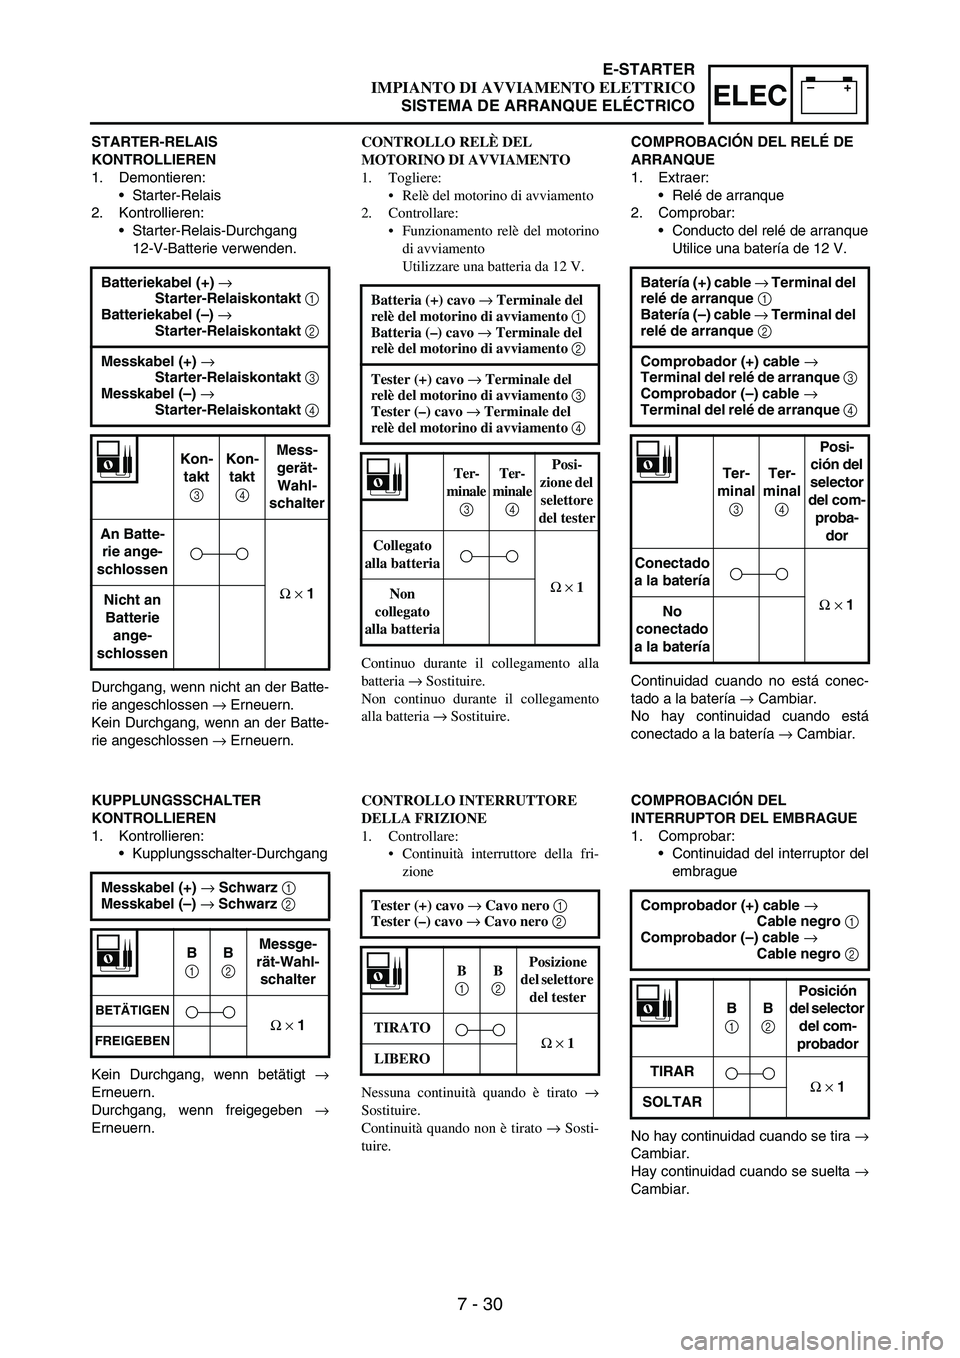
STARTER-RELAIS
KONTROLLIEREN
1. Demontieren:
•Starter-Relais
2. Kontrollieren:
•Starter-Relais-Durchgang
12-V-Batterie verwenden.
Durchgang, wenn nicht an der Batte-
rie angeschlossen
→ Erneuern.
Kein Durchgang, wenn an der Batte-
rie angeschlossen
→ Erneuern. Batteriekabel (+) →
Starter-Relaiskontakt 1
Batteriekabel (–) →
Starter-Relaiskontakt 2
Messkabel (+) →
Starter-Relaiskontakt 3
Messkabel (–) →
Starter-Relaiskontakt 4
Kon-
takt
3 Kon-
takt
4 Mess-
gerät-
Wahl-
schalter
An Batte-
rie ange-
schlossen
Ω × 1
Nicht an
Batterie
ange-
schlossen
KUPPLUNGSSCHALTER
KONTROLLIEREN
1. Kontrollieren:
•Kupplungsschalter-Durchgang
Kein Durchgang, wenn betätigt
→
Erneuern.
Durchgang, wenn freigegeben
→
Erneuern.Messkabel (+) → Schwarz 1
Messkabel (–) → Schwarz 2
B
1 B
2 Messge-
rät-Wahl-
schalter
BETÄTIGENΩ × 1FREIGEBEN
CONTROLLO RELÈ DEL
MOTORINO DI AVVIAMENTO
1. Togliere:
Relè del motorino di avviamento
2. Controllare:
Funzionamento relè del motorino
di avviamento
Utilizzare una batteria da 12 V.
Continuo durante il collegamento alla
batteria → Sostituire.
Non continuo durante il collegamento
alla batteria → Sostituire. Batteria (+) cavo → Terminale del
relè del motorino di avviamento 1
Batteria (–) cavo → Terminale del
relè del motorino di avviamento 2
Tester (+) cavo → Terminale del
relè del motorino di avviamento 3
Tester (–) cavo → Terminale del
relè del motorino di avviamento 4
Ter-
minale
3 Ter-
minale
4 Posi-
zione del
selettore
del tester
Collegato
alla batteria
Ω × 1
Non
collegato
alla batteria
CONTROLLO INTERRUTTORE
DELLA FRIZIONE
1. Controllare:
Continuità interruttore della fri-
zione
Nessuna continuità quando è tirato →
Sostituire.
Continuità quando non è tirato → Sosti-
tuire.Tester (+) cavo → Cavo nero 1
Tester (–) cavo → Cavo nero 2
B
1 B
2 Posizione
del selettore
del tester
TIRATO
Ω × 1
LIBERO
COMPROBACIÓN DEL RELÉ DE
ARRANQUE
1. Extraer:
•Relé de arranque
2. Comprobar:
•Conducto del relé de arranque
Utilice una batería de 12 V.
Continuidad cuando no está conec-
tado a la batería
→ Cambiar.
No hay continuidad cuando está
conectado a la batería
→ Cambiar. Batería (+) cable → Terminal del
relé de arranque 1
Batería (–) cable → Terminal del
relé de arranque 2
Comprobador (+) cable →
Terminal del relé de arranque 3
Comprobador (–) cable →
Terminal del relé de arranque 4
Ter-
minal
3 Ter-
minal
4 Posi-
ción del
selector
del com-
proba-
dor
Conectado
a la batería
Ω × 1
No
conectado
a la batería
COMPROBACIÓN DEL
INTERRUPTOR DEL EMBRAGUE
1. Comprobar:
•Continuidad del interruptor del
embrague
No hay continuidad cuando se tira
→
Cambiar.
Hay continuidad cuando se suelta
→
Cambiar.Comprobador (+) cable →
Cable negro 1
Comprobador (–) cable →
Cable negro 2
B
1 B
2 Posición
del selector
del com-
probador
TIRAR
Ω × 1
SOLTAR
E-STARTER
IMPIANTO DI AVVIAMENTO ELETTRICO
SISTEMA DE ARRANQUE ELÉCTRICO
Page 852 of 912
7 - 31
–+ELECELECTRIC STARTING SYSTEM
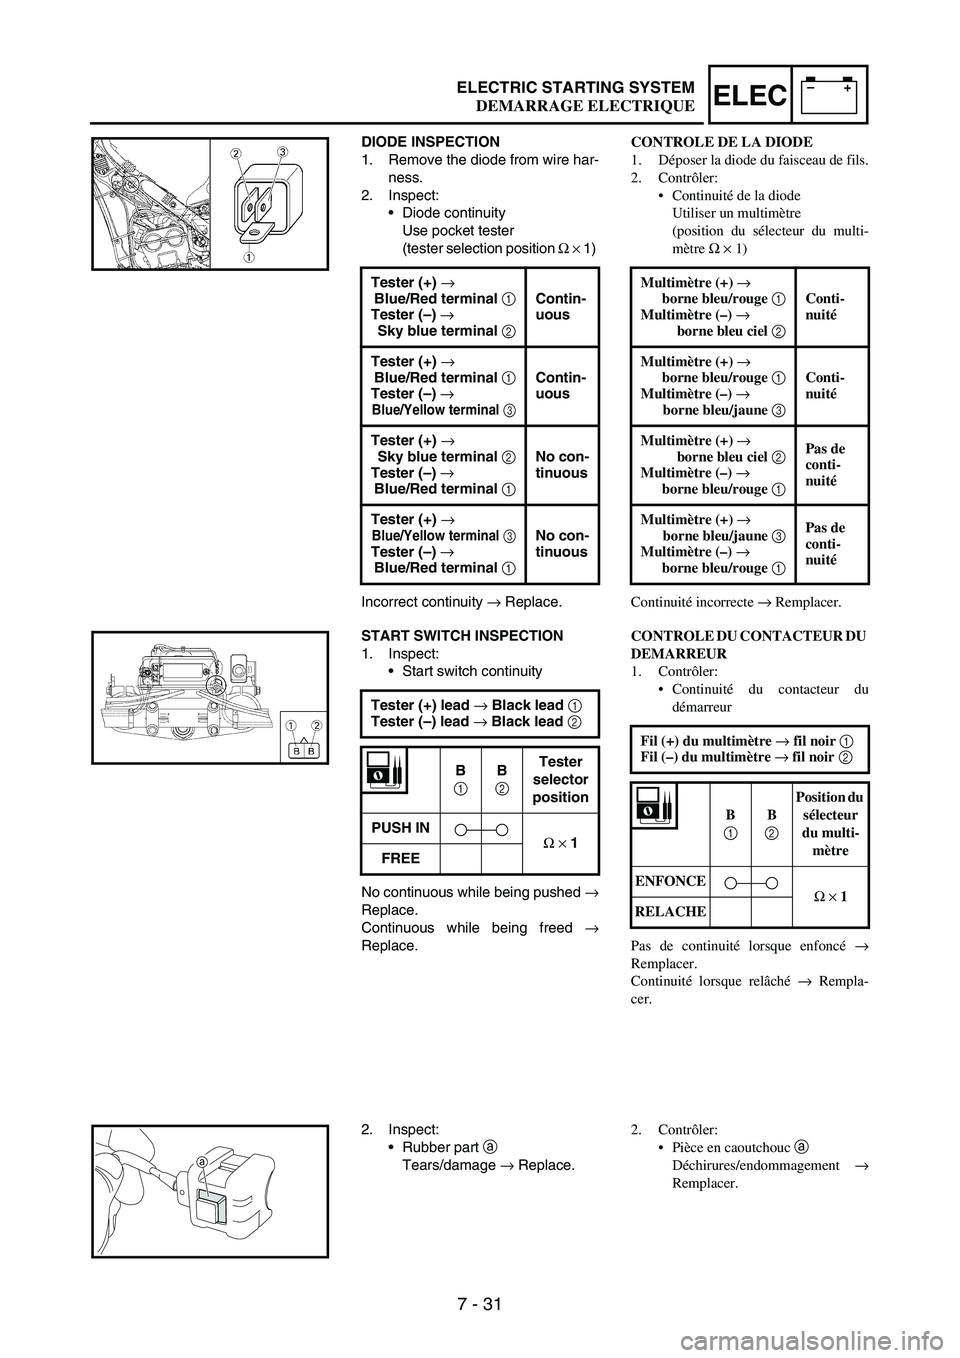
DIODE INSPECTION
1. Remove the diode from wire har-
ness.
2. Inspect:
•Diode continuity
Use pocket tester
(tester selection position
Ω
× 1)
Incorrect continuity
→ Replace. Tester (+) →
Blue/Red terminal 1
Tester (–) →
Sky blue terminal 2Contin-
uous
Tester (+) →
Blue/Red terminal 1
Tester (–) →
Blue/Yellow terminal 3
Contin-
uous
Tester (+) →
Sky blue terminal 2
Tester (–) →
Blue/Red terminal 1No con-
tinuous
Tester (+) →
Blue/Yellow terminal 3Tester (–) →
Blue/Red terminal 1No con-
tinuous
START SWITCH INSPECTION
1. Inspect:
•Start switch continuity
No continuous while being pushed
→
Replace.
Continuous while being freed
→
Replace.Tester (+) lead →
Black lead 1
Tester (–) lead →
Black lead 2
B
1
B
2
Tester
selector
position
PUSH IN
Ω
×
1
FREE
2. Inspect:
•Rubber part
a
Tears/damage
→ Replace.
a
CONTROLE DE LA DIODE
1. Déposer la diode du faisceau de fils.
2. Contrôler:
Continuité de la diode
Utiliser un multimètre
(position du sélecteur du multi-
mètre Ω × 1)
Continuité incorrecte → Remplacer. Multimètre (+) →
borne bleu/rouge 1
Multimètre (–) →
borne bleu ciel 2Conti-
nuité
Multimètre (+) →
borne bleu/rouge 1
Multimètre (–) →
borne bleu/jaune 3Conti-
nuité
Multimètre (+) →
borne bleu ciel 2
Multimètre (–) →
borne bleu/rouge 1Pas de
conti-
nuité
Multimètre (+) →
borne bleu/jaune 3
Multimètre (–) →
borne bleu/rouge 1Pas de
conti-
nuité
CONTROLE DU CONTACTEUR DU
DEMARREUR
1. Contrôler:
Continuité du contacteur du
démarreur
Pas de continuité lorsque enfoncé →
Remplacer.
Continuité lorsque relâché → Rempla-
cer.Fil (+) du multimètre → fil noir 1
Fil (–) du multimètre → fil noir 2
B
1 B
2 Position du
sélecteur
du multi-
mètre
ENFONCE
Ω × 1
RELACHE
2. Contrôler:
Pièce en caoutchouc a
Déchirures/endommagement →
Remplacer.
DEMARRAGE ELECTRIQUE
Page 853 of 912
7 - 32
–+ELEC
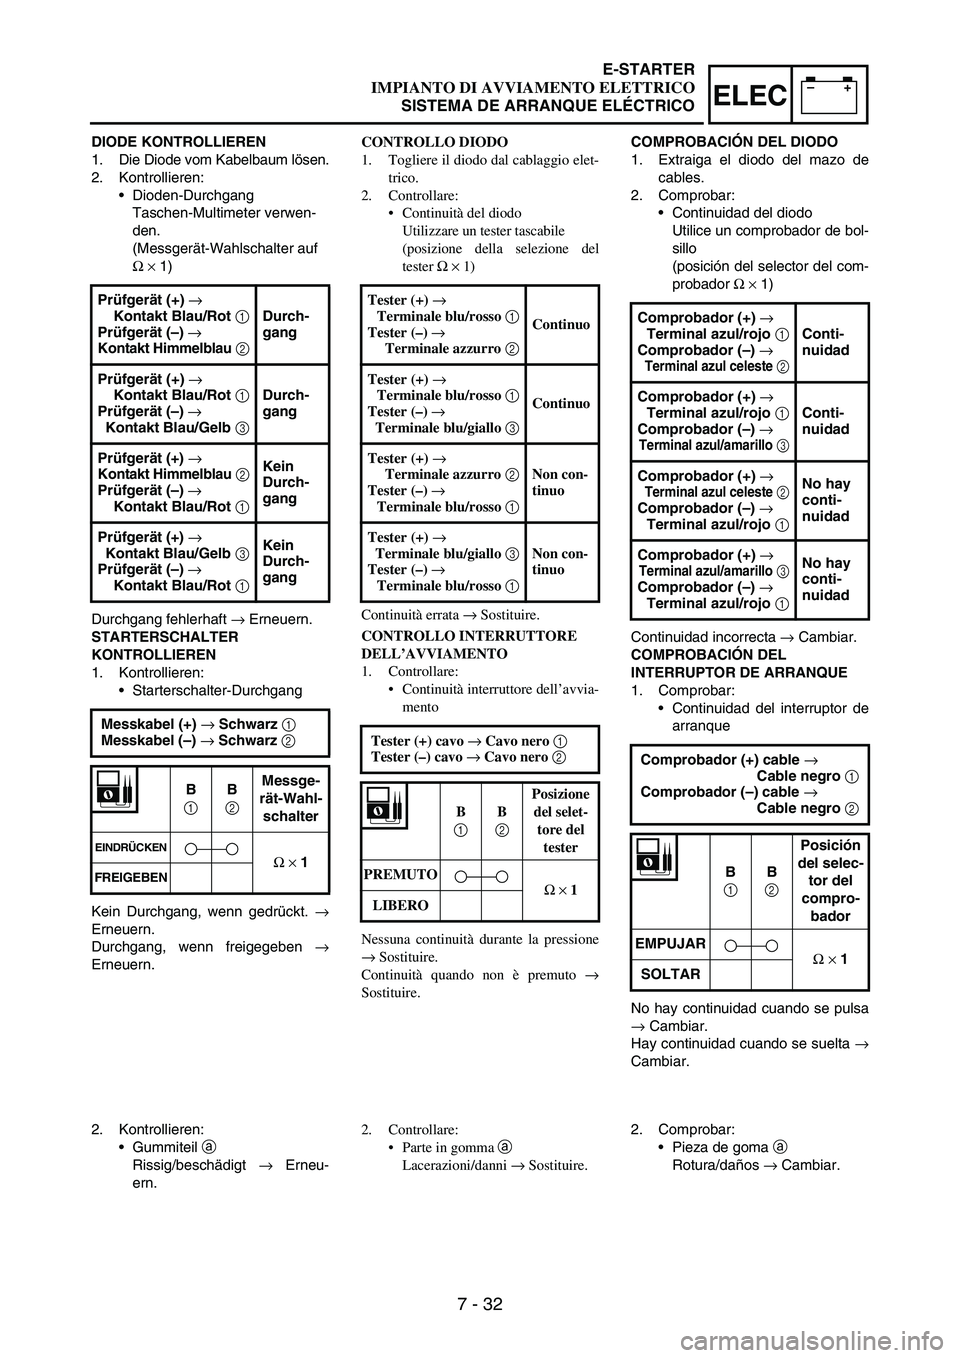
DIODE KONTROLLIEREN
1. Die Diode vom Kabelbaum lösen.
2. Kontrollieren:
•Dioden-Durchgang
Taschen-Multimeter verwen-
den.
(Messgerät-Wahlschalter auf
Ω×1)
Durchgang fehlerhaft
→ Erneuern.
STARTERSCHALTER
KONTROLLIEREN
1. Kontrollieren:
•Starterschalter-Durchgang
Kein Durchgang, wenn gedrückt.
→
Erneuern.
Durchgang, wenn freigegeben
→
Erneuern.Prüfgerät (+) →
Kontakt Blau/Rot 1
Prüfgerät (–) →
Kontakt Himmelblau2
Durch-
gang
Prüfgerät (+) →
Kontakt Blau/Rot 1
Prüfgerät (–) →
Kontakt Blau/Gelb 3Durch-
gang
Prüfgerät (+) →
Kontakt Himmelblau2
Prüfgerät (–) →
Kontakt Blau/Rot 1Kein
Durch-
gang
Prüfgerät (+) →
Kontakt Blau/Gelb 3
Prüfgerät (–) →
Kontakt Blau/Rot 1Kein
Durch-
gang
Messkabel (+) → Schwarz 1
Messkabel (–) → Schwarz 2
B
1 B
2 Messge-
rät-Wahl-
schalter
EINDRÜCKENΩ × 1FREIGEBEN
2. Kontrollieren:
•Gummiteil
a
Rissig/beschädigt
→ Erneu-
ern.CONTROLLO DIODO
1. Togliere il diodo dal cablaggio elet-
trico.
2. Controllare:
Continuità del diodo
Utilizzare un tester tascabile
(posizione della selezione del
tester Ω × 1)
Continuità errata → Sostituire. Tester (+) →
Terminale blu/rosso 1
Tester (–) →
Terminale azzurro 2Continuo
Tester (+) →
Terminale blu/rosso 1
Tester (–) →
Terminale blu/giallo 3Continuo
Tester (+) →
Terminale azzurro 2
Tester (–) →
Terminale blu/rosso 1Non con-
tinuo
Tester (+) →
Terminale blu/giallo 3
Tester (–) →
Terminale blu/rosso 1Non con-
tinuo
CONTROLLO INTERRUTTORE
DELL’AVVIAMENTO
1. Controllare:
Continuità interruttore dell’avvia-
mento
Nessuna continuità durante la pressione
→ Sostituire.
Continuità quando non è premuto →
Sostituire.Tester (+) cavo → Cavo nero 1
Tester (–) cavo → Cavo nero 2
B
1 B
2 Posizione
del selet-
tore del
tester
PREMUTO
Ω × 1
LIBERO
2. Controllare:
Parte in gomma a
Lacerazioni/danni → Sostituire.COMPROBACIÓN DEL DIODO
1. Extraiga el diodo del mazo de
cables.
2. Comprobar:
•Continuidad del diodo
Utilice un comprobador de bol-
sillo
(posición del selector del com-
probador
Ω
× 1)
Continuidad incorrecta
→ Cambiar.
COMPROBACIÓN DEL
INTERRUPTOR DE ARRANQUE
1. Comprobar:
•Continuidad del interruptor de
arranque
No hay continuidad cuando se pulsa
→ Cambiar.
Hay continuidad cuando se suelta
→
Cambiar.Comprobador (+) →
Terminal azul/rojo 1
Comprobador (–) →
Terminal azul celeste2
Conti-
nuidad
Comprobador (+) →
Terminal azul/rojo 1
Comprobador (–) →
Terminal azul/amarillo 3
Conti-
nuidad
Comprobador (+) →
Terminal azul celeste2Comprobador (–) →
Terminal azul/rojo 1No hay
conti-
nuidad
Comprobador (+) →
Terminal azul/amarillo 3
Comprobador (–) →
Terminal azul/rojo 1No hay
conti-
nuidad
Comprobador (+) cable →
Cable negro 1
Comprobador (–) cable →
Cable negro 2
B
1 B
2 Posición
del selec-
tor del
compro-
bador
EMPUJAR
Ω × 1
SOLTAR
2. Comprobar:
•Pieza de goma
a
Rotura/daños
→ Cambiar.
E-STARTER
IMPIANTO DI AVVIAMENTO ELETTRICO
SISTEMA DE ARRANQUE ELÉCTRICO
Page 854 of 912
7 - 33
–+ELECELECTRIC STARTING SYSTEM
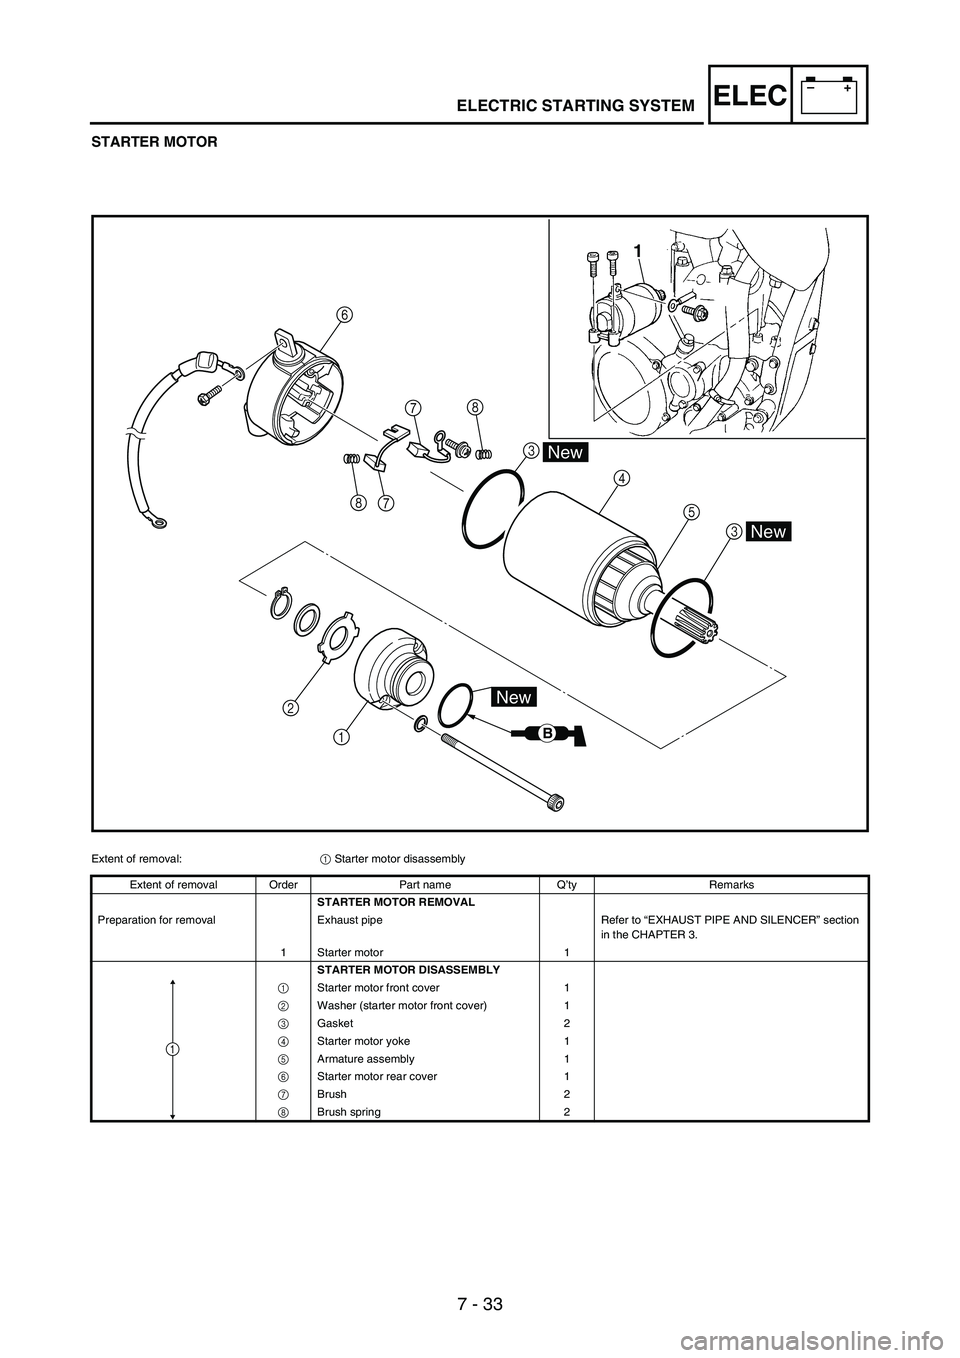
STARTER MOTOR
78
7 84
5
3
2
1
New
B
New
New
1
3 6
Extent of removal:
1 Starter motor disassembly
Extent of removal Order Part name Q’ty Remarks
STARTER MOTOR REMOVAL
Preparation for removal Exhaust pipe Refer to “EXHAUST PIPE AND SILENCER” section
in the CHAPTER 3.
1 Starter motor 1
STARTER MOTOR DISASSEMBLY
1 Starter motor front cover 1
2 Washer (starter motor front cover) 1
3 Gasket 2
4 Starter motor yoke 1
5 Armature assembly 1
6 Starter motor rear cover 1
7 Brush 2
8 Brush spring 2
1
Page 855 of 912
7 - 34
–+ELEC
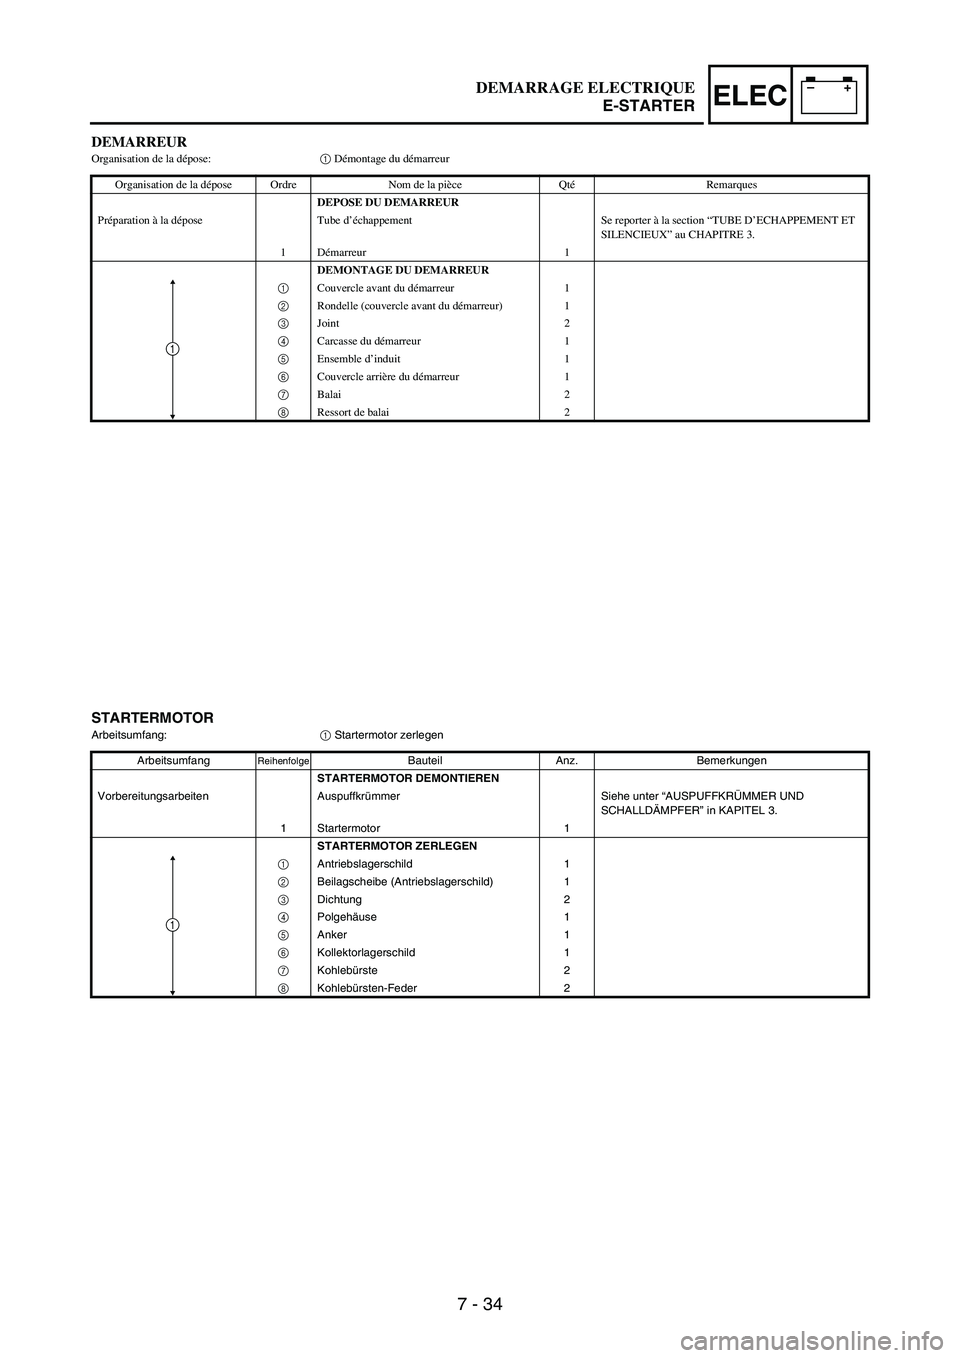
DEMARREUROrganisation de la dépose:1 Démontage du démarreur
Organisation de la dépose Ordre Nom de la pièce QtéRemarques
DEPOSE DU DEMARREUR
Préparation à la dépose Tube d’échappement Se reporter à la section “TUBE D’ECHAPPEMENT ET
SILENCIEUX” au CHAPITRE 3.
1Démarreur 1
DEMONTAGE DU DEMARREUR
1 Couvercle avant du démarreur 1
2 Rondelle (couvercle avant du démarreur) 1
3 Joint 2
4 Carcasse du démarreur 1
5 Ensemble d’induit 1
6 Couvercle arrière du démarreur 1
7 Balai 2
8 Ressort de balai 2
1
STARTERMOTOR
Arbeitsumfang:
1 Startermotor zerlegen
Arbeitsumfang
ReihenfolgeBauteil Anz. Bemerkungen
STARTERMOTOR DEMONTIEREN
Vorbereitungsarbeiten Auspuffkrümmer Siehe unter “AUSPUFFKRÜMMER UND
SCHALLDÄMPFER” in KAPITEL 3.
1 Startermotor 1
STARTERMOTOR ZERLEGEN
1 Antriebslagerschild 1
2 Beilagscheibe (Antriebslagerschild) 1
3 Dichtung 2
4 Polgehäuse 1
5 Anker 1
6 Kollektorlagerschild 1
7 Kohlebürste 2
8 Kohlebürsten-Feder 2
1
DEMARRAGE ELECTRIQUE
E-STARTER
Page 856 of 912
7 - 35
–+ELEC
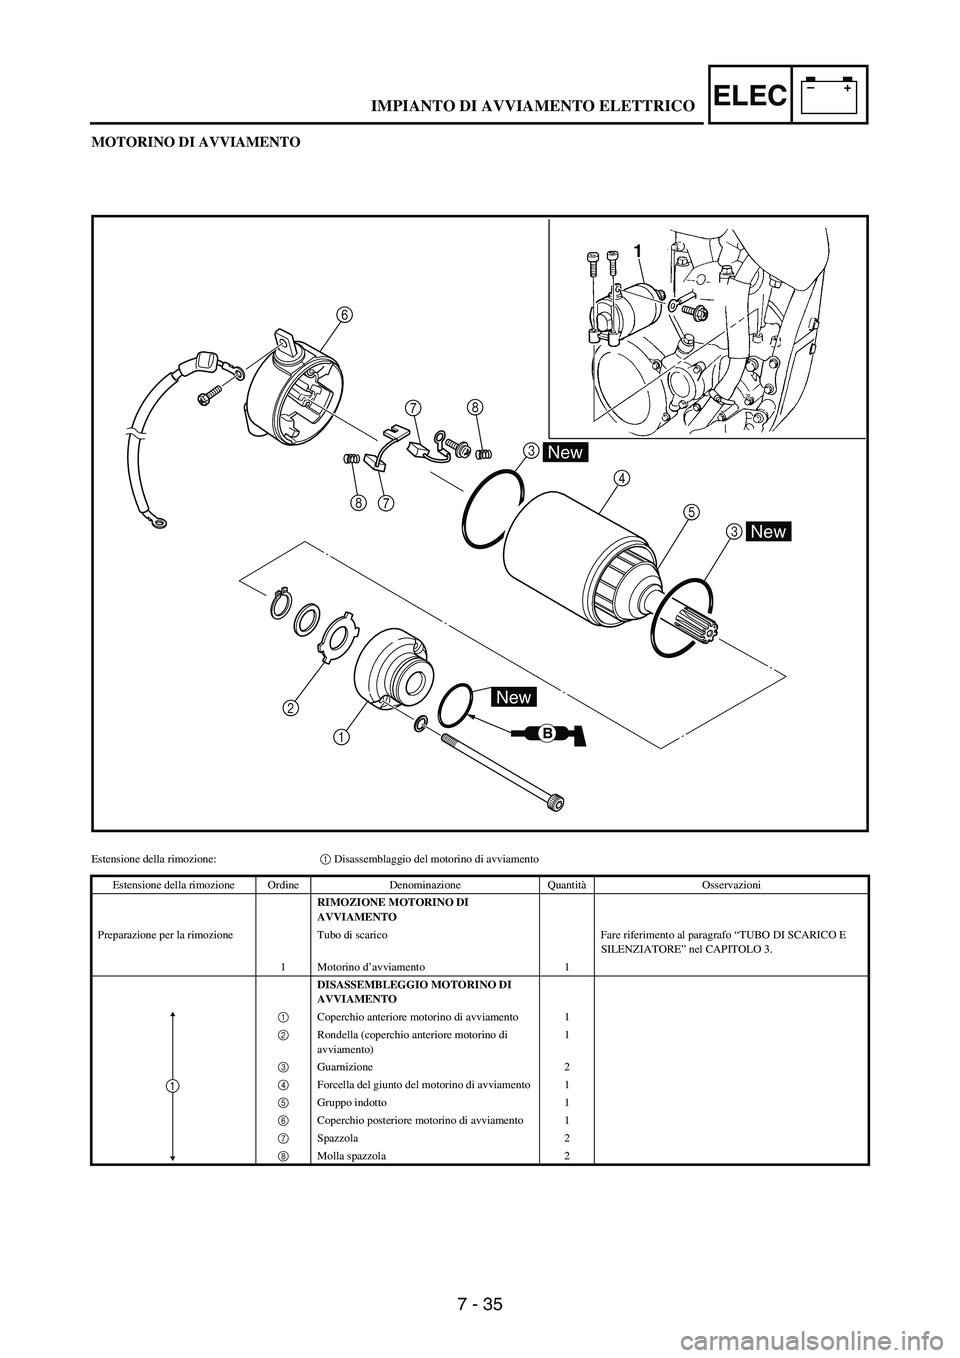
MOTORINO DI AVVIAMENTO
78
7 84
5
3
2
1
New
B
New
New
1
3 6
Estensione della rimozione:1 Disassemblaggio del motorino di avviamento
Estensione della rimozione Ordine Denominazione QuantitàOsservazioni
RIMOZIONE MOTORINO DI
AVVIAMENTO
Preparazione per la rimozione Tubo di scarico Fare riferimento al paragrafo “TUBO DI SCARICO E
SILENZIATORE” nel CAPITOLO 3.
1 Motorino d’avviamento 1
DISASSEMBLEGGIO MOTORINO DI
AVVIAMENTO
1 Coperchio anteriore motorino di avviamento 1
2 Rondella (coperchio anteriore motorino di
avviamento)1
3 Guarnizione 2
4 Forcella del giunto del motorino di avviamento 1
5 Gruppo indotto 1
6 Coperchio posteriore motorino di avviamento 1
7 Spazzola 2
8 Molla spazzola 2
1
IMPIANTO DI AVVIAMENTO ELETTRICO
Page 857 of 912
7 - 36
–+ELEC
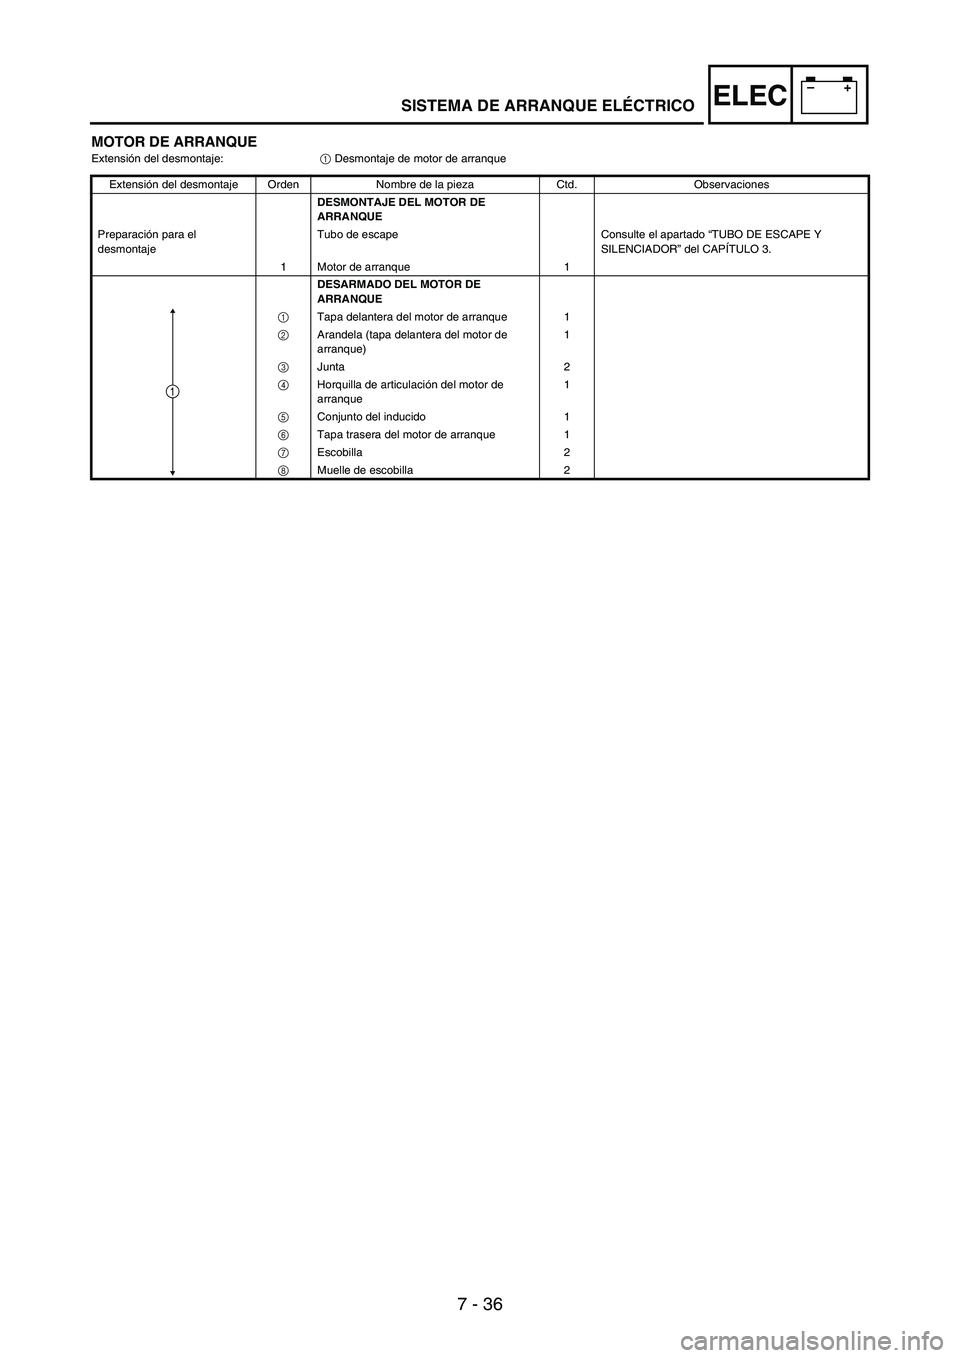
MOTOR DE ARRANQUE Extensión del desmontaje:
1 Desmontaje de motor de arranque
Extensión del desmontaje Orden Nombre de la pieza Ctd. Observaciones
DESMONTAJE DEL MOTOR DE
ARRANQUE
Preparación para el
desmontajeTubo de escape Consulte el apartado “TUBO DE ESCAPE Y
SILENCIADOR” del CAPÍTULO 3.
1 Motor de arranque 1
DESARMADO DEL MOTOR DE
ARRANQUE
1 Tapa delantera del motor de arranque 1
2 Arandela (tapa delantera del motor de
arranque)1
3 Junta 2
4 Horquilla de articulación del motor de
arranque1
5 Conjunto del inducido 1
6 Tapa trasera del motor de arranque 1
7 Escobilla 2
8 Muelle de escobilla 2
1
SISTEMA DE ARRANQUE ELÉCTRICO
Page 858 of 912
7 - 37
–+ELECELECTRIC STARTING SYSTEM
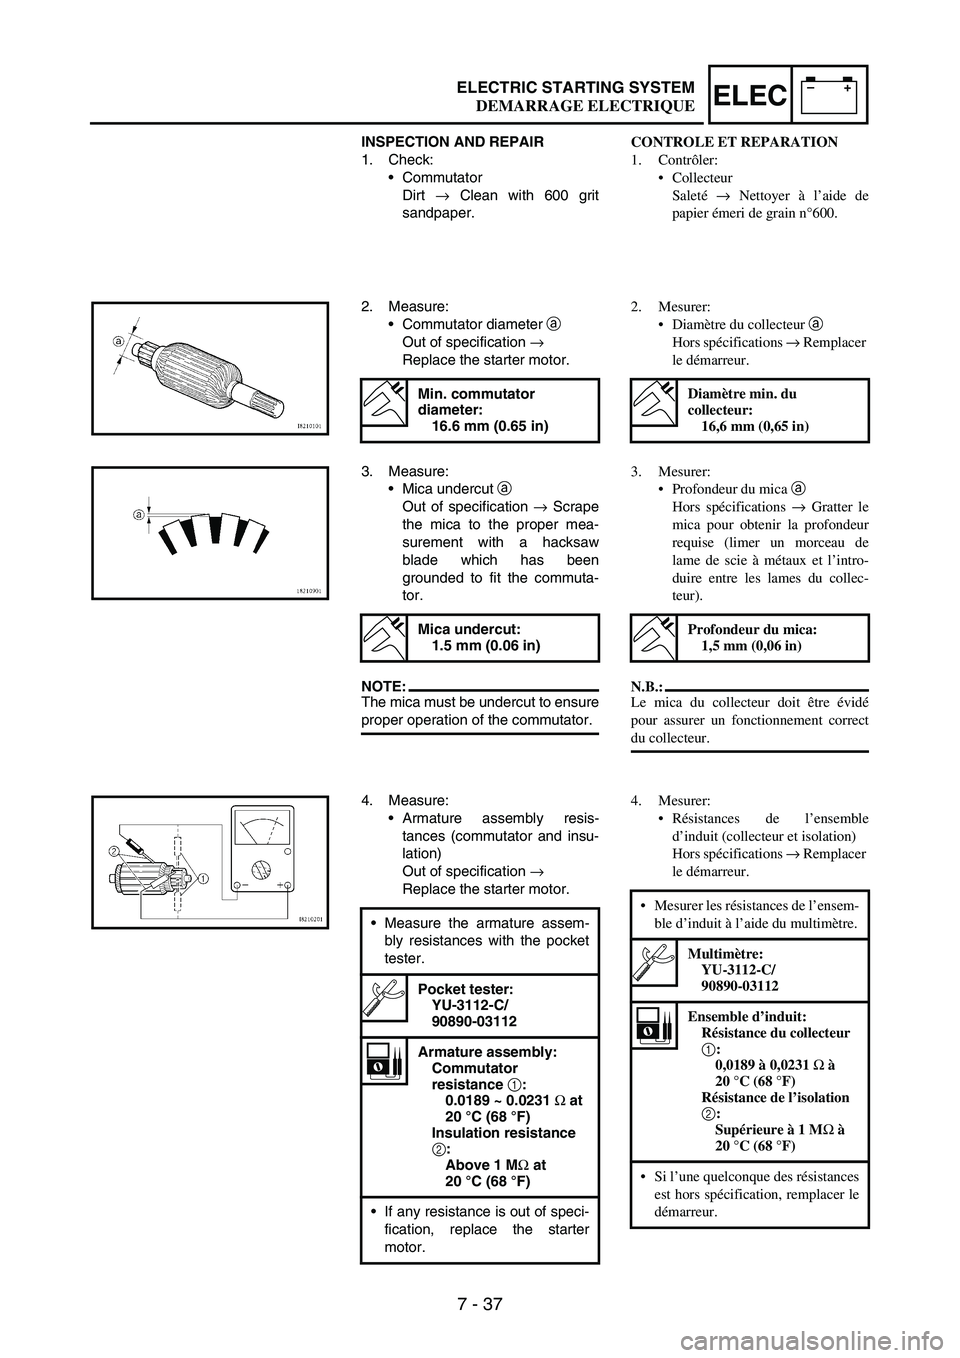
INSPECTION AND REPAIR
1. Check:
•Commutator
Dirt
→ Clean with 600 grit
sandpaper.
2. Measure:
•Commutator diameter
a
Out of specification
→
Replace the starter motor.
Min. commutator
diameter:
16.6 mm (0.65 in)
3. Measure:
•Mica undercut
a
Out of specification
→ Scrape
the mica to the proper mea-
surement with a hacksaw
blade which has been
grounded to fit the commuta-
tor.
NOTE:The mica must be undercut to ensure
proper operation of the commutator.
Mica undercut:
1.5 mm (0.06 in)
4. Measure:
•Armature assembly resis-
tances (commutator and insu-
lation)
Out of specification
→
Replace the starter motor.
•Measure the armature assem-
bly resistances with the pocket
tester.
Pocket tester:
YU-3112-C/
90890-03112
Armature assembly:
Commutator
resistance 1
:
0.0189 ~ 0.0231 Ω
at
20 °C (68 °F)
Insulation resistance
2
:
Above 1 MΩ
at
20 °C (68 °F)
•If any resistance is out of speci-
fication, replace the starter
motor.
CONTROLE ET REPARATION
1. Contrôler:
Collecteur
Saleté → Nettoyer à l’aide de
papier émeri de grain n°600.
2. Mesurer:
Diamètre du collecteur a
Hors spécifications → Remplacer
le démarreur.
Diamètre min. du
collecteur:
16,6 mm (0,65 in)
3. Mesurer:
Profondeur du mica a
Hors spécifications → Gratter le
mica pour obtenir la profondeur
requise (limer un morceau de
lame de scie à métaux et l’intro-
duire entre les lames du collec-
teur).
N.B.:
Le mica du collecteur doit être évidé
pour assurer un fonctionnement correct
du collecteur.
Profondeur du mica:
1,5 mm (0,06 in)
4. Mesurer:
Résistances de l’ensemble
d’induit (collecteur et isolation)
Hors spécifications → Remplacer
le démarreur.
Mesurer les résistances de l’ensem-
ble d’induit à l’aide du multimètre.
Multimètre:
YU-3112-C/
90890-03112
Ensemble d’induit:
Résistance du collecteur
1:
0,0189 à 0,0231 Ω à
20 °C (68 °F)
Résistance de l’isolation
2:
Supérieure à 1 MΩ à
20 °C (68 °F)
Si l’une quelconque des résistances
est hors spécification, remplacer le
démarreur.
DEMARRAGE ELECTRIQUE
Page 859 of 912
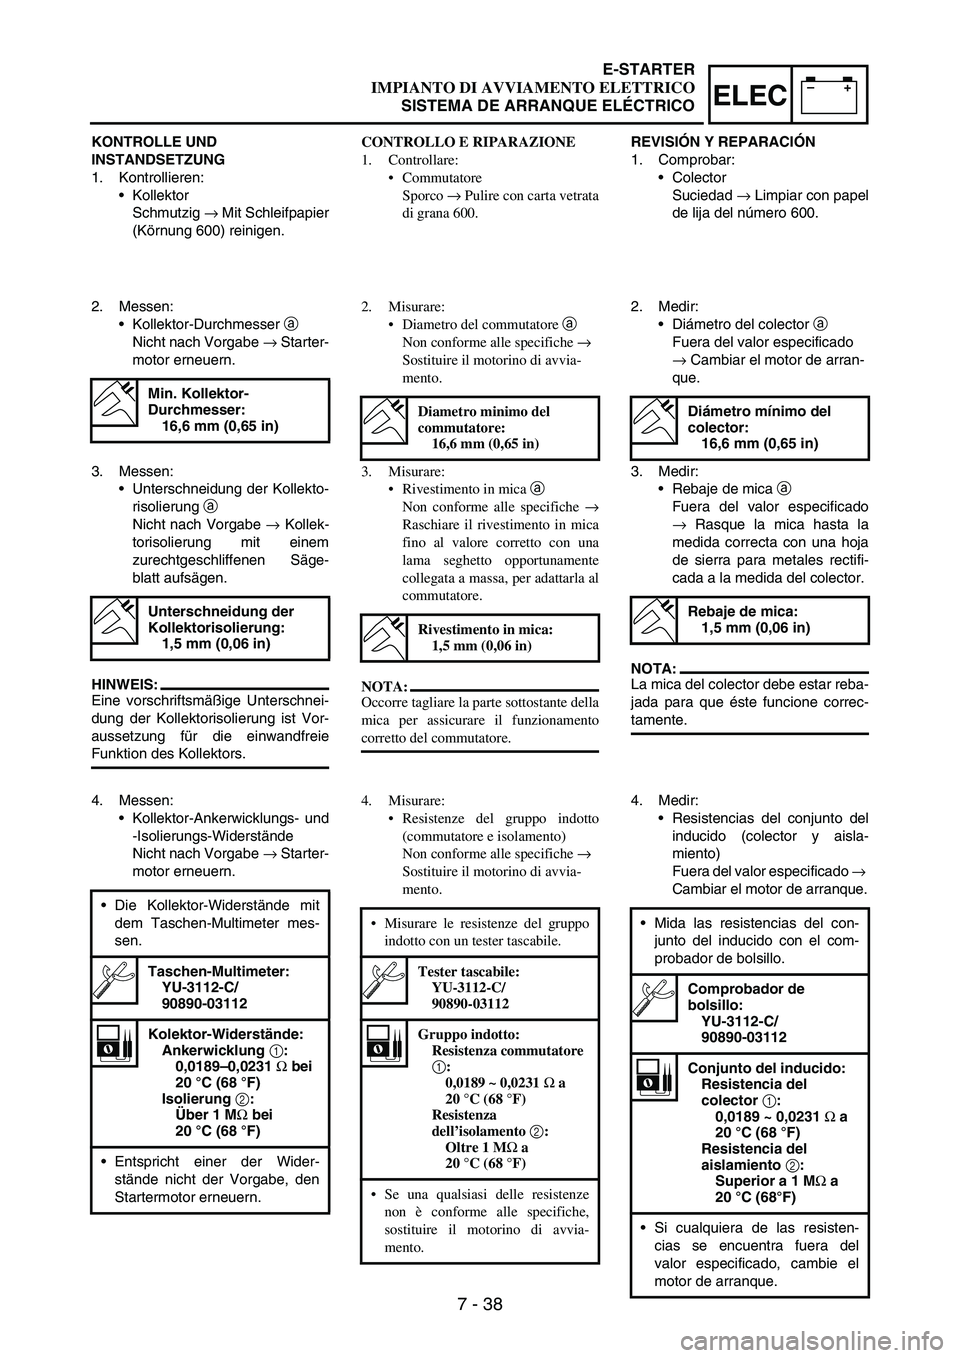
7 - 38
–+ELEC
KONTROLLE UND
INSTANDSETZUNG
1. Kontrollieren:
•Kollektor
Schmutzig
→ Mit Schleifpapier
(Körnung 600) reinigen.
2. Messen:
•Kollektor-Durchmesser
a
Nicht nach Vorgabe
→ Starter-
motor erneuern.
Min. Kollektor-
Durchmesser:
16,6 mm (0,65 in)
3. Messen:
•Unterschneidung der Kollekto-
risolierung
a
Nicht nach Vorgabe
→ Kollek-
torisolierung mit einem
zurechtgeschliffenen Säge-
blatt aufsägen.
HINWEIS:
Eine vorschriftsmäßige Unterschnei-
dung der Kollektorisolierung ist Vor-
aussetzung für die einwandfreie
Funktion des Kollektors.
Unterschneidung der
Kollektorisolierung:
1,5 mm (0,06 in)
4. Messen:
•Kollektor-Ankerwicklungs- und
-Isolierungs-Widerstände
Nicht nach Vorgabe
→ Starter-
motor erneuern.
•Die Kollektor-Widerstände mit
dem Taschen-Multimeter mes-
sen.
Taschen-Multimeter:
YU-3112-C/
90890-03112
Kolektor-Widerstände:
Ankerwicklung 1:
0,0189–0,0231 Ω bei
20 °C (68 °F)
Isolierung 2:
Über 1 MΩ bei
20 °C (68 °F)
•Entspricht einer der Wider-
stände nicht der Vorgabe, den
Startermotor erneuern.
CONTROLLO E RIPARAZIONE
1. Controllare:
Commutatore
Sporco → Pulire con carta vetrata
di grana 600.
2. Misurare:
Diametro del commutatore a
Non conforme alle specifiche →
Sostituire il motorino di avvia-
mento.
Diametro minimo del
commutatore:
16,6 mm (0,65 in)
3. Misurare:
Rivestimento in mica a
Non conforme alle specifiche →
Raschiare il rivestimento in mica
fino al valore corretto con una
lama seghetto opportunamente
collegata a massa, per adattarla al
commutatore.
NOTA:
Occorre tagliare la parte sottostante della
mica per assicurare il funzionamento
corretto del commutatore.
Rivestimento in mica:
1,5 mm (0,06 in)
4. Misurare:
Resistenze del gruppo indotto
(commutatore e isolamento)
Non conforme alle specifiche →
Sostituire il motorino di avvia-
mento.
Misurare le resistenze del gruppo
indotto con un tester tascabile.
Tester tascabile:
YU-3112-C/
90890-03112
Gruppo indotto:
Resistenza commutatore
1:
0,0189 ~ 0,0231 Ω a
20 °C (68 °F)
Resistenza
dell’isolamento 2:
Oltre 1 MΩ a
20 °C (68 °F)
Se una qualsiasi delle resistenze
non è conforme alle specifiche,
sostituire il motorino di avvia-
mento.
REVISIÓN Y REPARACIÓN
1. Comprobar:
•Colector
Suciedad
→ Limpiar con papel
de lija del número 600.
2. Medir:
•Diámetro del colector
a
Fuera del valor especificado
→ Cambiar el motor de arran-
que.
Diámetro mínimo del
colector:
16,6 mm (0,65 in)
3. Medir:
•Rebaje de mica
a
Fuera del valor especificado
→ Rasque la mica hasta la
medida correcta con una hoja
de sierra para metales rectifi-
cada a la medida del colector.
NOTA:
La mica del colector debe estar reba-
jada para que éste funcione correc-
tamente.
Rebaje de mica:
1,5 mm (0,06 in)
4. Medir:
•Resistencias del conjunto del
inducido (colector y aisla-
miento)
Fuera del valor especificado
→
Cambiar el motor de arranque.
•Mida las resistencias del con-
junto del inducido con el com-
probador de bolsillo.
Comprobador de
bolsillo:
YU-3112-C/
90890-03112
Conjunto del inducido:
Resistencia del
colector 1:
0,0189 ~ 0,0231 Ω a
20 °C (68 °F)
Resistencia del
aislamiento 2:
Superior a 1 MΩ a
20 °C (68°F)
•Si cualquiera de las resisten-
cias se encuentra fuera del
valor especificado, cambie el
motor de arranque.
E-STARTER
IMPIANTO DI AVVIAMENTO ELETTRICO
SISTEMA DE ARRANQUE ELÉCTRICO
Page 860 of 912
7 - 39
–+ELECELECTRIC STARTING SYSTEM
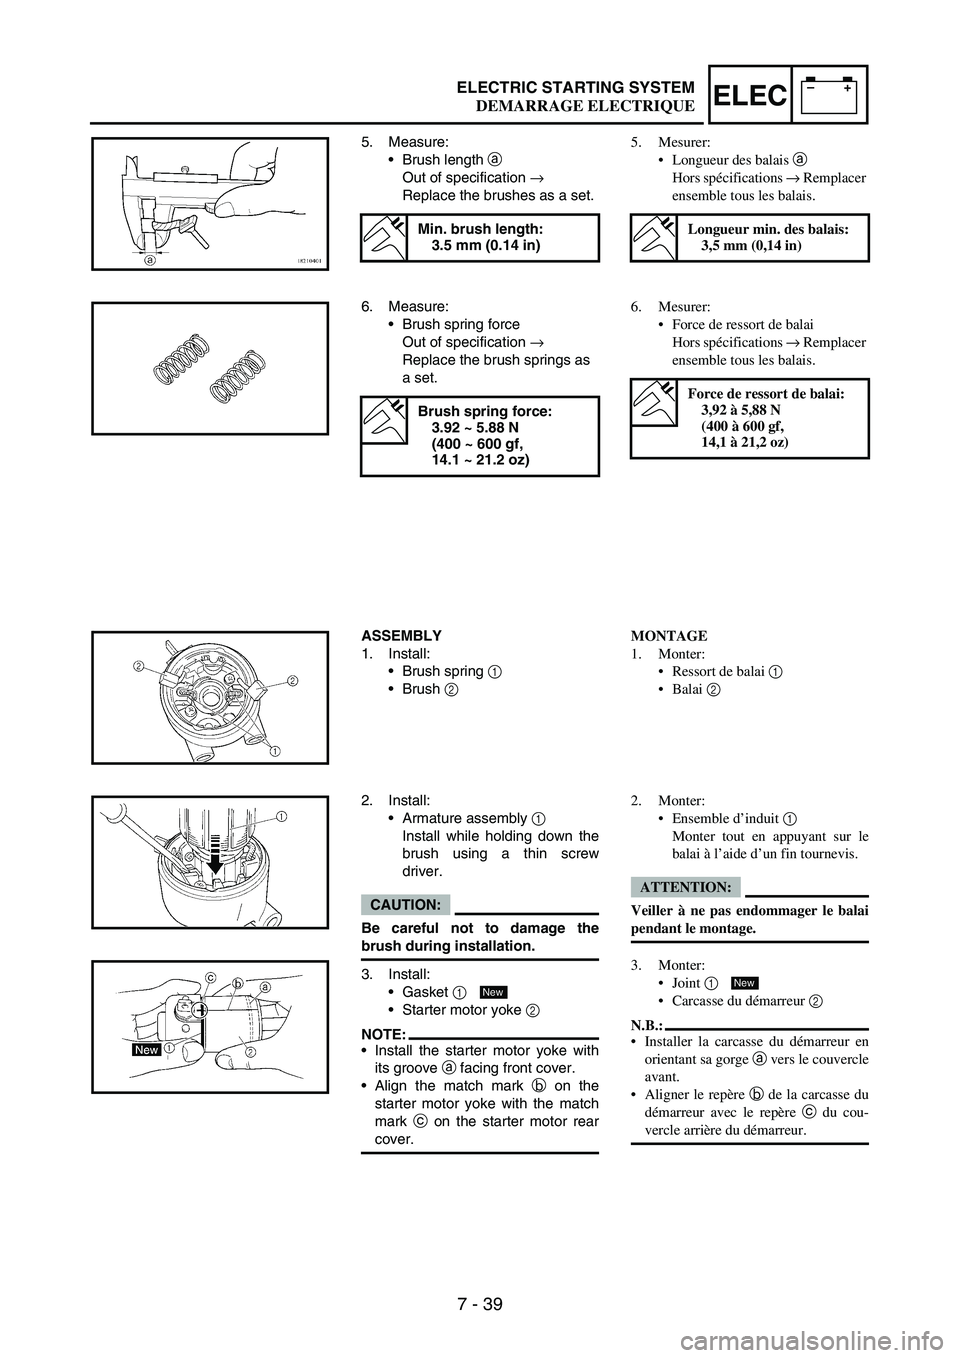
5. Measure:
•Brush length
a
Out of specification
→
Replace the brushes as a set.
Min. brush length:
3.5 mm (0.14 in)
6. Measure:
•Brush spring force
Out of specification
→
Replace the brush springs as
a set.
Brush spring force:
3.92 ~ 5.88 N
(400 ~ 600 gf,
14.1 ~ 21.2 oz)
ASSEMBLY
1. Install:
•Brush spring
1
•Brush
2
2. Install:
•Armature assembly
1
Install while holding down the
brush using a thin screw
driver.
CAUTION:
Be careful not to damage the
brush during installation.
3. Install:
•Gasket
1
•Starter motor yoke
2
NOTE:•Install the starter motor yoke with
its groove
a facing front cover.
•Align the match mark
b on the
starter motor yoke with the match
mark
c on the starter motor rear
cover.
New
5. Mesurer:
Longueur des balais a
Hors spécifications → Remplacer
ensemble tous les balais.
Longueur min. des balais:
3,5 mm (0,14 in)
6. Mesurer:
Force de ressort de balai
Hors spécifications → Remplacer
ensemble tous les balais.
Force de ressort de balai:
3,92 à 5,88 N
(400 à 600 gf,
14,1 à 21,2 oz)
MONTAGE
1. Monter:
Ressort de balai 1
Balai 2
2. Monter:
Ensemble d’induit 1
Monter tout en appuyant sur le
balai à l’aide d’un fin tournevis.
ATTENTION:
Veiller à ne pas endommager le balai
pendant le montage.
3. Monter:
Joint 1
Carcasse du démarreur 2
N.B.:
Installer la carcasse du démarreur en
orientant sa gorge a vers le couvercle
avant.
Aligner le repère b de la carcasse du
démarreur avec le repère c du cou-
vercle arrière du démarreur.
New
DEMARRAGE ELECTRIQUE