ACURA NSX 1991 Service Repair Manual
Manufacturer: ACURA, Model Year: 1991, Model line: NSX, Model: ACURA NSX 1991Pages: 1640, PDF Size: 60.48 MB
Page 1101 of 1640
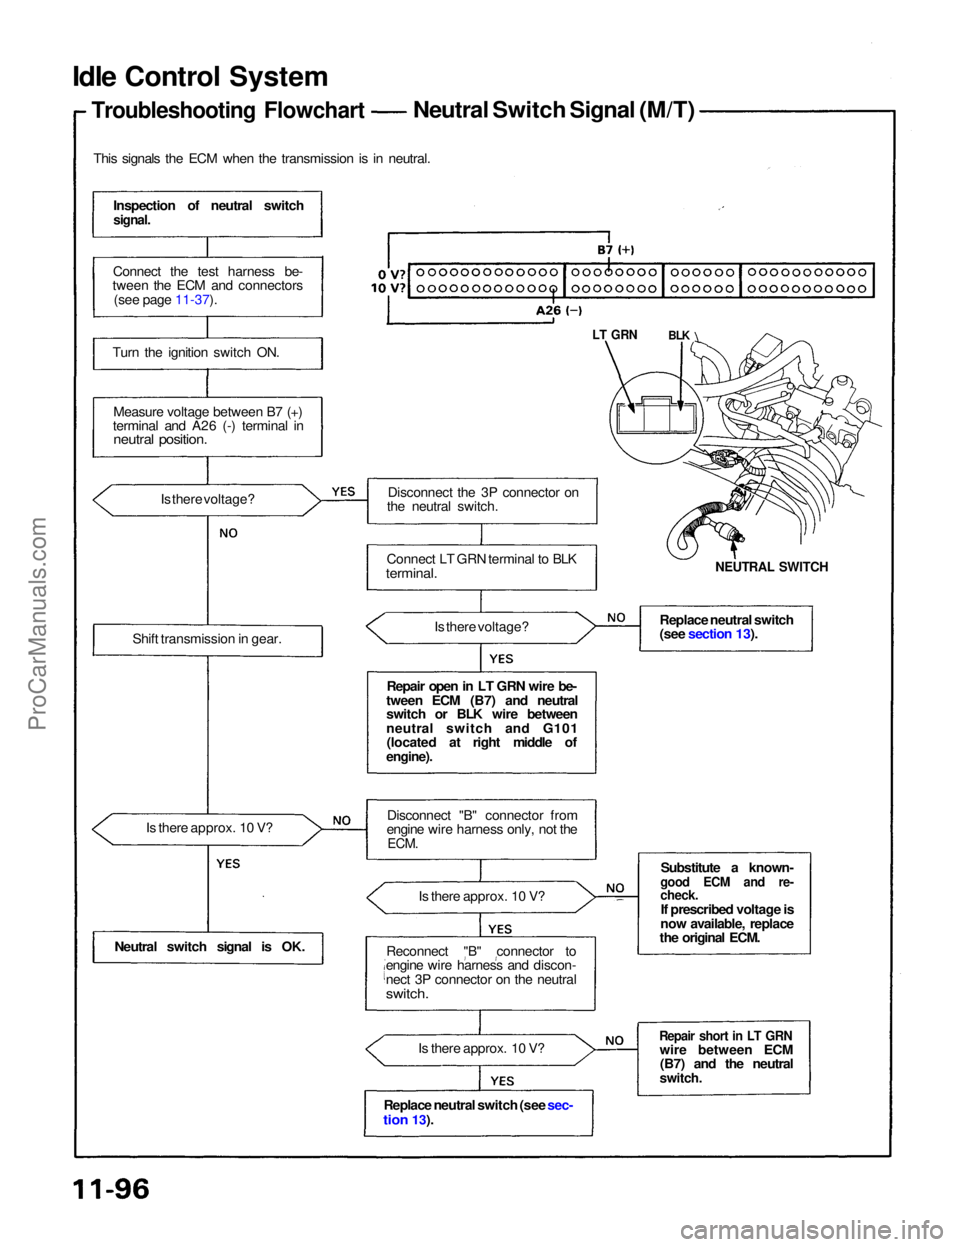
Idle Control System
Troubleshooting Flowchart
Neutral Switch Signal (M/T)
This signals the ECM when the transmission is in neutral.
Inspection of neutral switch
signal.
Connect the test harness be-
tween the ECM and connectors
(see page 11-37).
Turn the ignition switch ON.
Measure voltage between B7 (+)
terminal and A26 (-) terminal in
neutral position.
Is there voltage?
Shift transmission in gear.
Is there approx. 10 V?
Neutral switch signal is OK.
Replace neutral switch (see sec-
tion
13). Is there approx. 10 V?
Reconnect "B" connector to
engine wire harness and discon-
nect 3P connector on the neutral
switch.
Is there approx. 10 V?
Disconnect "B" connector from
engine wire harness only, not the
ECM.
Repair open in LT GRN wire be-
tween ECM (B7) and neutral
switch or BLK wire between
neutral switch and G101 (located at right middle of
engine).
Is there voltage?
Connect LT GRN terminal to BLK
terminal.
Disconnect the 3P connector on
the neutral switch.
Replace neutral switch
(see section 13).
NEUTRAL SWITCH
LT GRN
BLK
Substitute a known-
good ECM and re-
check.
If prescribed voltage is
now available, replace
the original ECM.
Repair short in LT GRN
wire between ECM(B7) and the neutral
switch.ProCarManuals.com
Page 1102 of 1640
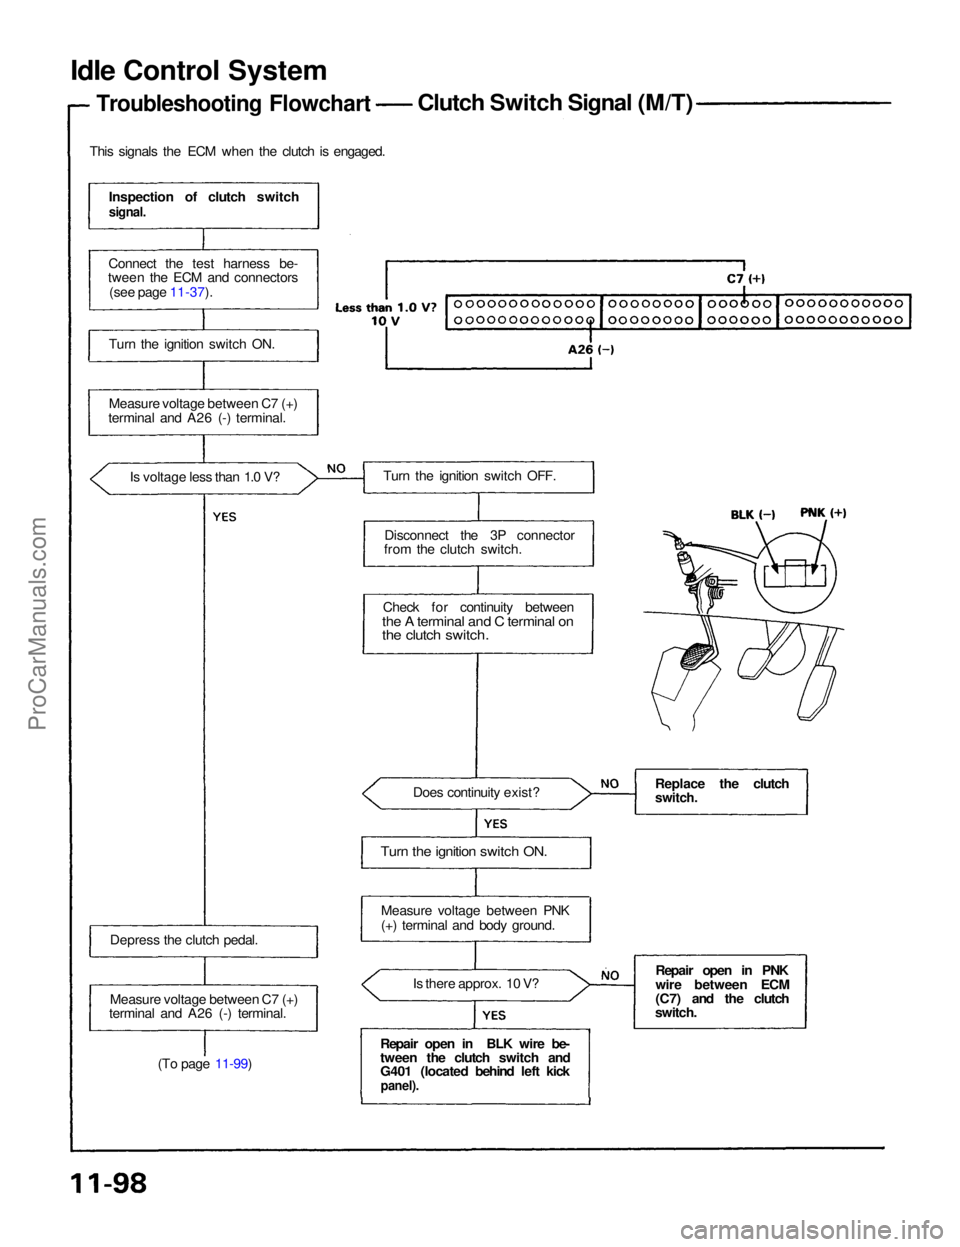
Idle Control System
Troubleshooting Flowchart
Clutch Switch Signal (M/T)
This signals the ECM when the clutch is engaged. Inspection of clutch switch
signal.
Connect the test harness be-
tween the ECM and connectors
(see page 11-37).
Turn the ignition switch ON.
Measure voltage between C7 (+)
terminal and A26 (-) terminal.
Is voltage less than 1.0 V?
Depress the clutch pedal.
Measure voltage between C7 (+)
terminal and A26 (-) terminal.
(To page 11-99) Turn the ignition switch OFF.
Disconnect the 3P connector
from the clutch switch.
Check for continuity between
the A terminal and C terminal on
the clutch switch.
Does continuity exist?
Turn the ignition switch ON.
Measure voltage between PNK
(+) terminal and body ground. Is there approx. 10 V?
Repair open in BLK wire be-
tween the clutch switch and
G401 (located behind left kick
panel).
Replace the clutch
switch.
Repair open in PNK
wire between ECM
(C7) and the clutch
switch.ProCarManuals.com
Page 1103 of 1640
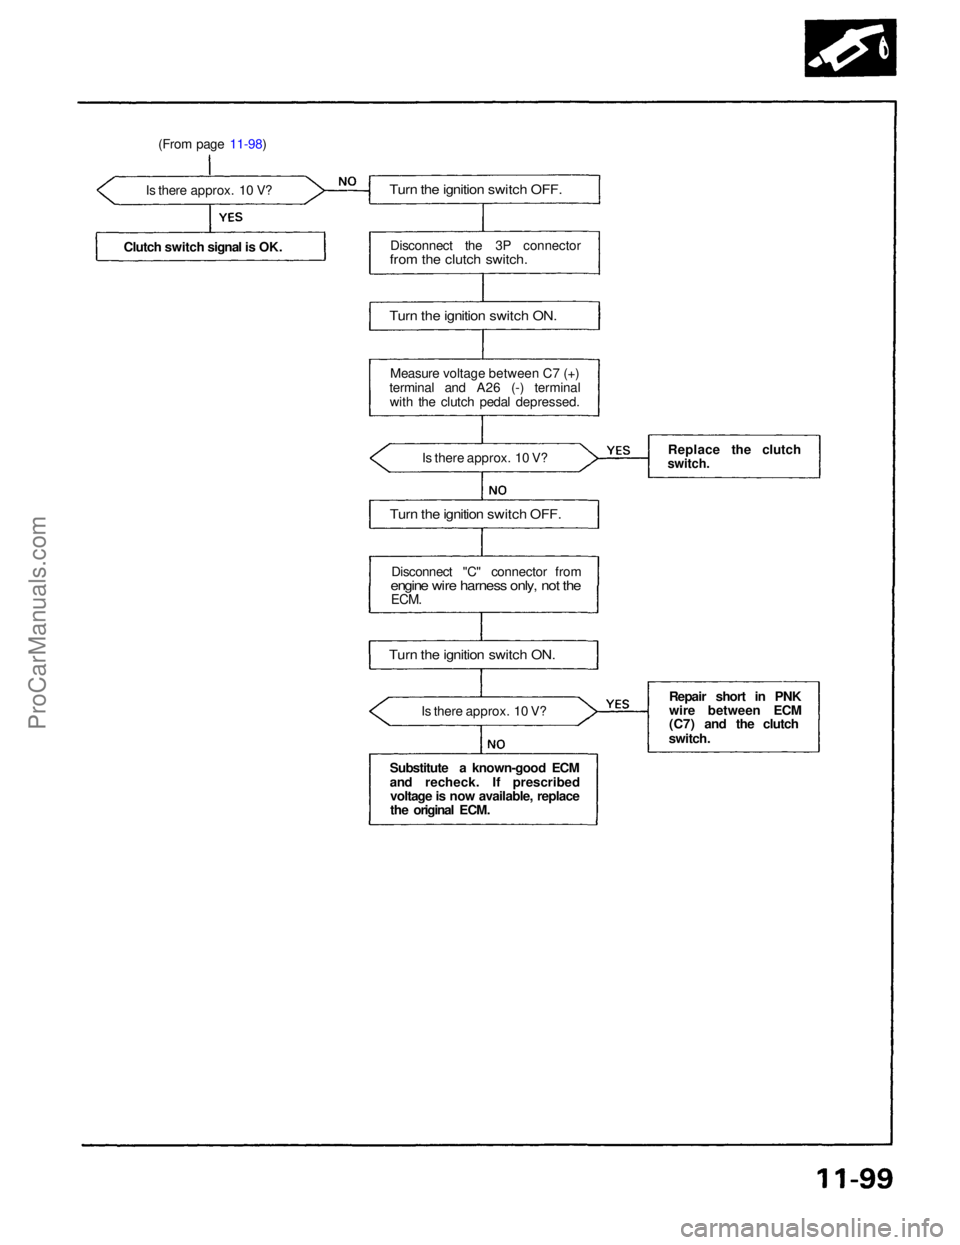
(From page 11-98)
Is there approx. 10 V?
Clutch switch signal is OK.
Turn the ignition switch OFF.
Disconnect the 3P connector
from the clutch switch.
Turn the ignition switch ON.
Measure voltage between C7 (+)
terminal and A26 (-) terminal with the clutch pedal depressed.
Is there approx. 10 V?
Turn the ignition switch OFF.
Disconnect "C" connector from
engine wire harness only, not the
ECM.
Turn the ignition switch ON.
Is there approx. 10 V?
Substitute a known-good ECM
and recheck. If prescribed voltage is now available, replace
the original ECM. Replace the clutch
switch.
Repair short in PNK
wire between ECM
(C7) and the clutch
switch.ProCarManuals.com
Page 1104 of 1640
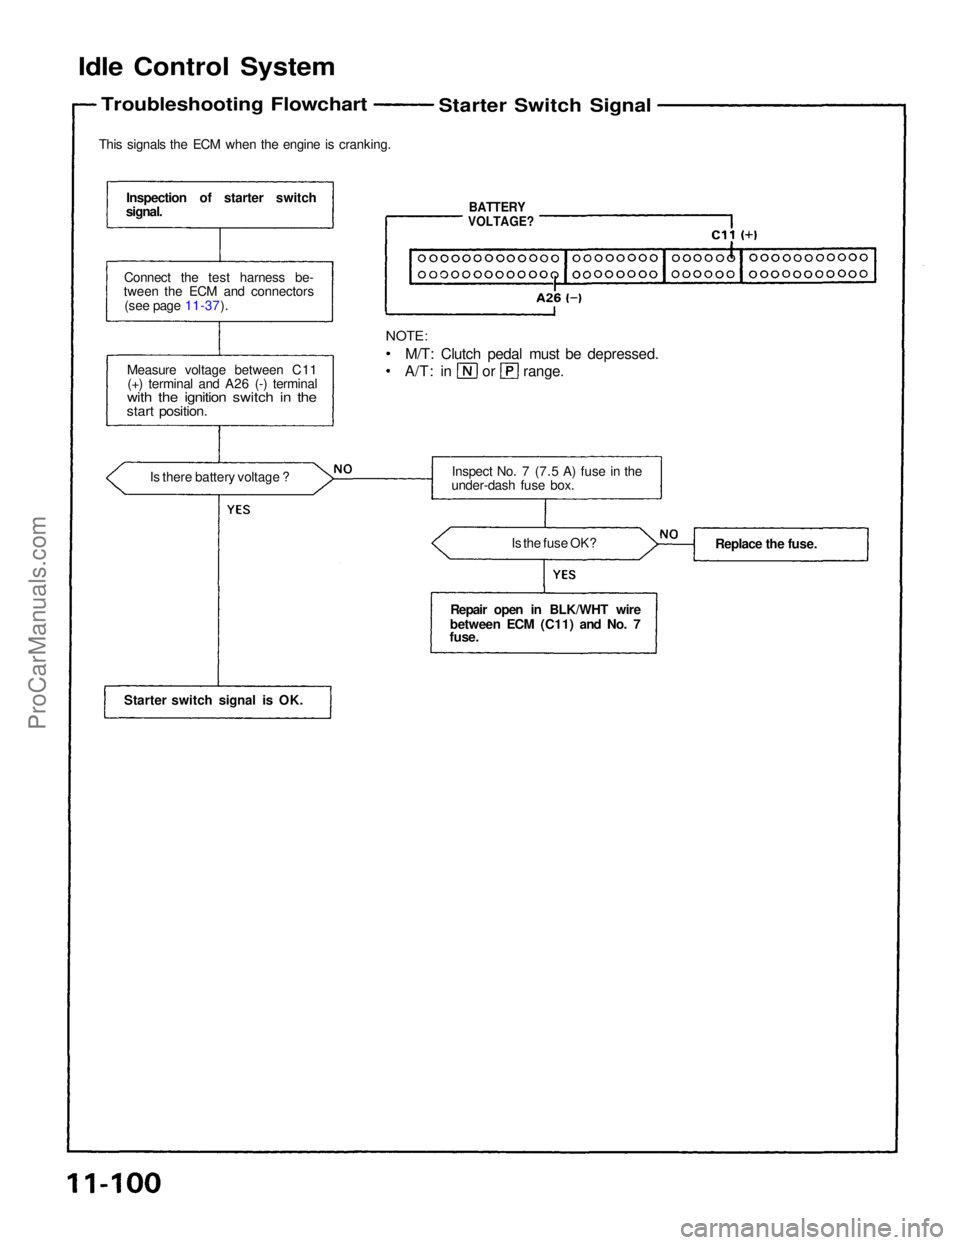
Idle Control System
Troubleshooting Flowchart
This signals the ECM when the engine is cranking.
Inspection of starter switch
signal.
Connect the test harness be-
tween the ECM and connectors
(see page 11-37).
Measure voltage between C11(+) terminal and A26 (-) terminal
with the ignition switch in the
start position.
Is there battery voltage ?
Starter switch signal is OK.
NOTE:
M/T: Clutch pedal must be depressed. A/T: in or range.
Inspect No. 7 (7.5 A) fuse in the
under-dash fuse box.
Is the fuse OK?
Repair open in BLK/WHT wire
between ECM (C11) and No. 7
fuse. Replace the fuse.
Starter Switch Signal
BATTERY
VOLTAGE?ProCarManuals.com
Page 1105 of 1640
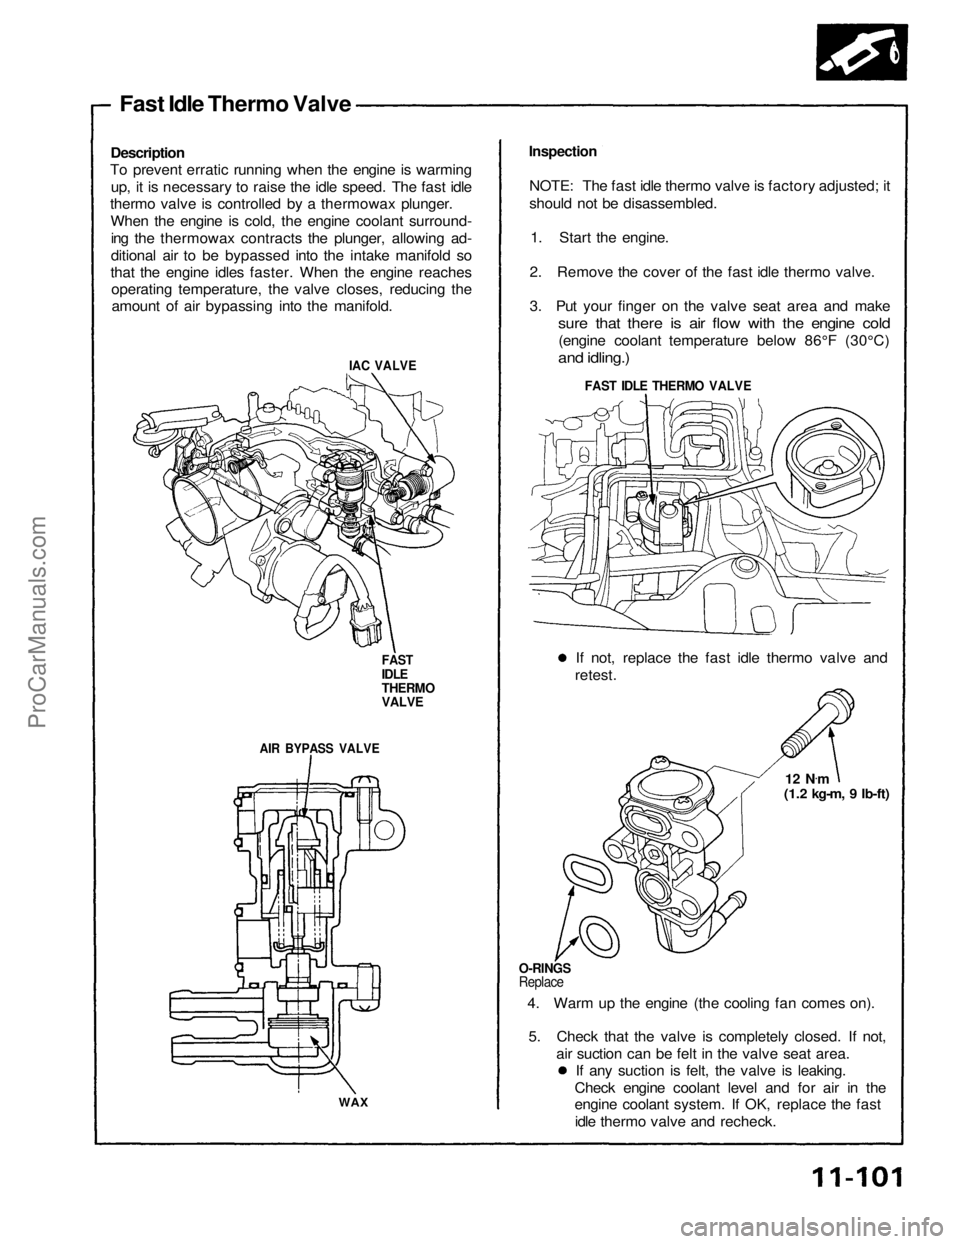
Fast Idle Thermo Valve
Description
To prevent erratic running when the engine is warming
up, it is necessary to raise the idle speed. The fast idle
thermo valve is controlled by a thermowax plunger.
When the engine is cold, the engine coolant surround-ing the thermowax contracts the plunger, allowing ad-
ditional air to be bypassed into the intake manifold so
that the engine idles faster. When the engine reaches operating temperature, the valve closes, reducing theamount of air bypassing into the manifold.
IAC VALVE
FAST
IDLE
THERMO
VALVE
AIR BYPASS VALVE
WAX
Inspection
NOTE: The fast idle thermo valve is factory adjusted; it
should not be disassembled. 1. Start the engine.
2. Remove the cover of the fast idle thermo valve.
3. Put your finger on the valve seat area and make
sure that there is air flow with the engine cold
(engine coolant temperature below 86°F (30°C)
and idling.)
FAST IDLE THERMO VALVE
If not, replace the fast idle thermo valve and
retest.
12 N.
m
(1.2 kg-m, 9 Ib-ft)
O-RINGS
Replace
4. Warm up the engine (the cooling fan comes on).
5. Check that the valve is completely closed. If not, air suction can be felt in the valve seat area.If any suction is felt, the valve is leaking.
Check engine coolant level and for air in the
engine coolant system. If OK, replace the fast idle thermo valve and recheck.ProCarManuals.com
Page 1106 of 1640
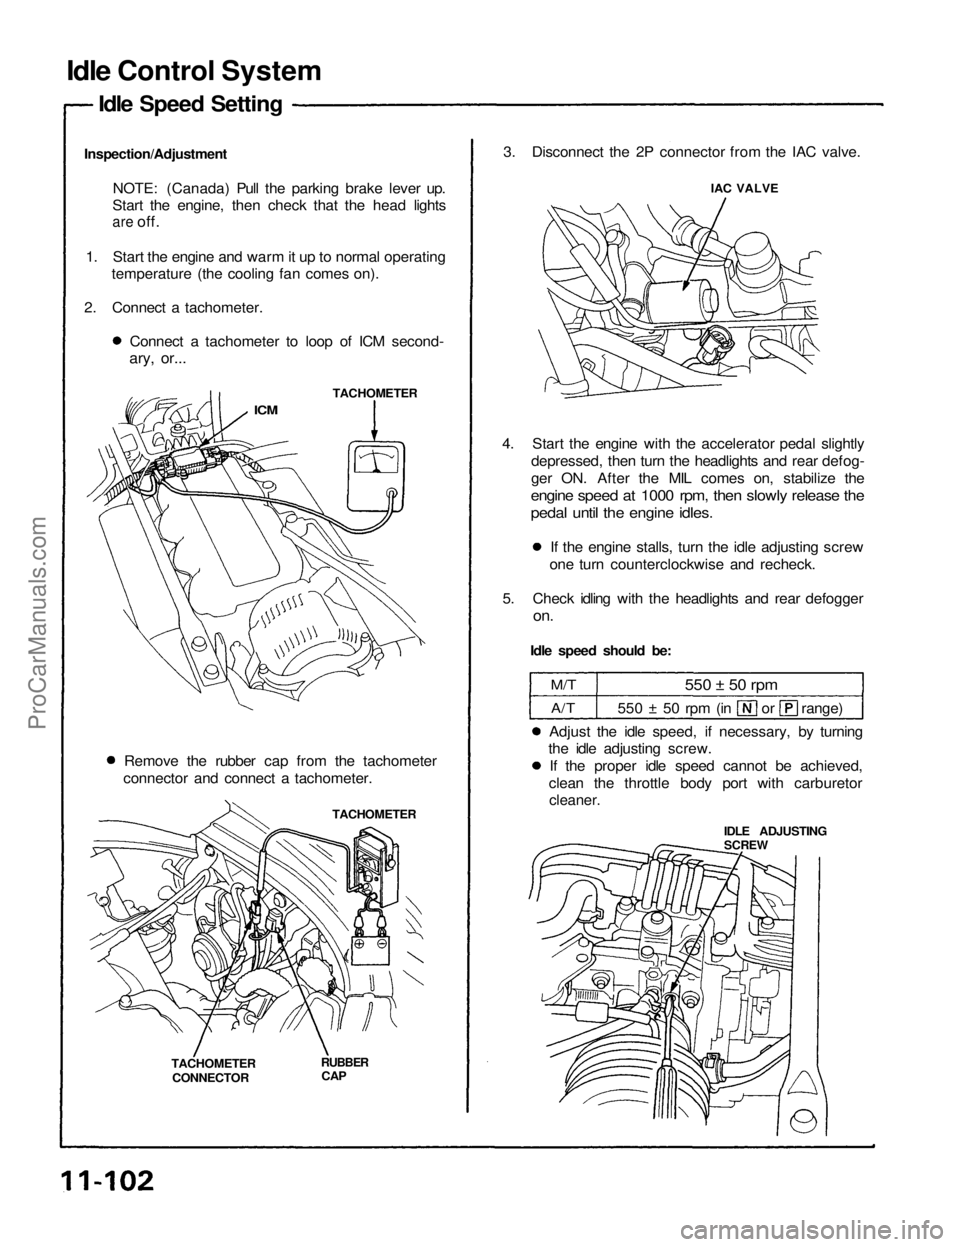
Idle Control System
Idle Speed Setting
Inspection/Adjustment NOTE: (Canada) Pull the parking brake lever up.
Start the engine, then check that the head lights
are
off.
1. Start the engine and warm it up to normal operating temperature (the cooling fan comes on).
2. Connect a tachometer. Connect a tachometer to loop of ICM second-
ary, or...
TACHOMETER
ICM
Remove the rubber cap from the tachometer
connector and connect a tachometer.
TACHOMETER
TACHOMETER CONNECTOR
RUBBER
CAP
3. Disconnect the 2P connector from the IAC valve.
IAC VALVE
4. Start the engine with the accelerator pedal slightly depressed, then turn the headlights and rear defog-
ger ON. After the MIL comes on, stabilize the
engine speed at 1000 rpm, then slowly release the
pedal until the engine idles.
If the engine stalls, turn the idle adjusting screw
one turn counterclockwise and recheck.
5. Check idling with the headlights and rear defogger
on.
Idle speed should be:
M/T
A/T
550 ± 50 rpm
550 ± 50 rpm (in or range)
Adjust the idle speed, if necessary, by turning
the idle adjusting screw.
If the proper idle speed cannot be achieved,
clean the throttle body port with carburetor
cleaner.
IDLE ADJUSTING
SCREWProCarManuals.com
Page 1107 of 1640
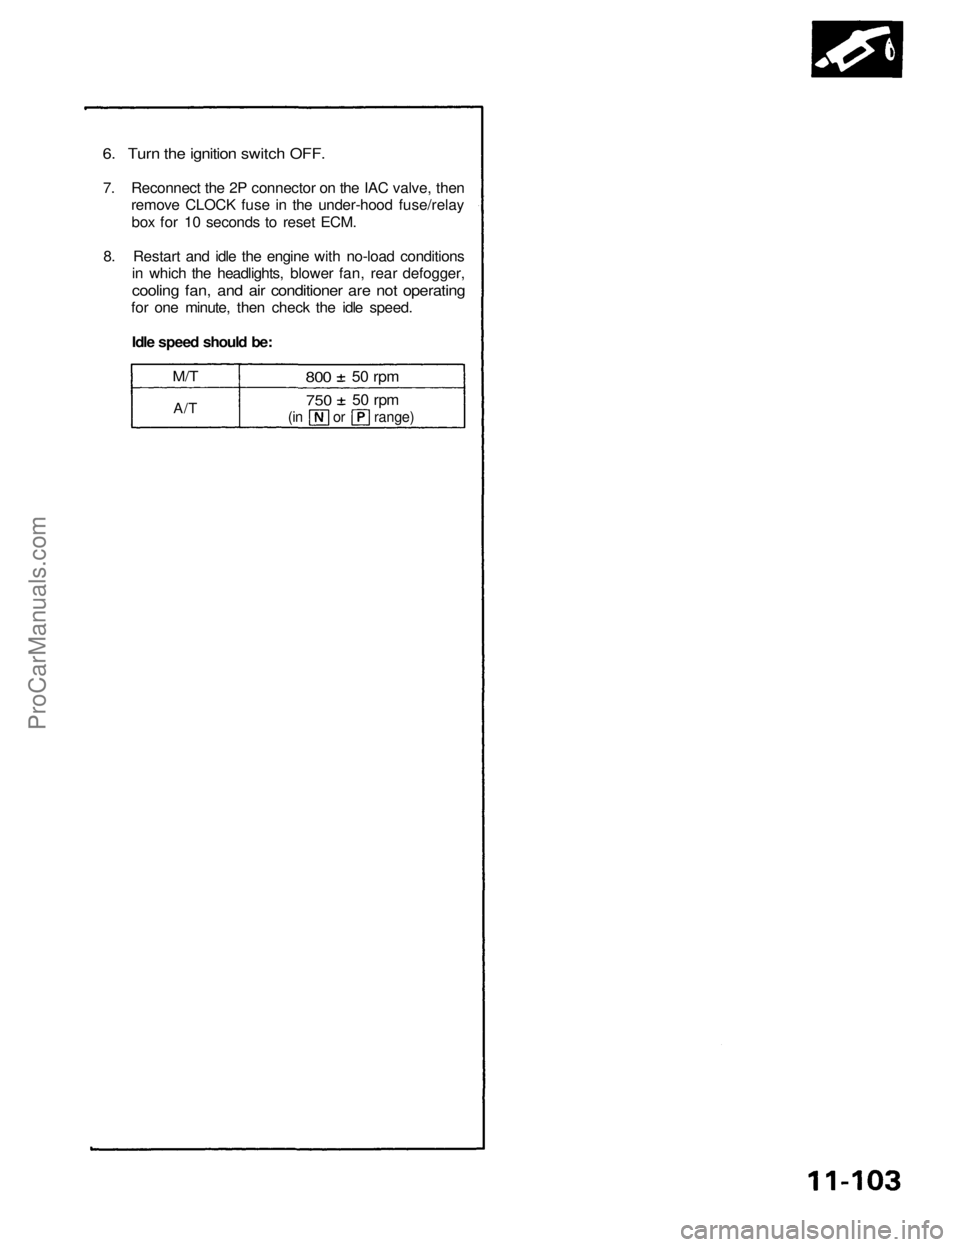
6. Turn the ignition switch OFF.
7. Reconnect the 2P connector on the IAC valve, then
remove CLOCK fuse in the under-hood fuse/relay
box for 10 seconds to reset ECM.
8. Restart and idle the engine with no-load conditions
in which the headlights, blower fan, rear defogger,
cooling fan, and air conditioner are not operating
for one minute, then check the idle speed.
Idle speed should be:
M/T
A/T
800
50 rpm
750
50 rpm
(in or range)ProCarManuals.com
Page 1108 of 1640
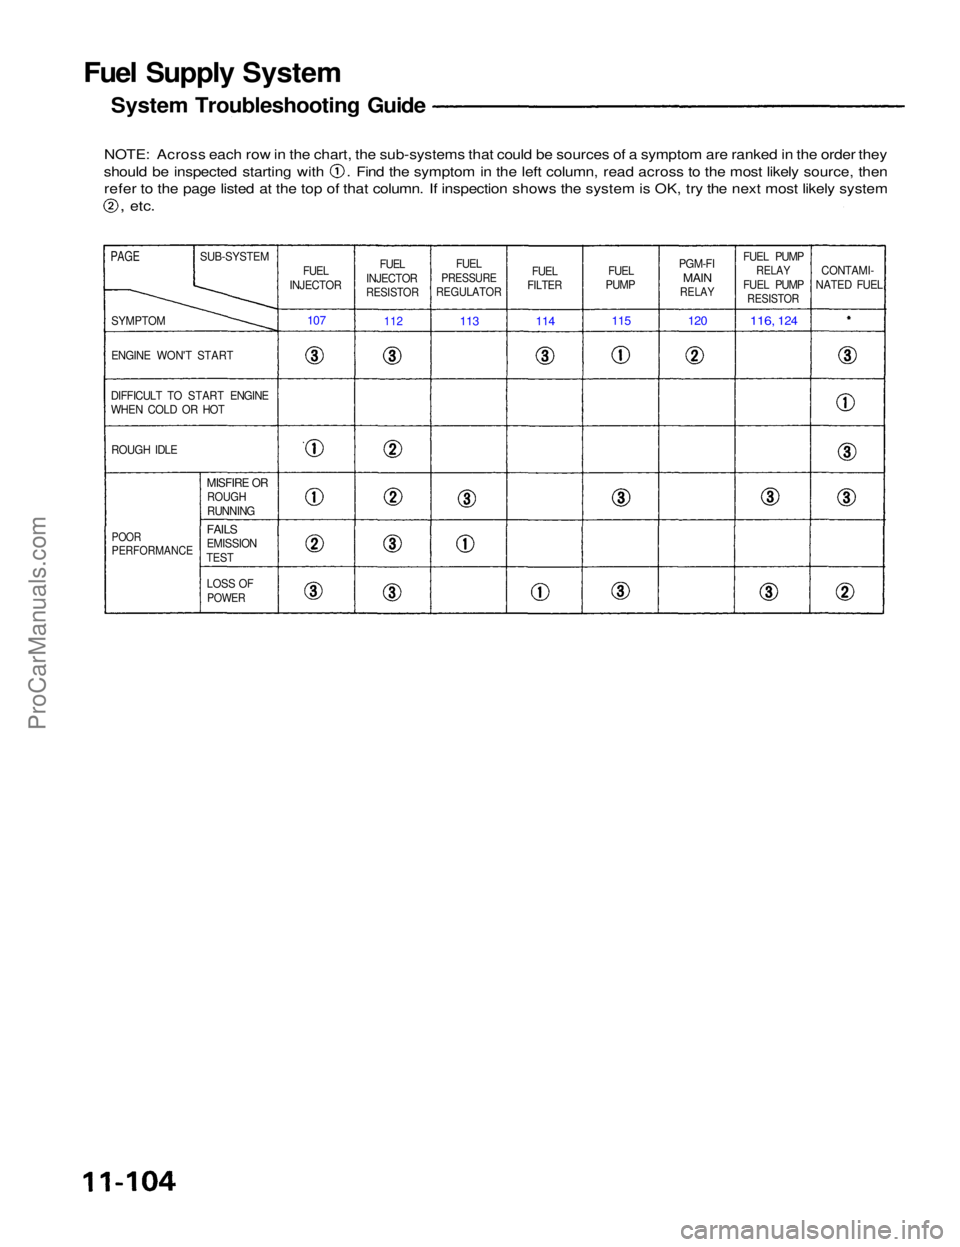
Fuel Supply System
System Troubleshooting Guide
NOTE: Across each row in the chart, the sub-systems that could be sources of a symptom are ranked in the order they should be inspected starting with . Find the symptom in the left column, read across to the most likely source, then
refer to the page listed at the top of that column. If inspection shows the system is OK, try the next most likely system
,
etc.
PAGE
SUB-SYSTEM
FUEL
INJECTOR FUEL
INJECTOR
RESISTOR
FUEL
PRESSURE
REGULATOR
FUEL
FILTER
FUEL
PUMP PGM-FI
MAIN
RELAY
FUEL PUMP
RELAY
FUEL PUMP
RESISTOR
CONTAMI-
NATED FUEL
SYMPTOM
ENGINE WON'T START
DIFFICULT TO START ENGINE
WHEN COLD OR HOT ROUGH IDLE
107
112
113
114
115
120
116,
124
POOR
PERFORMANCE
MISFIRE OR
ROUGH
RUNNING
FAILS
EMISSION
TEST
LOSS OF
POWERProCarManuals.com
Page 1109 of 1640
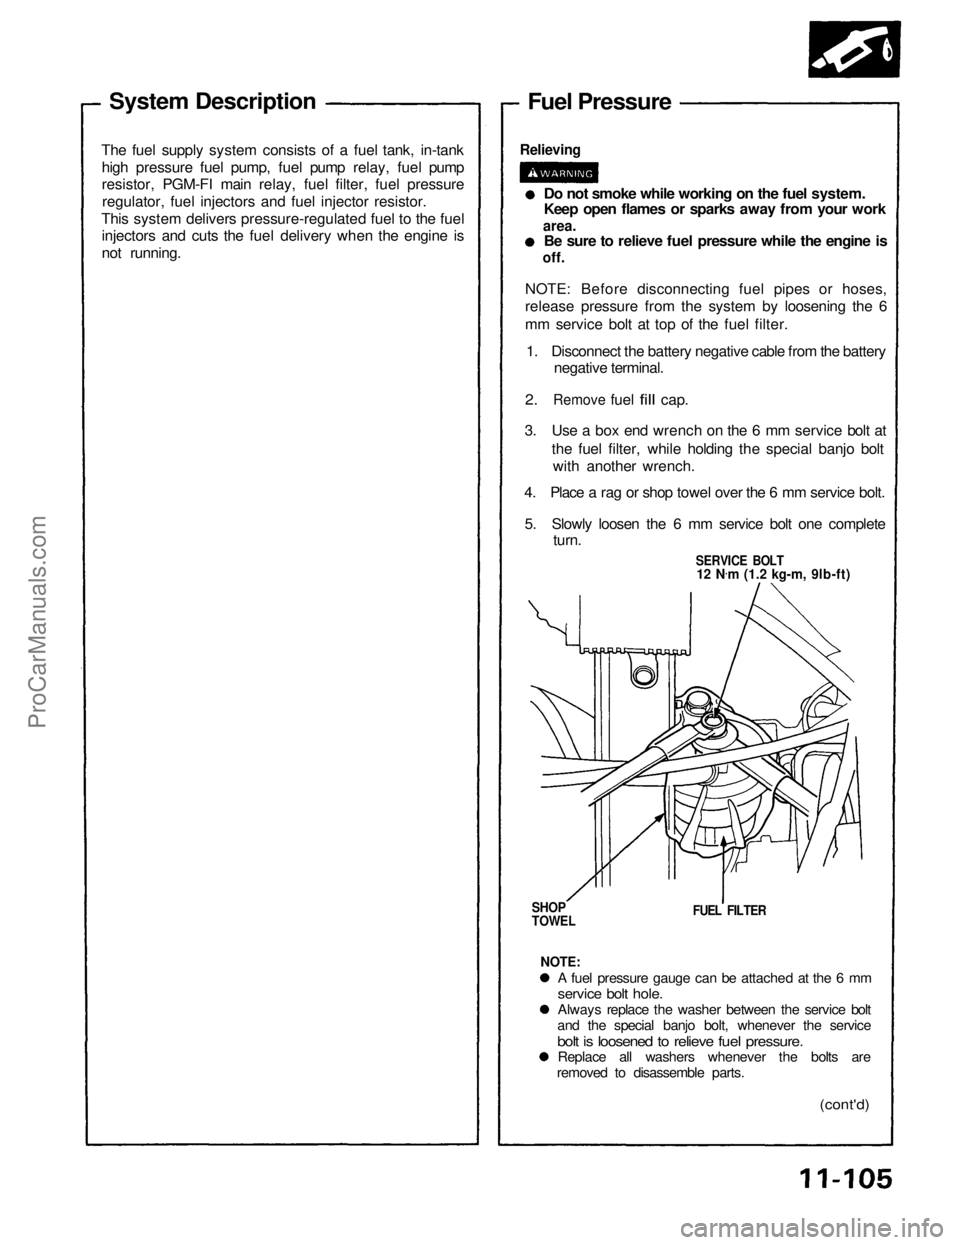
System Description
The fuel supply system consists of a fuel tank, in-tank high pressure fuel pump, fuel pump relay, fuel pump
resistor, PGM-FI main relay, fuel filter, fuel pressureregulator, fuel injectors and fuel injector resistor.
This system delivers pressure-regulated fuel to the fuel injectors and cuts the fuel delivery when the engine is
not running. Fuel Pressure
Relieving
Do not smoke while working on the fuel system.
Keep open flames or sparks away from your work
area.
Be sure to relieve fuel pressure while the engine is
off.
NOTE: Before disconnecting fuel pipes or hoses,
release pressure from the system by loosening the 6
mm service bolt at top of the fuel filter. 1. Disconnect the battery negative cable from the battery negative terminal.
2.
Remove
fuel
fill
cap.
3. Use a box end wrench on the 6 mm service bolt at the fuel filter, while holding the special banjo boltwith another wrench.
4. Place a rag or shop towel over the 6 mm service bolt.
5. Slowly loosen the 6 mm service bolt one complete turn.
SERVICE BOLT
12 N .
m (1.2 kg-m, 9lb-ft)
SHOP
TOWEL
FUEL FILTER
NOTE:
A fuel pressure gauge can be attached at the 6 mm
service bolt hole.
Always replace the washer between the service bolt
and the special banjo bolt, whenever the service
bolt is loosened to relieve fuel pressure.
Replace all washers whenever the bolts are
removed to disassemble parts.
(cont'd)ProCarManuals.com
Page 1110 of 1640
Fuel Supply System
Fuel Pressure (cont'd)
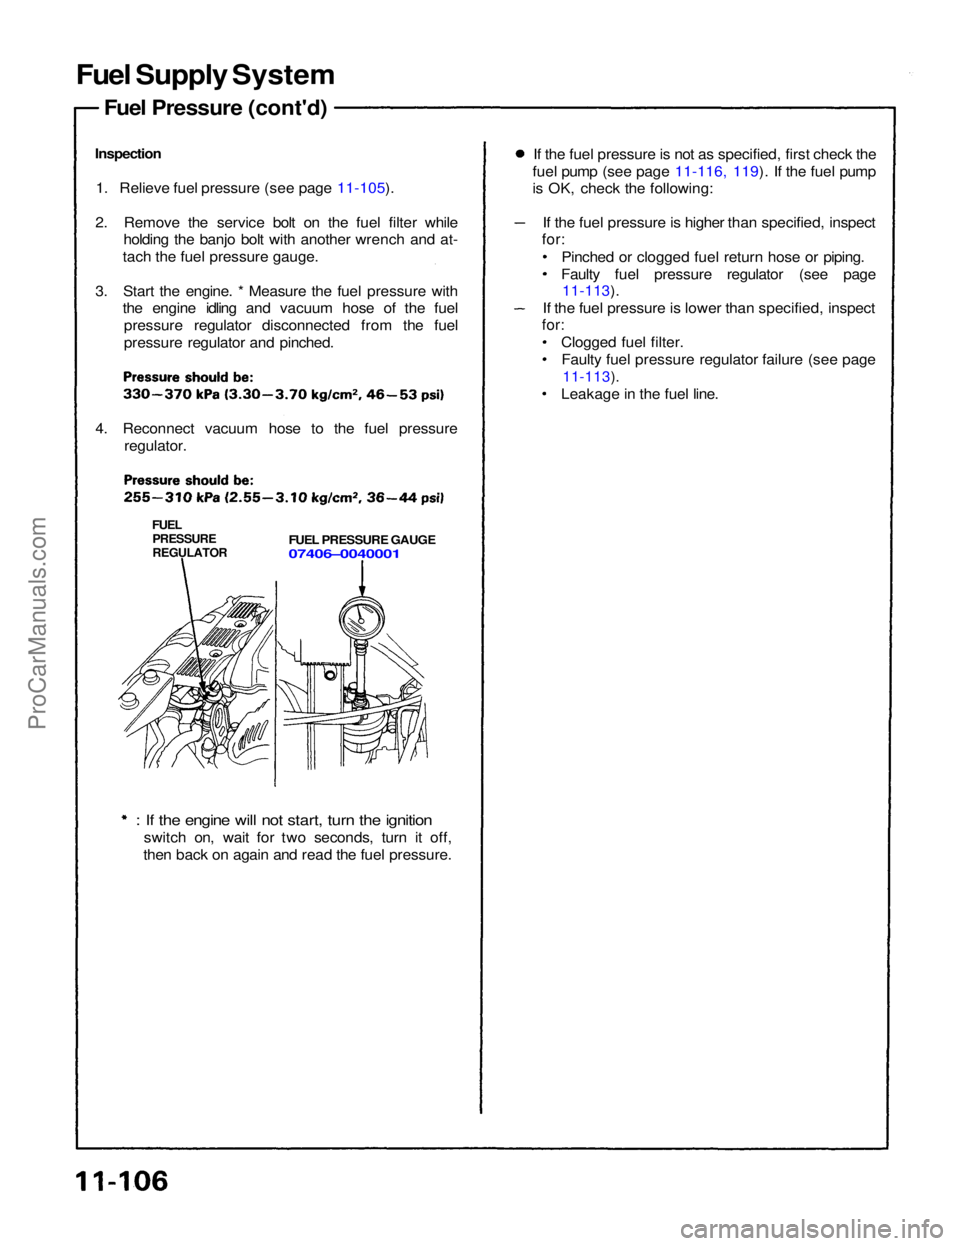
Inspection 1. Relieve fuel pressure (see page 11-105).
2. Remove the service bolt on the fuel filter while holding the banjo bolt with another wrench and at-
tach the fuel pressure gauge.
3. Start the engine. * Measure the fuel pressure with the engine idling and vacuum hose of the fuel
pressure regulator disconnected from the fuel
pressure regulator and pinched.
4. Reconnect vacuum hose to the fuel pressure regulator.
FUEL
PRESSURE
REGULATOR
FUEL PRESSURE GAUGE
07406–0040001
: If the engine will not start, turn the ignition
switch on, wait for two seconds, turn it off,
then back on again and read the fuel pressure. If the fuel pressure is not as specified, first check the
fuel pump (see page 11-116, 119). If the fuel pump
is OK, check the following:
If the fuel pressure is higher than specified, inspect
for:
Pinched or clogged fuel return hose or piping.
Faulty fuel pressure regulator (see page
11-113).
If the fuel pressure is lower than specified, inspect
for:
Clogged fuel filter.Faulty fuel pressure regulator failure (see page
11-113).
Leakage in the fuel line.ProCarManuals.com