ACURA NSX 1991 Service Repair Manual
Manufacturer: ACURA, Model Year: 1991, Model line: NSX, Model: ACURA NSX 1991Pages: 1640, PDF Size: 60.48 MB
Page 1071 of 1640
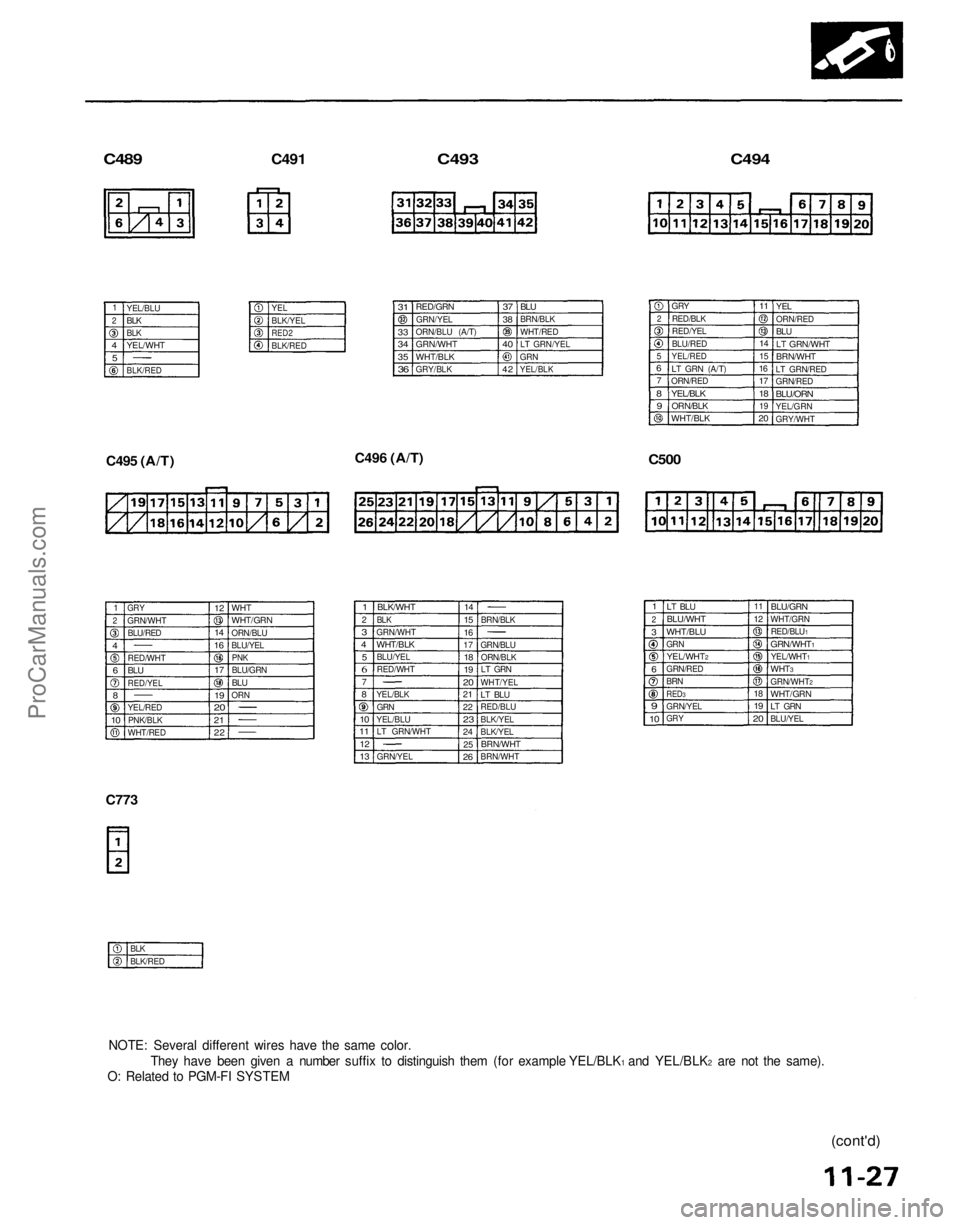
C489
C491
C493
C494
C495
(A/T)
C496 (A/T)
C500
C773
1
2
4
5
YEL/BLU
BLK
BLK
YEL/WHT
BLK/RED
YEL
BLK/YEL
RED2
BLK/RED
31
33
34
35
36
RED/GRN
GRN/YEL
ORN/BLU (A/T)
GRN/WHT
WHT/BLK
GRY/BLK
37
38
40
42
BLU
BRN/BLK
WHT/RED
LT GRN/YEL
GRN
YEL/BLK
2
5
6
7
8
9
GRY
RED/BLK
RED/YEL
BLU/RED
YEL/RED
LT GRN
(A/T)
ORN/RED
YEL/BLK
ORN/BLK
WHT/BLK
11
14
15
16
17
18
19
20
YEL
ORN/RED
BLU
LT GRN/WHT
BRN/WHT
LT GRN/RED
GRN/RED
BLU/ORN
YEL/GRN
GRY/WHT
1
2
4
6
8
10
GRY
GRN/WHT
BLU/RED
RED/WHT
BLU
RED/YEL
YEL/RED
PNK/BLK
WHT/RED
12
14
16
17
19
20
21
22
WHT
WHT/GRN
ORN/BLU
BLU/YEL
PNK
BLU/GRN
BLU
ORN
1
2
3
4
5
6
7
8
10
11
12
13
BLK/WHT
BLK
GRN/WHT
WHT/BLK
BLU/YEL
RED/WHT
YEL/BLK
GRN
YEL/BLU LT GRN/WHT
GRN/YEL
14
15
16
17
18
19
20
21
22
23
24
25
26
BRN/BLK
GRN/BLU ORN/BLK
LT GRN
WHT/YEL
LT BLU
RED/BLU
BLK/YEL
BLK/YEL
BRN/WHT
BRN/WHT
1
2
3
6
9
10
LT BLU
BLU/WHT
WHT/BLU
GRN
YEL/WHT2
GRN/RED
BRN
RED3
GRN/YEL
GRY
11
12
18
19
20
BLU/GRN
WHT/GRN RED/BLU1
GRN/WHT1
YEL/WHT1
WHT3
GRN/WHT2
WHT/GRN
LT GRN
BLU/YEL
BLK
BLK/RED
NOTE: Several different wires have the same color. They have been given a number suffix to distinguish them (for example YEL/BLK1 and YEL/BLK2 are not the same).
O: Related to PGM-FI SYSTEM
(cont'd)ProCarManuals.com
Page 1072 of 1640
![ACURA NSX 1991 Service Repair Manual System Description
System Connectors [Front Compartment and Under-dash] (cont'd)
UNDER-HOOD
FUSE/RELAY
BOX
C464
C249
C446
C425
C439
C412
FLOOR
WIRE
HARNESS
SIDE
WIRE
HARNESS
UNDER-DASH ACURA NSX 1991 Service Repair Manual System Description
System Connectors [Front Compartment and Under-dash] (cont'd)
UNDER-HOOD
FUSE/RELAY
BOX
C464
C249
C446
C425
C439
C412
FLOOR
WIRE
HARNESS
SIDE
WIRE
HARNESS
UNDER-DASH](/img/32/56988/w960_56988-1071.png)
System Description
System Connectors [Front Compartment and Under-dash] (cont'd)
UNDER-HOOD
FUSE/RELAY
BOX
C464
C249
C446
C425
C439
C412
FLOOR
WIRE
HARNESS
SIDE
WIRE
HARNESS
UNDER-DASH
FUSE
BOX
C405
C406
C404
C318
C458
C228
FRONT
COMPARTMENT
WIRE
HARNESS
SUB RELAY
BOX AProCarManuals.com
Page 1073 of 1640
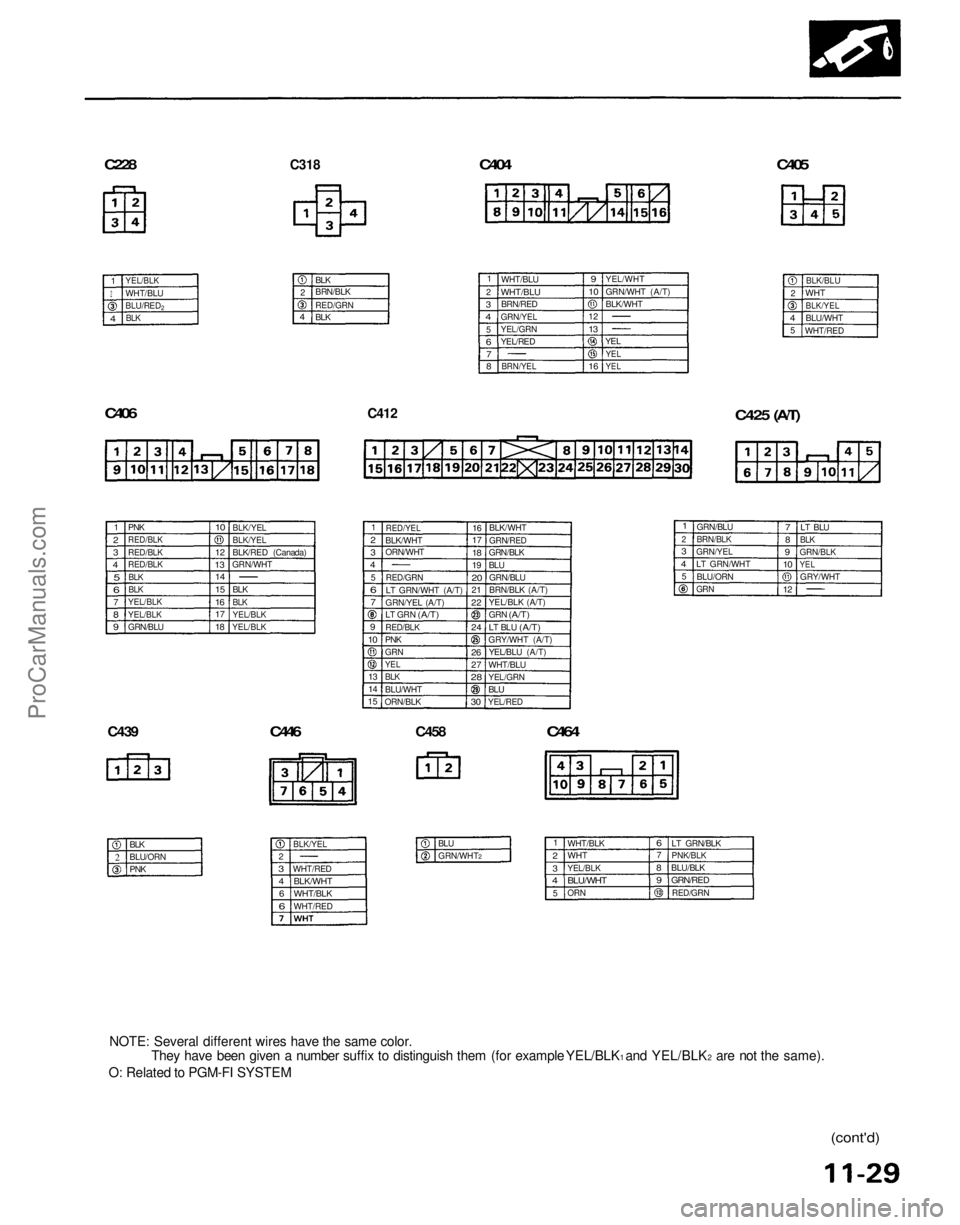
C228
C318
C404
C405
C406
C412
C425 (A/T)
C439
C446
C458
C464
NOTE: Several different wires have the same color.
They have been given a number suffix to distinguish them (for example YEL/BLK1 and YEL/BLK2 are not the same).
O: Related to PGM-FI SYSTEM
(cont'd)
1
2
4
YEL/BLK
WHT/BLU
BLU/RED
2
BLK
2
4
BLK
BRN/BLK
RED/GRN
BLK
1
2
3
4
5
6
7
8
WHT/BLU
WHT/BLU
BRN/RED
GRN/YEL
YEL/GRN
YEL/RED
BRN/YEL
9
10
12
13
16
YEL/WHT
GRN/WHT (A/T)
BLK/WHT
YEL
YEL
YEL
2
4
5
BLK/BLU
WHT
BLK/YEL
BLU/WHT
WHT/RED
1
2
3
4
PNK
RED/BLK
RED/BLK
RED/BLK
5
BLK
6
BLK
7
YEL/BLK
8
9
YEL/BLK
GRN/BLU
10
12
13
14
15
16
17
18
BLK/YEL
BLK/YEL
BLK/RED (Canada)
GRN/WHT
BLK
BLK
YEL/BLK
YEL/BLK
1
2
3
4
5
6
7
9
10
13
14
15
RED/YEL
BLK/WHT
ORN/WHT
RED/GRN
LT GRN/WHT (A/T)
GRN/YEL (A/T)
LT GRN
(A/T)
RED/BLK
PNK
GRN
YEL
BLK
BLU/WHT
ORN/BLK
16
17
18
19
20
21
22
24
26
27
28
30
BLK/WHT
GRN/RED
GRN/BLK
BLU
GRN/BLU
BRN/BLK (A/T)
YEL/BLK (A/T)
GRN
(A/T)
LT BLU
(A/T)
GRY/WHT (A/T) YEL/BLU (A/T)
WHT/BLU
YEL/GRN
BLU
YEL/RED
2
BLK
BLU/ORN
PNK
2
3
4
6
6
BLK/YEL
WHT/RED
BLK/WHT
WHT/BLK
WHT/RED
BLU
GRN/WHT2
1
2
3
4
5
WHT/BLK
WHT
YEL/BLK
BLU/WHT
ORN
6
7
8
9
LT GRN/BLK
PNK/BLK
BLU/BLK
GRN/RED
RED/GRN
1
2
3
4
5
GRN/BLU
BRN/BLK
GRN/YEL
LT GRN/WHT
BLU/ORN
GRN
7
8
9
10
12
LT BLU
BLK
GRN/BLK
YEL
GRY/WHTProCarManuals.com
Page 1074 of 1640
![ACURA NSX 1991 Service Repair Manual
System Description
System Connectors [Front Compartment and Under-dash] (cont'd)
C468
C244
C469
C245
FLOOR
WIRE
HARNESS
C523
C408
C524
C407
C521
C522
UNDER-DASH
FUSE
BOX
SIDE
WIRE
H ACURA NSX 1991 Service Repair Manual
System Description
System Connectors [Front Compartment and Under-dash] (cont'd)
C468
C244
C469
C245
FLOOR
WIRE
HARNESS
C523
C408
C524
C407
C521
C522
UNDER-DASH
FUSE
BOX
SIDE
WIRE
H](/img/32/56988/w960_56988-1073.png)
System Description
System Connectors [Front Compartment and Under-dash] (cont'd)
C468
C244
C469
C245
FLOOR
WIRE
HARNESS
C523
C408
C524
C407
C521
C522
UNDER-DASH
FUSE
BOX
SIDE
WIRE
HARNESS
FRONT
COMPARTMENT
WIRE HARNESS
UNDER-HOOD
FUSE/RELAY
BOXProCarManuals.com
Page 1075 of 1640
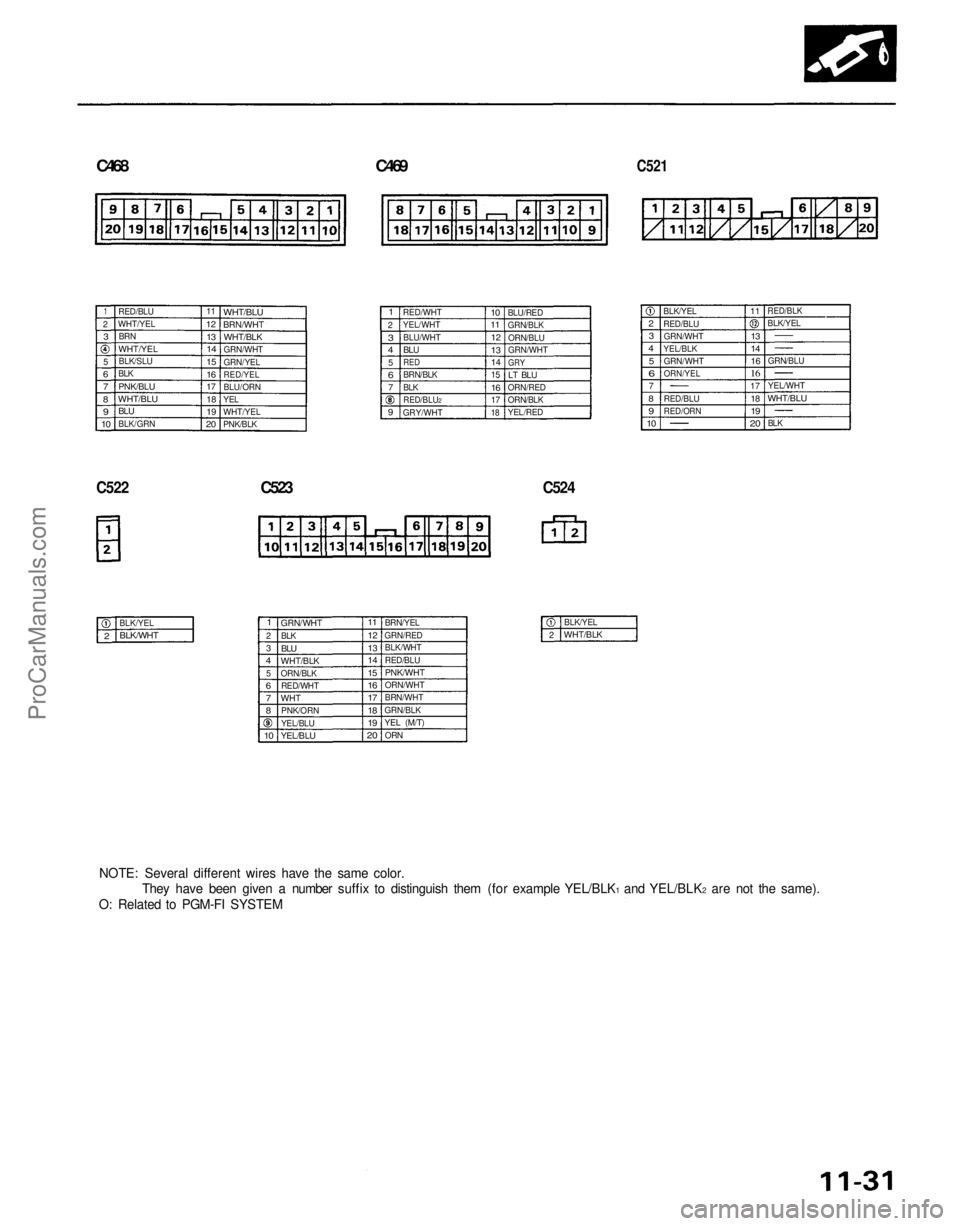
C468
C469
C521
C522
C523
C524
NOTE: Several different wires have the same color.
They have been given a number suffix to distinguish them (for example YEL/BLK1 and YEL/BLK2 are not the same).
O: Related to PGM-FI SYSTEM
1
2
3
5
6
7
8
9
10
RED/BLU
WHT/YEL
BRN
WHT/YEL
BLK/SLU
BLK
PNK/BLU
WHT/BLU
BLU
BLK/GRN
11
12
13
14
15
16
17
18
19
20
WHT/BLU
BRN/WHT
WHT/BLK
GRN/WHT
GRN/YEL
RED/YEL
BLU/ORN
YEL
WHT/YEL
PNK/BLK
1
2
3
4
5
6
7
9
RED/WHT
YEL/WHT
BLU/WHT
BLU
RED
BRN/BLK
BLK
RED/BLU2
GRY/WHT
10
11
12
13
14
15
16
17
18
BLU/RED
GRN/BLK
ORN/BLU
GRN/WHT
GRY
LT BLU
ORN/RED
ORN/BLK
YEL/RED
2
3
4
5
6
7
8
9
10
BLK/YEL
RED/BLU
GRN/WHT
YEL/BLK GRN/WHT
ORN/YEL
RED/BLU
RED/ORN
11
13
14
16
16
17
18
19
20
RED/BLK
BLK/YEL
GRN/BLU
YEL/WHT
WHT/BLU
BLK
2
BLK/YEL
BLK/WHT
1
2
3
4
5
6
7
8
10
GRN/WHT
BLK
BLU
WHT/BLK
ORN/BLK RED/WHT
WHT
PNK/ORN
YEL/BLU
YEL/BLU
11
12
13
14
15
16
17
18
19
20
BRN/YEL
GRN/RED BLK/WHT
RED/BLU
PNK/WHT
ORN/WHT
BRN/WHT
GRN/BLK
YEL
(M/T)
ORN
2
BLK/YEL
WHT/BLKProCarManuals.com
Page 1076 of 1640
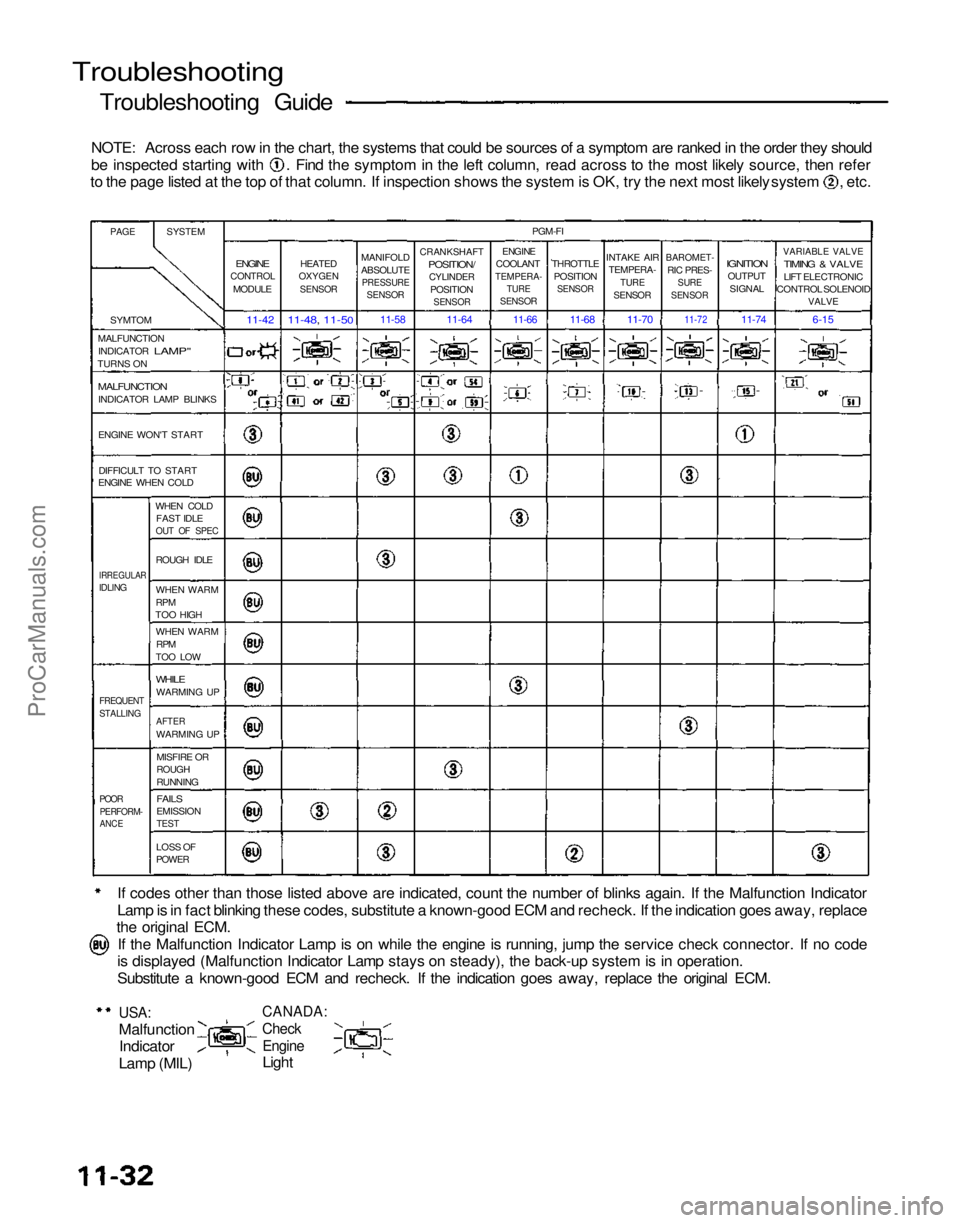
Troubleshooting
Troubleshooting Guide
NOTE: Across each row in the chart, the systems that could be sources of a symptom are ranked in the order they should be inspected starting with . Find the symptom in the left column, read across to the most likely source, then refer
to the page listed at the top of that column. If inspection shows the system is OK, try the next most likely system , etc.
If codes other than those listed above are indicated, count the number of blinks again. If the Malfunction Indicator
Lamp is in fact blinking these codes, substitute a known-good ECM and recheck. If the indication goes away, replace
the original ECM.
If the Malfunction Indicator Lamp is on while the engine is running, jump the service check connector. If no code
is displayed (Malfunction Indicator Lamp stays on steady), the back-up system is in operation.
Substitute a known-good ECM and recheck. If the indication goes away, replace the original ECM.
USA:
Malfunction
Indicator
Lamp (MIL)
CANADA:
Check
Engine
Light
PAGE
SYSTEM
SYMTOM
MALFUNCTION INDICATOR
LAMP"
TURNS ON
MALFUNCTION
INDICATOR LAMP BLINKS
ENGINE WON'T START
DIFFICULT TO START
ENGINE WHEN COLD
WHEN COLDFAST IDLE
OUT OF SPEC
IRREGULAR
IDLING
ROUGH IDLE
WHEN WARM
RPM
TOO HIGH
WHEN WARM
RPM
TOO LOW
WHILE
WARMING UP
FREQUENT
STALLING
AFTER
WARMING UP
MISFIRE OR
ROUGH
RUNNING
POOR
PERFORM-
ANCE
FAILS
EMISSION
TEST
LOSS OF
POWER
ENGINE
CONTROL
MODULE
11-42
HEATED
OXYGEN
SENSOR
11-48, 11-50
MANIFOLD
ABSOLUTE
PRESSURE
SENSOR
11-58
CRANKSHAFT
POSITION/
CYLINDER
POSITION
SENSOR
11-64
PGM-FI
ENGINE
COOLANT
TEMPERA-
TURE
SENSOR
THROTTLE
POSITION
SENSOR
INTAKE AIR
TEMPERA-
TURE
SENSOR
BAROMET-
RIC PRES-
SURE
SENSOR
IGNITION
OUTPUT
SIGNAL
VARIABLE VALVE
TIMING & VALVE
LIFT ELECTRONIC
CONTROL SOLENOID
VALVE
6-15
11-74
11-72
11-70
11-68
11-66
ProCarManuals.com
Page 1077 of 1640
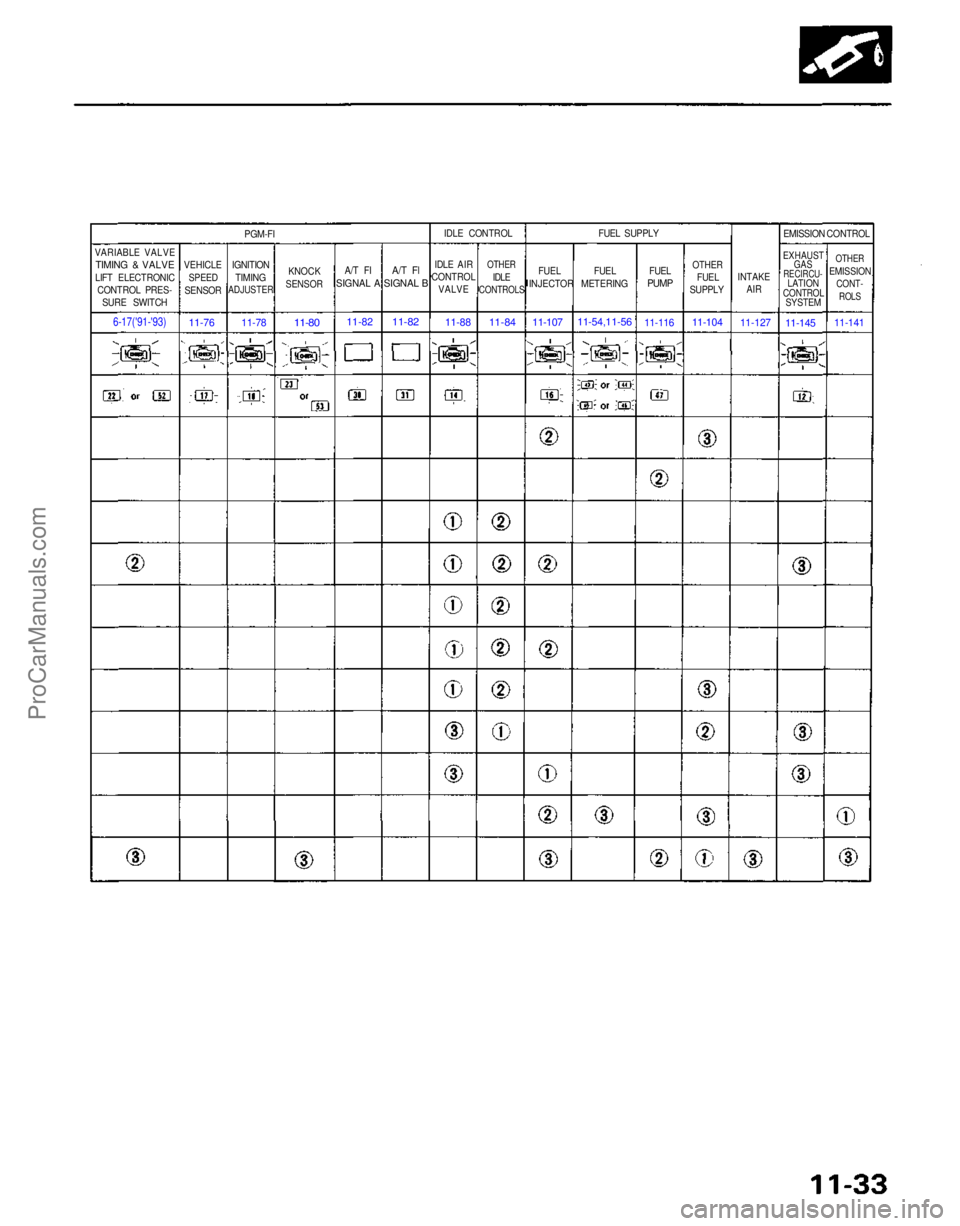
PGM-FI
VARIABLE VALVE
TIMING & VALVE
LIFT ELECTRONIC CONTROL PRES- SURE SWITCH VEHICLE
SPEED
SENSOR IGNITION
TIMING
ADJUSTER
KNOCK
SENSOR
A/T FI
SIGNAL A
A/T Fl
SIGNAL B
IDLE AIR
CONTROL VALVE
OTHER
IDLE
CONTROLS
FUEL
INJECTOR
FUEL
METERING
OTHER
FUEL
SUPPLY INTAKE
AIR
EXHAUST
GAS
RECIRCU-
LATION
CONTROL
SYSTEM
EMISSION CONTROL
OTHER
EMISSION
CONT-
ROLS
11-141
11-145
11-127
11-104
11-116
11-54,11-56
11-107
11-84
11-88
11-82
11-82
11-80
11-78
11-76
6-17('91-'93)
IDLE CONTROL
FUEL SUPPLY
FUEL
PUMPProCarManuals.com
Page 1078 of 1640
Troubleshooting
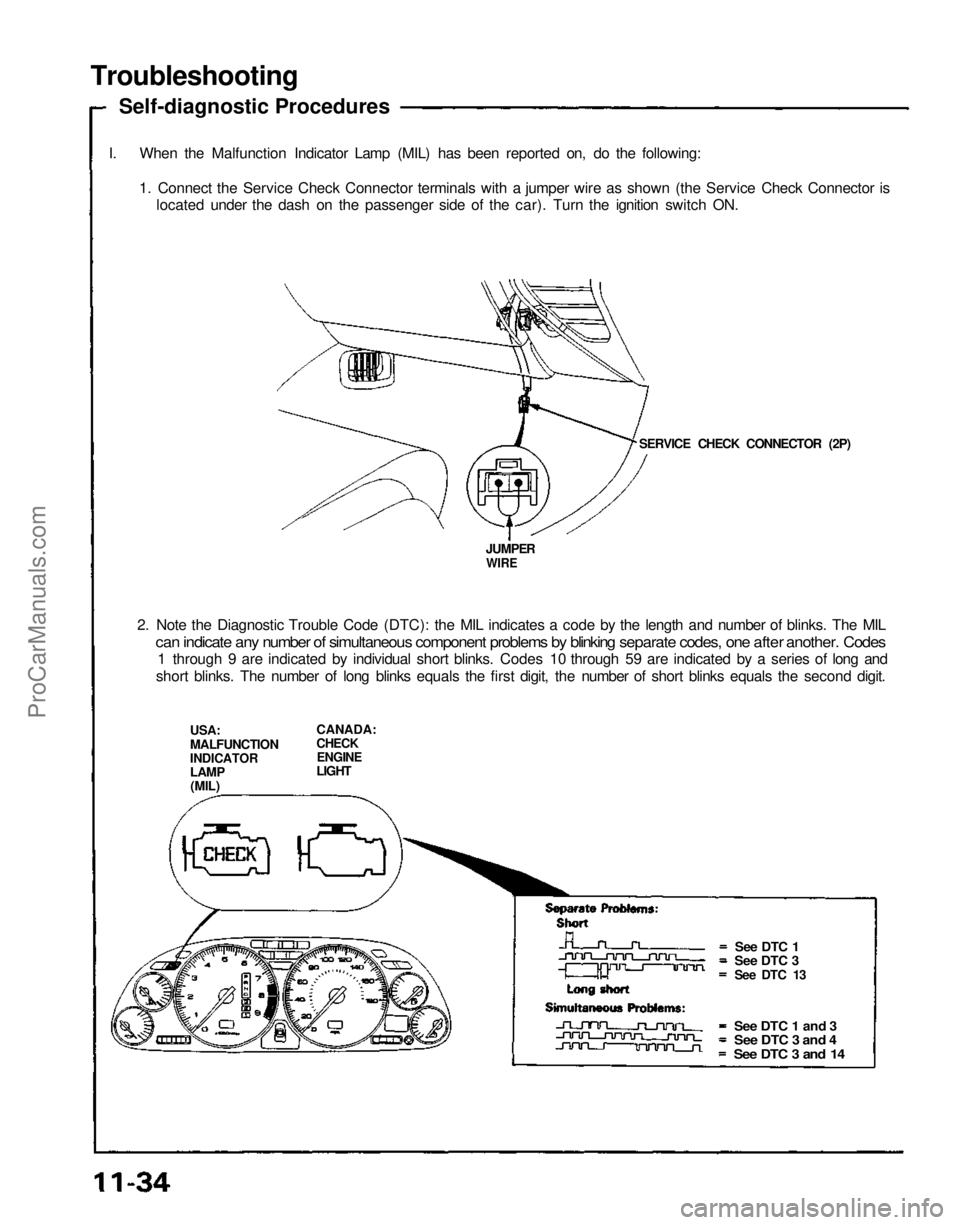
Self-diagnostic Procedures
I. When the Malfunction Indicator Lamp (MIL) has been reported on, do the following: 1. Connect the Service Check Connector terminals with a jumper wire as shown (the Service Check Connector islocated under the dash on the passenger side of the car). Turn the ignition switch ON.
SERVICE CHECK CONNECTOR (2P)
JUMPER
WIRE
2. Note the Diagnostic Trouble Code (DTC): the MIL indicates a code by the length and number of blinks. The MIL
can indicate any number of simultaneous component problems by blinking separate codes, one after another. Codes
1 through 9 are indicated by individual short blinks. Codes 10 through 59 are indicated by a series of long and
short blinks. The number of long blinks equals the first digit, the number of short blinks equals the second digit.
USA:
MALFUNCTION
INDICATOR
LAMP
(MIL) CANADA:
CHECK
ENGINE
LIGHT
See DTC 1
See DTC 3
See DTC 13
See DTC 1 and 3
See DTC 3 and 4
See DTC 3 and 14ProCarManuals.com
Page 1079 of 1640

II. ENGINE CONTROL MODULE (ECM) Reset Procedure
1. Turn the ignition switch off.
2. Remove the CLOCK (7.5 A) fuse from the under-hood fuse/relay box for 10 seconds to reset ECM.
NOTE: Disconnecting the CLOCK fuse also cancels the radio preset stations and the clock setting. Make note of
the radio presets before removing the fuse so you can reset them.
III. Final Procedure (this procedure must be done after any troubleshooting)
1. Remove the Jumper Wire.
NOTE: If the Service Check Connector is jumped, the MIL will stay on.
2. Do the ECM Reset Procedure.
3. Set the radio preset stations and the clock setting.
(cont'd)
CLOCK
(7.5 A) FUSE
UNDER-HOOD
FUSE/RELAY BOXProCarManuals.com
Page 1080 of 1640
Troubleshooting
Self-diagnostic Procedures (cont'd)
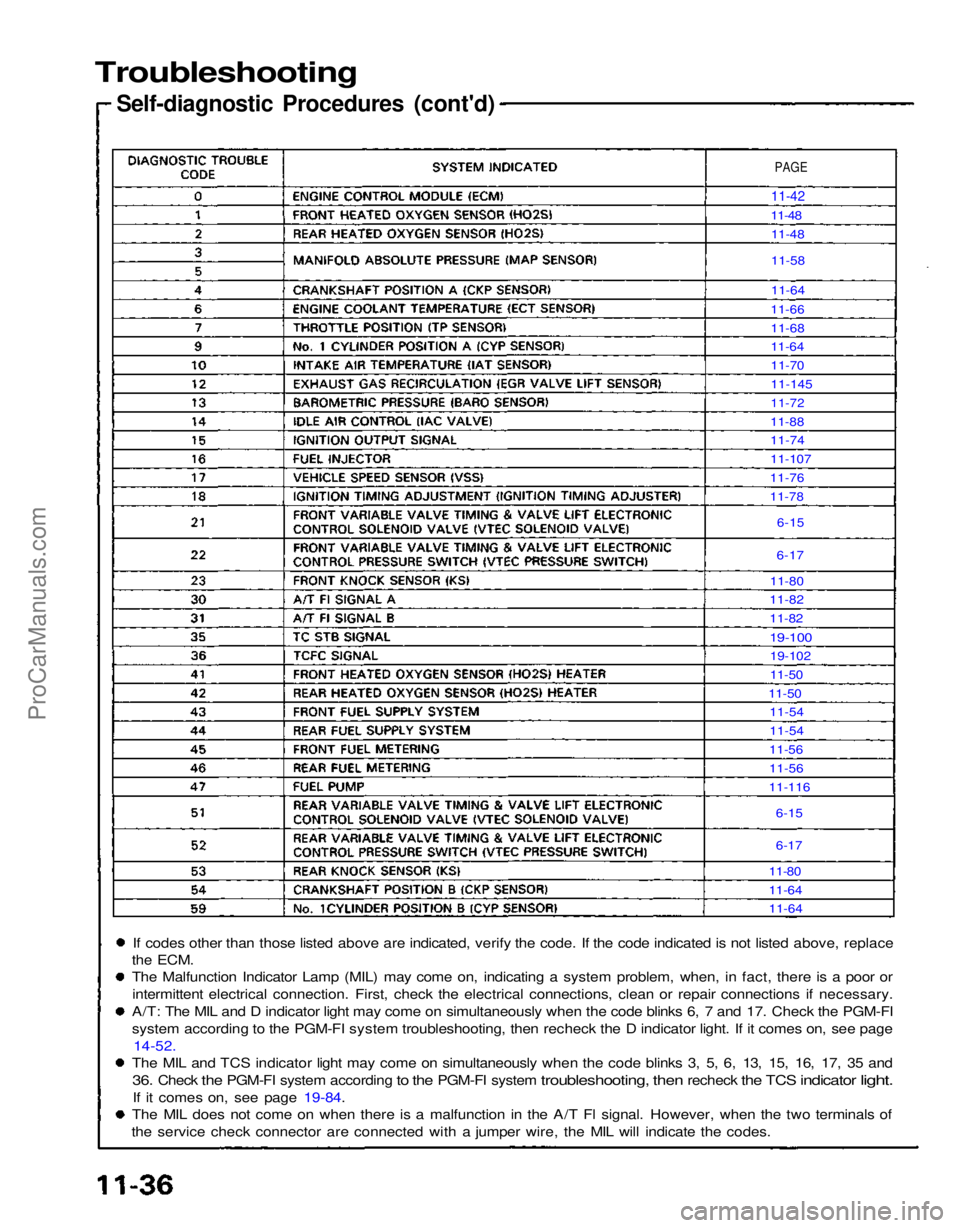
If codes other than those listed above are indicated, verify the code. If the code indicated is not listed above, replace
the
ECM.
The Malfunction Indicator Lamp (MIL) may come on, indicating a system problem, when, in fact, there is a poor or
intermittent electrical connection. First, check the electrical connections, clean or repair connections if necessary.
A/T: The MIL and D indicator light may come on simultaneously when the code blinks 6, 7 and 17. Check the PGM-FI
system according to the PGM-FI system troubleshooting, then recheck the D indicator light. If it comes on, see page 14-52.
The MIL and TCS indicator light may come on simultaneously when the code blinks 3, 5, 6, 13, 15, 16, 17, 35 and
36.
Check
the
PGM-FI system according
to the
PGM-FI system
troubleshooting,
then
recheck
the TCS
indicator
light.
If it comes on, see page 19-84.
The MIL does not come on when there is a malfunction in the A/T Fl signal. However, when the two terminals of
the service check connector are connected with a jumper wire, the MIL will indicate the codes.
PAGE
11-42
11-48 11-48
11-58
11-64
11-66
11-68
11-64
11-70
11-145
11-72
11-88
11-74
11-107
11-76
11-78
6-15
6-17
11-80
11-82
11-82
19-100
19-102
11-50
11-50 11-54
11-54
11-56
11-56
11-116
6-15
6-17
11-80
11-64
11-64ProCarManuals.com