ACURA NSX 1991 Service Repair Manual
Manufacturer: ACURA, Model Year: 1991, Model line: NSX, Model: ACURA NSX 1991Pages: 1640, PDF Size: 60.48 MB
Page 341 of 1640
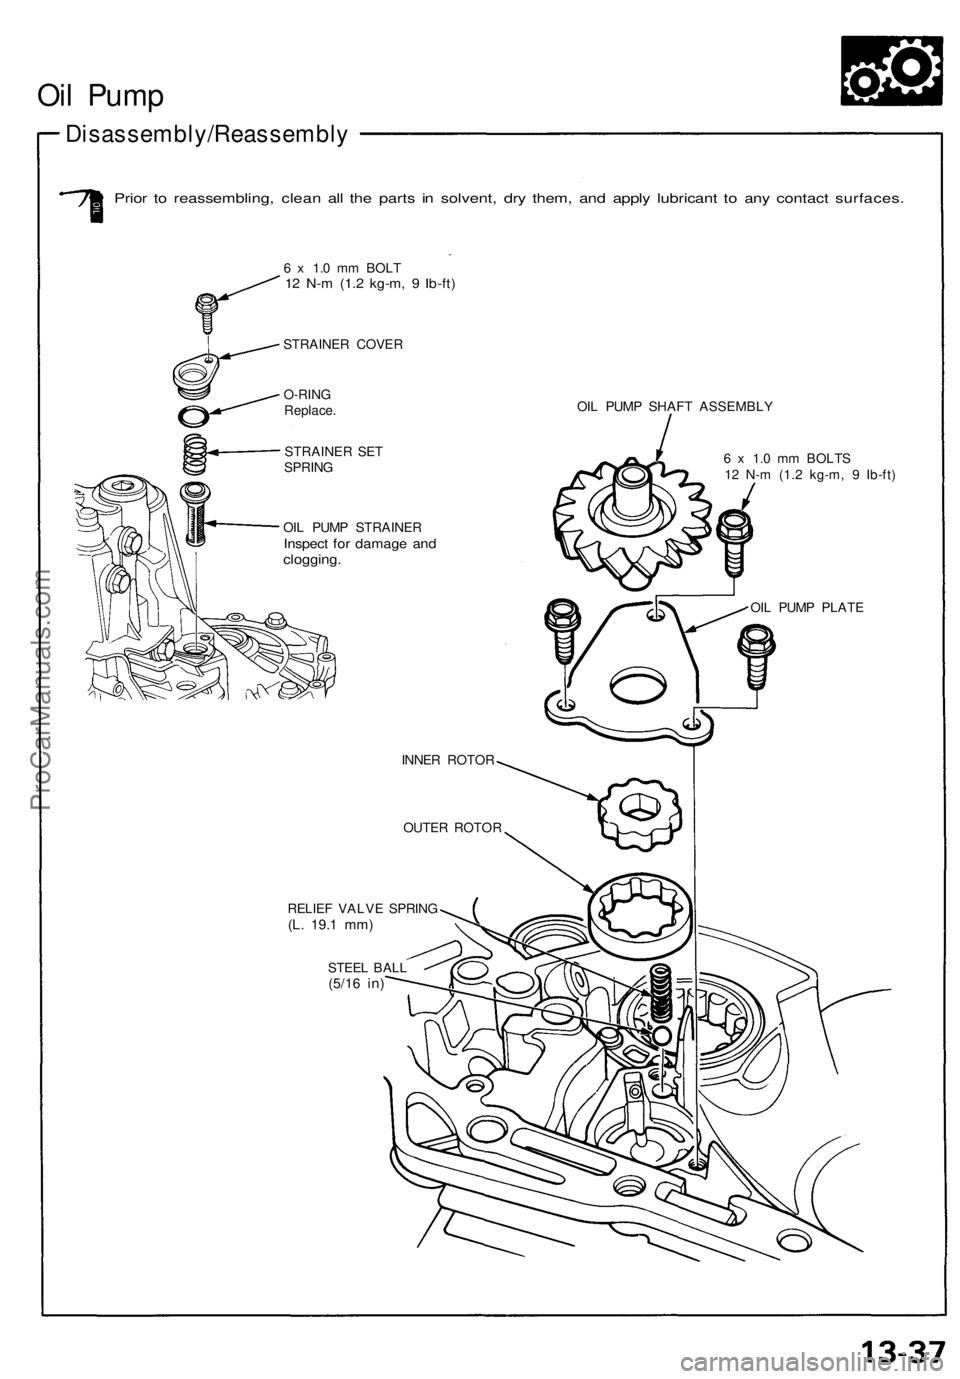
Oil Pump
Disassembly/Reassembly
Prior to reassembling, clean all the parts in solvent, dry them, and apply lubricant to any contact surfaces.
6 x 1.0 mm BOLT
12 N-m (1.2 kg-m, 9 Ib-ft)
STRAINER COVER
O-RING
Replace.
STRAINER SET
SPRING
OIL PUMP STRAINER
Inspect for damage and
clogging.
OIL PUMP SHAFT ASSEMBLY
6 x 1.0 mm BOLTS
12 N-m (1.2 kg-m, 9 Ib-ft)
INNER ROTOR
OUTER ROTOR
RELIEF VALVE SPRING
(L.
19.1
mm)
STEEL BALL
(5/16
in)
OIL PUMP PLATEProCarManuals.com
Page 342 of 1640
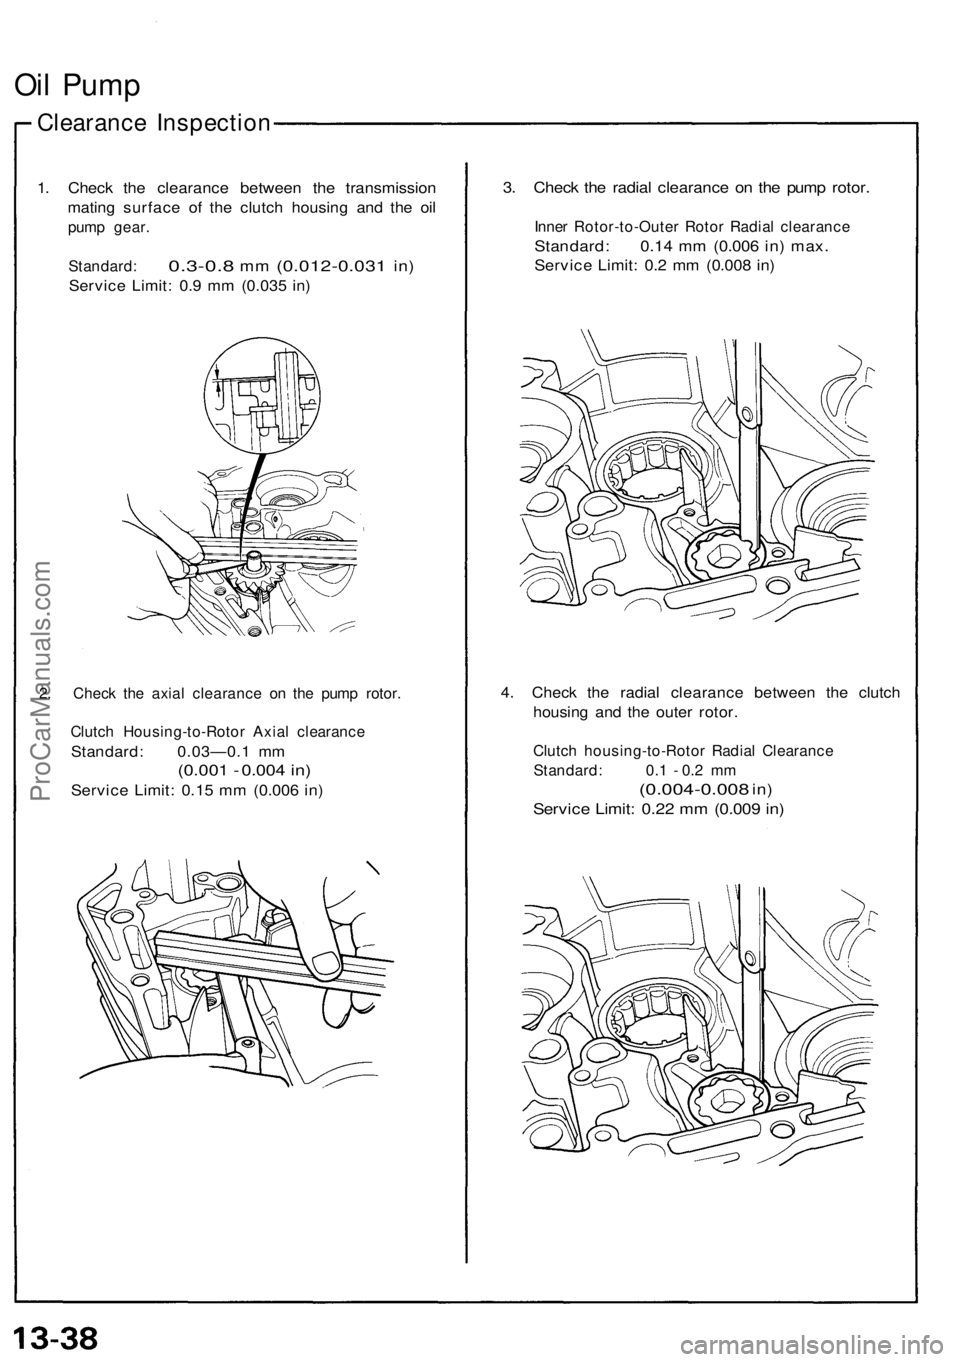
Oil Pump
Clearance Inspection
1. Check the clearance between the transmission
mating surface of the clutch housing and the oil
pump gear.
Standard:
0.3-0.8
mm
(0.012-0.031
in)
Service Limit: 0.9 mm (0.035 in)
2. Check the axial clearance on the pump rotor.
Clutch Housing-to-Rotor Axial clearance
Standard: 0.03—0.1 mm
(0.001 - 0.004 in)
Service Limit: 0.15 mm (0.006 in)
3. Check the radial clearance on the pump rotor.
Inner Rotor-to-Outer Rotor Radial clearance
Standard: 0.14 mm (0.006 in) max.
Service Limit: 0.2 mm (0.008 in)
4. Check the radial clearance between the clutch
housing and the outer rotor.
Clutch housing-to-Rotor Radial Clearance
Standard: 0.1 - 0.2 mm
(0.004-0.008
in)
Service Limit: 0.22 mm (0.009 in)ProCarManuals.com
Page 343 of 1640
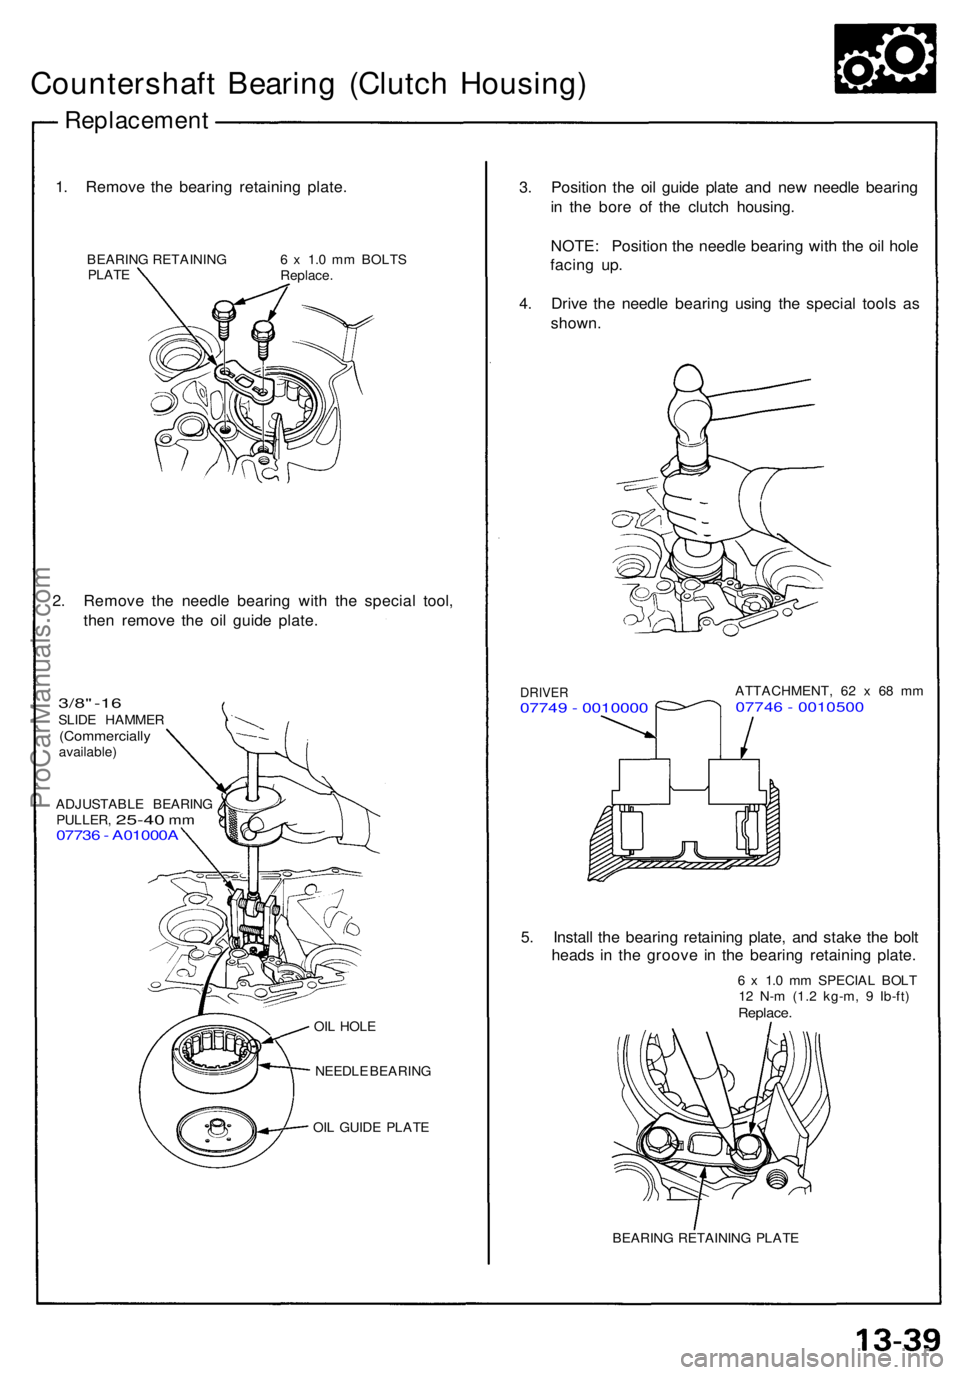
Countershaft Bearin g (Clutc h Housing )
Replacemen t
1. Remov e th e bearin g retainin g plate .
BEARIN G RETAININ G
PLAT E 6
x 1. 0 m m BOLT S
Replace .
2. Remov e th e needl e bearin g wit h th e specia l tool ,
the n remov e th e oi l guid e plate .
3/8"-1 6SLIDE HAMME R(Commerciall yavailable)
ADJUSTABL E BEARIN G
PULLER ,
25-40 mm0773 6 - A01000 A
OIL HOL E
NEEDL E BEARIN G
OI L GUID E PLAT E
3. Positio n th e oi l guid e plat e an d ne w needl e bearin g
i n th e bor e o f th e clutc h housing .
NOTE : Positio n th e needl e bearin g wit h th e oi l hol e
facin g up .
4 . Driv e th e needl e bearin g usin g th e specia l tool s a s
shown .
DRIVE R07749 - 001000 0ATTACHMENT, 6 2 x 68 m m07746 - 001050 0
5. Instal l th e bearin g retainin g plate , an d stak e th e bol t
head s i n th e groov e i n th e bearin g retainin g plate .
6 x 1. 0 m m SPECIA L BOL T
1 2 N- m (1. 2 kg-m , 9 Ib-ft )
Replace .
BEARIN G RETAININ G PLAT E
ProCarManuals.com
Page 344 of 1640
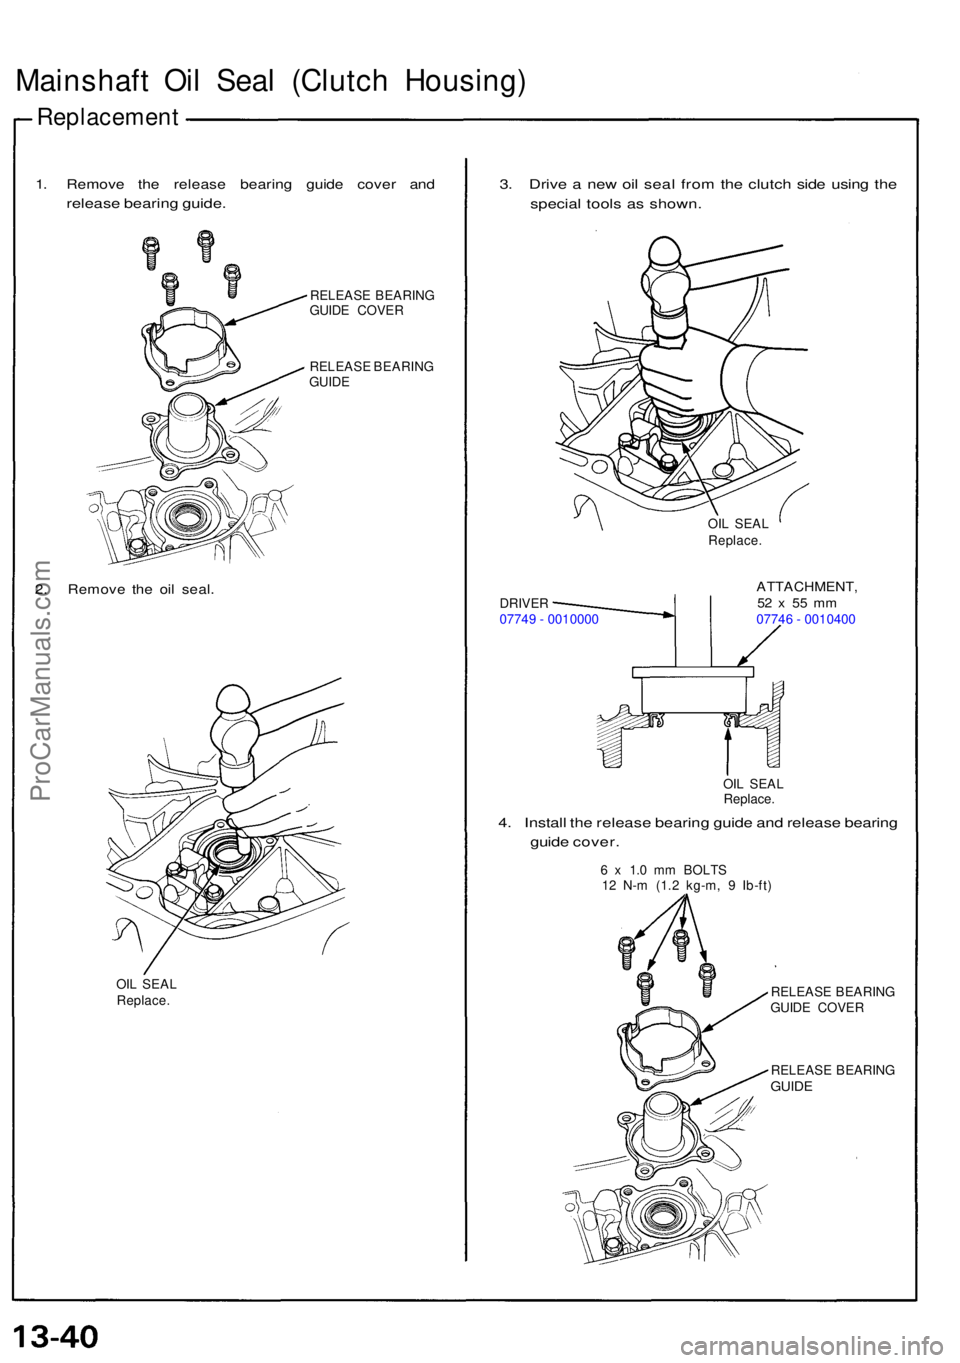
Mainshaft Oi l Sea l (Clutc h Housing )
Replacemen t
1. Remov e th e releas e bearin g guid e cove r an d
releas e bearin g guide .
RELEAS E BEARIN G
GUID E COVE R
RELEAS E BEARIN G
GUID E
2. Remov e th e oi l seal .
OIL SEA L
Replace .
3. Driv e a ne w oi l sea l fro m th e clutc h sid e usin g th e
specia l tool s a s shown .
OIL SEA L
Replace .
DRIVE R
07749 - 0010000
ATTACHMENT ,52 x 5 5 m m07746 - 0010400
OI L SEA L
Replace .
4. Instal l th e releas e bearin g guid e an d releas e bearin g
guid e cover .
6 x 1. 0 m m BOLT S
1 2 N- m (1. 2 kg-m , 9 Ib-ft )
RELEAS E BEARIN G
GUID E COVE R
RELEAS E BEARIN G
GUIDE
ProCarManuals.com
Page 345 of 1640

Mainshaft Thrust Shim
Adjustment
1. Remove the thrust shim and oil guide plate from the
transmission housing.
2. Install the mainshaft in the transmission housing.
NOTE: Do not install the clutch housing side ball
bearing.
3. Measure distance between the end of the
transmission housing and mainshaft.
NOTE:
• Use a straight edge and feeler gauge.
• Measure at three locations and average the
readings.
4. Set the mainshaft ball bearing in the clutch hous-
ing, and measure distance between the
surfaces of the clutch housing and the bearing in-
ner race.
NOTE:
• Use a straight edge and feeler gauge.
• Measure at three locations and average the
readings.
• Do not install the spring washer.
5. Select the proper thrust shim on the basis of the
following calculations.
NOTE: Do not use more than two thrust shims.
(Basic Formula)
A + B — 0.99 mm = shim thickness (max.)
A + B - 1.06 mm = shim thickness (min.)
A - C - 0.99 mm = shim thickness (max.)
A - C - 1.06 mm = shim thickness (min.)
82 mm THRUST SHIM
NOTE: Clean all the parts thoroughly before installation
6. Install the oil guide plate and thrust shim into the
transmission housing.
TRANSMISSION
HOUSING
THRUST SHIM
OIL GUIDE PLATE
13-41ProCarManuals.com
Page 346 of 1640
Mainshaft Thrus t Shi m
Adjustmen t
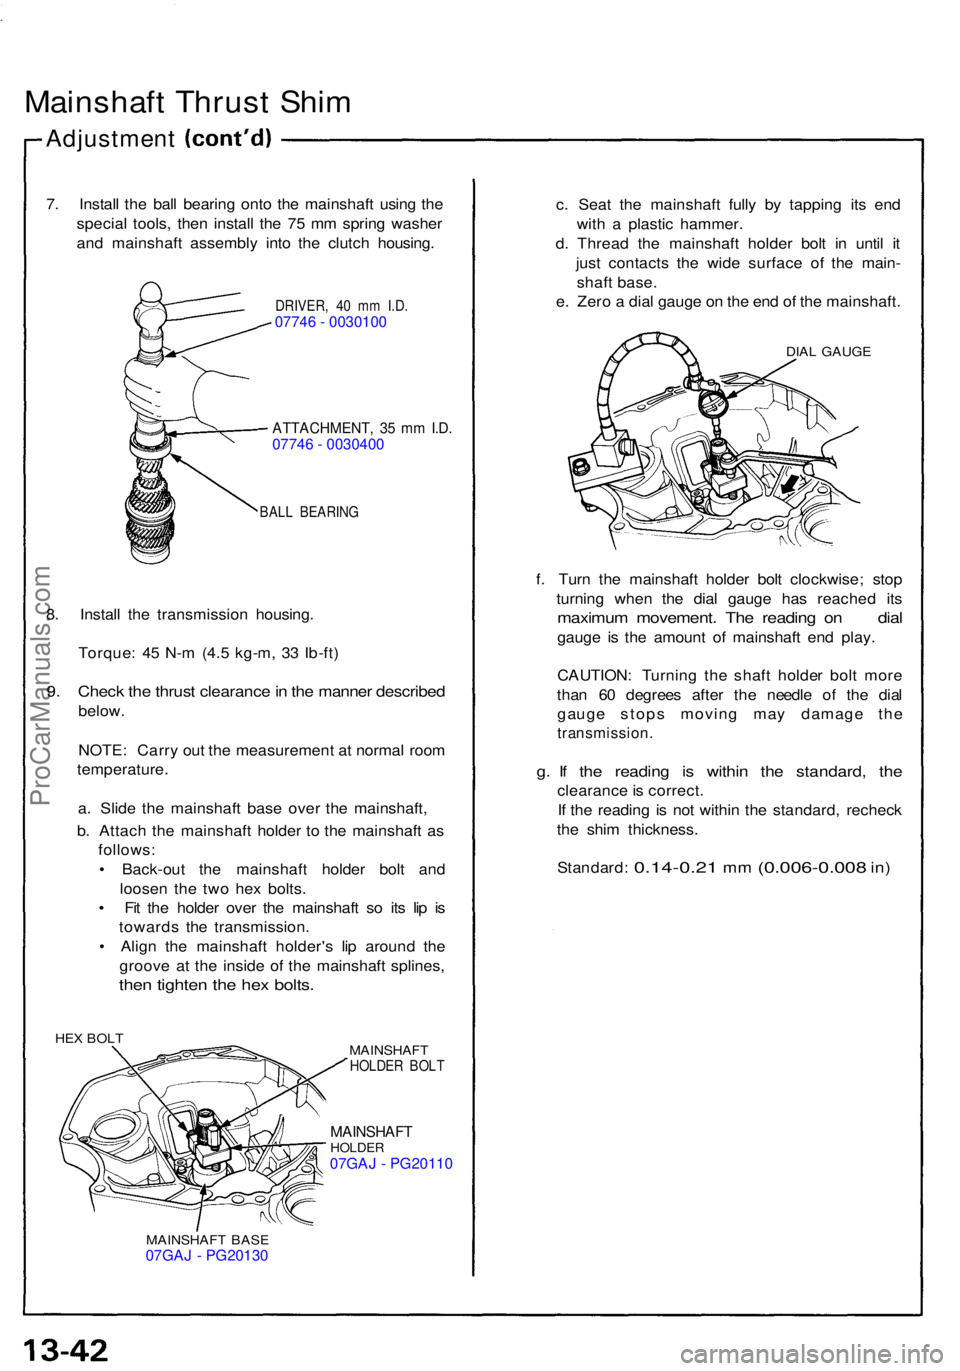
7. Instal l th e bal l bearin g ont o th e mainshaf t usin g th e
specia l tools , the n instal l th e 7 5 m m sprin g washe r
an d mainshaf t assembl y int o th e clutc h housing .
DRIVER, 4 0 m m I.D .07746 - 0030100
ATTACHMENT , 3 5 m m I.D .07746 - 0030400
BAL L BEARIN G
8. Instal l th e transmissio n housing .
Torque : 4 5 N- m (4. 5 kg-m , 3 3 Ib-ft )
9. Chec k th e thrus t clearanc e in th e manne r describe d
below.
NOTE : Carr y ou t th e measuremen t a t norma l roo m
temperature .
a . Slid e th e mainshaf t bas e ove r th e mainshaft ,
b . Attac h th e mainshaf t holde r t o th e mainshaf t a s
follows :
• Back-ou t th e mainshaf t holde r bol t an d
loose n th e tw o he x bolts .
• Fi t th e holde r ove r th e mainshaf t s o it s li p i s
toward s th e transmission .
• Alig n th e mainshaf t holder' s li p aroun d th e
groov e a t th e insid e of the mainshaf t splines ,
then tighte n th e he x bolts .
HEX BOL T
MAINSHAFT
HOLDER BOL T
MAINSHAF THOLDER07GAJ - PG20110
MAINSHAF T BAS E07GAJ - PG20130
c. Sea t th e mainshaf t full y b y tappin g it s en d
wit h a plasti c hammer .
d . Threa d th e mainshaf t holde r bol t i n unti l i t
jus t contact s th e wid e surfac e o f th e main -
shaf t base .
e . Zer o a dia l gaug e o n th e en d o f th e mainshaft .
DIAL GAUG E
f. Tur n th e mainshaf t holde r bol t clockwise ; sto p
turnin g whe n th e dia l gaug e ha s reache d it s
maximu m movement . Th e readin g o n dia l
gauge i s th e amoun t o f mainshaf t en d play .
CAUTION : Turnin g th e shaf t holde r bol t mor e
tha n 6 0 degree s afte r th e needl e o f th e dia l
gaug e stop s movin g ma y damag e th e
transmission .
g. I f th e readin g i s withi n th e standard , th e
clearanc e is correct .
I f th e readin g i s no t withi n th e standard , rechec k
th e shi m thickness .
Standard :
0.14-0.21 mm (0.006-0.00 8 in)
ProCarManuals.com
Page 347 of 1640
Transmission
Reassembly
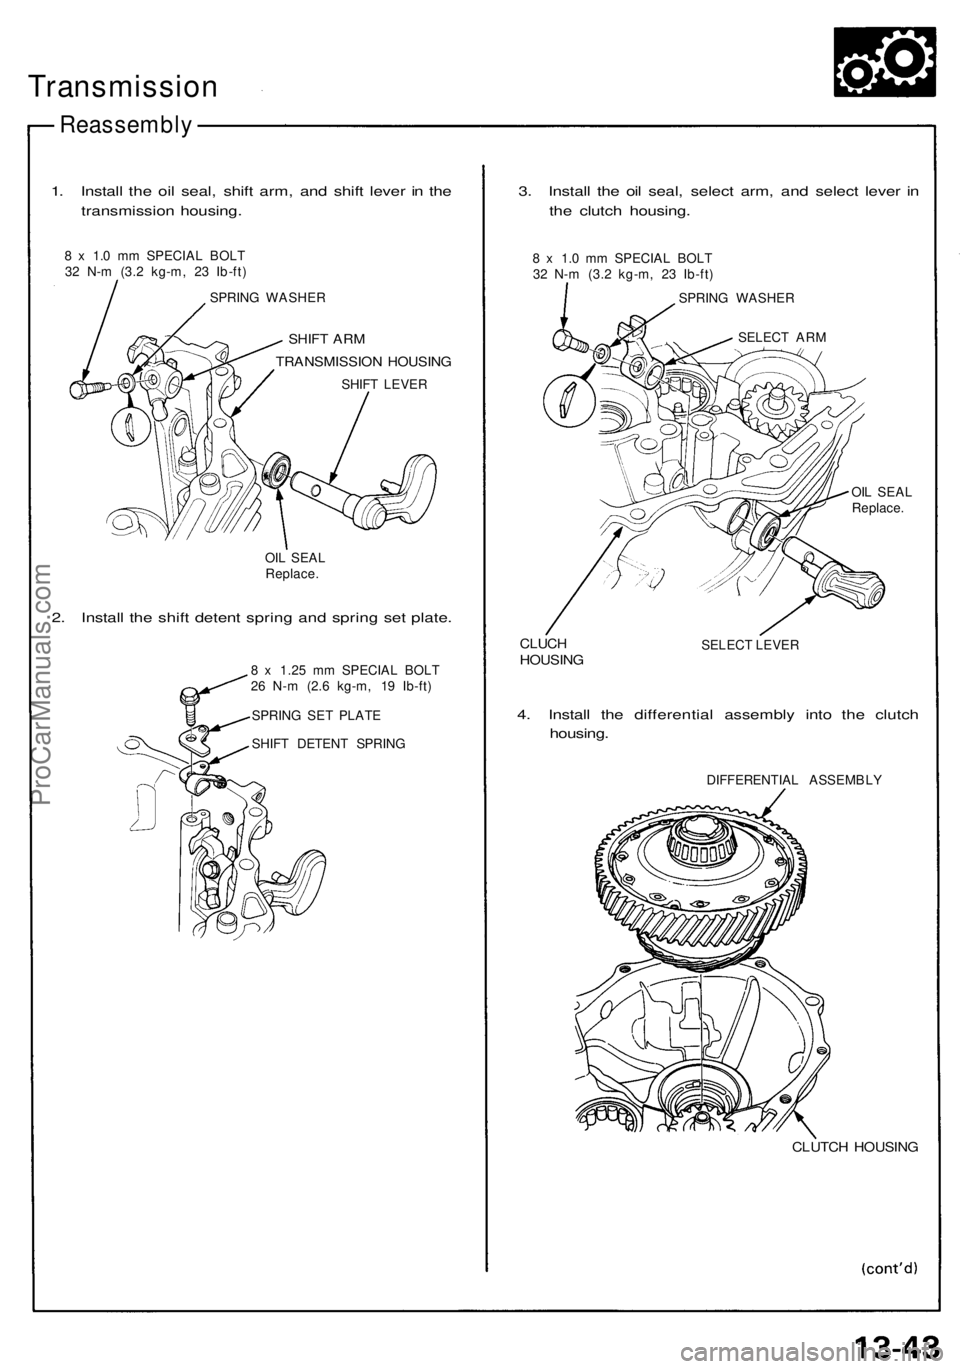
1. Install the oil seal, shift arm, and shift lever in the
transmission housing.
8 x 1.0 mm SPECIAL BOLT
32 N-m (3.2 kg-m, 23 Ib-ft)
SPRING WASHER
SHIFT ARM
TRANSMISSION HOUSING
SHIFT LEVER
OIL SEAL
Replace.
2. Install the shift detent spring and spring set plate.
8 x 1.25 mm SPECIAL BOLT
26 N-m (2.6 kg-m, 19 Ib-ft)
SPRING SET PLATE
SHIFT DETENT SPRING
3. Install the oil seal, select arm, and select lever in
the clutch housing.
8 x 1.0 mm SPECIAL BOLT
32 N-m (3.2 kg-m, 23 Ib-ft)
SPRING WASHER
SELECT ARM
OIL SEAL
Replace.
CLUCH
HOUSING
SELECT LEVER
4. Install the differential assembly into the clutch
housing.
DIFFERENTIAL ASSEMBLY
CLUTCH HOUSINGProCarManuals.com
Page 348 of 1640
Transmission
Reassembly
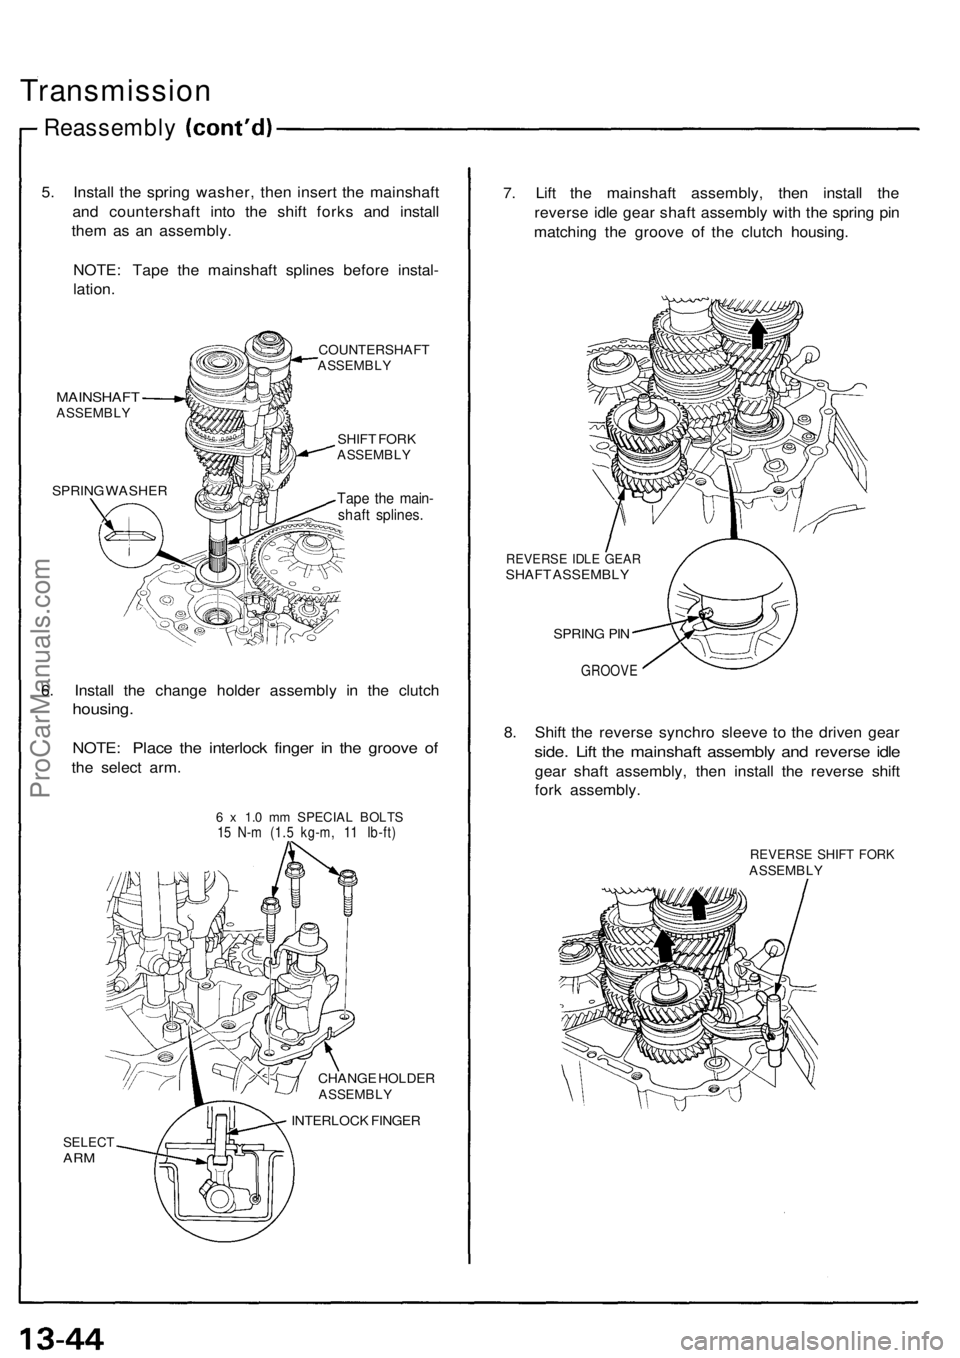
5. Install the spring washer, then insert the mainshaft
and countershaft into the shift forks and install
them as an assembly.
NOTE: Tape the mainshaft splines before instal-
lation.
COUNTERSHAFT
ASSEMBLY
MAINSHAFT
ASSEMBLY
SPRING WASHER
SHIFT FORK
ASSEMBLY
Tape the main-
shaft splines.
6. Install the change holder assembly in the clutch
housing.
NOTE: Place the interlock finger in the groove of
the select arm.
6 x 1.0 mm SPECIAL BOLTS
15 N-m (1.5 kg-m, 11 Ib-ft)
SELECT
ARM
CHANGE HOLDER
ASSEMBLY
INTERLOCK FINGER
7. Lift the mainshaft assembly, then install the
reverse idle gear shaft assembly with the spring pin
matching the groove of the clutch housing.
REVERSE IDLE GEAR
SHAFT ASSEMBLY
SPRING PIN
GROOVE
8. Shift the reverse synchro sleeve to the driven gear
side. Lift the mainshaft assembly and reverse idle
gear shaft assembly, then install the reverse shift
fork assembly.
REVERSE SHIFT FORK
ASSEMBLYProCarManuals.com
Page 349 of 1640
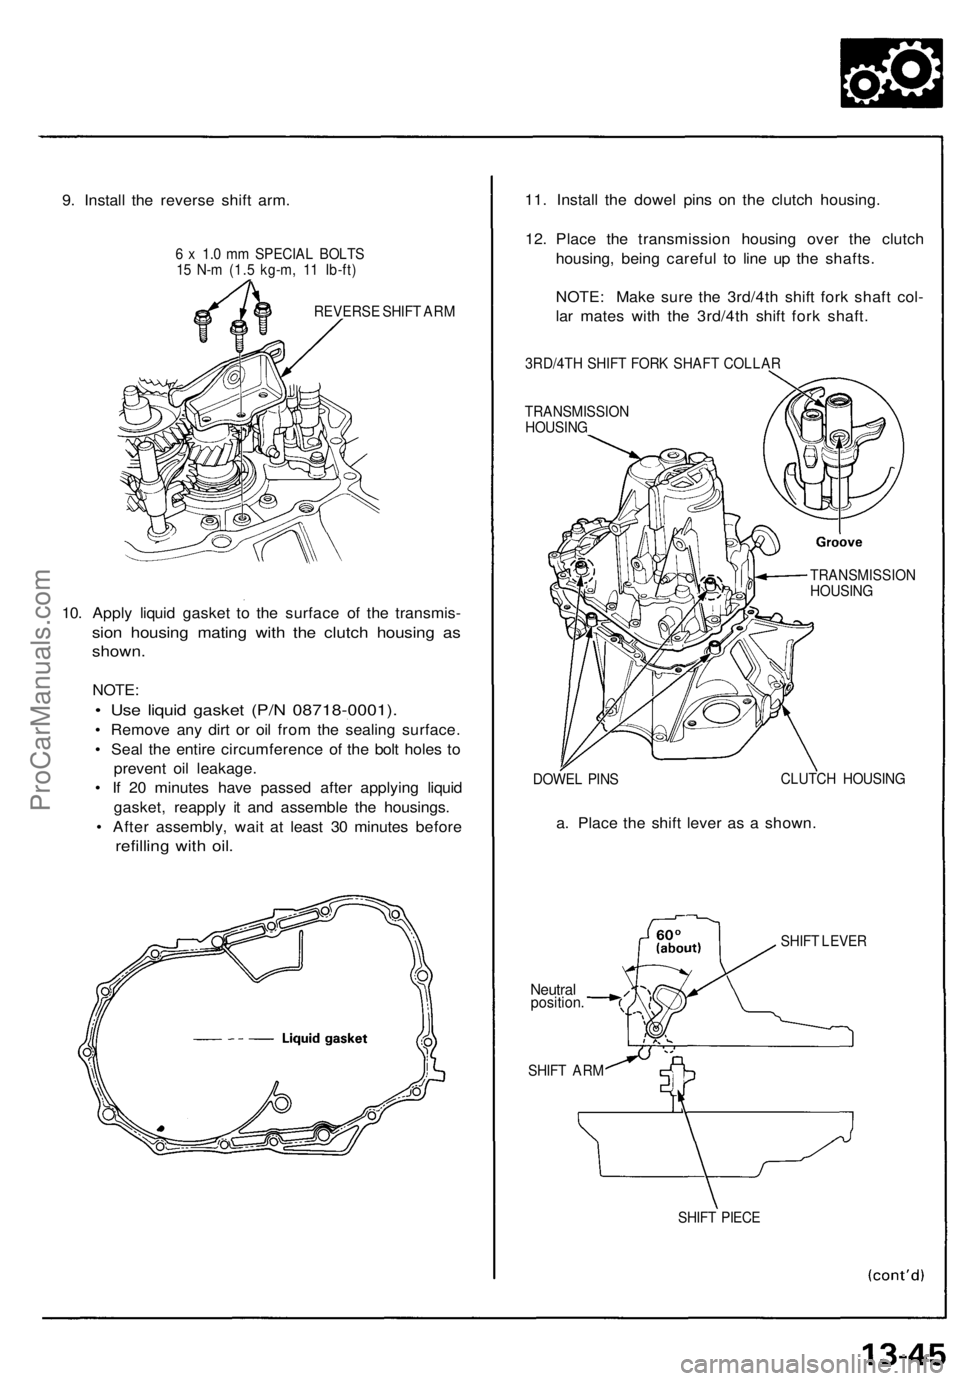
9. Install the reverse shift arm.
6 x 1.0 mm SPECIAL BOLTS
15 N-m (1.5 kg-m, 11 Ib-ft)
REVERSE SHIFT ARM
10. Apply liquid gasket to the surface of the transmis-
sion housing mating with the clutch housing as
shown.
NOTE:
• Use liquid gasket (P/N 08718-0001).
• Remove any dirt or oil from the sealing surface.
• Seal the entire circumference of the bolt holes to
prevent oil leakage.
• If 20 minutes have passed after applying liquid
gasket, reapply it and assemble the housings.
• After assembly, wait at least 30 minutes before
refilling with oil.
11. Install the dowel pins on the clutch housing.
12. Place the transmission housing over the clutch
housing, being careful to line up the shafts.
NOTE: Make sure the 3rd/4th shift fork shaft col-
lar mates with the 3rd/4th shift fork shaft.
3RD/4TH SHIFT FORK SHAFT COLLAR
TRANSMISSION
HOUSING
TRANSMISSION
HOUSING
DOWEL PINS
CLUTCH HOUSING
a. Place the shift lever as a shown.
SHIFT LEVER
Neutral
position.
SHIFT ARM
SHIFT PIECEProCarManuals.com
Page 350 of 1640
Transmission
Reassembly
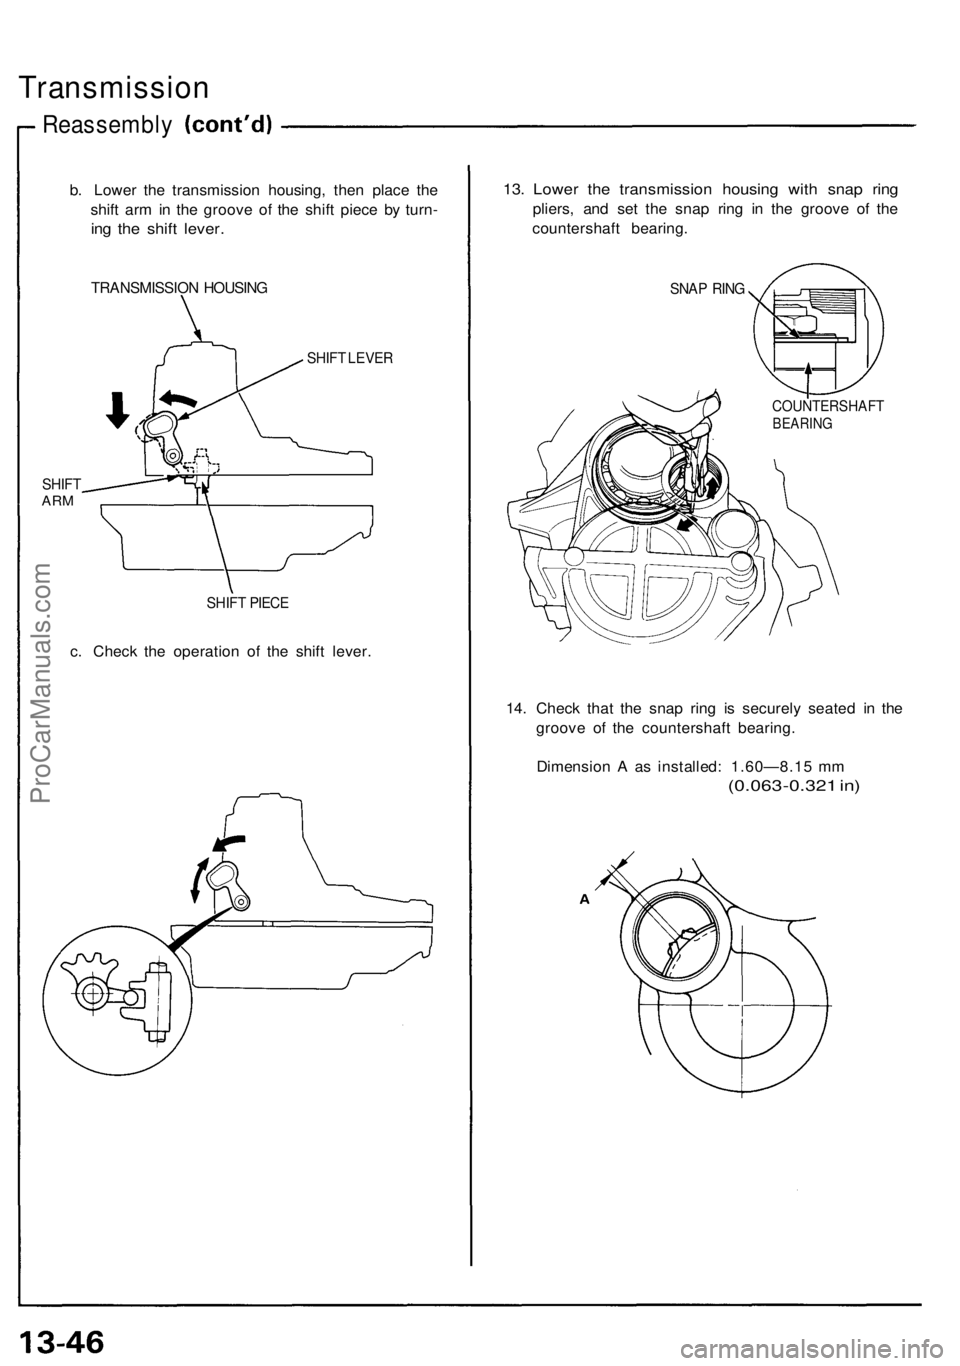
b. Lower the transmission housing, then place the
shift arm in the groove of the shift piece by turn-
ing the shift lever.
TRANSMISSION HOUSING
SHIFT LEVER
SHIFT
ARM
SHIFT PIECE
c. Check the operation of the shift lever.
13. Lower the transmission housing with snap ring
pliers, and set the snap ring in the groove of the
countershaft bearing.
SNAP RING
14. Check that the snap ring is securely seated in the
groove of the countershaft bearing.
Dimension A as installed: 1.60—8.15 mm
(0.063-0.321 in)
COUNTERSHAFT
BEARINGProCarManuals.com