ACURA NSX 1997 Service Repair Manual
Manufacturer: ACURA, Model Year: 1997, Model line: NSX, Model: ACURA NSX 1997Pages: 1503, PDF Size: 57.08 MB
Page 1031 of 1503
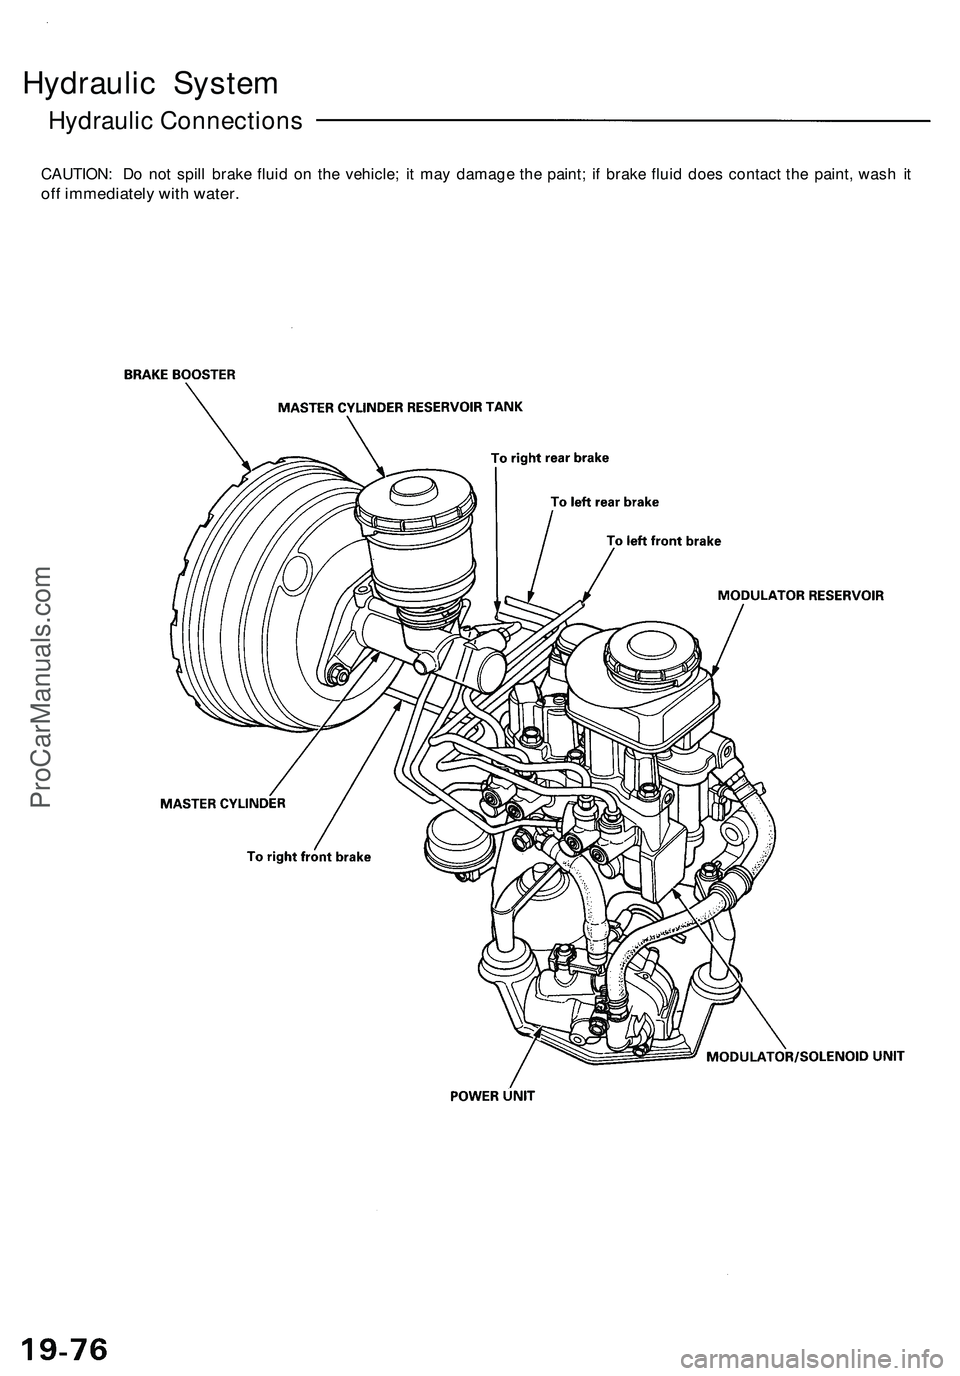
Hydraulic System
Hydraulic Connections
CAUTION: Do not spill brake fluid on the vehicle; it may damage the paint; if brake fluid does contact the paint, wash it
off immediately with water.ProCarManuals.com
Page 1032 of 1503
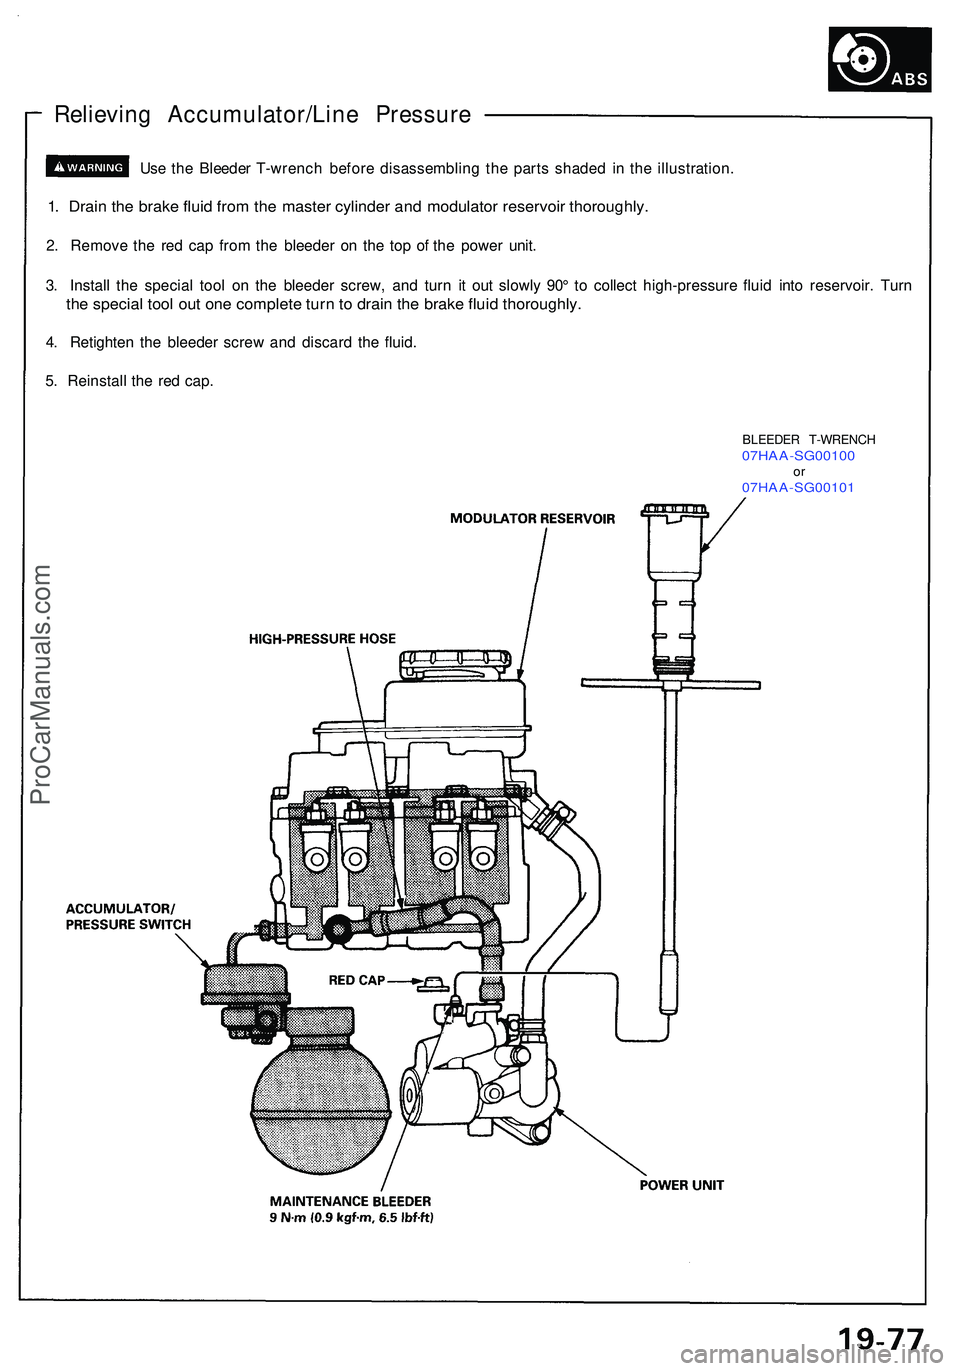
Relieving Accumulator/Lin e Pressur e
Use th e Bleede r T-wrenc h befor e disassemblin g th e part s shade d i n th e illustration .
1. Drai n th e brak e flui d fro m th e maste r cylinde r an d modulato r reservoi r thoroughly .
2. Remov e th e re d ca p fro m th e bleede r o n th e to p o f th e powe r unit .
3 . Instal l th e specia l too l o n th e bleede r screw , an d tur n i t ou t slowl y 90 ° t o collec t high-pressur e flui d int o reservoir . Tur n
the specia l too l ou t on e complet e tur n t o drai n th e brak e flui d thoroughly .
4. Retighte n th e bleede r scre w an d discar d th e fluid .
5 . Reinstal l th e re d cap .
BLEEDE R T-WRENC H07HAA-SG0010 0or07HAA-SG0010 1
ProCarManuals.com
Page 1033 of 1503
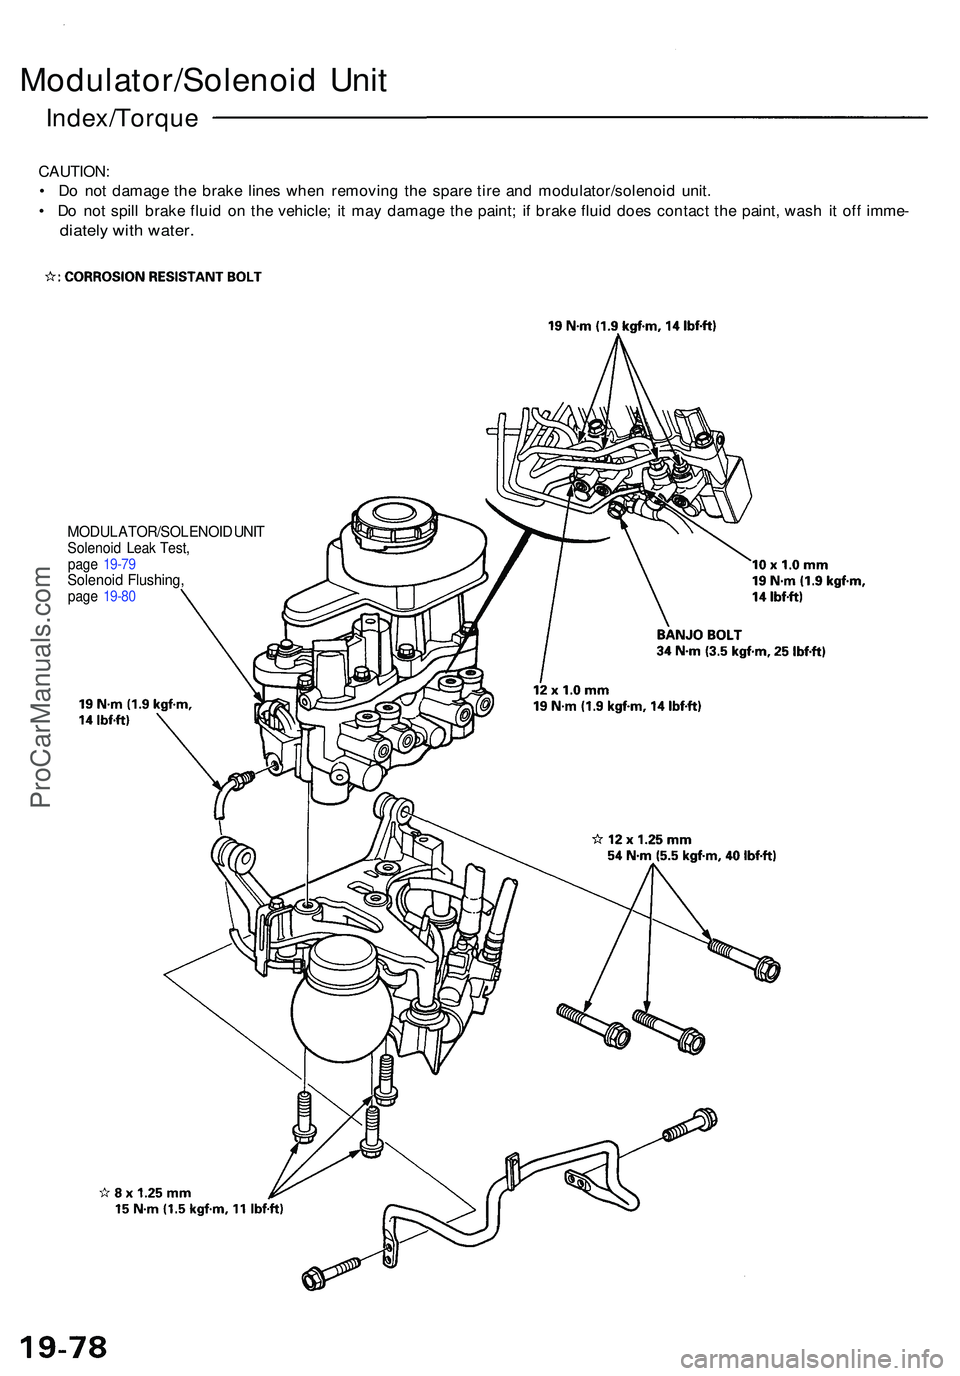
CAUTION:
• D o no t damag e th e brak e line s whe n removin g th e spar e tir e an d modulator/solenoi d unit .
• D o no t spil l brak e flui d o n th e vehicle ; i t ma y damag e th e paint ; i f brak e flui d doe s contac t th e paint , was h it of f imme -
diately wit h water .
Index/Torqu e
Modulator/Solenoi d Uni t
MODULATOR/SOLENOI D UNI TSolenoi d Lea k Test ,page 19-7 9Solenoi d Flushing ,page 19-8 0
ProCarManuals.com
Page 1034 of 1503
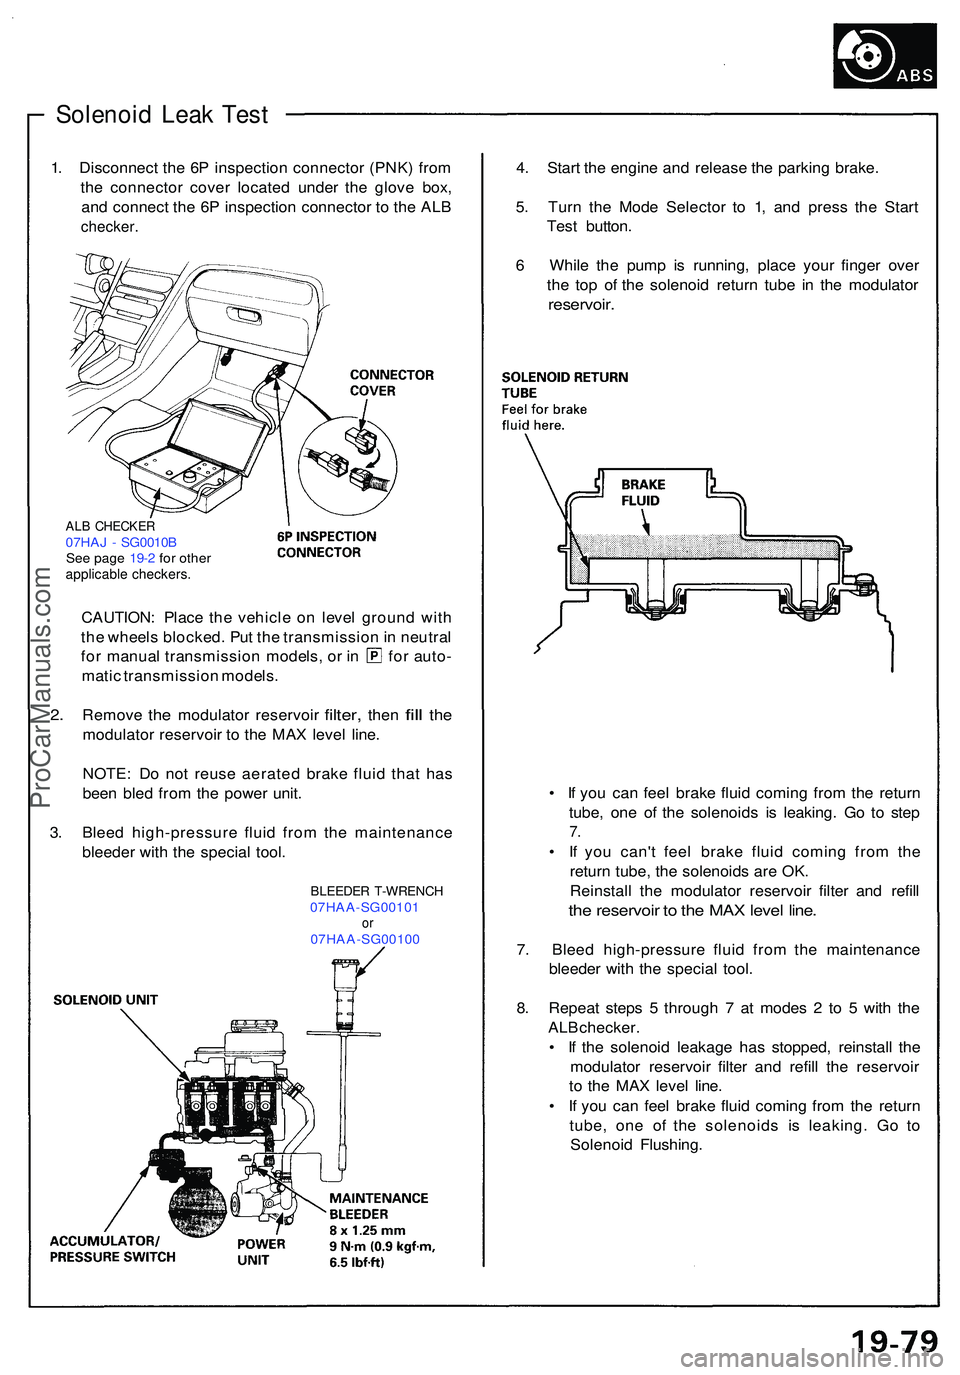
Solenoid Lea k Tes t
1. Disconnec t th e 6 P inspectio n connecto r (PNK ) fro m
th e connecto r cove r locate d unde r th e glov e box ,
an d connec t th e 6 P inspectio n connecto r t o th e AL B
checker .
ALB CHECKE R07HAJ - SG0010 B
Se e pag e 19- 2 fo r othe r
applicabl e checkers .
CAUTION : Plac e th e vehicl e o n leve l groun d wit h
th e wheel s blocked . Pu t th e transmissio n in neutra l
for manua l transmissio n models , o r i n fo r auto -
mati c transmissio n models .
2. Remov e the modulato r reservoi r filter, then fill th e
modulato r reservoi r t o th e MA X leve l line .
NOTE : D o no t reus e aerate d brak e flui d tha t ha s
bee n ble d fro m th e powe r unit .
3 . Blee d high-pressur e flui d fro m th e maintenanc e
bleede r wit h th e specia l tool .
BLEEDE R T-WRENC H07HAA-SG0010 1or07HAA-SG0010 0
• I f yo u ca n fee l brak e flui d comin g fro m th e retur n
tube , on e o f th e solenoid s i s leaking . G o t o ste p
7.
• I f yo u can' t fee l brak e flui d comin g fro m th e
retur n tube , th e solenoid s ar e OK .
Reinstal l th e modulato r reservoi r filte r an d refil l
the reservoi r t o th e MA X leve l line .
7. Blee d high-pressur e flui d fro m th e maintenanc e
bleede r wit h th e specia l tool .
8 . Repea t step s 5 throug h 7 at mode s 2 to 5 wit h th e
AL B checker .
• I f th e solenoi d leakag e ha s stopped , reinstal l th e
modulato r reservoi r filte r an d refil l th e reservoi r
t o th e MA X leve l line .
• I f yo u ca n fee l brak e flui d comin g fro m th e retur n
tube , on e o f th e solenoid s i s leaking . G o t o
Solenoi d Flushing .
4
. Star t th e engine and releas e th e parkin g brake .
5 . Tur n th e Mod e Selecto r t o 1 , an d pres s th e Star t
Tes t button .
6 Whil e th e pum p i s running , plac e you r finge r ove r
th e to p o f th e solenoi d retur n tub e i n th e modulato r
reservoir.
ProCarManuals.com
Page 1035 of 1503
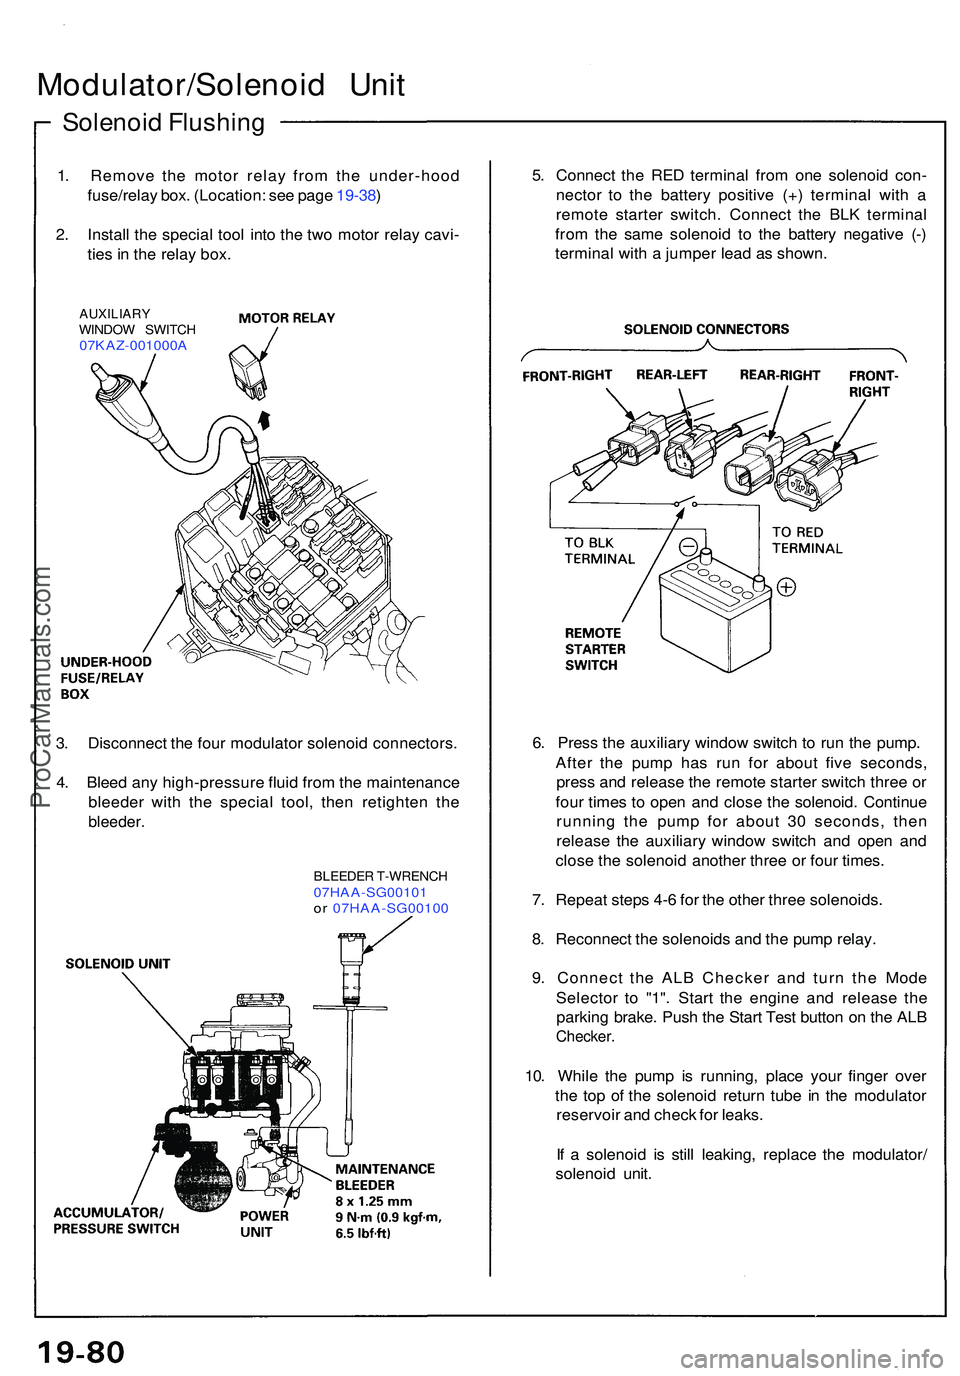
Solenoid Flushin g
Modulator/Solenoi d Uni t
1. Remov e th e moto r rela y fro m th e under-hoo d
fuse/rela y box . (Location : se e pag e 19-38 )
2 . Instal l th e specia l too l int o th e tw o moto r rela y cavi -
tie s in th e rela y box .
AUXILIAR YWINDOW SWITC H07KAZ-001000 A
5. Connec t th e RE D termina l fro m on e solenoi d con -
necto r t o th e batter y positiv e (+ ) termina l wit h a
remot e starte r switch . Connec t th e BL K termina l
fro m th e sam e solenoi d t o th e batter y negativ e (- )
termina l wit h a jumpe r lea d a s shown .
3 . Disconnec t th e fou r modulato r solenoi d connectors .
4 . Blee d an y high-pressur e flui d fro m th e maintenanc e
bleede r wit h th e specia l tool , the n retighte n th e
bleeder .
BLEEDE R T-WRENC H07HAA-SG0010 1or 07HAA-SG0010 0
6. Pres s th e auxiliar y windo w switc h t o ru n th e pump .
Afte r th e pum p ha s ru n fo r abou t fiv e seconds ,
pres s an d releas e th e remot e starte r switc h thre e o r
fou r time s t o ope n an d clos e th e solenoid . Continu e
runnin g th e pum p fo r abou t 3 0 seconds , the n
releas e th e auxiliar y windo w switc h an d ope n an d
clos e th e solenoi d anothe r thre e o r fou r times .
7 . Repea t step s 4- 6 fo r th e othe r thre e solenoids .
8 . Reconnec t th e solenoid s an d th e pum p relay .
9 . Connec t th e AL B Checke r an d tur n th e Mod e
Selecto r t o "1" . Star t th e engin e an d releas e th e
parkin g brake . Pus h th e Star t Tes t butto n o n th e AL B
Checker .
10. Whil e th e pum p i s running , plac e you r finge r ove r
th e to p o f th e solenoi d retur n tub e i n th e modulato r
reservoi r an d chec k fo r leaks .
I f a solenoi d i s stil l leaking , replac e th e modulator /
solenoi d unit .
ProCarManuals.com
Page 1036 of 1503
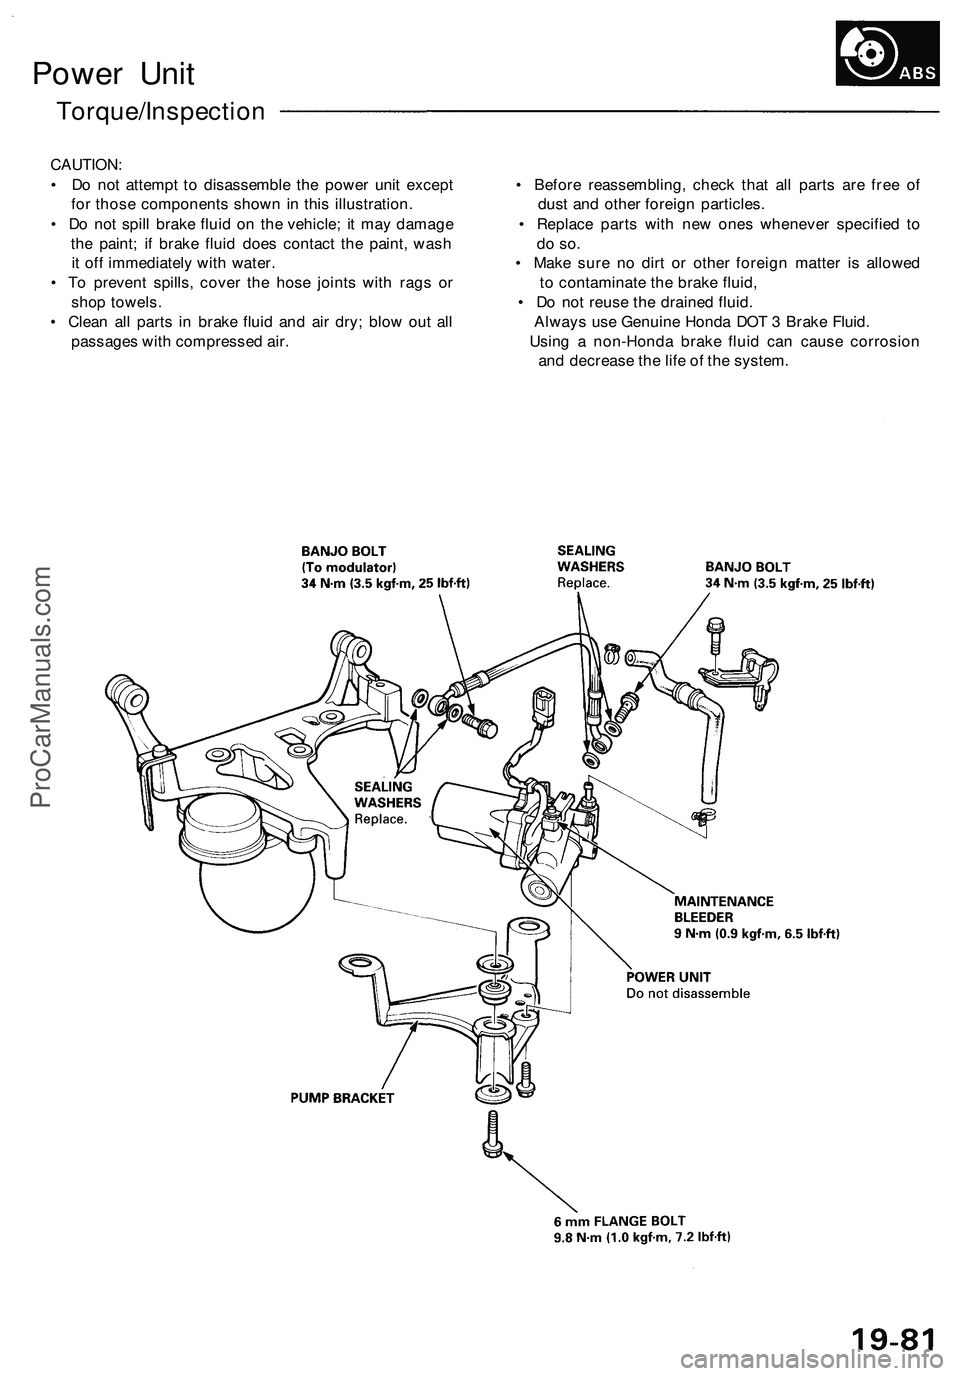
Power Unit
Torque/Inspection
CAUTION:
• Do not attempt to disassemble the power unit except • Before reassembling, check that all parts are free of
for those components shown in this illustration. dust and other foreign particles.
• Do not spill brake fluid on the vehicle; it may damage • Replace parts with new ones whenever specified to
the paint; if brake fluid does contact the paint, wash do so.
it off immediately with water. • Make sure no dirt or other foreign matter is allowed
• To prevent spills, cover the hose joints with rags or to contaminate the brake fluid,
shop towels. • Do not reuse the drained fluid.
• Clean all parts in brake fluid and air dry; blow out all Always use Genuine Honda DOT 3 Brake Fluid.
passages with compressed air. Using a non-Honda brake fluid can cause corrosion
and decrease the life of the system.ProCarManuals.com
Page 1037 of 1503
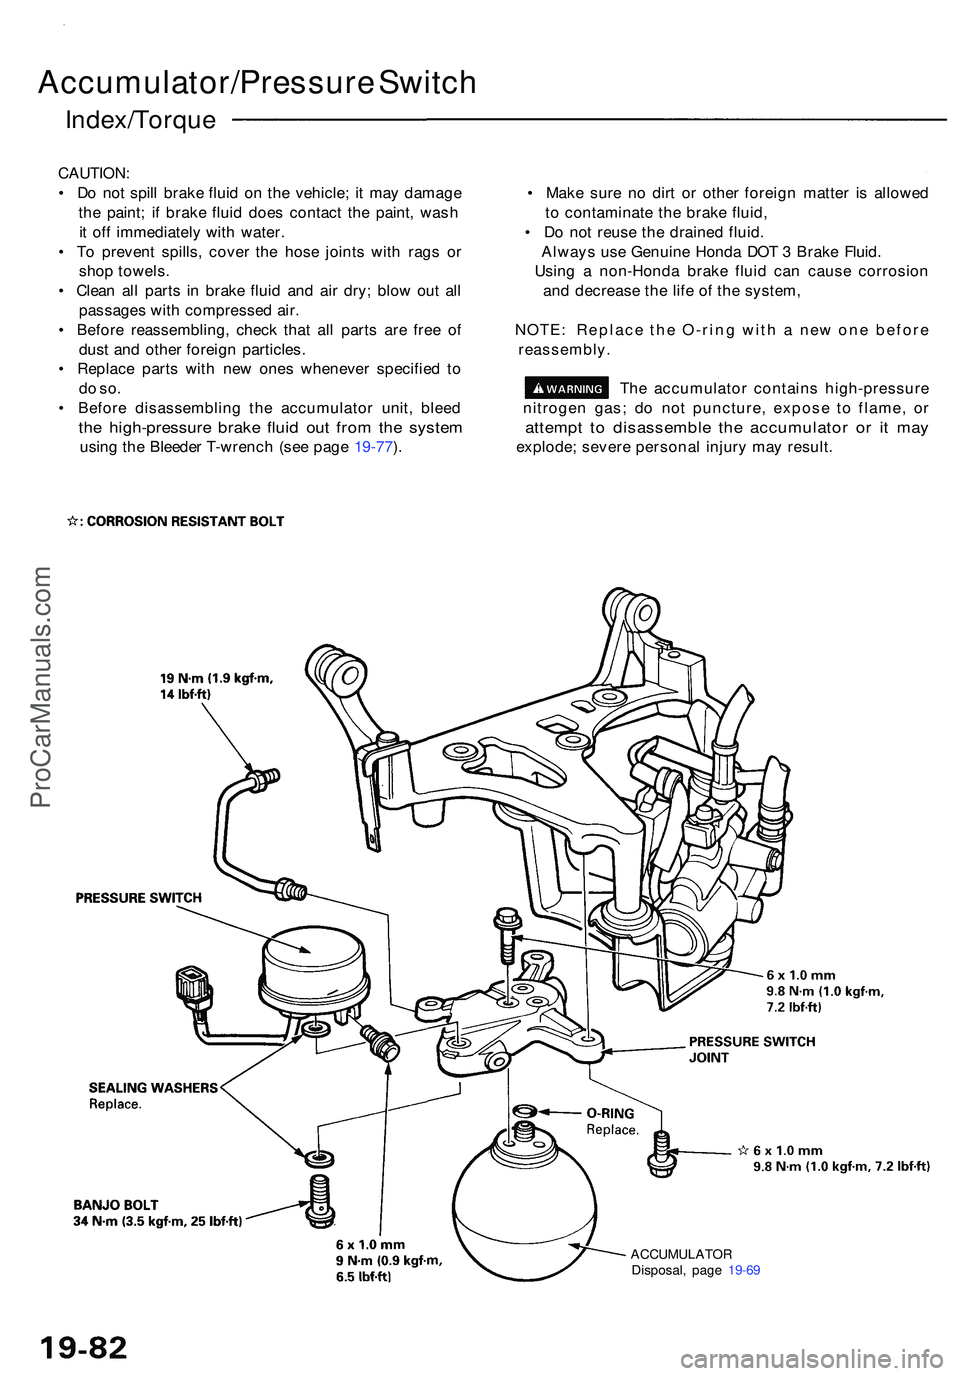
Accumulator/Pressure Switc h
Index/Torqu e
CAUTION:
• D o no t spil l brak e flui d o n th e vehicle ; i t ma y damag e • Make sur e n o dir t o r othe r foreig n matte r i s allowe d
th e paint ; i f brak e flui d doe s contac t th e paint , was h t o contaminat e th e brak e fluid ,
i t of f immediatel y wit h water . • Do no t reus e th e draine d fluid .
• T o preven t spills , cove r th e hos e joint s wit h rag s o r Alway s us e Genuin e Hond a DO T 3 Brak e Fluid .
sho p towels . Usin g a non-Hond a brak e flui d ca n caus e corrosio n
• Clea n al l part s i n brak e flui d an d ai r dry ; blo w ou t al l an d decreas e th e lif e o f th e system ,
passage s wit h compresse d air .
• Befor e reassembling , chec k tha t al l part s ar e fre e o f NOTE : Replac e th e O-rin g wit h a ne w on e befor e
dus t an d othe r foreig n particles . reassembly .
• Replac e part s wit h ne w one s wheneve r specifie d t o
do so . Th e accumulato r contain s high-pressur e
• Befor e disassemblin g th e accumulato r unit , blee d nitroge n gas ; d o no t puncture , expos e t o flame , o r
the high-pressur e brak e flui d ou t fro m th e syste m attemp t t o disassembl e th e accumulato r o r i t ma y
using th e Bleede r T-wrenc h (se e pag e 19-77 ). explode ; sever e persona l injur y ma y result .
ACCUMULATO R
Disposal , pag e 19-6 9
ProCarManuals.com
Page 1038 of 1503
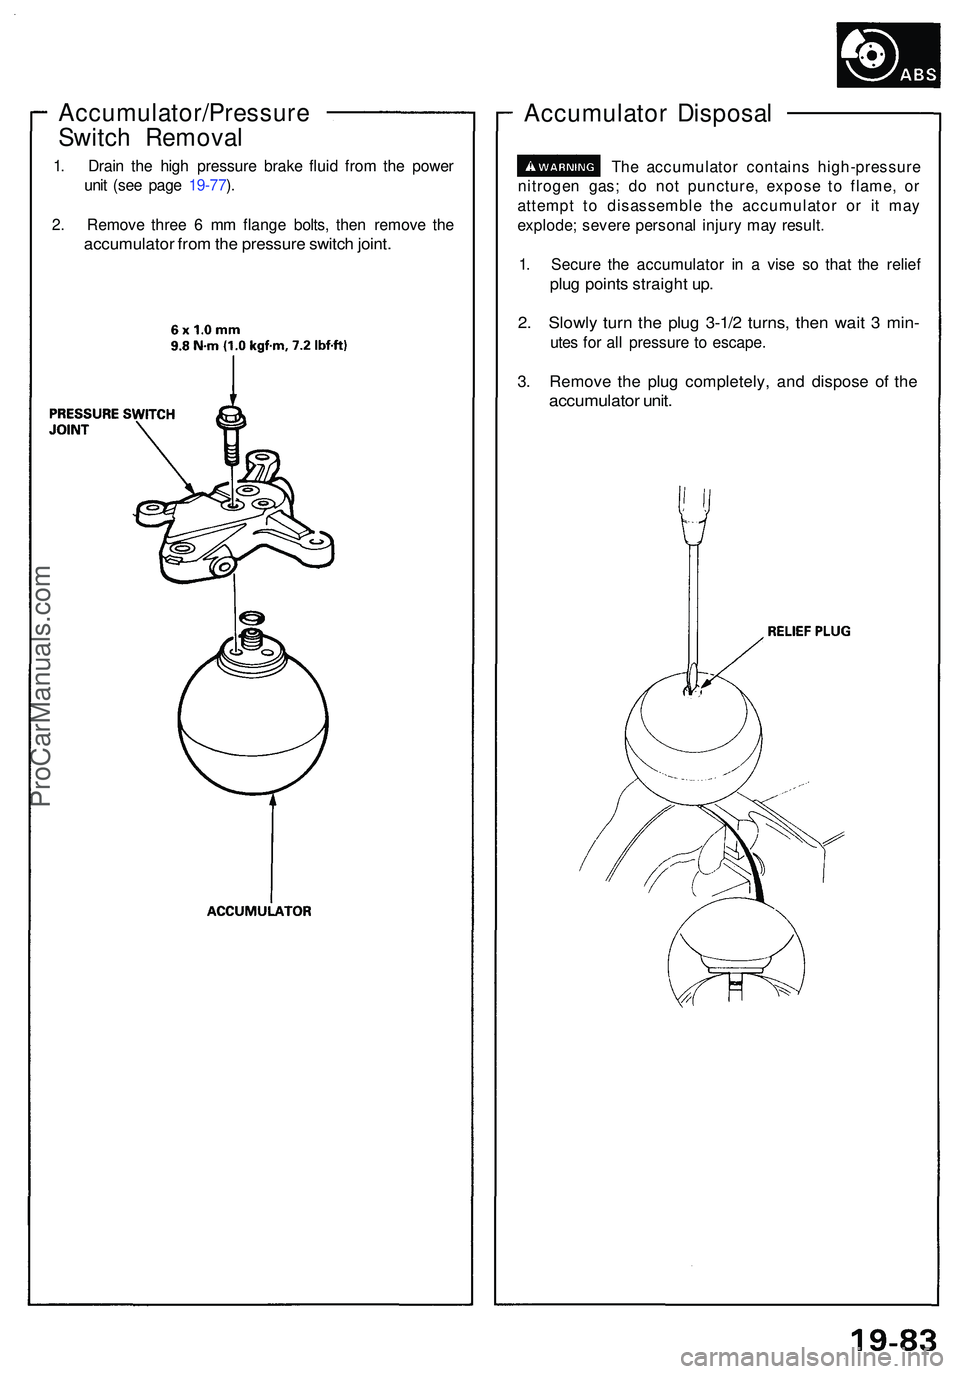
Accumulator/Pressure
Switc h Remova l
1. Drai n th e hig h pressur e brak e flui d fro m th e powe r
uni t (se e pag e 19-77 ).
2 . Remov e thre e 6 m m flang e bolts , the n remov e th e
accumulato r fro m th e pressur e switc h joint .
Accumulato r Disposa l
The accumulato r contain s high-pressur e
nitroge n gas ; d o no t puncture , expos e t o flame , o r
attemp t t o disassembl e th e accumulato r o r i t ma y
explode ; sever e persona l injur y ma y result .
1 . Secur e th e accumulato r i n a vis e s o tha t th e relie f
plug point s straigh t up .
2. Slowl y tur n th e plu g 3-1/ 2 turns , the n wai t 3 min -
utes fo r al l pressur e t o escape .
3. Remov e th e plu g completely , an d dispos e o f th e
accumulato r unit .
ProCarManuals.com
Page 1039 of 1503
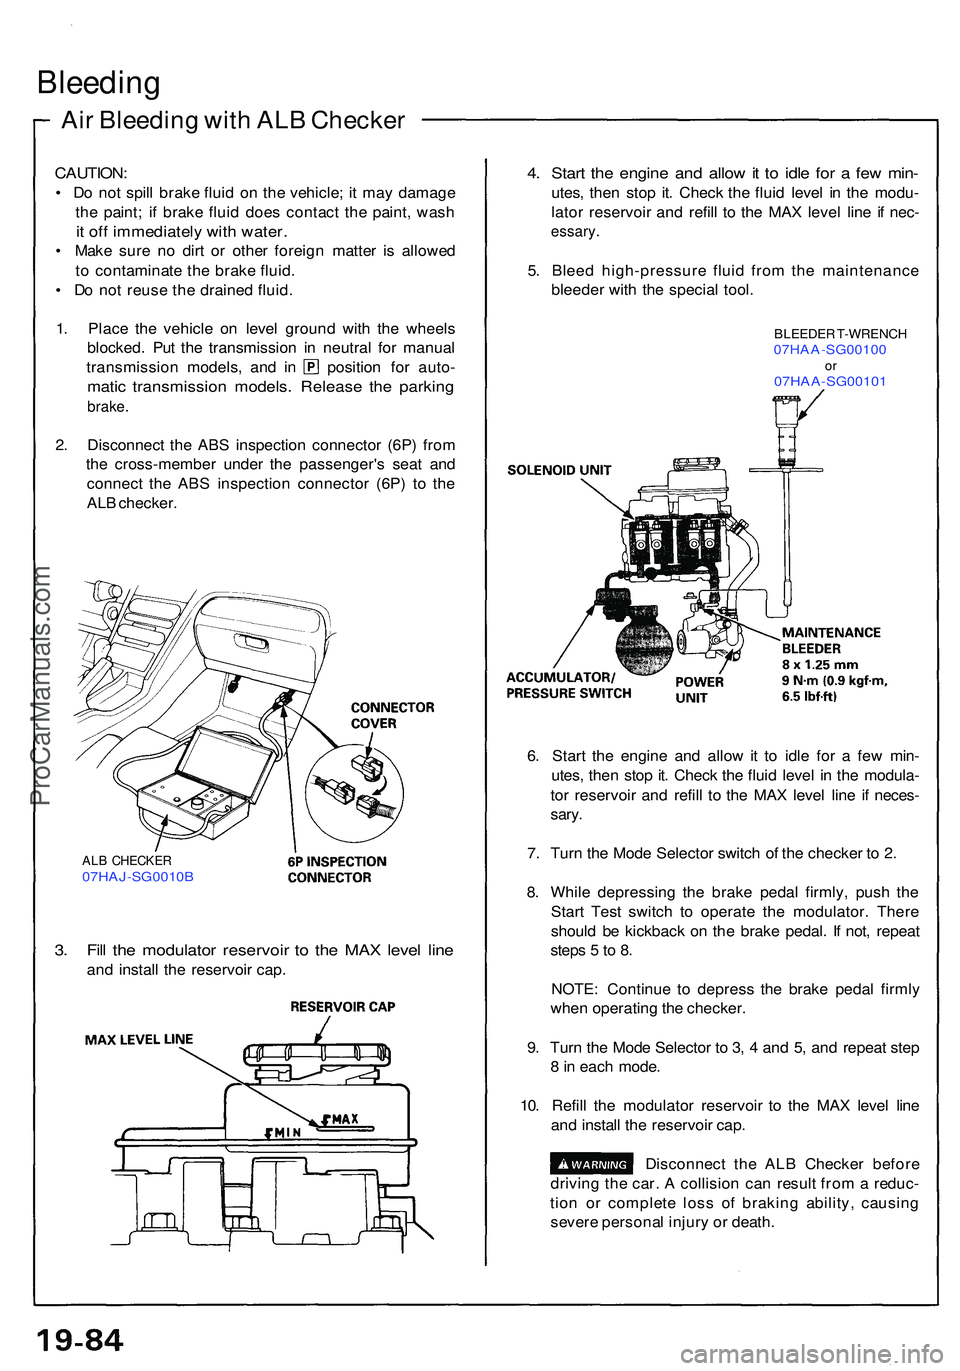
Air Bleedin g wit h AL B Checke r
Bleeding
CAUTION :
• D o no t spil l brak e flui d o n th e vehicle ; i t ma y damag e
th e paint ; i f brak e flui d doe s contac t th e paint , was h
it of f immediatel y wit h water .
• Mak e sur e n o dir t o r othe r foreig n matte r i s allowe d
t o contaminat e th e brak e fluid .
• D o no t reus e th e draine d fluid .
1 . Plac e th e vehicl e o n leve l groun d wit h th e wheel s
blocked . Pu t th e transmissio n i n neutra l fo r manua l
transmissio n models , an d i n positio n fo r auto -
matic transmissio n models . Releas e th e parkin g
brake.
2. Disconnec t th e AB S inspectio n connecto r (6P ) fro m
th e cross-membe r unde r th e passenger' s sea t an d
connec t th e AB S inspectio n connecto r (6P ) t o th e
AL B checker .
4. Star t th e engin e an d allo w it t o idl e fo r a fe w min -
utes, the n sto p it . Chec k th e flui d leve l i n th e modu -
lato r reservoi r an d refil l t o th e MA X leve l lin e i f nec -
essary .
5. Blee d high-pressur e flui d fro m th e maintenanc e
bleede r wit h th e specia l tool .
BLEEDE R T-WRENC H07HAA-SG0010 0or07HAA-SG0010 1
6. Star t th e engine and allo w it t o idl e fo r a fe w min -
utes , the n sto p it . Chec k th e flui d leve l i n th e modula -
to r reservoi r an d refil l t o th e MA X leve l lin e i f neces -
sary .
7 . Tur n th e Mod e Selecto r switc h o f th e checke r t o 2 .
8 . Whil e depressin g th e brak e peda l firmly , pus h th e
Star t Tes t switc h t o operat e th e modulator . Ther e
shoul d b e kickbac k o n th e brak e pedal . I f not , repea t
step s 5 to 8 .
NOTE : Continu e t o depres s th e brak e peda l firml y
whe n operatin g th e checker .
9 . Tur n th e Mod e Selecto r t o 3 , 4 an d 5 , an d repea t ste p
8 in eac h mode .
10 . Refil l th e modulato r reservoi r t o th e MA X leve l lin e
an d instal l th e reservoi r cap .
Disconnec t th e AL B Checke r befor e
drivin g th e car . A collisio n ca n resul t fro m a reduc -
tio n o r complete loss o f brakin g ability , causin g
sever e persona l injur y o r death .
ALB CHECKE R07HAJ-SG0010 B
3. Fil l th e modulato r reservoi r t o th e MA X leve l lin e
and instal l th e reservoi r cap .
ProCarManuals.com
Page 1040 of 1503
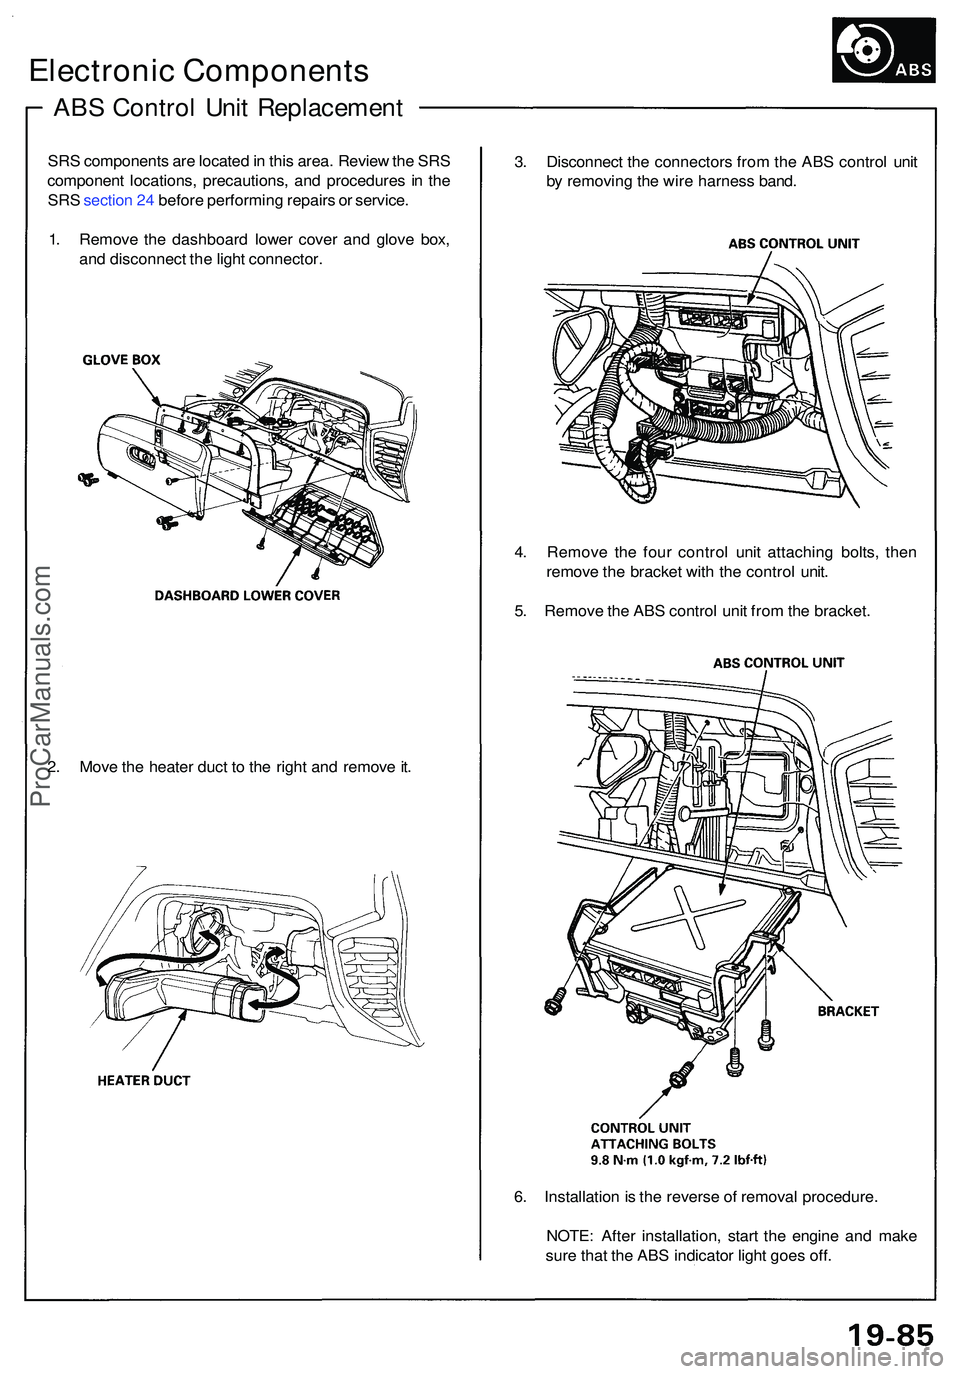
6. Installatio n is th e revers e o f remova l procedure .
NOTE : Afte r installation , star t th e engin e an d mak e
sur e tha t th e AB S indicato r ligh t goe s off .
4
. Remov e th e fou r contro l uni t attachin g bolts , the n
remov e th e bracke t wit h th e contro l unit .
5 . Remov e th e AB S contro l uni t fro m th e bracket .
2 . Mov e th e heate r duc t t o th e righ t an d remov e it .
SR
S component s ar e locate d in thi s area . Revie w th e SR S
componen t locations , precautions , an d procedure s i n th e
SR S sectio n 24 befor e performin g repair s o r service .
1 . Remov e th e dashboar d lowe r cove r an d glov e box ,
an d disconnec t th e ligh t connector . 3
. Disconnec t th e connector s fro m th e AB S contro l uni t
b y removin g th e wir e harnes s band .
ABS Contro l Uni t Replacemen t
Electronic Component s
ProCarManuals.com