ACURA NSX 1997 Service Repair Manual
Manufacturer: ACURA, Model Year: 1997,
Model line: NSX,
Model: ACURA NSX 1997
Pages: 1503, PDF Size: 57.08 MB
ACURA NSX 1997 Service Repair Manual
NSX 1997
ACURA
ACURA
https://www.carmanualsonline.info/img/32/56989/w960_56989-0.png
ACURA NSX 1997 Service Repair Manual
Trending: remove seats, phone, coolant capacity, airbag off, fog light bulb, engine coolant, start stop button
Page 381 of 1503
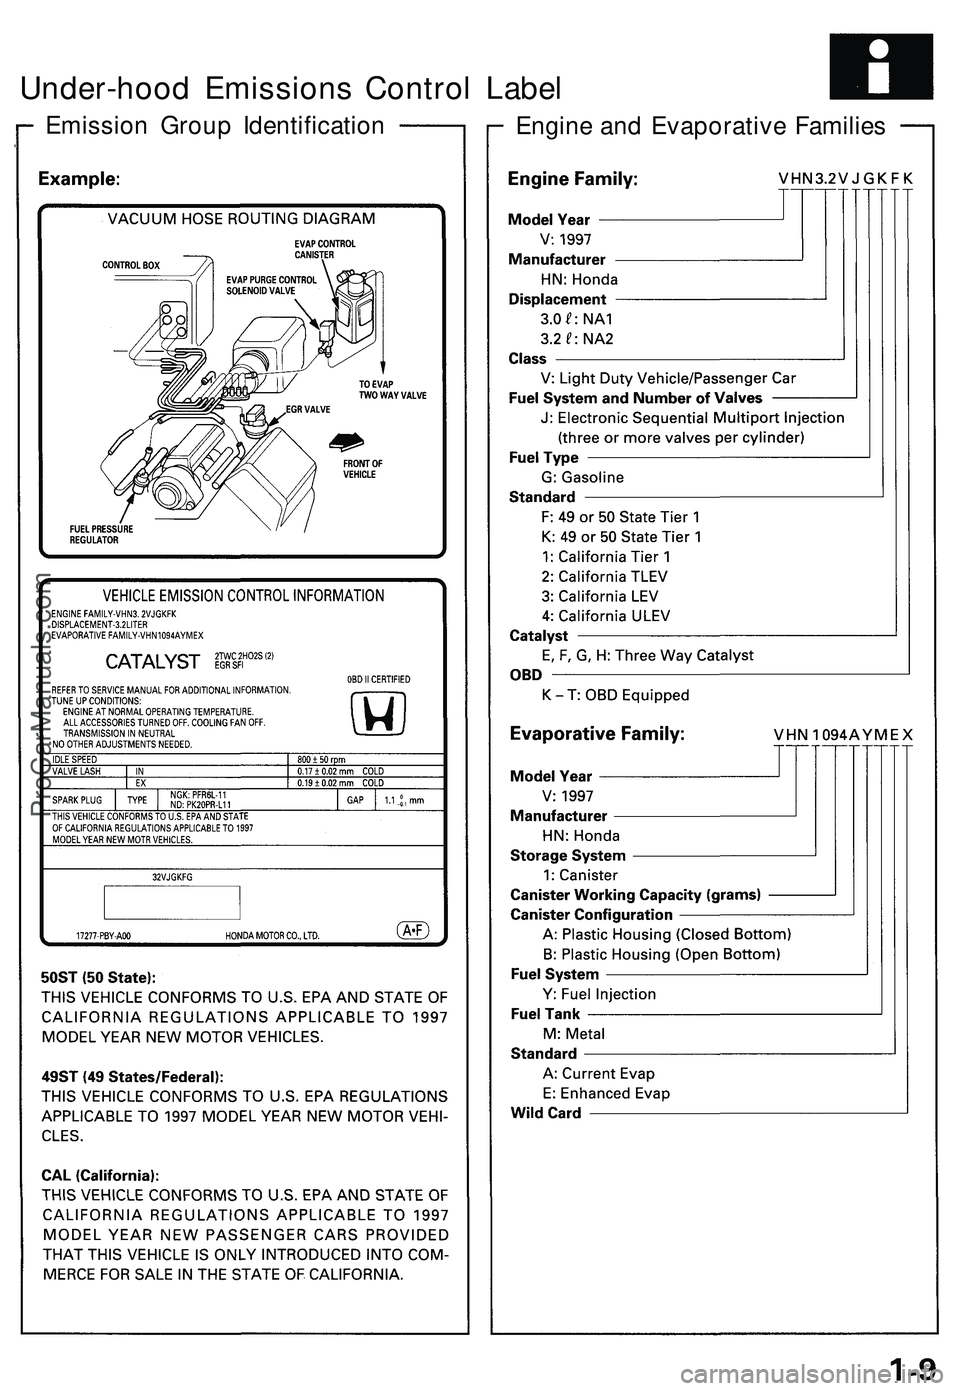
Under-hood Emissions Control Label
Emission Group Identification
Engine and Evaporative FamiliesProCarManuals.com
Page 382 of 1503
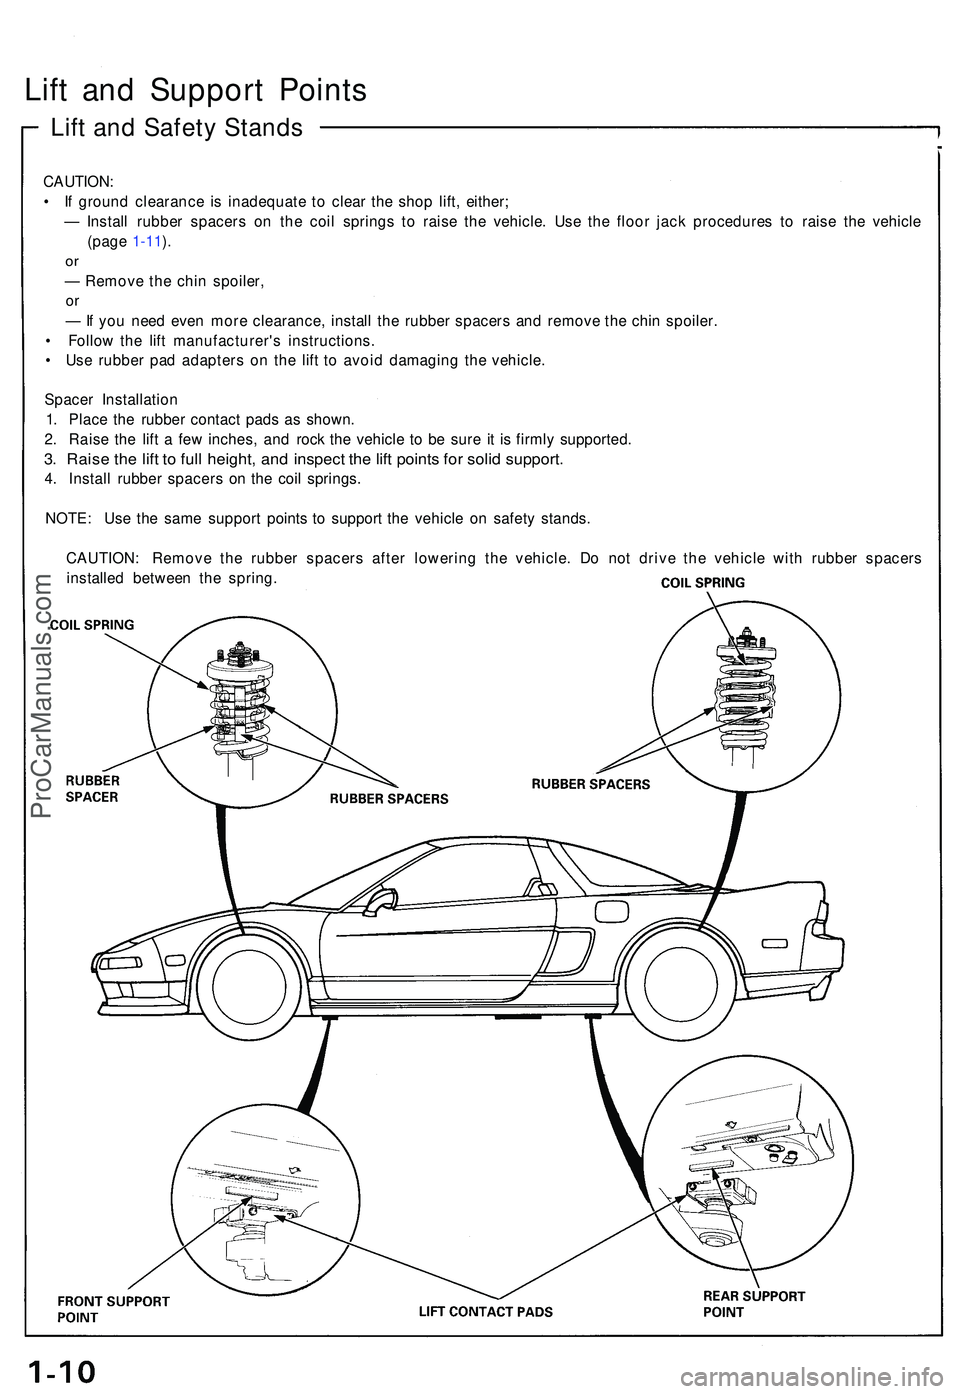
Lift an d Suppor t Point s
Lift an d Safet y Stand s
CAUTION :
• I f groun d clearanc e i s inadequat e t o clea r th e sho p lift , either ;
— Instal l rubbe r spacer s o n th e coi l spring s t o rais e th e vehicle . Us e th e floo r jac k procedure s t o rais e th e vehicl e
(pag e 1-11 ).
o r
— Remov e th e chi n spoiler ,
or
— If yo u nee d eve n mor e clearance , instal l th e rubbe r spacer s an d remov e th e chi n spoiler .
• Follo w th e lif t manufacturer' s instructions .
• Us e rubbe r pa d adapter s o n th e lif t t o avoi d damagin g th e vehicle .
Space r Installatio n
1 . Plac e th e rubbe r contac t pad s a s shown .
2 . Rais e th e lif t a fe w inches , an d roc k th e vehicl e t o b e sur e i t i s firml y supported .
3. Rais e th e lif t t o ful l height , an d inspec t th e lif t point s fo r soli d support .
4. Instal l rubbe r spacer s o n th e coi l springs .
NOTE : Us e th e sam e suppor t point s t o suppor t th e vehicl e o n safet y stands .
CAUTION : Remov e th e rubbe r spacer s afte r lowerin g th e vehicle . D o no t driv e th e vehicl e wit h rubbe r spacer s
installe d betwee n th e spring .
ProCarManuals.com
Page 383 of 1503
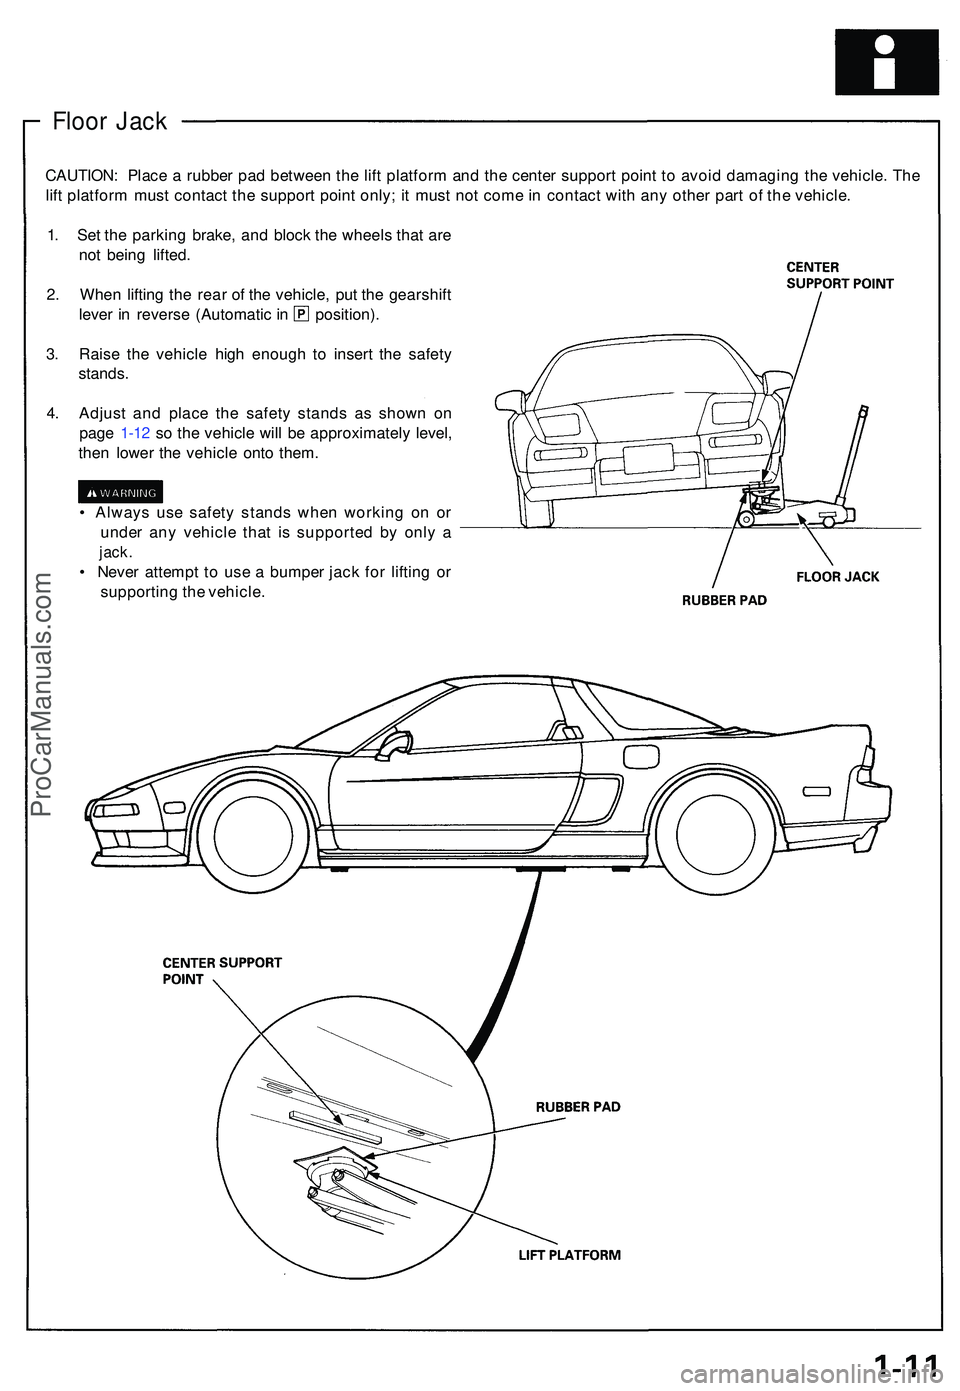
Floor Jac k
CAUTION : Plac e a rubbe r pa d betwee n th e lif t platfor m an d th e cente r suppor t poin t t o avoi d damagin g th e vehicle . Th e
lif t platfor m mus t contac t th e suppor t poin t only ; i t mus t no t com e in contac t wit h an y othe r par t o f th e vehicle .
1 . Se t th e parkin g brake , an d bloc k th e wheel s tha t ar e
no t bein g lifted .
2 . Whe n liftin g th e rea r o f th e vehicle , pu t th e gearshif t
lever i n revers e (Automati c in position) .
3 . Rais e th e vehicl e hig h enoug h t o inser t th e safet y
stands .
4 . Adjus t an d plac e th e safet y stand s a s show n o n
pag e 1-1 2 s o th e vehicl e wil l b e approximatel y level ,
the n lowe r th e vehicl e ont o them .
• Alway s us e safet y stand s whe n workin g o n o r
unde r an y vehicl e tha t i s supporte d b y onl y a
jack .
• Neve r attemp t t o us e a bumpe r jac k fo r liftin g o r
supportin g th e vehicle .
ProCarManuals.com
Page 384 of 1503
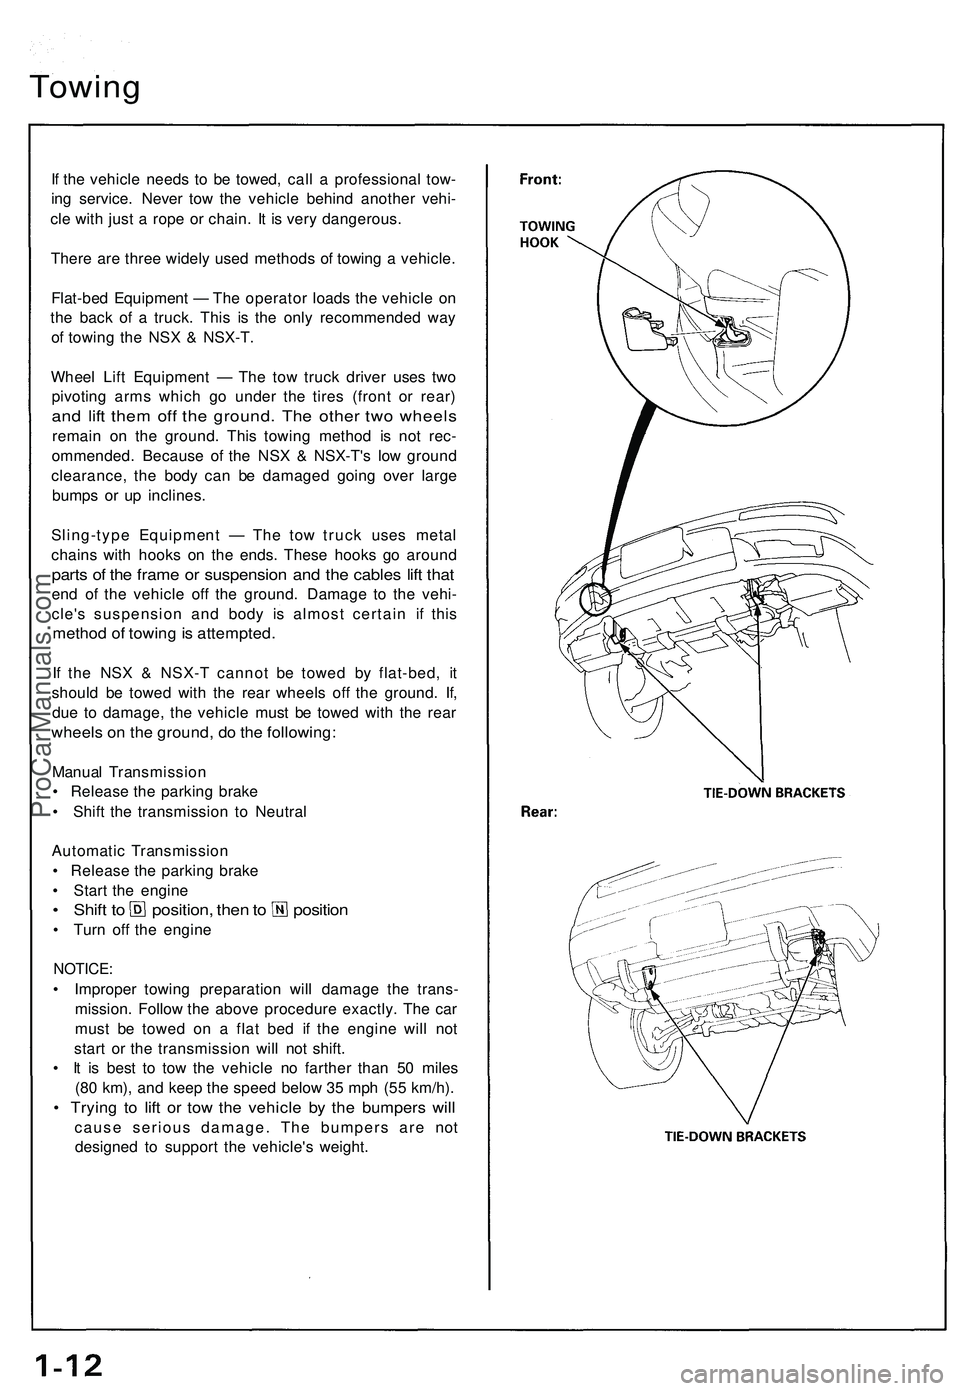
Towing
If the vehicle needs to be towed, call a professional tow-
ing service. Never tow the vehicle behind another vehi-
cle with just a rope or chain. It is very dangerous.
There are three widely used methods of towing a vehicle.
Flat-bed Equipment — The operator loads the vehicle on
the back of a truck. This is the only recommended way
of towing the NSX & NSX-T.
Wheel Lift Equipment — The tow truck driver uses two
pivoting arms which go under the tires (front or rear)
and lift them off the ground. The other two wheels
remain on the ground. This towing method is not rec-
ommended. Because of the NSX & NSX-T's low ground
clearance, the body can be damaged going over large
bumps or up inclines.
Sling-type Equipment — The tow truck uses metal
chains with hooks on the ends. These hooks go around
parts of the frame or suspension and the cables lift that
end of the vehicle off the ground. Damage to the vehi-
cle's suspension and body is almost certain if this
method of towing is attempted.
If the NSX & NSX-T cannot be towed by flat-bed, it
should be towed with the rear wheels off the ground. If,
due to damage, the vehicle must be towed with the rear
wheels on the ground, do the following:
Manual Transmission
• Release the parking brake
• Shift the transmission to Neutral
Automatic Transmission
• Release the parking brake
• Start the engine
• Shift to position, then to position
• Turn off the engine
NOTICE:
• Improper towing preparation will damage the trans-
mission. Follow the above procedure exactly. The car
must be towed on a flat bed if the engine will not
start or the transmission will not shift.
• It is best to tow the vehicle no farther than 50 miles
(80 km), and keep the speed below 35 mph (55 km/h).
• Trying to lift or tow the vehicle by the bumpers will
cause serious damage. The bumpers are not
designed to support the vehicle's weight.ProCarManuals.com
Page 385 of 1503
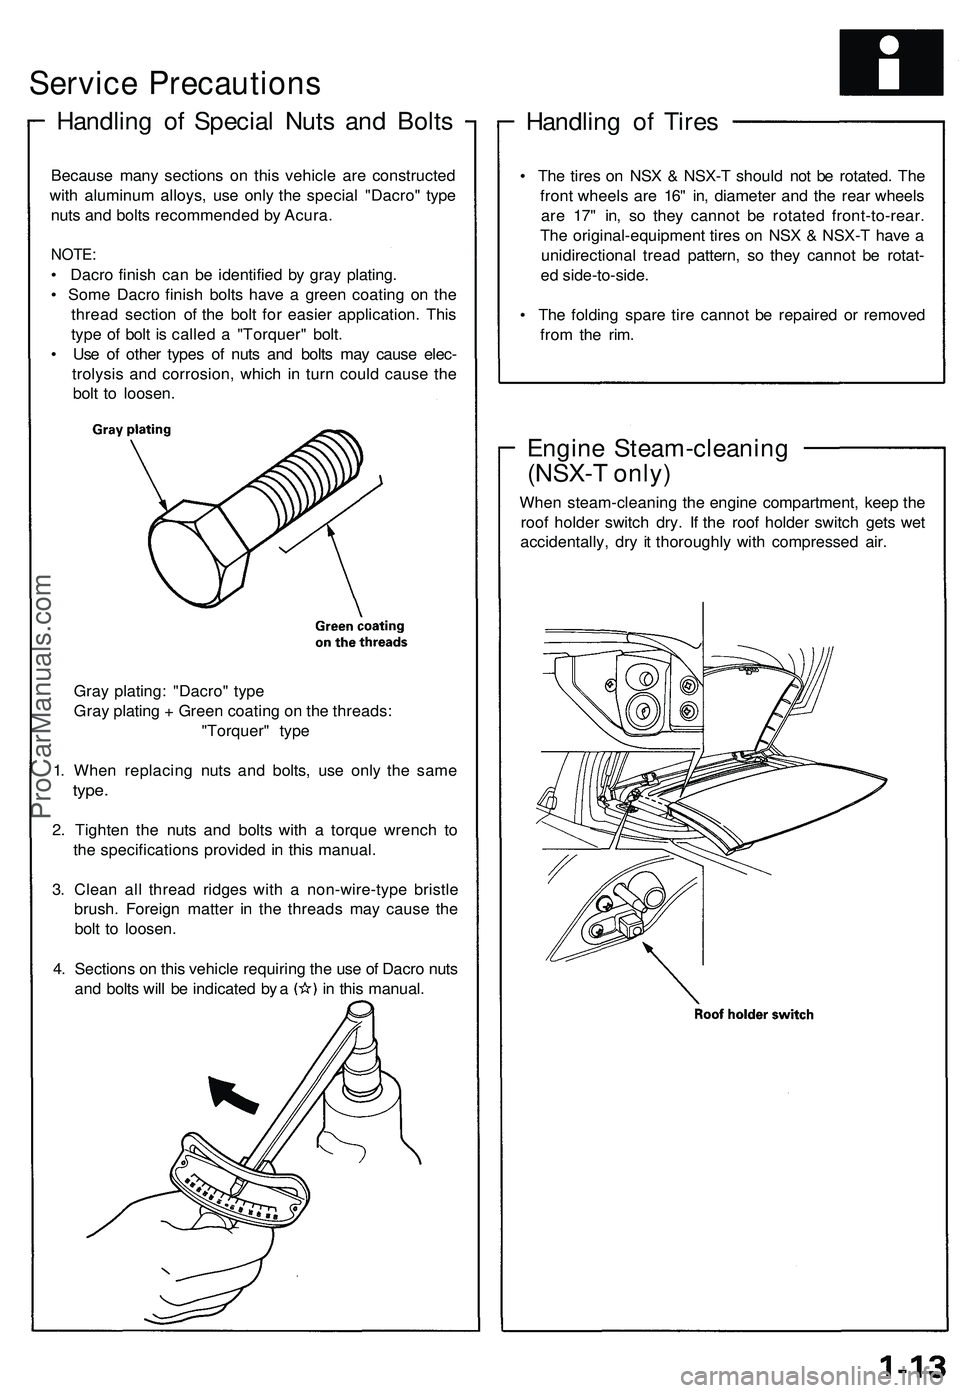
Service Precautions
Handling of Special Nuts and Bolts
Handling of Tires
• The tires on NSX & NSX-T should not be rotated. The
front wheels are 16" in, diameter and the rear wheels
are 17" in, so they cannot be rotated front-to-rear.
The original-equipment tires on NSX & NSX-T have a
unidirectional tread pattern, so they cannot be rotat-
ed side-to-side.
• The folding spare tire cannot be repaired or removed
from the rim.
Engine Steam-cleaning
(NSX-T only)
When steam-cleaning the engine compartment, keep the
roof holder switch dry. If the roof holder switch gets wet
accidentally, dry it thoroughly with compressed air.
Because many sections on this vehicle are constructed
with aluminum alloys, use only the special "Dacro" type
nuts and bolts recommended by Acura.
NOTE:
• Dacro finish can be identified by gray plating.
• Some Dacro finish bolts have a green coating on the
thread section of the bolt for easier application. This
type of bolt is called a "Torquer" bolt.
• Use of other types of nuts and bolts may cause elec-
trolysis and corrosion, which in turn could cause the
bolt to loosen.
Gray plating: "Dacro" type
Gray plating + Green coating on the threads:
"Torquer" type
1. When replacing nuts and bolts, use only the same
type.
2. Tighten the nuts and bolts with a torque wrench to
the specifications provided in this manual.
3. Clean all thread ridges with a non-wire-type bristle
brush. Foreign matter in the threads may cause the
bolt to loosen.
4. Sections on this vehicle requiring the use of Dacro nuts
and bolts will be indicated by a in this manual.ProCarManuals.com
Page 386 of 1503
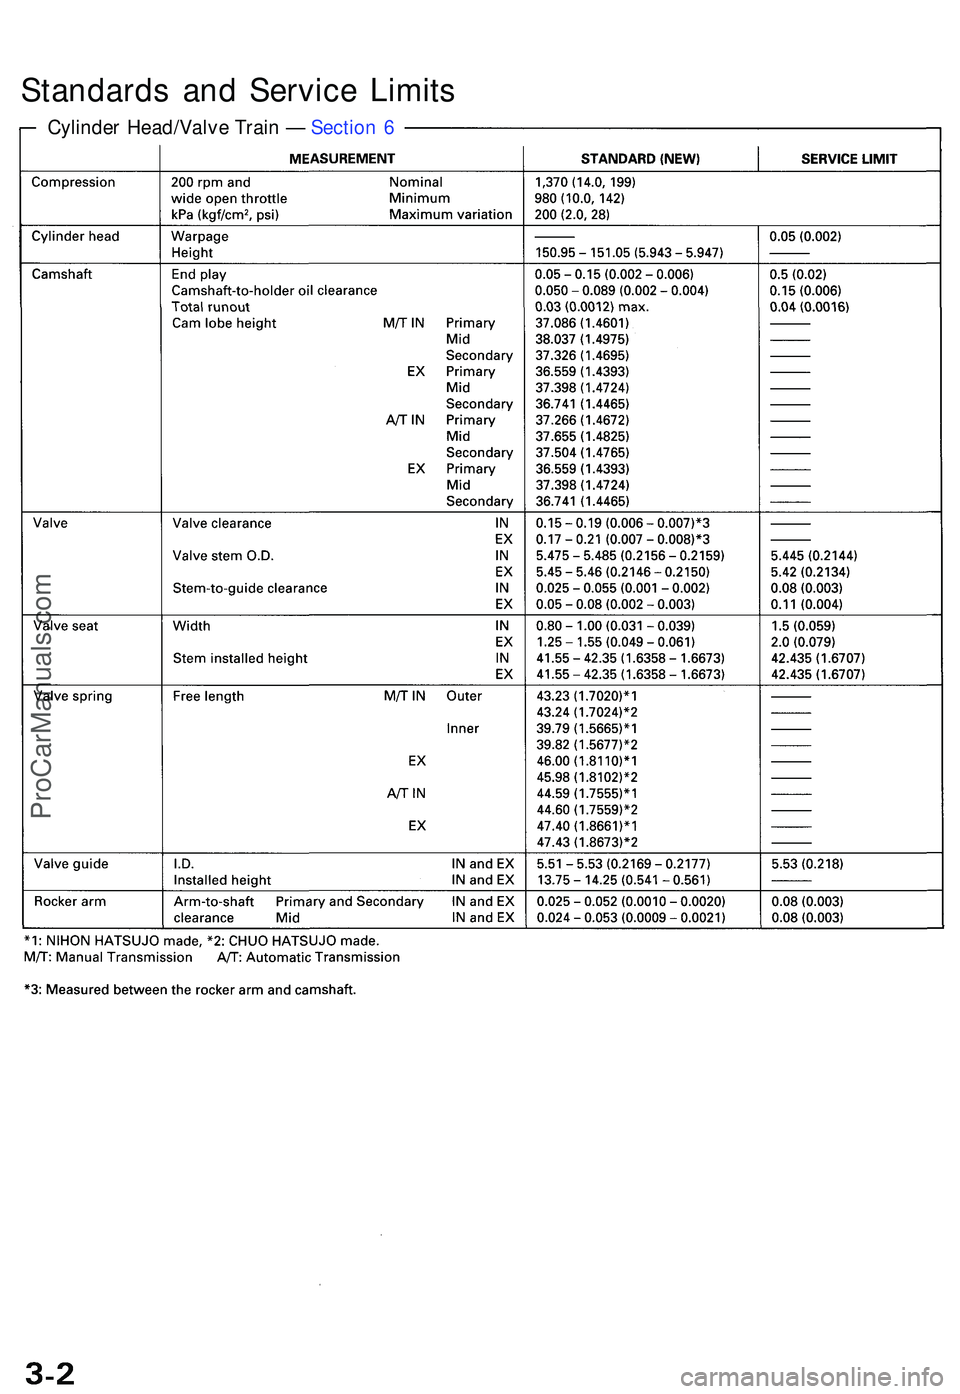
Standards an d Servic e Limit s
Cylinde r Head/Valv e Trai n — Sectio n 6
ProCarManuals.com
Page 387 of 1503
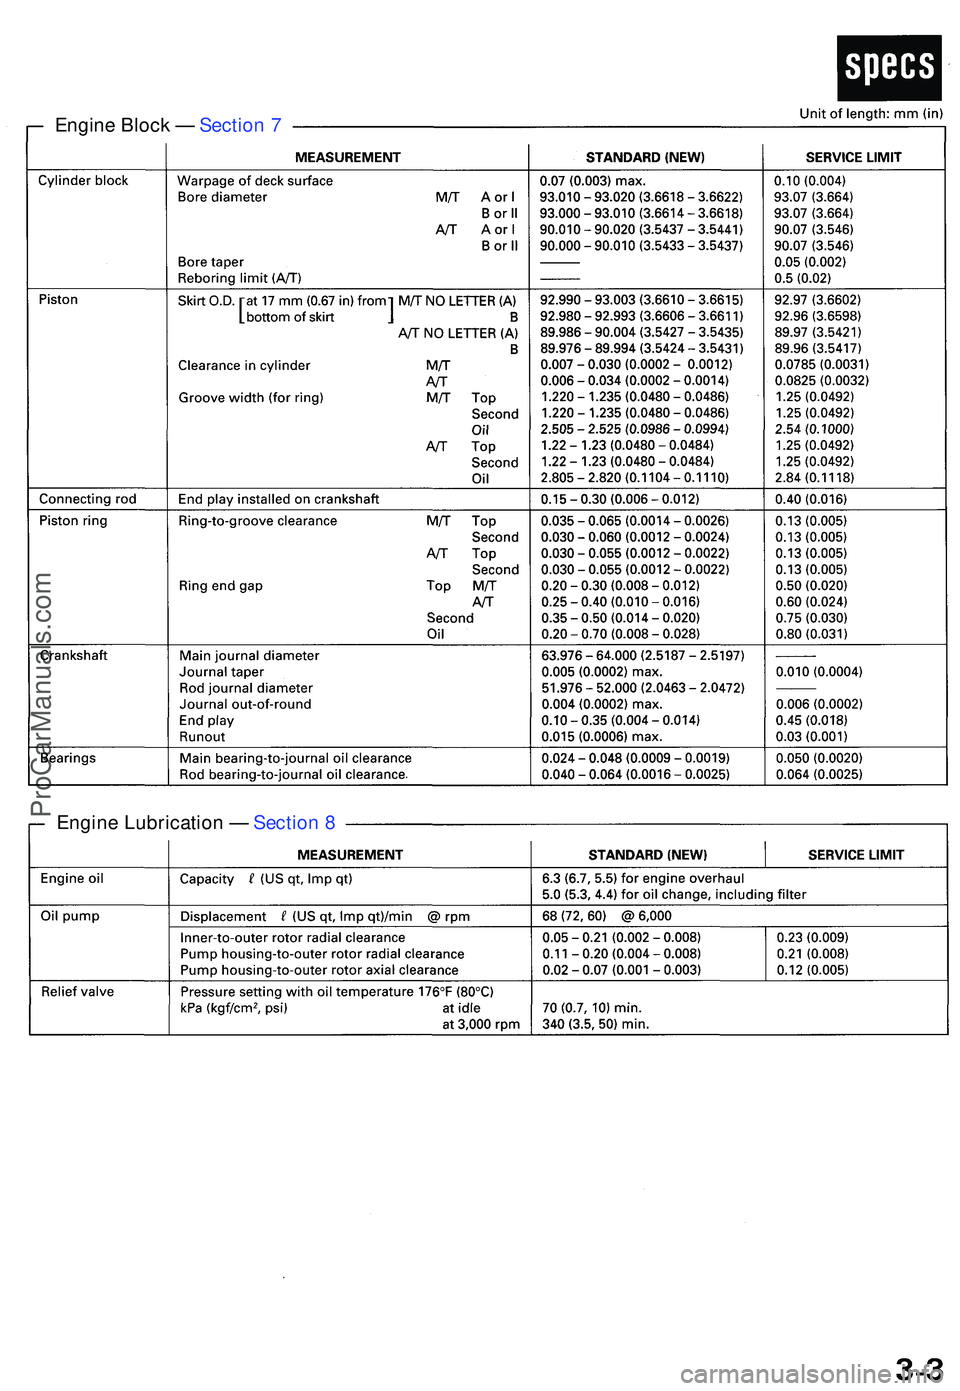
Engine Bloc k — Sectio n 7
Engin e Lubricatio n — Sectio n 8
ProCarManuals.com
Page 388 of 1503
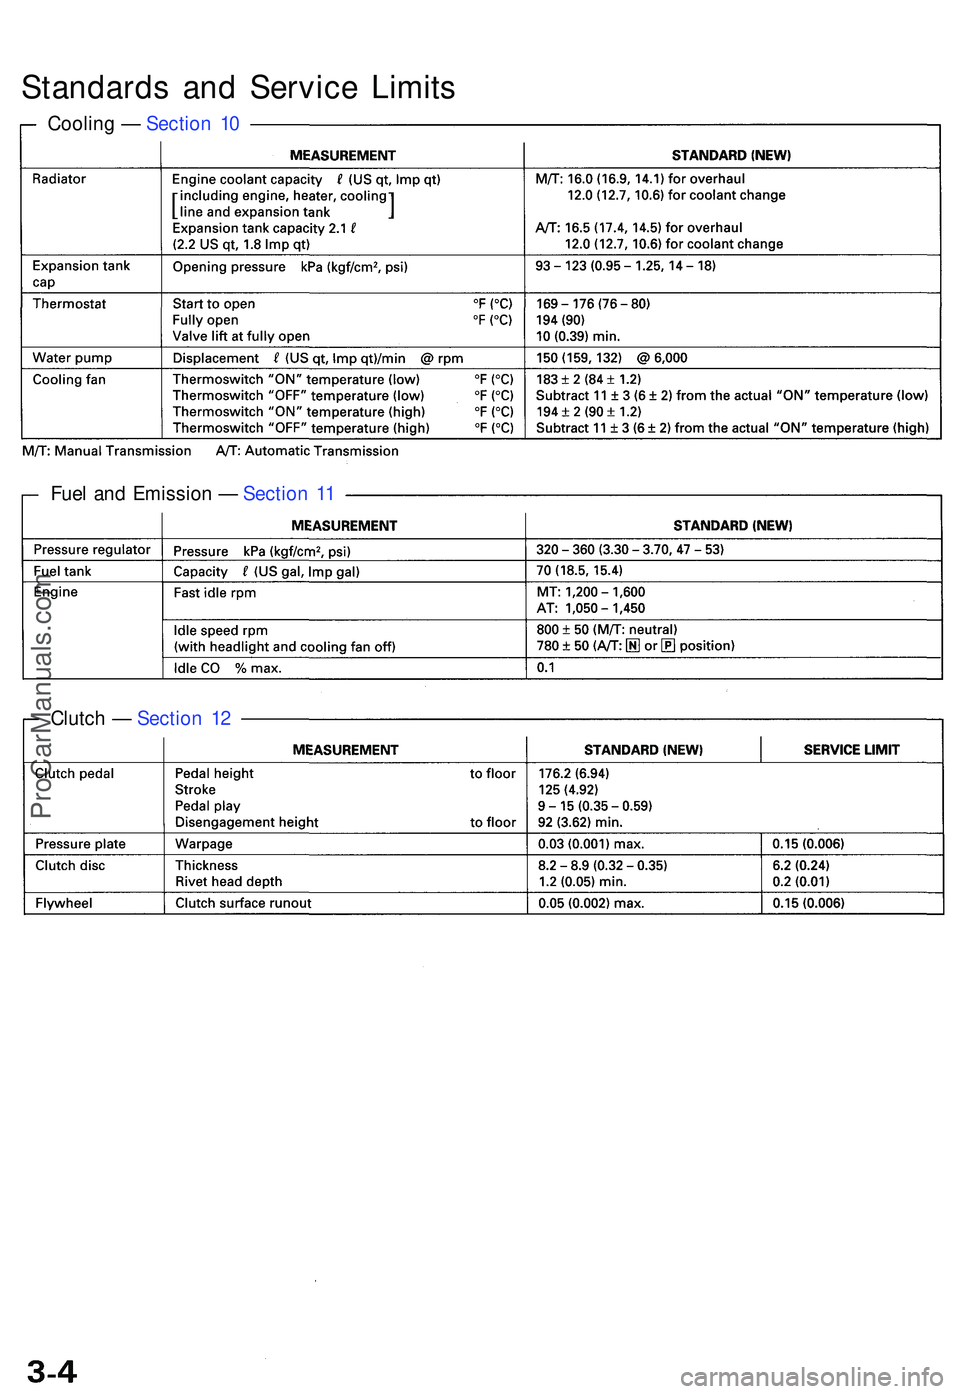
Cooling — Sectio n 1 0
Standard s an d Servic e Limit s
Fuel an d Emissio n — Sectio n 1 1
Clutc h — Sectio n 1 2
ProCarManuals.com
Page 389 of 1503
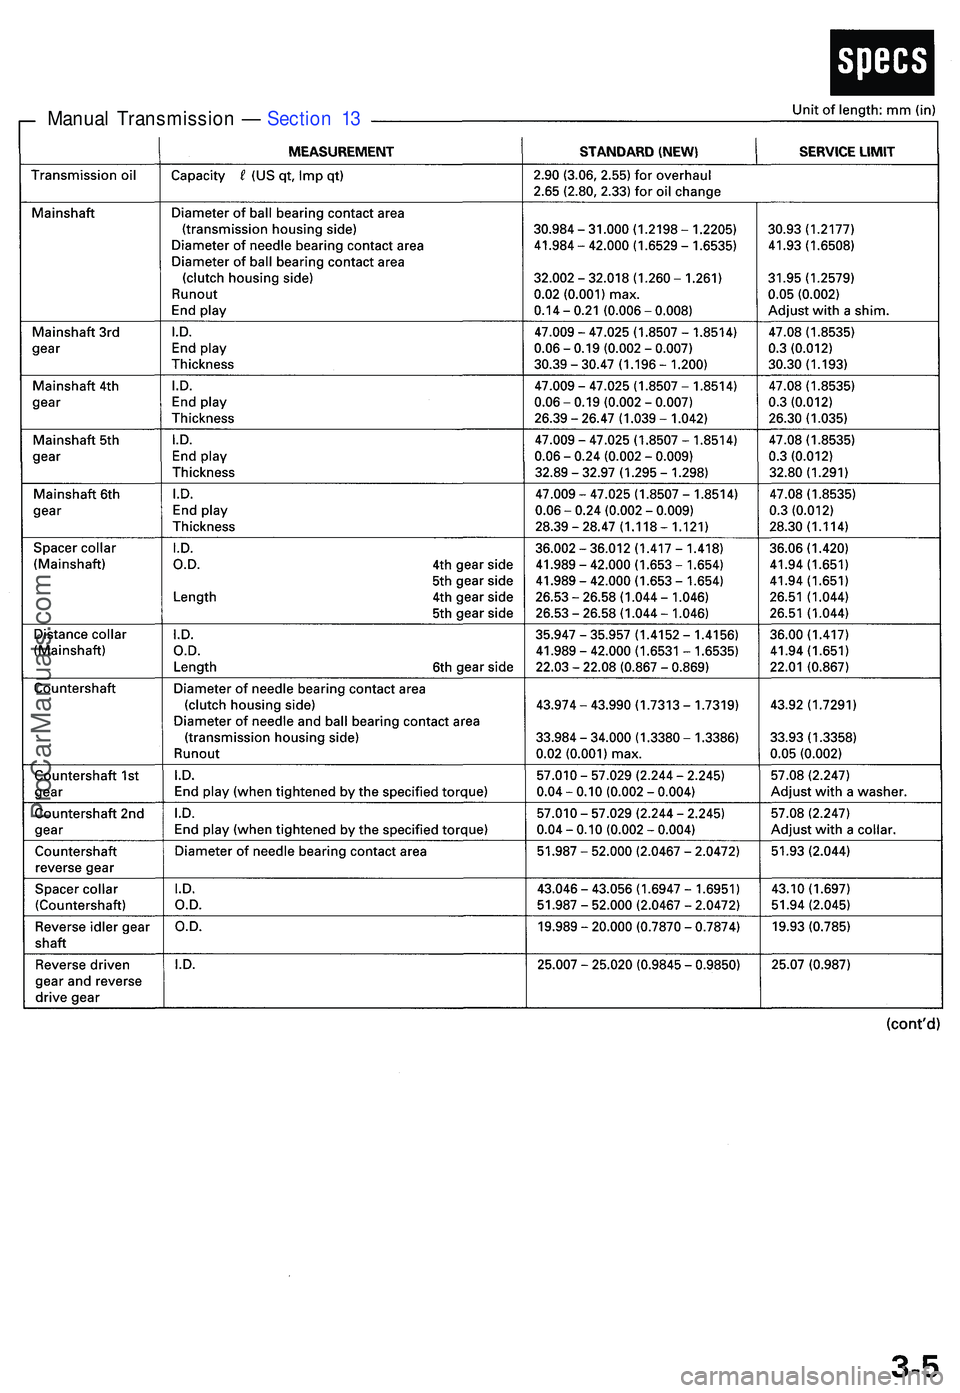
Manual Transmissio n — Sectio n 1 3
ProCarManuals.com
Page 390 of 1503
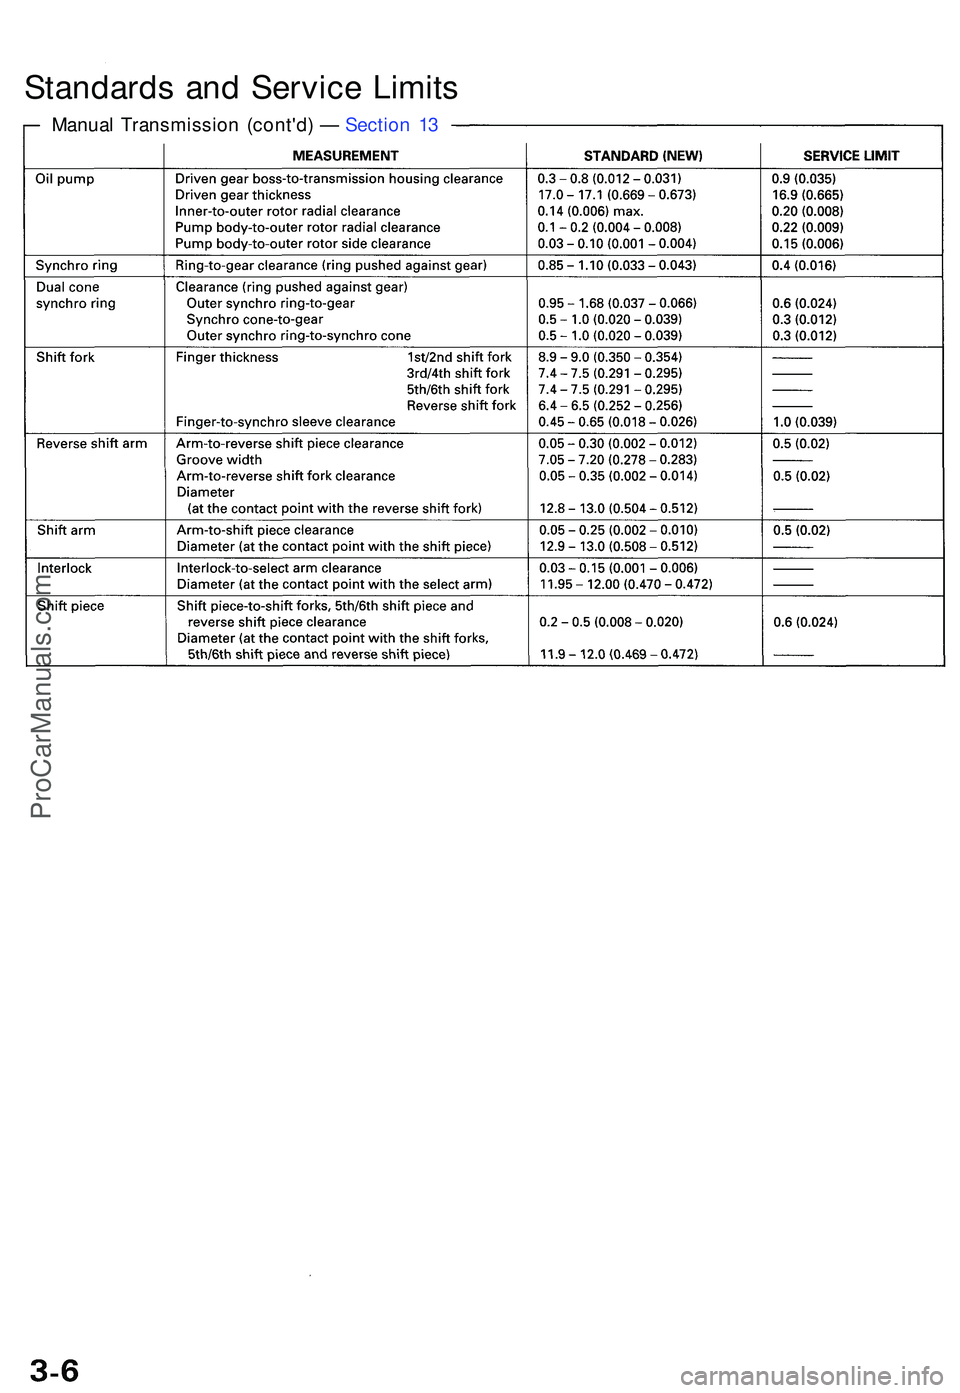
Manual Transmissio n (cont'd ) — Sectio n 1 3
Standard s an d Servic e Limit s
ProCarManuals.com
Trending: oil type, radiator cap, cooling, key battery, oil, oil capacity, wheelbase
