ACURA NSX 1997 Service Repair Manual
Manufacturer: ACURA, Model Year: 1997,
Model line: NSX,
Model: ACURA NSX 1997
Pages: 1503, PDF Size: 57.08 MB
ACURA NSX 1997 Service Repair Manual
NSX 1997
ACURA
ACURA
https://www.carmanualsonline.info/img/32/56989/w960_56989-0.png
ACURA NSX 1997 Service Repair Manual
Trending: water pump, oil change, check engine light, reset, fuel filter, display, steering wheel
Page 401 of 1503
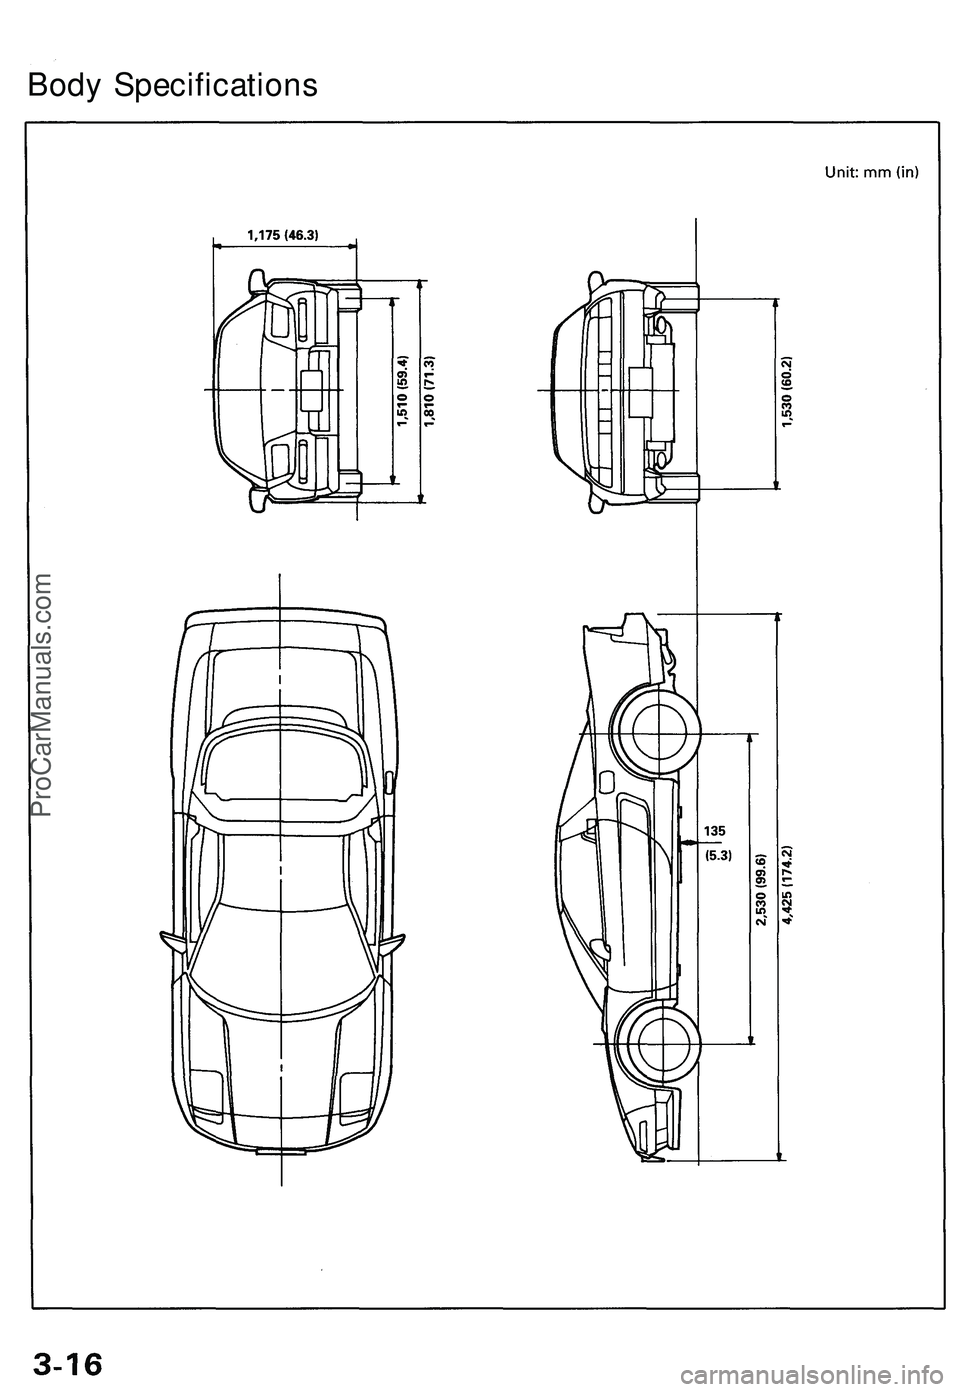
Body SpecificationsProCarManuals.com
Page 402 of 1503
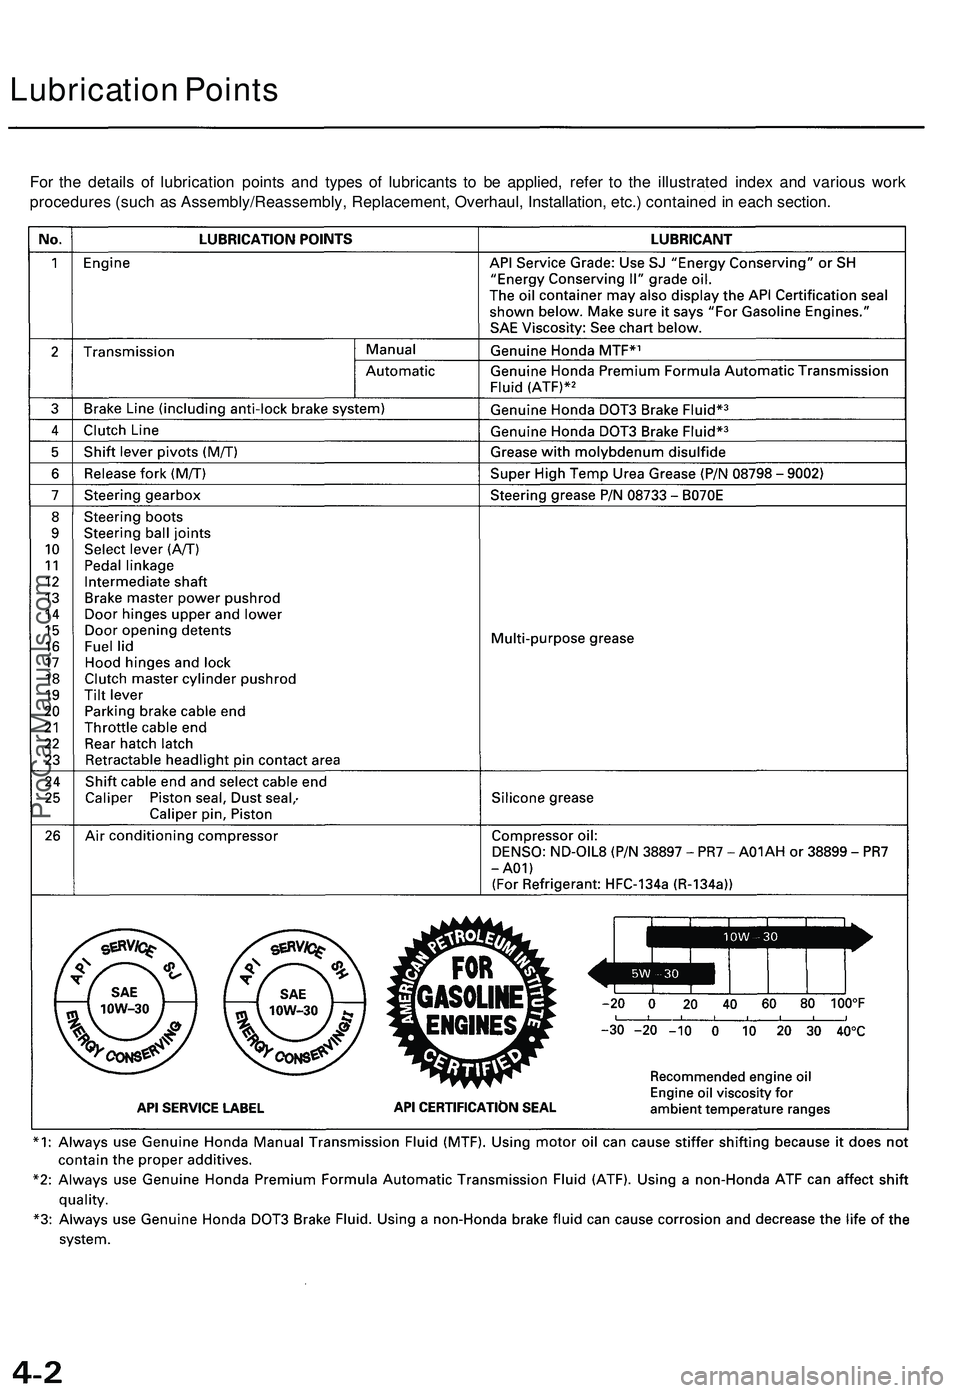
Lubrication Points
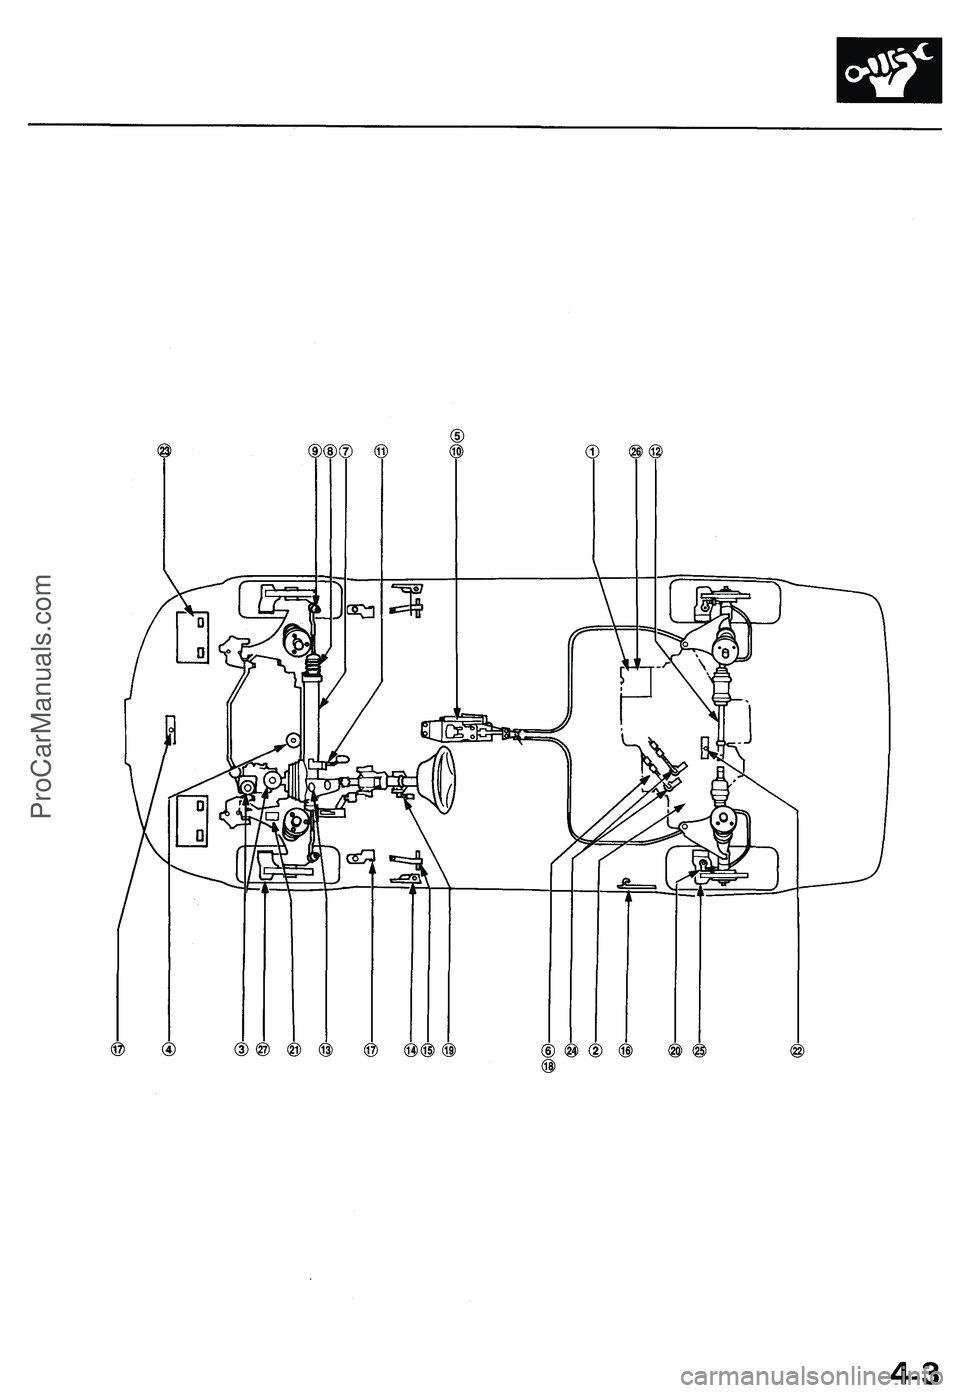
For the details of lubrication points and types of lubricants to be applied, refer to the illustrated index and various work
procedures (such as Assembly/Reassembly, Replacement, Overhaul, Installation, etc.) contained in each section.ProCarManuals.com
Page 403 of 1503
Page 404 of 1503
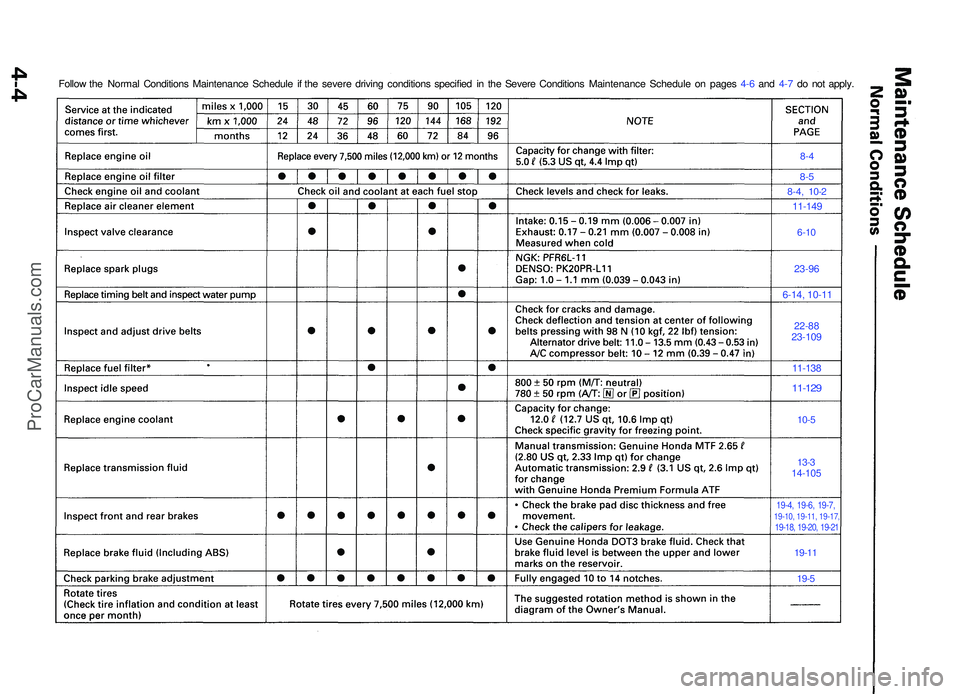
8-4
8-5
8-4 , 10- 2
11-14 9
6-10
23-9 6
6-14, 10-1 1
22-8823-10 9
11-13 8
11-129
10-5
13- 3
14-10 5
19-4, 19-6 , 19-7 ,19-10, 19-11, 19-17 ,19-18, 19-20 , 19-2 1
19-11
19- 5
Follo w th e Norma l Condition s Maintenanc e Schedul e i f th e sever e drivin g condition s specifie d i n th e Sever e Condition s Maintenanc e Schedul e o n page s 4- 6 an d 4- 7 d o no t apply .
ProCarManuals.com
Page 405 of 1503
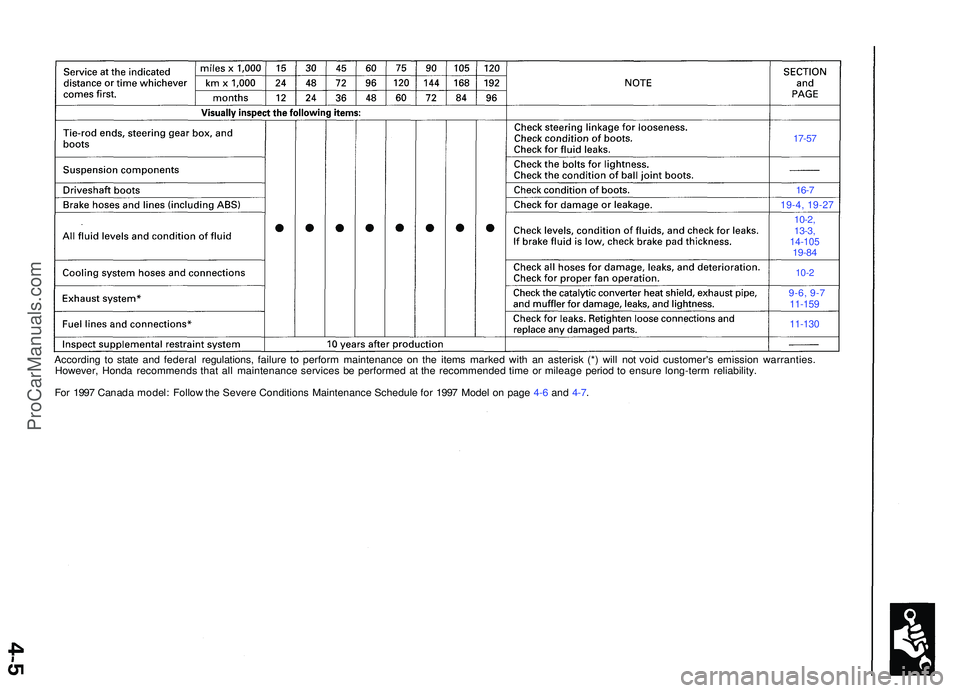
17-57
16-7
19-4, 19-2 7
10-2,
13-3 ,
14-10 519-84
10-2
9-6, 9- 711-159
11-130
Accordin g t o stat e an d federa l regulations , failur e t o perfor m maintenanc e o n th e item s marke d wit h a n asteris k (* ) wil l no t voi d customer' s emissio n warranties .
However , Hond a recommend s tha t al l maintenanc e service s b e performe d a t th e recommende d tim e o r mileag e perio d t o ensur e long-ter m reliability .
Fo r 199 7 Canad a model : Follo w th e Sever e Condition s Maintenanc e Schedule for 199 7 Mode l o n pag e 4-6 and 4-7 .
ProCarManuals.com
Page 406 of 1503
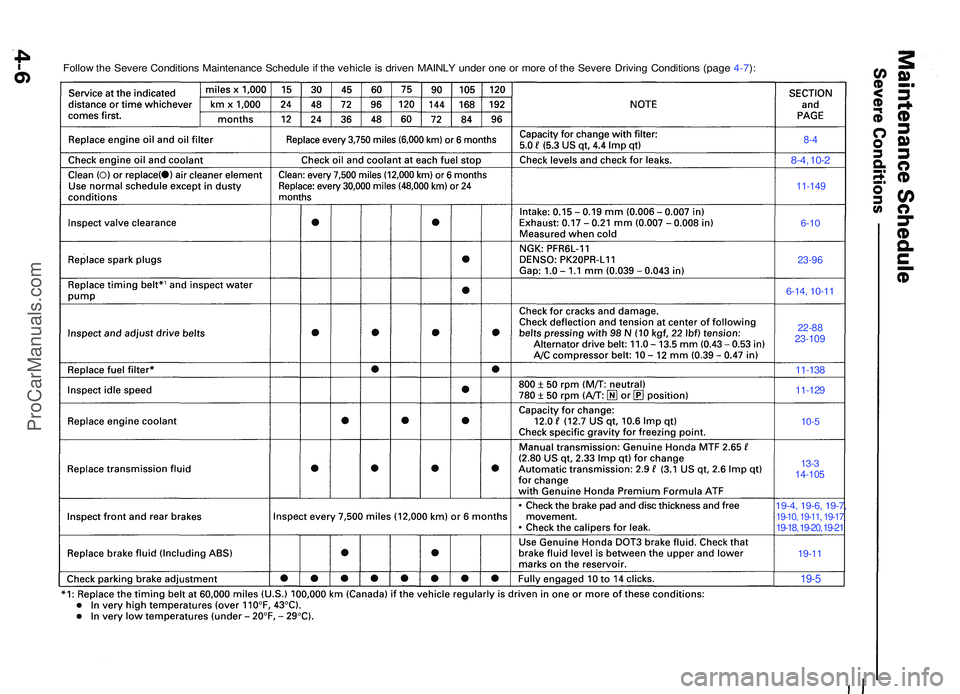
Follow th e Sever e Condition s Maintenanc e Schedul e if th e vehicl e is drive n MAINL Y unde r on e o r mor e o f th e Sever e Drivin g Condition s (pag e 4-7 ):
8- 4
8-4 , 10- 2
11-14 9
6-10
23-9 6
6-14, 10-1 1
22-8823-10 9
11-138
11-12 9
10-5
13-314-10 5
19-4, 19-6 , 19-7 ,19-10 , 19-11 , 19-17 ,19-18, 19-20, 19-21
19-11
19-5
ProCarManuals.com
Page 407 of 1503
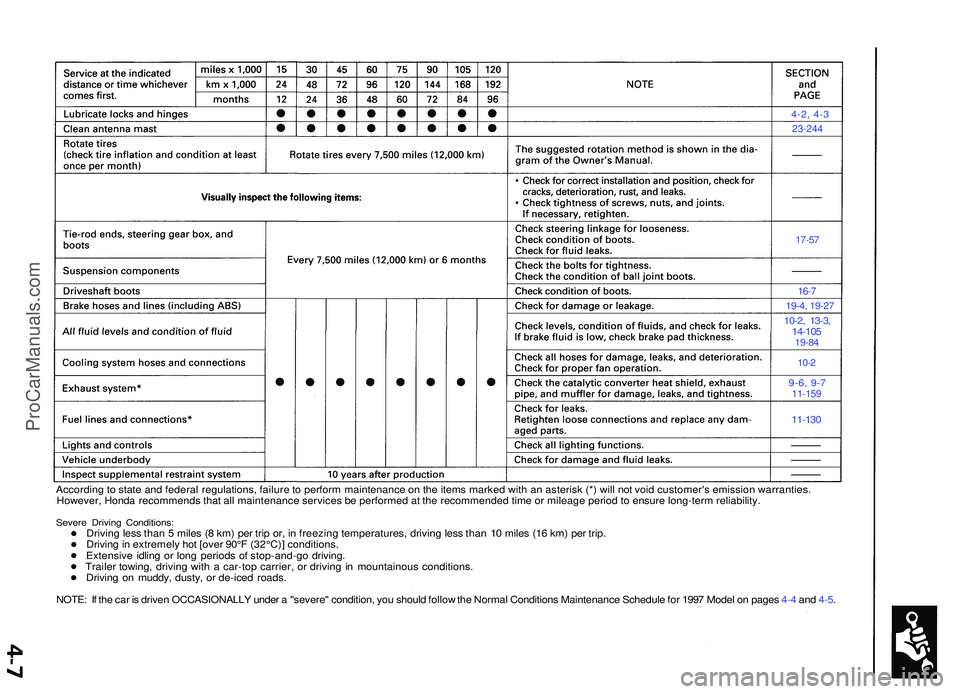
4-2, 4-3
23-244
17-57
16-7
19-4 , 19-2 7
10-2, 13-3 ,14-10 519-84
10-2
9-6, 9-711-15 9
11-130
Accordin g to stat e an d federa l regulations , failur e to perfor m maintenanc e o n th e item s marke d wit h a n asteris k (* ) wil l no t voi d customer' s emissio n warranties .
However , Hond a recommend s tha t al l maintenanc e service s b e performe d a t th e recommende d tim e o r mileag e perio d to ensur e long-ter m reliability .
Severe Drivin g Conditions :Driving les s tha n 5 mile s ( 8 km ) pe r tri p or , i n freezin g temperatures , drivin g les s tha n 1 0 mile s (1 6 km ) pe r trip .
Drivin g in extremel y ho t [ove r 90° F (32°C) ] conditions .
Extensiv e idlin g o r lon g period s o f stop-and-g o driving .
Traile r towing , drivin g wit h a car-to p carrier , o r drivin g in mountainou s conditions .
Drivin g o n muddy , dusty , o r de-ice d roads .
NOTE : I f th e ca r i s drive n OCCASIONALL Y unde r a "severe " condition , yo u shoul d follo w th e Norma l Condition s Maintenanc e Schedul e fo r 199 7 Mode l o n page s 4- 4 an d 4-5 .
ProCarManuals.com
Page 408 of 1503
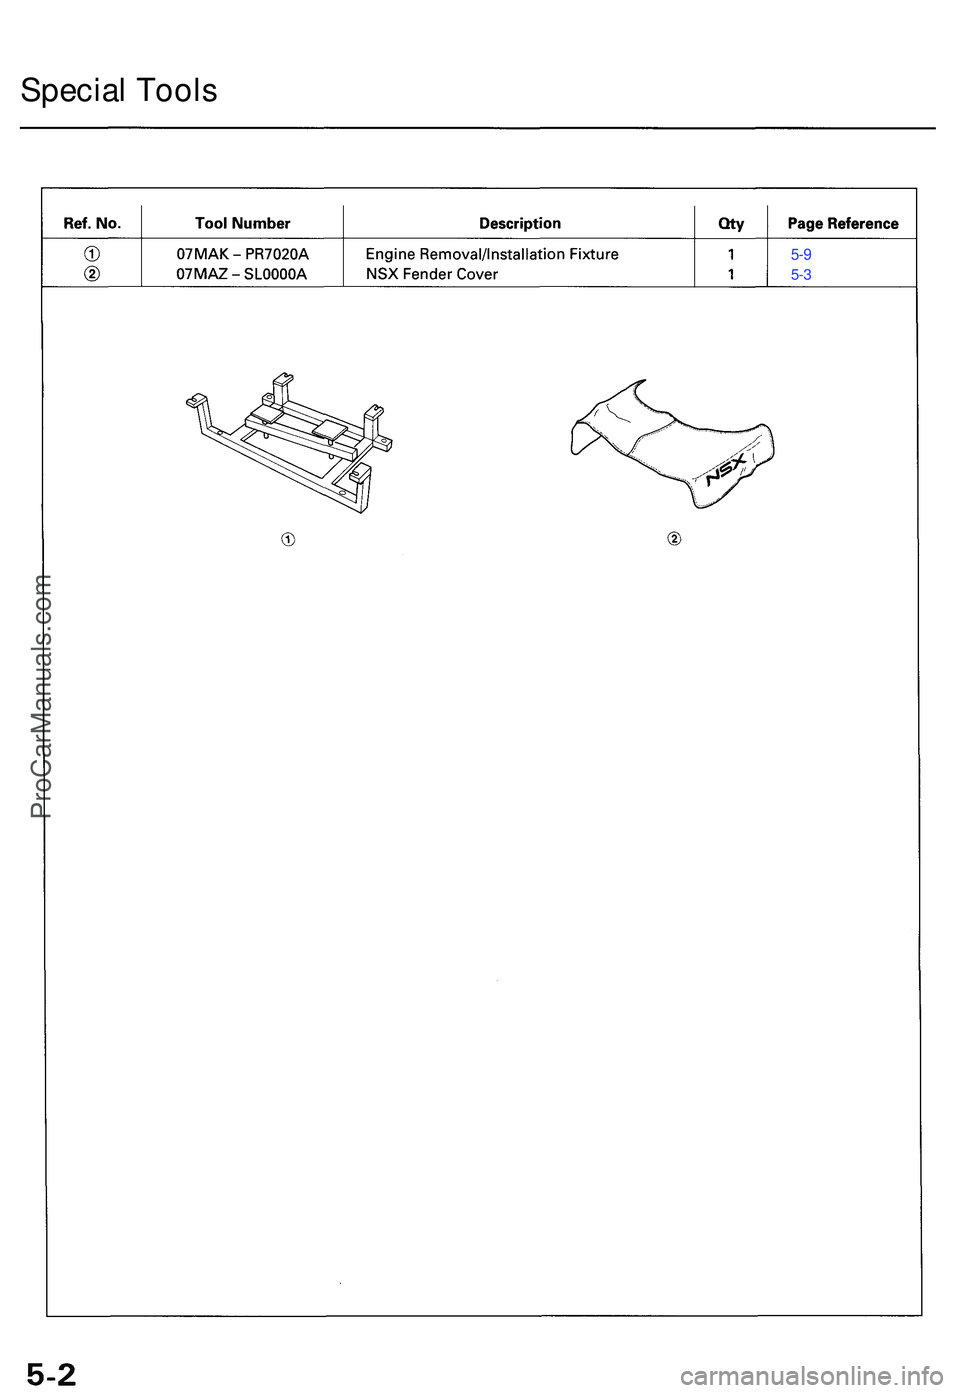
Special Tool s
5-9
5-3
ProCarManuals.com
Page 409 of 1503
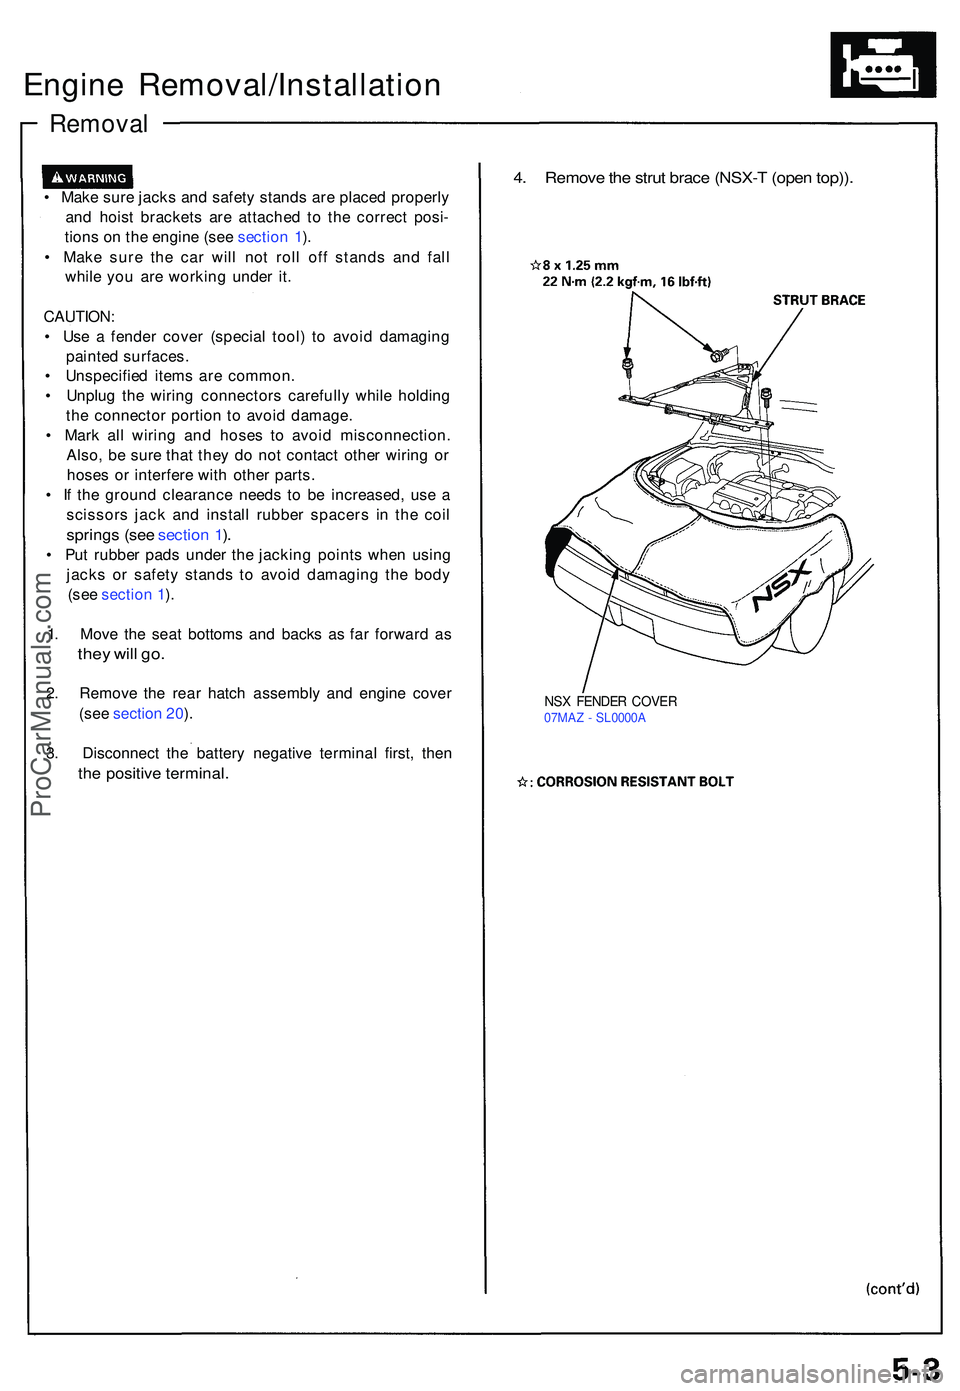
Engine Removal/Installatio n
Removal
• Mak e sur e jack s an d safet y stand s ar e place d properl y
an d hois t bracket s ar e attache d t o th e correc t posi -
tion s o n th e engin e (se e sectio n 1 ).
• Mak e sur e th e ca r wil l no t rol l of f stand s an d fal l
whil e yo u ar e workin g unde r it .
CAUTION :
• Us e a fende r cove r (specia l tool ) t o avoi d damagin g
painte d surfaces .
• Unspecifie d item s ar e common .
• Unplu g th e wirin g connector s carefull y whil e holdin g
th e connecto r portio n t o avoi d damage .
• Mar k al l wirin g an d hose s t o avoi d misconnection .
Also , b e sur e tha t the y d o no t contac t othe r wirin g o r
hose s o r interfer e wit h othe r parts .
• I f th e groun d clearanc e need s t o b e increased , us e a
scissor s jac k an d instal l rubbe r spacer s i n th e coi l
spring s (se e sectio n 1 ).
• Pu t rubbe r pad s unde r th e jackin g point s whe n usin g
jack s o r safet y stand s t o avoi d damagin g th e bod y
(se e sectio n 1 ).
1 . Mov e th e sea t bottom s an d back s a s fa r forwar d a s
the y wil l go .
2. Remov e th e rea r hatc h assembl y an d engin e cove r
(se e sectio n 20 ).
3 . Disconnec t th e batter y negativ e termina l first , the n
the positiv e terminal .
4. Remov e th e stru t brac e (NSX- T (ope n top)) .
NSX FENDE R COVE R07MAZ - SL0000 A
ProCarManuals.com
Page 410 of 1503
Removal (cont'd)
Engine Removal/Installation
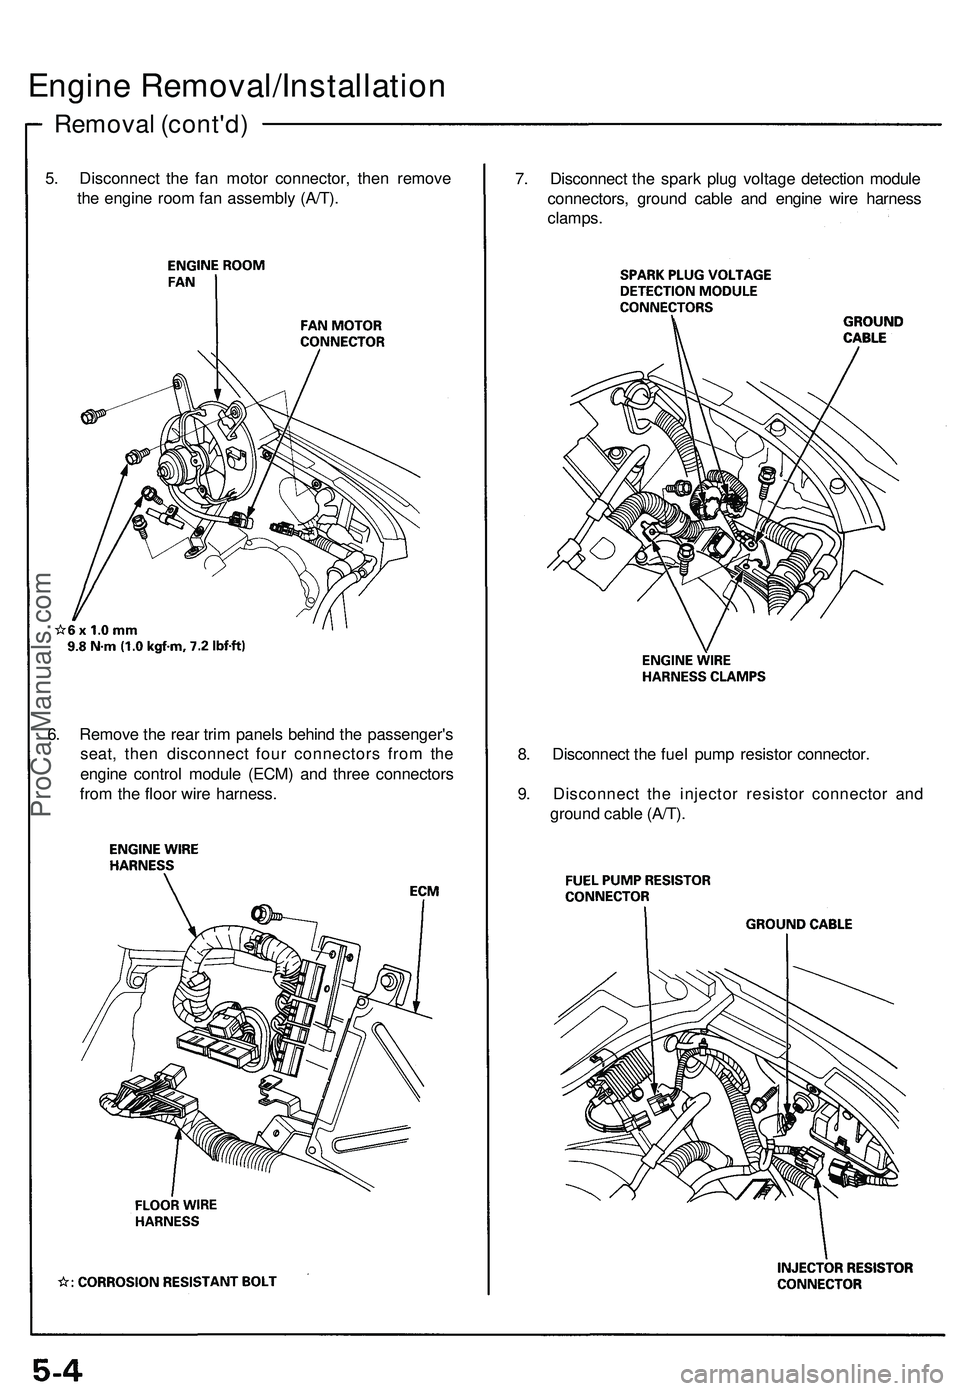
5. Disconnect the fan motor connector, then remove
the engine room fan assembly (A/T).
7. Disconnect the spark plug voltage detection module
connectors, ground cable and engine wire harness
clamps.
8. Disconnect the fuel pump resistor connector.
9. Disconnect the injector resistor connector and
ground cable (A/T).
6. Remove the rear trim panels behind the passenger's
seat, then disconnect four connectors from the
engine control module (ECM) and three connectors
from the floor wire harness.ProCarManuals.com
Trending: brakes, automatic transmission fluid, CD player, warning, recommended oil, fuel pressure, change time
