ACURA RL KA9 1996 Service Repair Manual
Manufacturer: ACURA, Model Year: 1996, Model line: RL KA9, Model: ACURA RL KA9 1996Pages: 1954, PDF Size: 61.44 MB
Page 1331 of 1954
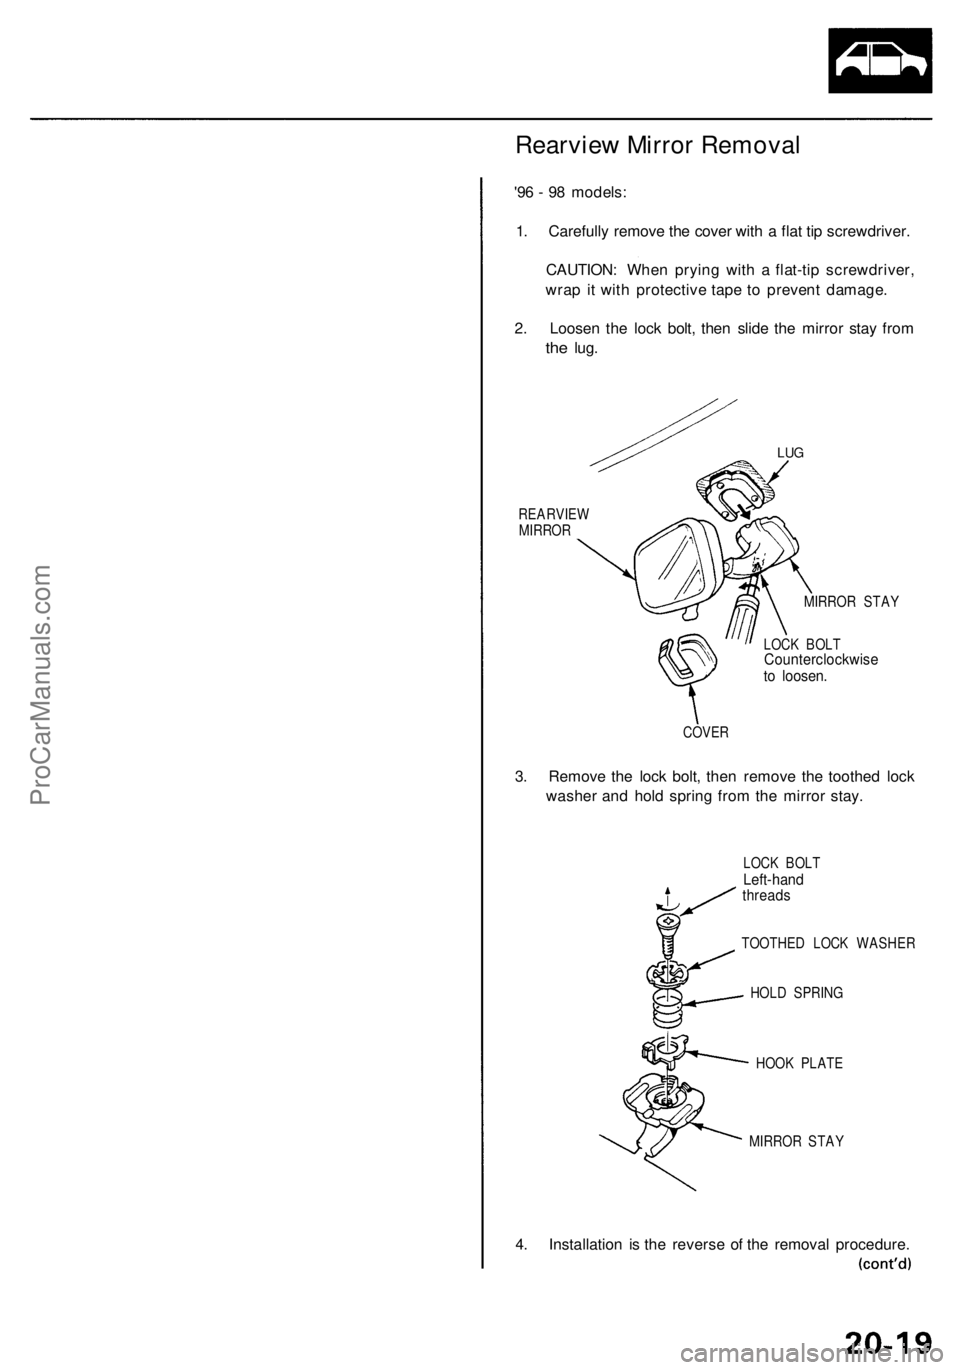
Rearview Mirror Removal
'96 - 98 models:
1. Carefully remove the cover with a flat tip screwdriver.
CAUTION: When prying with a flat-tip screwdriver,
wrap it with protective tape to prevent damage.
2. Loosen the lock bolt, then slide the mirror stay from
the
lug.
LUG
REARVIEW
MIRROR
MIRROR STAY
LOCK BOLT
Counterclockwise
to loosen.
COVER
3. Remove the lock bolt, then remove the toothed lock
washer and hold spring from the mirror stay.
LOCK BOLT
Left-hand
threads
TOOTHED LOCK WASHER
HOLD SPRING
HOOK PLATE
MIRROR STAY
4. Installation is the reverse of the removal procedure.ProCarManuals.com
Page 1332 of 1954
Mirrors
Rearvie w Mirro r Remova l (cont'd )
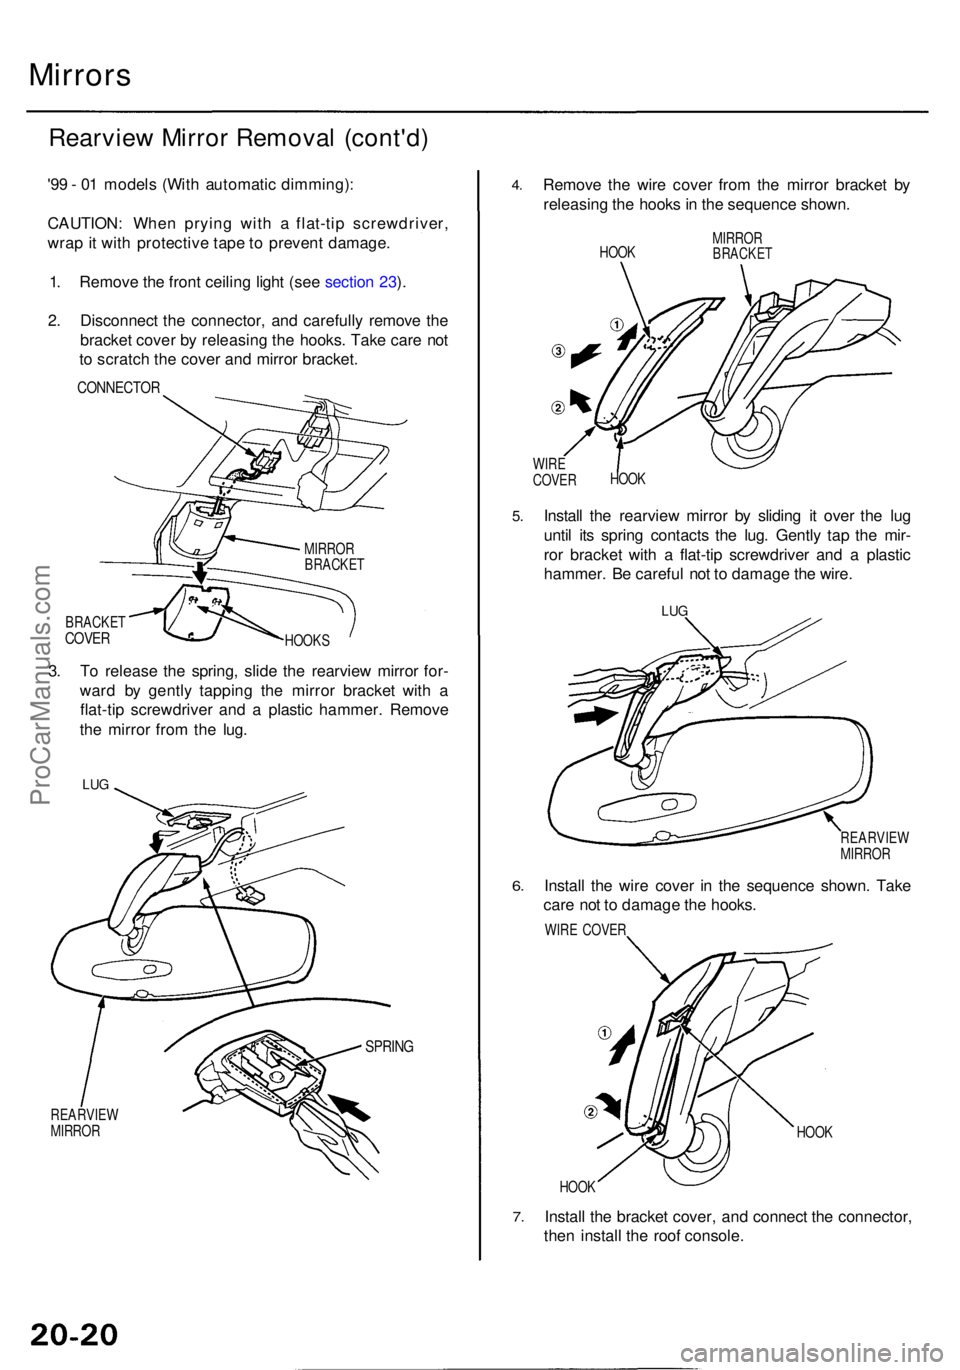
'99 - 0 1 model s (Wit h automati c dimming) :
CAUTION : Whe n pryin g wit h a flat-ti p screwdriver ,
wra p it wit h protectiv e tap e t o preven t damage .
1 . Remov e th e fron t ceilin g ligh t (se e sectio n 23 ).
2 . Disconnec t th e connector , an d carefull y remov e th e
bracke t cove r b y releasin g th e hooks . Tak e car e no t
t o scratc h th e cove r an d mirro r bracket .
CONNECTO R
BRACKETCOVERHOOK S
3. T o releas e th e spring , slid e th e rearvie w mirro r for -
war d b y gentl y tappin g th e mirro r bracke t wit h a
flat-ti p screwdrive r an d a plasti c hammer . Remov e
th e mirro r fro m th e lug .
LUG
SPRIN G
REARVIE W
MIRRO R
4.Remov e th e wir e cove r fro m th e mirro r bracke t b y
releasin g th e hook s in th e sequenc e shown .
HOOK MIRRO
RBRACKE T
WIRE
COVE R HOO
K
5.Instal l th e rearvie w mirro r b y slidin g i t ove r th e lu g
unti l it s sprin g contact s th e lug . Gentl y ta p th e mir -
ro r bracke t wit h a flat-ti p screwdrive r an d a plasti c
hammer. Be carefu l no t t o damag e th e wire .
LUG
6.
REARVIE W
MIRRO R
Install th e wir e cove r i n th e sequenc e shown . Tak e
car e no t t o damag e th e hooks .
WIRE COVE R
HOOK
7.
HOO K
Instal l th e bracke t cover , an d connec t th e connector ,
the n instal l th e roo f console .
MIRRORBRACKE T
ProCarManuals.com
Page 1333 of 1954
Windshield/Rear Windo w
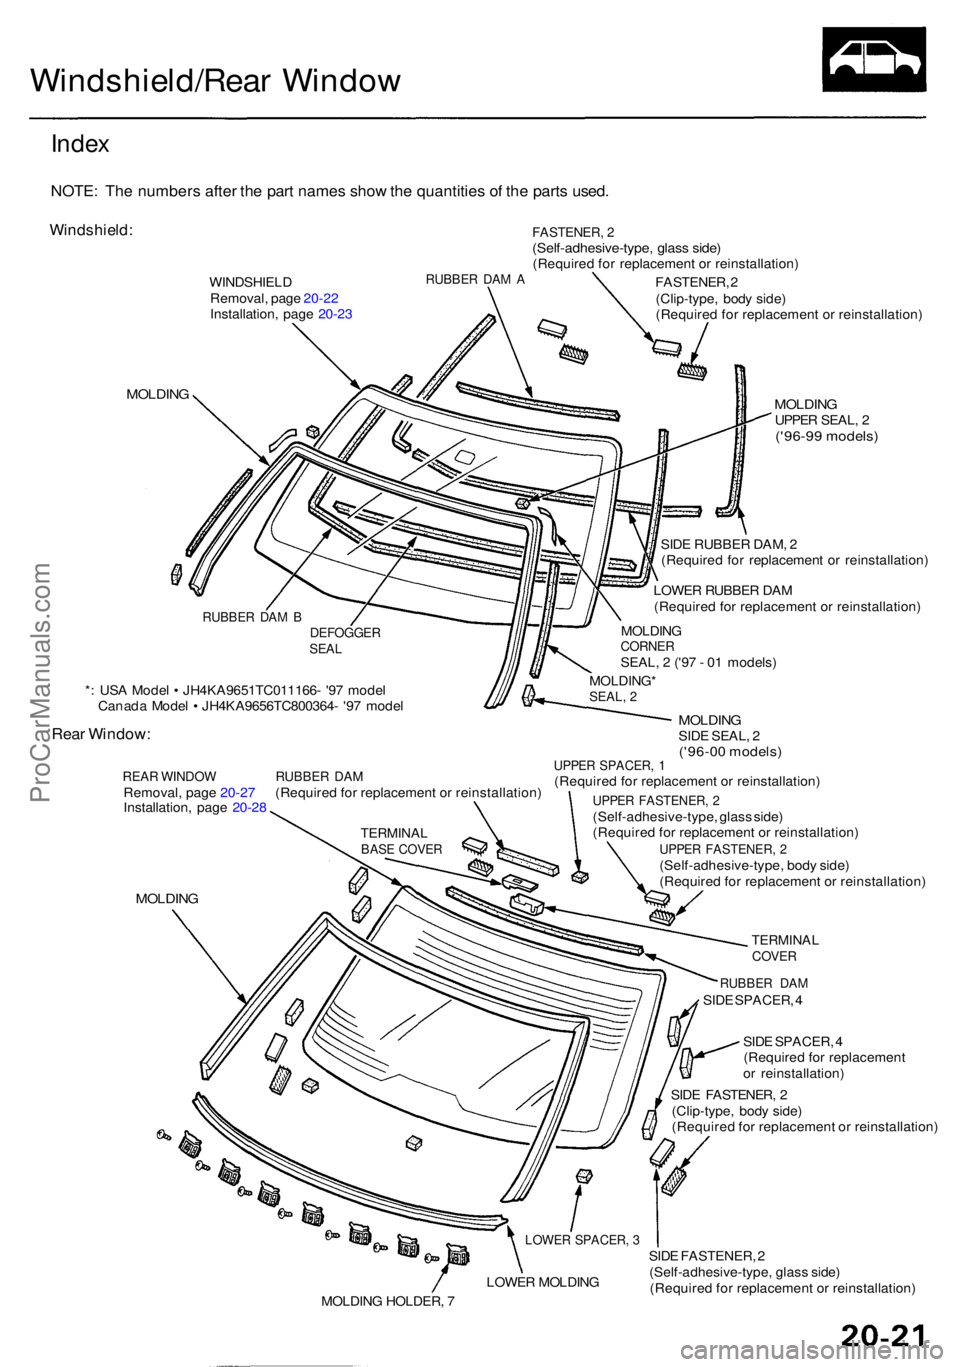
Index
NOTE : Th e number s afte r th e par t name s sho w th e quantitie s o f th e part s used .
Windshield :
WINDSHIEL D
Removal , pag e 20-2 2
Installation , pag e 20-2 3RUBBE R DA M A
FASTENER , 2(Self-adhesive-type , glas s side )(Require d fo r replacemen t o r reinstallation )
MOLDING
*: US A Mode l • JH4KA9651TC011166 - '9 7 mode l
Canad a Mode l • JH4KA9656TC800364 - '9 7 mode l
Rear Window :
REAR WINDO W RUBBE R DA MRemoval , pag e 20-2 7 (Require d fo r replacemen t o r reinstallation )
Installation , pag e 20-2 8
MOLDIN G
FASTENER , 2
(Clip-type , bod y side )
(Require d fo r replacemen t o r reinstallation )
MOLDINGUPPER SEAL , 2('96-9 9 models )
RUBBER DA MSIDE SPACER , 4
SID E SPACER , 4
(Require d fo r replacemen t
o r reinstallation )
SID E FASTENER , 2
(Clip-type , bod y side )
(Require d fo r replacemen t o r reinstallation )
SID E FASTENER , 2
(Self-adhesive-type , glas s side )
(Require d fo r replacemen t o r reinstallation )
DEFOGGERSEAL
MOLDING *SEAL, 2
MOLDIN GCORNERSEAL, 2 ('9 7 - 0 1 models )
LOWE
R RUBBE R DA M
(Require d fo r replacemen t o r reinstallation )
SID
E RUBBE R DAM , 2
(Require d fo r replacemen t o r reinstallation )
MOLDINGSIDE SEAL , 2('96-0 0 models )UPPER SPACER , 1(Require d fo r replacemen t o r reinstallation )
UPPER FASTENER , 2(Self-adhesive-type , glas s side )
(Require d fo r replacemen t o r reinstallation )
UPPER FASTENER , 2(Self-adhesive-type , bod y side )
(Require d fo r replacemen t o r reinstallation )
TERMINALCOVER
LOWE R SPACER , 3
LOWE R MOLDIN G
MOLDIN G HOLDER , 7
TERMINA LBASE COVE R
RUBBE R DA M B
ProCarManuals.com
Page 1334 of 1954
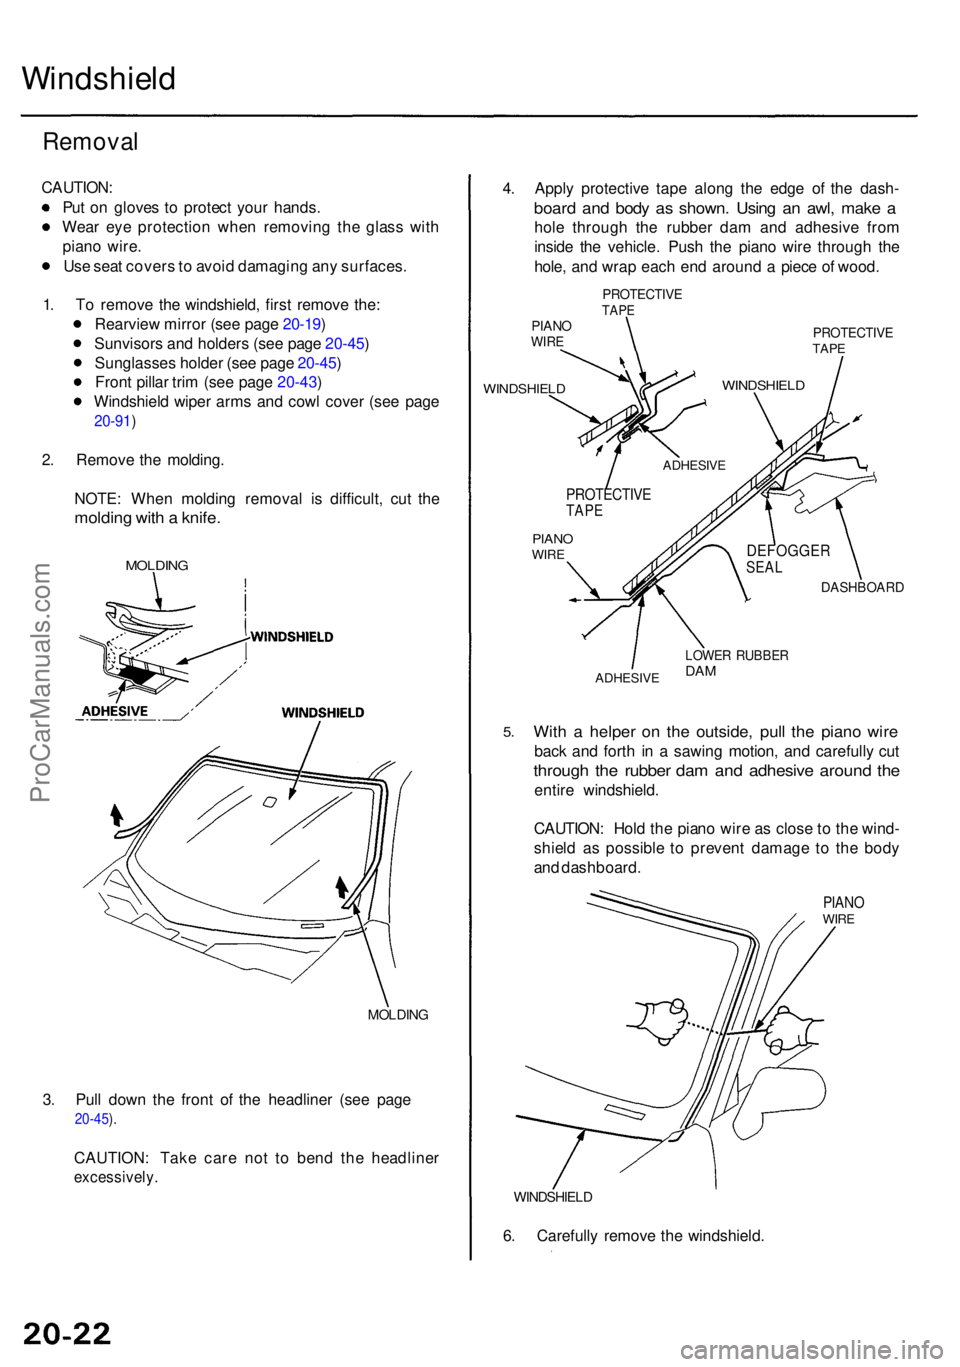
Windshield
Removal
CAUTION :
Pu t o n glove s t o protec t you r hands .
Wea r ey e protectio n whe n removin g th e glas s wit h
pian o wire .
Us e sea t cover s to avoi d damagin g an y surfaces .
1 . T o remov e th e windshield , firs t remov e the :
Rearvie w mirro r (se e pag e 20-19 )
Sunvisor s an d holder s (se e pag e 20-45 )
Sunglasse s holde r (se e pag e 20-45 )
Fron t pilla r tri m (se e pag e 20-43 )
Windshiel d wipe r arm s an d cow l cove r (se e pag e
20-91 )
2. Remov e th e molding .
NOTE : Whe n moldin g remova l i s difficult , cu t th e
moldin g wit h a knife .
MOLDIN G
MOLDIN G
3. Pul l dow n th e fron t o f th e headline r (se e pag e
20-45 ).
CAUTION : Tak e car e no t t o ben d th e headline r
excessively .
4. Appl y protectiv e tap e alon g th e edg e o f th e dash -
board an d bod y a s shown . Usin g a n awl , mak e a
hol e throug h th e rubbe r da m an d adhesiv e fro m
insid e th e vehicle . Pus h th e pian o wir e throug h th e
hole , an d wra p eac h en d aroun d a piec e o f wood .
PROTECTIV ETAPEPIAN OWIRE
WINDSHIEL D
PROTECTIV ETAPE
PIAN OWIRE
DASHBOAR D
ADHESIVE
LOWER RUBBE RDAM
5.Wit h a helpe r o n th e outside , pul l th e pian o wir e
back an d fort h i n a sawin g motion , an d carefull y cu t
throug h th e rubbe r da m an d adhesiv e aroun d th e
entir e windshield .
CAUTION : Hol d th e pian o wir e a s clos e t o th e wind -
shiel d a s possibl e t o preven t damag e t o th e bod y
an d dashboard .
PIANOWIRE
WINDSHIEL D
6. Carefull y remov e th e windshield .
WINDSHIEL D
ADHESIVE
PROTECTIVETAPE
DEFOGGE RSEAL
ProCarManuals.com
Page 1335 of 1954
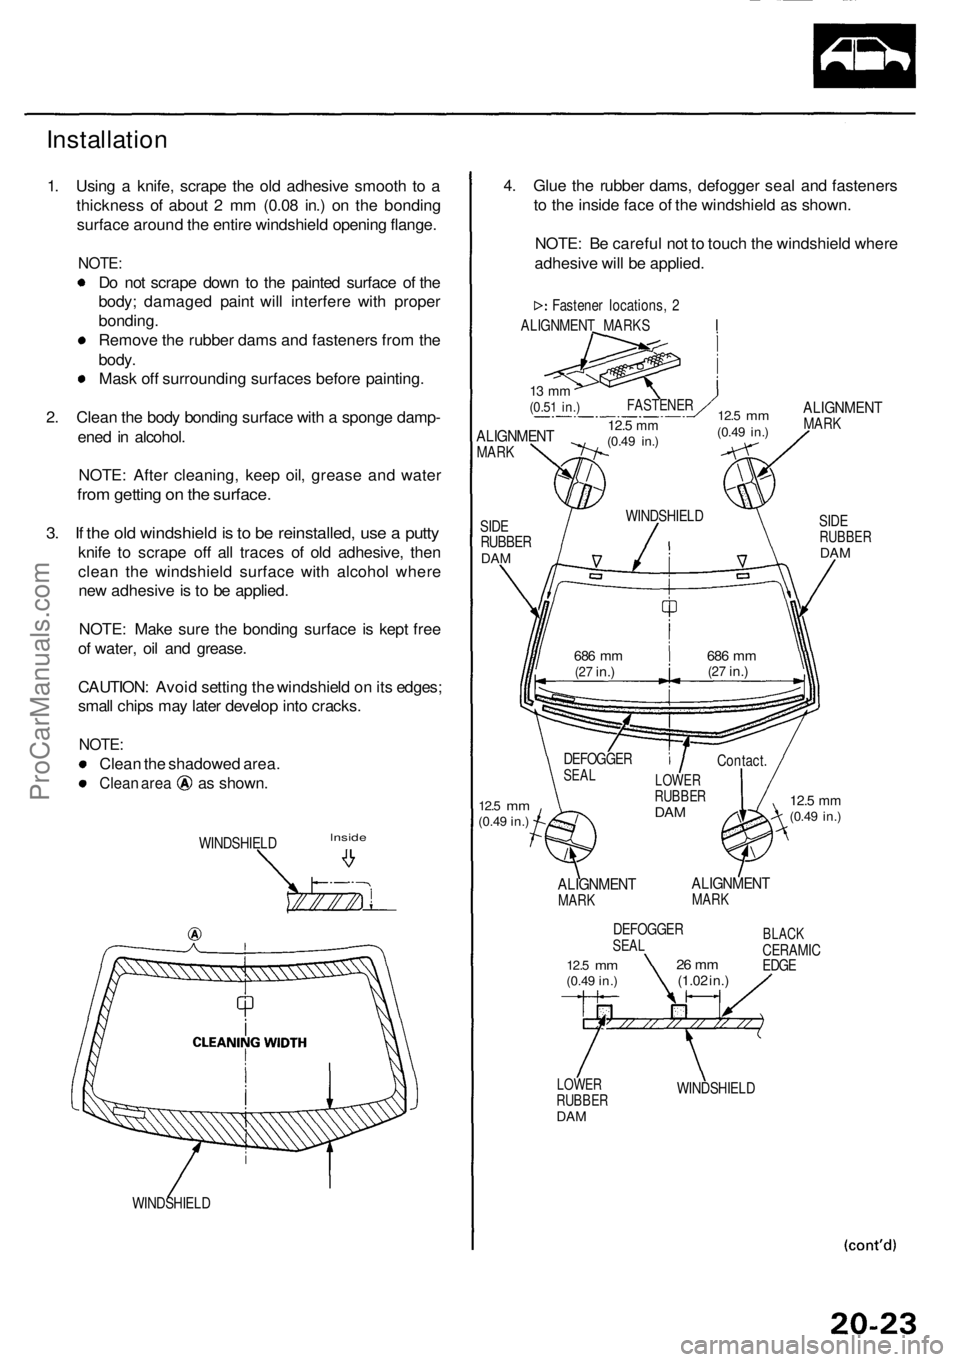
Installation
1. Usin g a knife , scrap e th e ol d adhesiv e smoot h t o a
thicknes s o f abou t 2 m m (0.0 8 in. ) o n th e bondin g
surfac e aroun d th e entir e windshiel d openin g flange .
NOTE:
Do no t scrap e dow n t o th e painte d surfac e o f th e
body ; damage d pain t wil l interfer e wit h prope r
bonding .
Remov e th e rubbe r dam s an d fastener s fro m th e
body .
Mas k of f surroundin g surface s befor e painting .
2 . Clea n th e bod y bondin g surfac e wit h a spong e damp -
ene d in alcohol .
NOTE : Afte r cleaning , kee p oil , greas e an d wate r
from gettin g o n th e surface .
3. I f th e ol d windshiel d is to b e reinstalled , us e a putt y
knife t o scrap e of f al l trace s o f ol d adhesive , the n
clea n th e windshiel d surfac e wit h alcoho l wher e
ne w adhesiv e is t o b e applied .
NOTE : Mak e sur e th e bondin g surfac e i s kep t fre e
o f water , oi l an d grease .
CAUTION : Avoi d settin g th e windshiel d o n it s edges ;
smal l chip s ma y late r develo p int o cracks .
NOTE:
Clean th e shadowe d area .
Clean are a a s shown .
WINDSHIEL D lnsid e
WINDSHIELD
4. Glu e th e rubbe r dams , defogge r sea l an d fastener s
t o th e insid e fac e o f th e windshiel d a s shown .
NOTE : B e carefu l no t t o touc h th e windshiel d wher e
adhesiv e wil l b e applied .
Fastene r locations , 2
ALIGNMEN T MARK S I
ALIGNMEN TMARK
SIDERUBBE RDAM
13 m m(0.5 1 in. )
ALIGNMEN TMARK
SIDE
RUBBE R
DAM
12.5 m m(0.4 9 in. )
12.5 mm(0.4 9 in. )
ALIGNMEN TMARKALIGNMEN TMARK
LOWE RRUBBE RDAM
WINDSHIEL D
12.5 m m(0.4 9 in. )
FASTENE R
12.5 mm(0.4 9 in. )
WINDSHIEL D
686 m m(27 in. )686 m m(27 in. )
Contact .
LOWERRUBBE RDAM
DEFOGGE RSEAL
DEFOGGE RSEALBLAC KCERAMI C
EDG E26 m m(1.0 2 in. )12. 5 m m(0.4 9 in. )
ProCarManuals.com
Page 1336 of 1954
Windshield
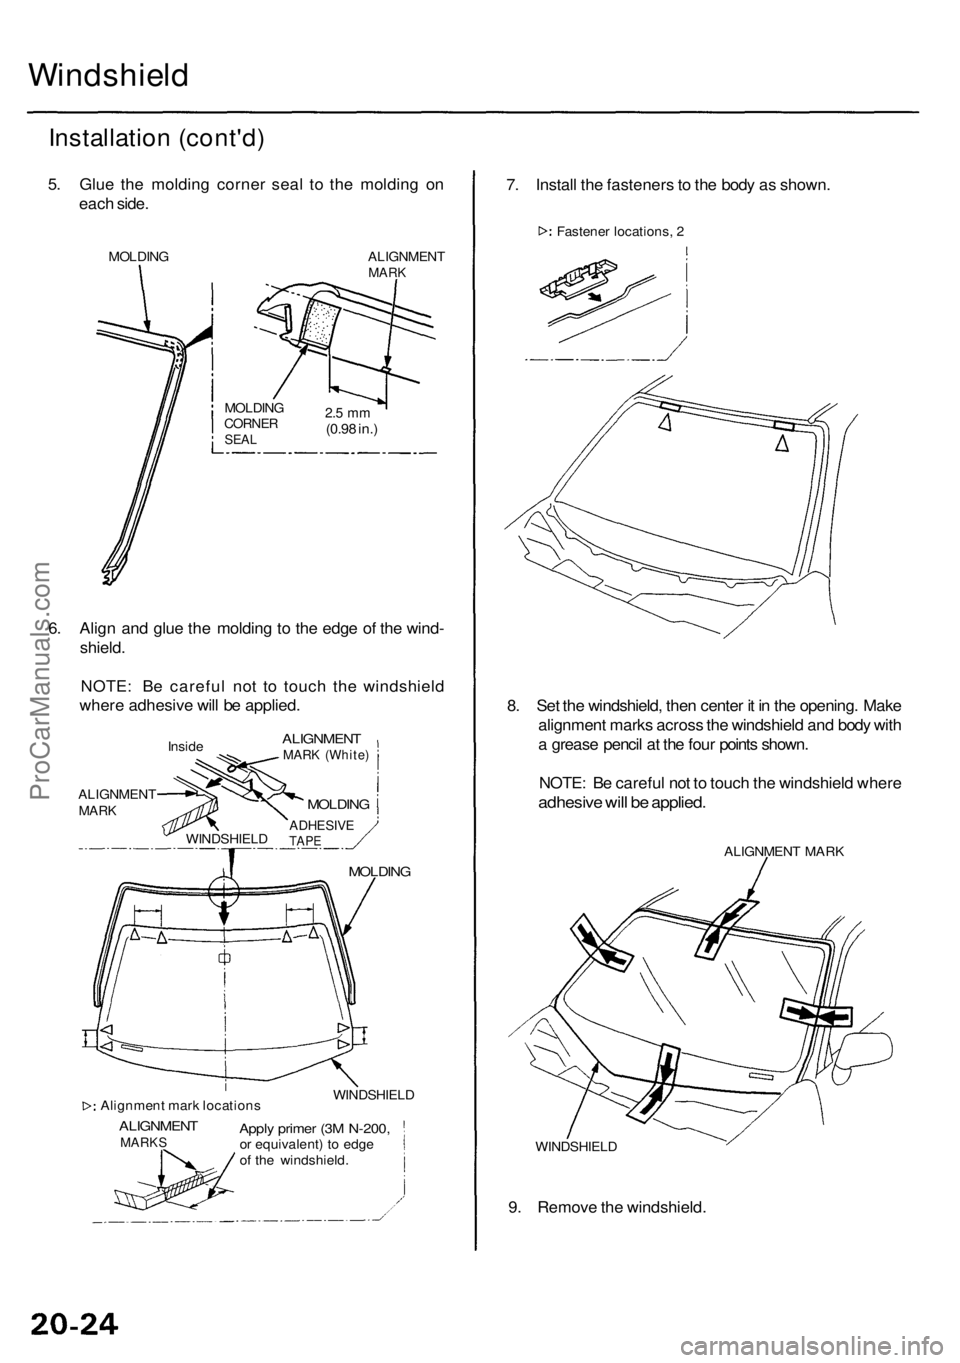
Installation (cont'd)
5. Glue the molding corner seal to the molding on
each side.
MOLDING
ALIGNMENT
MARK
6. Align and glue the molding to the edge of the wind-
shield.
NOTE: Be careful not to touch the windshield
where adhesive will be applied.
Inside
ALIGNMENT
MARK
ALIGNMENT
MARK (White)
7. Install the fasteners to the body as shown.
Fastener locations, 2
8. Set the windshield, then center it in the opening. Make
alignment marks across the windshield and body with
a grease pencil at the four points shown.
NOTE: Be careful not to touch the windshield where
adhesive will be applied.
ALIGNMENT MARK
WINDSHIELD
9. Remove the windshield.
2.5 mm
(0.98 in.)
MOLDING
CORNER
SEAL
Apply primer (3M N-200,
or equivalent) to edge
of the windshield.
WINDSHIELD
Alignment mark locations
ALIGNMENT
MARKS
MOLDING
ADHESIVE
TAPE
MOLDING
WINDSHIELDProCarManuals.com
Page 1337 of 1954
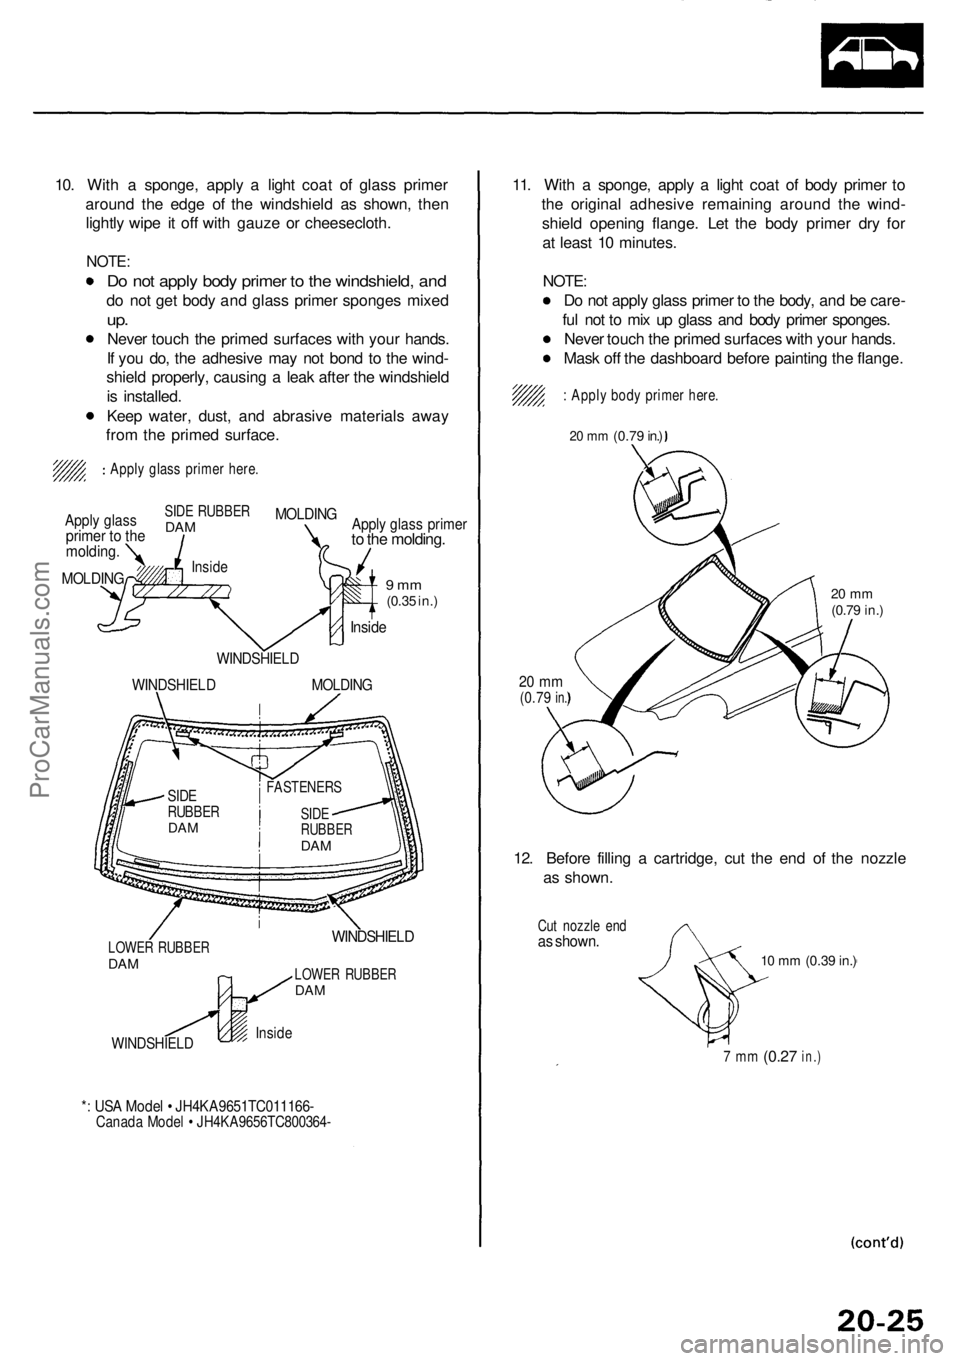
10. Wit h a sponge , appl y a ligh t coa t o f glas s prime r
aroun d th e edg e o f th e windshiel d a s shown , the n
lightl y wip e i t of f wit h gauz e o r cheesecloth .
NOTE:
Do no t appl y bod y prime r t o th e windshield , an d
do no t ge t bod y an d glas s prime r sponge s mixe d
up.
Neve r touc h th e prime d surface s wit h you r hands .
I f yo u do , th e adhesiv e ma y no t bon d t o th e wind -
shiel d properly , causin g a lea k afte r th e windshiel d
i s installed .
Kee p water , dust , an d abrasiv e material s awa y
fro m th e prime d surface .
WINDSHIEL D
WINDSHIEL D MOLDIN G
LOWER RUBBE RDAM
WINDSHIEL D
WINDSHIELD
LOWER RUBBE RDAM
*: US A Mode l • JH4KA9651TC011166 -Canada Mode l • JH4KA9656TC800364 -
11. Wit h a sponge , appl y a ligh t coa t o f bod y prime r t o
th e origina l adhesiv e remainin g aroun d th e wind -
shiel d openin g flange . Le t th e bod y prime r dr y fo r
a t leas t 1 0 minutes .
NOTE :
D o no t appl y glas s prime r t o th e body , an d b e care -
fu l no t t o mi x u p glas s an d bod y prime r sponges .
Neve r touc h th e prime d surface s wit h you r hands .
Mas k of f th e dashboar d befor e paintin g th e flange .
: Appl y bod y prime r here .
20 m m (0.7 9 in. )
20 m m(0.7 9 in. )
20 m m(0.7 9 in.)
12. Befor e fillin g a cartridge , cu t th e en d o f th e nozzl e
a s shown .
Cut nozzl e en das shown .
10 m m (0.3 9 in. )
7 m m (0.2 7 in.)
Insid e
SIDERUBBE RDAM
FASTENER SSIDERUBBE RDAM
Insid e
9 m m(0.3 5 in. )
Insid eMOLDIN G
Apply glas sprime r t o th emolding .
SIDE RUBBE RDAMMOLDIN GApply glas s prime rto th e molding .
Apply glas s prime r here .
ProCarManuals.com
Page 1338 of 1954
Windshield
Installation (cont'd )
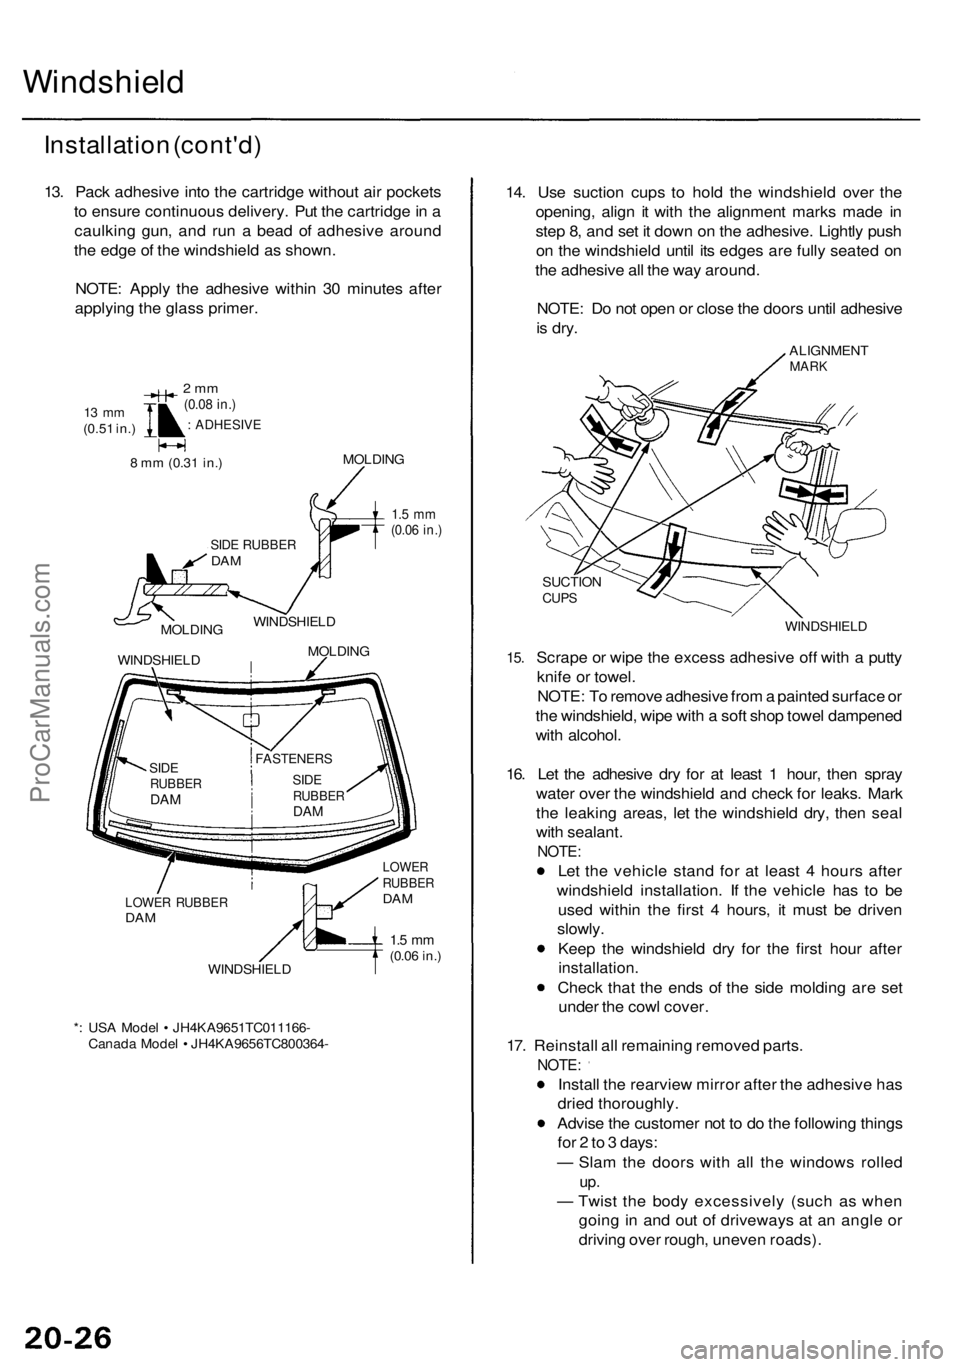
13. Pac k adhesiv e int o th e cartridg e withou t ai r pocket s
t o ensur e continuou s delivery . Pu t th e cartridg e in a
caulkin g gun , an d ru n a bea d o f adhesiv e aroun d
th e edg e o f th e windshiel d a s shown .
NOTE : Appl y th e adhesiv e withi n 3 0 minute s afte r
applyin g th e glas s primer .
13 m m(0.5 1 in. )
2 m m(0.0 8 in. )
: ADHESIV E
8 m m (0.3 1 in. )MOLDIN G
SIDE RUBBE RDAM
1.5 m m(0.0 6 in. )
MOLDIN G
WINDSHIEL DWINDSHIEL
D
MOLDIN G
LOWER RUBBE RDAM
WINDSHIEL D
* : US A Mode l • JH4KA9651TC011166 -
Canad a Mode l • JH4KA9656TC800364 -
LOWERRUBBE RDAM
1.5 m m(0.0 6 in. )
14. Us e suctio n cup s t o hol d th e windshiel d ove r th e
opening , alig n i t wit h th e alignmen t mark s mad e i n
ste p 8 , an d se t i t dow n o n th e adhesive . Lightl y pus h
o n th e windshiel d unti l it s edge s ar e full y seate d o n
th e adhesiv e al l th e wa y around .
NOTE : D o no t ope n o r clos e th e door s unti l adhesiv e
is dry .
ALIGNMEN TMARK
15.
SUCTIO NCUPS
WINDSHIEL D
Scrape o r wip e th e exces s adhesiv e of f wit h a putt y
knif e o r towel .
NOTE : T o remov e adhesiv e fro m a painte d surfac e o r
th e windshield , wip e wit h a sof t sho p towe l dampene d
wit h alcohol .
16 . Le t th e adhesiv e dr y fo r a t leas t 1 hour , the n spra y
wate r ove r th e windshiel d an d chec k fo r leaks . Mar k
th e leakin g areas , le t th e windshiel d dry , the n sea l
wit h sealant .
NOTE:
Let th e vehicl e stan d fo r a t leas t 4 hour s afte r
windshiel d installation . I f th e vehicl e ha s t o b e
use d withi n th e firs t 4 hours , i t mus t b e drive n
slowly .
Kee p th e windshiel d dr y fo r th e firs t hou r afte r
installation .
Check tha t th e end s o f th e sid e moldin g ar e se t
unde r th e cow l cover .
17 . Reinstal l al l remainin g remove d parts .
NOTE :
Install th e rearvie w mirro r afte r th e adhesiv e ha s
drie d thoroughly .
Advis e th e custome r no t t o d o th e followin g thing s
fo r 2 to 3 days :
— Sla m th e door s wit h al l th e window s rolle d
up.
— Twis t th e bod y excessivel y (suc h a s whe n
goin g i n an d ou t o f driveway s a t a n angl e o r
drivin g ove r rough , uneve n roads) .
FASTENER S
SIDERUBBE RDAM
SID ERUBBE RDAM
ProCarManuals.com
Page 1339 of 1954
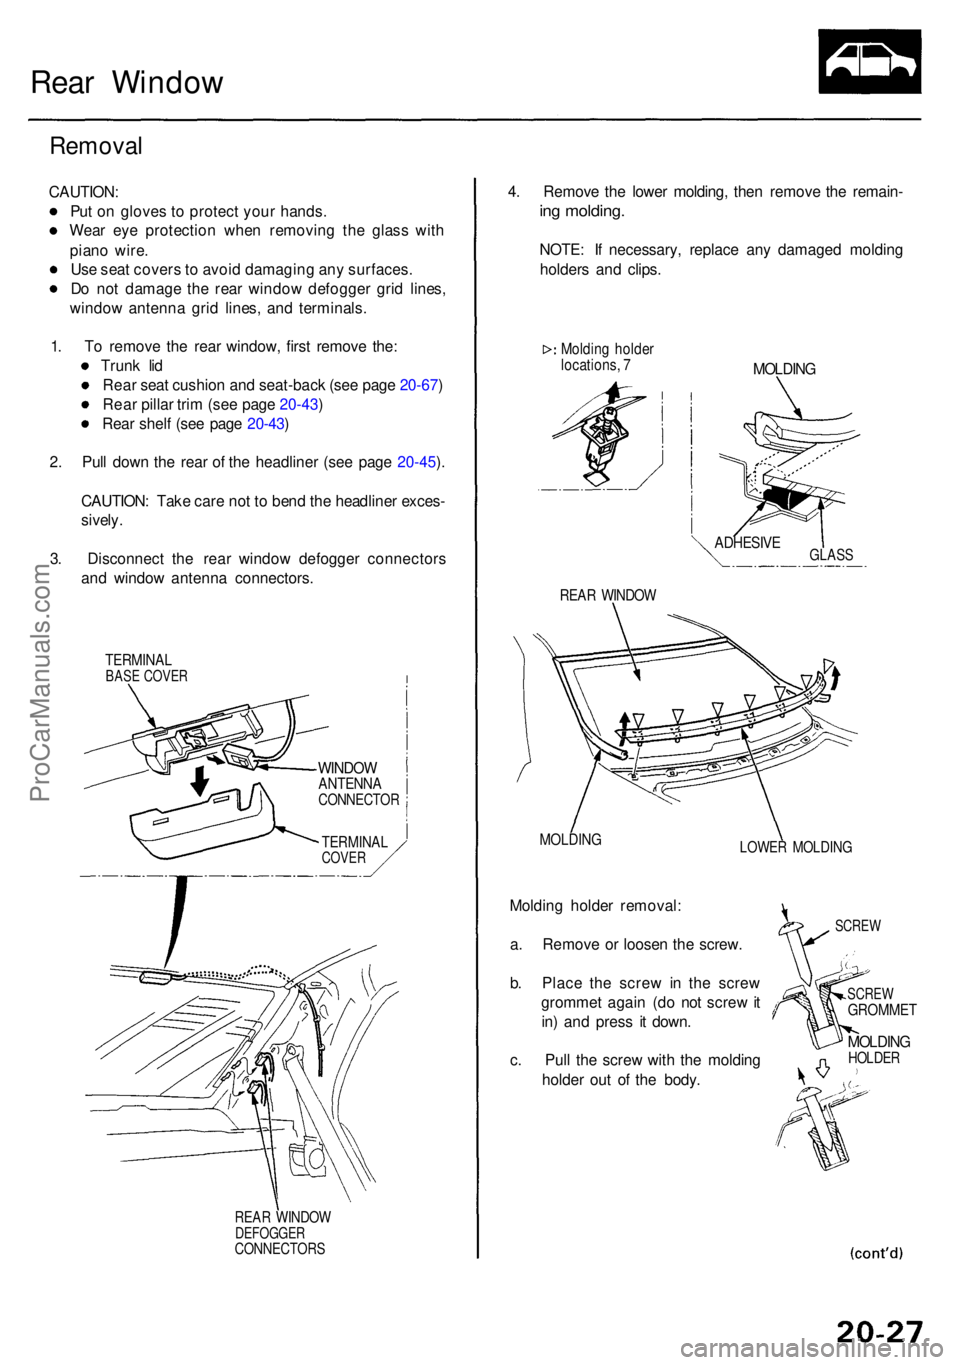
Rear Windo w
Remova l
CAUTION :
Pu t o n glove s t o protec t you r hands .
Wea r ey e protectio n whe n removin g th e glas s wit h
pian o wire .
Us e sea t cover s to avoi d damagin g an y surfaces .
D o no t damag e th e rea r windo w defogge r gri d lines ,
windo w antenn a gri d lines , an d terminals .
1 . T o remov e th e rea r window , firs t remov e the :
Trun k li d
Rea r sea t cushio n an d seat-bac k (se e pag e 20-67 )
Rea r pilla r tri m (se e pag e 20-43 )
Rea r shel f (se e pag e 20-43 )
2 . Pul l dow n th e rea r o f th e headline r (se e pag e 20-45 ).
CAUTION : Tak e car e no t t o ben d th e headline r exces -
sively.
3. Disconnec t th e rea r windo w defogge r connector s
an d windo w antenn a connectors .
TERMINALBASE COVE R
REAR WINDO WDEFOGGE RCONNECTOR S
4. Remov e th e lowe r molding , the n remov e th e remain -
ing molding .
NOTE: I f necessary , replac e an y damage d moldin g
holder s an d clips .
Moldin g holde rlocations , 7MOLDIN G
REAR WINDO W
MOLDIN GLOWER MOLDIN G
Molding holde r removal :
a . Remov e o r loose n th e screw .
b . Plac e th e scre w i n th e scre w
gromme t agai n (d o no t scre w it
in ) an d pres s i t down .
c . Pul l th e scre w wit h th e moldin g
holde r ou t o f th e body .
SCRE W
SCRE W
GROMME T
MOLDINGHOLDER
WINDOWANTENN ACONNECTO R
TERMINALCOVER
GLASSADHESIV E
ProCarManuals.com
Page 1340 of 1954
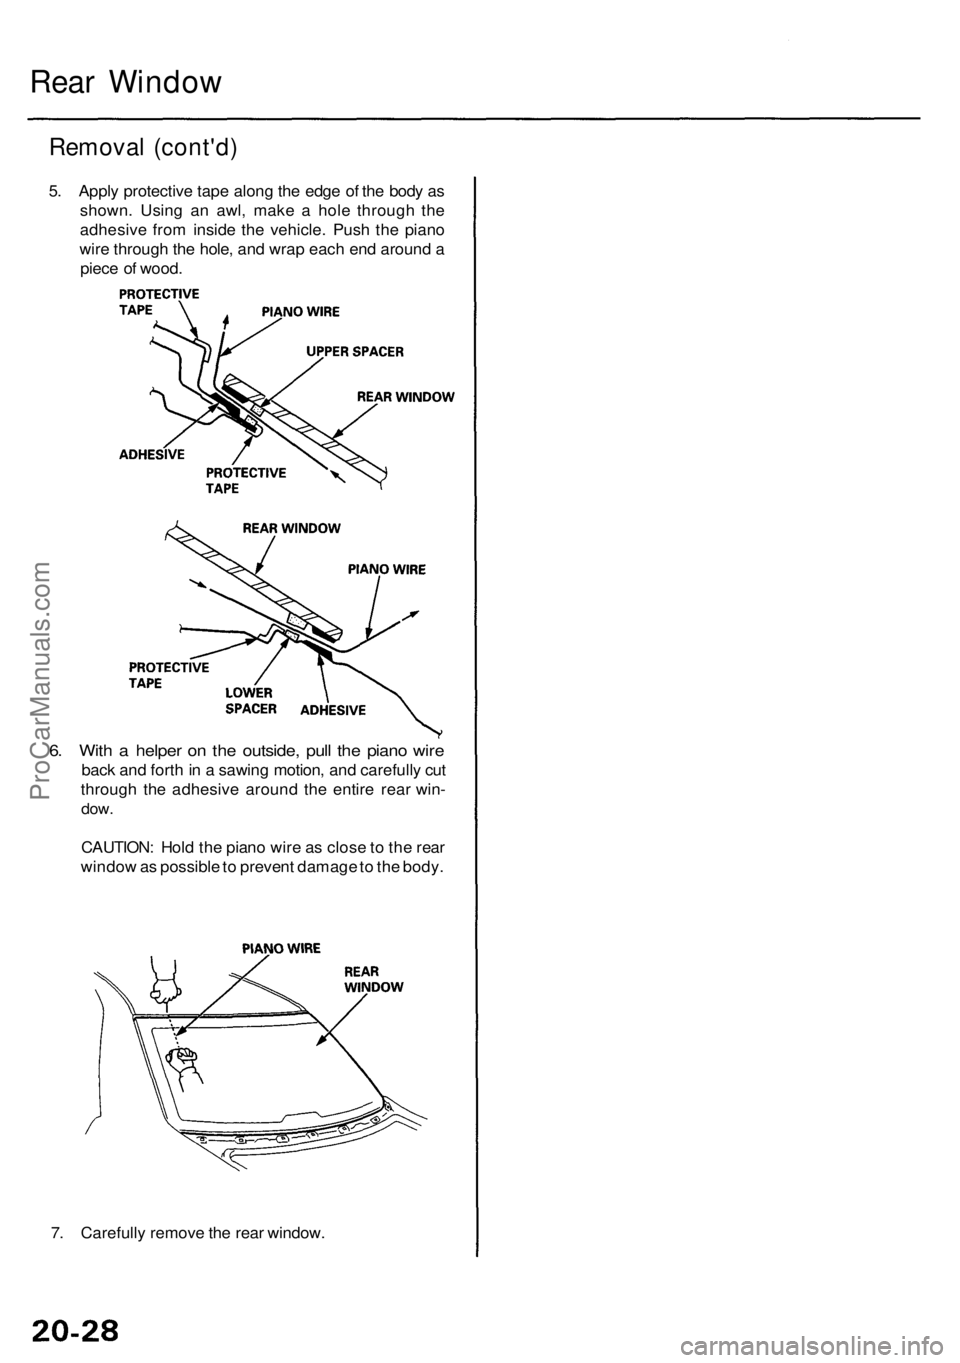
Rear Windo w
Remova l (cont'd )
5. Appl y protectiv e tap e alon g th e edg e o f th e bod y a s
shown . Usin g a n awl , mak e a hol e throug h th e
adhesiv e fro m insid e th e vehicle . Pus h th e pian o
wir e throug h th e hole , an d wra p eac h en d aroun d a
piec e o f wood .
6. Wit h a helpe r o n th e outside , pul l th e pian o wir e
bac k an d fort h in a sawin g motion , an d carefull y cu t
throug h th e adhesiv e aroun d th e entir e rea r win -
dow.
CAUTION : Hol d th e pian o wir e a s clos e to th e rea r
windo w as possibl e to preven t damag e to th e body .
7 . Carefull y remov e th e rea r window .
ProCarManuals.com