ACURA RL KA9 1996 Service Repair Manual
Manufacturer: ACURA, Model Year: 1996, Model line: RL KA9, Model: ACURA RL KA9 1996Pages: 1954, PDF Size: 61.44 MB
Page 1361 of 1954
Carpet
Remova l
SRS component s ar e locate d in thi s area . Revie w th e SR S
componen t locations , precautions , an d procedure s i n th e
Restraint s ( sectio n 24 ) befor e performin g repair s o r service .
1 . Remove :
Fron t sea t (se e pag e 20-57 )
Rea r sea t cushio n (se e pag e 20-67 )
Fron t an d rea r sid e tri m (se e pag e 20-43 )
Kic k pane l (se e pag e 20-43 )
Front an d rea r doo r tri m (se e pag e 20-43 )
Front sea t bel t lowe r ancho r (se e sectio n 24 )
Cente r pilla r tri m (se e pag e 20-43 )
Rea r heate r cove r (se e pag e 20-48 )
Consol e pane l an d rea r console , '9 6 - 9 8 model s
(se e pag e 20-48 )
Consol e pane l an d rea r console , '9 9 - 0 1 model s
(se e pag e 20-49 )
Dashboar d lowe r cove r (passenger's ) (se e pag e
20-53 )
Glove bo x (se e pag e 20-53 )
Opene r cove r (se e pag e 20-89 )
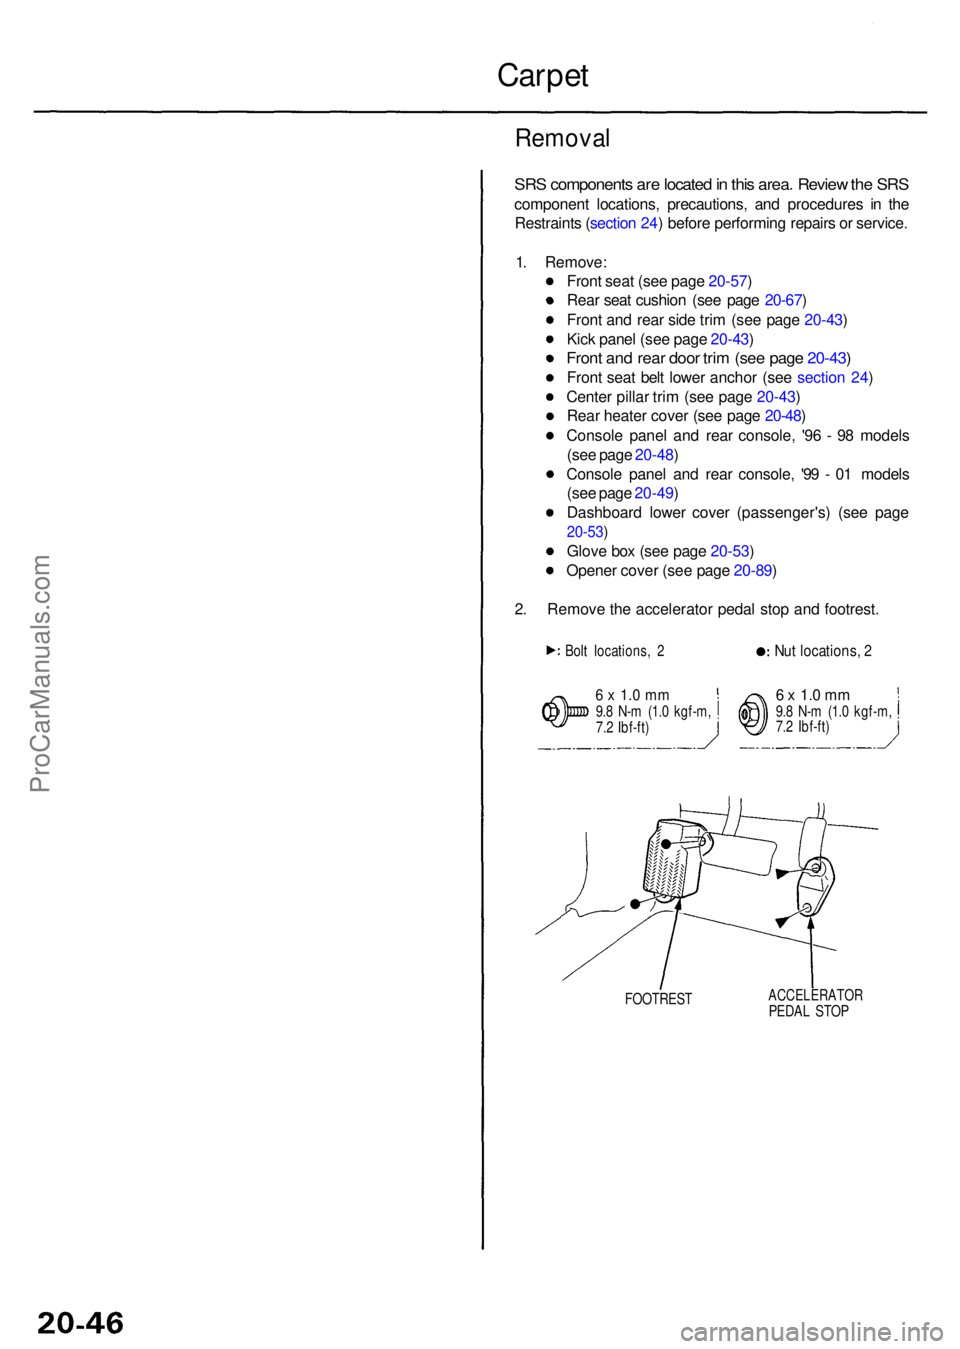
2 . Remov e th e accelerato r peda l sto p an d footrest .
Bolt locations , 2Nu t locations , 2
6 x 1. 0 m m9.8 N- m (1. 0 kgf-m ,
7. 2 Ibf-ft )6 x 1. 0 m m9.8 N- m (1. 0 kgf-m ,
7. 2 Ibf-ft )
FOOTRES T
ACCELERATO RPEDAL STO P
ProCarManuals.com
Page 1362 of 1954
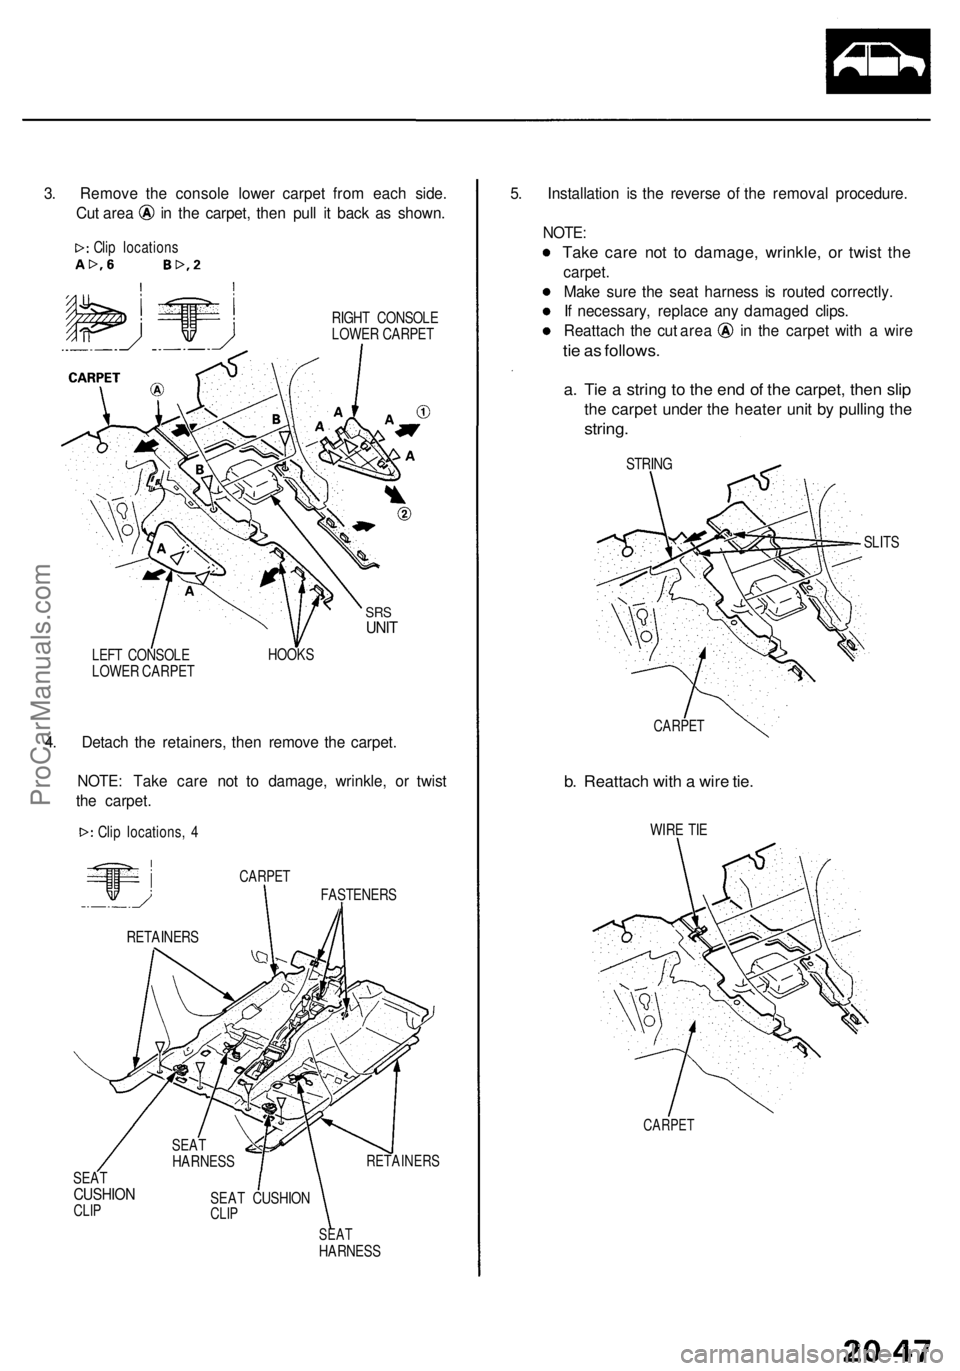
3. Remov e th e consol e lowe r carpe t fro m eac h side .
Cut are a i n th e carpet , the n pul l i t bac k a s shown .
Clip location s
RIGHT CONSOL E
LOWE R CARPE T
SRSUNI T
LEF T CONSOL E
LOWE R CARPE T HOOK
S
4. Detac h th e retainers , the n remov e th e carpet .
NOTE : Tak e car e no t t o damage , wrinkle , o r twis t
th e carpet .
Clip locations , 4
CARPE T
FASTENER S
RETAINERSSEATCUSHIO NCLIPSEA T CUSHIO NCLIP
SEA THARNES S
5. Installatio n i s th e revers e o f th e remova l procedure .
NOTE :
Take car e no t t o damage , wrinkle , o r twis t th e
carpet .
Mak e sur e th e sea t harnes s i s route d correctly .
I f necessary , replac e an y damage d clips .
Reattac h th e cu t are a i n th e carpe t wit h a wir e
tie a s follows .
a. Ti e a strin g t o th e en d o f th e carpet , the n sli p
the carpe t unde r th e heate r uni t b y pullin g th e
string .
STRIN G
SLITS
CARPE T
b. Reattac h wit h a wir e tie .
WIR E TI E
CARPE T
SEAT
HARNES S
RETAINER
S
ProCarManuals.com
Page 1363 of 1954
Console Panel/Rea r Consol e
Remova l — '96 - 9 8 Model s
CAUTION : Whe n pryin g wit h a flat-ti p screwdriver , wra p it wit h protectiv e tap e to preven t damage .
NOTE : Tak e car e no t t o scratc h th e consol e panel , rea r console , fron t seat , an d relate d parts .
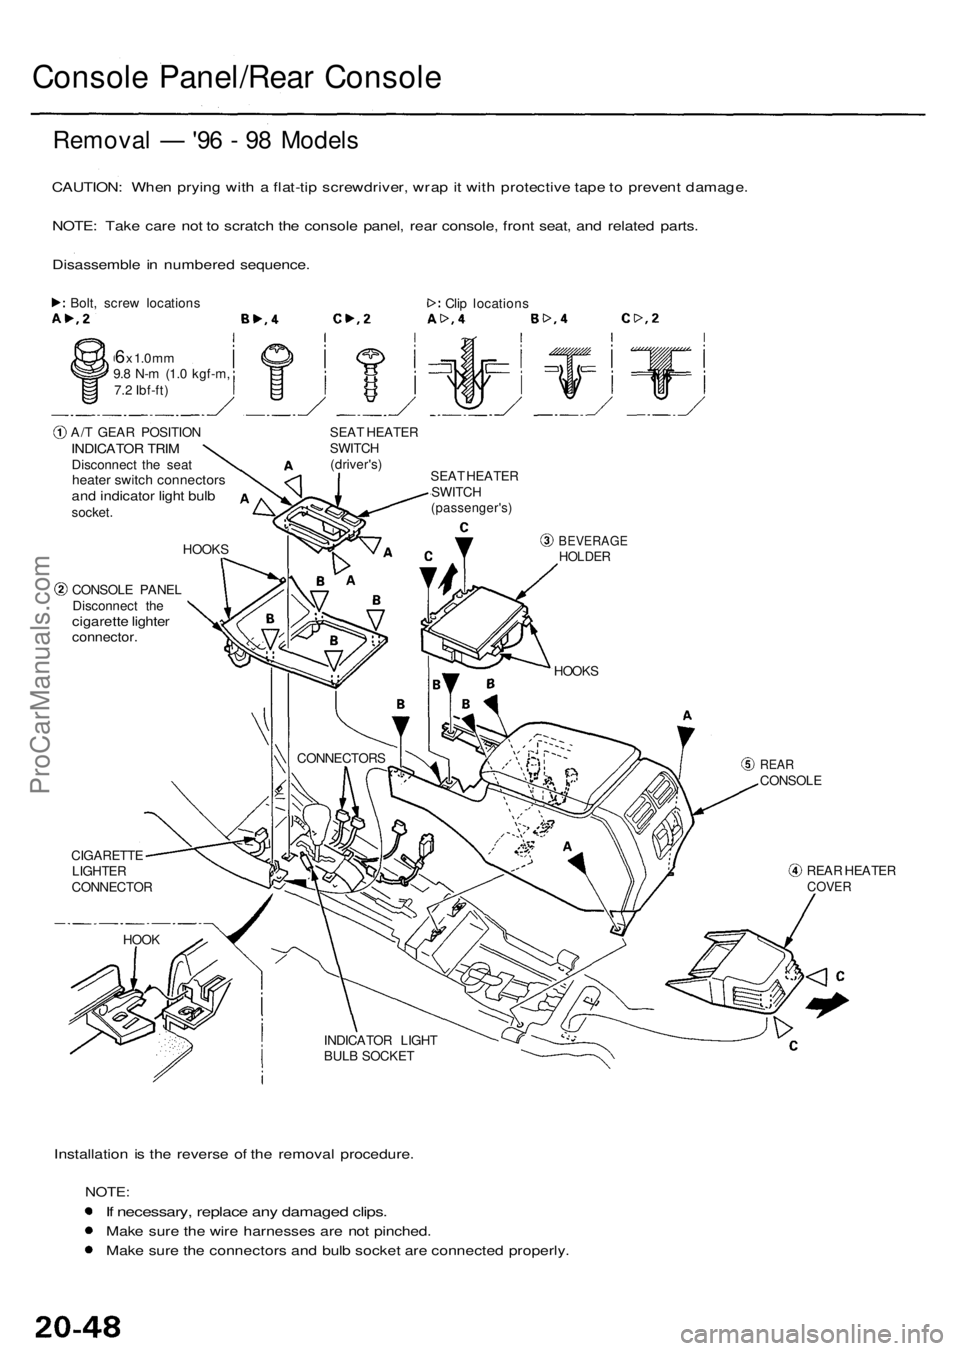
Disassembl e in numbere d sequence .
Bolt, scre w location s
6 x 1. 0 m m9.8 N- m (1. 0 kgf-m ,
7. 2 Ibf-ft )
A/ T GEA R POSITIO N
INDICATO R TRI MDisconnec t th e sea theate r switc h connector sand indicato r ligh t bul bsocket .
CONSOL E PANE L
Disconnec t th e
cigarett e lighte rconnector .
Clip location s
SEA T HEATE R
SWITC H
(driver's )
SEAT HEATE R
SWITC H
(passenger's )
BEVERAGEHOLDER
CIGARETT E
LIGHTE R
CONNECTO R
REARCONSOL E
REA R HEATE R
COVER
Installatio n i s th e revers e o f th e remova l procedure .
NOTE:
If necessary , replac e an y damage d clips .
Make sur e th e wir e harnesse s ar e no t pinched .
Mak e sur e th e connector s an d bul b socke t ar e connecte d properly .
INDICATO R LIGH T
BUL B SOCKE T
HOO
K HOOK
S
CONNECTOR S
HOOK
S
ProCarManuals.com
Page 1364 of 1954
Removal — '99 - 0 1 Model s
CAUTION : Whe n pryin g wit h a flat-ti p screwdriver , wra p it wit h protectiv e tap e t o preven t damage .
NOTE : Tak e car e no t t o scratc h th e consol e panel , rea r console , fron t seat , an d relate d parts .
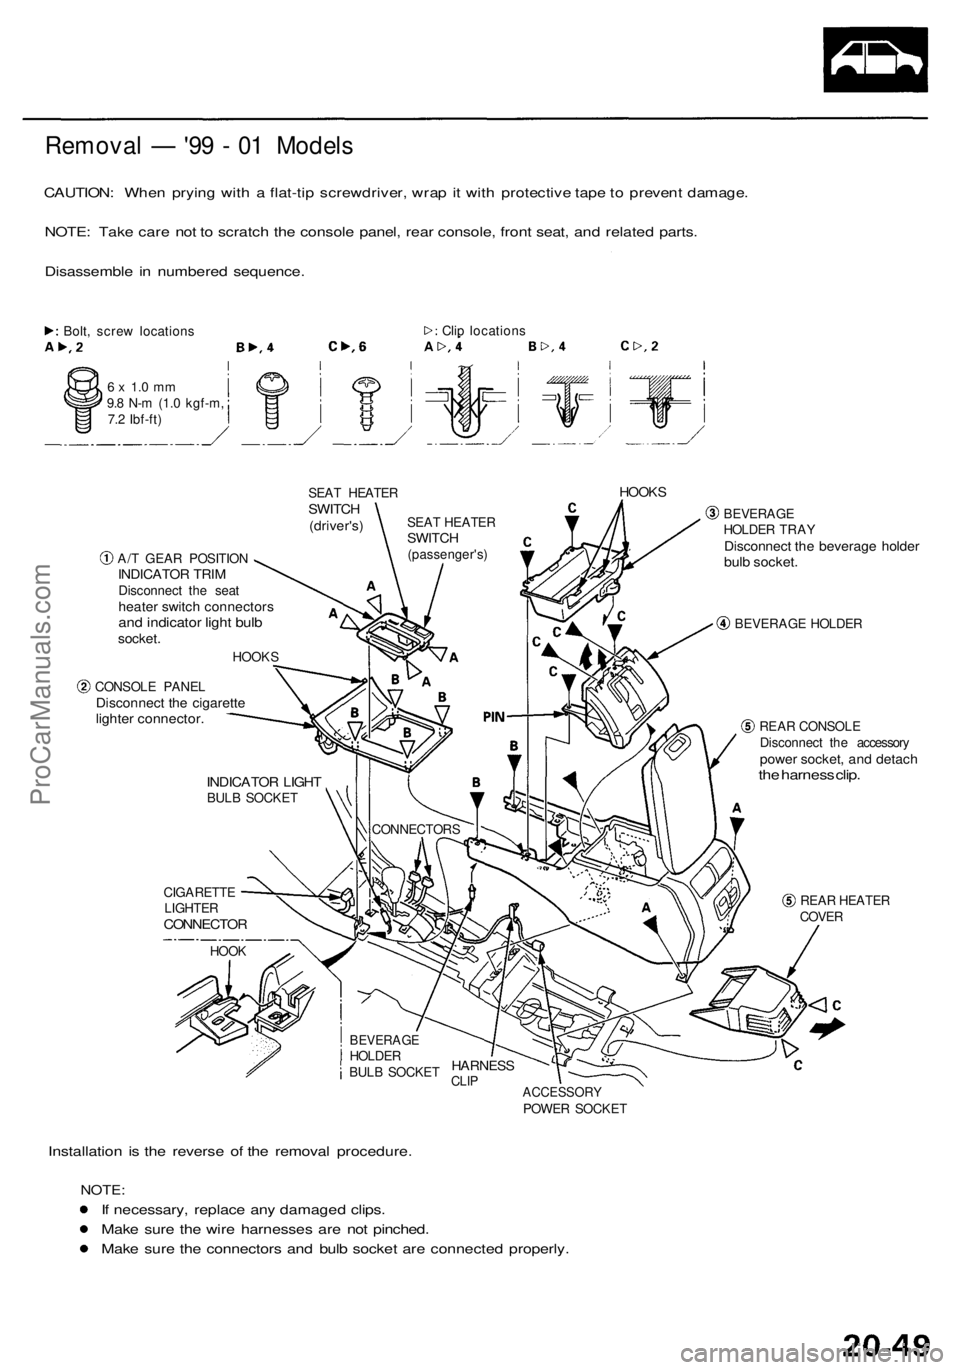
Disassembl e i n numbere d sequence .
Bolt, scre w location s
6 x 1. 0 m m9.8 N- m (1. 0 kgf-m ,
7. 2 Ibf-ft ) Cli
p location s
SEA T HEATE R
SWITCH(driver's )
HOOKS
CIGARETT E
LIGHTE R
CONNECTO R
ACCESSOR YPOWER SOCKE T
Installatio n i s th e revers e o f th e remova l procedure .
NOTE:
If necessary , replac e an y damage d clips .
Mak e sur e th e wir e harnesse s ar e no t pinched .
Mak e sur e th e connector s an d bul b socke t ar e connecte d properly .
BEVERAG E
HOLDE R TRA Y
Disconnec t th e beverag e holde rbulb socket .
BEVERAG E HOLDE R
REA R CONSOL E
Disconnec t th e accessor y
power socket , an d detac hthe harnes s clip .
REA R HEATE R
COVE R
CONSOL
E PANE L
Disconnec t th e cigarett elighter connector .
HOOKS
A/
T GEA R POSITIO N
INDICATO R TRI MDisconnec t th e sea theate r switc h connector sand indicato r ligh t bul bsocket .
INDICATO R LIGH TBULB SOCKE T
CONNECTORS
HOO K
BEVERAG EHOLDER
BUL B SOCKE THARNES SCLIP
SEA T HEATE RSWITCH(passenger's )
ProCarManuals.com
Page 1365 of 1954
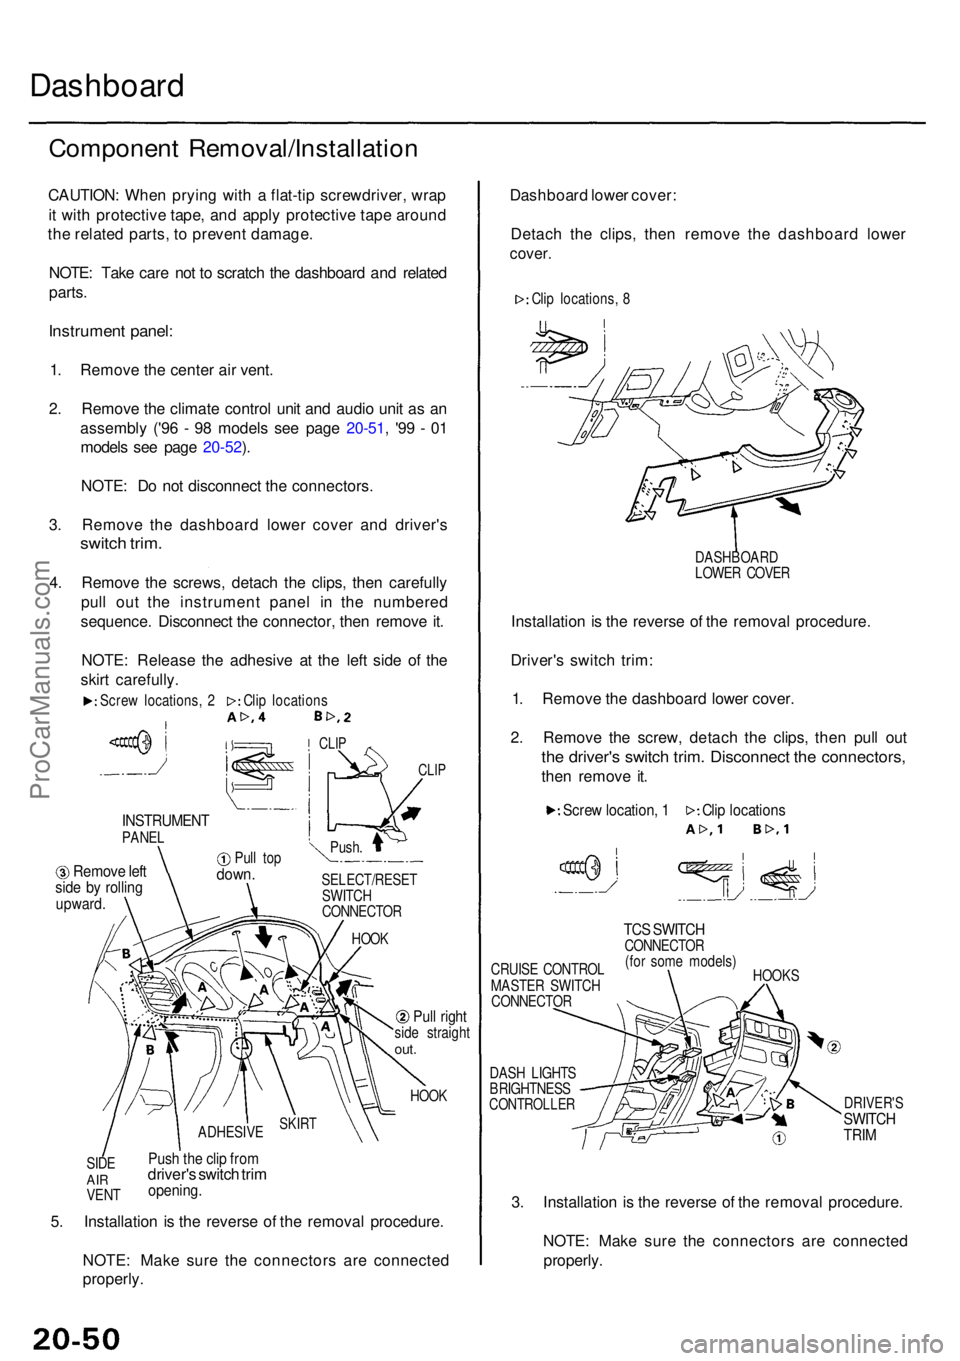
Dashboard
Componen t Removal/Installatio n
CAUTION: Whe n pryin g wit h a flat-ti p screwdriver , wra p
i t wit h protectiv e tape , an d appl y protectiv e tap e aroun d
th e relate d parts , t o preven t damage .
NOTE : Tak e car e no t t o scratc h th e dashboar d an d relate d
parts .
Instrumen t panel :
1. Remov e th e cente r ai r vent .
2 . Remov e th e climat e contro l uni t an d audi o uni t a s a n
assembl y ('9 6 - 9 8 model s se e pag e 20-51 , '9 9 - 0 1
model s se e pag e 20-52 ).
NOTE : D o no t disconnec t th e connectors .
3 . Remov e th e dashboar d lowe r cove r an d driver' s
switch trim .
4. Remov e th e screws , detac h th e clips , the n carefull y
pul l ou t th e instrumen t pane l i n th e numbere d
sequence . Disconnec t th e connector , the n remov e it .
NOTE : Releas e th e adhesiv e a t th e lef t sid e o f th e
skir t carefully .
CLIP
INSTRUMEN TPANEL
Remov e lef tsid e b y rollin gupward .
Pull to pdown .SELECT/RESE T
SWITC H
CONNECTO R
HOO K
Pull righ tside straigh tout.
HOO K
SID E
AIRVEN T
Push th e cli p fro mdriver' s switc h tri mopening .
5. Installatio n i s th e revers e o f th e remova l procedure .
NOTE : Mak e sur e th e connector s ar e connecte d
properly . Dashboar
d lowe r cover :
Detac h th e clips , the n remov e th e dashboar d lowe r
cover.
DASHBOAR D
LOWE R COVE R
Installatio n is th e revers e o f th e remova l procedure .
Driver' s switc h trim :
1 . Remov e th e dashboar d lowe r cover .
2 . Remov e th e screw , detac h th e clips , the n pul l ou t
the driver' s switc h trim . Disconnec t th e connectors ,
then remov e it .
CRUIS E CONTRO L
MASTE R SWITC H
CONNECTO R
DAS H LIGHT S
BRIGHTNES S
CONTROLLE R
TCS SWITC HCONNECTO R
(fo r som e models )
HOOK S
DRIVER' SSWITCHTRIM
3. Installatio n i s th e revers e o f th e remova l procedure .
NOTE : Mak e sur e th e connector s ar e connecte d
properly .
Screw locations , 2 Clip location s
CLIP
Push .
SKIR TADHESIV E
Clip location s
Scre w location , 1
Cli p locations , 8
ProCarManuals.com
Page 1366 of 1954
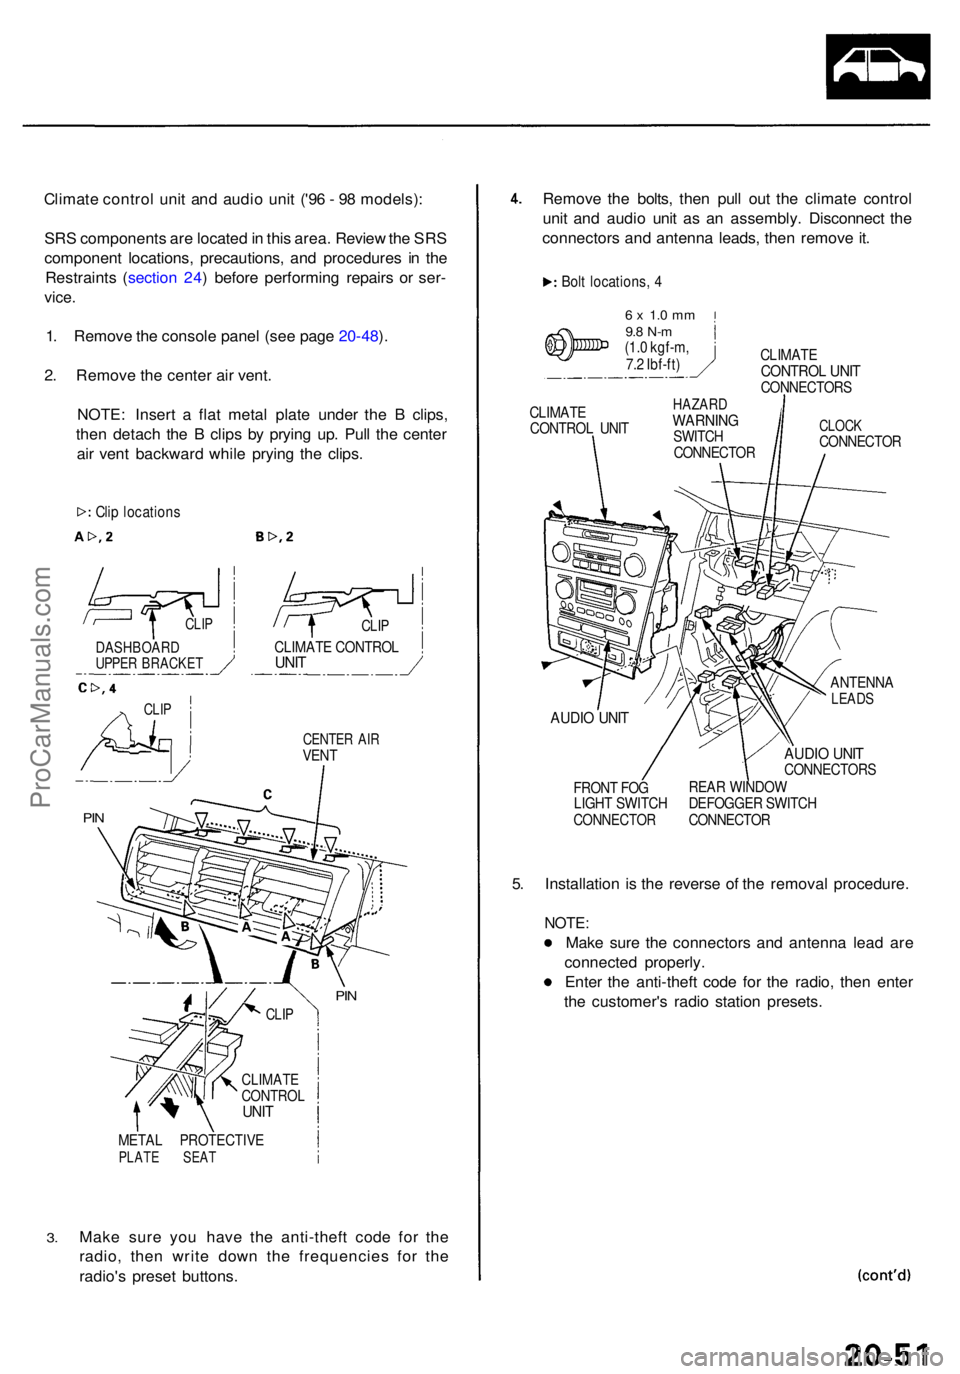
Climate contro l uni t an d audi o uni t ('9 6 - 9 8 models) :
SR S component s ar e locate d in thi s area . Revie w th e SR S
componen t locations , precautions , an d procedure s i n th e
Restraint s ( sectio n 24 ) befor e performin g repair s o r ser -
vice .
1. Remov e th e consol e pane l (se e pag e 20-48 ).
2 . Remov e th e cente r ai r vent .
NOTE : Inser t a fla t meta l plat e unde r th e B clips ,
the n detac h th e B clip s b y pryin g up . Pul l th e cente r
ai r ven t backwar d whil e pryin g th e clips .
CENTE R AI RVEN T
3.
META L PROTECTIV EPLATE SEA T
Make sur e yo u hav e th e anti-thef t cod e fo r th e
radio , the n writ e dow n th e frequencie s fo r th e
radio' s prese t buttons. Remov
e th e bolts , the n pul l ou t th e climat e contro l
uni t an d audi o uni t a s a n assembly . Disconnec t th e
connector s an d antenn a leads , the n remov e it .
Bol t locations , 4
6 x 1. 0 m m9.8 N- m(1.0 kgf-m ,
7. 2 Ibf-ft ) CLIMAT
E
CONTRO L UNI TCONNECTOR S
CLIMAT E
CONTRO L UNI THAZAR DWARNIN GSWITCH
CONNECTO RCLOCKCONNECTO R
AUDIO UNI T
FRON T FO G
LIGH T SWITC H
CONNECTO R
ANTENNALEADS
AUDIO UNI TCONNECTOR S
REA R WINDO W
DEFOGGE R SWITC H
CONNECTO R
5. Installatio n i s th e revers e o f th e remova l procedure .
NOTE:
Make sur e th e connector s an d antenn a lea d ar e
connecte d properly .
Ente r th e anti-thef t cod e fo r th e radio , the n ente r
th e customer' s radi o statio n presets .
Clip location s
CLIPCLIP
CLIMAT E CONTRO LUNITDASHBOAR DUPPER BRACKE T
CLIP
PIN
PIN
CLI P
CLIMAT ECONTRO LUNIT
ProCarManuals.com
Page 1367 of 1954
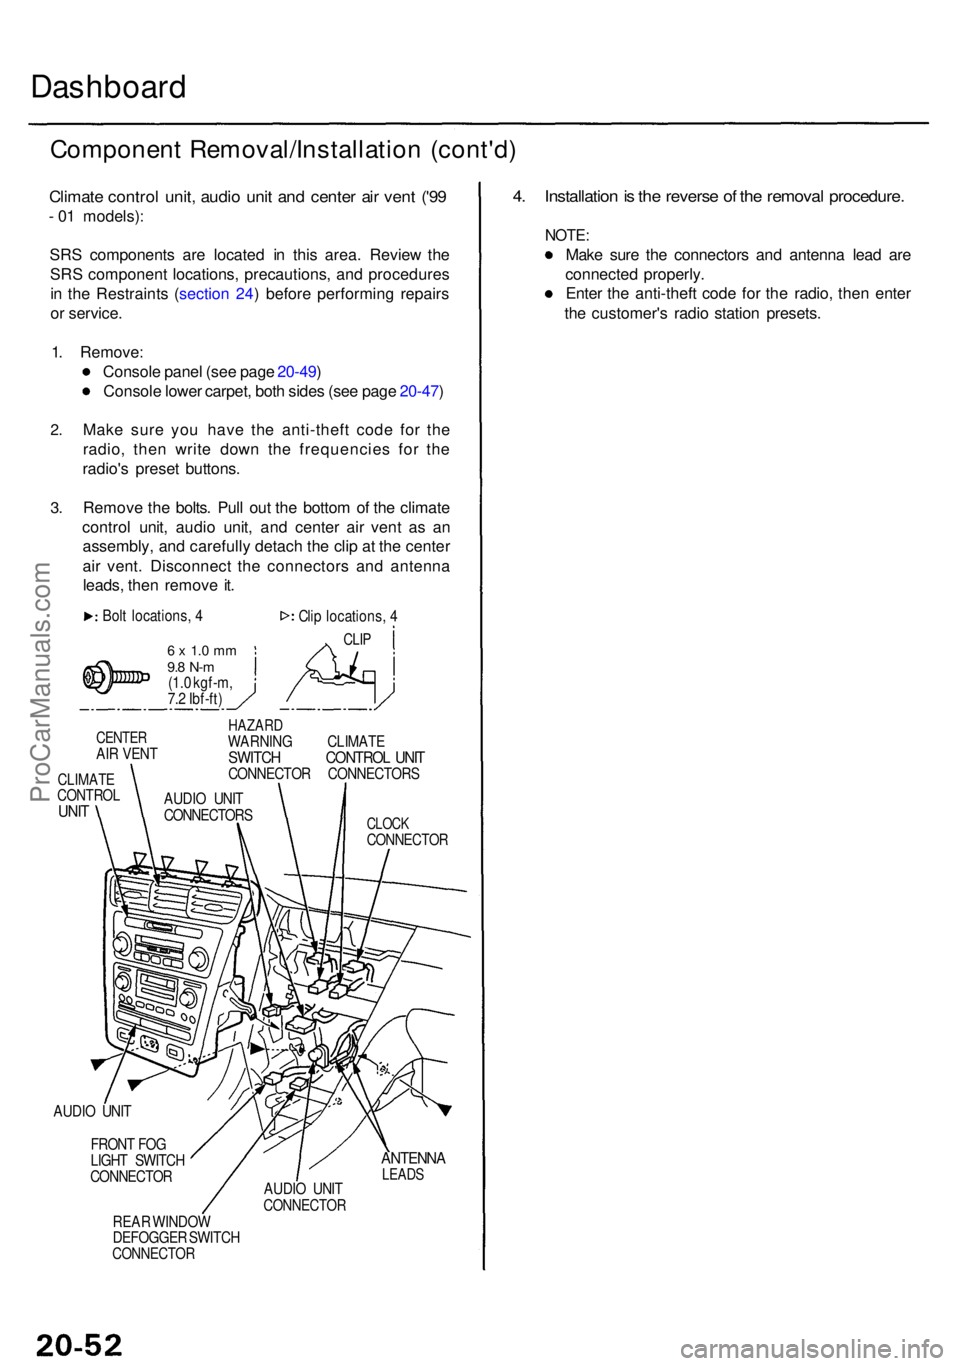
Dashboard
Componen t Removal/Installatio n (cont'd )
Climate contro l unit , audi o uni t an d cente r ai r ven t ('9 9
- 0 1 models) :
SR S component s ar e locate d i n thi s area . Revie w th e
SR S componen t locations , precautions , an d procedure s
i n th e Restraint s ( sectio n 24 ) befor e performin g repair s
o r service .
1 . Remove :
Consol e pane l (se e pag e 20-49 )
Consol e lowe r carpet , bot h side s (se e pag e 20-47 )
2.
3.
Mak e sur e yo u hav e th e anti-thef t cod e fo r th e
radio , the n writ e dow n th e frequencie s fo r th e
radio' s prese t buttons .
Remov e th e bolts . Pul l ou t th e botto m o f th e climat e
contro l unit , audi o unit , an d cente r ai r ven t a s a n
assembly , an d carefull y detac h th e cli p a t th e cente r
ai r vent . Disconnec t th e connector s an d antenn a
leads , the n remov e it .
Bol t locations , 4
6 x 1. 0 m m9.8 N- m(1.0 kgf-m ,
7. 2 Ibf-ft ) Cli
p locations , 4
CLI P
CENTE RAIR VEN T
CLIMAT ECONTRO LUNIT
HAZAR DWARNIN G CLIMAT ESWITCH CONTRO L UNI TCONNECTO R CONNECTOR S
CLOCKCONNECTO R
AUDIO UNI T
FRON T FO G
LIGH T SWITC H
CONNECTO R
REA R WINDO W
DEFOGGE R SWITC H
CONNECTO R
ANTENNALEADSAUDIO UNI TCONNECTO R
4. Installatio n is th e revers e o f th e remova l procedure .
NOTE:
Make sur e th e connector s an d antenn a lea d ar e
connecte d properly .
Ente r th e anti-thef t cod e fo r th e radio , the n ente r
th e customer' s radi o statio n presets .
AUDIO UNI T
CONNECTOR S
ProCarManuals.com
Page 1368 of 1954
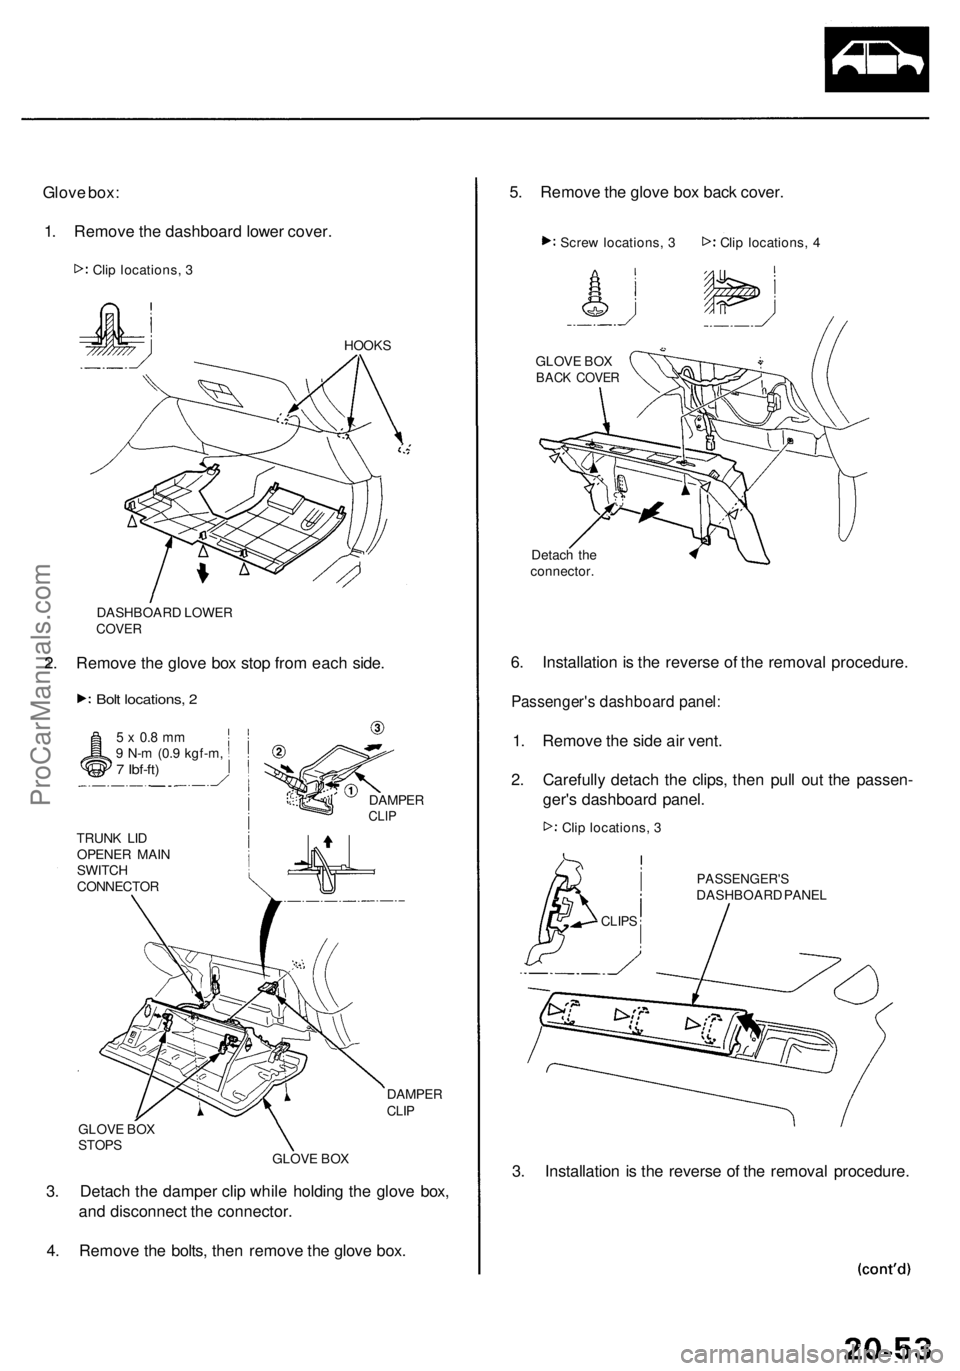
Glove box :
1 . Remov e th e dashboar d lowe r cover .
HOOK S
DASHBOAR D LOWE R
COVER
2. Remov e th e glov e bo x sto p fro m eac h side .
Bolt locations , 2
5 x 0. 8 m m9 N- m (0. 9 kgf-m ,7 Ibf-ft )
TRUN K LI D
OPENE R MAI N
SWITC H
CONNECTO R
DAMPERCLIP
DAMPE RCLIP
GLOV E BO X
STOP S
GLOVE BO X
3. Detac h th e dampe r cli p whil e holdin g th e glov e box ,
an d disconnec t th e connector .
4 . Remov e th e bolts , the n remov e th e glov e box . 5
. Remov e th e glov e bo x bac k cover .
Clip locations , 4
GLOV E BO X
BAC K COVE R
6. Installatio n is th e revers e o f th e remova l procedure .
Passenger' s dashboar d panel :
1. Remov e th e sid e ai r vent .
2 . Carefull y detac h th e clips , the n pul l ou t th e passen -
ger' s dashboar d panel .
PASSENGER' SDASHBOARD PANE L
3. Installatio n i s th e revers e o f th e remova l procedure .
CLIPS
Clip locations , 3
Detac
h th e
connector .
Scre
w locations , 3
Cli p locations , 3
ProCarManuals.com
Page 1369 of 1954
Component Removal/Installatio n
(cont'd)
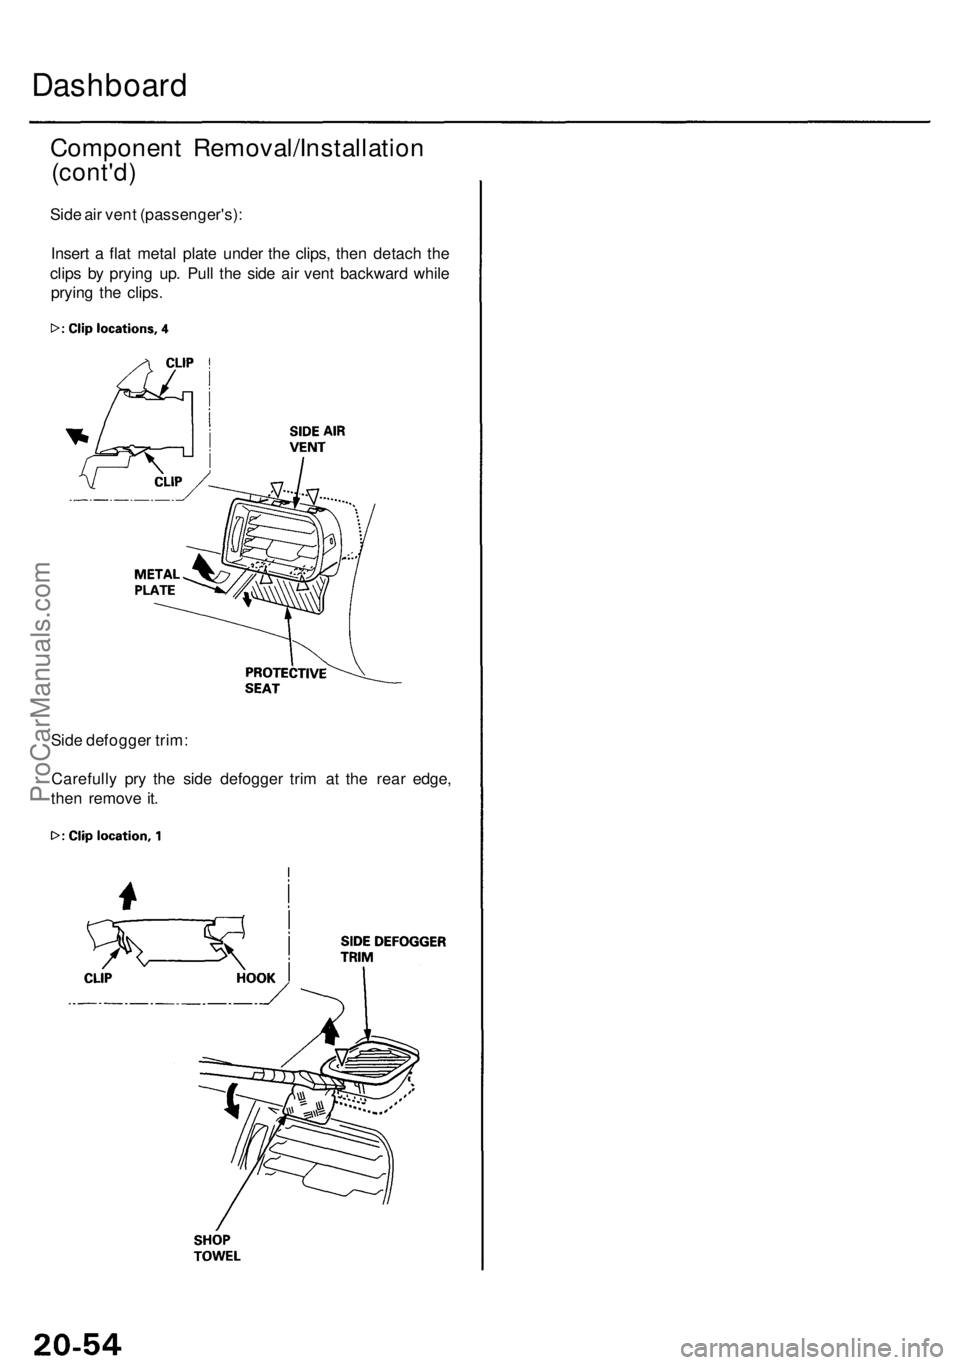
Side ai r ven t (passenger's) :
Inser t a fla t meta l plat e unde r th e clips , the n detac h th e
clip s b y pryin g up . Pul l th e sid e ai r ven t backwar d whil e
pryin g th e clips .
Sid e defogge r trim :
Carefull y pr y th e sid e defogge r tri m a t th e rea r edge ,
the n remov e it .
Dashboar d
ProCarManuals.com
Page 1370 of 1954
Removal
SRS component s ar e locate d in thi s area . Revie w th e SR S
componen t locations , precautions , an d procedure s i n th e
Restraint s ( sectio n 24 ) befor e preformin g repair s o r ser -
vice .
NOTE :
• A n assistan t i s helpfu l whe n removin g an d installin g
th e dashboard .
• Tak e car e no t t o scratc h th e dashboard , body , an d
relate d parts .
1 . Mak e sur e yo u hav e th e anti-thef t cod e fo r th e
radio , the n writ e dow n th e frequencie s fo r th e
radio' s prese t buttons .
2 . Disconnec t th e negativ e cabl e fro m th e battery .
3 . Remove :
• Consol e pane l an d rea r console , '9 6 - 9 8 model s
(se e pag e 20-48 )
• Consol e pane l an d rea r console , '9 9 - 0 1 model s
(se e pag e 20-49 )
• Cente r ai r vent , '9 6 - 9 8 model s (se e pag e 20-51 )
• Climat e contro l uni t an d audi o unit , '9 6 - 9 8 model s
(se e pag e 20-51 )
• Climat e contro l unit , audi o unit , an d cente r ai r vent ,
'99 - 0 1 model s (se e pag e 20-52 )
• Dashboar d lowe r cove r (passenger's) , glov e bo x
an d glov e bo x bac k cove r (se e pag e 20-53 )
• Consol e lowe r carpe t (se e pag e 20-47 )
• Dashboar d lowe r cove r (driver's ) (se e pag e 20-50 )
• Kic k pane l (se e pag e 20-43 )
4 . Lowe r th e steerin g colum n (se e sectio n 17 ).
T o avoi d accidenta l deploymen t an d
possibl e injury / alway s disconnec t th e driver' s airba g
connecto r befor e lowerin g th e steerin g colum n (se e
sectio n 24 ).
NOTE : T o preven t damag e to th e steerin g column , wra p it
wit h a sho p towel .
5. Remove the front passenger's airbag (see
section 24 ).
T o avoi d accidenta l deploymen t an d
possibl e injury , alway s disconnec t th e fron t passen -
ger' s airba g connecto r whe n th e SR S mai n harnes s
i s disconnecte d (se e sectio n 24 ).
Dashboar d
ProCarManuals.com