ACURA RL KA9 1996 Service Repair Manual
Manufacturer: ACURA, Model Year: 1996, Model line: RL KA9, Model: ACURA RL KA9 1996Pages: 1954, PDF Size: 61.44 MB
Page 1381 of 1954
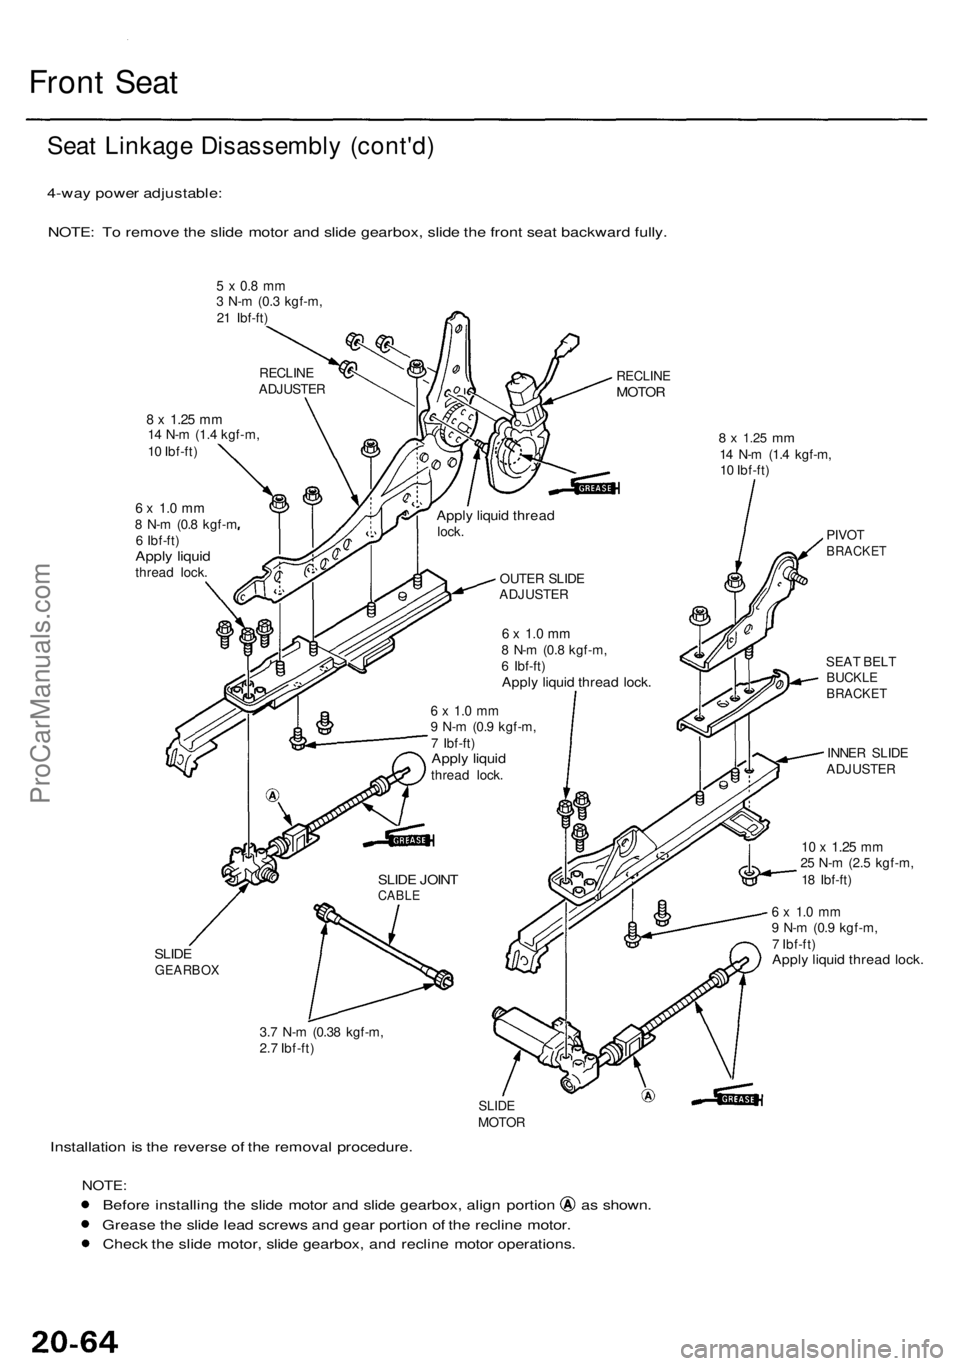
Front Sea t
Seat Linkag e Disassembl y (cont'd )
4-way powe r adjustable :
NOTE : T o remov e th e slid e moto r an d slid e gearbox , slid e th e fron t sea t backwar d fully .
5 x 0. 8 m m3 N- m (0. 3 kgf-m ,
2 1 Ibf-ft )
RECLIN EMOTOR
8 x 1.2 5 mm14 N- m (1. 4 kgf-m ,
1 0 Ibf-ft )
6 x 1. 0 m m8 N- m (0. 8 kgf- m
6 Ibf-ft )
Apply liqui dthrea d lock .
8 x 1.2 5 mm14 N- m (1. 4 kgf-m ,
1 0 Ibf-ft )
PIVOT
BRACKE T
SEAT BEL TBUCKL EBRACKE T
INNER SLID E
ADJUSTE R
10 x 1.2 5 mm25 N- m (2. 5 kgf-m ,
1 8 Ibf-ft )
SLIDEGEARBO X
6 x 1. 0 m m9 N- m (0. 9 kgf-m ,
7 Ibf-ft )
Apply liqui d threa d lock .
3.7 N- m (0.3 8 kgf-m ,
2. 7 Ibf-ft )
Installatio n is th e revers e o f th e remova l procedure .
SLIDEMOTO R
NOTE:
Before installin g th e slid e moto r an d slid e gearbox , alig n portio n a s shown .
Greas e th e slid e lea d screw s an d gea r portio n o f th e reclin e motor .
Chec k th e slid e motor , slid e gearbox , an d reclin e moto r operations .
6 x 1. 0 m m8 N- m (0. 8 kgf-m ,
6 Ibf-ft )
Apply liqui d threa d lock .
OUTE R SLID E
ADJUSTE R
RECLIN
E
ADJUSTE R
Apply liqui d threa dlock.
6 x 1. 0 m m9 N- m (0. 9 kgf-m ,
7 Ibf-ft )
Apply liqui dthrea d lock .
SLIDE JOIN TCABL E
ProCarManuals.com
Page 1382 of 1954
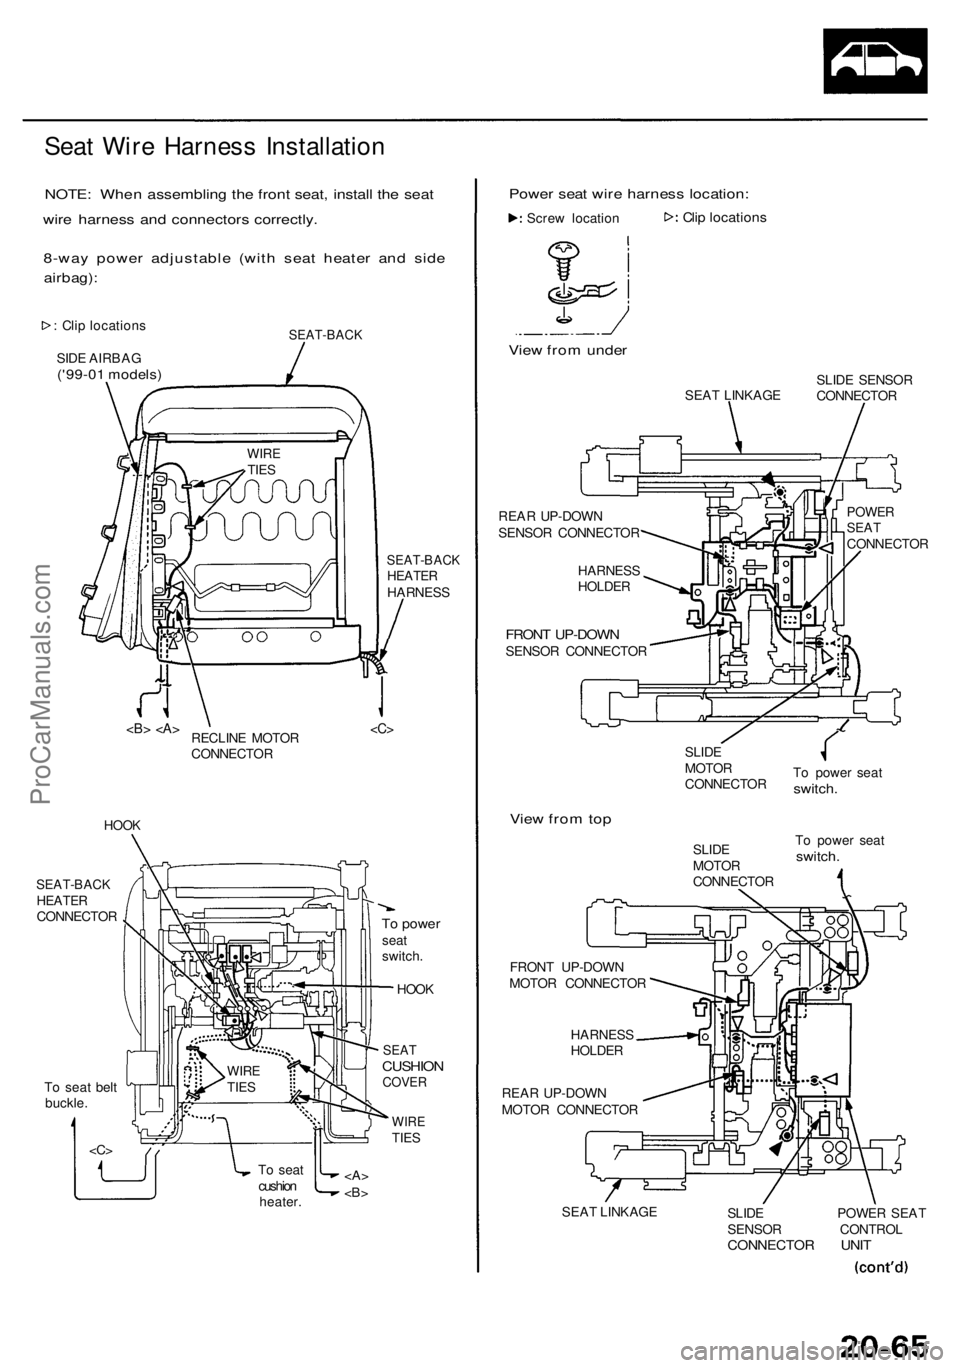
Seat Wir e Harnes s Installatio n
NOTE: Whe n assemblin g th e fron t seat , instal l th e sea t
wir e harnes s an d connector s correctly .
8-wa y powe r adjustabl e (wit h sea t heate r an d sid e
airbag) :
: Cli p location s
SID E AIRBA G
('99-01 models )
SEAT-BAC K
SEAT-BACKHEATERHARNES S
RECLIN E MOTO R
CONNECTO R
HOO K
SEAT-BAC KHEATERCONNECTO R
T o sea t bel t
buckle .To powe rseatswitch .
HOOK
SEATCUSHIO NCOVER
WIRETIES
Powe r sea t wir e harnes s location :
Vie w fro m unde r
REAR UP-DOW N
SENSO R CONNECTO R
FRONT UP-DOW NSENSOR CONNECTO R
View fro m to p
FRON T UP-DOW N
MOTO R CONNECTO R
HARNES S
HOLDE R
REA R UP-DOW N
MOTO R CONNECTO R
SEA T LINKAG ESEA
T LINKAG ESLID
E SENSO R
CONNECTO R
SLIDEMOTO R
CONNECTO R
SLID E
MOTO R
CONNECTO RT
o powe r sea t
switch .
To powe r sea tswitch .
SLIDE POWE R SEA T
SENSO R CONTRO L
CONNECTOR UNI T
WIRETIES
WIR ETIES
To sea t
cushio n
heater .
HARNES SHOLDER
POWERSEATCONNECTO R
Scre
w locatio n
Clip location s
ProCarManuals.com
Page 1383 of 1954
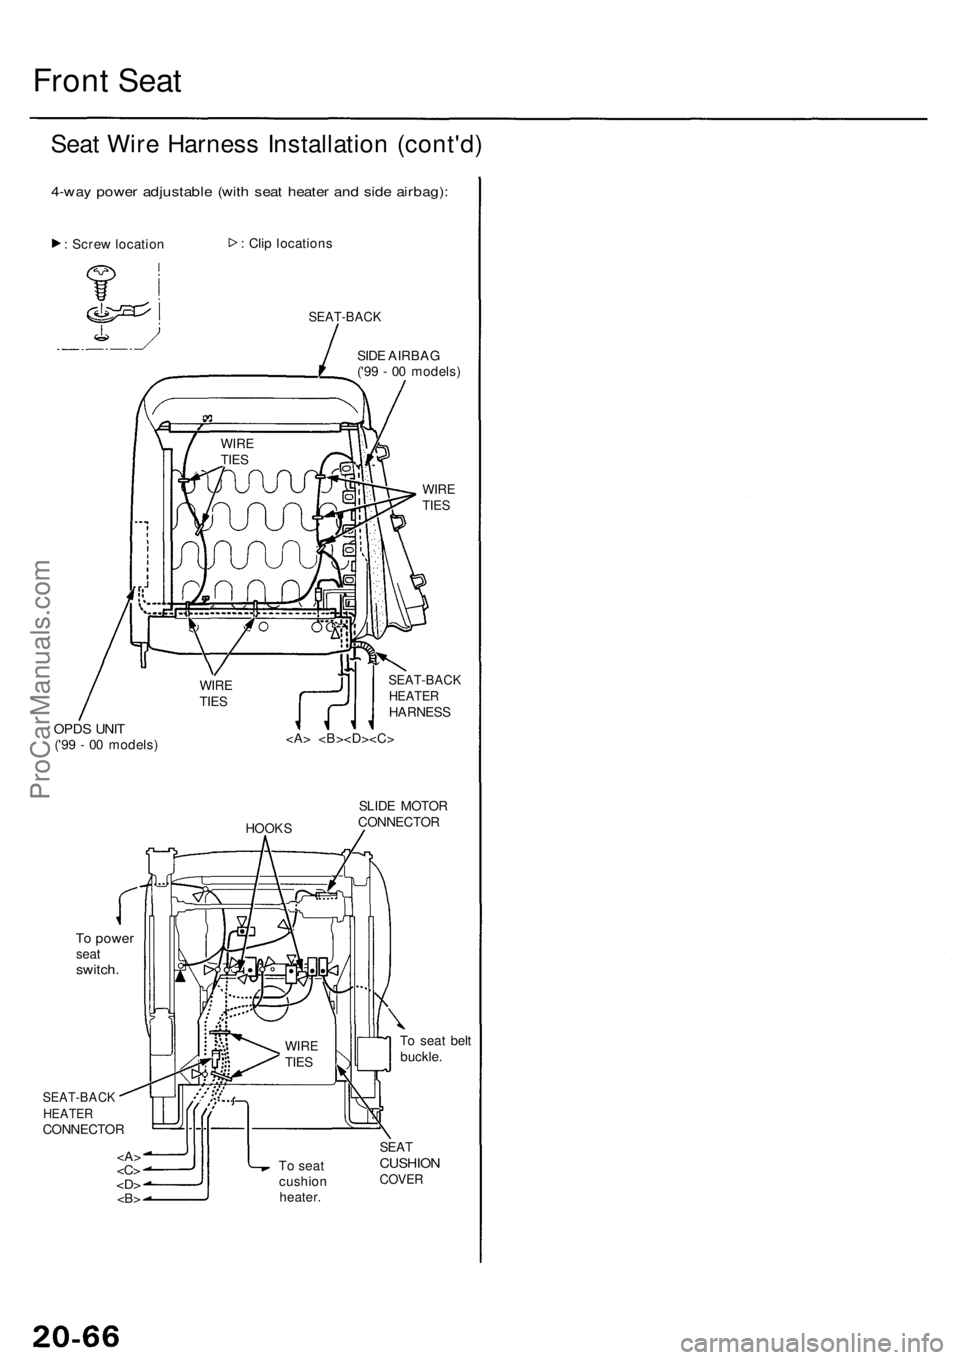
Front Sea t
Seat Wir e Harnes s Installatio n (cont'd )
4-way powe r adjustabl e (wit h sea t heate r an d sid e airbag) :
: Scre w locatio n :
Cli p location s
SEAT-BAC K
SIDE AIRBA G
('9 9 - 0 0 models )
WIRETIES
OPD S UNI T('99 - 0 0 models )
SEAT-BAC KHEATERHARNES S
HOOKS
SLIDE MOTO R
CONNECTO R
To powe rseatswitch .
SEAT-BAC KHEATERCONNECTO R T
o sea t bel t
buckle .
T o sea t
cushio n
heater . SEA
T
CUSHIO NCOVER
WIRETIES
WIR ETIES
WIRETIES
ProCarManuals.com
Page 1384 of 1954
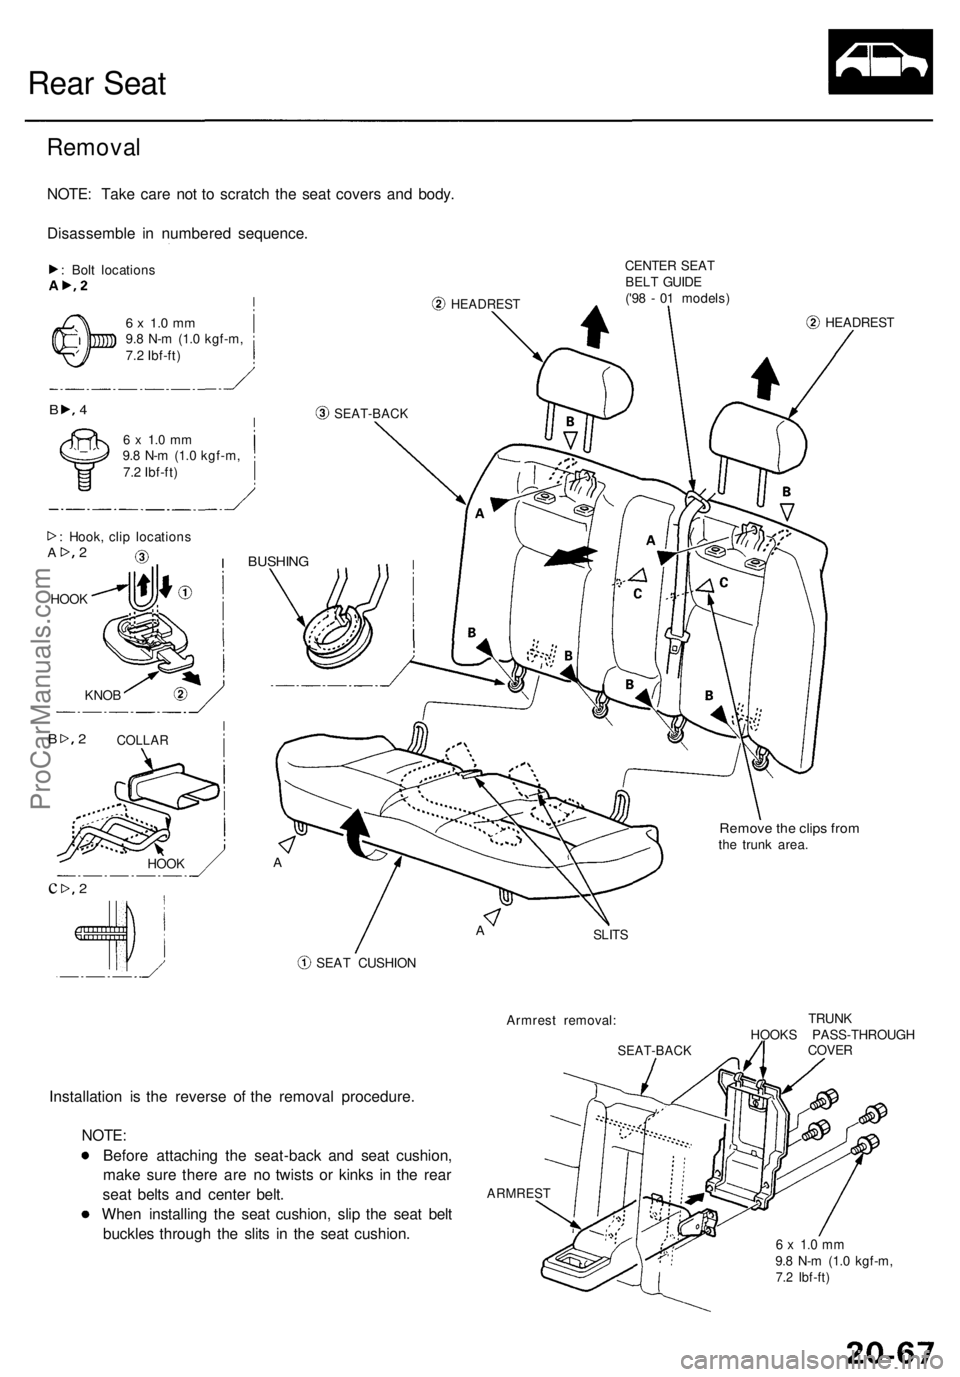
Rear Sea t
Remova l
NOTE: Tak e car e no t t o scratc h th e sea t cover s an d body .
Disassembl e i n numbere d sequence .
: Bol t location s
HEADRES T
CENTER SEA T
BEL T GUID E
('9 8 - 0 1 models )
4
6 x 1. 0 m m9.8 N- m (1. 0 kgf-m ,
7. 2 Ibf-ft )
6 x 1. 0 m m9.8 N- m (1. 0 kgf-m ,
7. 2 Ibf-ft )
: Hook , cli p location s
HOO K
BUSHIN G
HEADRES T
A
Remove th e clip s fro mthe trun k area .
SLIT S
SEA T CUSHIO N
Armrest removal :
Installation i s th e revers e o f th e remova l procedure .
NOTE :
Befor e attachin g th e seat-bac k an d sea t cushion ,
mak e sur e ther e ar e n o twist s o r kink s i n th e rea r
sea t belt s an d cente r belt .
Whe n installin g th e sea t cushion , sli p th e sea t bel t
buckle s throug h th e slit s i n th e sea t cushion .
SEAT-BAC K
TRUNK
HOOK S PASS-THROUG H
COVER
ARMRES T
6 x 1. 0 m m9.8 N- m (1. 0 kgf-m ,7.2 Ibf-ft )
SEAT-BAC KB
2A
KNOB
COLLA R2B
HOOK
2c
A
ProCarManuals.com
Page 1385 of 1954
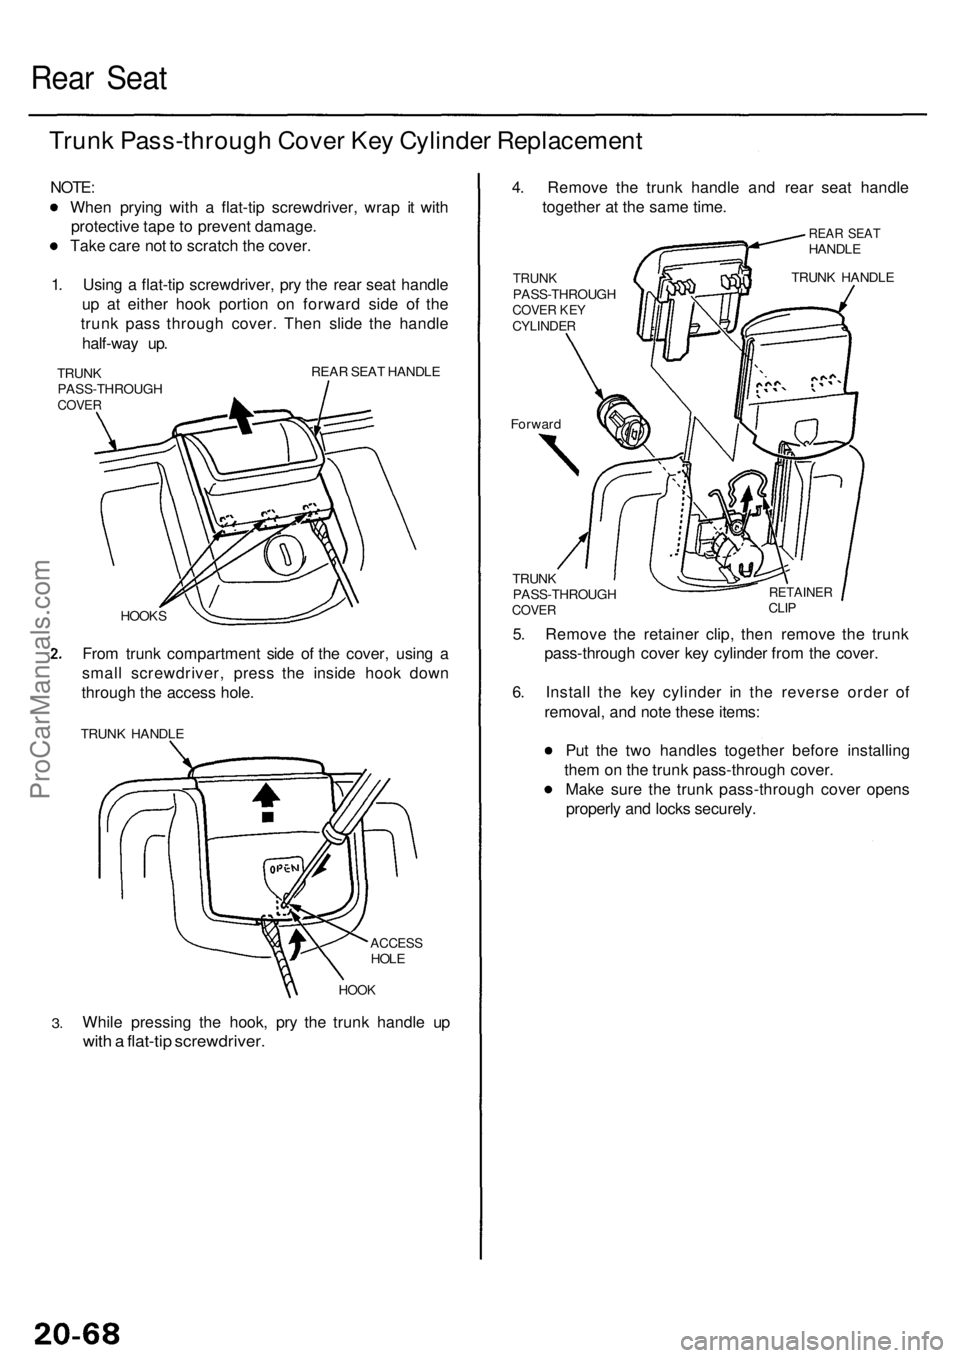
Rear Sea t
Trun k Pass-throug h Cove r Ke y Cylinde r Replacemen t
NOTE:
Whe n pryin g wit h a flat-ti p screwdriver , wra p i t wit h
protectiv e tap e to preven t damage .
Tak e car e no t t o scratc h th e cover .
1 . Usin g a flat-ti p screwdriver , pr y th e rea r sea t handl e
u p a t eithe r hoo k portio n o n forwar d sid e o f th e
trun k pas s throug h cover . The n slid e th e handl e
half-wa y up .
TRUN K
PASS-THROUG H
COVER
REAR SEA T HANDL E
HOOK S
From trun k compartmen t sid e o f th e cover , usin g a
smal l screwdriver , pres s th e insid e hoo k dow n
throug h th e acces s hole .
TRUN K HANDL E
ACCESSHOLE
3.
HOO K
While pressin g th e hook , pr y th e trun k handl e u p
wit h a flat-ti p screwdriver .
4. Remov e th e trun k handl e an d rea r sea t handl e
togethe r a t th e sam e time .
REAR SEA THANDL E
TRUNKPASS-THROUG HCOVER KE YCYLINDE R
Forward TRUN
K HANDL E
TRUN K
PASS-THROUG H
COVER
RETAINE RCLIP
5. Remov e th e retaine r clip , the n remov e th e trun k
pass-throug h cove r ke y cylinde r fro m th e cover .
6 . Instal l th e ke y cylinde r i n th e revers e orde r o f
removal , an d not e thes e items :
Pu t th e tw o handle s togethe r befor e installin g
the m o n th e trun k pass-throug h cover .
Mak e sur e th e trun k pass-throug h cove r open s
properl y an d lock s securely .
ProCarManuals.com
Page 1386 of 1954
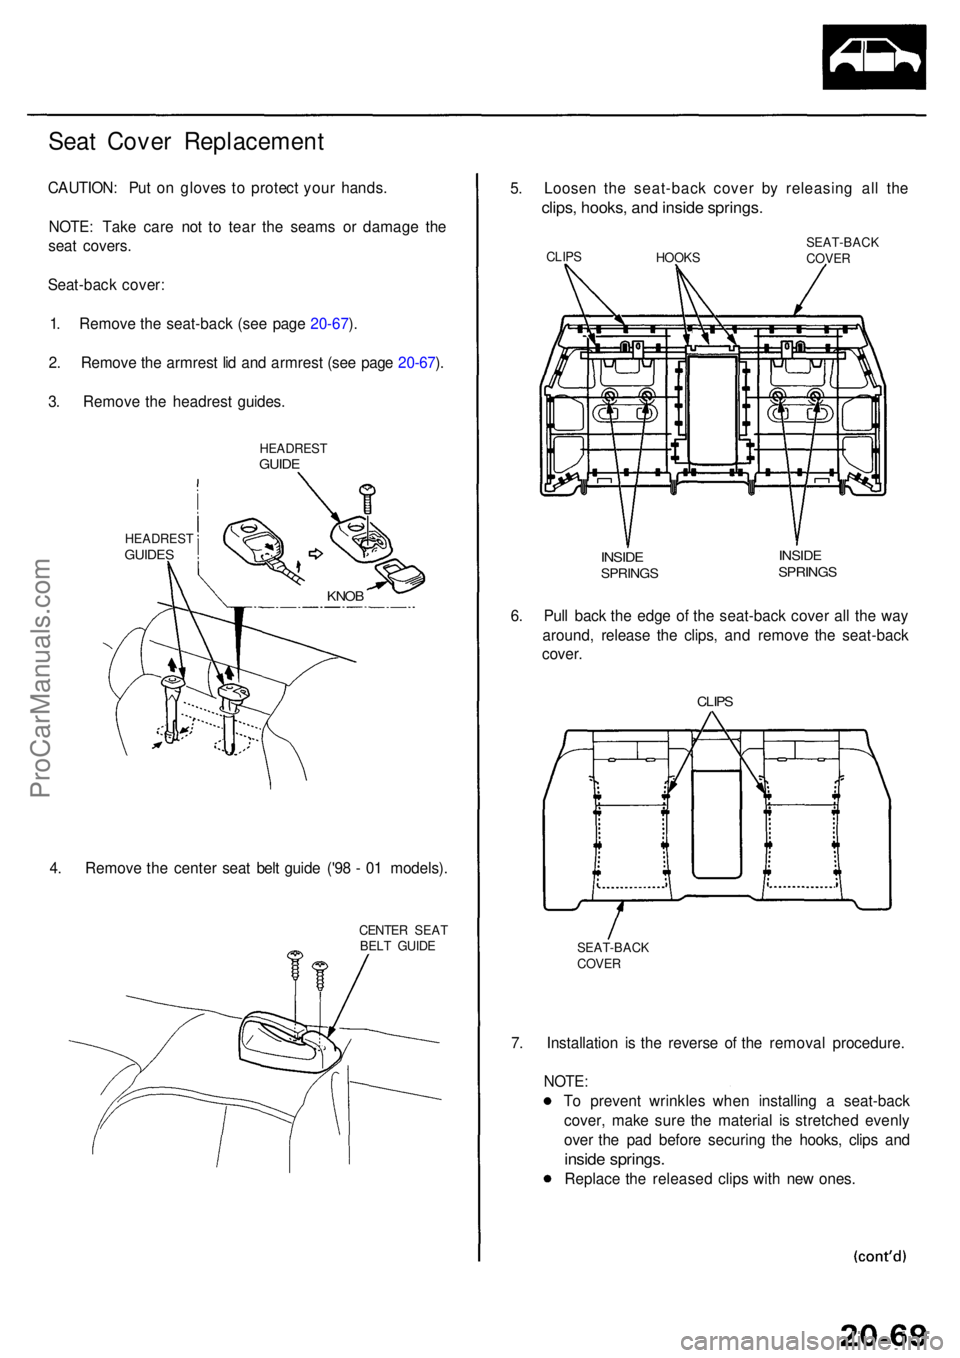
Seat Cove r Replacemen t
CAUTION: Pu t o n glove s t o protec t you r hands .
NOTE : Tak e car e no t t o tea r th e seam s o r damag e th e
sea t covers .
Seat-bac k cover :
1 . Remov e th e seat-bac k (se e pag e 20-67 ).
2 . Remov e th e armres t li d an d armres t (se e pag e 20-67 ).
3 . Remov e th e headres t guides .
HEADRES TGUIDES
HEADRES TGUIDE
4. Remov e th e cente r sea t bel t guid e ('9 8 - 0 1 models) .
CENTER SEA T
BEL T GUID E
5. Loose n th e seat-bac k cove r b y releasin g al l th e
clips , hooks , an d insid e springs .
CLIPS
HOOKS SEAT-BAC
K
COVE R
INSIDESPRING S
INSIDESPRING S
6. Pul l bac k th e edg e o f th e seat-bac k cove r al l th e wa y
around , releas e th e clips , an d remov e th e seat-bac k
cover .
CLIPS
SEAT-BAC K
COVE R
7. Installatio n i s th e revers e o f th e remova l procedure .
NOTE:
To preven t wrinkle s whe n installin g a seat-bac k
cover , mak e sur e th e materia l i s stretche d evenl y
ove r th e pa d befor e securin g th e hooks , clip s an d
insid e springs .
Replace th e release d clip s wit h ne w ones .
KNOB
ProCarManuals.com
Page 1387 of 1954
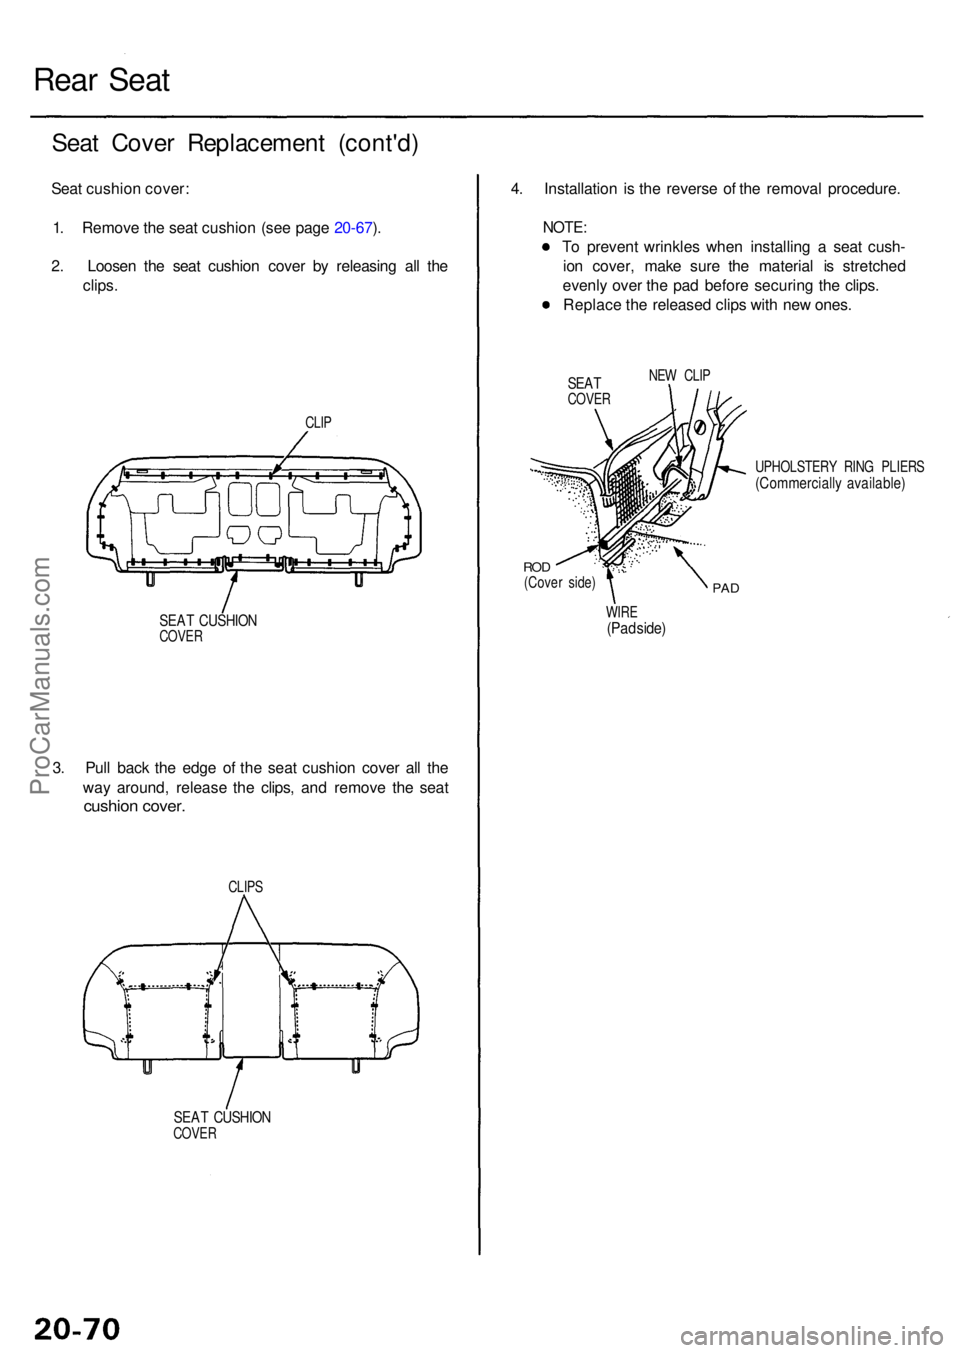
Rear Sea t
Seat Cove r Replacemen t (cont'd )
Seat cushio n cover :
1 . Remov e th e sea t cushio n (se e pag e 20-67 ).
2 . Loose n th e sea t cushio n cove r b y releasin g al l th e
clips .
CLIP
SEA T CUSHIO NCOVER
3. Pul l bac k th e edg e o f th e sea t cushio n cove r al l th e
wa y around , releas e th e clips , an d remov e th e sea t
cushio n cover .
CLIPS
SEAT CUSHIO NCOVER
4. Installatio n i s th e revers e o f th e remova l procedure .
NOTE:
To preven t wrinkle s whe n installin g a sea t cush -
io n cover , mak e sur e th e materia l i s stretche d
evenl y ove r th e pa d befor e securin g th e clips .
Replac e th e release d clip s wit h ne w ones .
SEATCOVE R NE
W CLI P
UPHOLSTER Y RIN G PLIER S
(Commerciall y available )
ROD(Cove r side )PAD
WIR E(Pad side )
ProCarManuals.com
Page 1388 of 1954
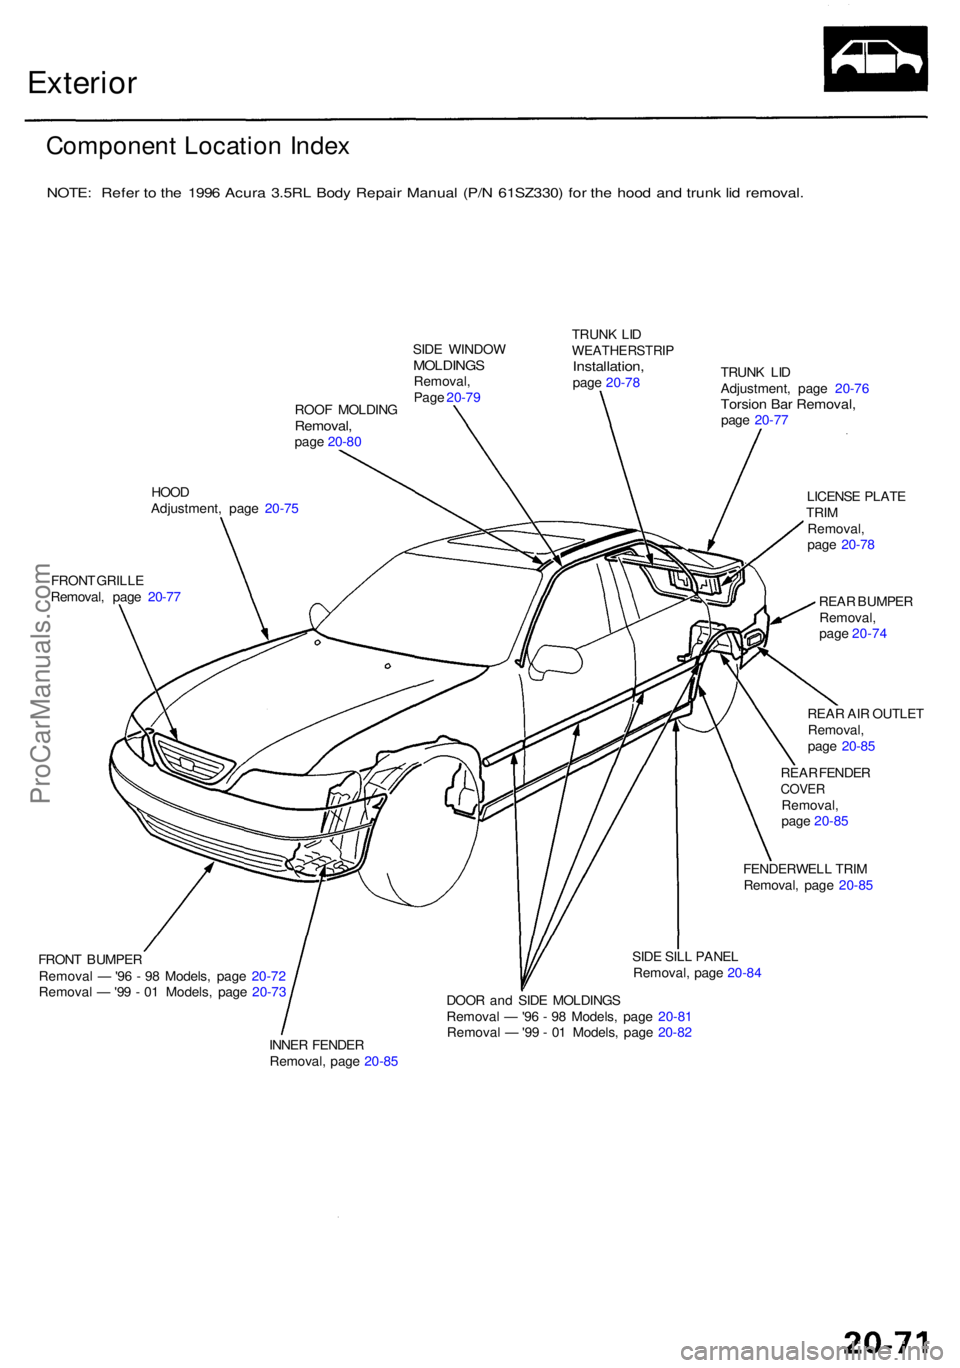
Exterior
Componen t Locatio n Inde x
NOTE : Refe r t o th e 199 6 Acur a 3.5R L Bod y Repai r Manua l (P/ N 61SZ330 ) fo r th e hoo d an d trunk lid removal .
ROOF MOLDIN GRemoval,page 20-8 0 SID
E WINDO W
MOLDING SRemoval,
Pag e 20-7 9 TRUN
K LI D
WEATHERSTRI PInstallation,page 20-7 8 TRUN
K LI D
Adjustment , pag e 20-7 6
Torsio n Ba r Removal ,page 20-7 7
HOO D
Adjustment , pag e 20-7 5
FRON T GRILL E
Removal , pag e 20-7 7 LICENS
E PLAT E
TRI M
Removal ,
pag e 20-78
REA R BUMPE R
Removal ,
pag e 20-7 4
REA R AI R OUTLE T
Removal ,
pag e 20-8 5
REA R FENDE R
COVERRemoval ,
pag e 20-8 5
FENDERWEL L TRI M
Removal , pag e 20-8 5
FRON T BUMPE R
Remova l — '96 - 9 8 Models , pag e 20-7 2
Remova l — '99 - 0 1 Models , pag e 20-7 3 SID
E SIL L PANE L
Removal , pag e 20-8 4
INNE R FENDE R
Removal , pag e 20-8 5 DOO
R an d SID E MOLDING S
Remova l — '96 - 9 8 Models , pag e 20-8 1
Remova l — '99 - 0 1 Models , pag e 20-8 2
ProCarManuals.com
Page 1389 of 1954
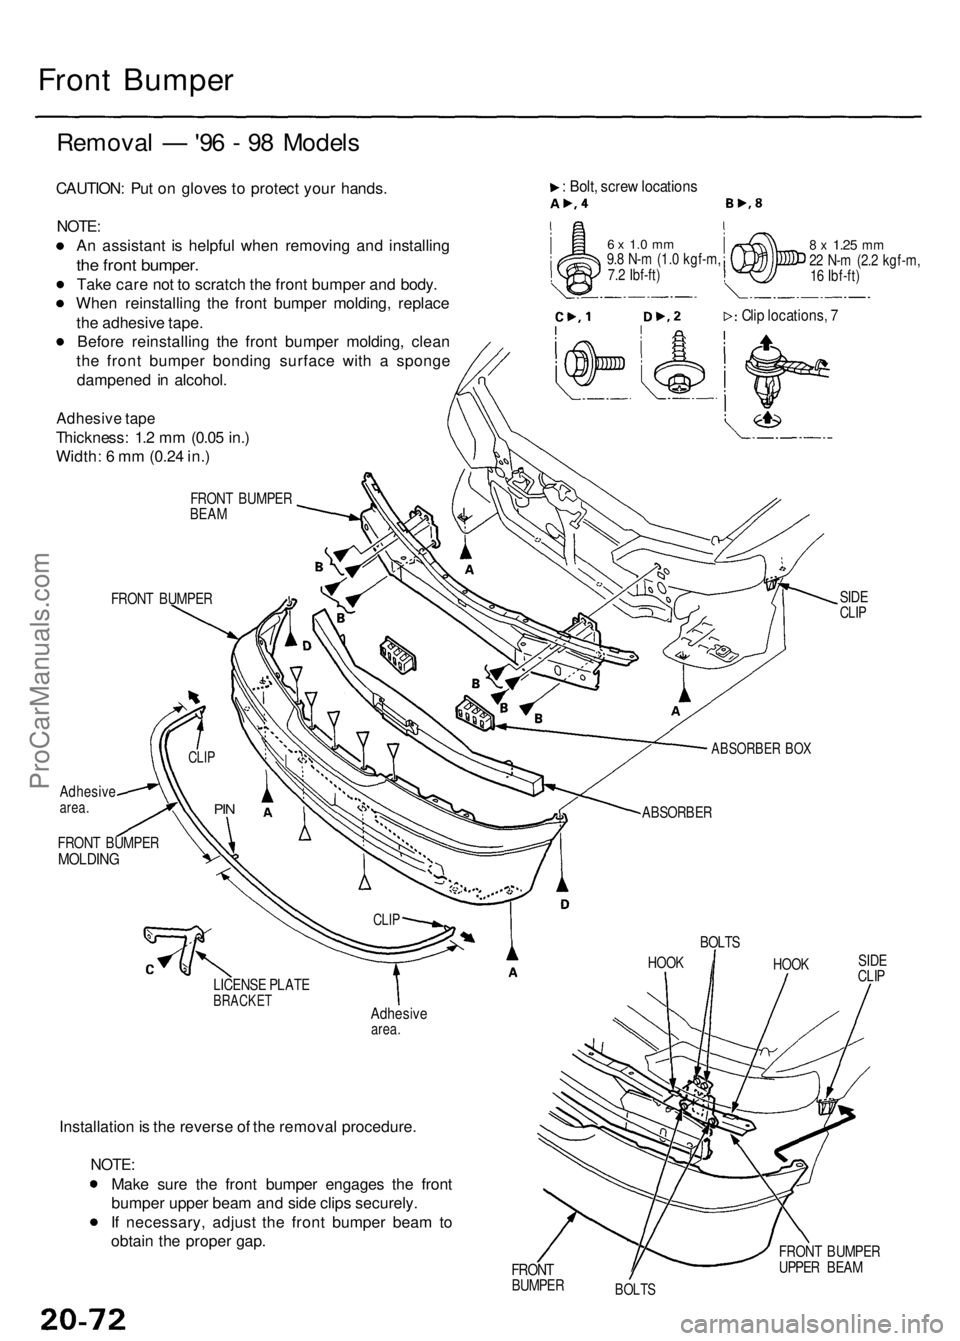
Front Bumpe r
Remova l — '96 - 9 8 Model s
CAUTION : Pu t o n glove s to protec t you r hands .
NOTE:
An assistan t i s helpfu l whe n removin g an d installin g
the fron t bumper .
Take car e no t t o scratc h th e fron t bumpe r an d body .
Whe n reinstallin g th e fron t bumpe r molding , replac e
th e adhesiv e tape .
Befor e reinstallin g th e fron t bumpe r molding , clea n
th e fron t bumpe r bondin g surfac e wit h a spong e
dampene d i n alcohol .
Adhesiv e tap e
Thickness : 1. 2 m m (0.0 5 in. )
Width : 6 m m (0.2 4 in. )
FRON T BUMPE R
BEA M
FRON T BUMPE R
: Bolt , scre w location s
6 x 1. 0 m m9.8 N- m (1. 0 kgf-m ,
7. 2 Ibf-ft )8 x 1.2 5 mm22 N- m (2. 2 kgf-m ,
1 6 Ibf-ft )
Clip locations , 7
Installatio n is th e revers e o f th e remova l procedure .
NOTE:
Make sur e th e fron t bumpe r engage s th e fron t
bumpe r uppe r bea m an d sid e clip s securely .
I f necessary , adjus t th e fron t bumpe r bea m to
obtai n th e prope r gap .
FRON TBUMPE R FRON
T BUMPE R
UPPE R BEA MBOLT S
SIDECLIP
ABSORBE R BO X
ABSORBE R
SIDE
CLI P
HOO K
BOLT S
HOOK
Adhesiv earea.
LICENS E PLAT EBRACKE T
CLIP
PIN
FRON T BUMPE RMOLDING
CLIP
Adhesiv earea.
ProCarManuals.com
Page 1390 of 1954
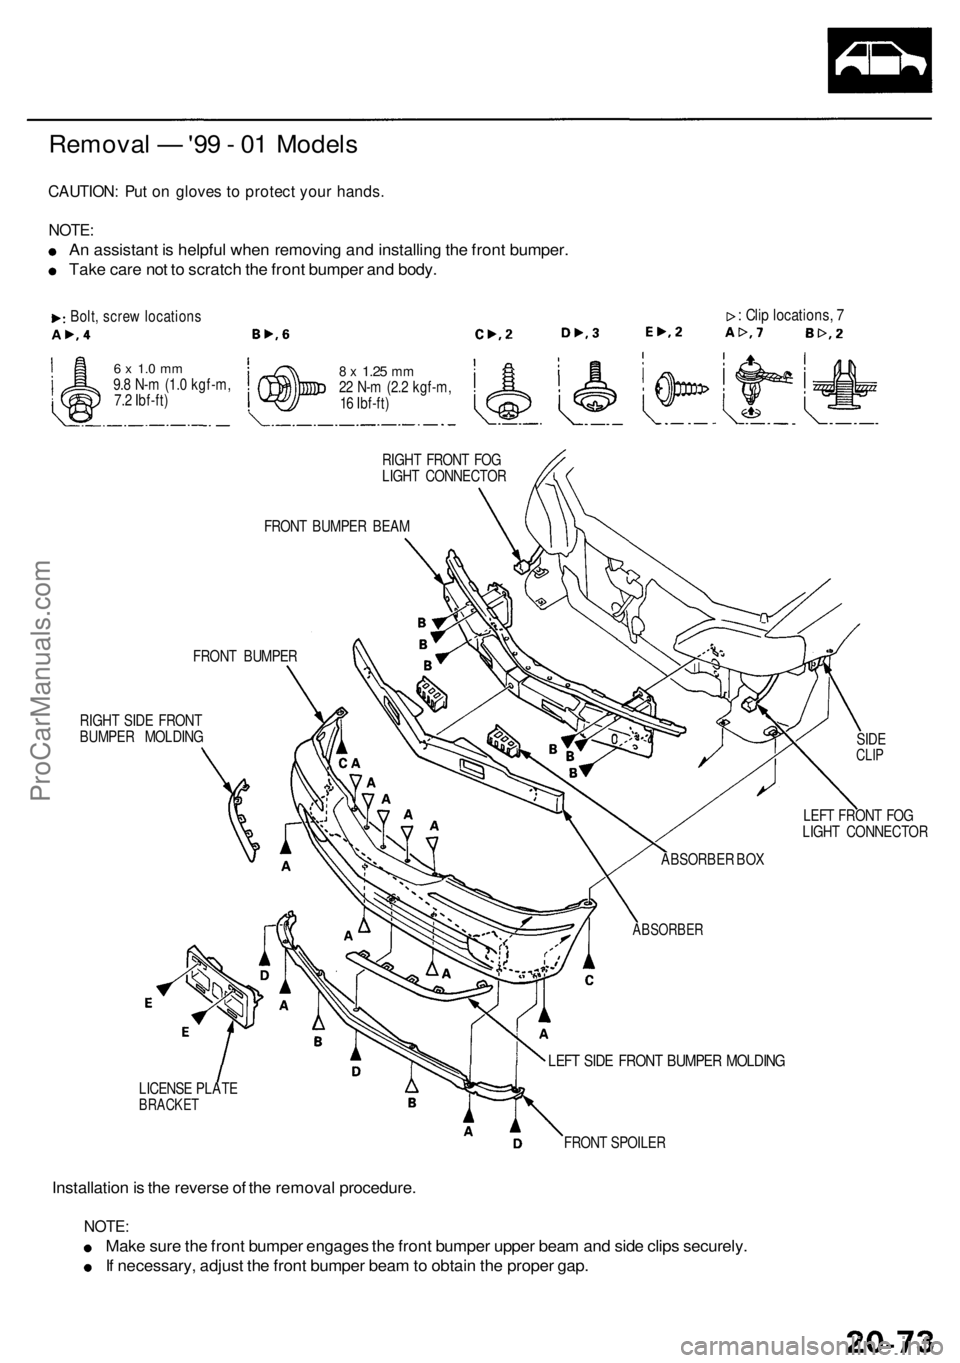
Removal — '99 - 0 1 Model s
CAUTION : Pu t o n glove s t o protec t you r hands .
NOTE:
An assistan t i s helpfu l whe n removin g an d installin g th e fron t bumper .
Tak e car e no t t o scratc h th e fron t bumpe r an d body .
8 x 1.2 5 mm22 N- m (2. 2 kgf-m ,
1 6 Ibf-ft )
: Cli p locations , 7
RIGH T FRON T FO G
LIGH T CONNECTO R
FRON T BUMPE R BEA M
FRON T BUMPE R
RIGH T SID E FRON T
BUMPE R MOLDIN G
LEFT FRON T FO G
LIGH T CONNECTO R
LICENS E PLAT E
BRACKE T
LEFT SID E FRON T BUMPE R MOLDIN G
FRONT SPOILE R
Installatio n is th e revers e o f th e remova l procedure .
NOTE:
Make sur e th e fron t bumpe r engage s th e fron t bumpe r uppe r bea m an d sid e clip s securely .
I f necessary , adjus t th e fron t bumpe r bea m to obtai n th e prope r gap .
ABSORBE R
ABSORBER BO X SID
E
CLIP
Bolt , scre w location s
6 x 1. 0 m m9.8 N- m (1. 0 kgf-m ,
7. 2 Ibf-ft )
ProCarManuals.com