DODGE TRUCK 1993 Service Repair Manual
Manufacturer: DODGE, Model Year: 1993, Model line: TRUCK, Model: DODGE TRUCK 1993Pages: 1502, PDF Size: 80.97 MB
Page 921 of 1502
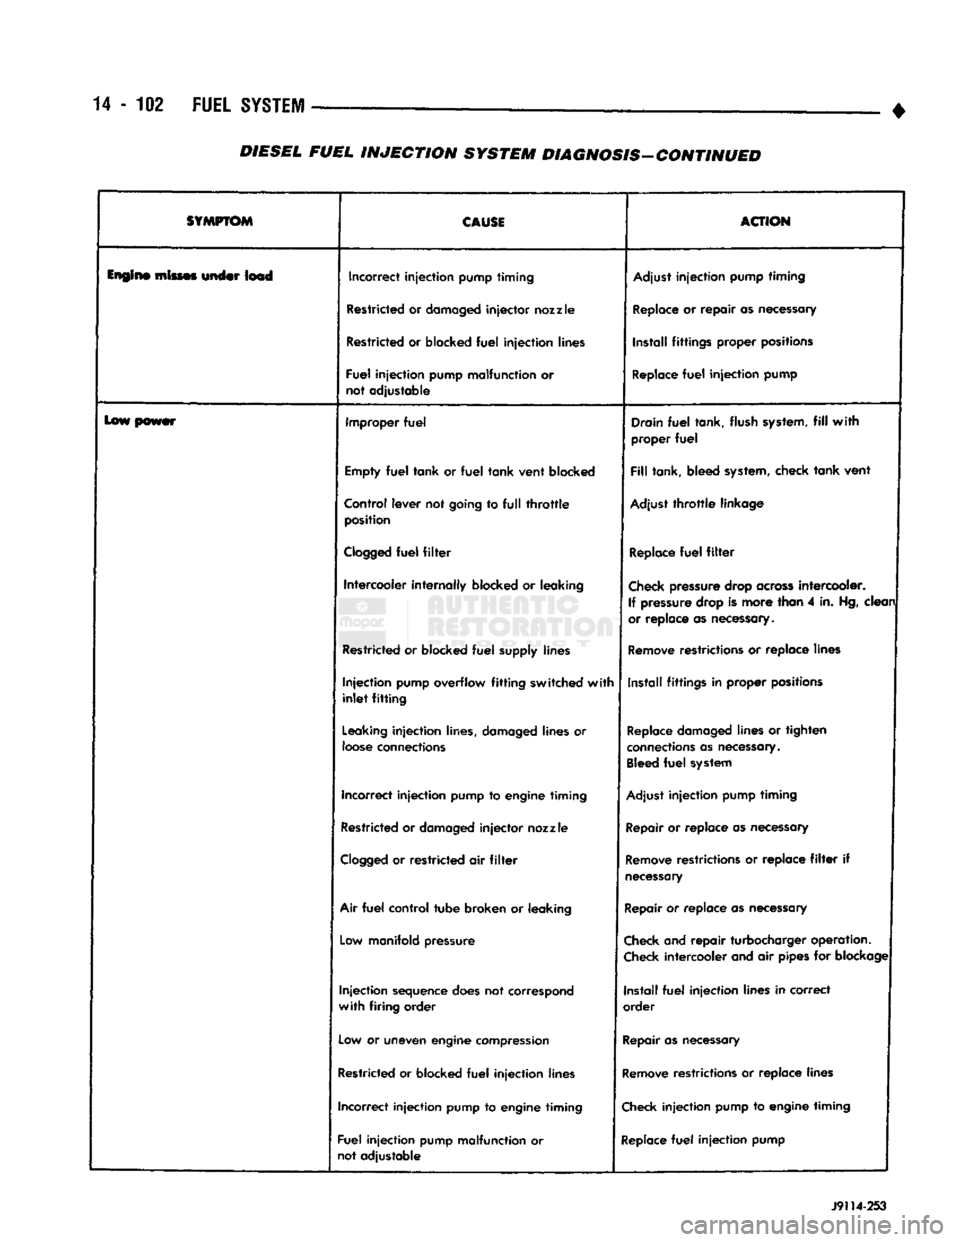
14
- 102
FUEL
SYSTEM
—
•
SYMPTOM
CAUSI
ACTION
lupin*
mimes under Im4 Incorrect
injection
pump
timing
Adjust
injection
pump
timing
Restricted
or
damaged
injector
nozzle
Replace
or
repair
as
necessary
Restricted
or
blocked
fuel
injection
lines Install
fittings
proper positions
Fuel
Injection
pump malfunction
or
not adjustable
Replace
fuel
injection
pump
lew power Improper
fuel
Drain
fuel
tank, flush
system,
fill
with
proper
fuel
Empty
fuel
tank or
fuel
tank vent blocked
Fill
tank, bleed
system,
check tank vent
Control lever not going
to full throttle
position Adjust
throttle
linkage
Clogged
fuel
filter
Replace
fuel
filter
Intercooler
internally
blocked
or
leaking
Check
pressure
drop
across
intercooler.
If
pressure
drop is more than
4
in.
Hg,
clean
or replace
as
necessary.
Restricted
or
blocked
fuel
supply lines
Remove
restrictions
or
replace lines
Injection
pump overflow
fitting
switched
with
inlet
fitting
Install
fittings
in
proper positions
Leaking
injection
lines, damaged lines
or
loose
connections
Replace
damaged
lines
or
tighten
connections
as
necessary.
Bleed
fuel
system
Incorrect
injection
pump
to
engine
timing
Adjust
injection
pump
timing
Restricted or
damaged
injector
nozzle
Repair
or replace as
necessary
Clogged
or
restricted
air filter
Remove
restrictions
or
replace
filter if
necessary
Air
fuel
control
tube broken
or
leaking
Repair
or replace
as
necessary
Low
manifold pressure
Check
and repair turbocharger operation.
Check
intercooler and
air
pipes
for
blockage
Injection
sequence
does
not correspond
with
firing
order Install
fuel
injection
lines in correct
order
Low
or
uneven
engine
compression
Repair
as
necessary
Restricted or blocked
fuel
injection
lines
Remove
restrictions
or
replace lines
Incorrect
injection
pump
to
engine
timing
Check
injection
pump
to
engine
timing
Fuel
injection
pump malfunction
or
not adjustable
Replace
fuel
injection
pump J9114-253
DIESEL
FUEL
INJECTION
SYSTEM
DIAGNOSIS-CONTINUED
Page 922 of 1502
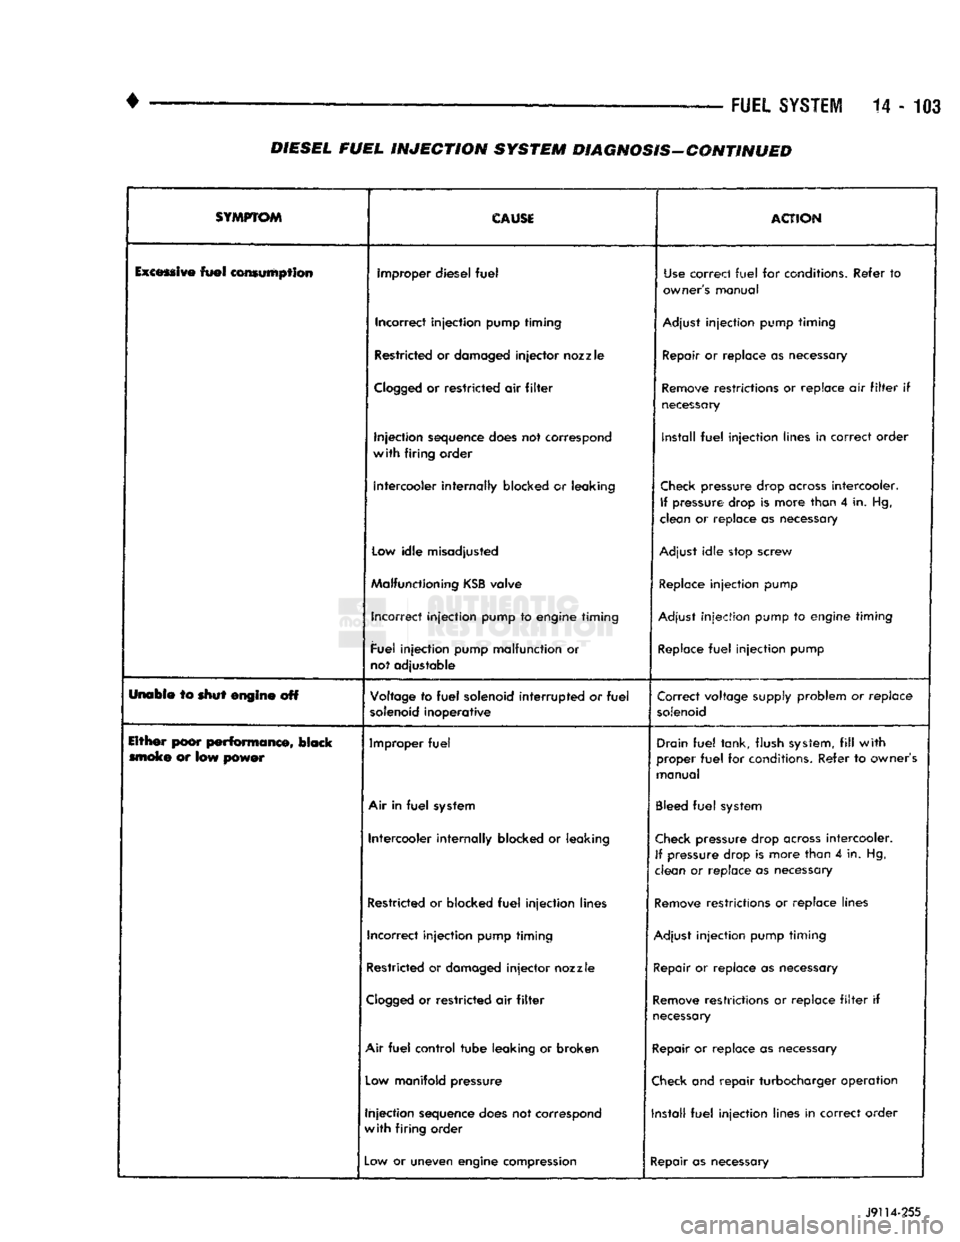
FUEL
SYSTEM
14-103
DIESEL FUEL
INJECTION
SYSTEM DIAGNOSIS-CONTINUED
SYMPTOM
CAUSE
ACTION
Excessive
fuel
consumption improper diesel
fuel
Use
correct
fuel
for conditions. Refer
to
owner's manual
Incorrect injection pump timing
Adjust
injection pump timing
Restricted or damaged
injector
nozzle Repair or replace as necessary
Clogged
or
restricted air
filter
Remove
restrictions or replace air
filter
if
necessary
Injection sequence does not correspond
with
firing order install
fuel
injection lines in correct order
Intercooler internally blocked
or
leaking
Check
pressure drop
across
intercooler.
If
pressure drop
is
more than
4
in. Hg,
clean or replace as necessary
Low
idle misadjusted
Adjust
idle stop screw
Malfunctioning
KSB
valve
Replace
injection pump
Incorrect injection pump to engine timing
Adjust
injection pump to engine timing
Fuel injection pump malfunction or
not adjustable
Replace
fuel
injection pump
Unabie to shut engine off Voltage to
fuel
solenoid
interrupted
or
fuel
solenoid
inoperative Correct voltage supply problem or
replace
solenoid
Either poor
performance,
black moke
or
low power Improper
fuel
Drain
fuel
tank, flush
system,
fill
with
proper
fuel
for conditions. Refer to owner's
manual
Air
in
fuel
system
Bleed
fuel
system
Intercooler internally blocked
or
leaking
Check
pressure drop
across
intercooler.
If
pressure drop is more than
4
in. Hg,
clean
or
replace
as
necessary
Restricted or blocked
fuel
injection lines
Remove
restrictions or replace lines
Incorrect injection pump timing
Adjust
injection pump timing
Restricted or damaged
injector
nozzle
Repair
or replace as necessary
Clogged
or restricted air
filter
Remove
restrictions or replace
filter
if
necessary
Air
fuel
control tube leaking or broken Repair or replace as necessary
Low
manifold pressure
Check
and repair turbocharger operation
Injection sequence does not correspond
with
firing order Install
fuel
injection lines in correct order
—
Low
or uneven engine compression
Repair as necessary
J9114-255
Page 923 of 1502
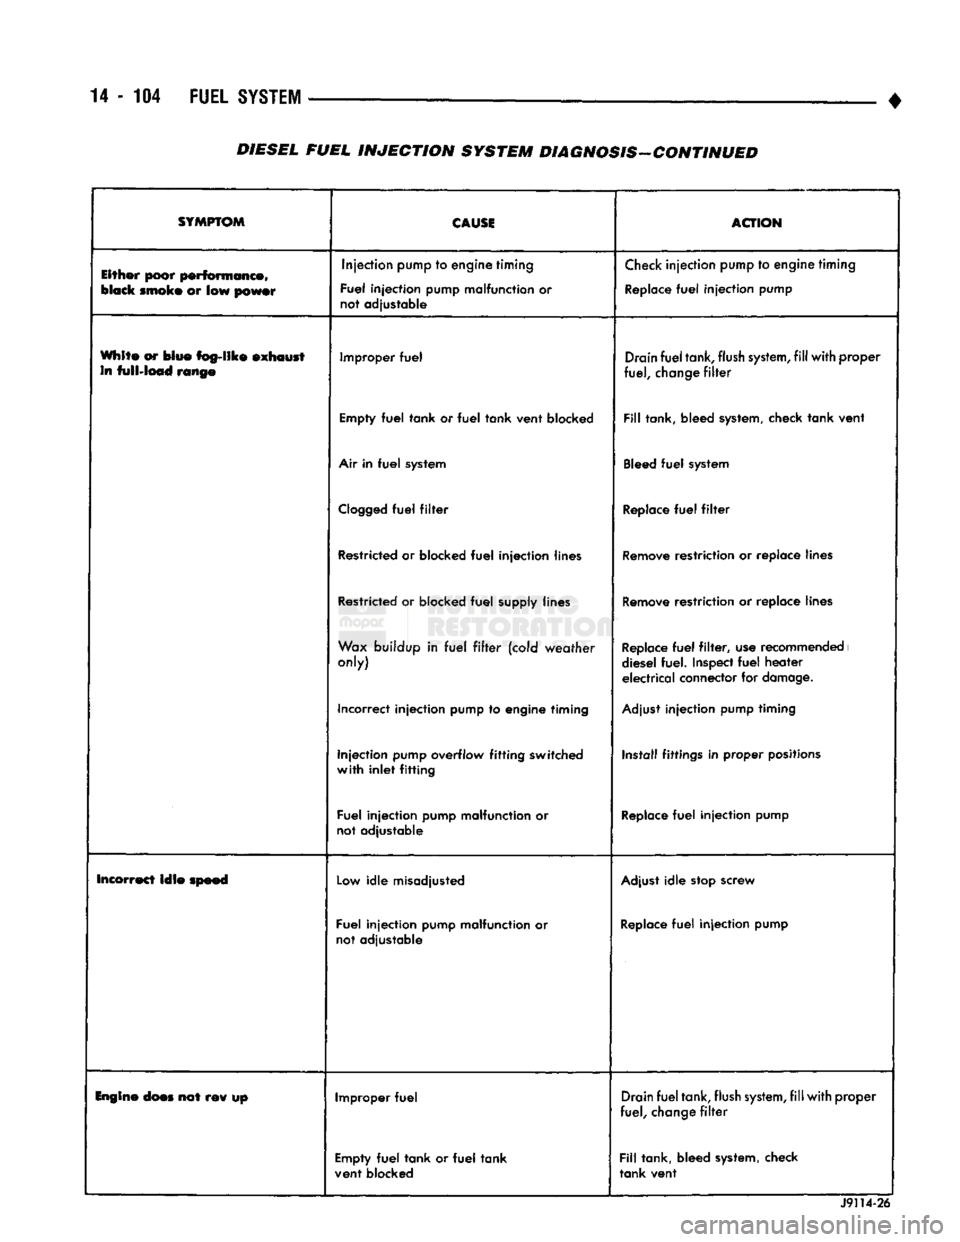
14-104
FUEL
SYSTEM
• DIESEL FUEL INJECTION SYSTEM DIAGNOSIS-CONTINUED
SYMPTOM
CAUSE
ACTION
Either poor performance,
black
smoke
or low
power
Injection
pump
to engine timing
Fuel injection pump malfunction or
not adjustable
Check
injection
pump
to
engine
timing
Replace
fuel
injection pump
White or blue fog-like exhaust in full-load range Improper
fuel
Drain
fuel
tank,
flush
system,
fill
with proper
fuel,
change
filter
Empty
fuel
tank or
fuel
tank vent blocked
Fill
tank, bleed
system,
check tank vent
Air
in
fuel
system
Bleed
fuel
system
Clogged
fuel
filter
Replace
fuel
filter
Restricted
or blocked
fuel
injection lines
Remove
restriction or replace lines
Restricted
or blocked
fuel
supply lines
Remove
restriction or replace lines
Wax
buildup in
fuel
filter
(cold weather
only)
Replace
fuel
filter,
use
recommended
i
diesel fuel.
Inspect
fuel
heater electrical connector for
damage.
Incorrect injection pump to engine timing
Adjust
injection pump timing
Injection pump overflow fitting switched
with inlet fitting Install fittings in
proper
positions
Fuel injection pump malfunction or
not adjustable
Replace
fuel
injection pump
Incorrect lale speed
Low
idle misadjusted
Adjust
idle
stop
screw
Fuel injection pump malfunction or
not adjustable
Replace
fuel
injection pump
Engine
does
not rev up Improper
fuel
Drain
fuel
tank,
flush
system,
fill
with proper
fuel,
change
filter
Empty
fuel
tank or
fuel
tank
vent blocked
Fill
tank, bleed
system,
check
tank vent J9114-26
Page 924 of 1502
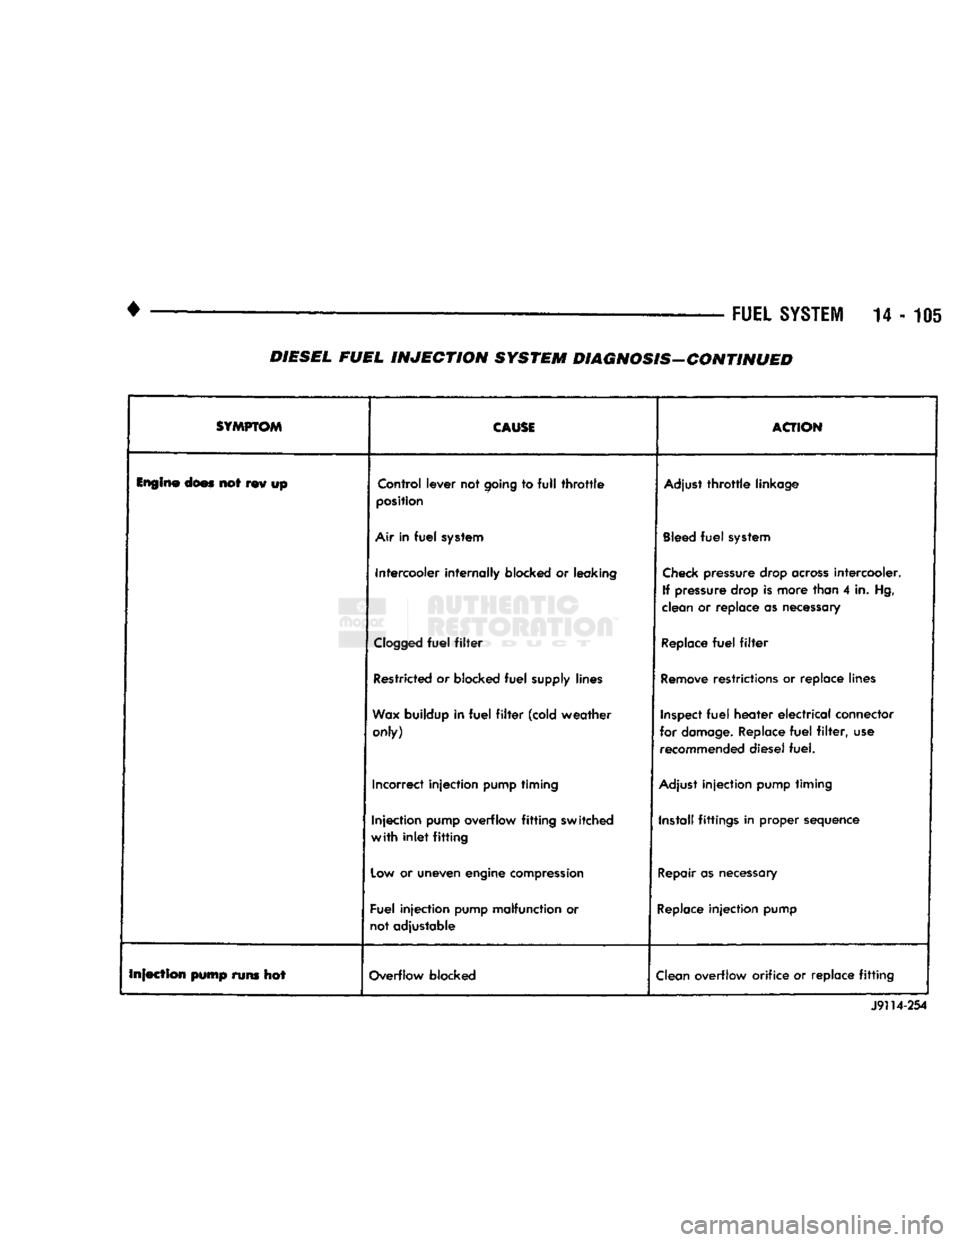
•
FUEL
SYSTEM
14-105 DIESEL FUEL INJECTION SYSTEM DIAGNOSIS-CONTINUED
SYMPTOM
CAUSE
ACTION
Engine
does not rev up Control lever not
going
to
full
throttle
position
Adjust
throttle
linkage
Air
in
fuel
system
Bleed
fuel
system
Intercooler internally blocked or leaking
Check
pressure drop
across
intercooler.
If pressure drop is more than 4 in. Hg,
clean or replace as necessary
Clogged
fuel
filter
Replace
fuel
filter
Restricted or blocked
fuel
supply lines
Remove
restrictions or replace lines
Wax
buildup in
fuel
filter
(cold weather only)
Inspect
fuel
heater
electrical
connector
for
damage.
Replace
fuel
filter,
use recommended diesel fuel.
Incorrect injection pump timing
Adjust
injection pump timing
Injection pump overflow
fitting
switched
with
inlet
fitting
Install fittings in proper sequence
Low
or uneven engine
compression
Repair
as
necessary
Fuel injection pump malfunction or
not adjustable
Replace
injection pump
Infection pump runs hot Overflow blocked
Clean
overflow orifice or replace
fitting
J9114-254
Page 925 of 1502
14
- 106
FUEL SYSTEi
DIESEL FUEL
INJECTION-SERVICE
PROCEDURES
INDEX
page
Air Bleed Procedure
106
Air Fuel Control Tube
107
Air Intake Heater
107
Engine
Speed
Sensor
108
Fuel Drain Manifold
109
Fuel Heater
. 110
Fuel
Injection
Pump
110
Fuel
Injection
Pump Supply Line
114
Fuel
Injectors
114
AIR BLEED PROCEDURE
A certain amount
of air
becomes trapped
in the
fuel system when fuel system components
are
ser
viced
or
replaced. Bleed
the
system after fuel system service according
to the
following procedures.
WARNING:
DO NOT
BLEED
AIR
FROM
THE
FUEL
SYSTEM
OF
A
HOT
ENGINE.
DO
NOT
ALLOW FUEL
TO SPRAY ONTO
THE
EXHAUST MANIFOLD WHEN BLEEDING
AIR
FROM
THE
FUEL SYSTEM.
MANUAL BLEEDING
Some
air
enters
the
fuel system when
the
filters
or
injection pump supply line
are
changed. This small
amount
of air is
vented automatically from
the
injec
tion pump through
the
fuel drain manifold. This
is if
the filter
was
changed according
to
instructions.
The system will have
to be
bleed manually
if:
•
The
fuel filter
is not
filled before installation
•
Injection pump
is
replaced
•
High pressure fuel line connections
are
loosened
or
lines replaced
•
Initial engine start-up
or
start-up after
an ex
tended period
of no
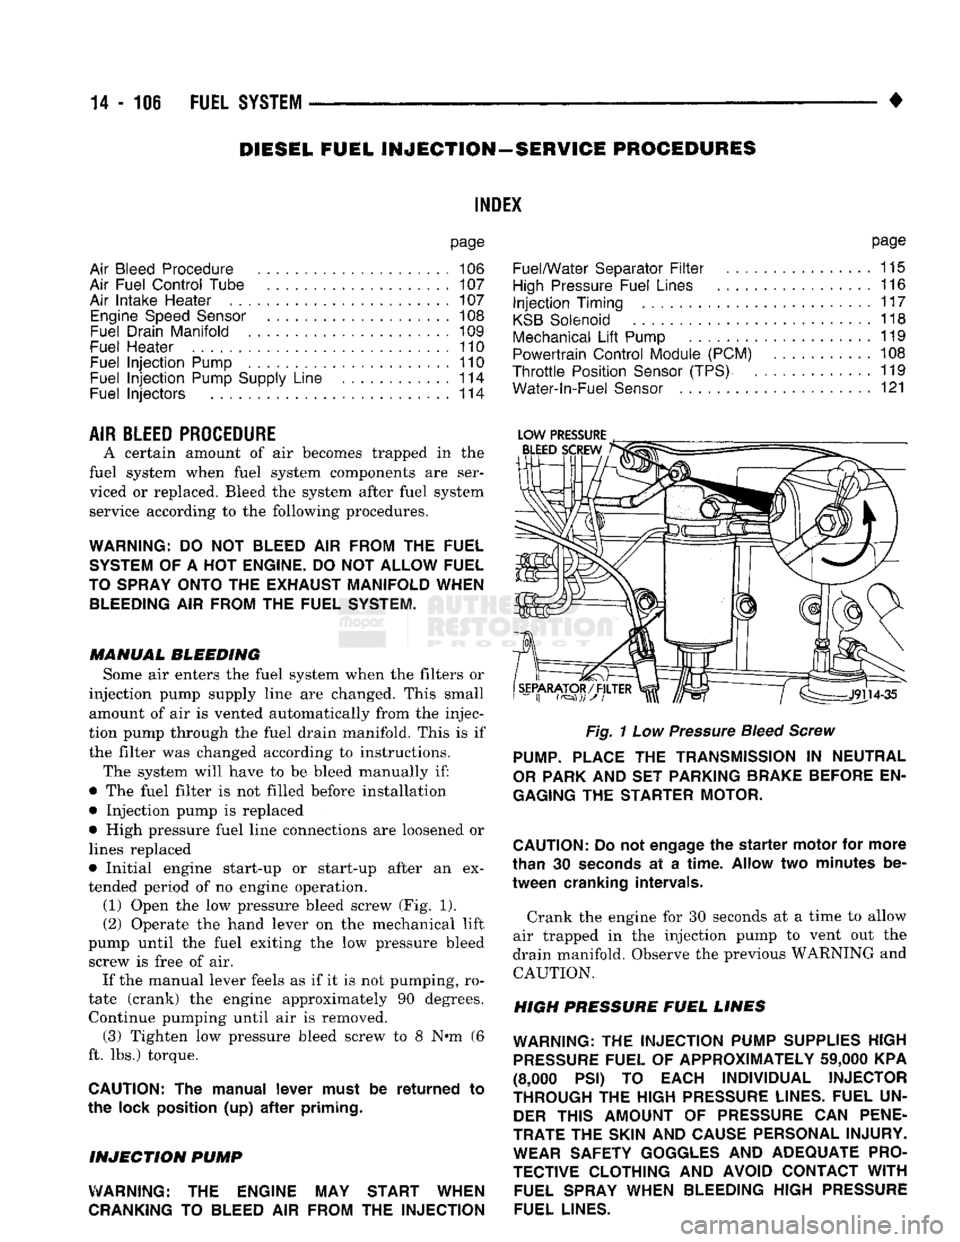
engine operation. (1) Open
the low
pressure bleed screw
(Fig. 1).
(2) Operate
the
hand lever
on the
mechanical lift
pump until
the
fuel exiting
the low
pressure bleed screw
is
free
of air.
If
the
manual lever feels
as if it is not
pumping,
ro
tate (crank)
the
engine approximately
90
degrees. Continue pumping until
air is
removed. (3) Tighten
low
pressure bleed screw
to 8 N»m (6
ft.
lbs.)
torque.
CAUTION:
The
manual lever must
be
returned
to
the lock position
(up) after
priming.
INJECTION
PUMP
WARNING:
THE
ENGINE
MAY
START WHEN
CRANKING
TO
BLEED
AIR
FROM
THE
INJECTION
page
Fuel/Water Separator
Filter
................
115
High
Pressure Fuel Lines
116
Injection
Timing
117
KSB
Solenoid
118
Mechanical
Lift
Pump
119
Powertrain Control Module (PCM)
108
Throttle
Position
Sensor
(TPS)
119
Water-ln-Fuel
Sensor
121
Fig.
1
Low
Pressure
Bleed Screw
PUMP.
PLACE
THE
TRANSMISSION
IN
NEUTRAL
OR
PARK
AND SET
PARKING BRAKE BEFORE
EN
GAGING
THE
STARTER MOTOR.
CAUTION:
Do
not
engage
the
starter
motor
for
more
than
30
seconds
at a
time.
Allow
two
minutes
be
tween cranking intervals.
Crank
the
engine
for 30
seconds
at a
time
to
allow
air trapped
in the
injection pump
to
vent
out the
drain manifold. Observe
the
previous WARNING
and
CAUTION.
HIGH PRESSURE FUEL LINES
WARNING:
THE
INJECTION PUMP SUPPLIES HIGH
PRESSURE
FUEL
OF
APPROXIMATELY
59,000
KPA
(8,000
PSI) TO
EACH INDIVIDUAL INJECTOR
THROUGH
THE
HIGH
PRESSURE
LINES. FUEL
UN
DER
THIS AMOUNT
OF
PRESSURE
CAN
PENE
TRATE
THE
SKIN
AND
CAUSE PERSONAL INJURY. WEAR SAFETY GOGGLES
AND
ADEQUATE PRO
TECTIVE CLOTHING
AND
AVOID CONTACT
WITH
FUEL SPRAY WHEN BLEEDING HIGH
PRESSURE
FUEL LINES.
Page 926 of 1502
•
FUEL SYSTEM 14 - 107
WARNING;
DO NOT
BLEED
AIR
FROM
THE
FUEL
SYSTEM
OF A HOT
ENGINE.
DO NOT
ALLOW FUEL
TO SPRAY ONTO
THE
EXHAUST MANIFOLD WHEN
BLEEDING
AIR
FROM
THE
FUEL SYSTEM.
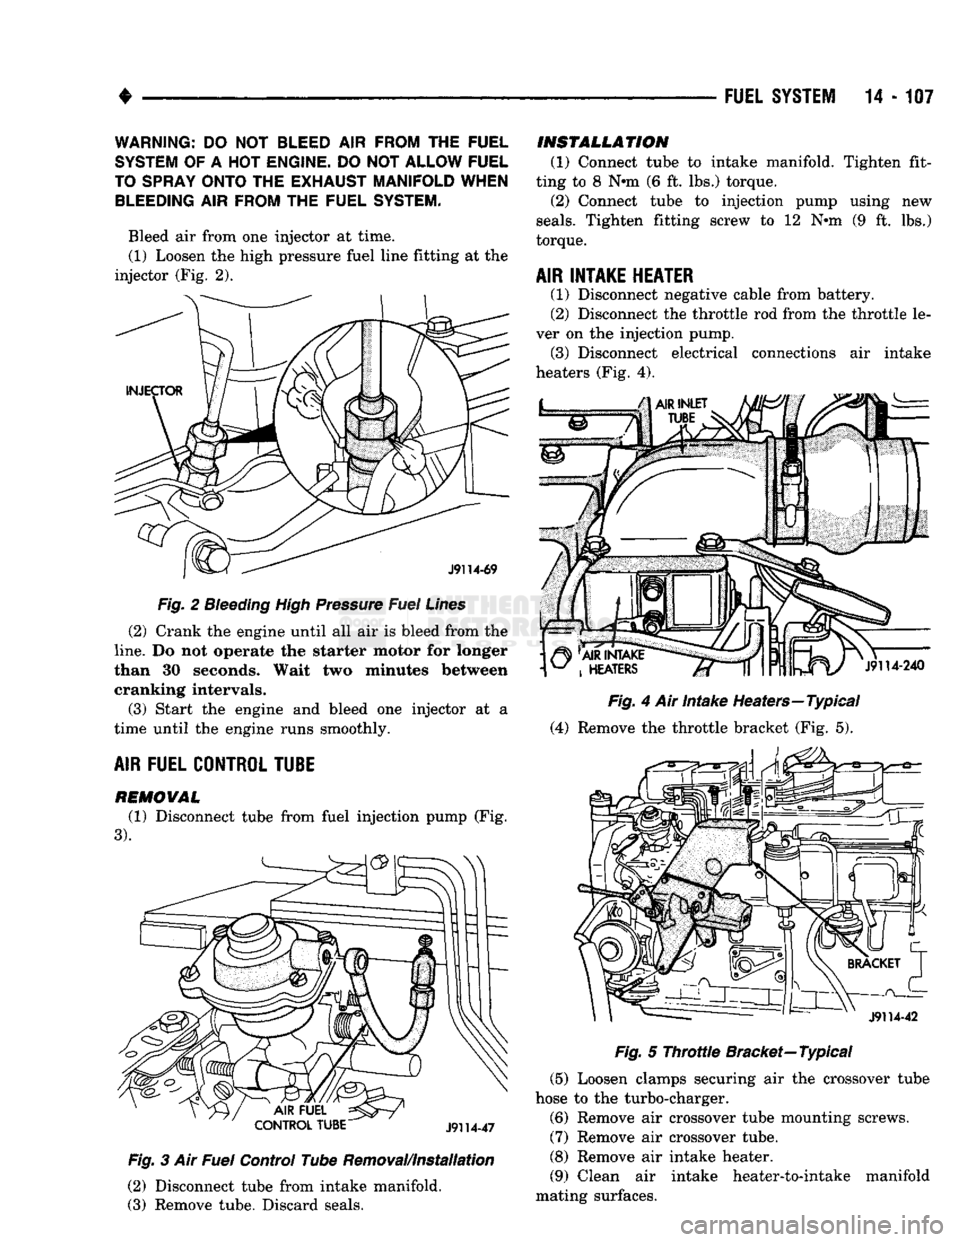
Bleed air from one injector at time. (1) Loosen the high pressure fuel line fitting at the
injector (Fig. 2).
Fig.
2
Bleeding
High Pressure Fuel Lines
(2) Crank the engine until all air is bleed from the
line.
Do not operate the starter motor for longer
than 30 seconds. Wait two minutes between cranking intervals.
(3) Start the engine and bleed one injector at a
time until the engine runs smoothly.
AIR
FUEL CONTROL TUBE
REMOWAL
(1) Disconnect tube from fuel injection pump (Fig.
3). Fig.
3 Air
Fuel
Control Tube Removal/Installation
(2) Disconnect tube from intake manifold.
(3) Remove tube. Discard seals.
INSTALLATION
(1) Connect tube to intake manifold. Tighten fit
ting to 8 Nnn (6 ft. lbs.) torque. (2) Connect tube to injection pump using new
seals.
Tighten fitting screw to 12 Nnn (9 ft. lbs.)
torque.
AIR INTAKE HEATER
(1) Disconnect negative cable from battery.
(2) Disconnect the throttle rod from the throttle le
ver on the injection pump. (3) Disconnect electrical connections air intake
heaters (Fig. 4).
Fig.
4 Air Intake Heaters—Typical
(4) Remove the throttle bracket (Fig. 5).
Fig.
5
Throttle
Bracket—Typical
(5) Loosen clamps securing air the crossover tube
hose to the turbo-charger.
(6) Remove air crossover tube mounting screws.
(7) Remove air crossover tube.
(8) Remove air intake heater.
(9) Clean air intake heater-to-intake manifold
mating surfaces.
Page 927 of 1502
(10) Install air intake heater (with new gasket) in
reverse order of removal.
AIR
INTAKE
HE
A TER
RELA YS
(1) Disconnect negative cable from battery.
(2) Disconnect electrical connections from relays
(Fig. 6).
HEATER
RELAYS
WHEEL..
WELL
J9114-67
Fig. 6 Air intake Heater Relays—Typical (3) Remove relay mounting screws. Remove relays.
(4) Install relays in reverse order of removal.
POWERTRAIN CONTROL MODULE
(PCI)
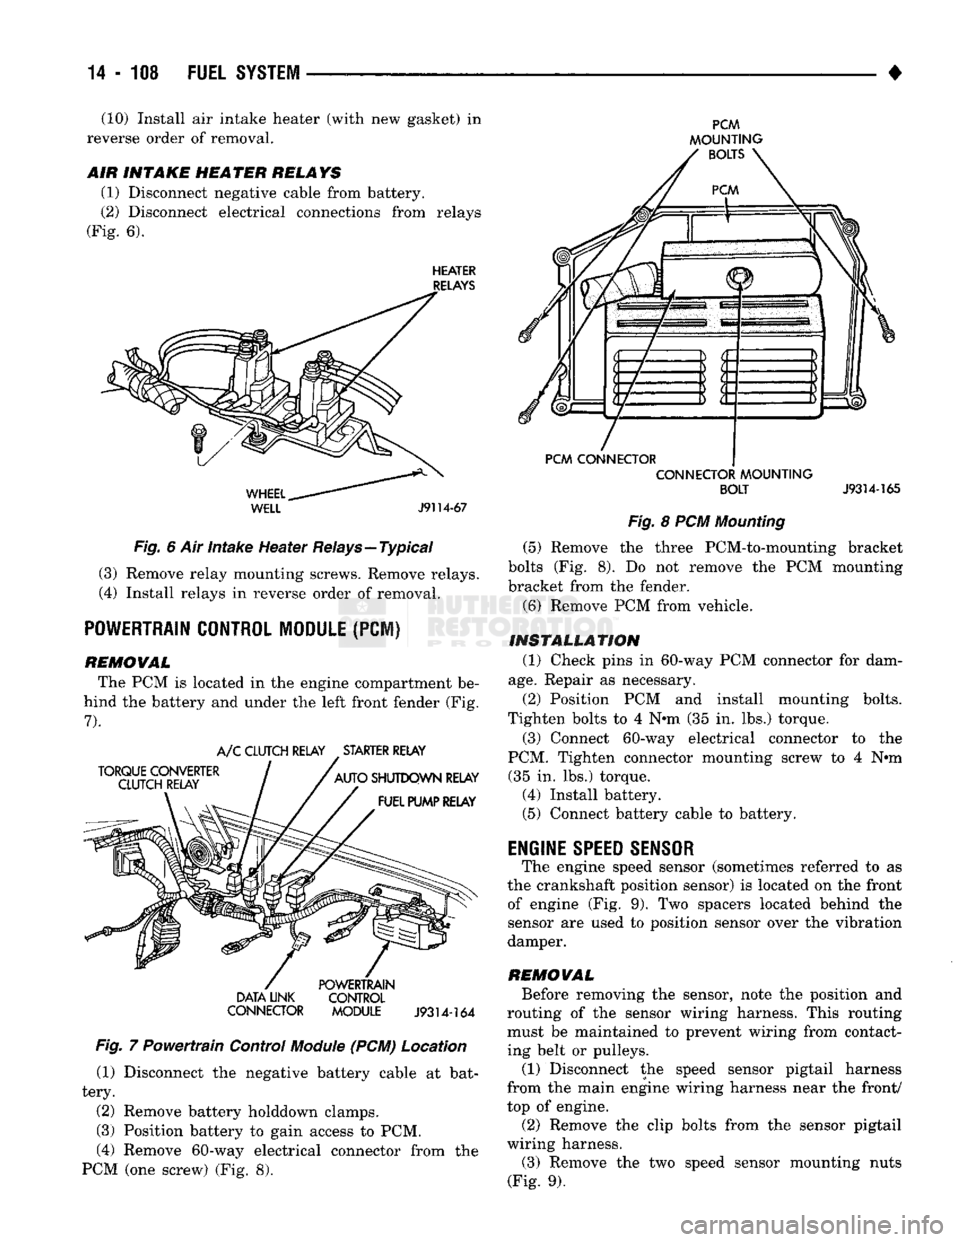
REMOWAL The PCM is located in the engine compartment be
hind the battery and under the left front fender (Fig.
7).
TORQUE CONVERTER
CLUTCH RELAY A/C CLUTCH RELAY STARTER RELAY
AUTO SHUTDOWN RELAY FUEL PUMP RELAY DATA LINK
CONNECTOR POWERTRAIN
CONTROL
MODULE
J9314-164
Fig. 7 Powertrain Control
Module
(PCM) Location (1) Disconnect the negative battery cable at bat
tery.
(2) Remove battery holddown clamps.
(3) Position battery to gain access to PCM,
(4) Remove 60-way electrical connector from the
PCM (one screw) (Fig. 8).
PCM
MOUNTING BOLTS
PCM CONNECTOR CONNECTOR MOUNTING
BOLT
J9314-165
Fig. 8 PCM Mounting (5) Remove the three PCM-to-mounting bracket
bolts (Fig. 8). Do not remove the PCM mounting
bracket from the fender.
(6) Remove PCM from vehicle.
INSTALLATION (1) Check pins in 60-way PCM connector for dam
age.
Repair as necessary.
(2) Position PCM and install mounting bolts.
Tighten bolts to 4 N*m (35 in. lbs.) torque.
(3) Connect 60-way electrical connector to the
PCM. Tighten connector mounting screw to 4 N#m (35 in. lbs.) torque. (4) Install battery. (5) Connect battery cable to battery.
ENGINE
SPEED SENSOR
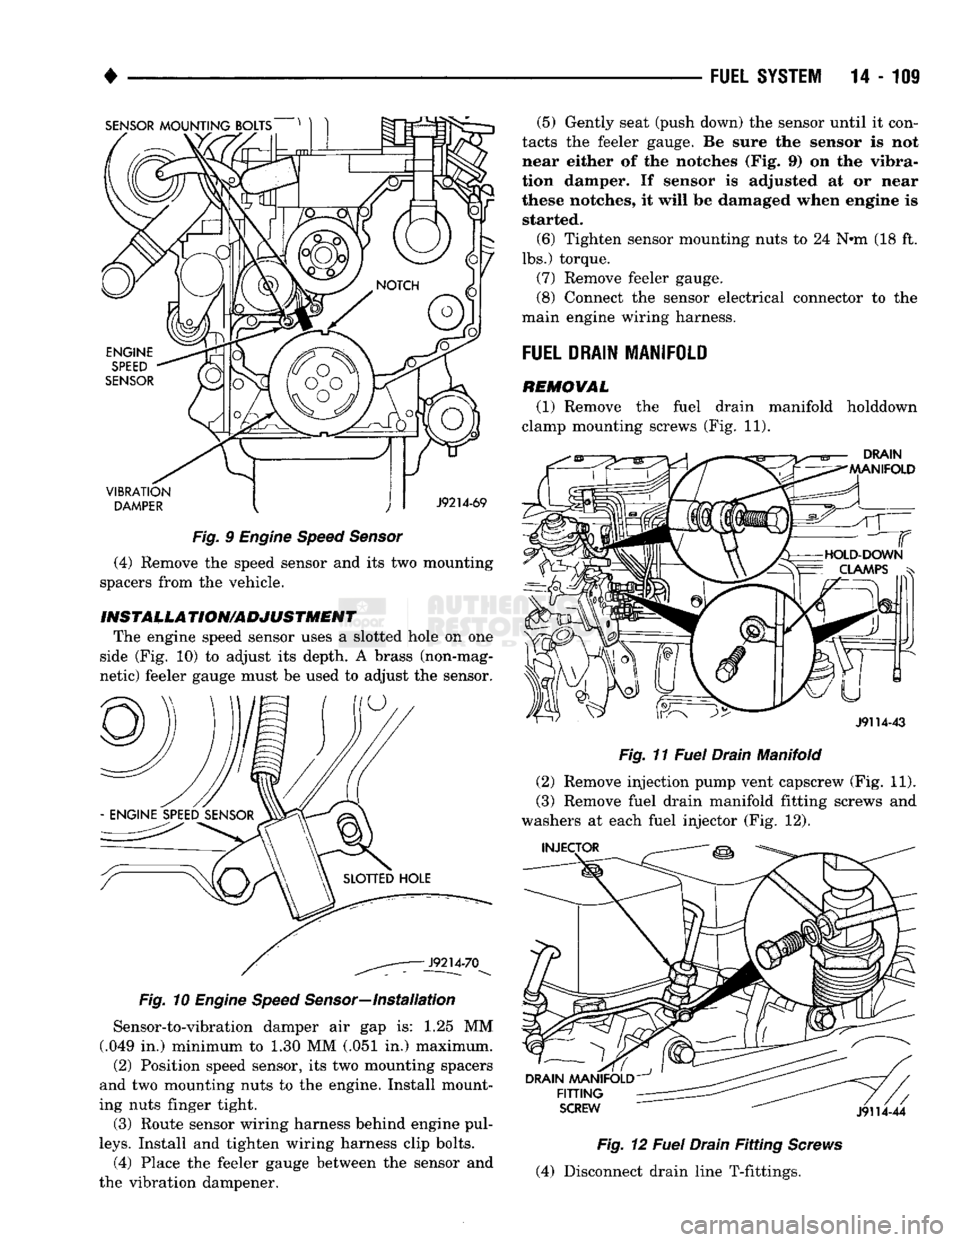
The engine speed sensor (sometimes referred to as
the crankshaft position sensor) is located on the front of engine (Fig. 9). Two spacers located behind the
sensor are used to position sensor over the vibration
damper.
REMOWAL Before removing the sensor, note the position and
routing of the sensor wiring harness. This routing must be maintained to prevent wiring from contact
ing belt or pulleys.
(1) Disconnect the speed sensor pigtail harness
from the main engine wiring harness near the front/
top of engine.
(2) Remove the clip bolts from the sensor pigtail
wiring harness. (3) Remove the two speed sensor mounting nuts
(Fig. 9).
Page 928 of 1502
SENSOR
MOUNTING BOLTS
VIBRATION
DAMPER
J9214-69
Fig.
9
Engine Speed Sensor
(4) Remove the speed sensor and its two mounting
spacers from the vehicle.
INST
ALL A
TION/ADJUSTMENT
The engine speed sensor uses a slotted hole on one
side (Fig. 10) to adjust its depth. A brass (non-mag
netic) feeler gauge must be used to adjust the sensor.
Fig.
10
Engine Speed
Sensor—Installation
Sensor-to-vibration damper air gap is: 1.25 MM
(.049 in.) minimum to 1.30 MM (.051 in.) maximum.
(2) Position speed sensor, its two mounting spacers
and two mounting nuts to the engine. Install mount
ing nuts finger tight.
(3) Route sensor wiring harness behind engine pul
leys.
Install and tighten wiring harness clip bolts. (4) Place the feeler gauge between the sensor and
the vibration dampener. (5) Gently seat (push down) the sensor until it con
tacts the feeler gauge. Be sure the sensor is not
near either of the notches (Fig. 9) on the vibra
tion damper. If sensor is adjusted at or near
these notches, it will be damaged when engine is started.
(6) Tighten sensor mounting nuts to 24 N#m (18 ft.
lbs.) torque.
(7) Remove feeler gauge.
(8) Connect the sensor electrical connector to the
main engine wiring harness.
FUEL
DRAIN
MANIFOLD
REMOVAL
(1) Remove the fuel drain manifold holddown
clamp mounting screws (Fig. 11).
DRAIN
MANIFOLD
J9114-43
Fig.
11
Fuel
Drain Manifold
(2) Remove injection pump vent capscrew (Fig. 11).
(3) Remove fuel drain manifold fitting screws and
washers at each fuel injector (Fig. 12).
INJECTOR
DRAIN
MANIFOLD
FITTING
SCREW
J9114-44
Fig.
12
Fuel
Drain
Fitting
Screws
(4) Disconnect drain line T-fittings.
Page 929 of 1502
14
- 110
FUEL SYSTEM
SENSOR
J9114-39
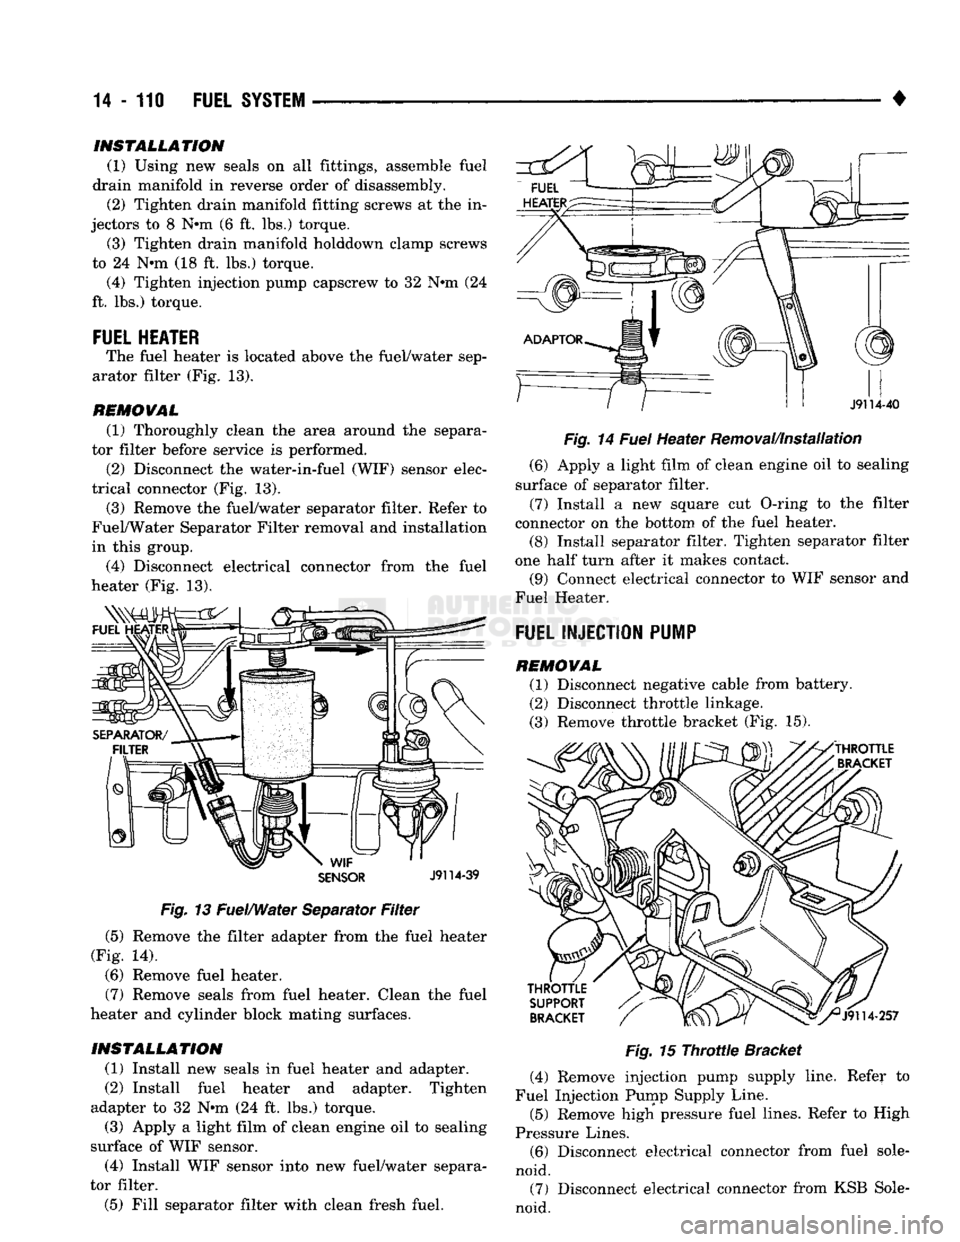
Fig.
13 Fuel/Water Separator
Filter
(5) Remove the filter adapter from the fuel heater
(Fig. 14).
(6) Remove fuel heater.
(7) Remove seals from fuel heater. Clean the fuel
heater and cylinder block mating surfaces.
INSTALLATION
(1) Install new seals in fuel heater and adapter.
(2) Install fuel heater and adapter. Tighten
adapter to 32 Nrn (24 ft. lbs.) torque. (3) Apply a light film of clean engine oil to sealing
surface of WIF sensor.
(4) Install WIF sensor into new fuel/water separa
tor filter.
(5) Fill separator filter with clean fresh fuel. •
Fig.
14
Fuel
Heater Removal/Installation (6) Apply a light film of clean engine oil to sealing
surface of separator filter.
(7) Install a new square cut O-ring to the filter
connector on the bottom of the fuel heater. (8) Install separator filter. Tighten separator filter
one half turn after it makes contact. (9) Connect electrical connector to WIF sensor and
Fuel Heater.
FUEL INJECTION PUMP
REMOVAL (1) Disconnect negative cable from battery.
(2) Disconnect throttle linkage.
(3) Remove throttle bracket (Fig. 15).
Fig.
15
Throttle
Bracket
(4) Remove injection pump supply line. Refer to
Fuel Injection Pump Supply Line.
(5) Remove high pressure fuel lines. Refer to High
Pressure Lines. (6) Disconnect electrical connector from fuel sole
noid. (7) Disconnect electrical connector from KSB Sole
noid.
INSTALLATION
(1) Using new seals on all fittings, assemble fuel
drain manifold in reverse order of disassembly. (2) Tighten drain manifold fitting screws at the in
jectors to 8 N#m (6 ft. lbs.) torque. (3) Tighten drain manifold holddown clamp screws
to 24 N*m (18 ft. lbs.) torque. (4) Tighten injection pump capscrew to 32 N#m (24
ft. lbs.) torque.
FUEL HEATER
The fuel heater is located above the fuel/water sep
arator filter (Fig. 13).
REMOVAL
(1) Thoroughly clean the area around the separa
tor filter before service is performed.
(2) Disconnect the water-in-fuel (WIF) sensor elec
trical connector (Fig. 13). (3) Remove the fuel/water separator filter. Refer to
Fuel/Water Separator Filter removal and installation
in this group.
(4) Disconnect electrical connector from the fuel
heater (Fig. 13).
Page 930 of 1502
•
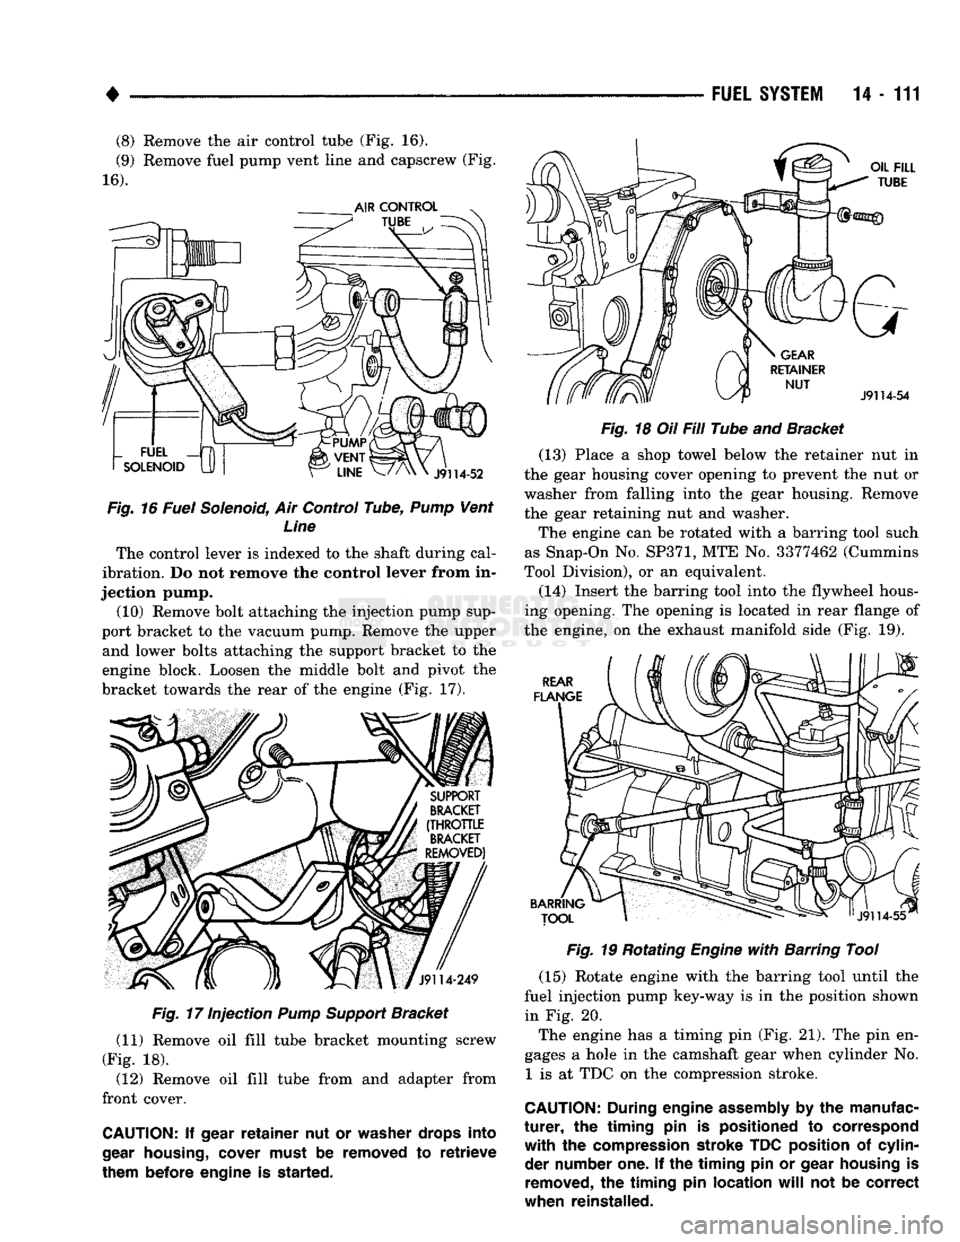
(8) Remove the air control tube (Fig. 16).
(9) Remove fuel pump vent line and capscrew (Fig.
16).
Fig.
16 Fuel Solenoid, Air Control Tube,
Pump
Vent Line
The control lever is indexed to the shaft during cal
ibration. Do not remove the control lever from in
jection pump. (10) Remove bolt attaching the injection pump sup
port bracket to the vacuum pump. Remove the upper and lower bolts attaching the support bracket to the
engine block. Loosen the middle bolt and pivot the
bracket towards the rear of the engine (Fig. 17).
Fig.
17 Injection
Pump
Support
Bracket
(11) Remove oil fill tube bracket mounting screw
(Fig. 18). (12) Remove oil fill tube from and adapter from
front cover.
CAUTION:
If
gear
retainer
nut or
washer drops into
gear
housing,
cover must
be
removed
to
retrieve
them before engine
is
started. FUEL
SYSTEM
14-111
Fig.
18 Oil Fill Tube and Bracket (13) Place a shop towel below the retainer nut in
the gear housing cover opening to prevent the nut or
washer from falling into the gear housing. Remove
the gear retaining nut and washer.
The engine can be rotated with a barring tool such
as Snap-On No.
SP371,
MTE No. 3377462 (Cummins
Tool Division), or an equivalent.
(14) Insert the barring tool into the flywheel hous
ing opening. The opening is located in rear flange of
the engine, on the exhaust manifold side (Fig. 19).
Fig.
19 Rotating
Engine
with
Barring Tool
(15) Rotate engine with the barring tool until the
fuel injection pump key-way is in the position shown in Fig. 20.
The engine has a timing pin (Fig. 21). The pin en
gages a hole in the camshaft gear when cylinder No. 1 is at TDC on the compression stroke.
CAUTION:
During
engine
assembly
by the
manufac
turer,
the
timing
pin is
positioned
to
correspond
with
the
compression stroke TDC position
of
cylin der number one.
If the
timing
pin or
gear housing
is
removed,
the
timing
pin
location
will
not be
correct
when reinstalled.