DODGE TRUCK 1993 Service Repair Manual
Manufacturer: DODGE, Model Year: 1993, Model line: TRUCK, Model: DODGE TRUCK 1993Pages: 1502, PDF Size: 80.97 MB
Page 941 of 1502
14
- 122
FUEL
SYSTEM
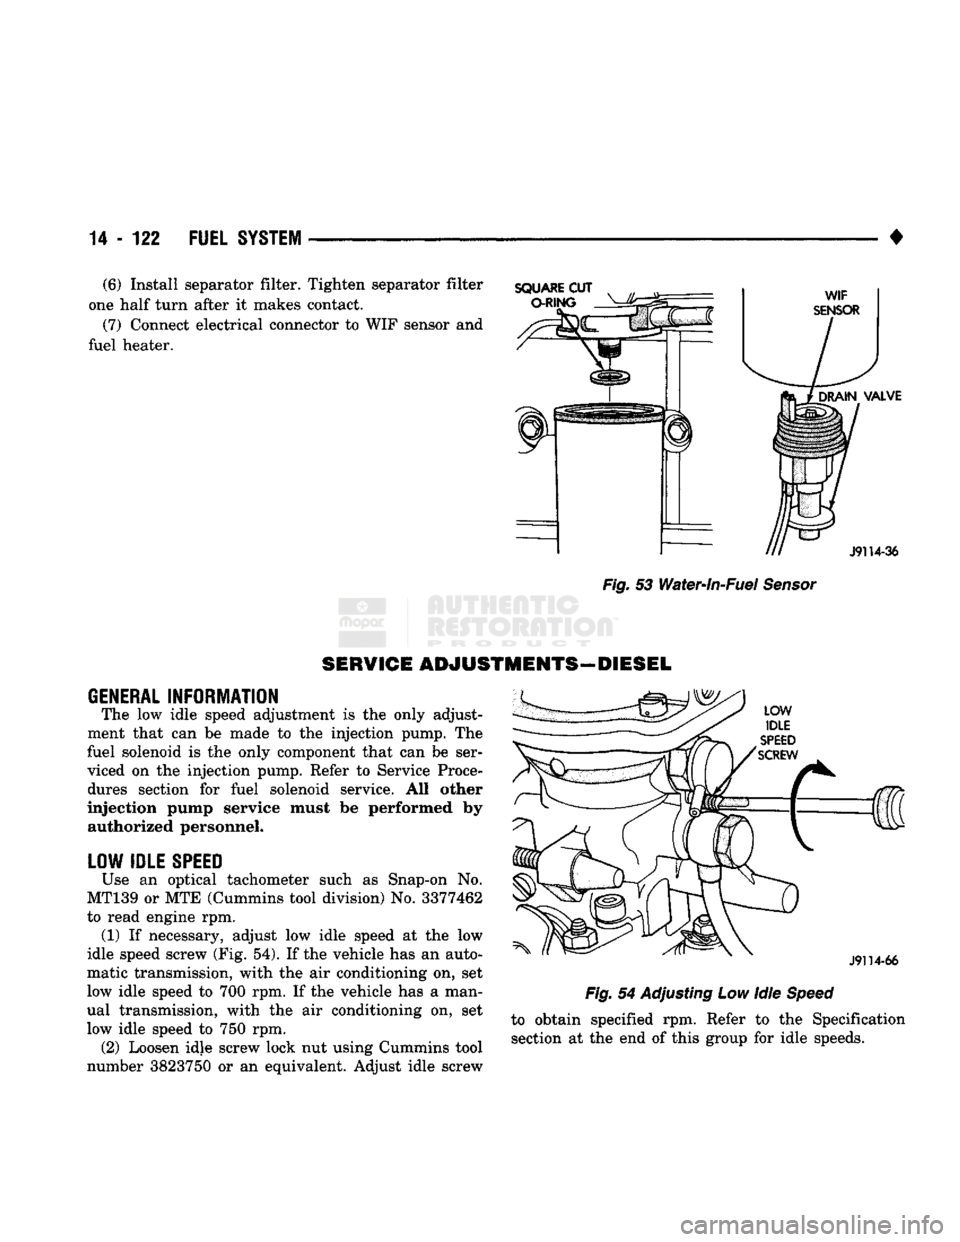
• (6) Install separator filter. Tighten separator filter
one half turn after it makes contact.
(7) Connect electrical connector to WIF sensor and
fuel heater.
GENERAL
INFORMATION
The low idle speed adjustment is the only adjust
ment that can be made to the injection pump. The
fuel solenoid is the only component that can be ser viced on the injection pump. Refer to Service Procedures section for fuel solenoid service. All other
injection pump service must be performed by authorized personnel.
LOW IDLE
SPEED
Use an optical tachometer such as Snap-on No.
MT139 or MTE (Cummins tool division) No. 3377462
to read engine rpm. (1) If necessary, adjust low idle speed at the low
idle speed screw (Fig. 54). If the vehicle has an auto
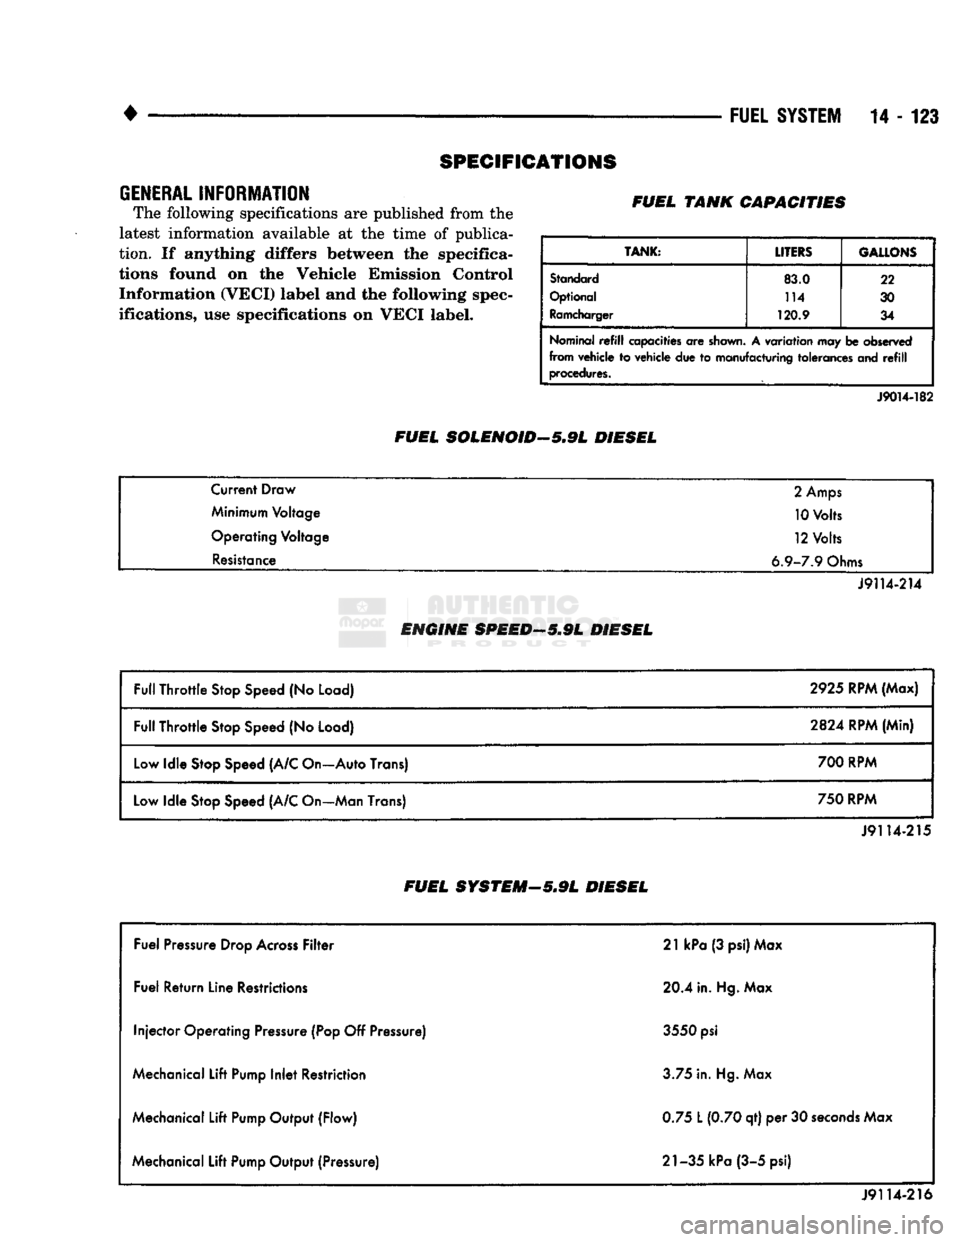
matic transmission, with the air conditioning on, set
low idle speed to 700 rpm. If the vehicle has a man
ual transmission, with the air conditioning on, set
low idle speed to 750 rpm. (2) Loosen idle screw lock nut using Cummins tool
number 3823750 or an equivalent. Adjust idle screw
Fig.
54 Adjusting Low Idle
Speed
to obtain specified rpm. Refer to the Specification section at the end of this group for idle speeds.
SERVICE ADJUSTMENTS—DIESEL
Page 942 of 1502
•
FUEL
SYSTEM
14 - 123
SPECIFICATIONS
GENERAL
INFORMATION
The following specifications
are
published from
the
latest information available
at the
time
of
publica
tion.
If
anything differs between
the
specifica
tions found
on the
Vehicle Emission Control Information (VECI) label
and the
following spec
ifications,
use
specifications
on
VECI label. FUEL TANK CAPACITIES
TANK:
LITERS GALLONS
Standard
83.0 22
Optional 114
30
Ramcharger
120.9
34
Nominal
refill
capacities
are
shown.
A
variation
may be
observed
from vehicle
to
vehicle
due to
manufacturing tolerances
and refill
procedures.
FUEL SOLENOID-5.9L DIESEL
J9014-182
Current Draw
2
Amps
Minimum Voltage 10 Volts
Operating Voltage 12 Volts
Resistance 6.9-7.9 Ohms
J9114-214
ENGINE SPEED—5.9L DIESEL
Full Throttle Stop Speed
(No
Load) 2925 RPM (Max)
Full Throttle Stop Speed
(No
Load)
2824
RPM (Min)
Low Idle Stop Speed (A/C On—Auto Trans) 700 RPM
Low Idle Stop Speed (A/C On—Man Trans) 750 RPM
J9114-215
FUEL SYSTEM—5*9L DIESEL
Fuel Pressure Drop Across Filter 21
kPa
(3 psi) Max
Fuel Return Line Restrictions 20.4 in. Hg. Max
Injector Operating Pressure (Pop
Off
Pressure) 3550
psi
Mechanical Lift Pump Inlet Restriction 3.75 in. Hg. Max
Mechanical Lift Pump Output (Flow) 0.75
L
(0.70 qt)
per 30
seconds Max
Mechanical Lift Pump Output (Pressure) 21-35 kPa (3-5 psi)
J9114-216
Page 943 of 1502
14-124
FUEL SYSTEM
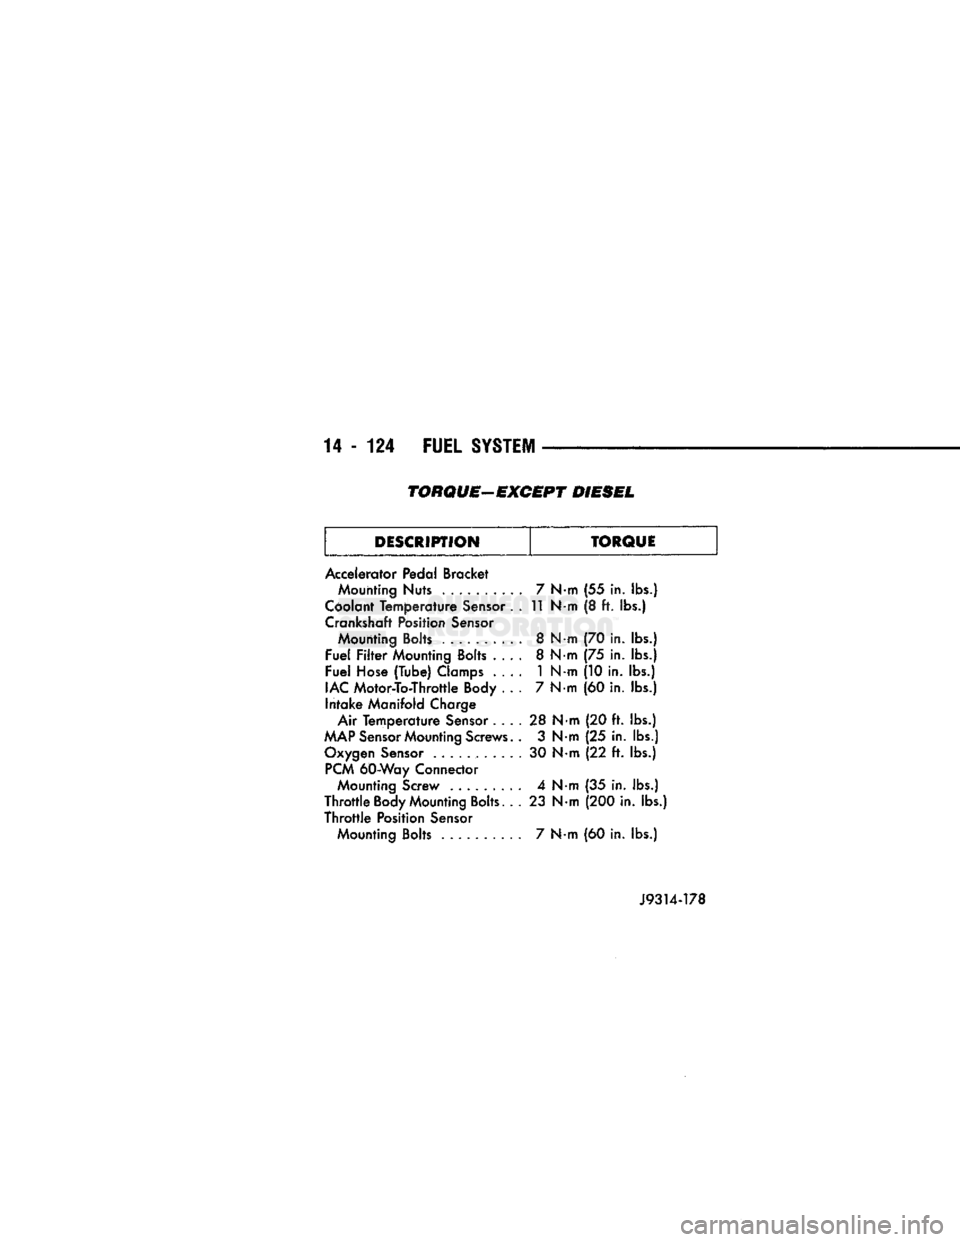
TORQUE-EXCEPT DIESEL
DESCRIPTION TORQUE
Accelerator Pedal Bracket Mounting
Nuts
. 7
N
m
(55
in.
lbs.)
Coolant Temperature Sensor . . 11
N«
m (8 ft. lbs.)
Crankshaft Position Sensor Mounting Bolts . 8
N«
m
(70 in.
lbs.)
Fuel Filter Mounting Bolts . . . . 8
N-
m
(75
in.
lbs.)
Fuel Hose (Tube) Clamps . . . . 1
N-
m
(10 in.
lbs.)
IAC Motor-To-Throttle Body . . . 7
N-
m (60 in.
lbs.)
Intake Manifold Charge (60 in.
lbs.)
Air Temperature Sensor . . . . 28
N
•m
(20 ft.
lbs.)
MAP Sensor Mounting Screws. . 3
N
•m
(25
in.
lbs.)
Oxygen Sensor . 30
N
•m
(22
ft.
lbs.)
PCM 60-Way Connector Mounting Screw . 4
N
•m
(35 in.
lbs.)
Throttle Body Mounting Bolts. . . 23
N
•m (200 in. lbs.)
Throttle Position Sensor Mounting Bolts ......... . 7
N«
m
(60 in.
lbs.)
Page 944 of 1502
• —_ —_
FUEL
SYSTEM
14 - 125
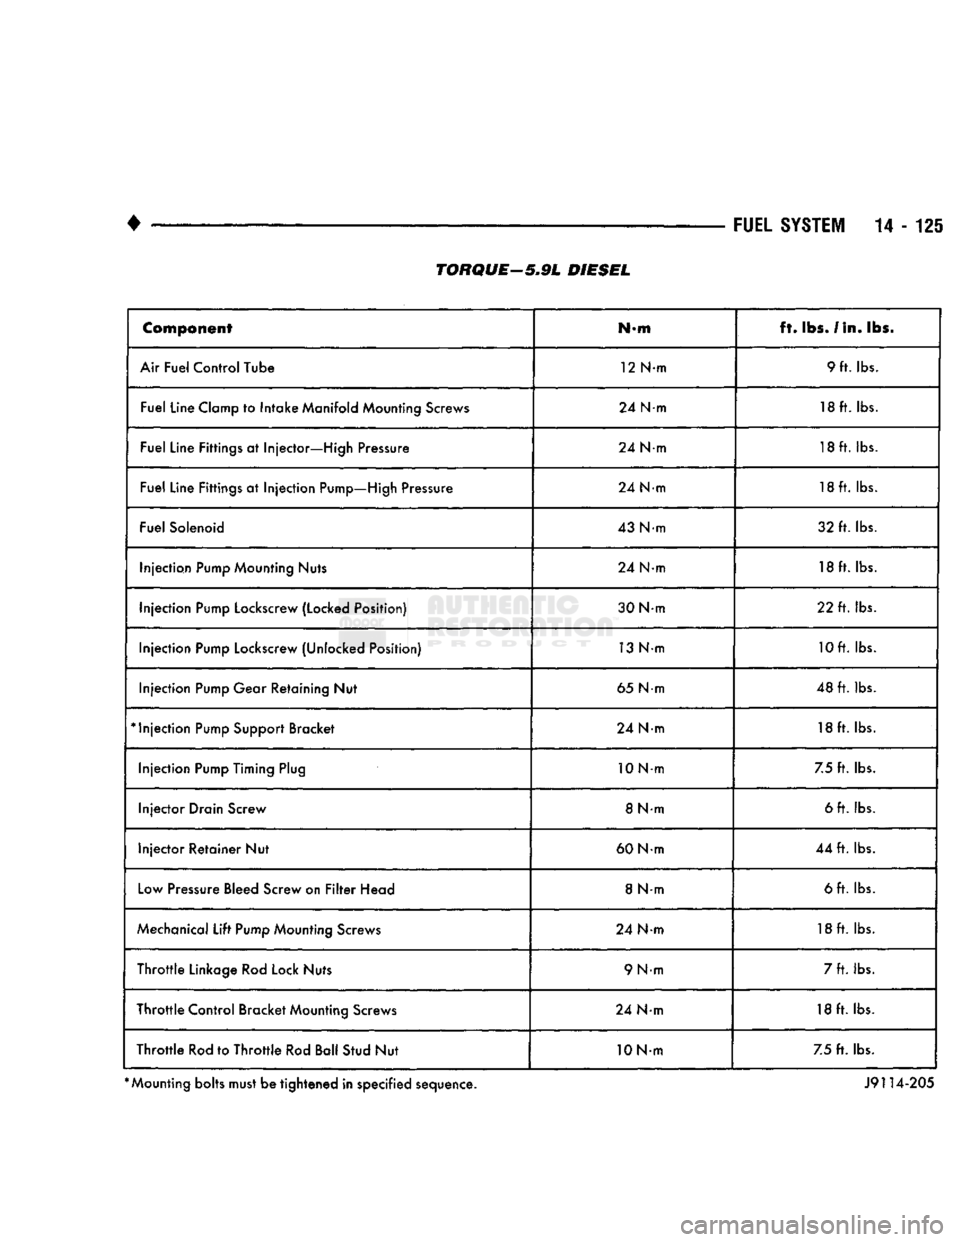
Component
N-m ft.
lbs.
/In. lbs.
Air Fuel Control Tube 12 N-m 9 ft. lbs.
Fuel Line Clamp to Intake Manifold Mounting Screws 24 N-m 18 ft. lbs.
Fuel Line Fittings at Injector—High Pressure 24 N-m 18ft. lbs.
Fuel Line Fittings at Injection Pump—High Pressure 24 N-m 18ft. lbs.
Fuel Solenoid 43 Nm 32 ft. lbs.
Injection Pump Mounting Nuts 24 N-m 18ft. lbs.
Injection Pump Lockscrew (Locked Position) 30 Nm 22 ft. lbs.
Injection Pump Lockscrew (Unlocked Position) 13 Nm 10ft. lbs.
Injection Pump Gear Retaining Nut 65 Nm 48 ft. lbs.
*
Injection Pump Support Bracket 24 Nm 18 ft. lbs.
Injection Pump Timing Plug 10Nm
7.5 ft. lbs.
Injector Drain Screw 8 N-m 6 ft. lbs.
Injector Retainer Nut 60 Nm 44 ft. lbs.
Low Pressure Bleed Screw on Filter Head 8 Nm 6 ft. lbs.
Mechanical Lift Pump Mounting Screws 24 Nm 18ft. lbs.
Throttle Linkage Rod Lock Nuts 9 N-m 7 ft. lbs.
Throttle Control Bracket Mounting Screws 24 Nm 18 ft. lbs.
Throttle Rod to Throttle Rod Ball Stud Nut 10 Nm 7.5 ft. lbs.
*
Mounting bolts must be tightened in specified sequence. J9114-205
TORQUE—5.9L
DIESEL
Page 945 of 1502

Page 946 of 1502
PROPELLER
SHAFTS
16-1
PROPELLER
SHAFTS
CONTENTS
page
GENERAL
INFORMATION
1
TORQUE SPECIFICATIONS
PROPELLER
SHAFT REPLACEMENT
8
UNIVERSAL
JOINT
REPLACEMENT
SERVICE
DIAGNOSIS/PROCEDURES
3
page
15
10
GENERAL INFORMATION
PROPELLER
SHAFTS
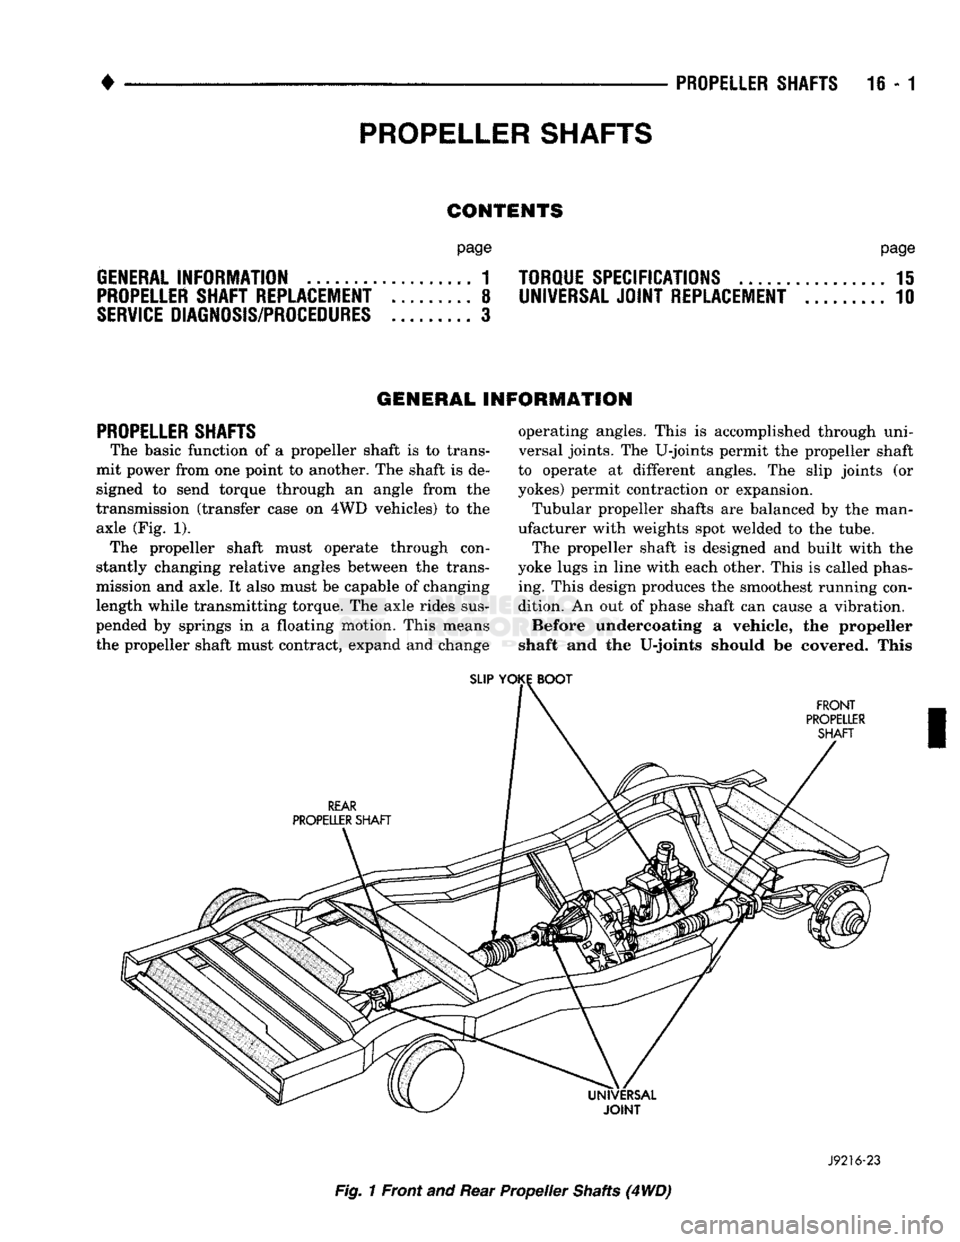
The basic function of a propeller shaft is to trans
mit power from one point to another. The shaft is de
signed to send torque through an angle from the
transmission (transfer case on 4WD vehicles) to the axle (Fig. 1). The propeller shaft must operate through con
stantly changing relative angles between the trans
mission and axle. It also must be capable of changing length while transmitting torque. The axle rides sus
pended by springs in a floating motion. This means
the propeller shaft must contract, expand and change operating angles. This is accomplished through uni
versal joints. The U-joints permit the propeller shaft
to operate at different angles. The slip joints (or
yokes) permit contraction or expansion.
Tubular propeller shafts are balanced by the man
ufacturer with weights spot welded to the tube.
The propeller shaft is designed and built with the
yoke lugs in line with each other. This is called phas ing. This design produces the smoothest running con
dition. An out of phase shaft can cause a vibration.
Before undercoating a vehicle, the propeller
shaft and the U-joints should be covered. This
SLIP
YOKE
BOOT
FRONT
PROPELLER SHAFT
REAR
PROPELLER SHAFT
Fig.
1 Front and Rear Propeller Shafts (4
WD)
J9216-23
Page 947 of 1502
16-2
PROPELLER SHAFTS
• will prevent the undercoating from causing an
unbalanced condition and vibration.
CAUTION: Use exact replacement
hardware
for at
taching
the
propeller
shafts.
Exact replacement
will
ensure safe operation.
The specified
torque must
always
be
applied when tightening
the
fasteners.
UNIVERSAL
JOINTS
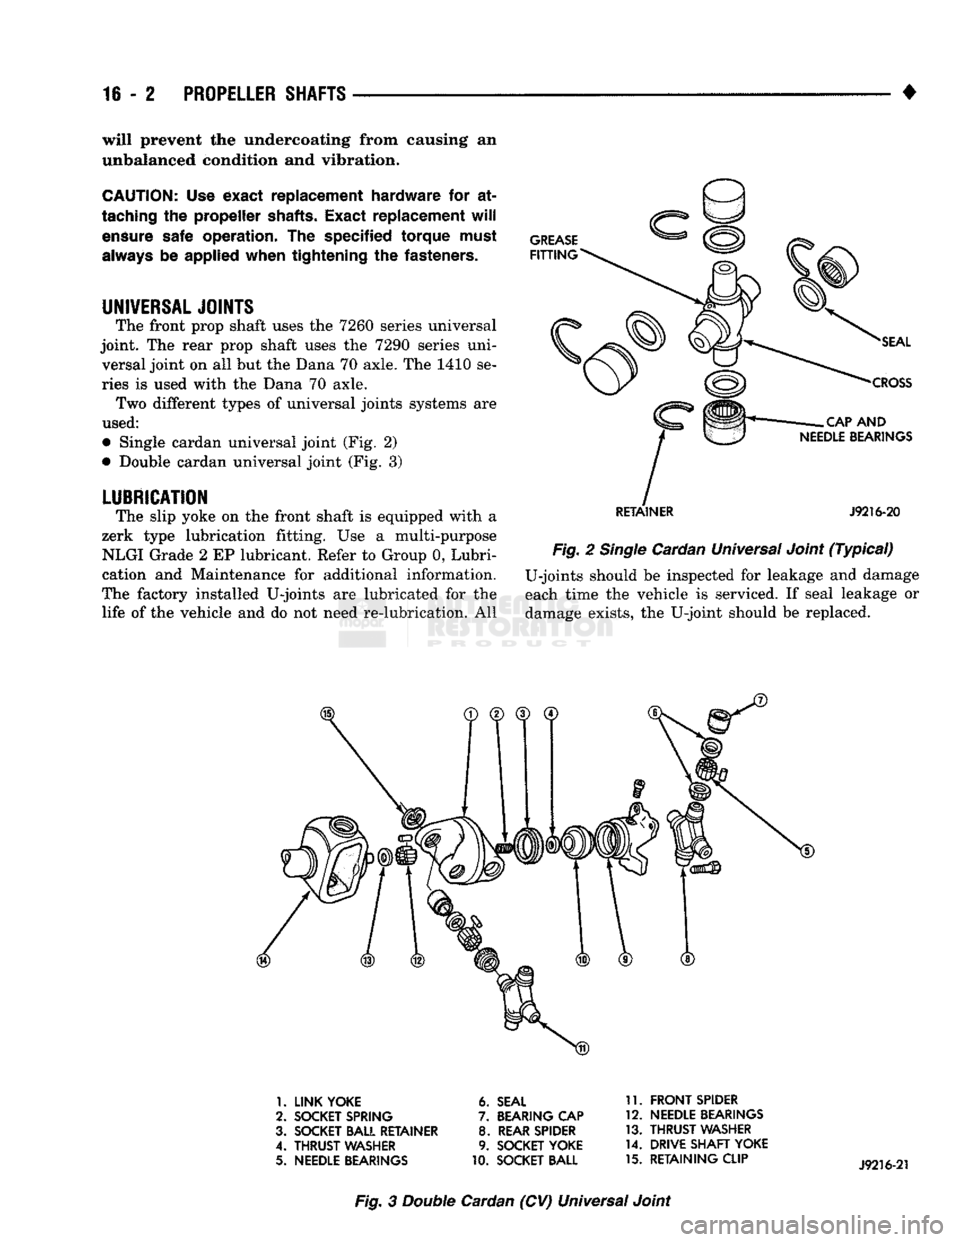
The front prop shaft uses the 7260 series universal
joint. The rear prop shaft uses the 7290 series uni versal joint on all but the Dana 70 axle. The 1410 se
ries is used with the Dana 70 axle. Two different types of universal joints systems are
used:
• Single cardan universal joint (Fig. 2)
• Double cardan universal joint (Fig. 3)
LUBRICATION
The slip yoke on the front shaft is equipped with a
zerk type lubrication fitting. Use a multi-purpose NLGI Grade 2 EP lubricant. Refer to Group 0, Lubri
cation and Maintenance for additional information.
The factory installed U-joints are lubricated for the life of the vehicle and do not need re-lubrication. All
RETAINER
J9216-20
Fig.
2
Single
Cardan Universal Joint
(Typical)
U-joints should be inspected for leakage and damage
each time the vehicle is serviced. If seal leakage or damage exists, the U-joint should be replaced.
1.
LINK YOKE
2.
SOCKET SPRING
3. SOCKET BALL RETAINER
4.
THRUST
WASHER
5.
NEEDLE BEARINGS
6.
SEAL
7.
BEARING
CAP
8.
REAR SPIDER
9.
SOCKET YOKE
10.
SOCKET BALL 11.
FRONT
SPIDER
12.
NEEDLE BEARINGS
13.
THRUST
WASHER
14.
DRIVE SHAFT YOKE
15.
RETAINING CLIP
Fig.
3
Double
Cardan (CV) Universal Joint
Page 948 of 1502
•
PROPELLER SHAFTS
16 - 3
SERVICE
DIAGNOSIS/PROCEDURES
INDEX
page page
Precautions . 3 Universal
Joint
Angle Measurement ............ 4
Runout
4
Vibration
3
Unbalance
3
PRECAUTIONS
Propeller shafts are balanced by the manufacturer
to prevent vibration. Before undercoating a vehicle, the propeller shaft and the U-joints should be covered. This will prevent the undercoating from caus
ing an unbalanced condition and vibration. Use exact replacement hardware for attaching the
propeller shafts. Exact replacement will ensure safe operation. The specified torque must always be ap
plied when tightening the fasteners.
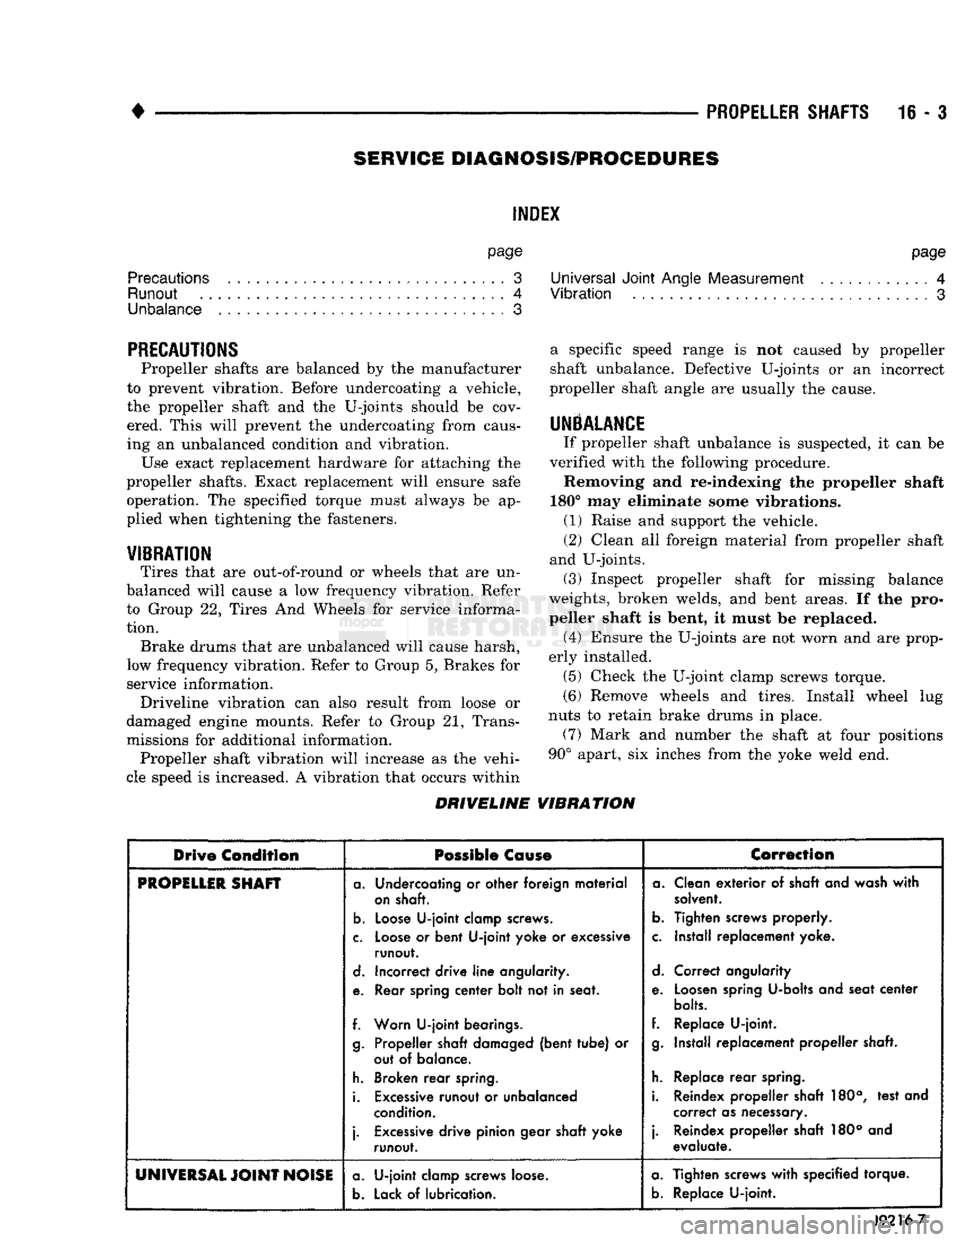
VIBRATION
Tires that are out-of-round or wheels that are un
balanced will cause a low frequency vibration. Refer to Group 22, Tires And Wheels for service informa
tion. Brake drums that are unbalanced will cause harsh,
low frequency vibration. Refer to Group 5, Brakes for
service information. Driveline vibration can also result from loose or
damaged engine mounts. Refer to Group 21, Trans
missions for additional information. Propeller shaft vibration will increase as the vehi
cle speed is increased. A vibration that occurs within a specific speed range is not caused by propeller
shaft unbalance. Defective U-joints or an incorrect
propeller shaft angle are usually the cause.
UNBALANCE
If propeller shaft unbalance is suspected, it can be
verified with the following procedure. Removing and re-indexing the propeller shaft
180° may eliminate some vibrations. (1) Raise and support the vehicle.
(2) Clean all foreign material from propeller shaft
and U-joints. (3) Inspect propeller shaft for missing balance
weights, broken welds, and bent areas. If the pro
peller shaft is bent, it must be replaced. (4) Ensure the U-joints are not worn and are prop
erly installed. (5) Check the U-joint clamp screws torque.
(6) Remove wheels and tires. Install wheel lug
nuts to retain brake drums in place. (7) Mark and number the shaft at four positions
90° apart, six inches from the yoke weld end.
DRIVELINE VIBRATION
Drive
Condition
Possible Cause
Correction
PROPiLLlR
SHAFT
a. Undercoating or other foreign material
on shaft.
b.
Loose U-joint clamp screws.
c. Loose or bent U-joint yoke or excessive runout.
d. Incorrect drive line angularity.
e. Rear spring center bolt not in seat.
f. Worn U-joint bearings. g. Propeller shaft damaged (bent tube) or out of balance.
h. Broken rear spring.
i. Excessive runout or unbalanced condition.
j.
Excessive drive pinion gear shaft yoke runout. a. Clean exterior of shaft and wash with
solvent.
b.
Tighten screws properly.
c. Install replacement yoke.
d. Correct angularity
e. Loosen spring U-bolts and seat center
bolts.
f. Replace U-joint. g. Install replacement propeller shaft.
h. Replace rear spring.
i. Reindex propeller shaft 180°, test and correct as necessary.
j.
Reindex propeller shaft 180° and evaluate.
UNIVERSAL
JOINT
NOISE a. U-joint clamp screws loose.
b.
Lack of lubrication. a. Tighten screws with specified torque.
b.
Replace U-joint.
J9216-7
Page 949 of 1502
16-4 PROPELLER SHAFTS
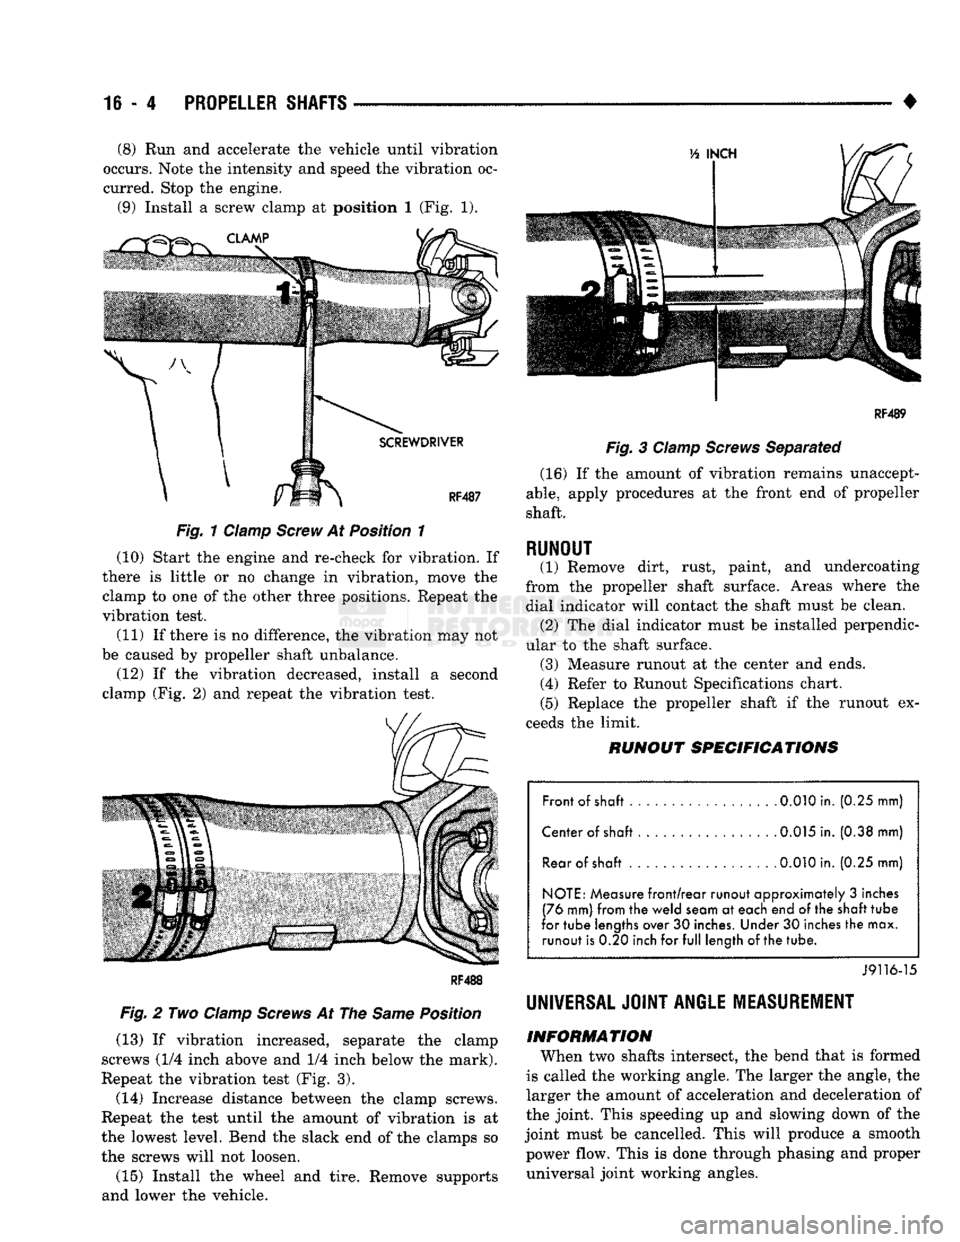
• (8) Run and accelerate the vehicle until vibration
occurs. Note the intensity and speed the vibration oc
curred. Stop the engine. (9) Install a screw clamp at position I (Fig. 1).
Fig.
1 Clamp
Screw
At Position 1
(10) Start the engine and re-check for vibration. If
there is little or no change in vibration, move the clamp to one of the other three positions. Repeat the
vibration test.
(11) If there is no difference, the vibration may not
be caused by propeller shaft unbalance. (12) If the vibration decreased, install a second
clamp (Fig. 2) and repeat the vibration test.
Fig.
2 Two
Clamp
Screws
At The
Same
Position
(13) If vibration increased, separate the clamp
screws (1/4 inch above and 1/4 inch below the mark).
Repeat the vibration test (Fig. 3).
(14) Increase distance between the clamp screws.
Repeat the test until the amount of vibration is at
the lowest level. Bend the slack end of the clamps so the screws will not loosen.
(15) Install the wheel and tire. Remove supports
and lower the vehicle.
RF4B9
Fig.
3
Clamp
Screws
Separated (16) If the amount of vibration remains unaccept
able,
apply procedures at the front end of propeller
shaft.
RUNOUT (1) Remove dirt, rust, paint, and undercoating
from the propeller shaft surface. Areas where the dial indicator will contact the shaft must be clean. (2) The dial indicator must be installed perpendic
ular to the shaft surface. (3) Measure runout at the center and ends. (4) Refer to Runout Specifications chart.
(5) Replace the propeller shaft if the runout ex
ceeds the limit.
RUNOUT
SPECIFICATIONS
Front of shaft 0.010 in. (0.25 mm)
Center of shaft . 0.015 in. (0.38 mm) Rear of
shaft
.
0.010
in. (0.25 mm)
NOTE: Measure front/rear runout approximately 3 inches
(76 mm) from the weld seam at each end of the
shaft
tube
for tube lengths over 30 inches. Under 30 inches the max. runout is 0.20 inch for full length of
the
tube.
J9116-15
UNIVERSAL JOINT
ANGLE
MEASUREMENT
INFORMATION
When two shafts intersect, the bend that is formed
is called the working angle. The larger the angle, the
larger the amount of acceleration and deceleration of
the joint. This speeding up and slowing down of the
joint must be cancelled. This will produce a smooth power flow. This is done through phasing and proper universal joint working angles.
Page 950 of 1502
•
PROPELLER
SHAFTS
16-5 A propeller shaft is properly phased when the yoke
ends are on the same plane or in line. A twisted
shaft will throw the yokes out of phase and cause a
noticeable vibration.
When taking universal joint angle measurements
or checking phasing with two piece shafts, consider
each shaft separately. On 4WD vehicles, the front shaft input (pinion shaft) angle has priority over the
caster angle.
Ideally the driveline system should have:
•
Angles that are in equal or opposite within 1
degree of each other
•
Have a 3 degree maximum operating angle
•
Have at least a 1/2 degree continuous operat
ing (propeller shaft) angle Engine speed (R.P.M.) is the main factor though in
determining maximum allowable operating angles.
As a guide to maximum normal operating angles re
fer to the chart listed (Fig. 4).
PROPELLER
SHAFT
MAX*
NORMAL
R«P*JVi*
OPERATING
ANGLES
5000
3°
4500
3°
4000
4°
3500
5°
3000
5°
2500
7°
2000
8°
1500 11°
J9316-4
Fig.
4 Maximum
Angles
and
R.P.M.
INSPECTION
Before measuring universal joint angles, the
following must done.
•
Inflate all tires to correct pressure.
•
Check angles in the same loaded or unloaded condition as when the vibration occurred. Prop
shaft angles will change according to the
amount of load in the vehicle. Always check an
gles in loaded and unloaded conditions.
•
Check the condition of all suspension components
and verify all fasteners are torqued to specifications.
•
Check the condition of the engine and transmis
sion mounts and verify all fasteners are torqued to
specifications.
MEASUREMENT
To accurately check driveline alignment, raise and
support the vehicle at the axles as level as possible.
Allow the wheels and propeller shaft to turn. Remove any external bearing snap rings (if equipped) from
universal joint so protractor base sits flat.
(1) Rotate the shaft until transmission/transfer
case output yoke bearing is facing downward.
Always make measurements from front to
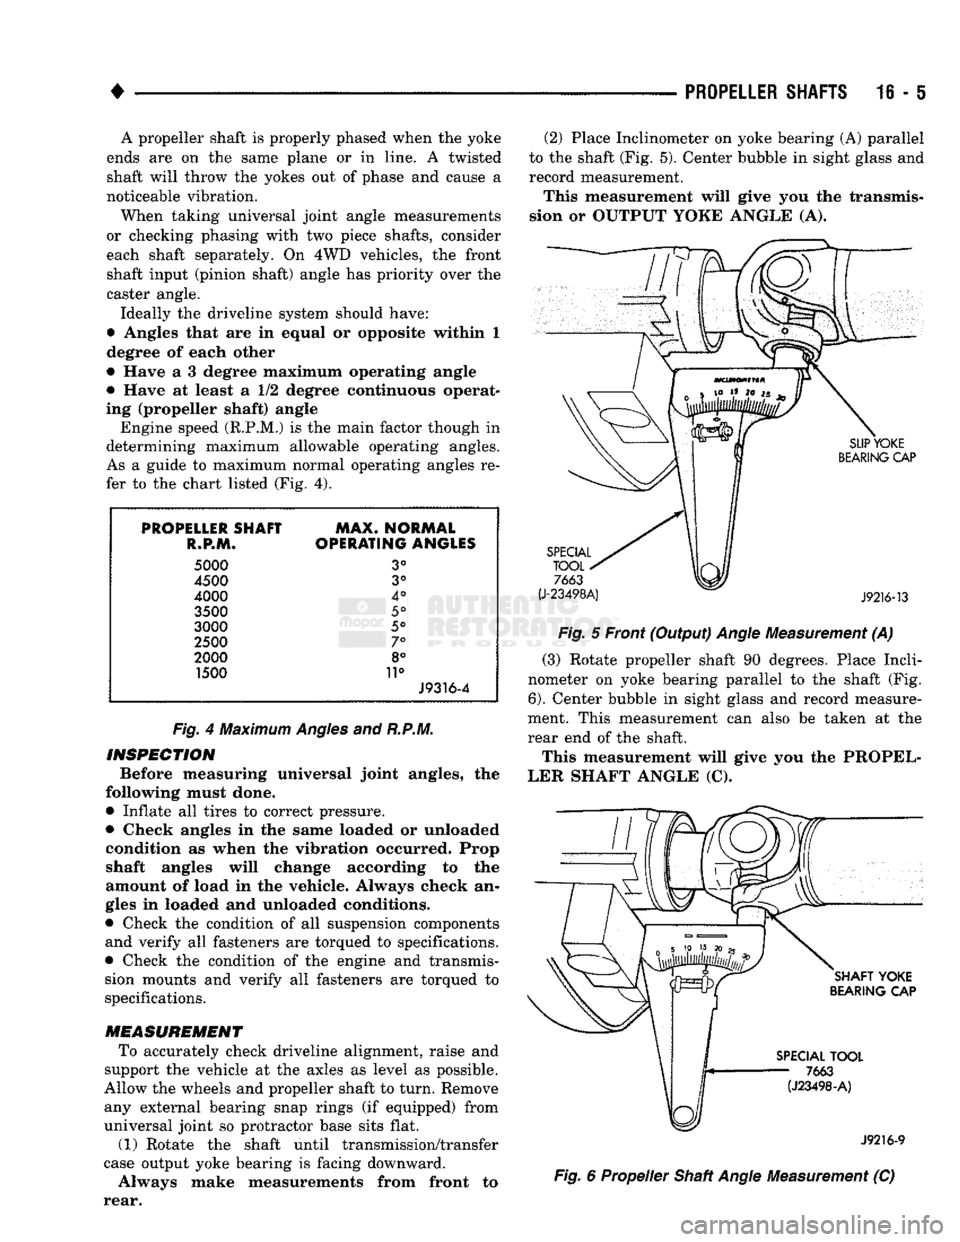
rear. (2) Place Inclinometer on yoke bearing (A) parallel
to the shaft (Fig. 5). Center bubble in sight glass and
record measurement.
This measurement will give you the transmis
sion or OUTPUT YOKE ANGLE (A).
Fig.
5 Front (Output)
Angle
Measurement (A)
(3) Rotate propeller shaft 90 degrees. Place Incli
nometer on yoke bearing parallel to the shaft (Fig.
6).
Center bubble in sight glass and record measure
ment. This measurement can also be taken at the
rear end of the shaft.
This measurement will give you the PROPEL
LER SHAFT ANGLE (C). J9216-9
Fig.
6 Propeller Shaft
Angle
Measurement (C)