FORD MUSTANG 1969 Volume One Chassis
Manufacturer: FORD, Model Year: 1969, Model line: MUSTANG, Model: FORD MUSTANG 1969Pages: 413, PDF Size: 75.81 MB
Page 61 of 413
02-02-42
Brake System
02-02-42
CALIPER
ABUTMENTS
OUTBOARD
CALIPER HOUSING
DUST
BOOT RETAINING GROOVE
DUST
BOOT (4)
PISTON
SEAL (4)
EXTERNAL
TRANSFER
TUBE
SCREW
INBOARD
CALIPER HOUSING
FLEXIBLE
HOSE-^
H1367-C
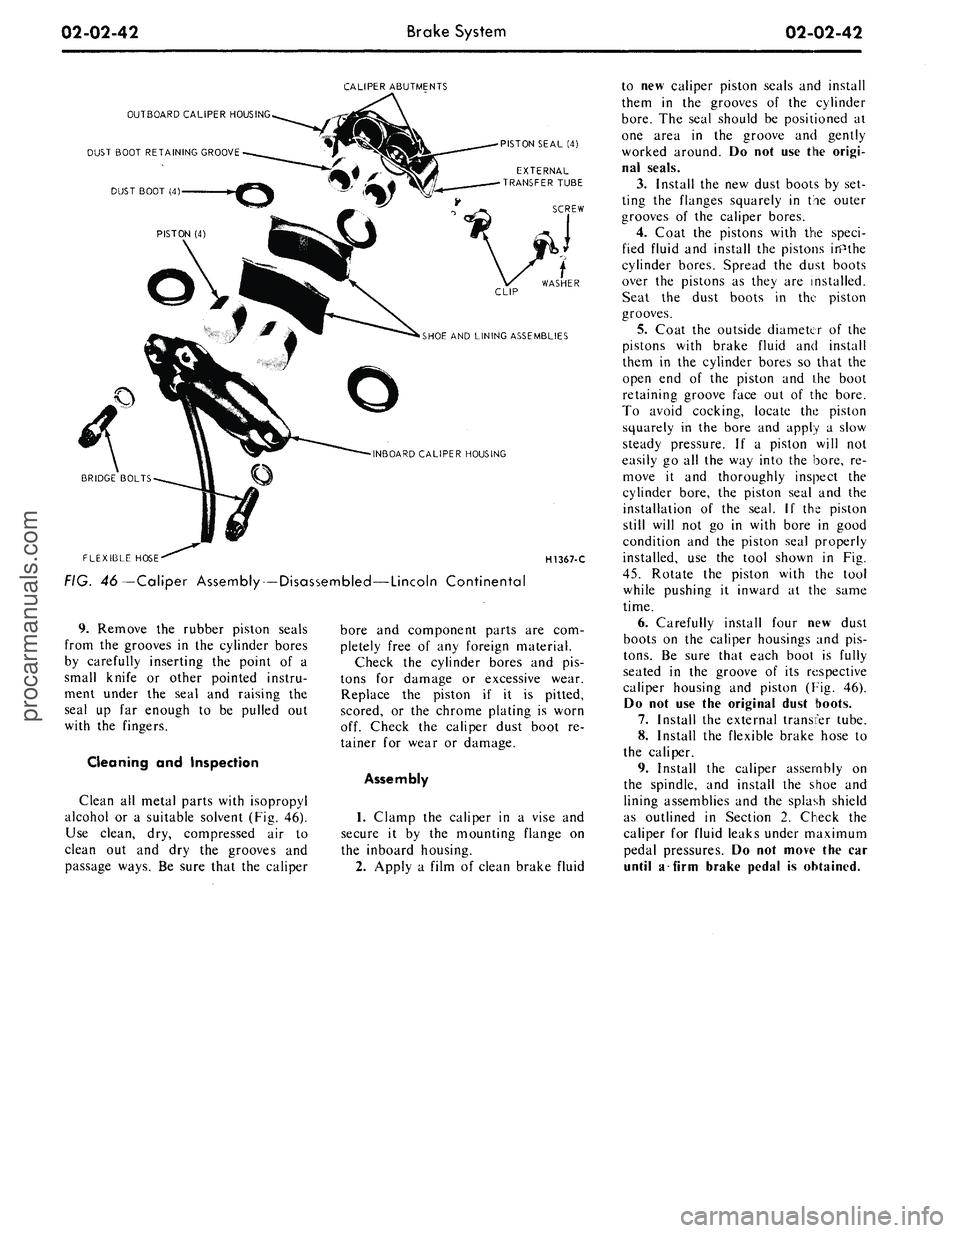
FIG. 46—Caliper Assembly — Disassembled—Lincoln Continental
9. Remove the rubber piston seals
from the grooves in the cylinder bores
by carefully inserting the point of a
small knife or other pointed instru-
ment under the seal and raising the
seal up far enough to be pulled out
with the fingers.
Cleaning and Inspection
Clean all metal parts with isopropyl
alcohol or a suitable solvent (Fig. 46).
Use clean, dry, compressed air to
clean out and dry the grooves and
passage ways. Be sure that the caliper
bore and component parts are com-
pletely free of any foreign material.
Check the cylinder bores and pis-
tons for damage or excessive wear.
Replace the piston if it is pitted,
scored, or the chrome plating is worn
off. Check the caliper dust boot re-
tainer for wear or damage.
Assembly
1.
Clamp the caliper in a vise and
secure it by the mounting flange on
the inboard housing.
2.
Apply a film of clean brake fluid
to new caliper piston seals and install
them in the grooves of the cylinder
bore.
The seal should be positioned at
one area in the groove and gently
worked around. Do not use the origi-
nal seals.
3.
Install the new dust boots by set-
ting the flanges squarely in the outer
grooves of the caliper bores.
4.
Coat the pistons with the speci-
fied fluid and install the pistons inPthe
cylinder bores. Spread the dust boots
over the pistons as they are installed.
Seat the dust boots in the piston
grooves.
5.
Coat the outside diameter of the
pistons with brake fluid and install
them in the cylinder bores so that the
open end of the piston and ihe boot
retaining groove face out of the bore.
To avoid cocking, locate the piston
squarely in the bore and apply a slow
steady pressure. If a piston will not
easily go all the way into the bore, re-
move it and thoroughly inspect the
cylinder bore, the piston seal and the
installation of the seal. If the piston
still will not go in with bore in good
condition and the piston seal properly
installed, use the tool shown in Fig.
45.
Rotate the piston with the tool
while pushing it inward at the same
time.
6. Carefully install four new dust
boots on the caliper housings and pis-
tons.
Be sure that each boot is fully
seated in the groove of its respective
caliper housing and piston (Fig. 46).
Do not use the original dust boots.
7.
Install the external transfer tube.
8. Install the flexible brake hose to
the caliper.
9. Install the caliper assembly on
the spindle, and install the shoe and
lining assemblies and the splash shield
as outlined in Section 2. Check the
caliper for fluid leaks under maximum
pedal pressures. Do not move the car
until a firm brake pedal is obtained.procarmanuals.com
Page 62 of 413
02-03-01
Specifications
02-03-01
PART
2-3
Specifications
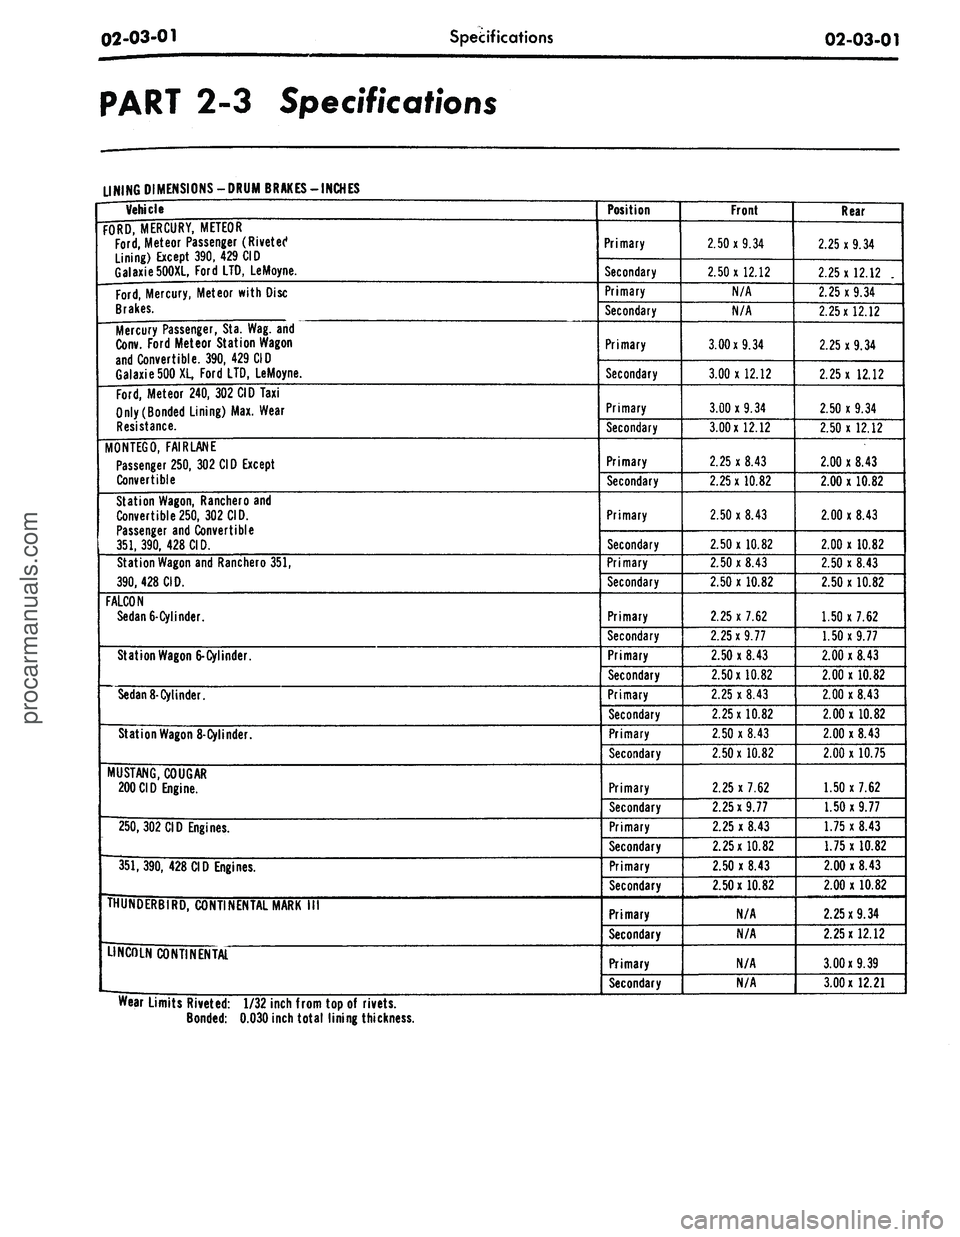
LINING
DIMENSIONS-DRUM
BRAKES-INCHES
Vehicle
FORD, MERCURY, METEOR
Ford,
Meteor Passenger (Rivetet1
Lining) Except 390, 429 CID
Galaxie500XL, Ford LTD, LeMoyne.
Ford,
Mercury, Meteor with Disc
Brakes.
Mercury Passenger, Sta. Wag. and
Conv. Ford Meteor Station Wagon
and Convertible. 390, 429 CID
Galaxie500XL, Ford LTD, LeMoyne.
Ford,
Meteor 240, 302 CID Taxi
Only (Bonded Lining) Max. Wear
Resistance.
MONTEGO,
FAIR LANE
Passenger 250, 302 CID Except
Convertible
Station Wagon, Ranchero and
Convertible250, 302 CID.
Passenger and Convertible
351,390, 428 CID.
Station Wagon and Ranchero 351,
390,
428 CID.
FALCON
Sedan
6-Cylinder.
Station Wagon
6-Cylinder.
Sedan
8- Cylinder.
Station Wagon
8-Cylinder.
MUSTANG, COUGAR
200CID Engine.
250,
302 CID Engines.
351,390, 428 CID Engines.
IHUNDERBIRD, CONTINENTAL MARK
III
LINCOLN CONTINENTAL
Position
Primary
Secondary
Primary
Secondary
Primary
Secondary
Primary
Secondary
Primary
Secondary
Primary
Secondary
Primary
Secondary
Primary
Secondary
Primary
Secondary
Primary
Secondary
Primary
Secondary
Primary
Secondary
Primary
Secondary
Primary
Secondary
Primary
Secondary
Primary
Secondary
Front
2.50x9.34
2.50x12.12
N/A
N/A
3.00x9.34
3.00x12.12
3.00x9.34
3.00x12.12
2.25 x 8.43
2.25x10.82
2.50x8.43
2.50x10.82
2.50x8.43
2.50 x 10.82
2.25 x 7.62
2.25x9.77
2.50 x 8.43
2.50x10.82
2.25 x 8.43
2.25x10.82
2.50 x 8.43
2.50x10.82
2.25 x 7.62
2.25x9.77
2.25 x 8.43
2.25x10.82
2.50 x 8.43
2.50x10.82
N/A
N/A
N/A
N/A
Rear
2.25x9.34
2.25x12.12
.
2.25x9.34
2.25x12.12
2.25x9.34
2.25 x 12.12
2.50 x 9.34
2.50x12.12
2.00 x 8.43
2.00 x 10.82
2.00x8.43
2.00 x 10.82
2.50 x 8.43
2.50 x 10.82
1.50 x 7.62
1.50x9.77
2.00 x 8.43
2.00 x 10.82
2.00 x 8.43
2.00x10.82
2.00x8.43
2.00 x 10.75
1.50 x 7.62
1.50 x 9.77
1.75 x 8.43
1.75x10.82
2.00 x 8.43
2.00 x 10.82
2.25x9.34
2.25x12.12
3.00x9.39
3.00
x
12.21
Wear Limits Riveted: 1/32 inch from top of rivets.
Bonded:
0.030
inch total lining thicknessprocarmanuals.com
Page 63 of 413
02-03-02
Specifications
02-03-02
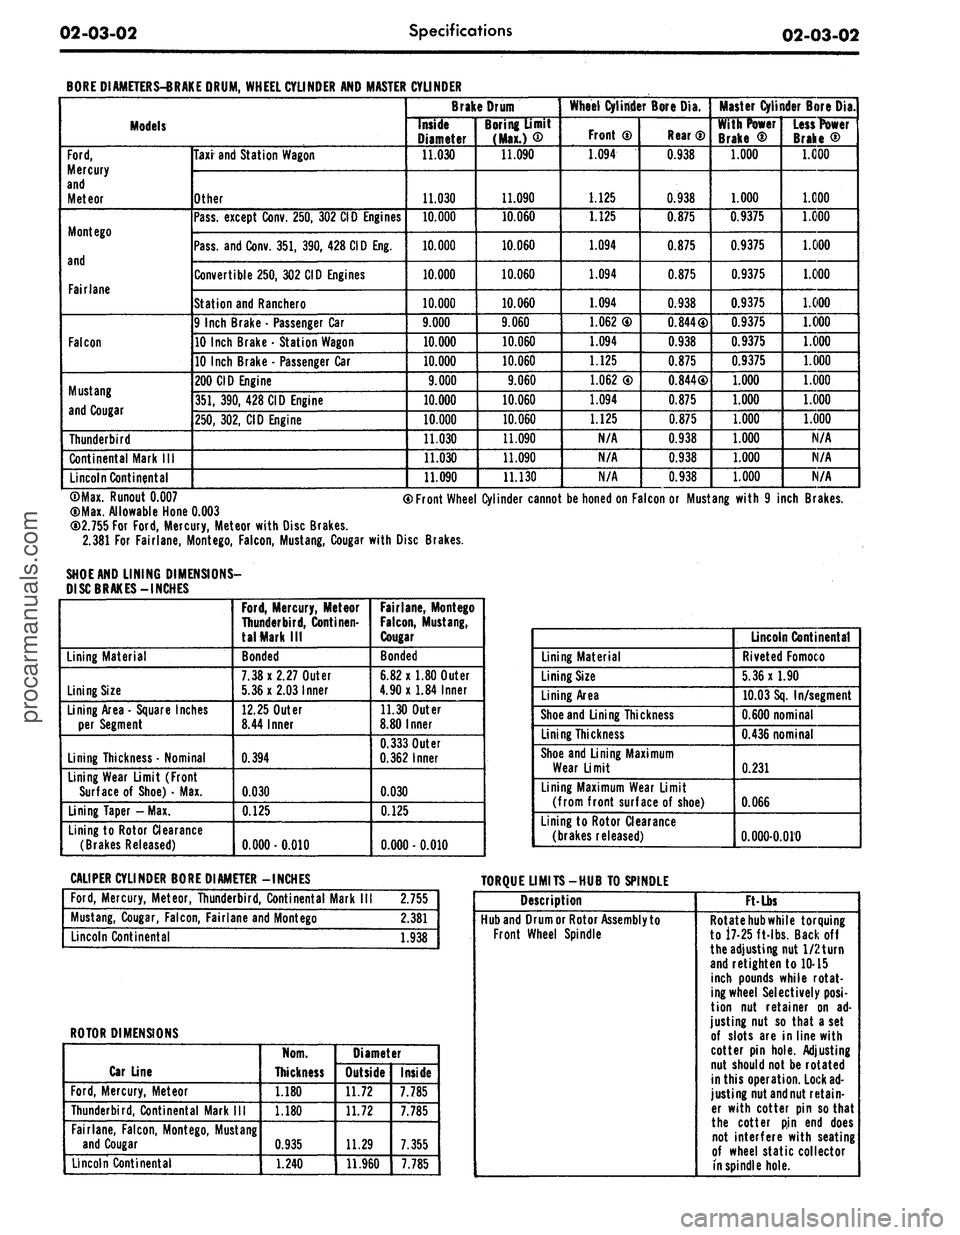
BORE DIAMETERS-BRAKE DRUM, WHEEL CYLINDER AND MASTER
Models
Ford,
Mercury
and
Meteor
Mont ego
and
Fairlane
Falcon
Mustang
and Cougar
Thunderbird
Continental Mark
III
Lincoln Continental
Taxi and Station Wagon
Other
Pass, except Conv. 250, 302 CID Engines
Pass, and Conv. 351, 390, 428 CID Eng.
Convertible 250, 302 CID Engines
Station and Ranchero
9 Inch Brake
-
Passenger Car
10 Inch Brake
•
Station Wagon
10 Inch Brake
•
Passenger Car
200 CID Engine
351,
390, 428 CID Engine
250,
302, CID Engine
CYLINDER
Brake Drum
Inside
Diameter
11.030
11.030
10.000
10.000
10.000
10.000
9.000
10.000
10.000
9.000
10.000
10.000
11.030
11.030
11.090
Boring Umit
(Max.)
®
11.090
11.090
10.060
10.060
10.060
10.060
9.060
10.060
10.060
9.060
10.060
10.060
11.090
11.090
11.130
Wheel Cylinder Bore Dia.
Front
0
1.094
L_ U25
1.125
1.094
1.094
1.094
1.062
0
1.094
1.125
1.062
®
1.094
1.125
N/A
N/A
N/A
Rear
®
0.938
0.938
0.875
0.875
0.875
0.938
0.844®
0.938
0.875
0.844®
0.875
0.875
0.938
0.938
0.938
Master Cylinder Bore Dia.
With Power
Brake
®
1.000
1.000
0.9375
0.9375
0.9375
0.9375
0.9375
0.9375
0.9375
1.000
1.000
1.000
1.000
1.000
1.000
Less Power
Brake
®
1.000
1.000
1.000
1.000
1.000
1.000
1.000
1.000
1.000
1.000
1.000
1.000
N/A
N/A
N/A
©Max. Runout
0.007
(DMax. Allowable Hone
0.003
CD2.755 For
Ford,
Mercury, Meteor with Disc Brakes.
2.381 For Fairlane, Montego, Falcon, Mustang, Cougar with Disc Brakes.
SHOE AND LINING DIMENSIONS-
DISC BRAKES-INCHES
® Front Wheel Cylinder cannot be honed on Falcon or Mustang with
9
inch Brakes.
Lining Material
Lining Size
Lining Area
-
Square Inches
per Segment
Lining Thickness • Nominal
Lining Wear Limit (Front
Surface
of
Shoe)
•
Max.
Lining Taper -Max.
Lining to Rotor Clearance
(Brakes Released)
Ford,
Mercury, Meteor
Thunderbird, Continen-
tal Mark
III
Bonded
7.38x2.27
Outer
5.36x2.03
Inner
12.25 Outer
8.44 Inner
0.394
0.030
0.125
0.000-0.010
Fairlane, Montego
Falcon,
Mustang,
Cougar
Bonded
6.82 x 1.80 Outer
4.90x1.84 Inner
11.30 Outer
8.80 Inner
0.333
Outer
0.362
Inner
0.030
0.125
0.000
• 0.010
Lining Material
Lining Size
Lining Area
Shoe and Lining Thickness
Lining Thickness
Shoe and Lining Maximum
Wear Limit
Lining Maximum Wear Limit
(from front surface
of
shoe)
Lining to Rotor Clearance
(brakes released)
Lincoln Continental
Riveted Fomoco
5.36x1.90
10.03 Sq. In/segment
0.600
nominal
0.436
nominal
0.231
0.066
0.000-0.010
CALIPER CYLINDER BORE DIAMETER -INCHES
TORQUE LIMITS-HUB TO SPINDLE
Ford,
Mercury, Meteor, Thunderbird, Continental Mark
2.755
Mustang, Cougar, Falcon, Fairlane and Montego
2.381
Lincoln Continental
1.938
ROTOR DIMENSIONS
Car Line
Ford,
Mercury, Meteor
Thunderbird, Continental Mark
III
Fairlane, Falcon, Montego, Mustang
and Cougar
Lincoln Continental
Norn.
Thickness
1.180
1.180
0.935
1.240
Diameter
Outside
11.72
11.72
11.29
11.960
Inside
7.785
7.785
7.355
7.785
Description
Hub and Drum or Rotor Assembly to
Front Wheel Spindle
Ft-Lbs
Rotate
hub
while torquing
to 17-25 ft-lbs. Backoff
the adjusting nut 1/2 turn
and retighten to 10-15
inch pounds while rotat-
ing wheel Selectively
posi-
tion
nut
retainer
on ad-
justing nut
so
that a set
of slots are in line with
cotter pin hole. Adjusting
nut should not be rotated
in this operation. Lock
ad-
justing nut and nut retain-
er with cotter pin so that
the cotter
pin end
does
not interfere with seating
of wheel static collector
in spindle hole.procarmanuals.com
Page 64 of 413
02-03-03
Specifications
02-03-03
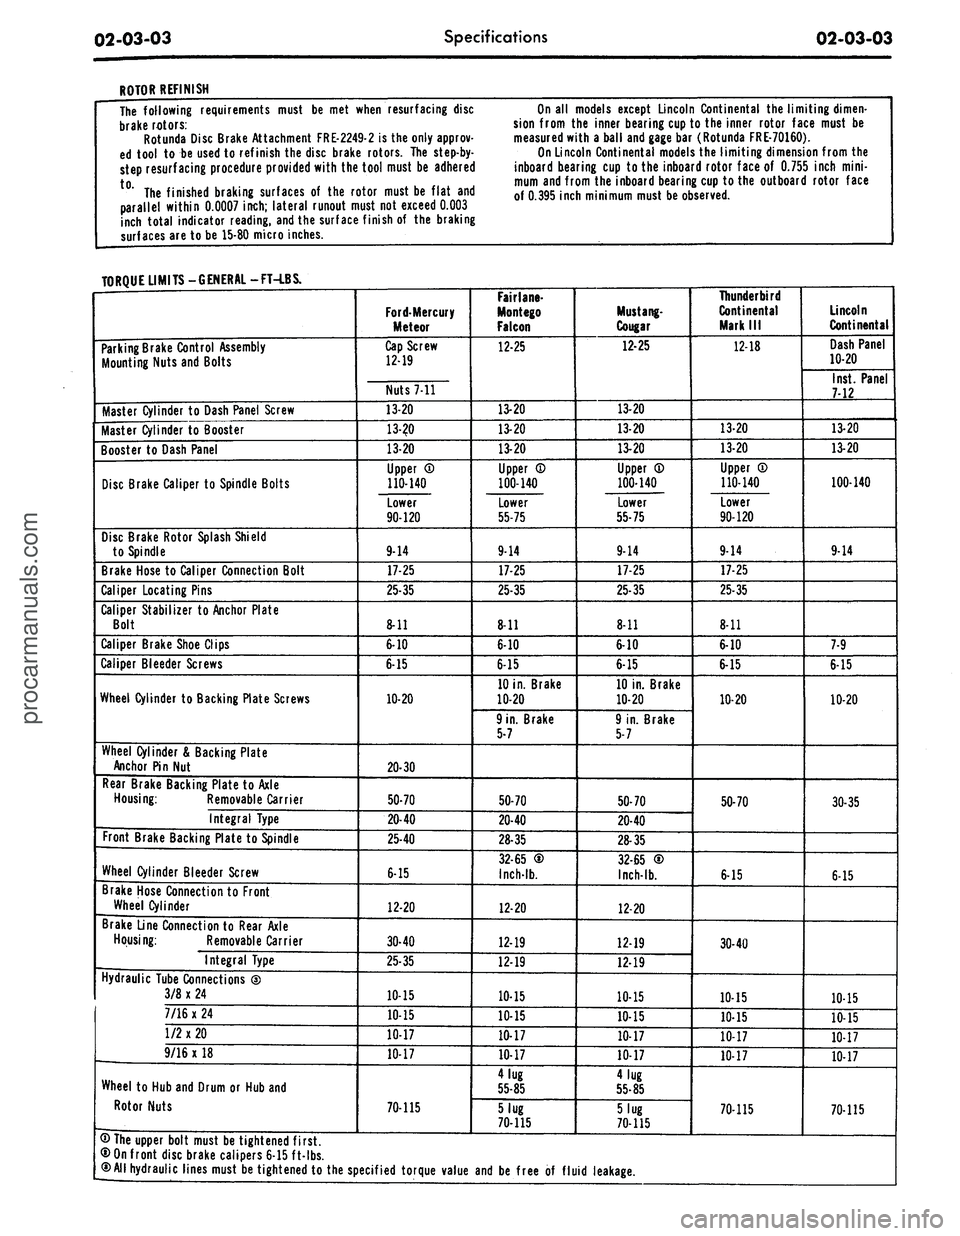
ROTOR REFINISH
The following requirements must be met when resurfacing disc
brake rotors:
Rotunda Disc Brake Attachment FRE-2249-2 is the only approv-
ed tool to be used to ref inish the disc brake rotors. The step-by-
step resurfacing procedure provided with the tool must be adhered
t0" The finished braking surfaces of the rotor must be flat and
parallel within 0.0007
inch;
lateral runout must not exceed 0.003
inch total indicator reading, and the surface finish of the braking
surfaces are to be 15-80 micro inches.
On all models except Lincoln Continental the limiting dimen-
sion from the inner bearing cup to the inner rotor face must be
measured with a ball and gage bar (Rotunda FRE-70160).
On Lincoln Continental models the limiting dimension from the
inboard bearing cup to the inboard rotor face of 0.755 inch
mini-
mum and from the inboard bearing cup to the outboard rotor face
of 0.395 inch minimum must be observed.
TORQUE LIMITS -GENERAL -FT-LBS.
Parking Brake Control Assembly
Mounting Nuts and Bolts
Master Cylinder to Dash Panel Screw
Master Cylinder to Booster
Booster to Dash Panel
Disc Brake Caliper to Spindle Bolts
Disc Brake Rotor Splash Shield
to Spindle
Brake Hose to Caliper Connection Bolt
Caliper Locating Pins
Caliper Stabilizer to Anchor Plate
Bolt
Caliper Brake Shoe Clips
Caliper Bleeder Screws
Wheel Cylinder to Backing Plate Screws
Wheel Cylinder & Backing Plate
Anchor Pin Nut
Rear Brake Backing Plate to Axle
Housing:
Removable Carrier
Integral Type
Front Brake Backing Plate to Spindle
Wheel Cylinder Bleeder Screw
Brake Hose Connection to Front
Wheel Cylinder
Brake Line Connection to Rear Axle
Housing:
Removable Carrier
Integral Type
Hydraulic Tube Connections ®
3/8 x 24
7/16 x 24
1/2 x 20
9/16 x 18
Wheel to Hub and Drum or Hub and
Rotor Nuts
Ford-Mercury
Meteor
Cap Screw
12-19
Nuts 7-11
13-20
13-?0
13-20
Upper ©
110-140
Lower
90-120
9-14
17-25
25-35
8-11
6-10
6-15
10-20
20-30
50-70
IPo
25-40
6-15
12-20
30-40
25-35
10-15
10-15
10-17
10-17
70-115
Fair
lane-
Montego
Falcon
12-25
13-20
13-20
13-20
Upper CD
100-140
Lower
55-75
9-14
17-25
25-35
8-11
6-10
6-15
10 in. Brake
10-20
9 in. Brake
5-7
50-70
20-40
28-35
32-65 ®
Inch-lb.
12-20
12-19
12-19
10-15
10-15
10-17
10-17
4 lug
55-85
5 lug
70-115
Mustang-
Cougar
12-25
13-20
13-20
13-20
Upper ©
100-140
Lower
55-75
9-14
17-25
25-35
8-11
6-10
6-15
10 in. Brake
10-20
9 in. Brake
5-7
50-70
20-40
28-35
32-65 ®
Inch-lb.
12-20
12-19
12-19
10-15
10-15
10-17
10-17
4 lug
55-85
5 lug
70-115
Thunderbird
Continental
Mark III
1218
13-20
13-20
Upper ©
110-140
Lower
90-120
9-14
17-25
25-35
8-11
6-10
6-15
10-20
50-70
6-15
30-40
10-15
10-15
10-17
10-17
70-115
Lincoln
Continental
Dash Panel
10-20
Inst. Panel
712
13-20
13-20
100-140
9-14
7-9
6-15
10-20
30-35
6-15
10-15
10-15
10-17
10-17
70-115
® The upper bolt must be tightened first.
® On front disc brake calipers 6-15 ft-lbs.
® All hydraulic lines must be tightened to the specified torque value and be free of fluid leakage.procarmanuals.com
Page 65 of 413
02-03-04
Specifications
02-03-04
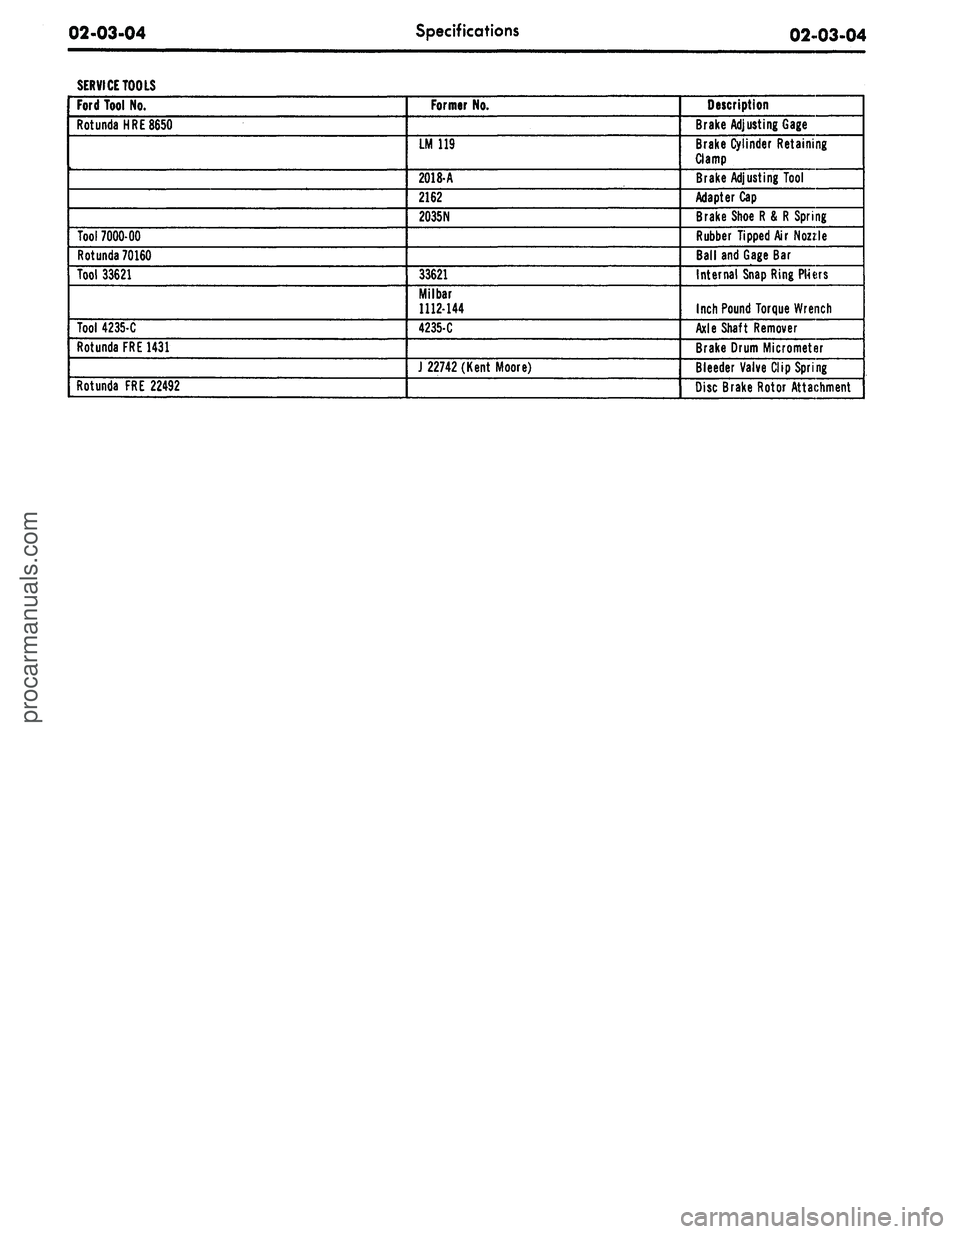
SERVICE TOOLS
Ford Tool
No.
Rotunda
HRE
8650
Tool
7000-00
Rotunda
70160
Tool 33621
Tool 4235-C
Rotunda
FRE 1431
Rotunda
FRE
22492
Former
No.
LM 119
2018-A
2162
2035N
33621
Milbar
1112-144
4235-C
J
22742 (Kent Moore)
Description
Brake
Adjusting
Gage
Brake
Cylinder
Retaining
Clamp
Brake
Adjusting
Tool
Adapter
Cap
Brake Shoe
R
&
R
Spring
Rubber
Tipped
Air
Nozzle
Ball
and
Gage
Bar
Internal
Snap Ring PMers
Inch Pound Torque
Wrench
Axle Shaft
Remover
Brake Drum
Micrometer
Bleeder
Valve Clip Spring
Disc Brake Rotor
Attachmentprocarmanuals.com
Page 66 of 413
03-01-01
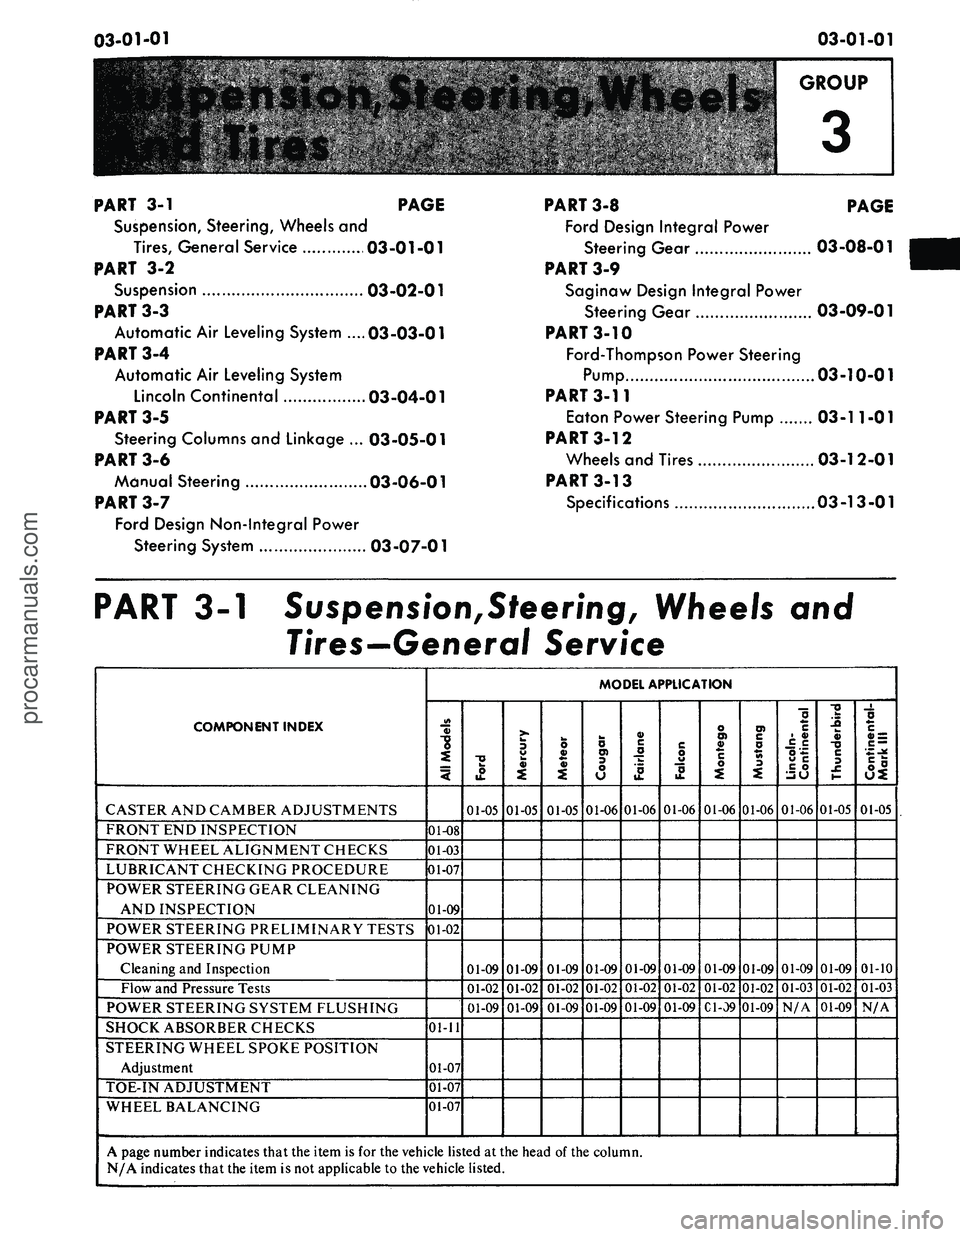
PART
3-1
PAGE
Suspension,
Steering, Wheels and
Tires,
General Service 03-01-01
PART
3-2
Suspension 03-02-01
PART
3-3
Automatic
Air
Leveling System ....03-03-01
PART
3-4
Automatic
Air
Leveling System
Lincoln Continental 03-04-01
PART
3-5
Steering Columns and Linkage ... 03-05-01
PART
3-6
Manual Steering 03-06-01
PART
3-7
Ford Design Non-Integral Power
Steering System
03-07-01
PART
3-8
PAGE
Ford Design Integral Power
Steering Gear 03-08-01
PART
3-9
Saginaw Design Integral Power
Steering Gear 03-09-01
PART
3-10
Ford-Thompson Power Steering
Pump 03-10-01
PART
3-11
Eaton Power Steering Pump 03-1
1-01
PART 3-12
Wheels and Tires 03-1 2-01
PART
3-13
Specifications
03-13-01
PART
3-1
Suspension,Steering, Wheels
and
Tires—General Service
COMPONENT INDEX
CASTER AND CAMBER ADJUSTMENTS
FRONT
END
INSPECTION
FRONT WHEEL ALIGNMENT CHECKS
LUBRICANT CHECKING PROCEDURE
POWER STEERING GEAR CLEANING
AND INSPECTION
POWER STEERING PRELIMINARY TESTS
POWER STEERING PUMP
Cleaning
and
Inspection
Flow
and
Pressure Tests
POWER STEERING SYSTEM FLUSHING
SHOCK ABSORBER CHECKS
STEERING WHEEL SPOKE POSITION
Adjustment
TOE-IN ADJUSTMENT
WHEEL BALANCING
MODEL APPLICATION
All
Models
01-08
01-03
01-07
01-09
01-02
01-11
01-07
01-07
01-07
Ford
01-05
01-09
01-02
01-09
Mercury
01-05
01-09
01-02
01-09
Meteor
01-05
01-09
01-02
01-09
Cougar
01-06
01-09
01-02
01-09
Fairlane
01-06
01-09
01-02
01-09
Falcon
01-06
01-09
01-02
01-09
Montego
01-06
01-09
01-02
Gl-09
Mustang
01-06
01-09
01-02
01-09
Lincoln-
Continental
01-06
01-09
01-03
N/A
Thunderbird
01-05
01-09
01-02
01-09
Continental-
Mark
III
01-05
01-10
01-03
N/A
A page number indicates that
the
item
is for the
vehicle listed
at the
head
of the
column.
N/A indicates that
the
item
is not
applicable
to the
vehicle listed.
procarmanuals.com
Page 67 of 413
03-01-02
Suspension — Steering, Wheels And Tires — General Service
03-01-02
1 TESTING
POWER STEERING-
PRELIMINARY TESTS
The following preliminary checks
should always be made before per-
forming any operations.
AIR BLEEDING
Air in the power steering system
(shown by bubbles in the fluid) should
be bled. After making sure that the
reservoir is filled to specification (the
fluid must be at normal operating
temperature when the check is made),
turn the steering wheel through its full
travel three or four times. Do not hold
the wheels against their stops. Re-
check the fluid level.
CHECK FLUID LEVEL
Run the engine until the fluid is at
normal operating temperature. Then
turn the steering wheel all the way to
the left and right several times, and
shut off the engine.
Check the fluid level in the power
steering reservoir. The level must show
on the cross hatching between the bot-
tom of the dipstick and the full mark
(Fig. 1). If the level is low, add
enough automatic transmission fluid
C1AZ-19582-A to raise the level to
the F mark on the dipstick. Do not
overfill the reservoir.
CHECK PUMP BELT
If the pump belt is broken, glazed,
or worn, replace it with a new belt.
Use only the specified type of belt.
Refer to Part 3-13 for belt adjustment
procedure.
CHECK FOR FLUID
LEAKS
With the engine idling, turn the
steering wheel from stop to stop sever-
al times. Check all possible leakage
points. Tighten all loose fittings, and
replace any damaged lines or defective
seats.
CHECK TURNING EFFORT
With the front wheels properly al-
igned and tire pressures correct, check
the effort required to turn the steering
wheel.
G 1508- A
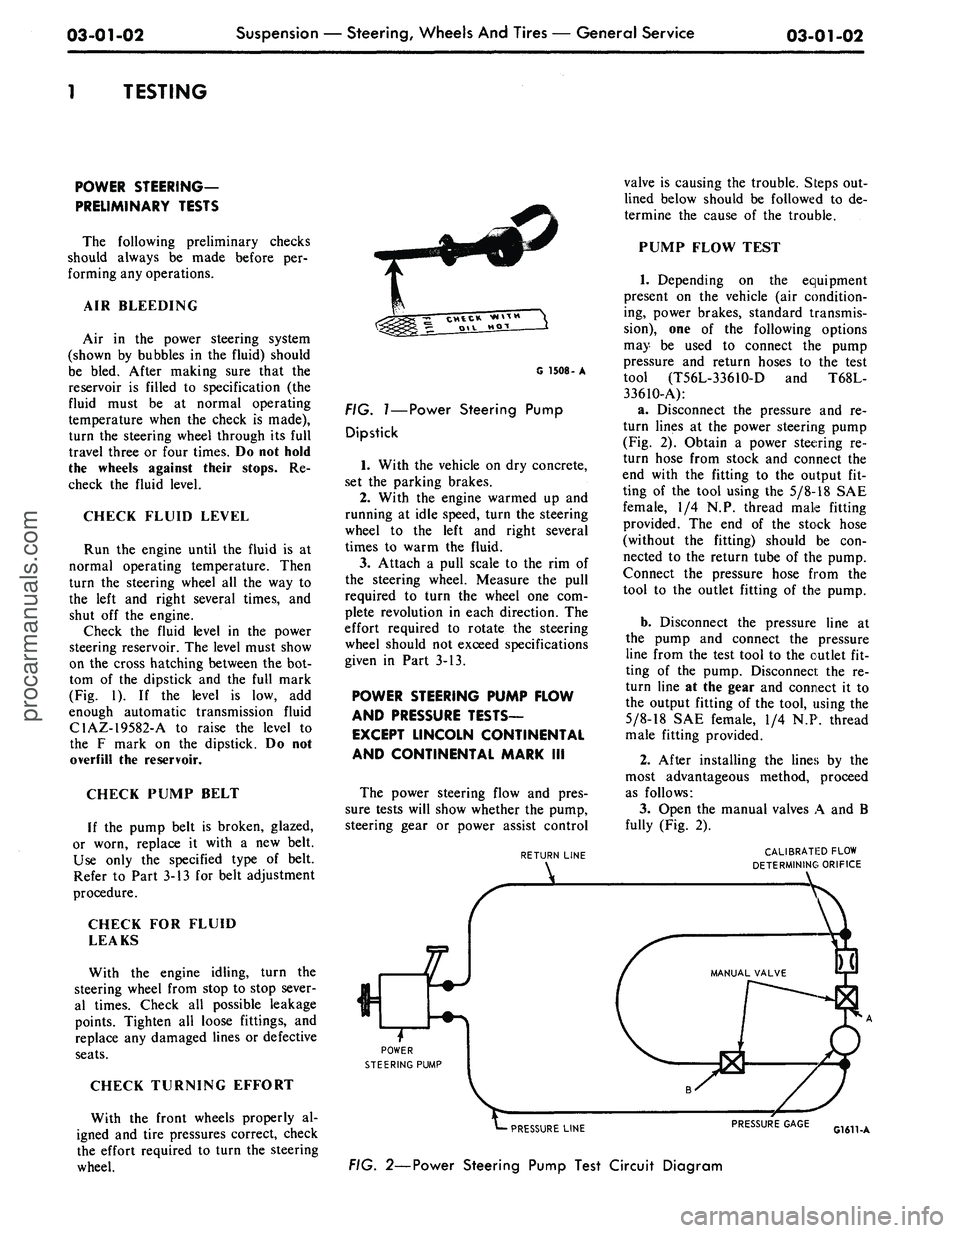
FIG.
1—Power
Steering Pump
Dipstick
1.
With the vehicle on dry concrete,
set the parking brakes.
2.
With the engine warmed up and
running at idle speed, turn the steering
wheel to the left and right several
times to warm the fluid.
3.
Attach a pull scale to the rim of
the steering wheel. Measure the pull
required to turn the wheel one com-
plete revolution in each direction. The
effort required to rotate the steering
wheel should not exceed specifications
given in Part 3-13.
POWER STEERING PUMP FLOW
AND PRESSURE TESTS—
EXCEPT LINCOLN CONTINENTAL
AND CONTINENTAL MARK III
The power steering flow and pres-
sure tests will show whether the pump,
steering gear or power assist control
RETURN LINE
POWER
STEERING PUMP
Sr
valve is causing the trouble. Steps out-
lined below should be followed to de-
termine the cause of the trouble.
PUMP FLOW TEST
1.
Depending on the equipment
present on the vehicle (air condition-
ing, power brakes, standard transmis-
sion),
one of the following options
may be used to connect the pump
pressure and return hoses to the test
tool (T56L-3361O-D and T68L-
33610-A):
a. Disconnect the pressure and re-
turn lines at the power steering pump
(Fig. 2). Obtain a power steering re-
turn hose from stock and connect the
end with the fitting to the output fit-
ting of the tool using the
5/8-18
SAE
female, 1/4 N.P. thread male fitting
provided. The end of the stock hose
(without the fitting) should be con-
nected to the return tube of the pump.
Connect the pressure hose from the
tool to the outlet fitting of the pump.
b.
Disconnect the pressure line at
the pump and connect the pressure
line from the test tool to the outlet fit-
ting of the pump. Disconnect the re-
turn line at the gear and connect it to
the output fitting of the tool, using the
5/8-18
SAE female, 1/4 N.P. thread
male fitting provided.
2.
After installing the lines by the
most advantageous method, proceed
as follows:
3.
Open the manual valves A and B
fully (Fig. 2).
CALIBRATED FLOW
DETERMINING ORIFICE
PRESSURE LINE
FIG. 2—Power Steering Pump Test Circuit Diagram
PRESSURE GAGE
G1611-Aprocarmanuals.com
Page 68 of 413
03-01-03
Suspension — Steering, Wheels And Tires — General Service
03-01-03
4.
Connect a tachometer, start the
engine and operate it at idle speed
until the reservoir fluid temperature
reaches 165 to 175. This temperature
must be maintained throughout the
test. Valve B may be partially closed
to create a back pressure up to 350
psi to hasten the temperature rise. The
reservoir fluid must be at the proper
level.
5.
With the engine operating at rec-
ommended idle rpm and fluid temper-
ature noted in Step 4, close the manu-
al valve B. The minimum acceptable
pressure reading is 620 psi.
6. If the pressure gauge reading is
below the minimum specification, the
pump is at fault and should be re-
paired with necessary parts.
7.
If the reading is at or above the
minimum specification, the pump flow
is normal. Open manual valve B and
proceed to the Pump Fluid Pressure
Test.
PUMP FLUID
PRESSURE TEST
1.
Keep the lines and tools con-
nected as in the Pump Flow Test.
2.
With manual valves A and B
opened fully, operate the engine at
recommended idle speed (Fig. 2).
Close manual valve A, then manual
valve B. Do not keep both valves
closed for more than 5 seconds as this
would abnormally increase the fluid
temperature and cause undue pump
and/or gear wear.
3.
With the valves fully closed, the
pressure gauge should read 1000 psi
minimum for Ford, Mercury, Meteor
or Thunderbird and 750 psi minimum
for Cougar, Fairlane, Falcon, Monte-
go or Mustang.
4.
If the pressure gauge reading is
below the minimum specification, the
pump is at fault and should be re-
paired with necessary parts.
5.
If the pressure gauge reading is
at or above the minimum specifica-
tions,
the pump is normal and the
power steering gear or power assist
control valve is at fault.
FLUID PRESSURE TEST-
LINCOLN CONTINENTAL AND
CONTINENTAL MARK III
The pressure testing gauge set, tool
T56L-33610-D, requires modification
to make it adaptable for installation
in the power steering hydraulic sys-
tem. The parts required and the modi-
fication procedure are as follows:
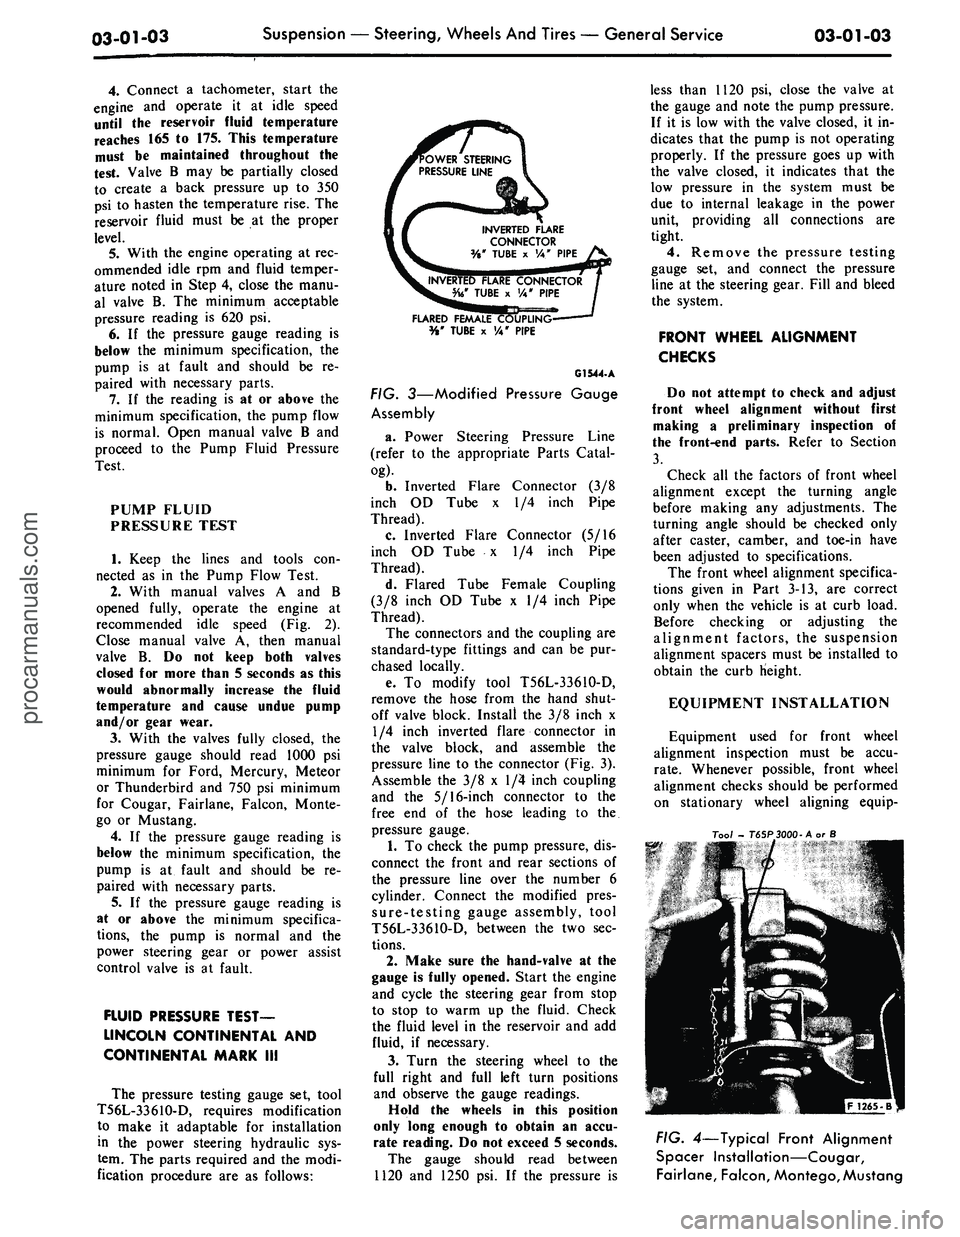
OWER STEERING
PRESSURE LINE
INVERTED FLARE
CONNECTOR
%* TUBE x VA" PIPE
FLARED FEMALE COUPW
%' TUBE x VA" PIPE
G1544.A
FIG. 3—Modified Pressure Gauge
Assembly
a. Power Steering Pressure Line
(refer to the appropriate Parts Catal-
og).
b.
Inverted Flare Connector (3/8
inch OD Tube x 1/4 inch Pipe
Thread).
c. Inverted Flare Connector (5/16
inch OD Tube x 1/4 inch Pipe
Thread).
d. Flared Tube Female Coupling
(3/8 inch OD Tube x 1/4 inch Pipe
Thread).
The connectors and the coupling are
standard-type fittings and can be pur-
chased locally.
e. To modify tool T56L-33610-D,
remove the hose from the hand shut-
off valve block. Install the 3/8 inch x
1/4 inch inverted flare connector in
the valve block, and assemble the
pressure line to the connector (Fig. 3).
Assemble the 3/8 x 1/4 inch coupling
and the 5/16-inch connector to the
free end of the hose leading to the.
pressure gauge.
1.
To check the pump pressure, dis-
connect the front and rear sections of
the pressure line over the number 6
cylinder. Connect the modified pres-
sure-testing gauge assembly, tool
T56L-3361O-D, between the two sec-
tions.
2.
Make sure the hand-valve at the
gauge is fully opened. Start the engine
and cycle the steering gear from stop
to stop to warm up the fluid. Check
the fluid level in the reservoir and add
fluid, if necessary.
3.
Turn the steering wheel to the
full right and full left turn positions
and observe the gauge readings.
Hold the wheels in this position
only long enough to obtain an accu-
rate reading. Do not exceed 5 seconds.
The gauge should read between
1120 and 1250 psi. If the pressure is
less than 1120 psi, close the valve at
the gauge and note the pump pressure.
If it is low with the valve closed, it in-
dicates that the pump is not operating
properly. If the pressure goes up with
the valve closed, it indicates that the
low pressure in the system must be
due to internal leakage in the power
unit, providing all connections are
tight.
4.
Remove the pressure testing
gauge set, and connect the pressure
line at the steering gear. Fill and bleed
the system.
FRONT WHEEL ALIGNMENT
CHECKS
Do not attempt to check and adjust
front wheel alignment without first
making a preliminary inspection of
the front-end parts. Refer to Section
3.
Check all the factors of front wheel
alignment except the turning angle
before making any adjustments. The
turning angle should be checked only
after caster, camber, and toe-in have
been adjusted to specifications.
The front wheel alignment specifica-
tions given in Part 3-13, are correct
only when the vehicle is at curb load.
Before checking or adjusting the
alignment factors, the suspension
alignment spacers must be installed to
obtain the curb Height.
EQUIPMENT INSTALLATION
Equipment used for front wheel
alignment inspection must be accu-
rate.
Whenever possible, front wheel
alignment checks should be performed
on stationary wheel aligning equip-
Too/
- T65P3000-A or S
FIG. 4—Typical Front Alignment
Spacer Installation—Cougar,
Fairlane, Falcon,
Montego,
Mustangprocarmanuals.com
Page 69 of 413
03-01-04
Suspension — Steering, Wheels And Tires — General Service
03-01-04
Tool
- T 65 P -
3000
B or C
1266-B
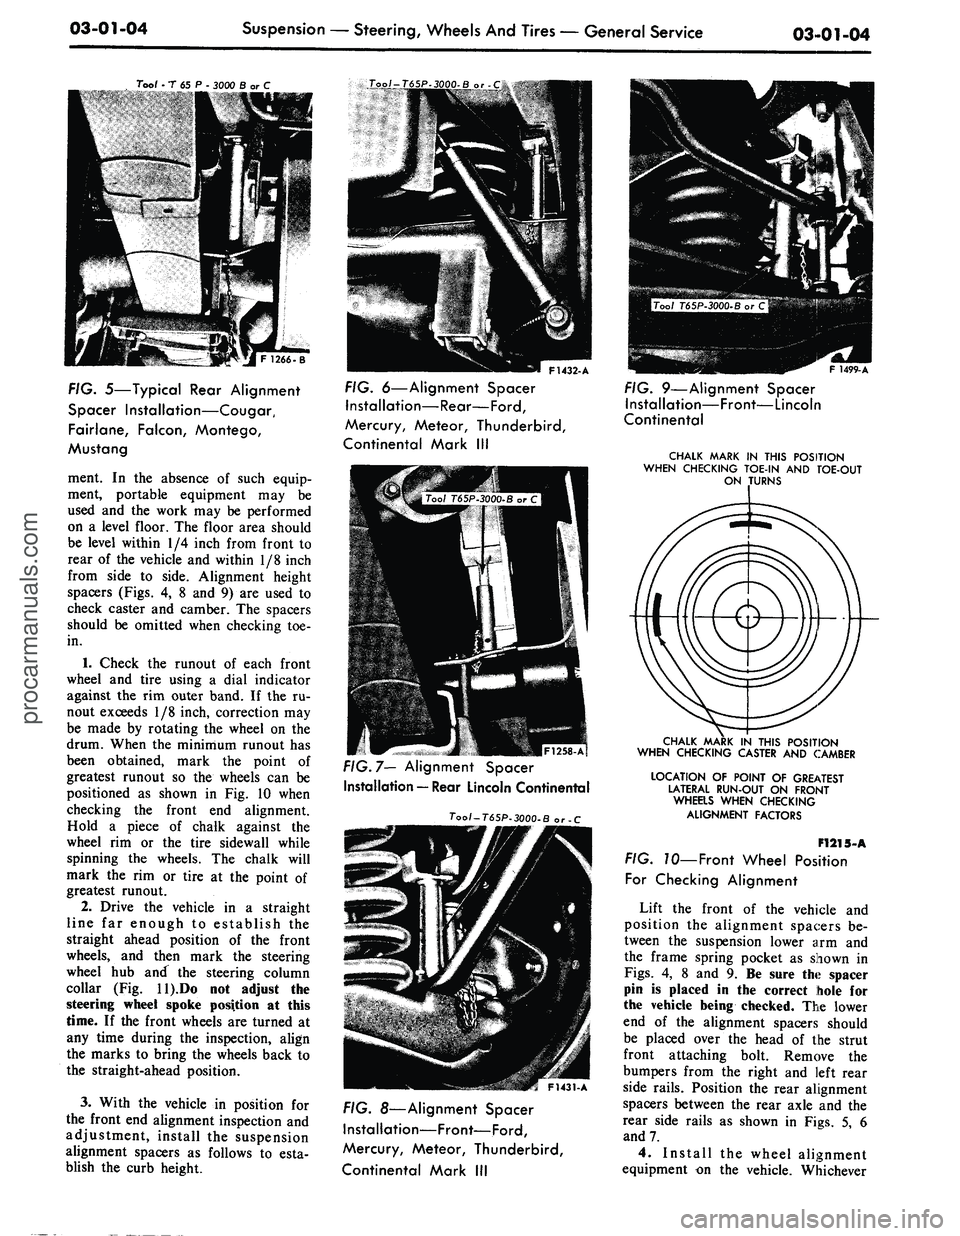
FIG. 5—Typical Rear Alignment
Spacer Installation—Cougar,
Fairlane, Falcon, Montego,
Mustang
ment. In the absence of such equip-
ment, portable equipment may be
used and the work may be performed
on a level floor. The floor area should
be level within 1/4 inch from front to
rear of the vehicle and within 1/8 inch
from side to side. Alignment height
spacers (Figs. 4, 8 and 9) are used to
check caster and camber. The spacers
should be omitted when checking toe-
in.
1.
Check the runout of each front
wheel and tire using a dial indicator
against the rim outer band. If the ru-
nout exceeds 1/8 inch, correction may
be made by rotating the wheel on the
drum. When the minimum runout has
been obtained, mark the point of
greatest runout so the wheels can be
positioned as shown in Fig. 10 when
checking the front end alignment.
Hold a piece of chalk against the
wheel rim or the tire sidewall while
spinning the wheels. The chalk will
mark the rim or tire at the point of
greatest runout.
2.
Drive the vehicle in a straight
line far enough to establish the
straight ahead position of the front
wheels, and then mark the steering
wheel hub and the steering column
collar (Fig. ll).Do not adjust the
steering wheel spoke position at this
time. If the front wheels are turned at
any time during the inspection, align
the marks to bring the wheels back to
the straight-ahead position.
3.
With the vehicle in position for
the front end alignment inspection and
adjustment, install the suspension
alignment spacers as follows to esta-
blish the curb height.
F1432-A
FIG. 6—Alignment Spacer
Installation—Rear—Ford,
Mercury, Meteor, Thunderbird,
Continental Mark III
|F1258-Af
FIG. 7— Alignment Spacer
Installation — Rear Lincoln Continental
Tool-T65P-3000-B or -C
F1431-A
FIG. 8—Alignment Spacer
Installation—Front—Ford,
Mercury, Meteor, Thunderbird,
Continental Mark III
F 1499-A
FIG. 9—Alignment Spacer
Installation—Front—Lincoln
Continental
CHALK MARK IN THIS POSITION
WHEN CHECKING TOE-IN AND TOE-OUT
ON TURNS
CHALK MARK IN THIS POSITION
WHEN CHECKING CASTER AND CAMBER
LOCATION OF POINT OF GREATEST
LATERAL RUN-OUT ON FRONT
WHEaS WHEN CHECKING
ALIGNMENT FACTORS
F1215-A
FIG. 70—Front Wheel Position
For Checking Alignment
Lift the front of the vehicle and
position the alignment spacers be-
tween the suspension lower arm and
the frame spring pocket as shown in
Figs.
4, 8 and 9. Be sure the spacer
pin is placed in the correct hole for
the vehicle being checked. The lower
end of the alignment spacers should
be placed over the head of the strut
front attaching bolt. Remove the
bumpers from the right and left rear
side rails. Position the rear alignment
spacers between the rear axle and the
rear side rails as shown in Figs. 5, 6
and 7.
4.
Install the wheel alignment
equipment on the vehicle. Whicheverprocarmanuals.com
Page 70 of 413
03-01-05
Suspension — Steering, Wheels And Tires — General Service
03-01-05
type of equipment is used, follow the
installation and inspection instructions
provided by the equipment manufactu-
rer.
CASTER
Check the caster angle at each front
wheel.
The caster is the forward or rear-
ward tilt of the top of the wheel
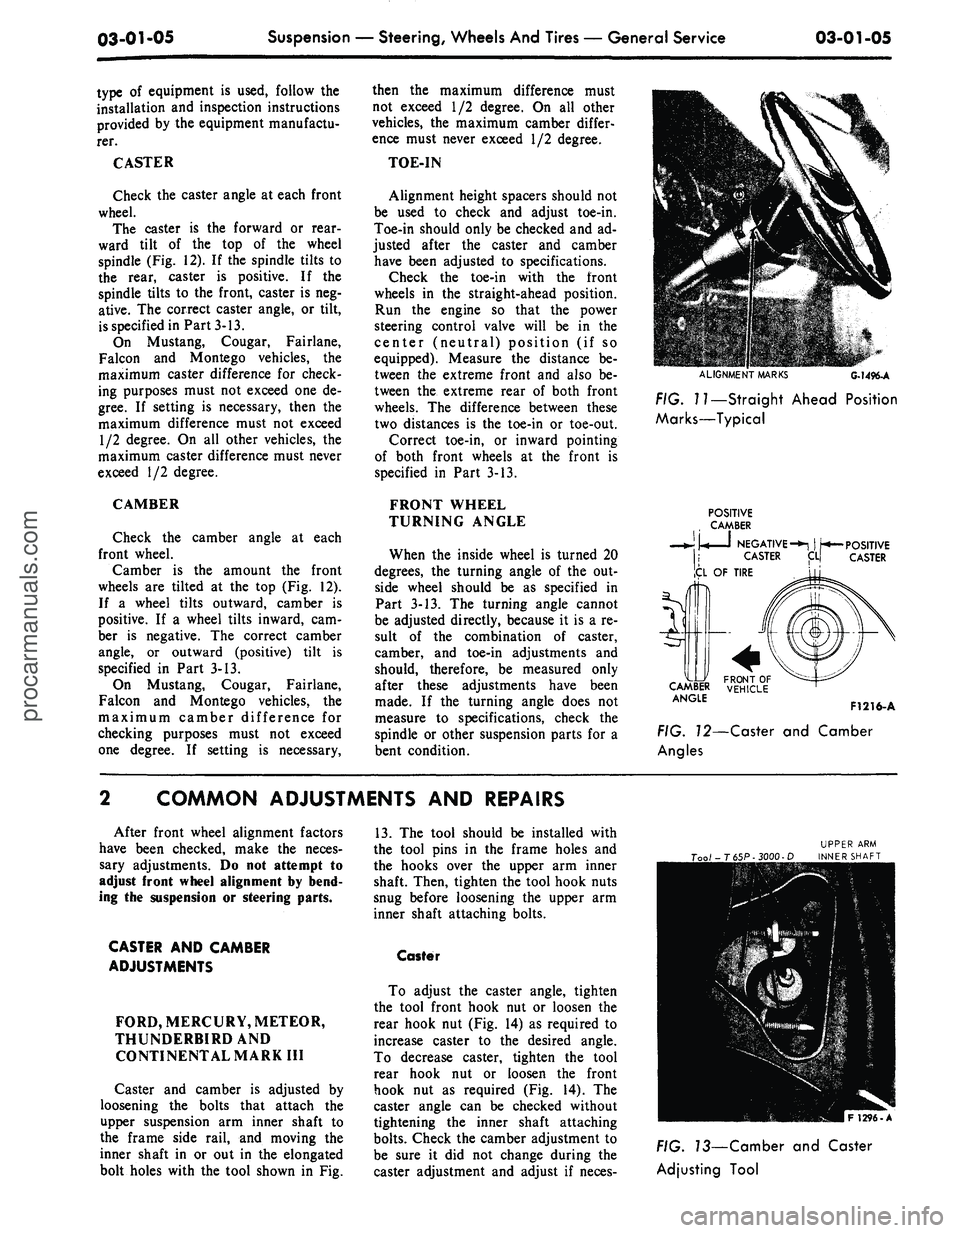
spindle (Fig. 12). If the spindle tilts to
the rear, caster is positive. If the
spindle tilts to the front, caster is neg-
ative. The correct caster angle, or tilt,
is specified in Part 3-13.
On Mustang, Cougar, Fairlane,
Falcon and Montego vehicles, the
maximum caster difference for check-
ing purposes must not exceed one de-
gree.
If setting is necessary, then the
maximum difference must not exceed
1/2 degree. On all other vehicles, the
maximum caster difference must never
exceed 1/2 degree.
CAMBER
Check the camber angle at each
front wheel.
Camber is the amount the front
wheels are tilted at the top (Fig. 12).
If a wheel tilts outward, camber is
positive. If a wheel tilts inward, cam-
ber is negative. The correct camber
angle, or outward (positive) tilt is
specified in Part 3-13.
On Mustang, Cougar, Fairlane,
Falcon and Montego vehicles, the
maximum camber difference for
checking purposes must not exceed
one degree. If setting is necessary,
then the maximum difference must
not exceed 1/2 degree. On all other
vehicles, the maximum camber differ-
ence must never exceed 1/2 degree.
TOE-IN
Alignment height spacers should not
be used to check and adjust toe-in.
Toe-in should only be checked and ad-
justed after the caster and camber
have been adjusted to specifications.
Check the toe-in with the front
wheels in the straight-ahead position.
Run the engine so that the power
steering control valve will be in the
center (neutral) position (if so
equipped). Measure the distance be-
tween the extreme front and also be-
tween the extreme rear of both front
wheels. The difference between these
two distances is the toe-in or toe-out.
Correct toe-in, or inward pointing
of both front wheels at the front is
specified in Part 3-13.
FRONT WHEEL
TURNING ANGLE
When the inside wheel is turned 20
degrees, the turning angle of the out-
side wheel should be as specified in
Part 3-13. The turning angle cannot
be adjusted directly, because it is a re-
sult of the combination of caster,
camber, and toe-in adjustments and
should, therefore, be measured only
after these adjustments have been
made. If the turning angle does not
measure to specifications, check the
spindle or other suspension parts for a
bent condition.
ALIGNMENT
MARKS
G-1496-A
FIG. I?—Straight Ahead Position
Marks—Typical
POSITIVE
CAMBER
• •
NEGATIVE-*!
| ^*—
CASTER
ICL
OF TIRE
POSITIVE
CASTER
5r\
CA&U
ANGlE
F1216-A
FIG. 72—Caster and Camber
Angles
COMMON ADJUSTMENTS AND REPAIRS
After front wheel alignment factors
have been checked, make the neces-
sary adjustments. Do not attempt to
adjust front wheel alignment by bend-
ing the suspension or steering parts.
CASTER AND CAMBER
ADJUSTMENTS
FORD, MERCURY, METEOR,
THUNDERBIRDAND
CONTINENTAL MARK III
Caster and camber is adjusted by
loosening the bolts that attach the
upper suspension arm inner shaft to
the frame side rail, and moving the
inner shaft in or out in the elongated
bolt holes with the tool shown in Fig.
13.
The tool should be installed with
the tool pins in the frame holes and
the hooks over the upper arm inner
shaft. Then, tighten the tool hook nuts
snug before loosening the upper arm
inner shaft attaching bolts.
Caster
To adjust the caster angle, tighten
the tool front hook nut or loosen the
rear hook nut (Fig. 14) as required to
increase caster to the desired angle.
To decrease caster, tighten the tool
rear hook nut or loosen the front
hook nut as required (Fig. 14). The
caster angle can be checked without
tightening the inner shaft attaching
bolts.
Check the camber adjustment to
be sure it did not change during the
caster adjustment and adjust if neces-
FIG. 73—Camber and Caster
Adjusting Toolprocarmanuals.com