HONDA INTEGRA 1998 4.G Workshop Manual
INTEGRA 1998 4.G
HONDA
HONDA
https://www.carmanualsonline.info/img/13/6069/w960_6069-0.png
HONDA INTEGRA 1998 4.G Workshop Manual
Trending: Clutch removal, throttle valve, air bleeding, c503, CD changer, engine oil capacity, child restraint
Page 1281 of 1681
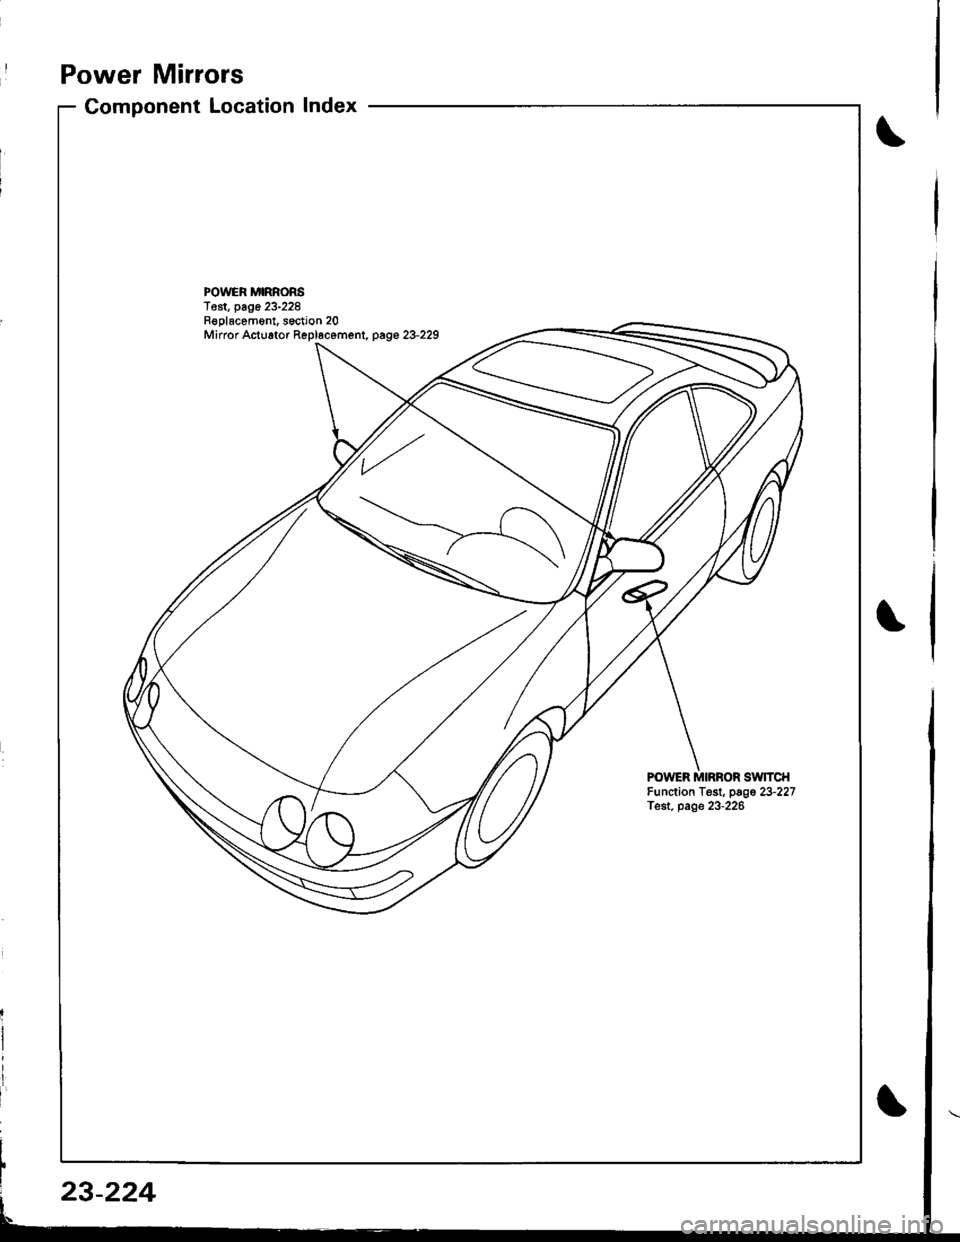
Power Mirrors
Component LocationIndex
I
POWER MIRRORST€st, page 23-228Replacom6nt, s6ction 20Mirror Actuator Repl6cemenl, page 23-229
FOWER MIRROR SWTCHFunction Test, page 23-227Test. page 23-226
23-224
Page 1282 of 1681
I
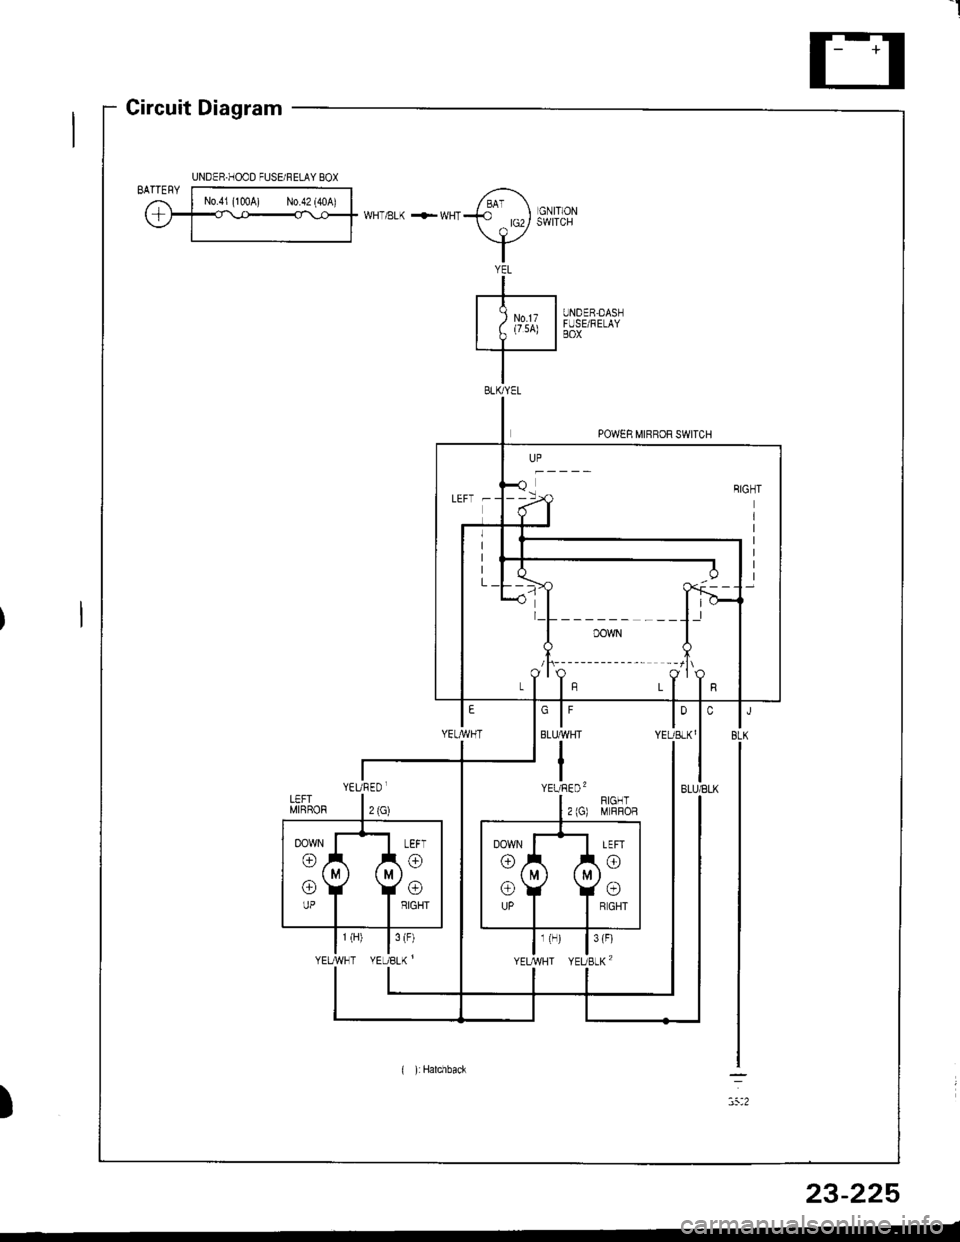
Circuit Diagram
UNDER,DASNFUSE/RELAYBOX
YEL
-+-----t
I Zu',x I.I--
POWER MIRROR SWITCH
)
UNDER.HOOD FUSE/FELAY BOX
LEFT -
l_L______ ___l.l
/t\-------- --lt\
YEURED.
( ):Hatchback
23-225
Page 1283 of 1681
Power Mirrors
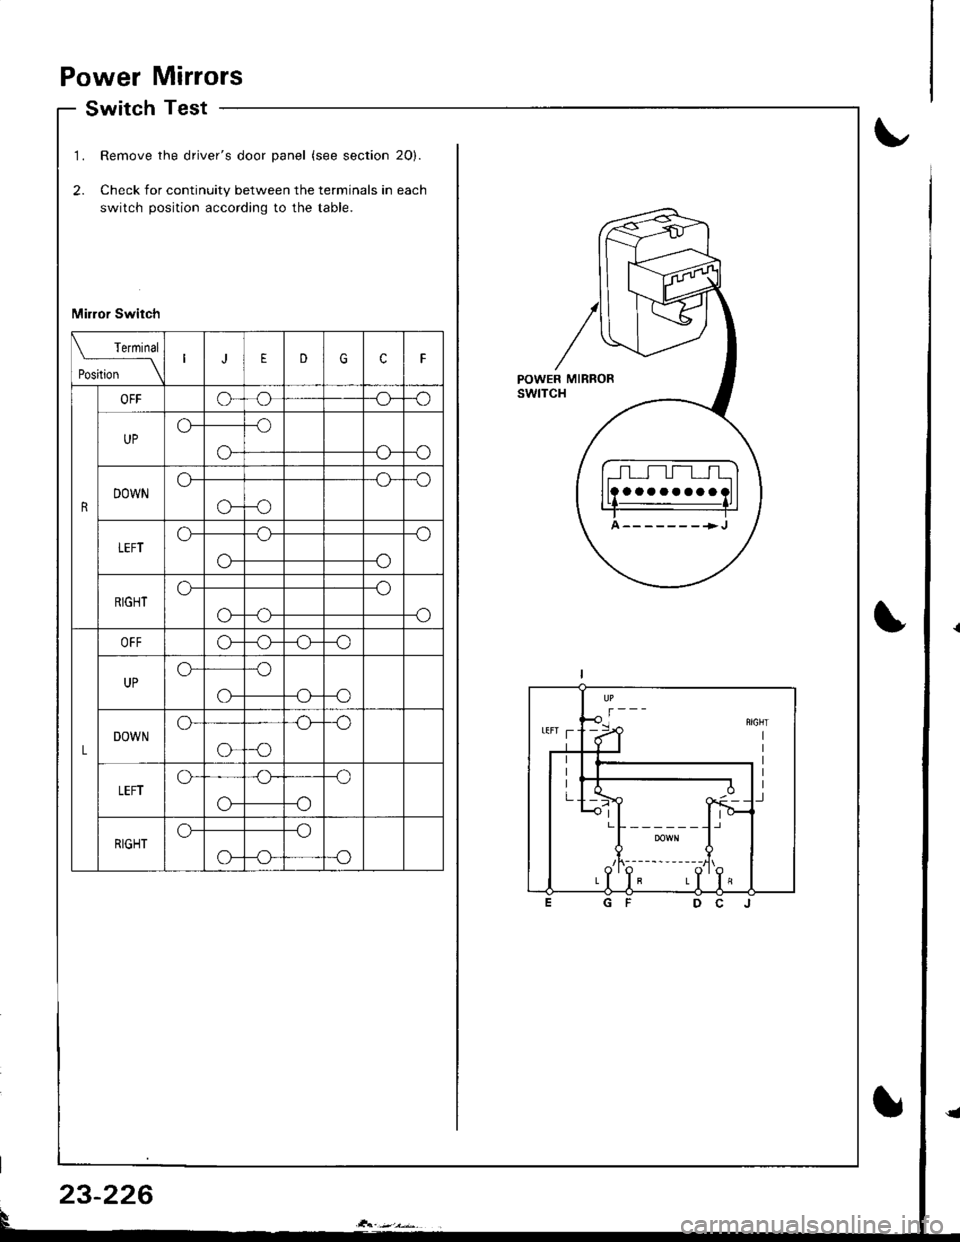
Switch Test
1.
2.
Remove the driver's door panel (see section 2O).
Check for continuity between the terminals in each
switch position according to the table.
Mirror Switch
aaaaaaaa
A-------->J
Terminal
Position \
EDGcF
R
OFFo--o
UPo--o
-oo--G
DOWNo--o
G-o
LEFTo--o
o--o
RIGHTo--o
-oo-
L
OFFo--o
UPo--o
-oo-
DOWNo--o
o--o
LEFTo--o
o--o
RIGHTo--o
-oo-
23-226
Page 1284 of 1681
)
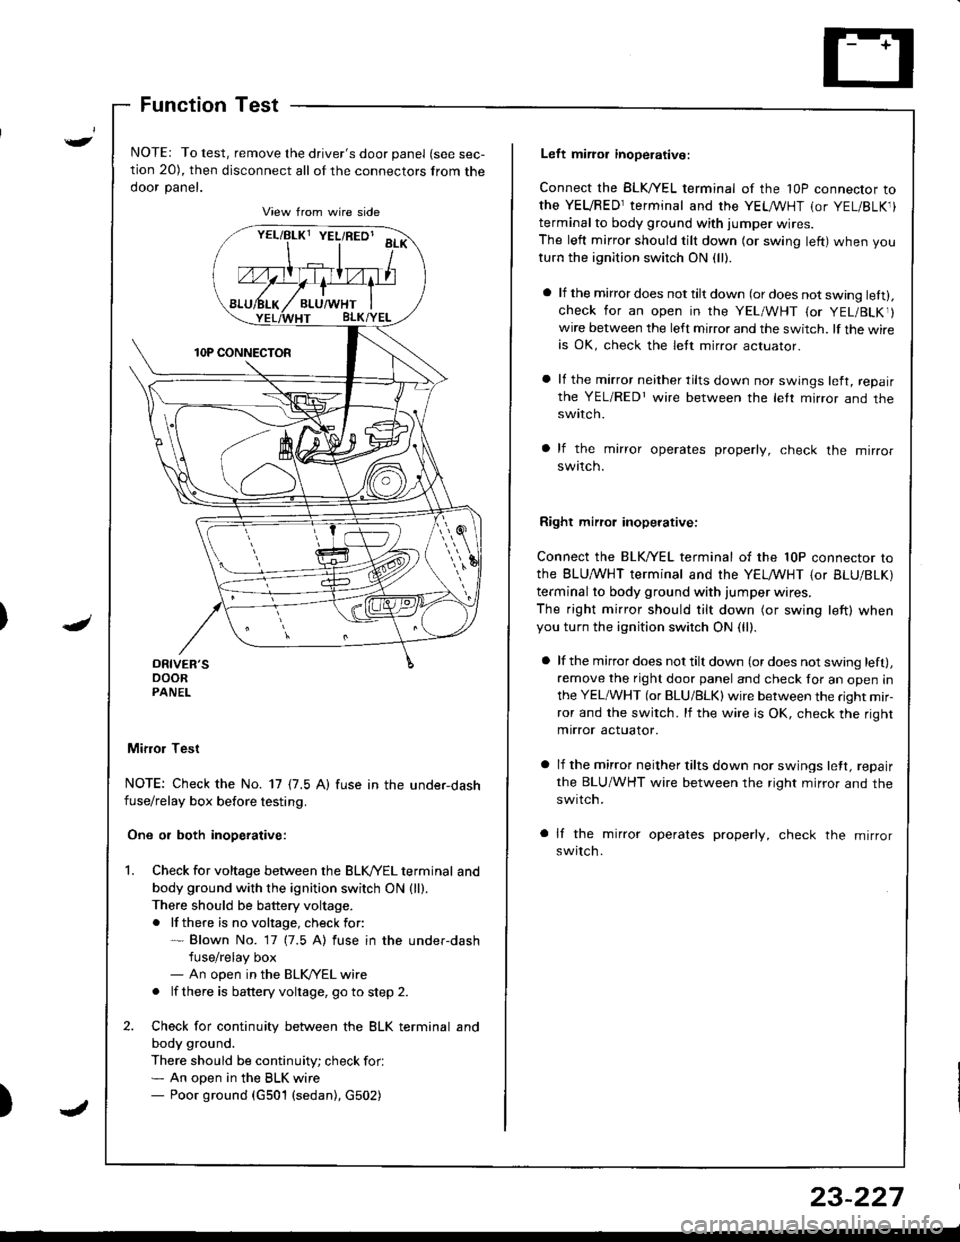
Function Test
NOTE: To test, remove the driver's door panel (see sec-
tion 20), then disconnect all of the connectors from the
ooor panet.
Mifior Test
NOTE: Check the No. 17 {7.5 A) fuse in the under-dashfuse/relay box before testing.
One or both inoperative:
Check for voltage between the BLK//EL terminal and
body ground with the ignition switch ON {ll).There should be battery voltage.
. lf there is no voltage, check for:* Blown No. 17 (7.5 A) fuse in the under-dash
fuse/relay box- An open in the BLK/YEL wire
. lf there is battery voltage, go to step 2.
Check for continuity between the BLK terminal and
body ground.
There should be continuity; check for.* An open in the BLK wire- Poor ground (G501 (sedan), G502)
vrllBtxt YEL/RED' aa*\
Left miror inoperative:
Connect the BLK,^/EL terminal of the 1OP connector to
the YEVRED1terminal and the YEL /VHT (or YEL/BLK1)
terminal to body ground with iumper wires.
The left mirror should tilt down (or swing left) when you
turn the ignition switch ON (ll).
a lf the mirror does not tilt down (or does not swing lett).check for an open in the YEL/WHT {or YEL/BLKr}wire between the left mirror and the switch. lf the wireis OK, check the lett mirror actuaror.
a lf the mirror neither tilts down nor swings left, repair
the YEL/REDr wire between the letr mirror and theswtlcn.
a lf the mirror operates properly, check the mirror
swttcn.
Right mirrol inoperative:
Connect the BLK/YEL terminal of the 10P connector to
the BLU,^/VHT terminal and the YELMHT {or BLU/BLK)
terminal to body ground with jumper wires.
The right mirror should tilt down (or swing left) whenyou turn the ignition switch ON (ll).
a lf the mirror does not tilt down (or does not swing left),
remove the right door panel and check for an open in
the YEL/WHT (or BLU/BLK) wire between the right mir-
ror and the switch. lf the wire is OK, check the right
mirror actuator.
a lf the mirror neither tilts down nor swings lett, repair
the BLU/WHT wire between the right mirror and the
swrtch.
a lf the mirror operates properly, check the mirror
switch.
23-227
Page 1285 of 1681
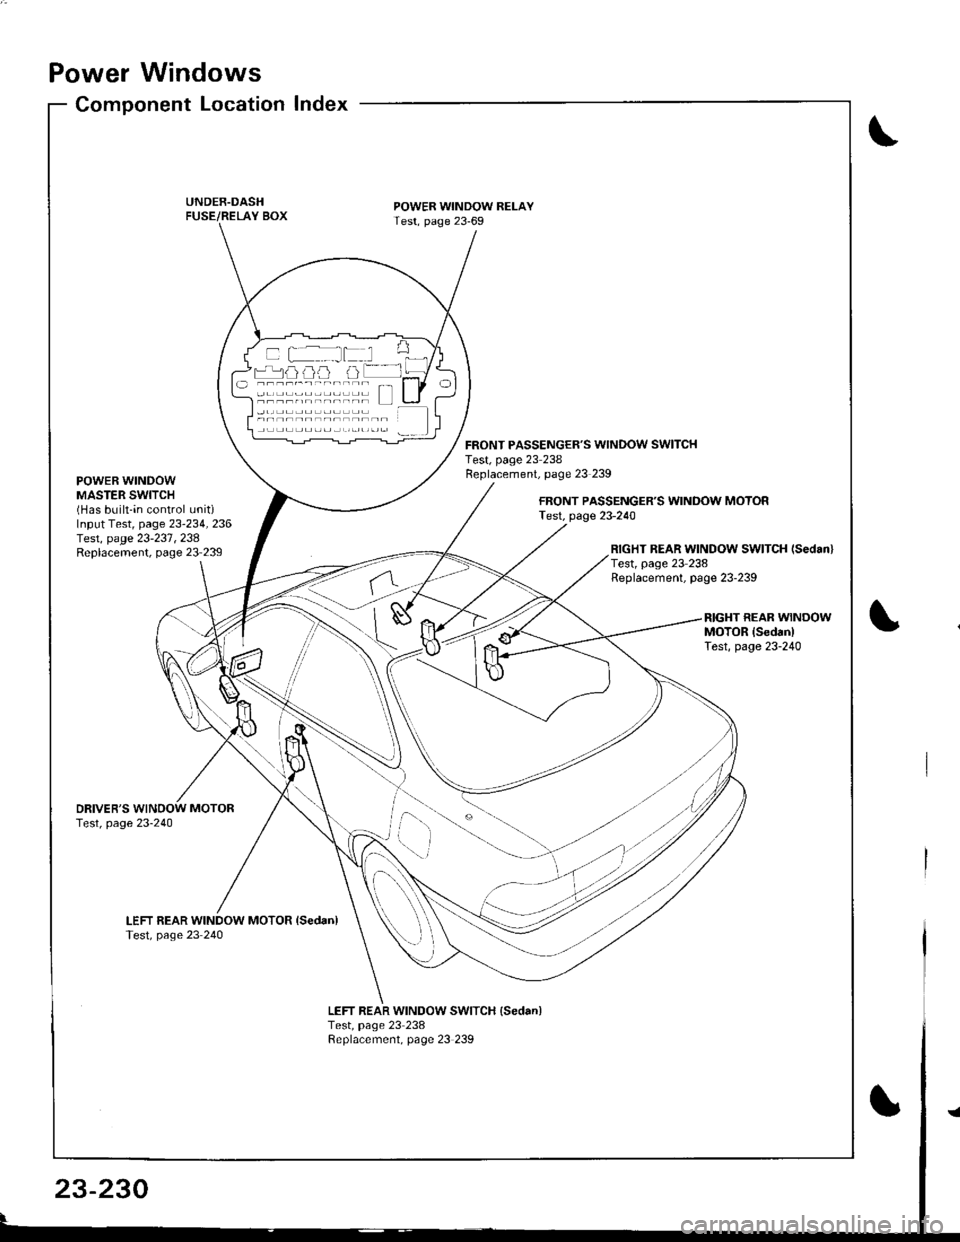
Power Windows
POWER WINDOWMASTER SWITCH(Has built-in control unitiInput Test, page 23-234, 236Iesr, page 23-23'1 ,238Replacement, page 23'239
Component Location Index
UNDER.DASHFUSE/RELAY BOX
DRIVER'STest, page 23-240
LEFT REAR WINDOW MOTOR isedan)Test, page 23 240
POWER WINDOW RELAYTest, page 23-69
LEFT REAR WINDOW SWITCH {Sedan)Test, page 23 238Replacement, page 23 239
FRONT PASSENGER'S WINDOW SWITCHTest, page 23 238Replacement, page 23 239
FRONT PASSENGER'S WINDOW MOTOFTest, page 23-240
RIGHT REAR WINDOW SWITCH (Sedanl
Test, page 23 238Replacement, page 23-239
RIGHT REAR WINOOWMOTOR lsedanlTest, page 23-240
a rrrr'---rnnrn Tl---t----, .----r- L l
(
\
23-230
Page 1286 of 1681
)
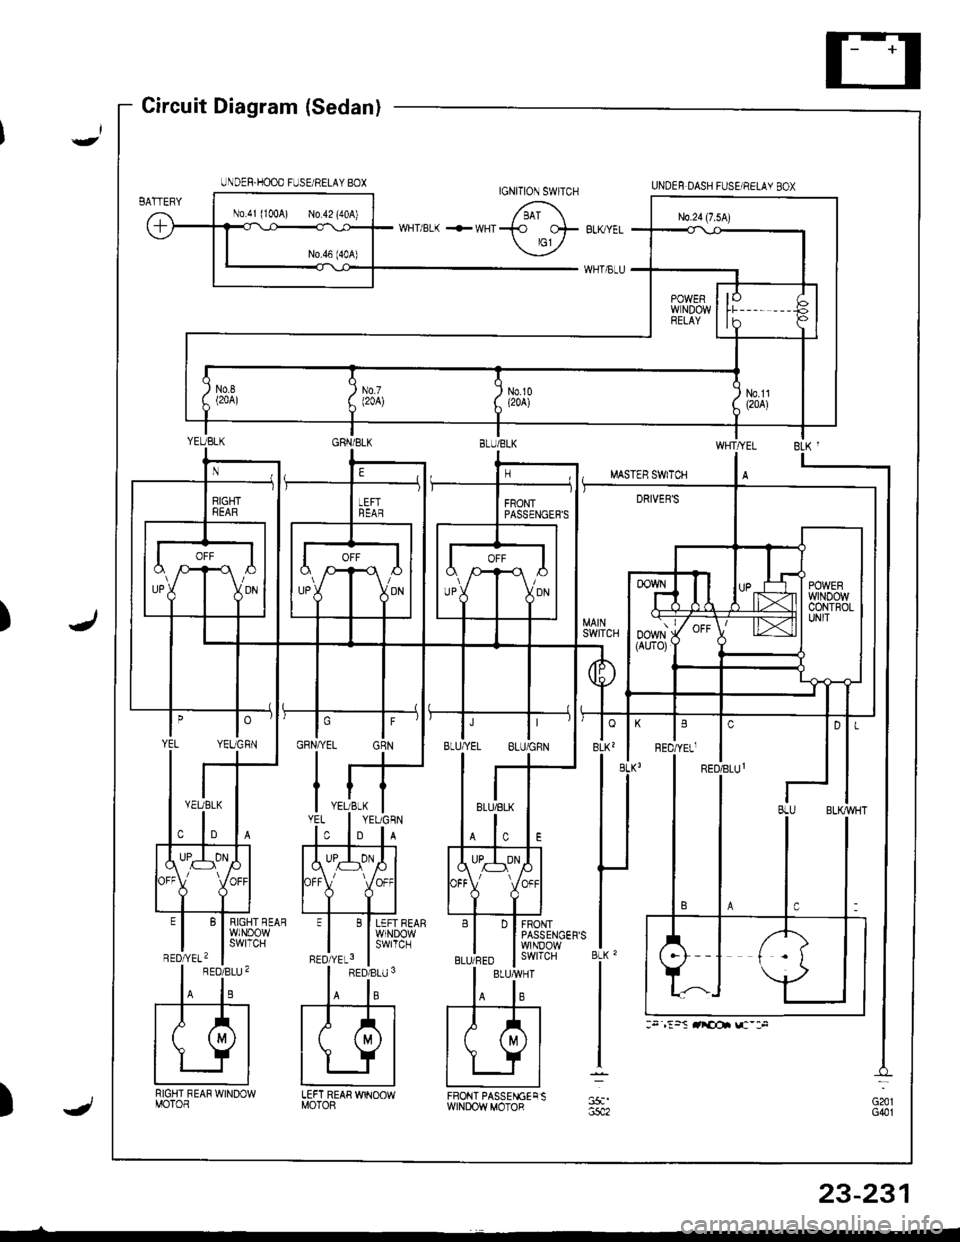
Circuit Diagram (Sedan)
RIGHT REAR WINOOWMOTOR
BLK '
LEFT REAR WINOOWMOTOF)
BLUIRED I swrrcH
UNDEF.HOOD FUSE/RELAY BOXUNDEF DASH FUSE/NELAY BOXIGNITION SWITCH
FRONT PASSENGECSWINDOWMOTOR
:. ,:5S rricot !c-:F
23-231
Page 1287 of 1681
ir
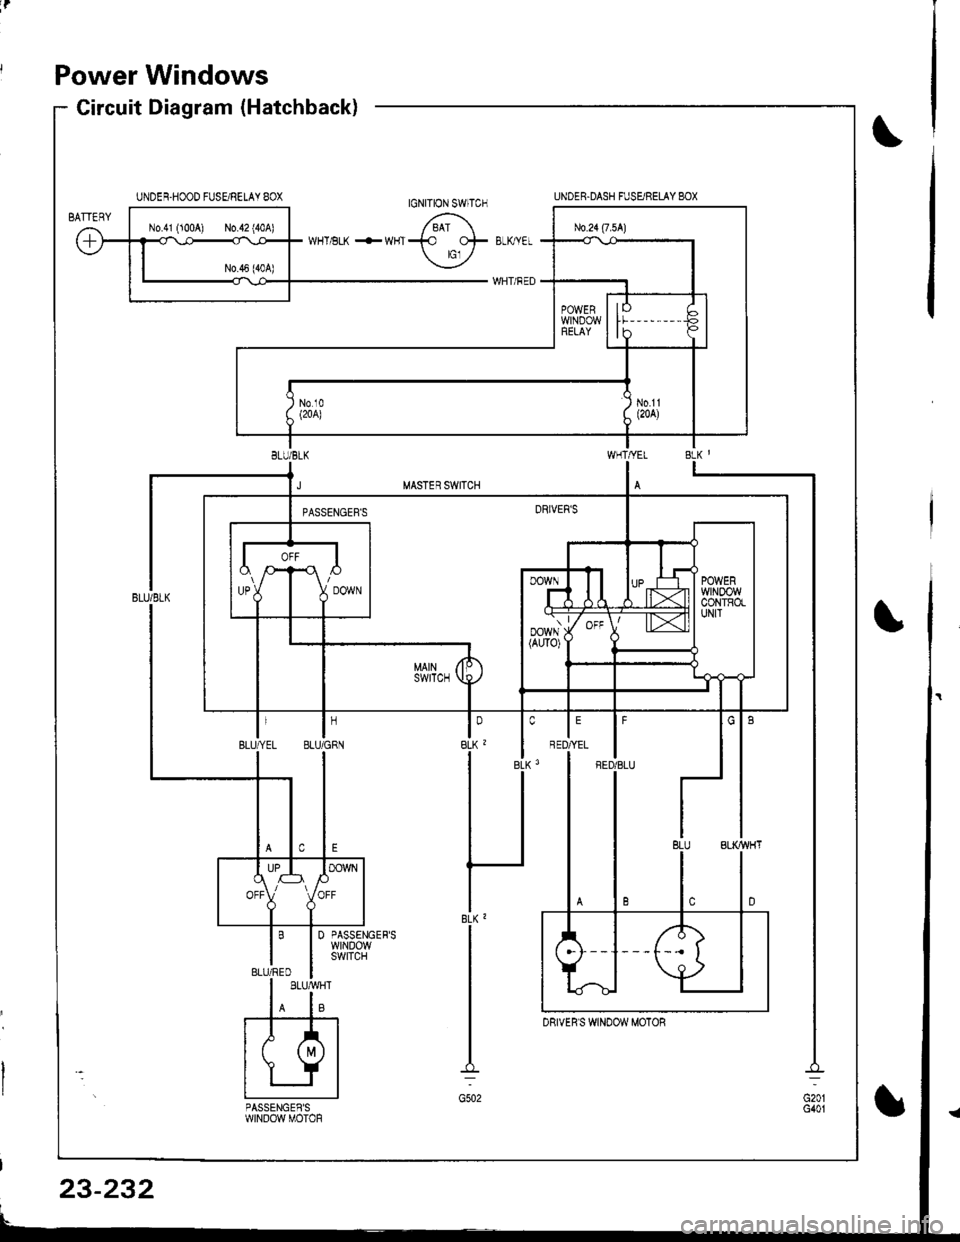
Power Windows
Circuit Diagram (Hatchback)
I'FED/BLU
DRIVER'S WINDOW MOTOR
23-232
Page 1288 of 1681
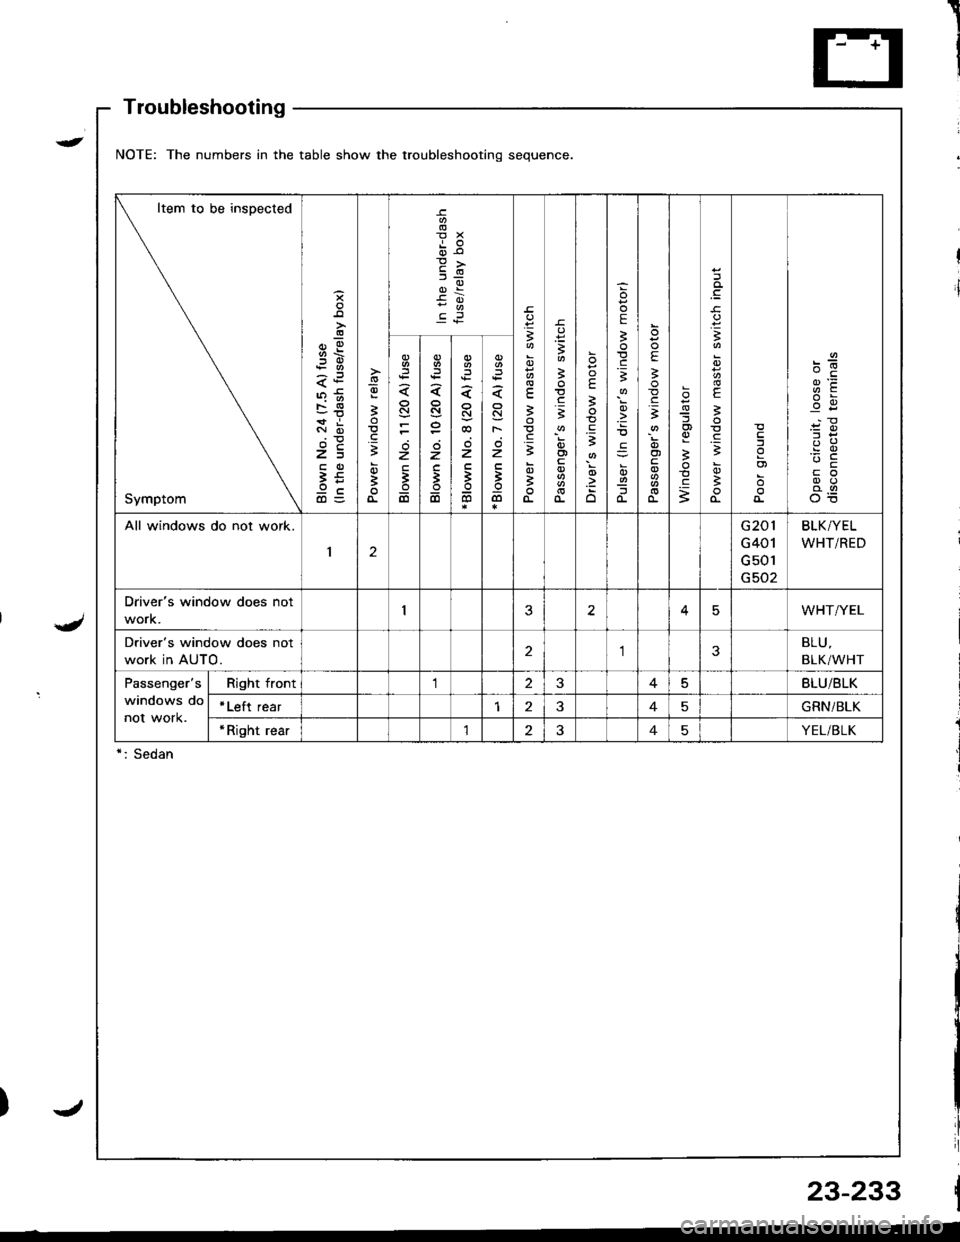
Troubleshooting
NOTE: The numbers in the table show the troubleshooting sequence
Item to be inspected
Symptom
;!
-!
z=
9cd)=
-9
3
;
oi
E
dr€
3
3
.=3
;
a
3
E.=3
E
;
;
.zo
E
3
.E3
!
o-
E
!.gi
oi
o-
og
3
c
.q
3
E
B
.gB
B
I
o)
c6z
3
6
N
z
;
6
z
'
6
N
F
z
B
@
All windows do not work.
12
G201
G401
G 501
G502
BLK/YEL
WHT/RED
Driver's window does not
work.25WHT/YEL
Driver's window does not
work in AUTO.23BLU,
BLK/WHT
Passenger's
windows do
not work.
Right front125BLU/BLK
*Left rear145GRN/BLK
*Right rear'lt?45YEL/BLK
*: Sedan
23-233
)t
Page 1289 of 1681
i
Power Windows
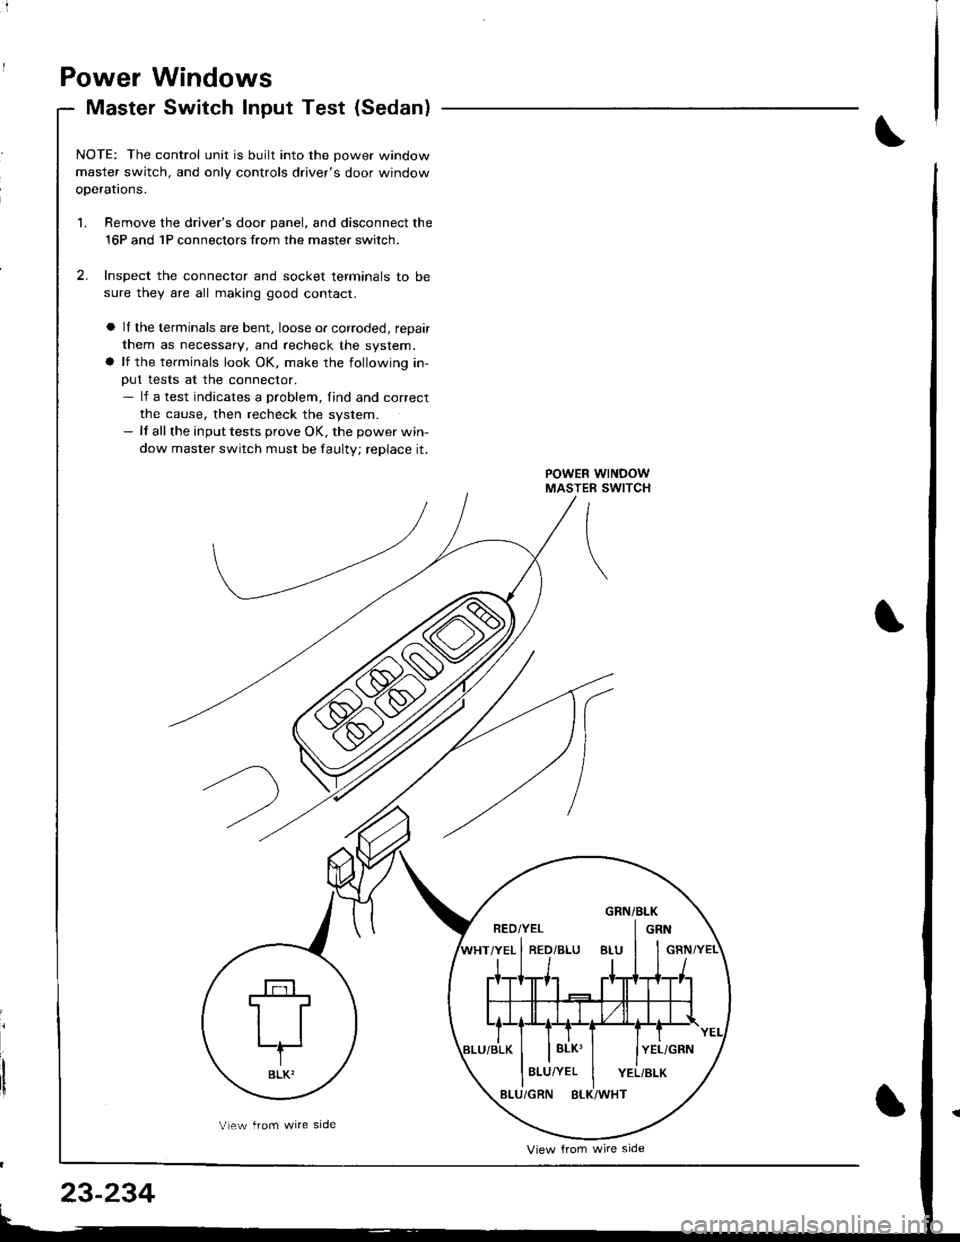
Master Switch Input Test (Sedan)
NOTE: The control unit is built into the Dower window
master switch, and only controls driver's door window
oDeratrons.
1. Bemove the driver's door panel, and disconnect the
16P and 1P connectors from the master switch.
2. Inspect the connector and socket terminals to be
sure they are all making good contact.
a ll the terminals are bent, loose or corroded, repair
them as necessary, and recheck the system.
a lf the terminals look OK, make the following in-
out tests at the conneclor.- lf a test indicates a problem, find and correct
the cause, then recheck the system.- lf all the input tests prove OK, the power win-
dow master switch must be faultV; replace it.
GRN/BLK
LT
BLK'
View trom wire side
23-234
Vlew from wire side
Page 1290 of 1681
Test conditionPo$sible cause if result is not obtained
)
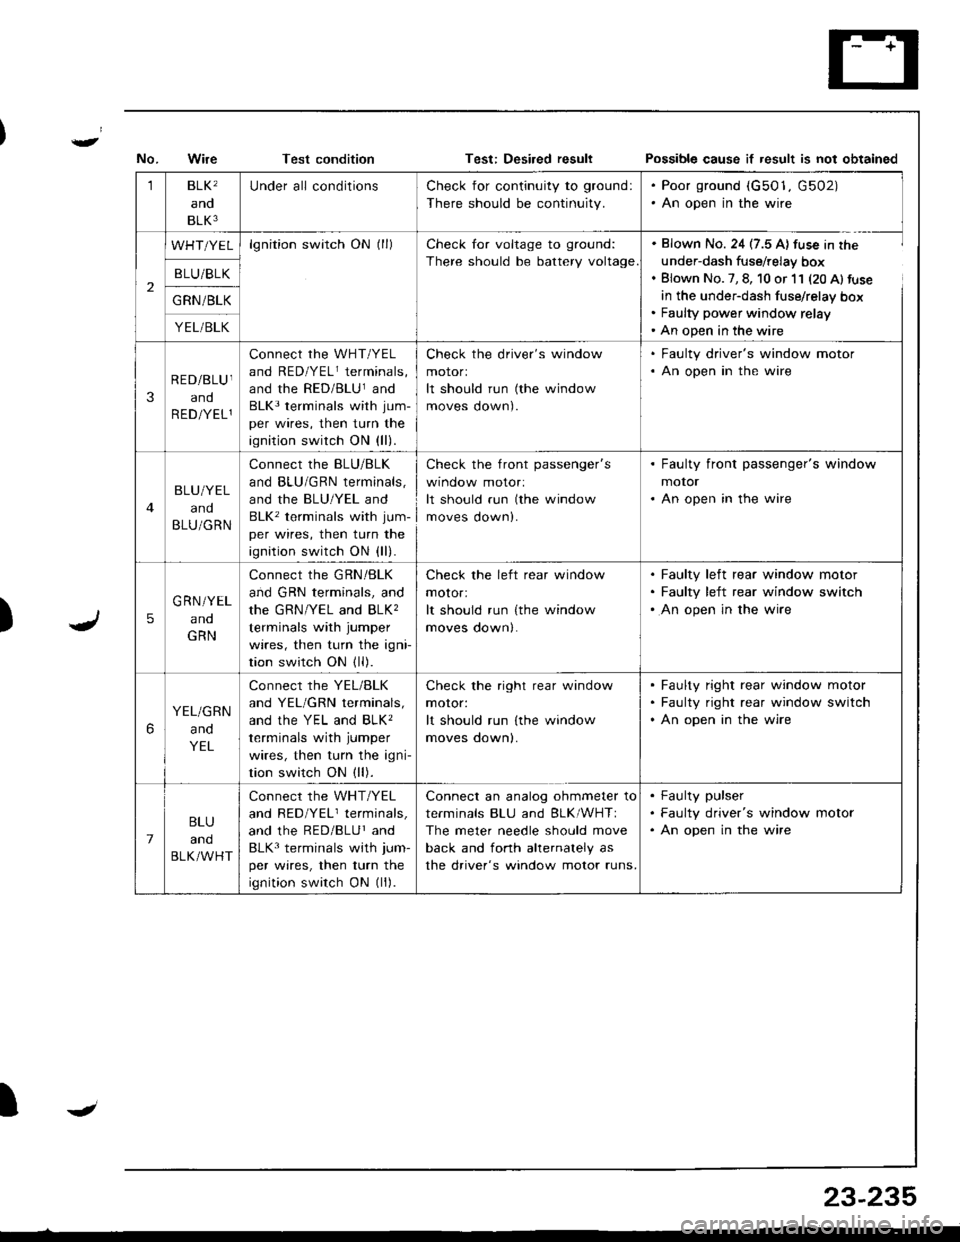
1BLK'
and
BLK3
Under all conditionsCheck for continuity to ground:
There should be continuity.
. Poor ground (G501, G502). An open in the wire
2
WHT/YELlgnition switch ON (ll)Check for voltage to ground:
There should be battery voltage
. Blown No. 24 (7.5 A) fuse in the
under-dash fuse/relay box. Blown No. 7, 8, 10 or 11 (20 Al fuse
in the under-dash fuse/relay box. Faulty power window relay' An open in the wire
B LU/BLK
G RN /BLK
YEL/BLK
3
RED/BLU I
and
R ED/YEL1
connect rhe wHT/YEL
and RED/YELr terminals,
and the RED/BLUland
BLK3 terminals with jum-
per wires, then turn the
ignition switch ON (ll).
Check the driver's window
motorl
It should run (the window
moves oown).
. Faulty driver's window motor. An open in the wire
BLU/YEL
and
BLU/GRN
Connect the BLU/BLK
and BLU/GRN terminals,
and the BLU/YEL and
BLK' terminals with jum-
per wires, then turn the
ignition switch ON (ll).
check the front passenger's
wtnoow molor:
It should run (the window
moves down).
. Faulty front passenger's window
motor. An open in the wire
5
G RN/YEL
ano
GRN
Connect the GRN/BLK
and GRN terminals, and
the GRN/YEL and BLK,
terminals with jumper
wires, then turn the igni
tion switch ON (ll).
Check the left rear window
motor:
It should run {the window
moves down|.
Faulty left rear window motor
Faulty left rear window switch
An open in the wire
6
YEL/GRN
and
YEL
Connect the YEL/BLK
and YEL/GRN terminals,
ANd thc YEL ANd BLK'
terminals with jumper
wires, then turn the igni-
tion switch ON (ll).
Check the right rear window
moror:
It should run lthe window
moves oownl.
Faulty right rear window motor
Faulty right rear window switch
An open in the wire
7
BLU
and
BLK/WHT
Connect the WHT/YEL
and RED/YELr terminals,
and the RED/BLUr and
BLK3 terminals with jum-
per wires, then turn the
ignition switch ON (ll).
Connect an analog ohmmeter to
terminals BLU and BLK/WHTI
The meter needle should move
back and fonh ahernalely as
the driver's window motor runs.
Faulty pulser
Faulty driver's window motor
An open in the wire
IJ
23-235
Trending: battery, remote control, fuse, radio, coolant capacity, weight, wheelbase
