HONDA INTEGRA 1998 4.G Workshop Manual
Manufacturer: HONDA, Model Year: 1998, Model line: INTEGRA, Model: HONDA INTEGRA 1998 4.GPages: 1681, PDF Size: 54.22 MB
Page 681 of 1681
Steering Column
Installation (cont'dl
CAUTION:
a All SRS wire harness€s are covored with yollow insu-
lation. B€fors you disconnect any part of an SRS wire
harness. disconnoct the airbag connoctois.
a Whenever the ignition switch is ON (lll, or has beon
turned OFF for less than throo minutos, be caleful not
to bump the SRS unit; ths airbags could accidsntslly
deploy and caus€ damago or iniuries.
a For additionalpracautions, reter to the SRS sub-section
in section 23,
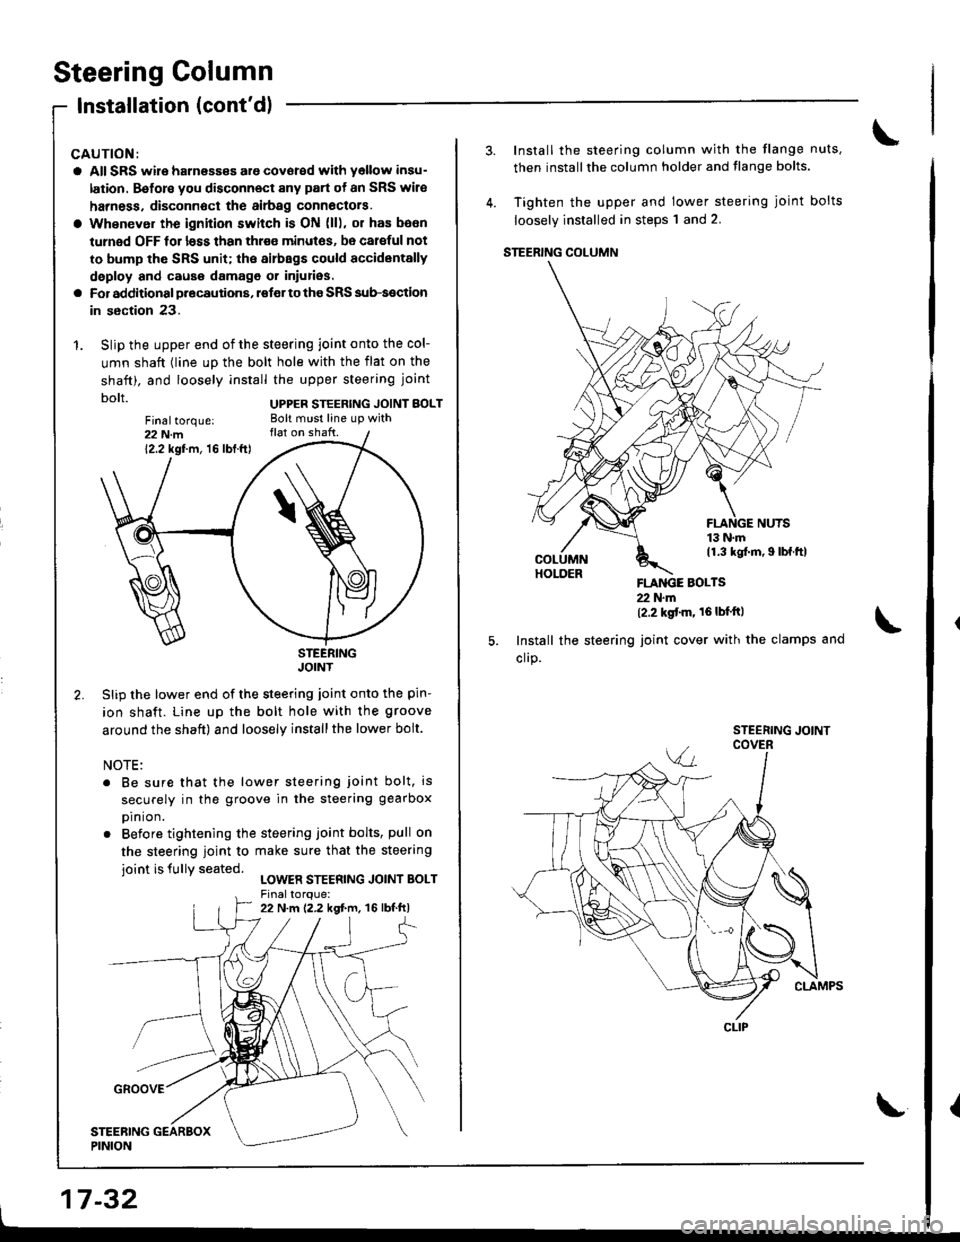
1. Slip the upper end of the steering joint onto the col-
umn shaft (line up the bolt hole with the flat on the
shaft). and loosely install the upper steering joint
bolt UPPER STEERTNG JorNT BoLT
STEERINGJOINT
Slip the lower end of the steering joint onto the pin-
ion shaft. Line up the bolt hole with the groove
around the shaft) and loosely installthe lower bolt.
NOTE:
. Be sure that the lower steering joint bolt, is
securely in the groove in the steering g€arbox
prn ron.
. Before tightening the steering joint bolts, pull on
the steering ioint to make sure that the steering
ioint is fullY seated.LOWER STEERING JOINT BOLT
Fin6ltorque:22 N.m12.2 kgf.m, 16 lbf.ft)
17-32
Install the steering column with the flange nuts,
then installthe column holder and flange bolts.
Tighten the upper and lower steering joint bolts
loosely installed in steps'l and 2.
STEERING COLUMN
FLANGE BOLTS22 N'm(2.2 kgt'm' 16lbf'ftl
Install the steering joint cover with the clamps and
cllP.
CLIP
\{
Page 682 of 1681
9.
1.
8.
11.
10.
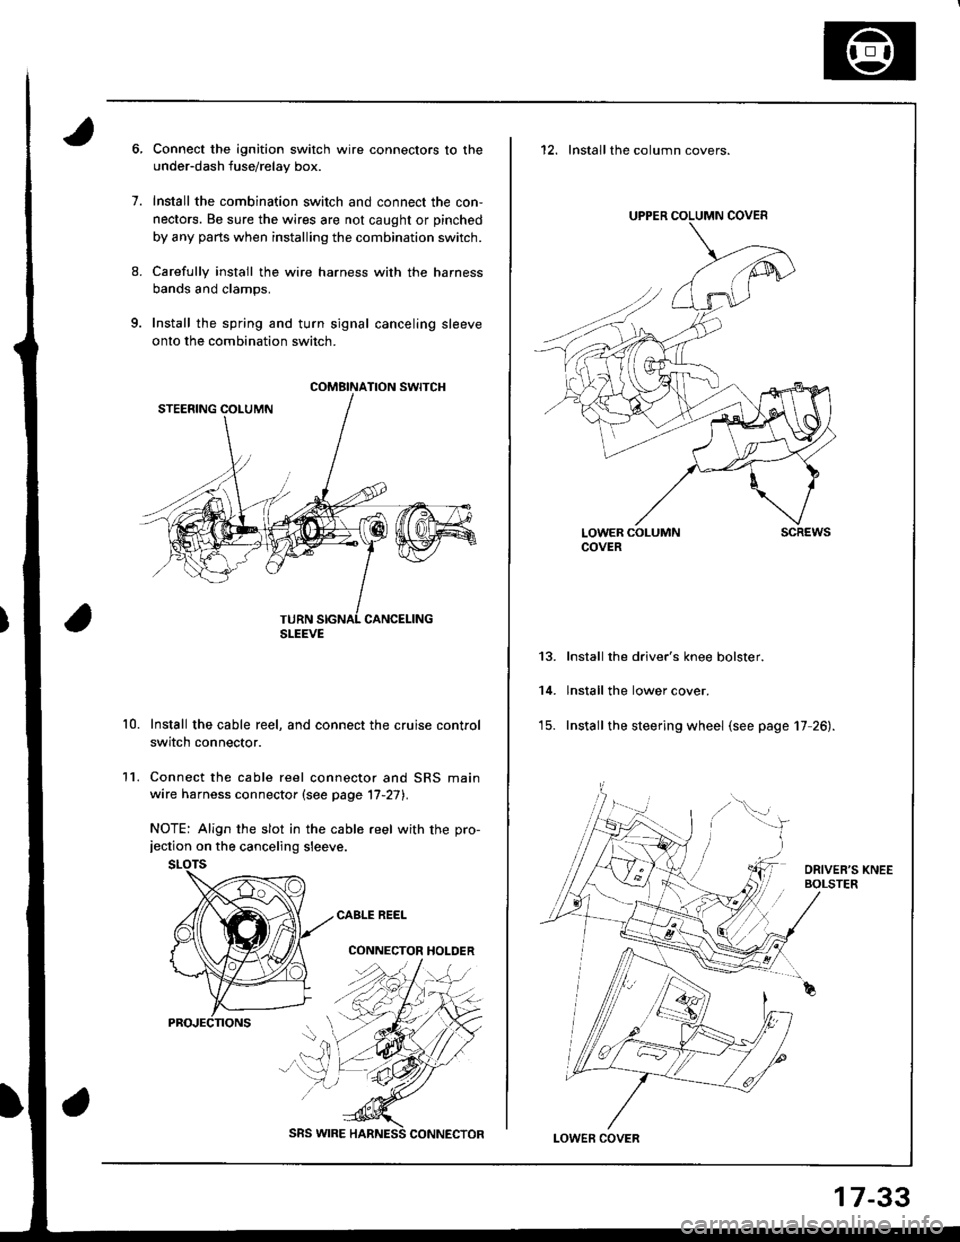
Connect the ignition switch wire connectors to the
under-dash fuse/relay box.
Install the combination switch and connect the con,
nectors. Be sure the wires are not caught or pinched
by any parts when installing the combination switch.
Carefully install the wire harness with the harness
bands and clamps.
Install the spring and turn signal canceling sleeve
onto the combination switch.
Install the cable reel, and connect the cruise control
switch connector.
Connect the cable reel connector and SRS main
wire harness connector (see page '17-27).
NOTE: Align the slot in the cable reel with the pro-jection on the canceling sleeve.
CABLE REEL
CONNECTOR HOLDER
COMBINATION SWITCH
SLEEVE
SRS WIRE
17-33
12. Installthe column covers.
UPPER COLUMN COVER
LOWER COLUMNCOVERscREws
13.
14.
Install the driver's knee bolster.
lnstall the lower cover.
Install the steering wheel (see page 17 26).
LOWEF COVER
Page 683 of 1681
Power Steering Hoses, Lines
Replacement
NOTE:
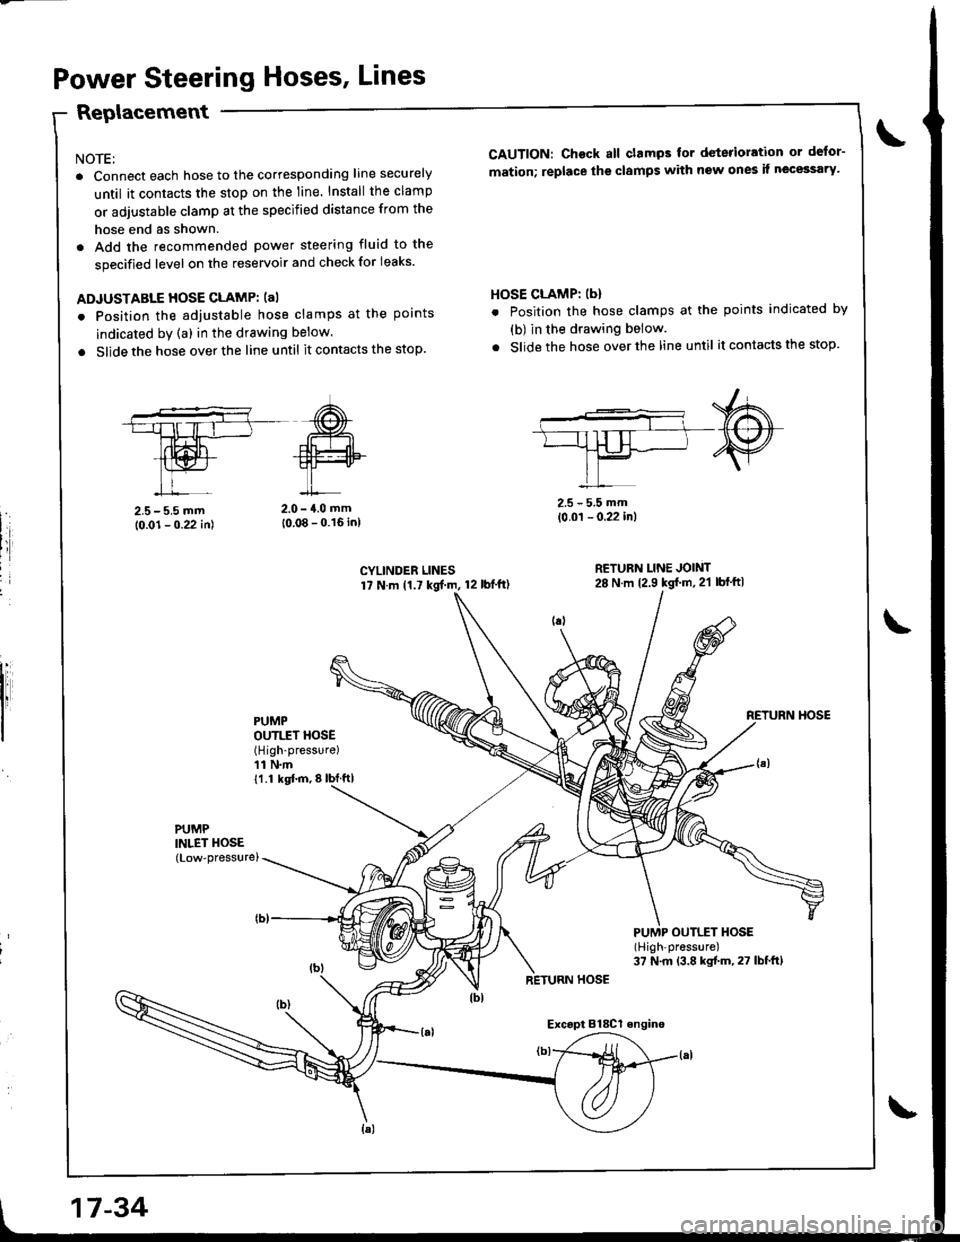
. Connect each hose to the corresponding line securely
until it contacts the stop on the line. Install the clamp
or adjustable clamp at the specified distance from the
hose end as shown.
. Add the recommended power steering fluid to the
specified level on the reservoir and check for leaks.
ADJUSTABLE HOSE CLAMP: (al
. Position the adjustable hose clamps at the points
indicated by (a) in the drawing below.
. Slide the hose over the line until it contacts the stop.
CAUTION: Ch€ck all clamps for deterioration or defor-
mation; replace the clamps with new ones it necessary'
HOSE CLAMP: (b)
. Position the hose clamps at the points indicated by
(b) in the drawing below.
. Slide the hose over the line until itcontactsthe stop.
2.5 - 5.5 mm(0.01 - 0.22 in)
RETURN LINE JOINT28 N m 12.9 kg{'m,2'l lbf'ft|
PUMP OUTLET HOSE(High'pressure)
37 N.m (3.8 kgtm,27 lbf.ft)
2.5-5.5 mm
10.01 - 0.22 in)2.0 - {.0 mm
10.08 - 0.16 inl
CYLINDER LINES17 N.m (1.7 kgt m, 12 lbf'ft)
PUMPOUTI.IT HOSE(High-pressure)
11 N.m11.1 kgl.m,8lbJftl
PUMPINLET HOSE(Low-pressurel
RETURN HOSE
Exc.pt Bl8Cl engino
17-34
Page 684 of 1681
Power Steering Pump
Replacement
NOTE: Before disconnecting the hoses from the pump,
place a suitable container under the vehicle.
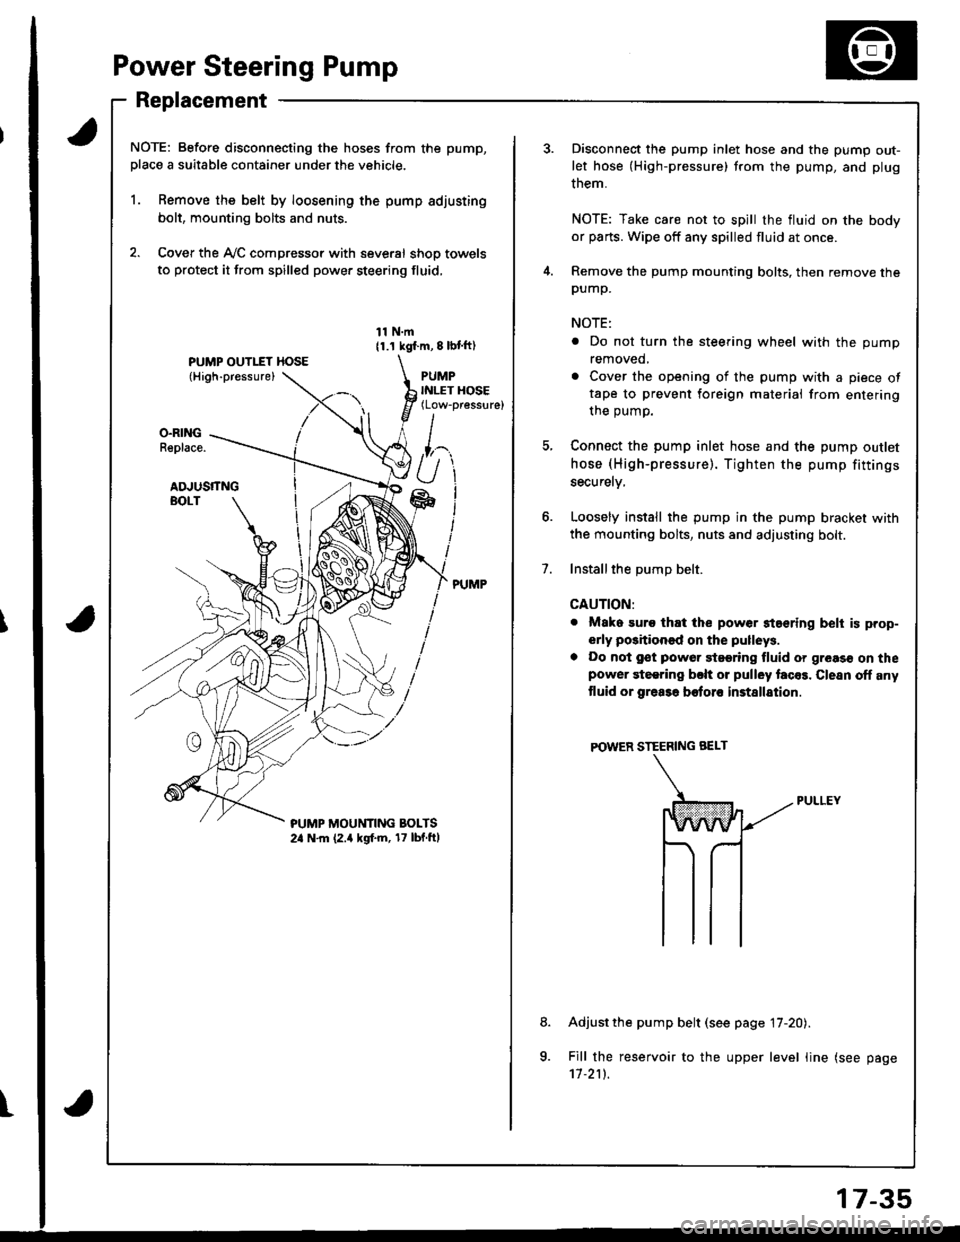
1. Remove the belt by loosening the pump adjusting
bolt, mounting bolts and nuts.
2. Cover the Ay'C compressor with several shop towels
to protect it from spilled power steering fluid,
11 N.m11.1 kgf.m, 8 lbl ft)
PUMPINLET HOSE(Low-pressure)
O.RINGReplace.
ADJUSTTNGBOLT
?UMP MOUt'lTlNG BOLTS2a N.m (2.a kgf.m, 17 lbf.ftl
t
7.
Disconnect the pump inlet hose and the pump out-
let hose (High-pressure) trom the pump, and plug
them.
NOTE: Take care not to spill the fluid on the body
or parts. Wipe off any spilled fluid at once.
Remove the pump mounting bolts, then remove thepump.
NOTE:
. Do not turn the steering wheel with the pump
removed,
. Cover the opening of the pump with a piece oftape to prevent foreign materiai from entering
the oumo.
Connect the pump inlet hose and the pump outlet
hose (High-pressure). Tighten the pump fittings
securelv,
Loosely install the pump in the pump bracket with
the mounting bolts, nuts and adjusting bolt.
Installthe DumD belt.
CAUTION:
. Mako suro that the power staering belt is prop-
erly positioned on the pulleys.
a Do not gst powor 9t99ring fluid or greas€ on thepower steering bclt or pulley facos. Clesn off any
tluid or grea3a botoro installation
POWER STEERING BEI-T
Adjust the pump belt (see page 17-20).
Fill the reservoir to the upper level line (see page'11.211.
8.
a
17-35
Page 685 of 1681
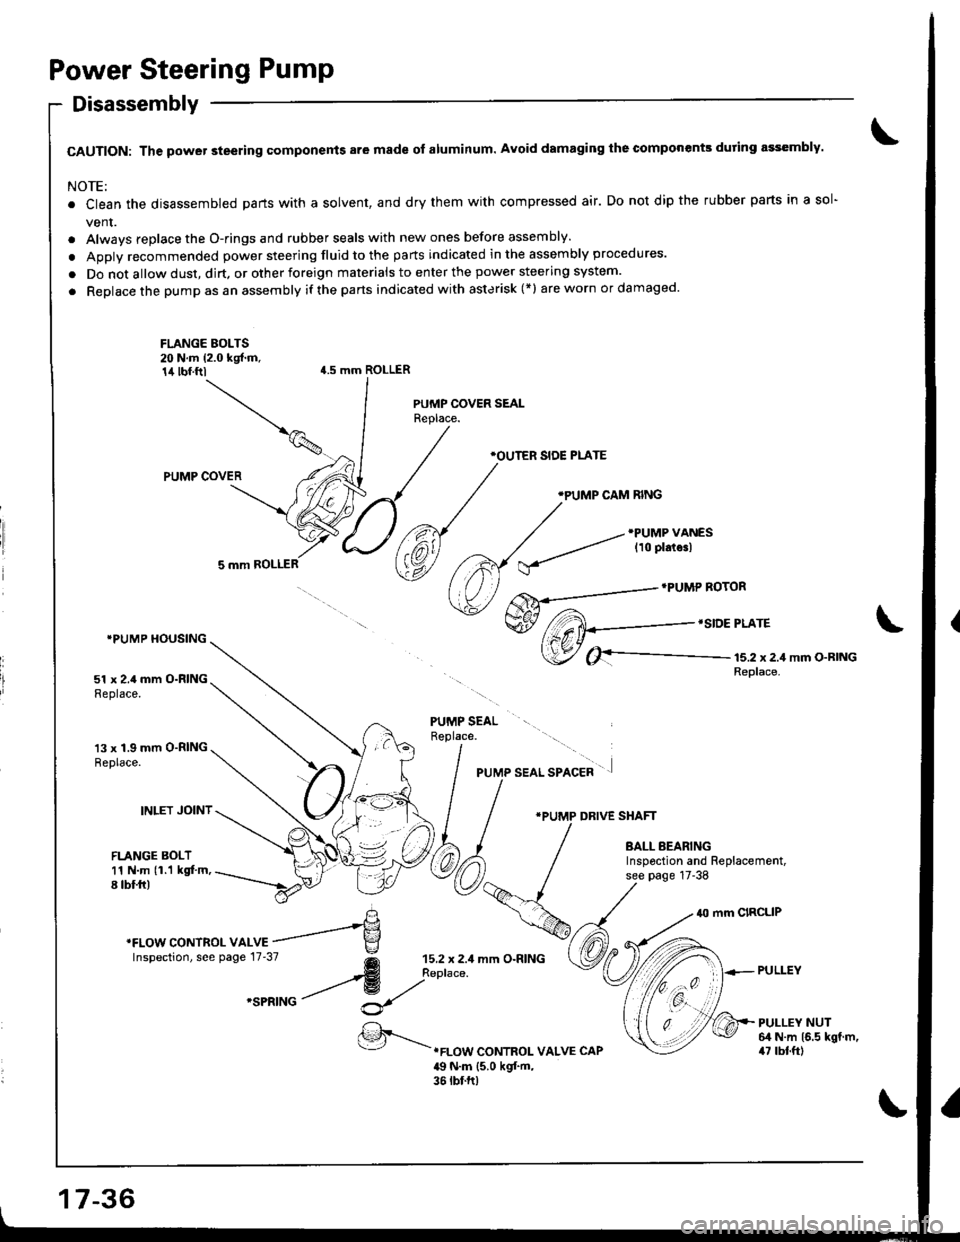
Power Steering Pump
Disassembly
CAUTION: The power steering components are made of aluminum. Avoid damaging the componenk during assembly.
NOTE:
. Clean the disassembled parts with a solvent, and dry them with compressed air. Do not dip the rubber parts in a sol-
vent.
. Always replace the O-rings and rubber seals with new ones before assembly.
. Apply recommended power steering fluid to the parts indicated in the assembly procedures.
. Do not allow dust, dirt, or other foreign materials to enter the power steering system.
. Replace the pump as an assembly if the parts indicated with asterisk (*l areworn ordamaged'
\
FLANGE BOLTS20 N.m (2.0 kgf.m,14 tbf.ftl{.5 mm ROLLER
PUMP COVER
5 mm ROLLER
IPUMP HOUSING
51 x 2.4 mm O-RINGReplace.
13 x 1.9 mm O-RINGReplace.
INLET JOINT
FLANGE BOLT11 N.m (1.1 kgt'm,8 tbf.fr)
PUMP SEALReplace.
,r"" aao, "ro"a* ' .]
*PUMP DRIVE SHAFT
BALL BEARINGInspoction and Replacement,see page 17-38
40 mm CIRCLIP
PULLEY
PULLEY NUT64 N.m 16.5 kgt.m,47 rbtft).FLOW CONTROI- VALVE CAP
49 N.m {5.0 kgf'm,36 tbt.ft)
'FLowcoNTRoLvA *r"=-'e
\
lnspectron, see pase 17.37
@ ;;:,:::
mm o.RrNG
'""^rro / ^t
17-36
Page 686 of 1681
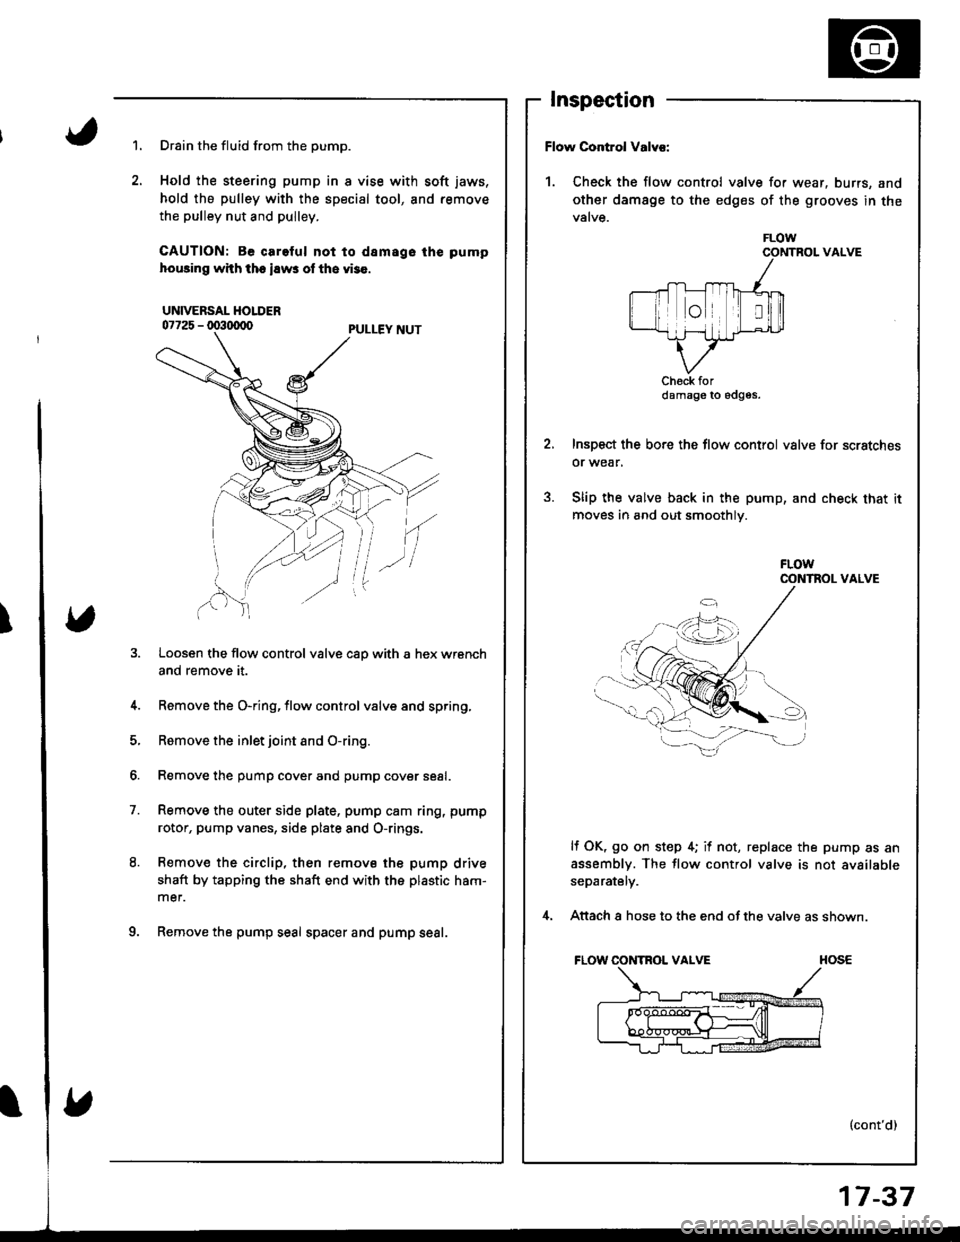
Inspection
'1.Drain the fluid from the pump.
Hold the steering pump in I vise with soft jaws,
hold the pulley with the special tool, and remove
the pulley nut and pulley.
CAUTION: Be careful not to d8m8go lh€ pump
hoBing with tho iEws ol the vi3e.
UNIVERSAL HOLDER07725 - lxt3(xxlo Dr l I Ev Nr rr
Loosen the flow control valve cao with a hex wrench
ano remove |l.
4. Remove the O-ring, {low control valve and spring,
5. Remove the inlet joint and O-ring.
6. Remove the pump cover and pump cover se8l.
7. Remove the outer side plate, pump cam ring, pump
rotor, pump vanes, side plate and o-rings.
8. Bemove the circlip, then remove the pump drive
shaft by tapping the shaft end with th€ plastic h8m-
mer.
9. Remove the pump seal spacer and pump seal.
I
Flow Control Valv€:
1. Check the flow control valve for wear. burrs, and
other damage to the edges of the grooves in the
valve.
FLOWCONTROL VALVE
Inspect the bore the flow control valve for scrstches
or wear,
Slip the valve back in the pump, and check that it
moves in and out smoothly.
lf OK, go on step 4; if not, replace the pump as an
assembly. The flow control valve is not available
separately.
Attach a hose to the end of the valve as shown.
FLOW CONTROL VALVE
(cont'd)
damage to edges.
17-37
Page 687 of 1681
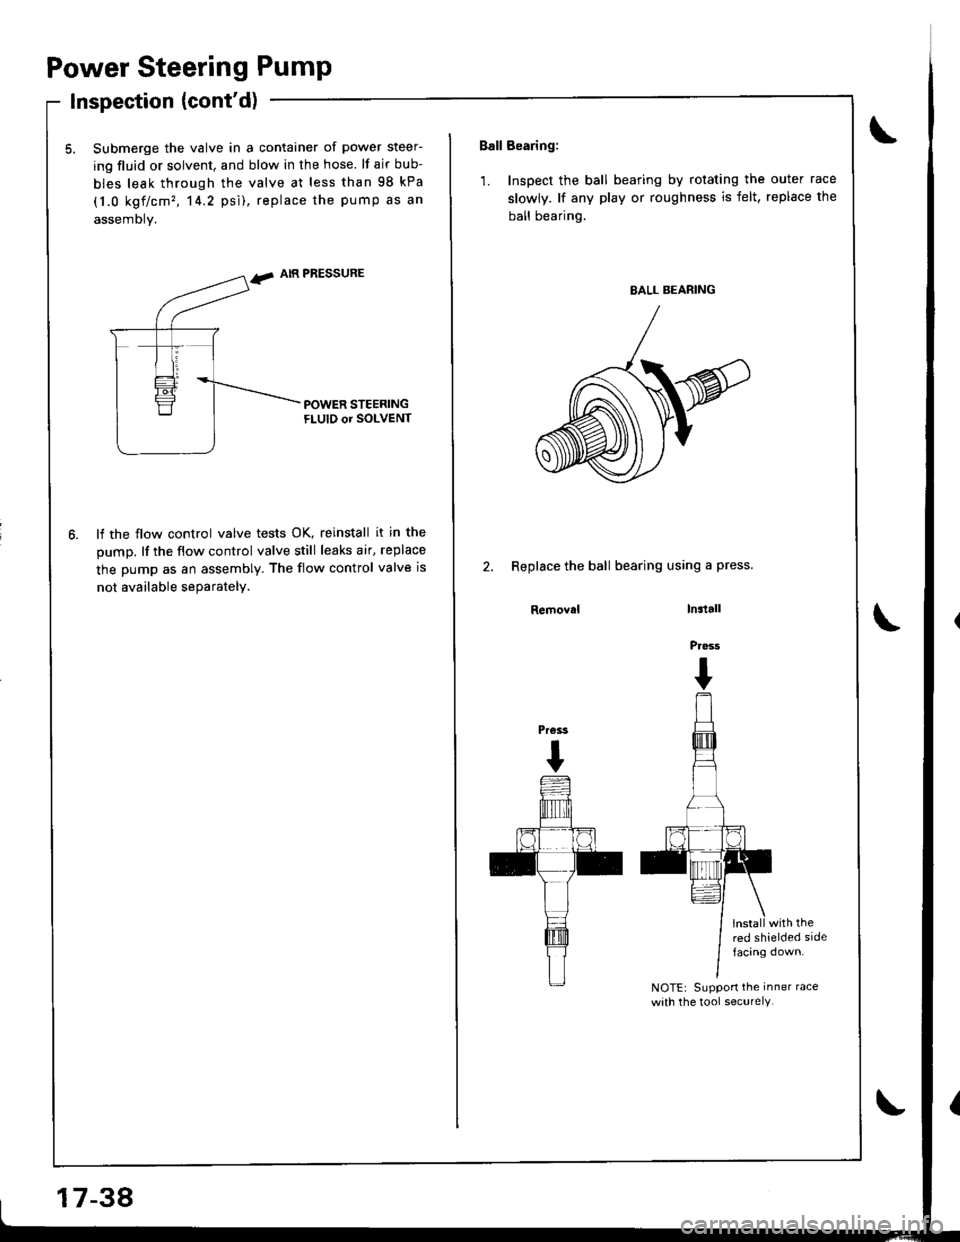
Power Steering Pump
lnspection {cont'd)
5. Submerge the valve in a container of power steer-
ing fluid or solvent, and blow in the hose. lf air bub-
bles leak through the valve at less than 98 kPa
(1.0 kgf/cm', 14.2 psi), replace the pump as an
assembly.
f. AIR PRESSURE
lf the flow control valve tests OK, reinstall it in the
pump. lf the flow control valve still leaks air, replace
the pump as an assembly. The flow control valve is
not available seDaratelv.
17-38
Ball Bearing:
1. Inspect the ball bearing by rotating the outer race
slowly. lf any play or roughness is felt, replace the
ball bearing.
2. Replace the ball bearing using a press.
Removalln3tall
Pross
I
install with thered shielded sidefacing down.
NOTEr Suppon the inner race
with the tool securelY.
Pr€ss
I
Page 688 of 1681
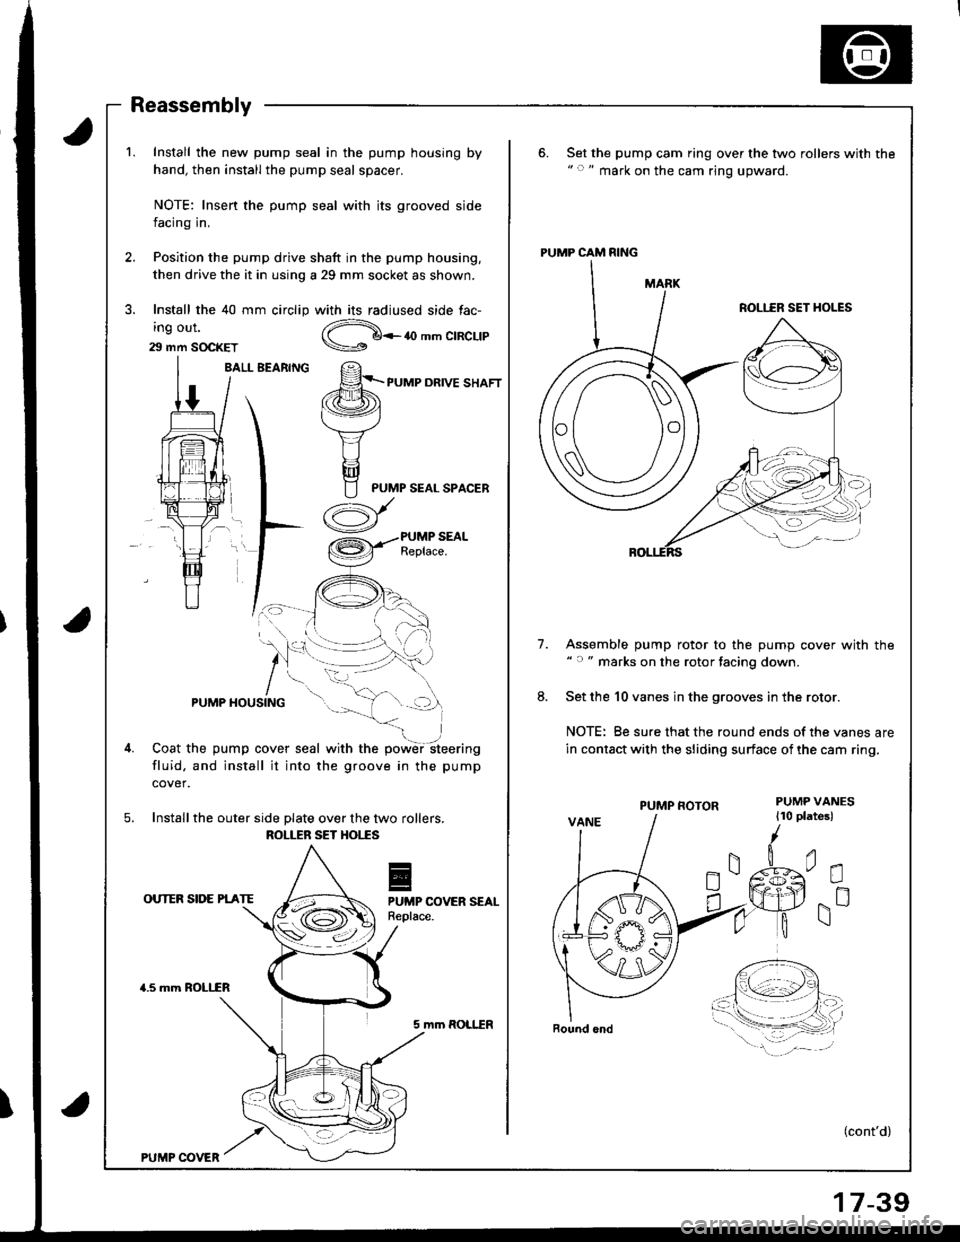
1. Install the new pump seal in the pump housing by
hand, then install the pump seal spacer.
6. Set the pump cam ring over the two rollers with the" c " mark on the cam ring upward.
NOTE: Insen the pump seal with its grooved side
facing in,
Position the pump drive shaft in the pump housing,
then drive the it in using a 29 mm socket as shown.
Install the 40 mm circlip with its radiused side fac-3.
ang out.
29 mm S(rcKET
Z-\g u<-{} mm clRcLlP
BALL BEARINGPUMP DRIVE SHAFT
PUMP SEAL SPACER
a)
7.Assemble pump rotor to the pump cover with the" " marks on the rotor tacing down.
Set the 10 vanes in the grooves in the rotor.
NOTE: Be sure that the round ends of the vanes are
in contact with the sliding surface of the cam ring.
8.
4.
fluid. and install it into the groove in the pump
cover.
5. Install the outer side plate over the two rollers.PUMP FOTORPUMP VANES
110 platesl
0r
gnOUTER SIDE PIATEPUIIIP COVER SEALReplace.
a.5 mm ROLLfR
PUMP CAM RING
ROLI.-ER SET HOLES
ROLLEB SET HOITS
Bound ond
PUMP COVER
5 mm ROLLER
(cont'd)
Page 689 of 1681
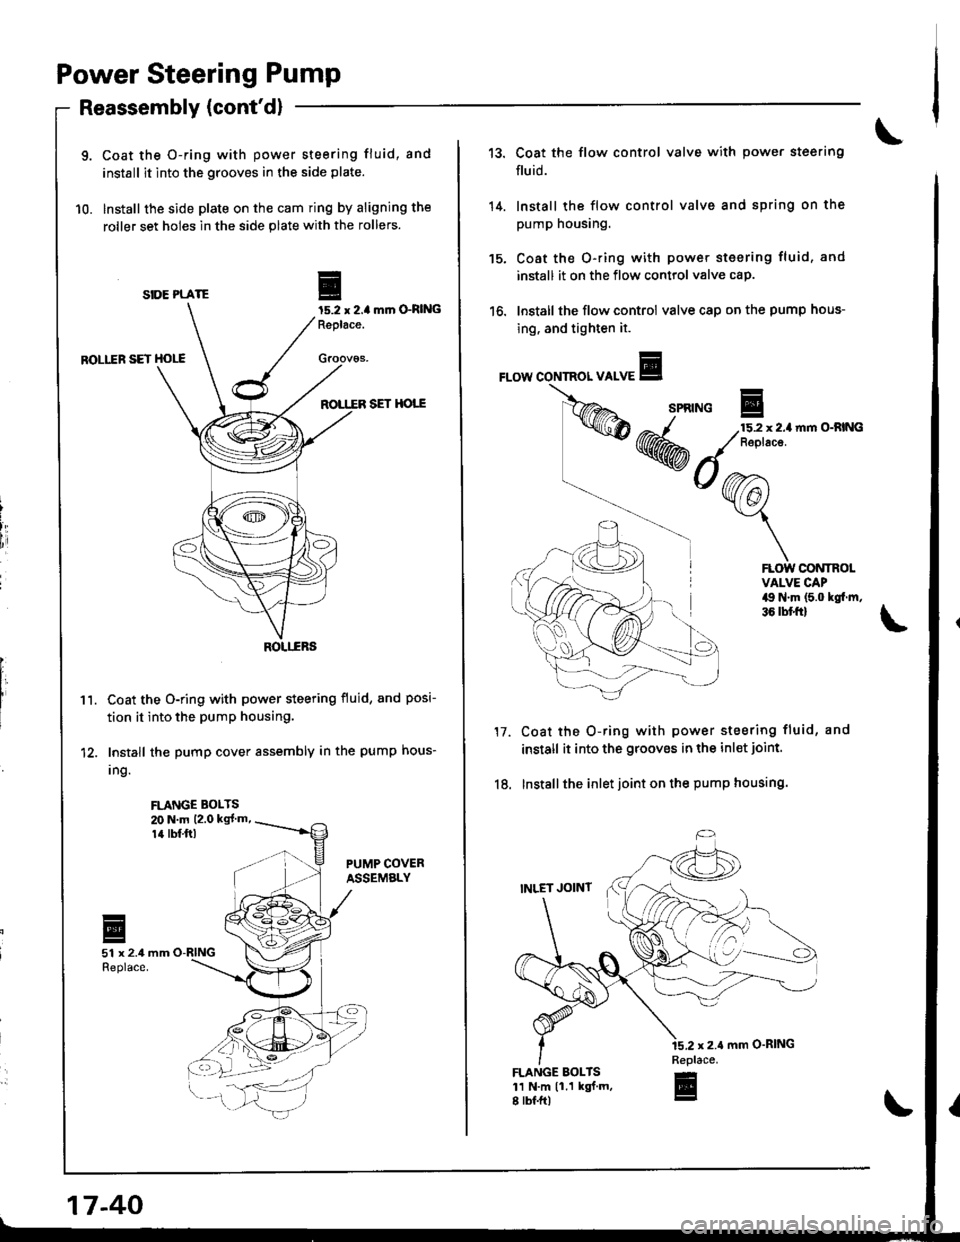
Power Steering Pump
9. Coat the O-ring with power steering fluid, and
install it into the grooves in the side plate.
10. Install the side plate on the cam ring by aligning the
roller set holes in the side plate with the rollers.
SIOE PLATEmrn O-RltlG
ROLI.ER SET HOLE
ROTT.ER SET HOTT
Coat the O-ring with power steering fluid, and posi-
tion it into the pumP housing.
Install the pump cover assembly in the pump hous-
Ing.
Reassembly (cont'dl
FLANGE BOLTS20 N.m 12.0 kgl m,
14 rbf.ftl
-
EI15.2 | 2.4Replace.
Groov6s,
iI
[,
1'�I.
I
17-40
14.
tc.
13. Coat the flow control valve with power steering
fluid.
Install the flow control valve and spring on the
pump housing.
Coat the O-ring with powet steering fluid, and
install it on the flow control valve cap.
Install the flow control valve cap on the pump hous-
ing. and tighten it.
FLOW CONTROL VALVE
n|m O-RING
SPRTNG E/-^-/ 215.2 x2.1
KWM ,// Reptace.
*o@ra
Y
l\i \
Coat the O-ring with power steering fluid, and
install it into the grooves in the inl€t joint.
Installthe inlet joint on the pump housing.
FLOW CONTROLVALVE CAP49 N'm (5.0 kgl.m,36 tbtft)
17.
18.
FLANGE BOLTS11 N.m 11.1 kgt.m,8 rbf.ftl
Replace.-
E
Page 690 of 1681
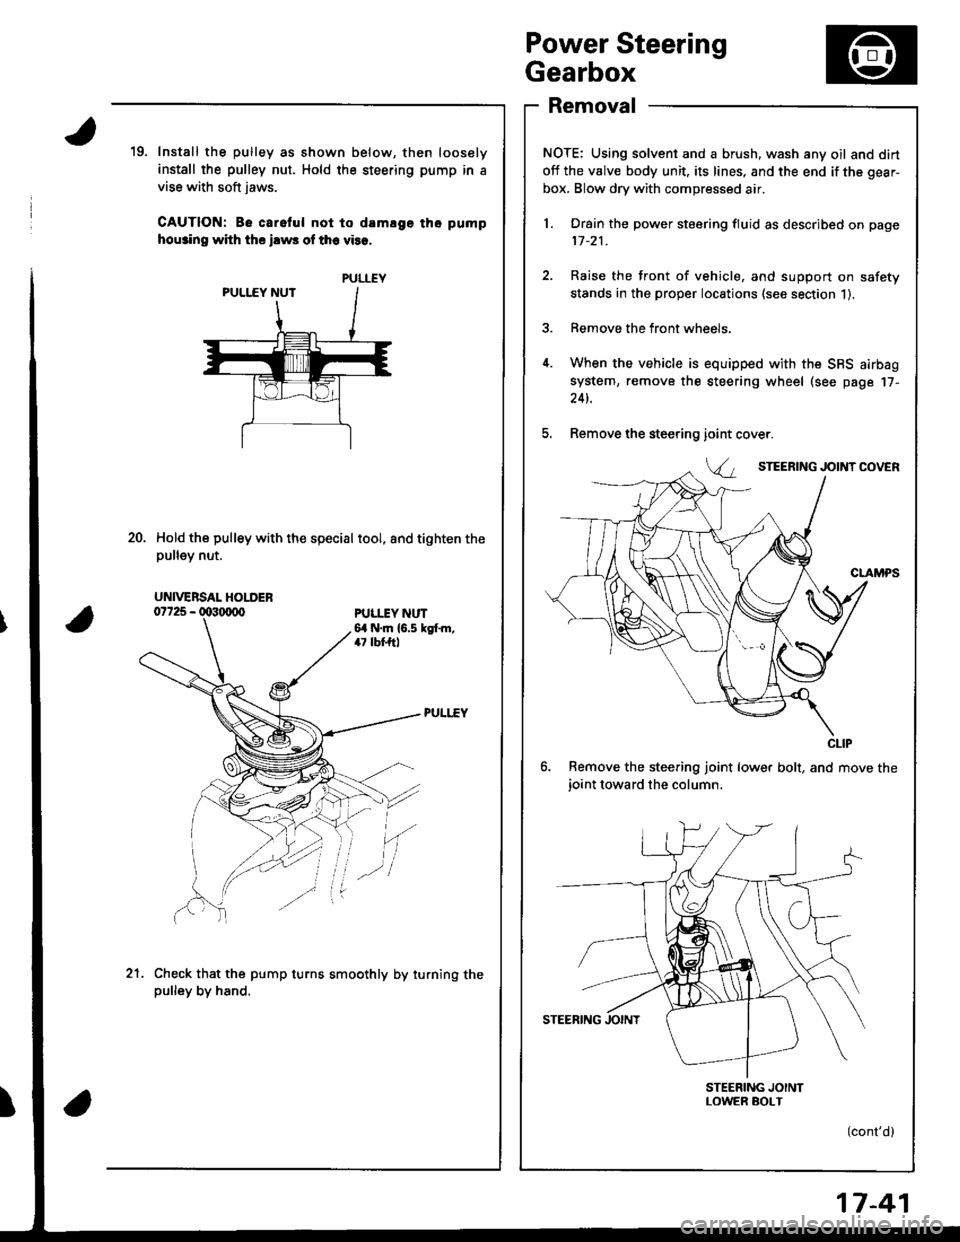
Power Steering
Gearbox
Removal
NOTE: Using solvent and a brush, wash any oil and dirt
off the valve body unit, its lines, and the end if the gear-
box. Blow dry with compressed air.
l. Drain the power steering fluid as described on page
11-21.
2. Raise the front of vehicle, and support on safety
stands in the proper locations (see section 1).
3. Remove the front wheels.
4. When the vehicle is equipped with the SBS airbag
system, remove the steering wheel (see page 17-
24t.
5. Remove the steering
6. Remove the steering joint lower bolt, and move the
ioint toward the column.
STEERING JOINTLOWER SOI-T
(cont'd)
19. Install the pulley as shown below, then loosely
install the pulley nut. Hold the steering pump in a
vise with soft jaws.
CAUTION: Be carelul not to damlge tho pump
hou3ino with ths ilws of th6 vies.
Hold the pulley with the special tool, and tighten thepu ey nut.
ioint
Va
20.
PULI.IY NUT6,1 N.m {6.5 kgt m,47 lbf,ftl
'(
Check that the pump turns smoothly by turning thepulley by hand.
.-l
21.
PULLEY
UNIVERSAL HOLDER
CLIP
17-41