check engine HONDA INTEGRA 1998 4.G Manual Online
[x] Cancel search | Manufacturer: HONDA, Model Year: 1998, Model line: INTEGRA, Model: HONDA INTEGRA 1998 4.GPages: 1681, PDF Size: 54.22 MB
Page 337 of 1681
In
Intake Air System
Throttle Body
$;
Description
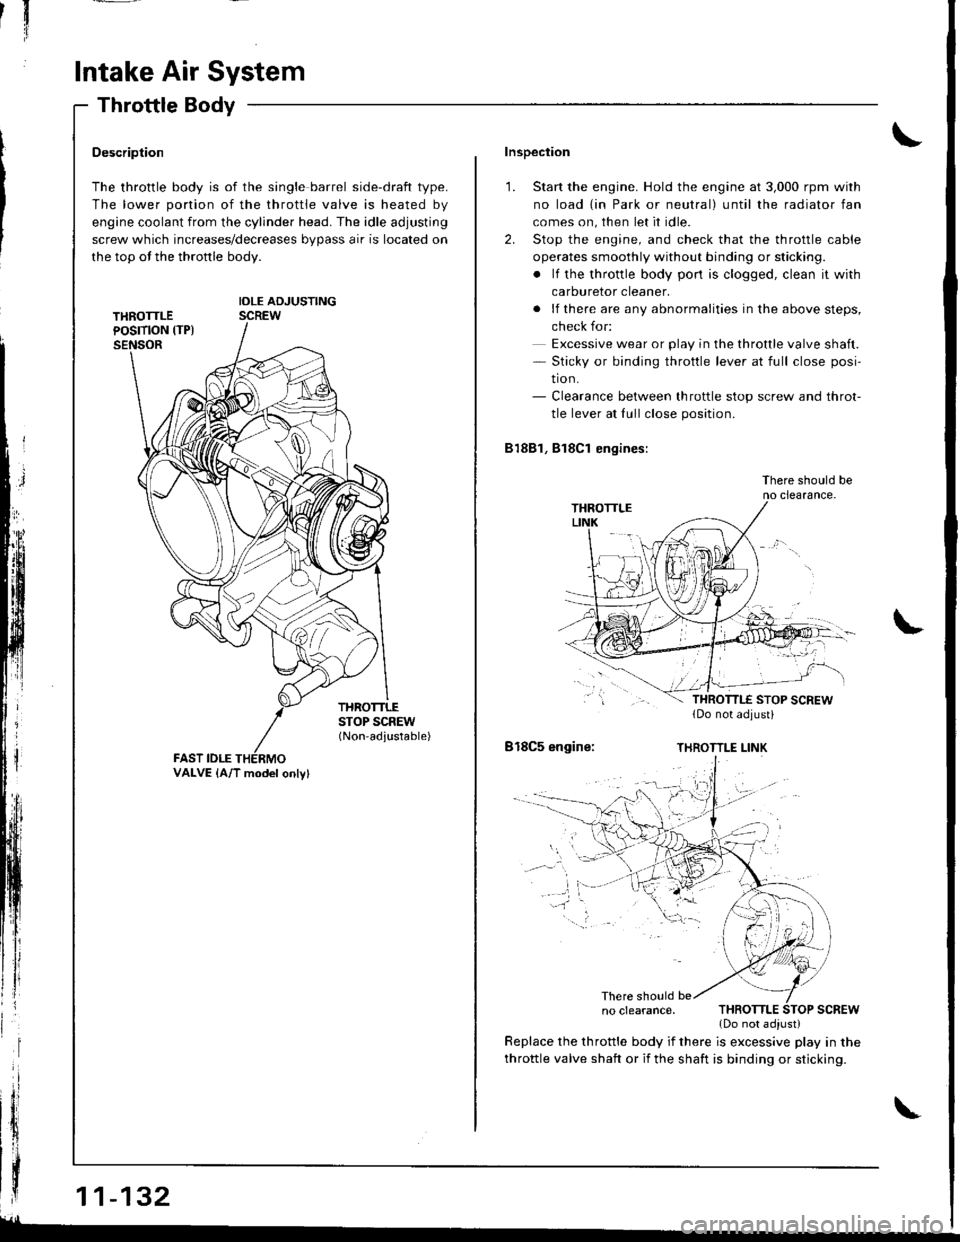
The throttle body is of the single barrel side-draft type.
The lower portion of the throttle valve is heated by
engine coolant from the cylinder head. The idle adjusting
screw which increases/decreases bypass air is located on
the top ot the thronle body.
IDLE ADJUSTINGSCREW
THROTTLESTOP SCREW(Non-adjustable)
FAST IDLE
| | .o clearance. THRoTTLE SToP scREw
{ | | _ .lDonotadiust)
| | y:::::::T,"9":::.'"Tl::f ,::i1::"1" fllyll-'n"
VALVE {A/T model onlv}
Inspection
1. Start the engine. Hold the engine at 3,000 rpm with
no load {in Park or neutral) until the radiator fan
comes on, then let it idle.
2. Stop the engine, and check that the throttle cable
operates smoothly without binding or sticking.
. lf the throttle body pon is clogged, clean it with
carburetor cleaner.
. lf there are any abnormalities in the above steps,
check for:
Excessive wear or play in the throttle valve shaft.- Sticky or binding throttle lever at full close posi-
tion.- Clearance between throttle stop screw and throt-
tle lever at fullclose position.
81881, Bl8Cl engines:
There should beno clearance.
818C5 engine:THROTTLE LINK
There should be
throttle valve shaft or if the shaft is binding or sticking.
glL-
Page 340 of 1681
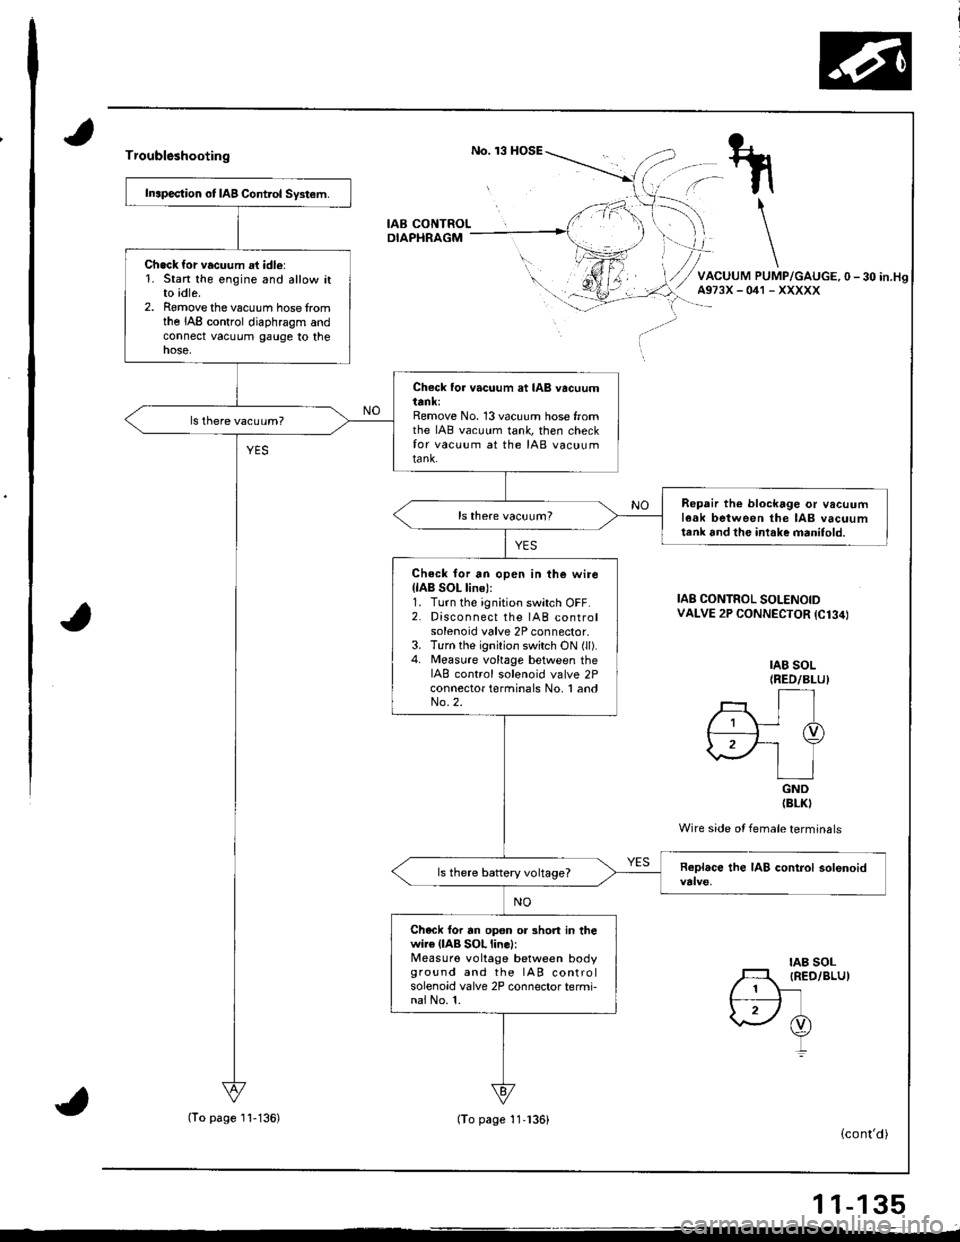
Troublsshooting
IAB CONTROLDIAPHRAGM
Inapection ot IAB Control System.
Chack {or vacuum at idle:1. Stan the engine and allow itto idle.2. Romove the vacuum hose fromthe IAB control diaphragm andconnect vacuum gauge to thenose,
Check to. vacuum at IAB vacuumttnl;Remove No. 13 vacuum hose fromthe IAB vacuum tank, then checkfor vacuum at the IAB vacuumtank.
Repair th€ blockage or vacuuml6ak between the IAB vacuumtenk 6nd the intake manifold.
Check for an open in the wirellAB SOL line):1. Turn the ignition switch OFF.2. Disconnect the IAB controlsolenoid valve 2P connector.3. Turn the ignition switch ON (ll).4. Measure vohage between theIAB control solenoid valve 2Pconnector terminals No, 1 andNo.2.
ls there battery voltage?
Chack for rn op€n or 3hort in thewire (lAB SOL line):Measuro voltage between bodyground and the IAB controlsolenoid valve 2P connector termi-nai No. 1.
IAB SOL(RED/BLUI
rt./; Ir I-TD,2F-' Y\.\/ | ]IGND(BLKI
Wire side ot female terminals
IAB CONTROL SOLENOIDVALVE 2P CONNECTOR {C134)
IAB SOLIRED/BLU)
(cont'd)
11-135
(To page I'l-136)(To page 11.136)
Page 341 of 1681
I
lntake
lntake
Air System
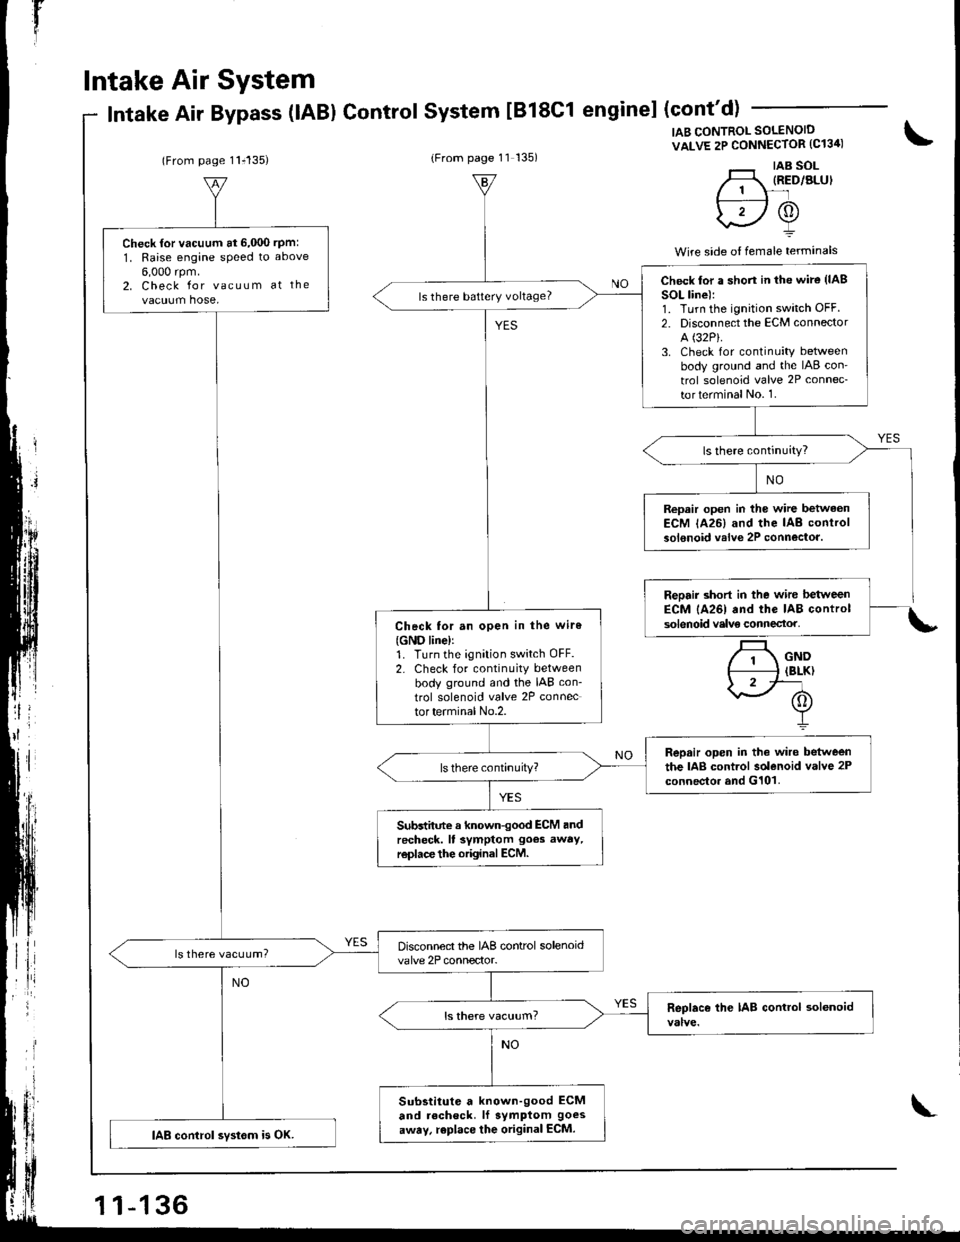
Air Bypass (lABl ControlSystem tB18C1 enginel (cont'd)
(From page 11i135)(From page 11 135)
IAB CONTROL SOLENOID
VALVE 2P CONNECTOR (C13ir)
'._r taB sol-H, IRED/ALUI// 1 \-'lf---:----l /A\
\2Y
Wire side o{ female terminals
\
.t
Check {or vacuum at 6,000 rpm:
1, Raise engane speed to above
6,000 rpm.2. Check for vacuum at the
vacuum hose,
Disconnect the IAB control solenoidvalve 2P connector.ls there vacuum?
Substitute a known-good ECM
and recheck. lf symptom goes
away, replace the original ECM.IAB control svstom is OK.
Check lor a shon in the wire (lAB
SOL line):1. Turn the ignition switch OFF.2. Disconnect the ECM connector
A (32P).
3. Check for continuity betweenbody ground and the IAB con'
trol solenoid valve 2P connec-
torterminalNo. 1.
ls there battery voltage?
Repair open in the wire betwaonECM lA26) and the IAB controlsolenoid valve 2P connectoa.
Check tor an open in the wiro
{GND line)r1. Turn the ignition switch OFF.2. Check for continuity betweenbody ground and the IAB con-
trol solenoid valve 2P connector terminal No.2.
Repair open in the wire betweenthe IAB control solenoid valve 2Pconnector and G101.
Subdhnte a known-good ECM andrecheck. ll symptom goes away,r€place the original ECM.
\
Page 342 of 1681
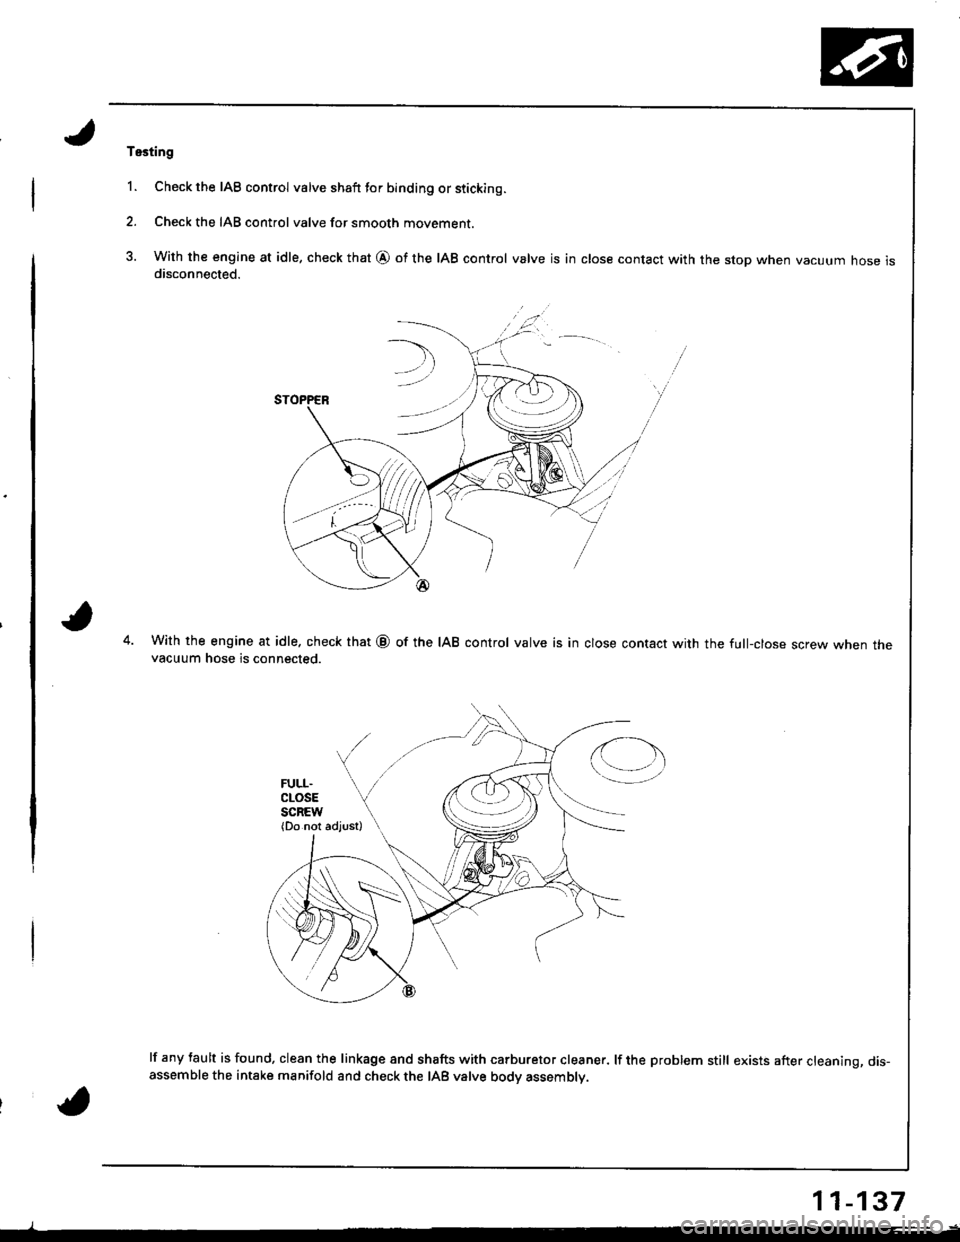
Tssting
1. Check the IAB control valve shaft tor binding or sticking.
2. Check the IAB control valve for smooth movement.
3. With the engine at idle, check that @ of the IAB control valve is in close contact with the stop when vacuum hose isdisconnected.
With the engine at idle. check that @ of the IAB control valve is in close contact with the full-close screw when thevacuum hose is connected.
lf any tault is found, clean the linkage 8nd shafts with carburetor cleaner. lf the problem still exists after cleaning, dis-assemble the intake manifold and check the IAB valve body assembly.
11-137
Page 343 of 1681
t"iI
Emission Gontrol System
System Description
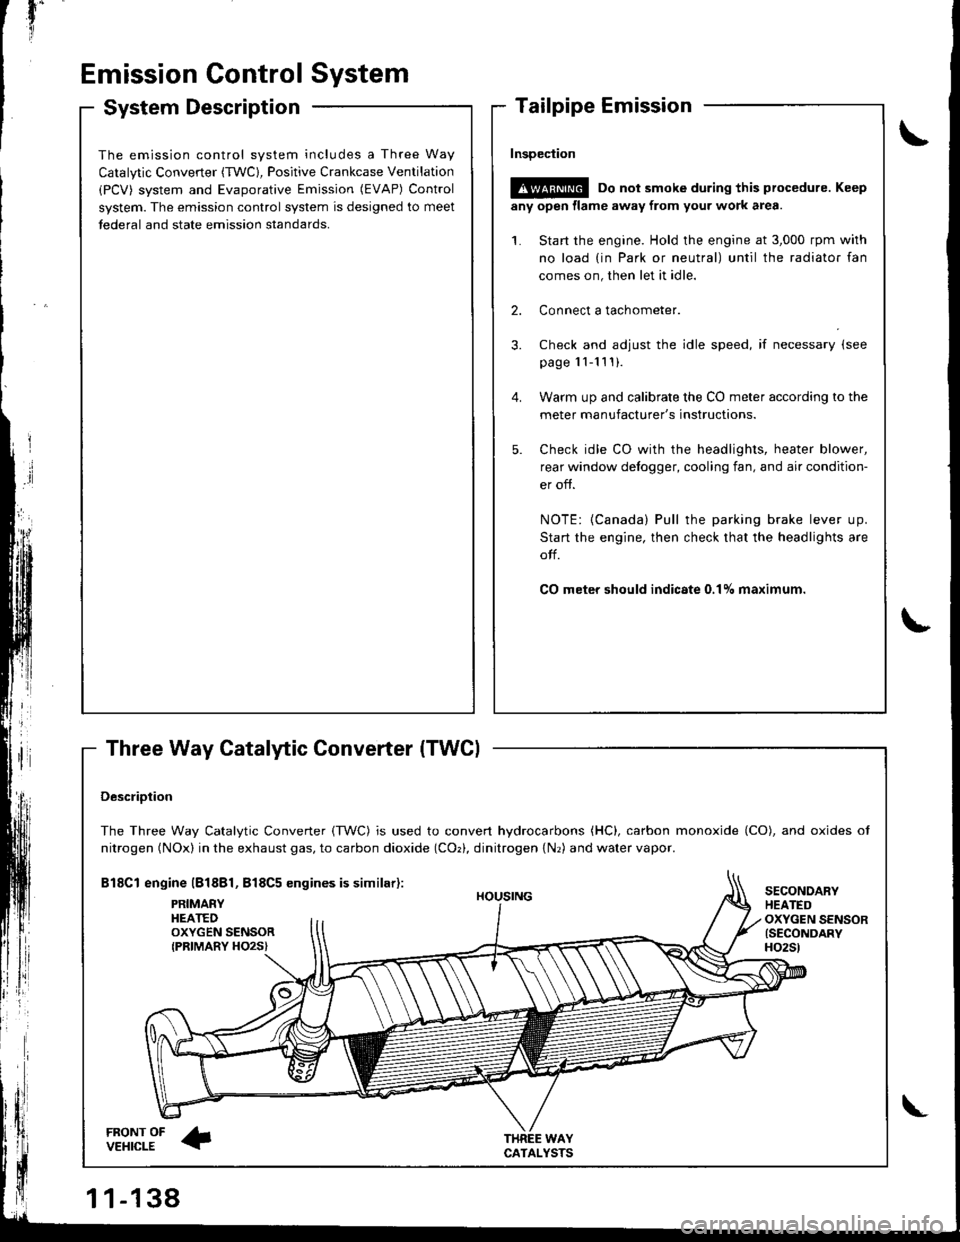
Three Way Catalytic Converter (TWCI
\
t
The emission control system includes a Three Way
Catalytic Converter (TWC), Positive Crankcase Ventilation
(PCV) system and Evaporative Emission (EVAP) Control
system. The emission control system is designed to meet
tederal and state emission standards.
InsDeciion
!@@ Do not smoke during this procedure. Keep
any open llame away from your work area.
1. Start the engine. Hold the engine at 3,000 rpm with
no load {in Park or neutral) until the radiator fan
comes on, then let it idle.
2. Connect a tachometer.
Check and adjust the idle speed, if necessary (see
page '11-11 ! ).
Warm up and calibrate the CO meter according to the
meter manufacturer's instructions.
Check idle CO with rhe headlights, heater blower,
rear window defogger, cooling fan, and air condition-
er off.
NOTE: {Canada) Pull the parking brake lever up.
Start the engine, then check that the headlights are
olf.
CO meter should indicste 0.17o maximum.
DescriDtion
The Three Way Catalytic Converter {TWC) is used to convert hydrocarbons (HC), carbon monoxide (CO), and oxides of
nitrogen (NOx) in the exhaust gas, to carbon dioxide (COr), dinitrogen {Nr) and water vapor.
Bl8Cl engine l818Bl, 818C5 engines is similar):
FRONT OFVEHICLE
PRIMAEYHEATEDOXYGEN SENSORIPRIMARY HO2S}
HOUSING
WAYCATALYSTS
SECONOARYHEATEDOXYGEN SENSOR{SECONDARYH02St
\
Page 344 of 1681
Three Way Catalytic Converter (TWC)
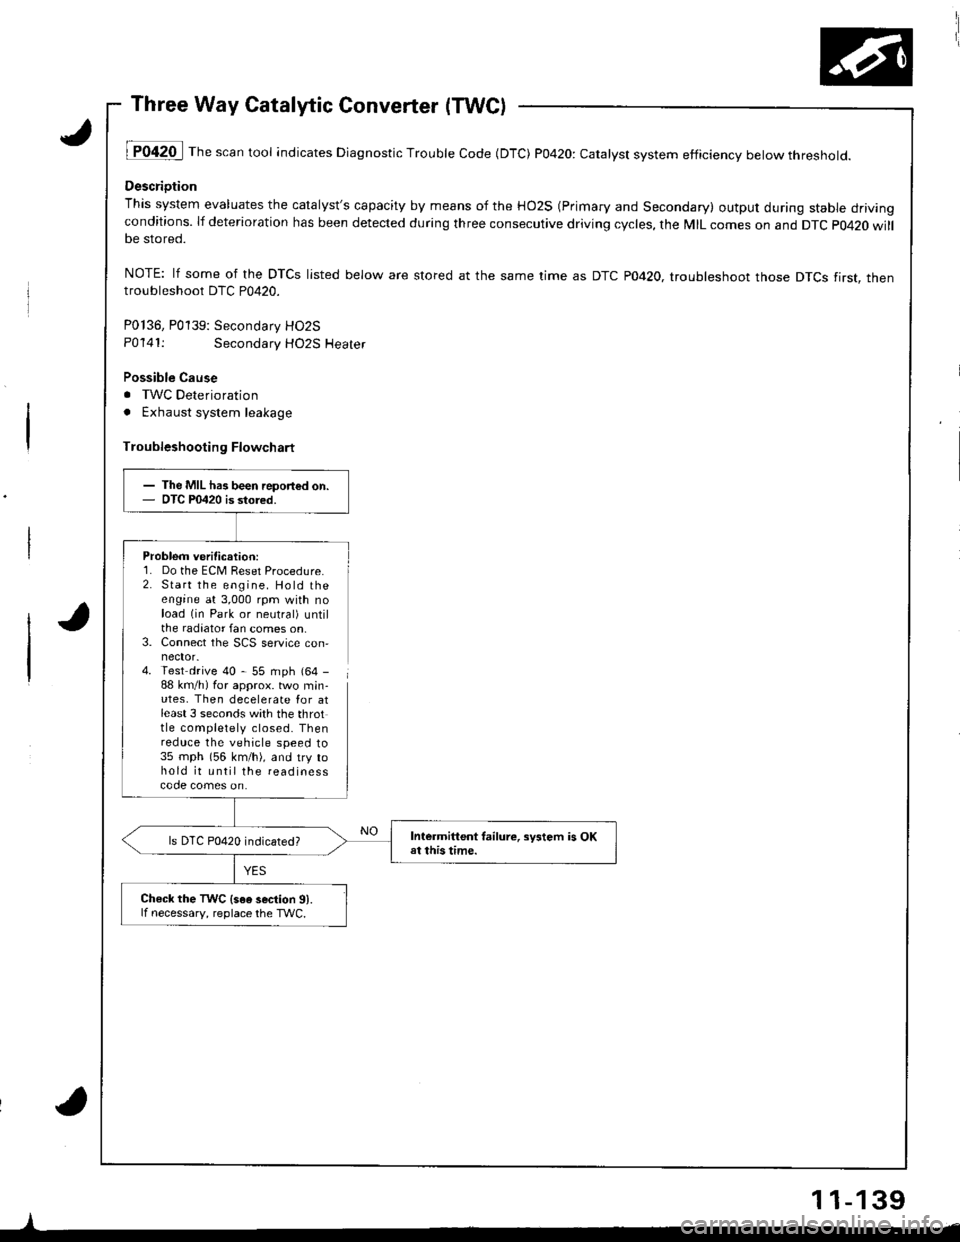
lT042O I Th" """n tool indicates Diagnostic Trouble Code (DTC) P0420: catatyst system efficiency below threshold.
Descriotion
This system evaluates the catalyst's capacity by means of the HO2S (Primary and Secondary) output during stable drivingconditions. lf deterioration has been detected during three consecutive driving cycles, the MIL comes on and DTC p0420 willbe stored.
NOTE: lf some of the DTCS listed below are stored at the same time as DTC PO42O. troubleshoot those DTCS tirst. thentroubleshoot DTC P0420.
P0136, P0139: Secondarv HO2S
P0141:Secondary HO2S Heater
Possible Cause
. TWC Deterioration
. Exhaust system leakage
Troubleshooting Flowchart
Problem verification:1. Do the ECM Reset Procedure.2. Start the engine. Hold theengine at 3,000 rpm with noload (in Park or neutral) untilthe radiator fan comes on,3. Connect the SCS service con,
4. Test drive 40 - 55 mph (64 -
88 km/h) for approx. two min-utes, Then decelerate Ior atleast 3 seconds with the throttle completely closed. Thenreduce the vehicle speed to35 mph (56 km/h), and try tohold it until the readinesscode comes on.
I
- The MIL has been report€d on.- OTC P0420 is stored.
Intermittent tailure, sFtem is OKat this time.ls DTC P0420 indicated?
Check the TWC {s6e 3ection 91.lf necessary, reolace the TWC.
11-139
Page 345 of 1681
'il
Emission Gontrol System
Positive Crankcase Ventilation (PCV) System
Description
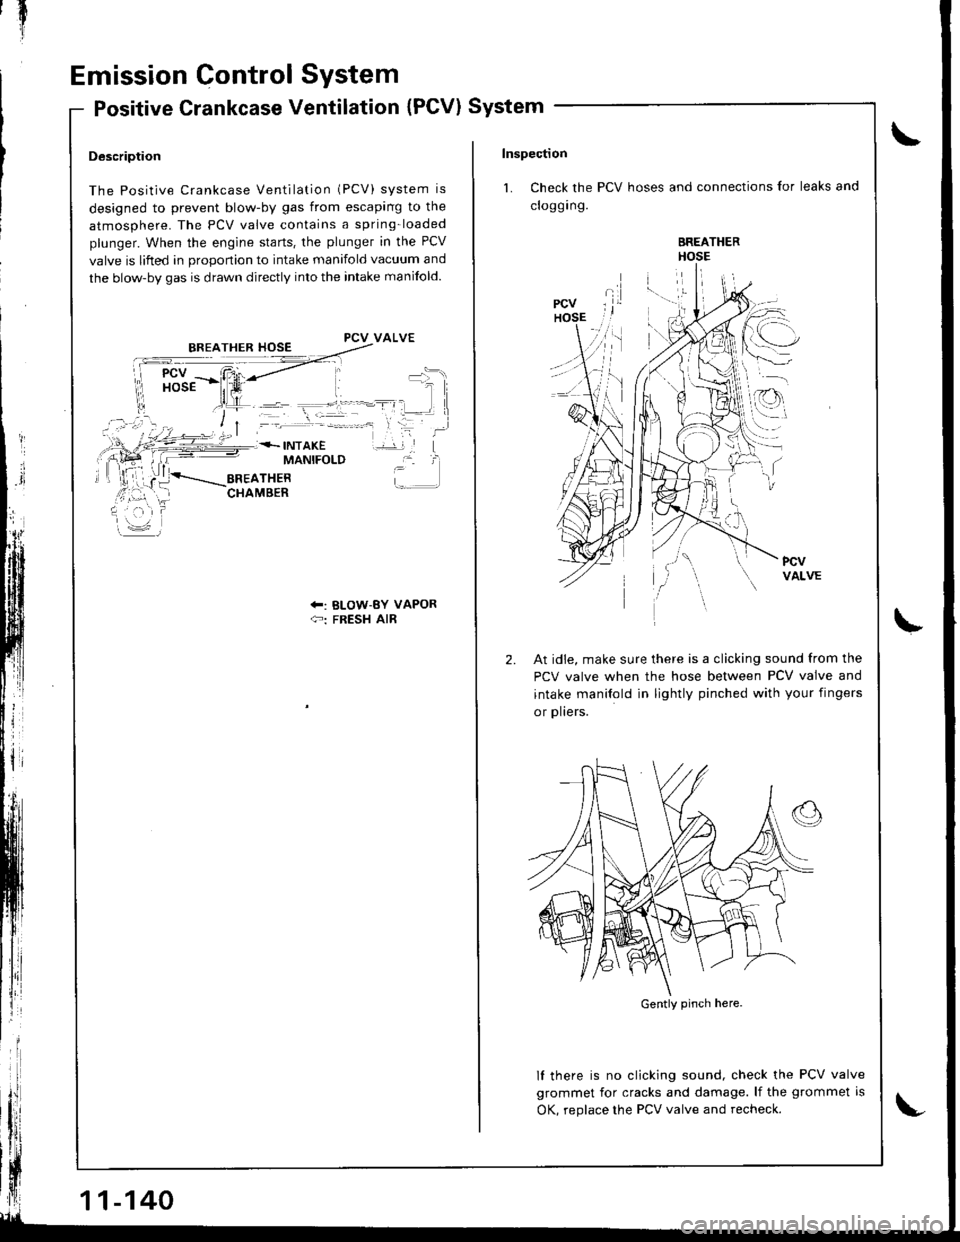
The Positive Crankcase Ventilation (PCV) system is
designed to prevent blow-by gas from escaping to the
atmosphere. The PCV valve contains a spring-loaded
plunger. When the engine starts. the plunger in the PCV
valve is lifted in orooonion to intake manifold vacuum and
the blow-by gas is drawn directly into the intake manifold.
PCV VALVE
MANIFOLD
+: BLOW-BY VAPOR{-: FRESH AIR
11-140
Inspection
1. Check the PCV hoses and connections for leaks and
croggrng.
BREATHERHOSE
l.--:\
,.r
I
2.At idie, make sure there is a clicking sound from the
PCV valve when the hose between PCV valve and
intake manilold in lightly pinched with your fingers
or plters.
lf there is no clicking sound, check the PCV valve
grommet for cracks and damage. lf the grommet is
OK, reolace the PCV valve and recheck.
Gently pinch here.
Page 352 of 1681
(From psge 11-146)
(To page 11-148)
Chack tho vldlum wh.n cold:'1. Disconnscl the vacuum hoseshown from the EVAP controlcanrster ano connect a vacuumgauge to the hose.2. Start the engine and aliow itto idls.NOTE: Engine coolant tem-porat{rre must be below 154"F{68'C} or A/C switch OFF.3. Ouickly raise the engine speedto 3,000 rpm.
lFrom page 11-146)
Check lor an opon in lhe wir€(lG1 lin6l:1. Turn the ignition switch OFF.2. Disconnect the 2P connectorlrom the EVAP control canis-ter vent shut valve.3. Turn the ignition switch ON (ll).
4. Measure voltage between theEVAP control canister vent shutvalve 2P connector terminalNo. 2 and body ground.
Ropair open in the wir6 betweonthe EVAP control canistor v6ntshut valve end the No. 15 ALTER-NATOR SP SENSOR 17.5 Al tu!e.
Ch€ck tor rn op€n in iho wire IVSVline):1. Turn tho ignition switch OFF.2. Reconnect the 2P connectorto the EVAP control canistervent shut valve,3. Turn the ignition switch ON (ll).
4, Measure vo ltage betweenECN/l connector terminals A29and A10.
Repair open in the wire beiwa€nthe EVAP cont.ol cenister ventshut valve and the EcM {4291.ls there baftery vohage?
ReDlacs tho EVAP cont.ol canis"ter vent shut valve.
EVAP CONTROLCANISTER VENT SHUIVALVE 2P CONNECTOR IC224)
.FJ.\1121-T rcl
(D (BLK/YEL)
I
Wire side ot female terminals
ECM CONNECIOR A {32P}
VSV ILT GRNI
Wire side of femaletermtnars
VACUUMPUMP/GAUGE,0 - 30 in.H94973X -
0a1 - xxxxx
(cont'd )
11-147
PG1 (BLKI
rl
4lq-r'rri l12t5t6t?l8r@llzzlzslul
25212a2
__l
Page 353 of 1681
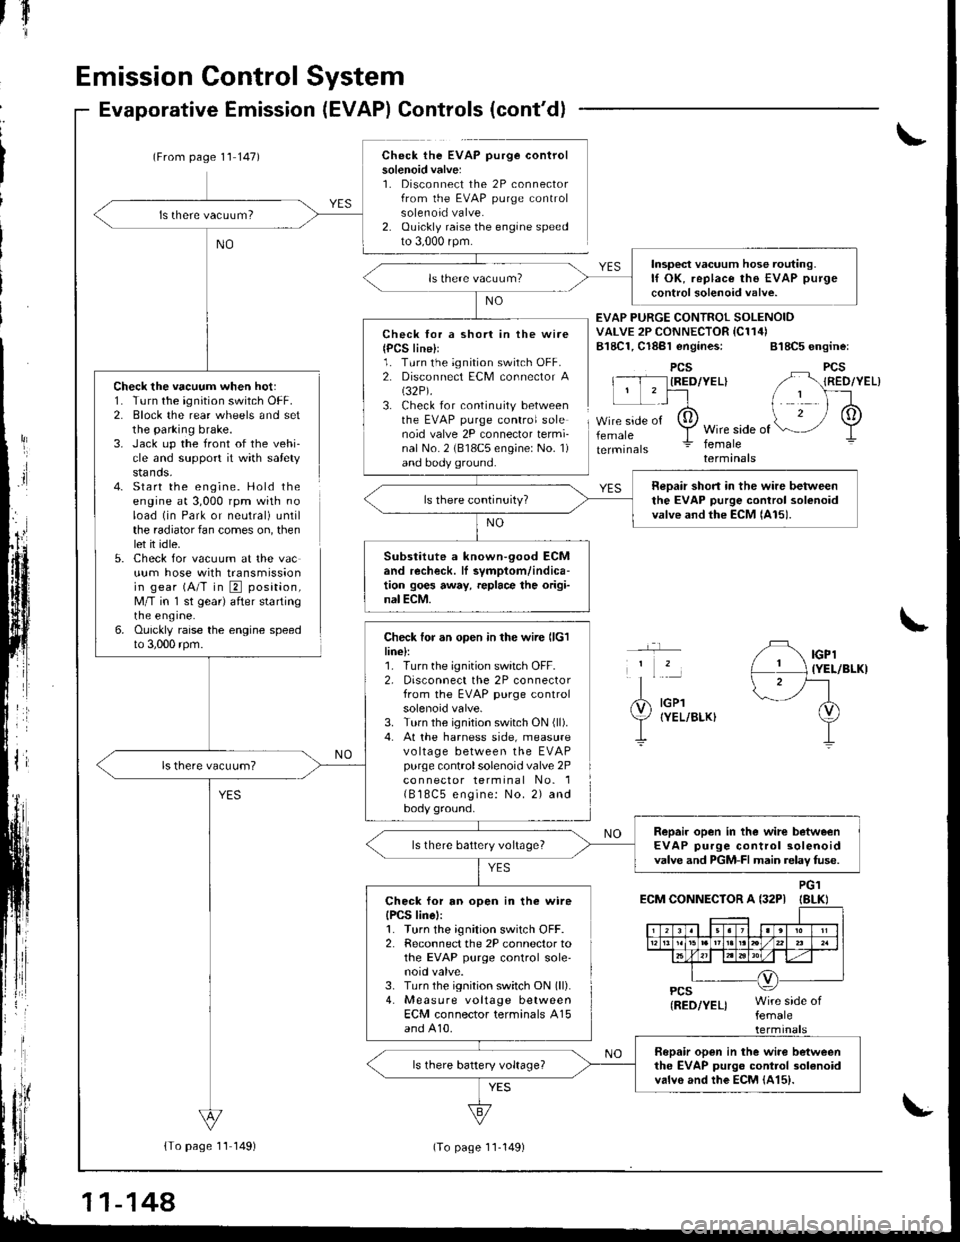
Emission Control System
Check the vacuum when hot:1. Turn the ignition switch OFF.2. Block the rear wheels and setthe parking brake.3. Jack up the front of the vehi-cle and support it with safetystands.4- Start the engine. Hold theengine at 3,000 rpm with noload (in Park or neutral) untilthe radiator fan comes on, thenlet it idle.5. Check for vacuum at the vacuum hose with transmissionin gear (A/T in E position,M/T in 'l st gear) after startingrne engrne.6. Ouickly raise the engine speedto 3,000 rpm.
Evaporative Emission (EVAP) Controls (cont'd)
(From page 1'l 147)Check the EVAP purge controlsolenoid valve:1. Disconnect the 2P connectorfrom the EVAP purge controlsolenoid valve.2. Ouickly raise the engine speedto 3,000 rpm.
{To page 11 149)
tfl'I
Check lor a short in the wire{PCS line}l1. Turn the ignition switch OFF.2. Disconnect ECM connector A(32P).
3. Check for continuity betweenthe EVAP purge control solenoid valve 2P connector termi-nal No. 2 (818C5 engine: No. 1)and body ground.
Check for an open in the wire llclline):1. Turn the ignition switch OFF.2, Disconnect the 2P connectorfrom the EVAP purge controlsolenoid valve.3. Turn the ignition switch ON (ll).
4. At the harness side, measurevo ltage between the EVAPpurge controlsolenoid valve 2Pco n nector terminal No. 1( B 18C5 engine: No. 2) andbody ground.
EVAP PURGE CONTROI SOLENOIDVALVE 2P CONNECTOR IC114)B18C1, Cl8Bl engines: 818C5 engine:
PCSIRED/YEL}
femaleWire side offemaleterminals
YES
IGPl{YEL/BLKI
IGPlIYEL/BLKI
ECM CONNECTOR A {32PIPG1IBLKI
Insp€ct vacuum hose routing.lf OK, replace the EVAP purge
control solenoid valve.
neDair short in the wire betweenthe EVAP purge control solenoidvalve and the ECM lAl5).
Substitute a known-90od ECMand recheck. lI symptom/indica-tion goes away, replace the origi-nal ECM.
Repair open in the wirc betweenEVAP purge control solenoidvalve and PGM-FI main relav fuse.ls there battery voltage?
Check for an open in the wireIPCS linel:1. Turn the ignition switch OFF.2. Reconnect the 2P connector tothe EVAP purge control sole'noid valve.3. Turn the ignition switch ON (ll).
4. Measure voltage betweenECM connector terminals A15and A10.
Bopair open in the wiro betweenthe EVAP purgo control 3olanoidvalvo and the EcM {415).
11-144
(To page 11-149)
Page 354 of 1681
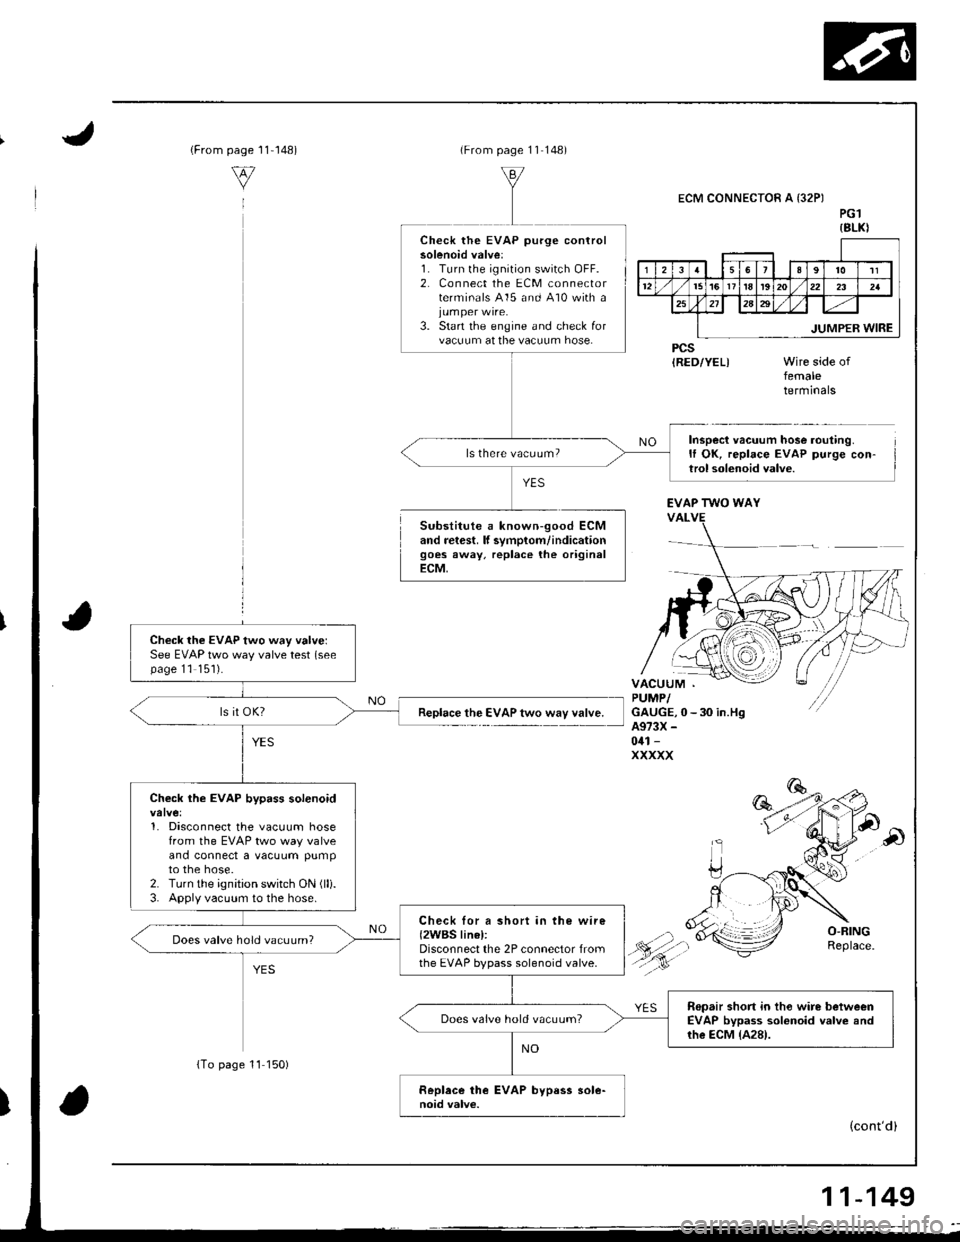
{From1 1-148)page
v
(From page 11 148)
Substitute a known-good ECMand retest. lf svmplom/indicationgoes away, replace the originalECM,
ECM CONNECTOR A {32PIPG1{8LKI
PCSIRED/YEL)femaletermrnars
Inspect vacuum hose routing.It OK, replace EVAP purge con-trol solenoid valve.
Check the EVAP purge controlsolenoid valve:1. Turn lhe ignition switch OFF.2, Connect the ECM connectorterminals 415 and 410 with a
3. Start the engine and check forvacuum at the vacuum hose.
ls there vacuum?
EVAP TWO WAY
Check the EVAP two way valvelSee EVAP two way valve test (seepage 11 '151).
Replace the EVAP two way valve.
Check the EVAP bypass solenoid
1. Disconnect the vacuum hosefrom the EVAP two way valveand connect a vacuum pumpto the hose.2. Turn the ignition switch ON (lli.
3. Apply vacuum to the hose.
Check lor a short in the wire{2WBS linel:Disconnect the 2P connector fromthe EVAP bypass solenoid valve.
Does valve hold vacuum?
Repair short in tho wire betweenEVAP bypass solonoid valve andrhe ECM {A28).
Does valve hold vacuum?
(cont'd)
{To page 11 150)
11-149