ISUZU TFS SERIES 1997 Manual Online
TFS SERIES 1997
ISUZU
ISUZU
https://www.carmanualsonline.info/img/61/57182/w960_57182-0.png
ISUZU TFS SERIES 1997 Manual Online
Trending: ABS, flat tire, relay, diagram, ECU, manual transmission, air condition
Page 81 of 1600
4C1-18 FRONT WHEEL DRIVE
INSPECTION AND REPAIR
Make all necessary adjustments, repairs, and part replacements if wear, damage, or other problems are discovered
during inspection.
BJ assembly
DOJ case, ball, ball guide, ball retainer
Bellows
Bearing
Dust seal, oil seal
Visual Check
Inspect the following parts for wear, damage, or other
abnormal conditions.
Page 82 of 1600
FRONT WHEEL DRIVE 4C1-19
REASSEMBLY
Reassembly Steps
1. Axle case and differential
2. DOJ case
3. Bracket
4. Oil seal
5. O-ring
6. Snap ring
7. Bearing
8. Snap ring
9. DOJ case assembly
10. Bolt
11. BJ shaft12. Dust seal
13. Bellows
14. Band
15. Ball guide
16. Ball retainer
17. Snap ring
18. Ball
19. BJ shaft assembly
20. Circlip
21. Bellows
22. Band
Page 83 of 1600
4C1-20 FRONT WHEEL DRIVE
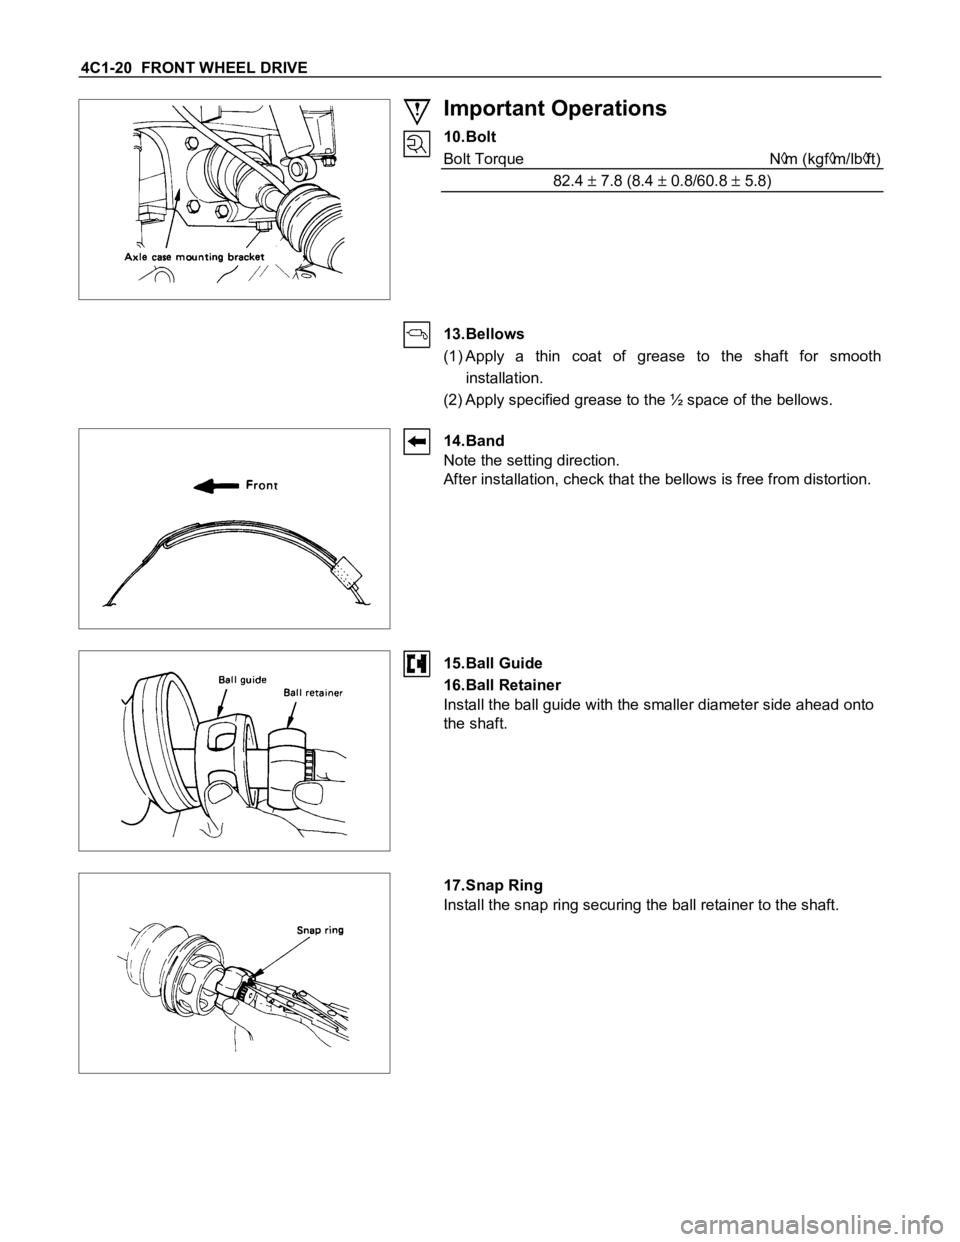
Important Operations
10.Bolt
Bolt Torque N
m (kgfm/lbft)
82.4
7.8 (8.4 0.8/60.8 5.8)
13.Bellows
(1) Apply a thin coat of grease to the shaft for smooth
installation.
(2) Apply specified grease to the ½ space of the bellows.
14.Band
Note the setting direction.
After installation, check that the bellows is free from distortion.
15.Ball Guide
16.Ball Retainer
Install the ball guide with the smaller diameter side ahead onto
the shaft.
17.Snap Ring
Install the snap ring securing the ball retainer to the shaft.
Page 84 of 1600
FRONT WHEEL DRIVE 4C1-21
18.Ball
Bring the ball guide of the cage into alignment with the
projected portion of the ring on the ball retainer, then turn the
cage ½ pitch. Align the track on the ball retainer with the
window in the cage and install the six balls into position.
19.BJ Shaft Assembly
Apply specified grease to the half of the space of the DOJ case
(Approx. 50g (1.8 oz)).
20.Circlip
Install the circlip so that open ends are positioned away from
the ball groove.
21.Bellows
(1) Before installation, insert the appropriate amount of
specified grease into the DOJ case.
(2) Adjust the air pressure within the bellows by inserting a
screwdriver or equivalent, so that it equals atmospheric
pressure.
22.Band
After installation, check that the bellows is free from distortion.
Page 85 of 1600
4C1-22 FRONT WHEEL DRIVE
DIFFERENTIAL
DISASSEMBLY
MAJOR COMPONENTS
Disassembly Steps
1. Bolt
2. Differential assembly
3. Axle case
4. Bolt
5. Bearing cap
6. Diff. cage assembly
7. Side bearing outer race
8. Side bearing
9. Adjust shims
10. Flange nut
11. Flange12. Dust cover
13. Pinion gear
14. Inner bearing
15. Adjust shim
16. Collapsible spacer
17. Inner bearing outer race
18. Oil seal
19. Outer bearing
20. Outer bearing outer race
21. Diff. carrier
Page 86 of 1600
FRONT WHEEL DRIVE 4C1-23
Important Operations
5. Bearing Cap
Apply a setting mark to the side bearing cap and the differential
carrier.
7. Side Bearing Outer Race
After removal, keep the right and left hand side bearing
assemblies separate to maintain inner and outer race
combinations.
8. Side Bearing
Remover : 5-8840-0013-0
(J-22888)
Adapter : 5-8521-0019-0 167 mm)
9-8521-1743-0 (194 mm)
(J-8107-2)
9. Adjust Shims
Note the thickness and position of the shims removed.
10.Flange Nut
Holding wrench : 5-8840-0133-0 (167 mm and 194 mm)
(J-8614-01)
13.Pinion Gear
Remove the drive pinion assembly using a soft metal rod and a
hammer.
Spindle : 9-8521-5032-0
Page 87 of 1600
4C1-24 FRONT WHEEL DRIVE
14.Inner Bearing
Remove the inner bearing using a separator and a press.
Separator : 5-8840-0015-0
(J-22912-01)
17.Inner Bearing Outer Race
20.Outer Bearing Outer Race
Remove the inner bearing outer race and the outer bearing
outer race by using a brass bar and a hammer.
Page 88 of 1600
FRONT WHEEL DRIVE 4C1-25
MINOR COMPONENTS
Disassembly Steps
1. Bolt
2. Ring gear
3. Lock pin
4. Cross pin5. Pinion gear
6. Side gear
7. Thrust washer
8. Differential cage
Page 89 of 1600
4C1-26 FRONT WHEEL DRIVE
Important Operations
3. Lock Pin
Break staking on the lock pin using a 5 mm (0.20 in.) diameter
drill.
4. Cross Pin
Remove the cross pin using a soft metal rod and a hammer.
Page 90 of 1600

FRONT WHEEL DRIVE 4C1-27
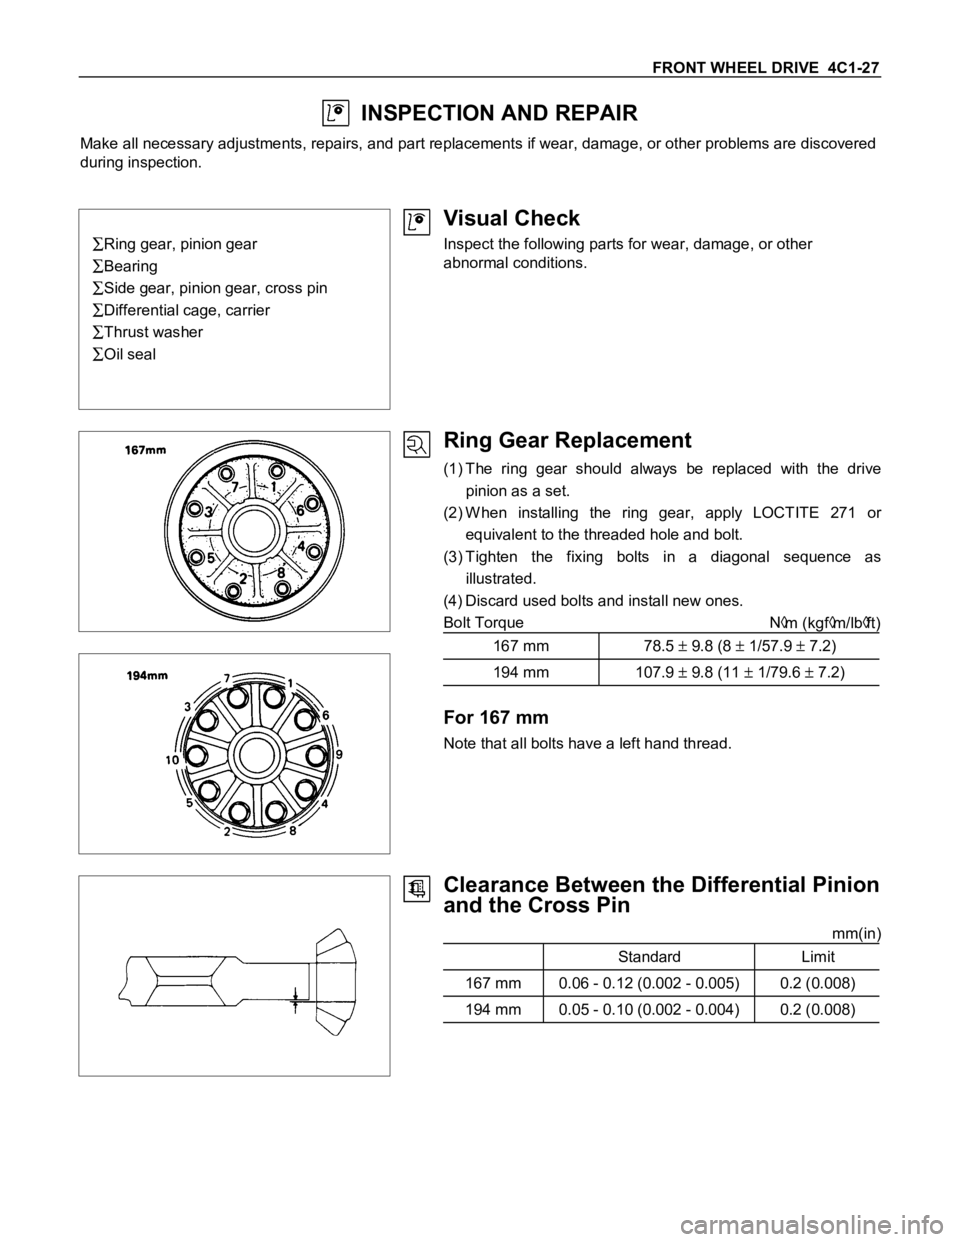
INSPECTION AND REPAIR
Make all necessary adjustments, repairs, and part replacements if wear, damage, or other problems are discovered
during inspection.
Ring gear, pinion gear
Bearing
Side gear, pinion gear, cross pin
Differential cage, carrier
Thrust washer
Oil seal
Visual Check
Inspect the following parts for wear, damage, or other
abnormal conditions.
Ring Gear Replacement
(1) The ring gear should always be replaced with the drive
pinion as a set.
(2) W hen installing the ring gear, apply LOCTITE 271 or
equivalent to the threaded hole and bolt.
(3) Tighten the fixing bolts in a diagonal sequence as
illustrated.
(4) Discard used bolts and install new ones.
Bolt Torque N
m (kgfm/lbft)
167 mm 78.5
9.8 (8 1/57.9 7.2)
194 mm 107.9 9.8 (11 1/79.6 7.2)
For 167 mm
Note that all bolts have a left hand thread.
Clearance Between the Differential Pinion
and the Cross Pin
mm(in)
Standard Limit
167 mm 0.06 - 0.12 (0.002 - 0.005) 0.2 (0.008)
194 mm 0.05 - 0.10 (0.002 - 0.004) 0.2 (0.008)
Trending: center console, hood open, tires, flat tire, oil level, transmission oil, check engine


