ECU JAGUAR X308 1998 2.G Workshop Manual
[x] Cancel search | Manufacturer: JAGUAR, Model Year: 1998, Model line: X308, Model: JAGUAR X308 1998 2.GPages: 2490, PDF Size: 69.81 MB
Page 970 of 2490

Engine Cooling - Cooling Fan Motors
Remo
val and Installation
Remov
a
l
Installation
1.
Re
move the Twin Fan and Motor Assembly (26.25.12)
described in this section. Do not remove the harness and pipe
securing clips from the assembly.
2. Re
move the fan and motor units from the twin fan and motor
assembly.
1. Remove the three nuts which secure the fan and motor unit.
2. Remove the fan and motor unit.
Re
peat the above two operations for the second fan.
3. Re
move the fan rubber mountings.
1. Remove the spacer from each rubber mounting.
2. Remove the rubber mountings; three for each fan unit.
1. Installation is th e reverse of the re moval procedure.
Page 971 of 2490

Engine Cooling - Cooling Fan Shroud
Re
moval and Installation
Remov
al
Installation
1.
R
emove the Twin Fan and Motor Assembly (26.25.12) from the
radiator.
2. With twin fan and motor assembly on the bench, remove both
fan and motor units (26.25.25).
3. R
emove the components from the mounting frame.
1. Remove the harness an d pipe securing clips.
2. Remove the rubber vent flaps.
1. Installation is th e reverse of the re moval procedure.
Page 974 of 2490
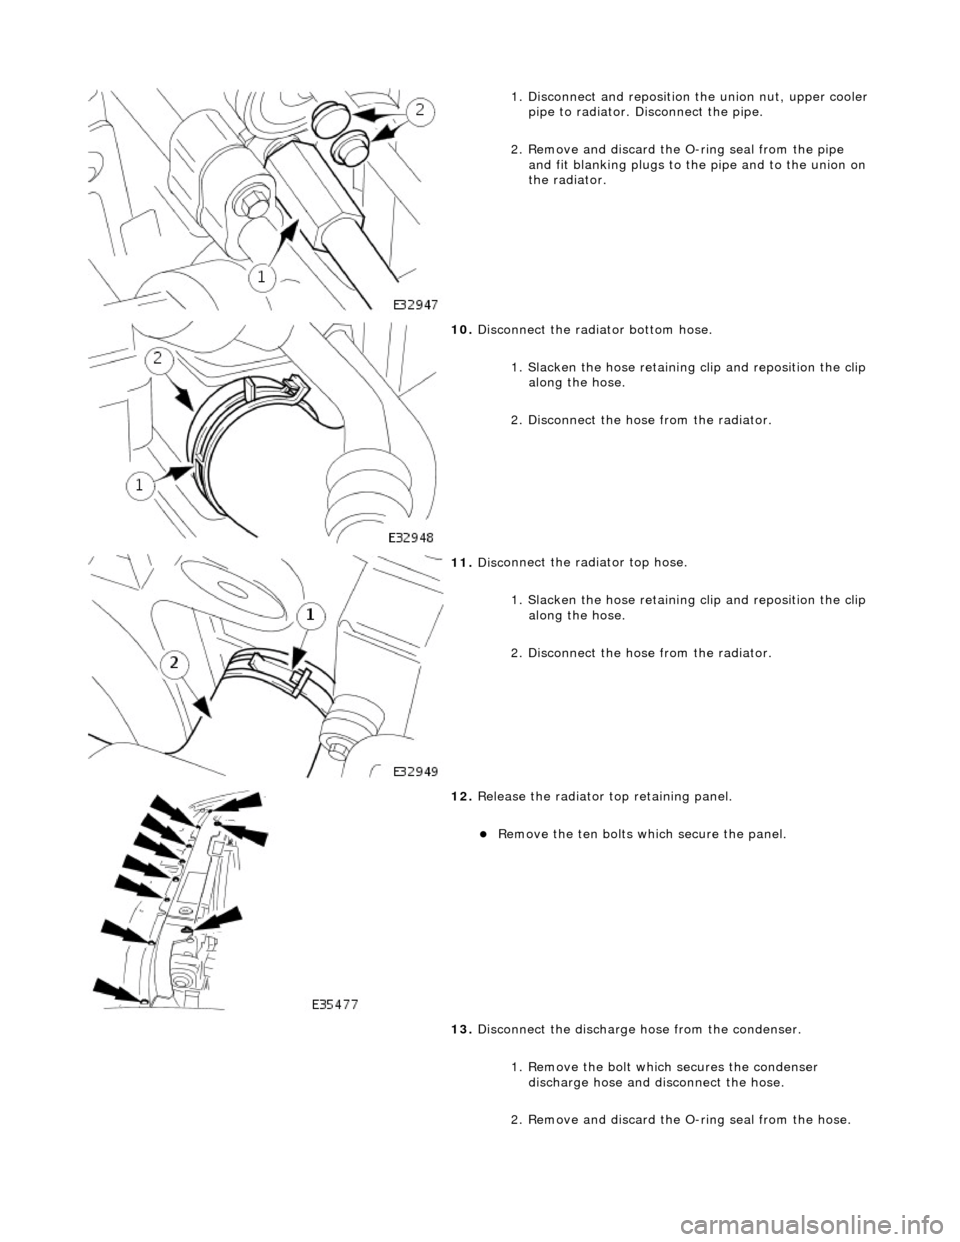
1. Disc
onnect and reposition the union nut, upper cooler
pipe to radiator. Di sconnect the pipe.
2. Remove and discard the O- ring seal from the pipe
and fit blanking plugs to the pipe and to the union on
the radiator.
10. D
isconnect the radiator bottom hose.
1. Slacken the hose retaining clip and reposition the clip
along the hose.
2. Disconnect the hose from the radiator.
11 . Disc
onnect the radiator top hose.
1. Slacken the hose retaining clip and reposition the clip
along the hose.
2. Disconnect the hose from the radiator.
12 . Relea
se the radiator top retaining panel.
R
e
move the ten bolts which secure the panel.
13. Disconnect the discharge hose from the condenser.
1. Remove the bolt which secures the condenser discharge hose and disconnect the hose.
2. Remove and discard the O-ring seal from the hose.
Page 975 of 2490

3
. Fit blanking plugs to the
hose and to the condenser.
14
.
Disconnect the condenser jump hose from the receiver /
drier.
1. Remove the bolt which secures the condenser jump hose and discon nect the hose.
2. Remove and discard the O-ring seal from the hose.
3. Fit blanking plugs to the hose and to the receiver / drier.
15
.
Remove the radiator top retaining panel.
1. Remove the panel.
2. Remove the radiator top mounting bushes.
16. Disconnect the bonnet switch harness.
17
.
Remove the radiator.
R
emove the radiator assembly.
Cl
ean coolant spillage from the radiator lower carrier
panel.
18. Remove the condenser from the radiator.
1. Remove the two bolts which secure the condenser to the radiator.
2. Remove the condenser.
If
necessary, remove the jump
hose from the condenser.
Page 976 of 2490
In
stallation
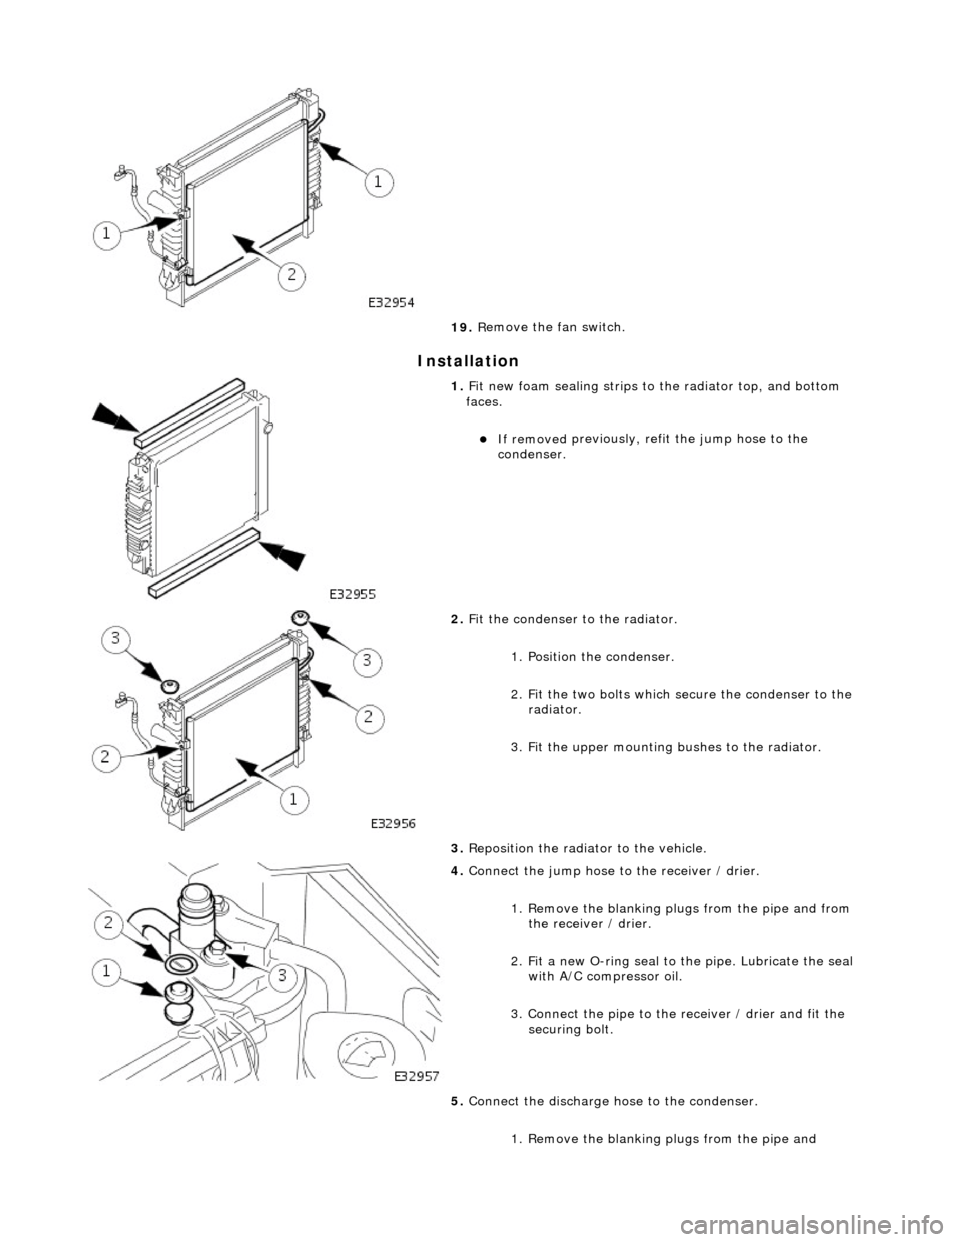
19
. R
emove the fan switch.
1. Fi
t new foam sealing strips to
the radiator top, and bottom
faces.
If removed
previously, refit the jump hose to the
condenser.
2. Fit t
he condenser to the radiator.
1. Position the condenser.
2. Fit the two bolts which secure the condenser to the radiator.
3. Fit the upper mounting bushes to the radiator.
3. Reposition the radiator to the vehicle.
4. Conne ct
the jump hose to
the receiver / drier.
1. Remove the blanking plugs from the pipe and from the receiver / drier.
2. Fit a new O-ring seal to the pipe. Lubricate the seal with A/C compressor oil.
3. Connect the pipe to the receiver / drier and fit the
securing bolt.
5. Connect the discharge hose to the condenser.
1. Remove the blanking plugs from the pipe and
Page 977 of 2490
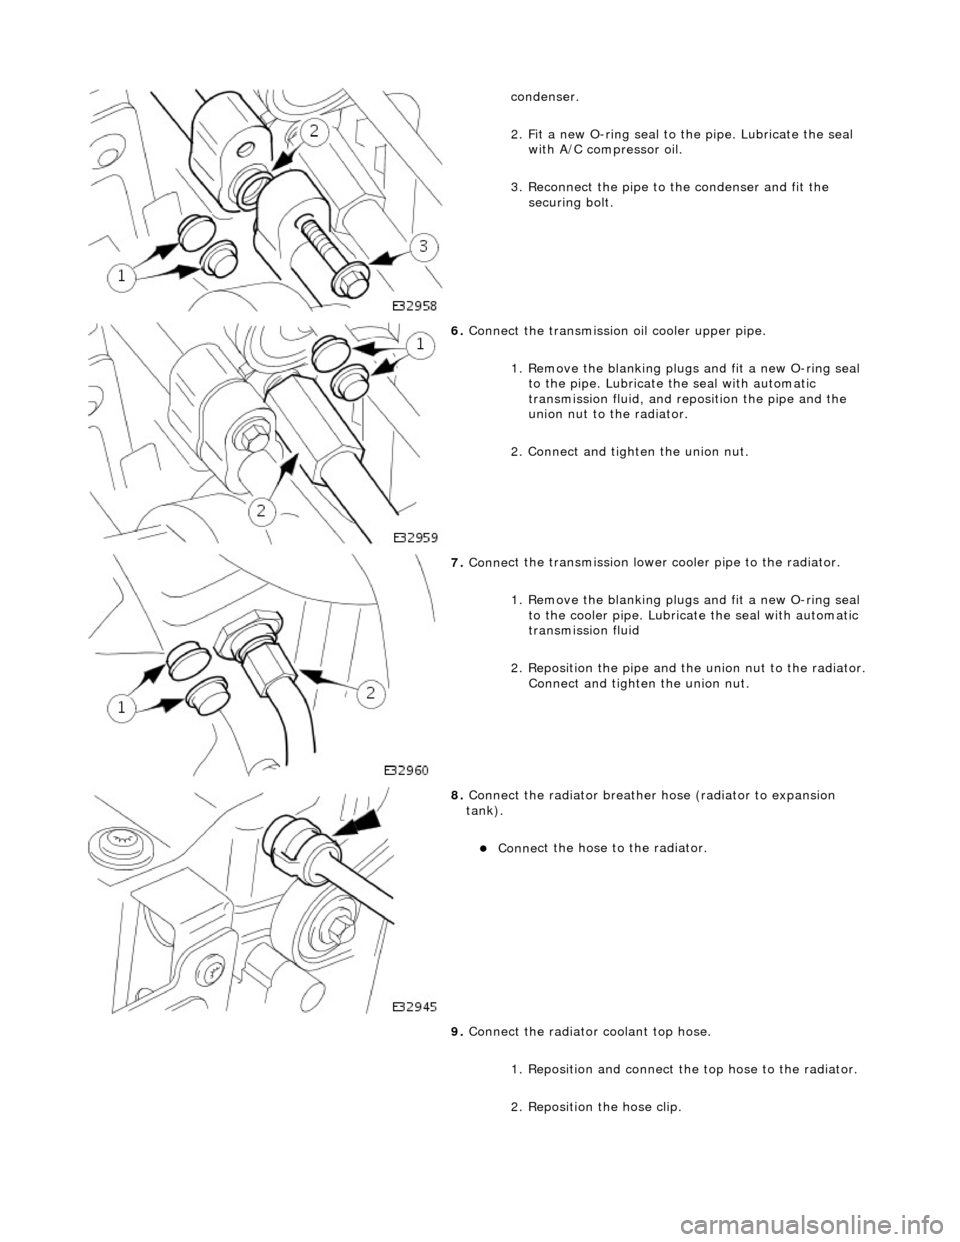
conde
nser.
2. Fit a new O-ring seal to the pipe. Lubricate the seal with A/C compressor oil.
3. Reconnect the pipe to the condenser and fit the securing bolt.
6. Conne
ct the transmission
oil cooler upper pipe.
1. Remove the blanking plugs and fit a new O-ring seal to the pipe. Lubricate the seal with automatic
transmission fluid, and re position the pipe and the
union nut to the radiator.
2. Connect and tighten the union nut.
7. Conne
ct the transmission lower cooler pipe to the radiator.
1. Remove the blanking plugs and fit a new O-ring seal to the cooler pipe. Lubricate the seal with automatic
transmission fluid
2. Reposition the pipe and th e union nut to the radiator.
Connect and tighten the union nut.
8. Connect
the radiator breather
hose (radiator to expansion
tank).
Conne
ct the hose to the radiator.
9. Connect the radiator coolant top hose.
1. Reposition and connect the top hose to the radiator.
2. Reposition the hose clip.
Page 978 of 2490
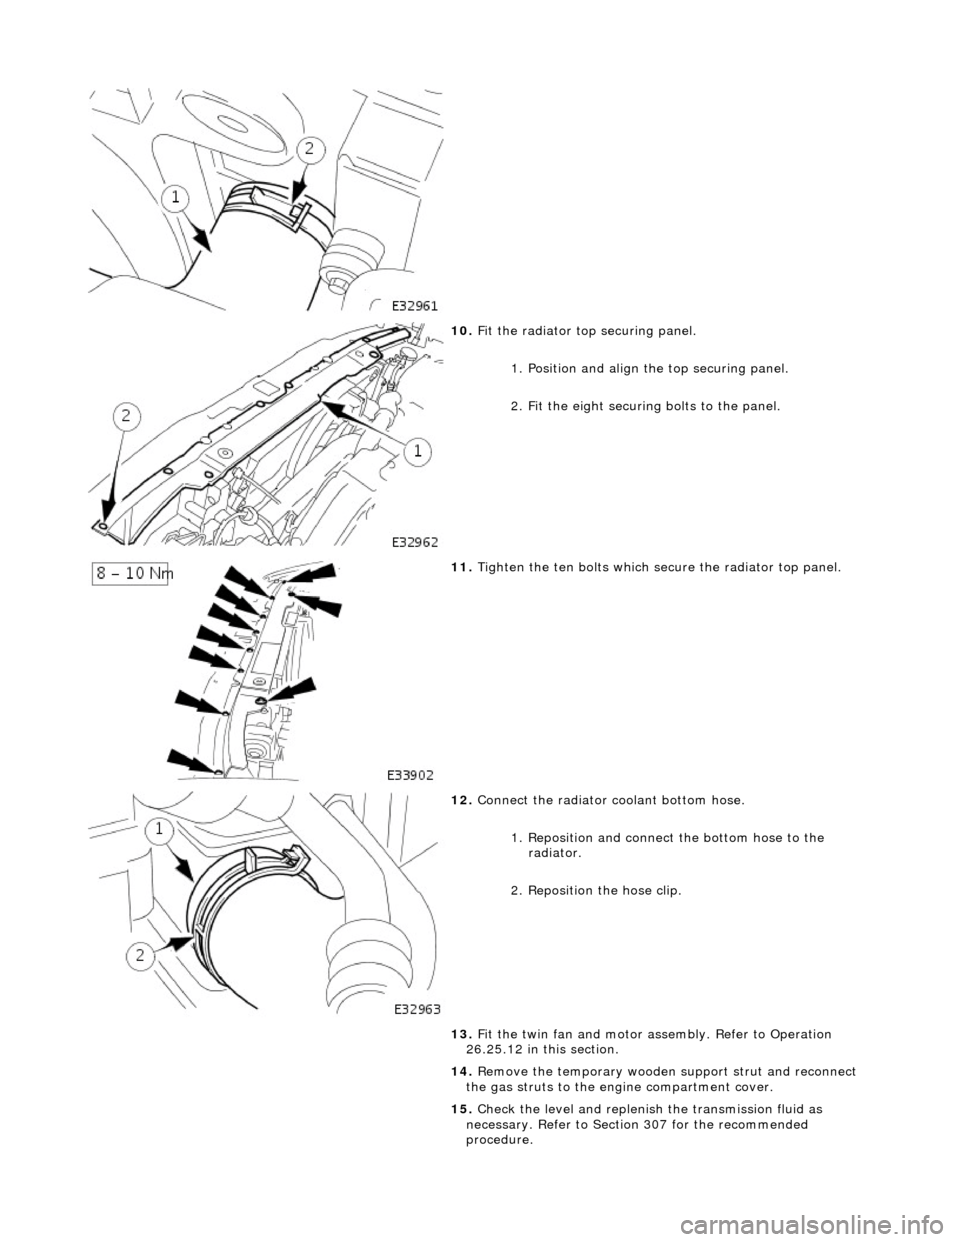
10. F
it the radiator top securing panel.
1. Position and align th e top securing panel.
2. Fit the eight securing bolts to the panel.
11. Tigh
ten the ten bolts which secu
re the radiator top panel.
12. Connect
the radiator coolant bottom hose.
1. Reposition and connect the bottom hose to the radiator.
2. Reposition the hose clip.
13. Fit the twin fan and motor assembly. Refer to Operation
26.25.12 in this section.
14. Remove the temporary wooden support strut and reconnect
the gas struts to the engine compartment cover.
15. Check the level and replenish the transmission fluid as
necessary. Refer to Section 307 for the recommended
procedure.
Page 981 of 2490

1.
Disconnect and reposition the union nut, upper cooler
pipe to radiator. Di sconnect the pipe.
2. Remove and discard the O- ring seal from the pipe
and fit blanking plugs to the pipe and to the union on
the radiator.
10
.
Disconnect the radiator bottom hose.
1. Slacken the hose retaining clip and reposition the clip
along the hose.
2. Disconnect the hose from the radiator.
11
.
Disconnect the radiator top hose.
1. Slacken the hose retaining clip and reposition the clip
along the hose.
2. Disconnect the hose from the radiator.
12
.
Release the radiator top retaining panel.
R
emove the ten bolts which secure the panel.
13. Disconnect the discharge hose from the condenser.
1. Remove the bolt which secures the condenser discharge hose and disconnect the hose.
2. Remove and discard the O-ring seal from the hose.
Page 982 of 2490

3.
Fit blanking plugs to the
hose and to the condenser.
14 . Di
sconnect the condenser jump
hose from the receiver /
drier.
1. Remove the bolt which secures the condenser jump hose and discon nect the hose.
2. Remove and discard the O-ring seal from the hose.
3. Fit blanking plugs to the hose and to the receiver / drier.
15 . Remove the
radiator top retaining panel.
1. Remove the panel.
2. Remove the radiator top mounting bushes.
16. Disconnect the bonnet switch harness.
17. R
emove the radiator.
Re
move the radiator assembly.
Cl
ean coolant spil
lage from the radiator lower carrier
panel.
18. Remove the condenser from the radiator.
1. Remove the two bolts which secure the condenser to the radiator.
2. Remove the condenser.
If necessary, remove the jump hose from the
condenser.
Page 983 of 2490
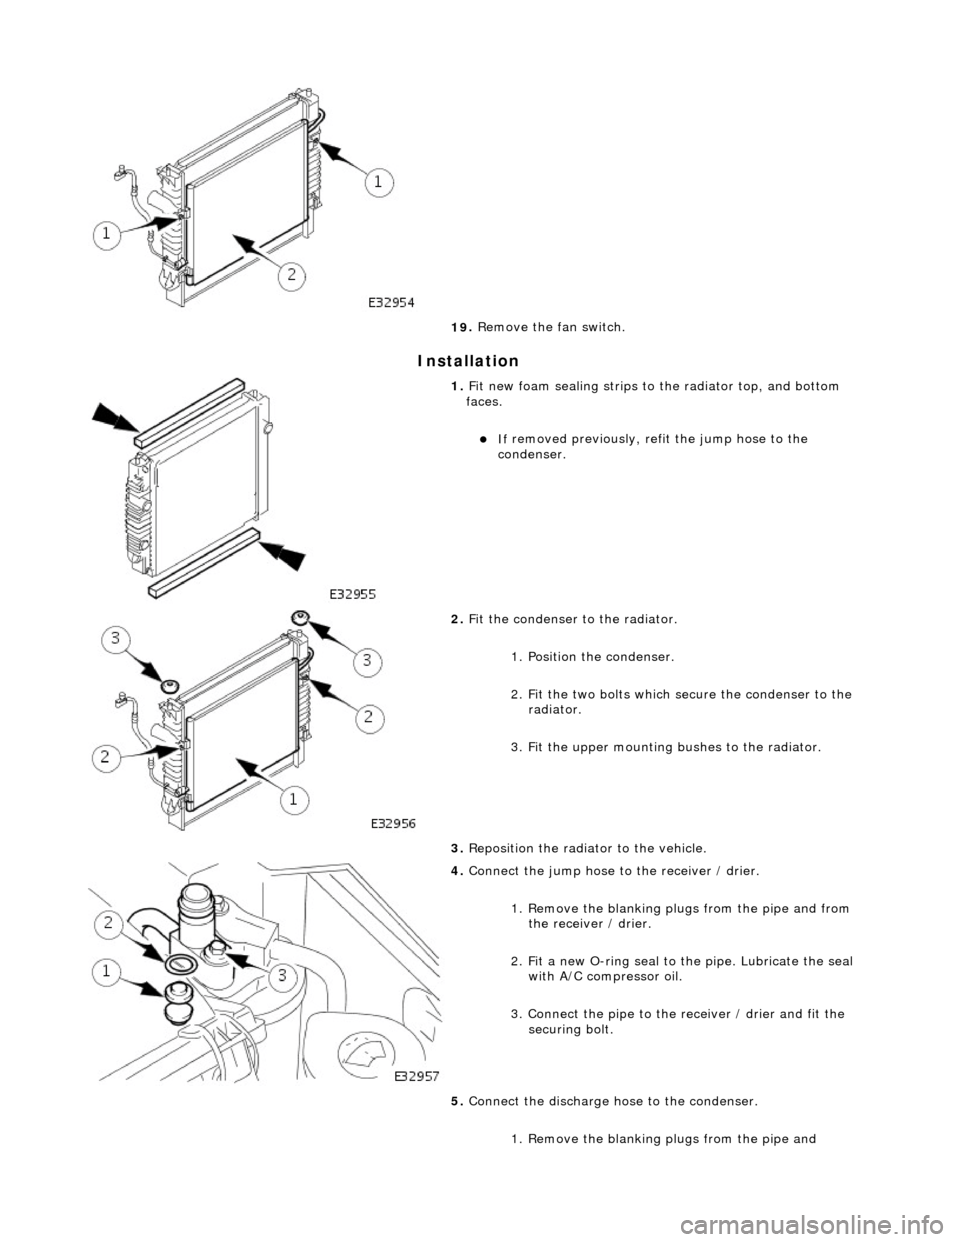
I
nstallation
19
.
Remove the fan switch.
1. F
it new foam sealing strips to
the radiator top, and bottom
faces.
If
removed previously, refit the jump hose to the
condenser.
2. Fi
t the condenser to the radiator.
1. Position the condenser.
2. Fit the two bolts which secure the condenser to the radiator.
3. Fit the upper mounting bushes to the radiator.
3. Reposition the radiator to the vehicle.
4. Conne
ct the jump hose to
the receiver / drier.
1. Remove the blanking plugs from the pipe and from the receiver / drier.
2. Fit a new O-ring seal to the pipe. Lubricate the seal with A/C compressor oil.
3. Connect the pipe to the receiver / drier and fit the
securing bolt.
5. Connect the discharge hose to the condenser.
1. Remove the blanking plugs from the pipe and